
DG10502 - Instant water heater and boiler SIEMENS - Free user manual and instructions
Find the device manual for free DG10502 SIEMENS in PDF.


| Brand | Siemens |
| Model | DG10502 |
| Product Type | Pressurized Water Heater (Storage) |
| Capacity | 10 L |
| Rated Output | 2 kW |
| Rated Voltage | 230 V AC |
| Rated Pressure | 0.9 MPa (9 bar) |
| Weight (filled) | 18 kg |
| Energy Efficiency Class | A |
| Hot Water Heating Energy Efficiency | 35.2% |
| Load Profile | XXS |
| Annual Energy Consumption | 524 kWh |
| Daily Energy Consumption | 2.461 kWh |
| Sound Power Level | 15 dB |
| Heat-up Time (12°C to 60°C) | 17 min |
| Heat-up Time (12°C to 75°C) | 22 min |
| Temperature Settings | Off (0), 35°C (I), 55°C (e), 75°C (III) |
| Safety Features | Safety valve, frost protection, electrical safety |
| Maintenance | Monthly safety valve check, periodic descaling by specialist |
| Cleaning | Wipe with damp cloth, no abrasive cleaners |
| Installation Requirements | Frost-free room, professional installation required |
Frequently Asked Questions - DG10502 SIEMENS
User questions about DG10502 SIEMENS
0 question about this device. Answer the ones you know or ask your own.
Ask a new question about this device
Download the instructions for your Instant water heater and boiler in PDF format for free! Find your manual DG10502 - SIEMENS and take your electronic device back in hand. On this page are published all the documents necessary for the use of your device. DG10502 by SIEMENS.
USER MANUAL DG10502 SIEMENS
natural_image
Illustration of a Siemens water dispenser with tubing and control panel (no text or symbols)DG10502
9001042093
Montage- und
Gebrauchsanleitung
Installation and
operating instructions
Sicherheitshinweise
natural_image
Technical illustration of a mechanical piping assembly with a valve and adjustment knob (no text or symbols)Eine Störung, was tun?

Achtung!
natural_image
Illustration of an open book with a curved arrow indicating rotation or change, next to a right-pointing arrow (no text or symbols)1.

II.

IV.


natural_image
Illustration of a bathroom sink and a water tank with plumbing fittings (no text or symbols)
natural_image
Technical illustration of a medical or laboratory apparatus with a sink, tubing, and control unit (no text or symbols)V.
VI.
1

2

3

4
VII.

natural_image
Mechanical assembly diagram showing a motor or gear mechanism with labeled component C (no text or symbols present)
VIII.
Safety information
This appliance is intended for domestic use or for household-based, non-commercial applications. Household-based applications include, e.g. usage in employees catering facilities for shops, offices, agricultural and other commercial operations, as well as usage by guests of guest houses, small hotels and similar residential establishments.
- Install and operate the appliance as described in the text and illustrations. We do not accept liability for damage resulting from failure to heed these instructions.
This appliance is intended for use up to an altitude of 2000 m above sea level.
The appliance may only be installed and stored in a frost-free room (due to residual water).

Risk of electric shock! If an fault occurs, immediately disconnect the plug from the power supply! Immediately shut off the cold water supply to the appliance should it leak.
The appliance may only be connected and put into operation by qualified professional.
To avoid potential sources of danger, repairs and maintenance may only be undertaken by a suitably qualified specialist.
The statutory regulations of the respective country, as well as those of the local electricity and water suppliers, must be adhered to.
If the power cord of this appliance is damaged, it must be replaced by the manufacturer, an authorized servicing agent or a similarly qualified person so as to avoid danger.
The connection cable may not make contact with hot components. This can damage the insulation.
- Do not touch electrically live parts after installation.
■ Only a prototype-tested diaphragm safety valve may be installed.
During the heating process, expansion water must drip out of the safety valve outlet. The outlet pipe of the safety valve must remain open to the atmosphere.
The safety valve prevents excessive pressure from developing in the water heater during the heating process. Expansion water must be able to drain off via the safety valve.
- Do not block the outlet pipe!
The size of the outlet pipe must suit the fully opened safety valve. The blow-off opening of the safety valve must remain open to the atmosphere.
The blow-off pipe of the safety group must be installed with a constant decline in a frost-free room. Regular maintenance and operation of the safety valve are required to remove deposits and to ensure that the safety valve is not blocked.
■ The installation instructions of the safety group must be followed.
A shutoff valve must not be installed between the safety valve and the water heater.
Supplied stickers: "For reasons of safety, water must come out of the outlet pipe during the heating period! Do not block!" – attach the stickers to the outlet pipe in a clearly visible position.
The safety valve must be operated regularly to verify its function and to decalcify the valve.
- Shut off the water supply before connecting the appliance. Do not insert the plug into the mains socket.
- Only connect the appliance to a correctly earthed electrical socket. Do not use extension cables.
■ Disconnect the power supply before opening the appliance.
■ Connect the water supply first, circulate water through the appliance and then connect the electrical supply.
■ Compliance with the IEC 60364-7-701 (DIN VDE 0100 Part 701) must be observed during installation of the appliance or the electrical accessories.
No modifications to the appliance are permissible.
This appliance can be used by children aged 8 years and older as well as by persons with diminished bodily, sensory or
mental perception, or those who lack knowledge or experience, if they are monitored or have received instruction concerning use and comprehend the possible dangers that can result. Children may not play with the appliance. Cleaning and maintenance by the user may not be performed by unsupervised children.
- Keep children away from the appliance.
- Please monitor children to ensure that they do not play with the appliance.
The mixer tap and the warm water pipe may be hot. Please inform and instruct children appropriately.
- Do not use aggressive or abrasive cleaning detergents!
- Do not use a steam cleaner.
■ The appliance is only to be descaled by a suitably qualified specialist.
Please observe the manufacturers warnings when decalcifying.
Congratulations on purchasing this Siemens appliance. You have acquired a top-quality product, which will give you a lot of enjoyment.
Please read this installation and operating instruction manual carefully, then act accordingly! Store for future reference.
Installation instructions
Install the small water heater as described in the illustrated section. Observe the instructions in the text.
The illustrations can be found in the centre of the instruction manual.
Unpacking
- Inspect the new appliance for transport damage!
Please dispose of the packaging, and if applicable, the old appliance in an environmentally-friendly manner.
I. Scope of delivery
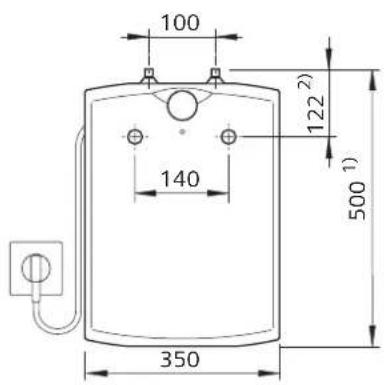
II. Dimensions
Product description
This appliance is a sealed water heater (pressurized water heater).
Only use fittings and mixer taps permitted for pressurized water heaters.
One or more tap connections (e. g. washbasin + sink) can be supplied with hot-water.
■ Water pressure at the cold-water connection is a max. 5 bar, otherwise fit a pressure-reducing valve.
■ After installation, completely fill the water heater with water and check that it functions properly.
Explain to the user how the appliance and the safety valve arrangement operate.
Hand over the operating instructions to the user.
Water connection
■ Install mixer tap on washbasin.
Instead of the cold-water corner valve, screw in pressure-tight the Siemens safety fitting. Handle 1 must be in a horizontal position after installation.
IV. Wall mounting
Note: Before mounting, check length of connecting pipe.
If necessary, fit longer pipes before mounting the appliance (see page 11).
- Suspend the heater from the screws.
■ Adjust the connecting pipes.
■ Connect the water.
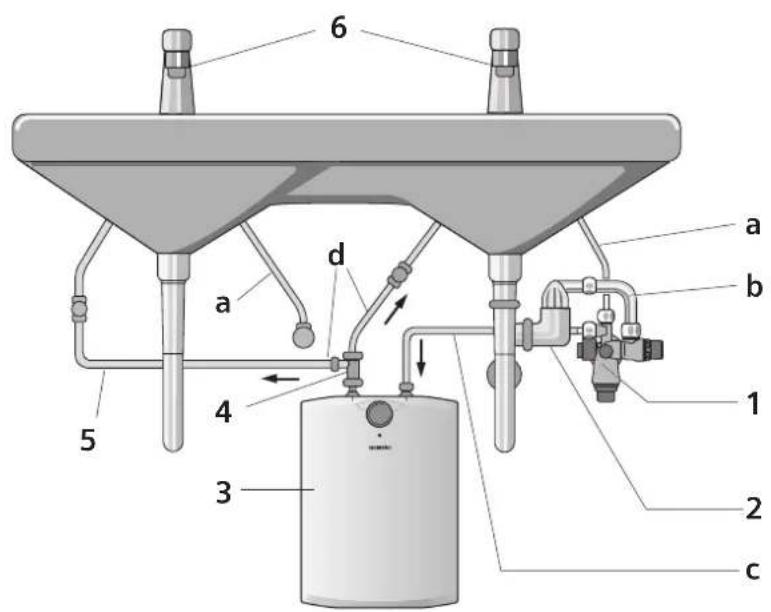
v. Installation example of 2 tap connections
The pressurized water heater can supply 2 sinks or wash-basins with hot-water.
In this case a T-piece (commercially available) must be fitted into the hot-water outlet nozzle of the water heater.
1 Safety valve arrangement BV 700000 (not included in standard delivery)
no diagramm: Savety valve arrangement BZ 30020 with flexible hose (not included in standard delivery)
2 Drainage angle with non-return valve
3 Sealed (pressure-resistant) water heater
4 T-piece (commercially available)
5 Soft copper connecting pipe, diam. 10mm
6 Single-hole pressure mixer (standard)
g Cold-water to the mixer tap
h Overflow water with unrestricted outlet to the syphon
i Cold-water to the water heater
j Hot-water from the water heater
Electrical connection
Connect to a 230 V AC power supply only.
Only connect the appliance to a socket with earthing contact installed according to regulations. Do not use multiway adaptors or push-on terminal strips. If necessary, fit the appliance with a longer cable.
- Do not connect the appliance to the earthed socket until it is mounted on the wall and filled with water.
This appliance complies with EC directive No. 76-889-EEC for interference suppression and supplementary directive No. 82/499.
Exchanging the connecting cable
The connection cable may only be replaced by one of our authorized customer service representatives in order to avoid potential sources of danger.
■ The plug must be removed from the mains before replacement.

Startup

Attention! Fill the appliance with water first.
Raise the safety valve before start up (see "Maintenance for the customer", page 12).
1 Pull out the power plug or disconnect the fuse. Fill the appliance, with the hot-water tap fully open, until the water comes out bubble-free.
First heat-up
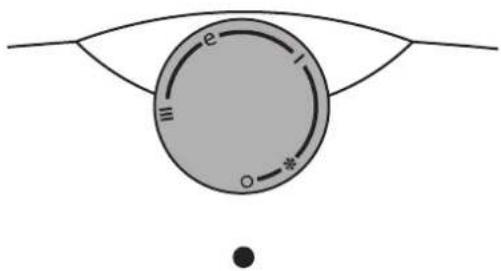
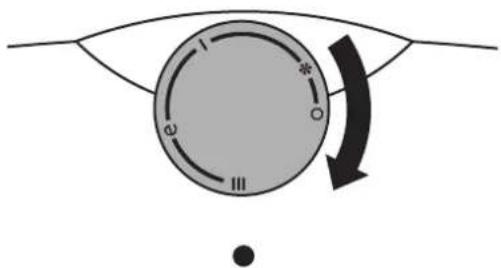
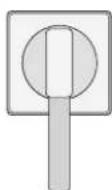
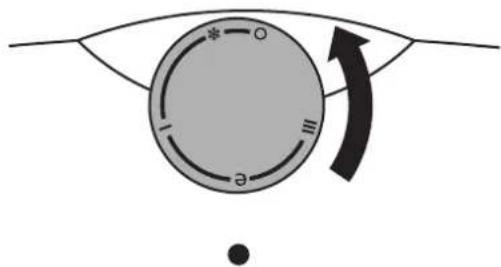
2 Turn the temperature selector switch to position "O". Insert the power plug.
3 Turn the temperature selector switch to position "III". Monitor the heating-up process. Check the temperature (approx. 75 °C).
4 Turn the temperature selector switch to position "e".

Limitation of the water temperature
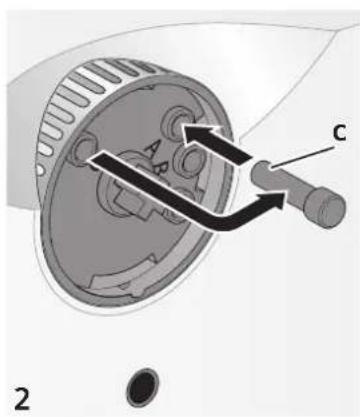
1 Insert the screwdriver into gap a and remove cover b.
2 Remove temperature selector pin c and set to the required temperature:
$$ C \approx 3 5 ^ {\circ} C $$
$$ B \approx 4 5 ^ {\circ} C $$
$$ A \approx 5 5 ^ {\circ} C $$
$$ 0 \approx 7 5 ^ {\circ} \mathrm{C} $$
Replace cover b.

Maintenance for the qualified professional
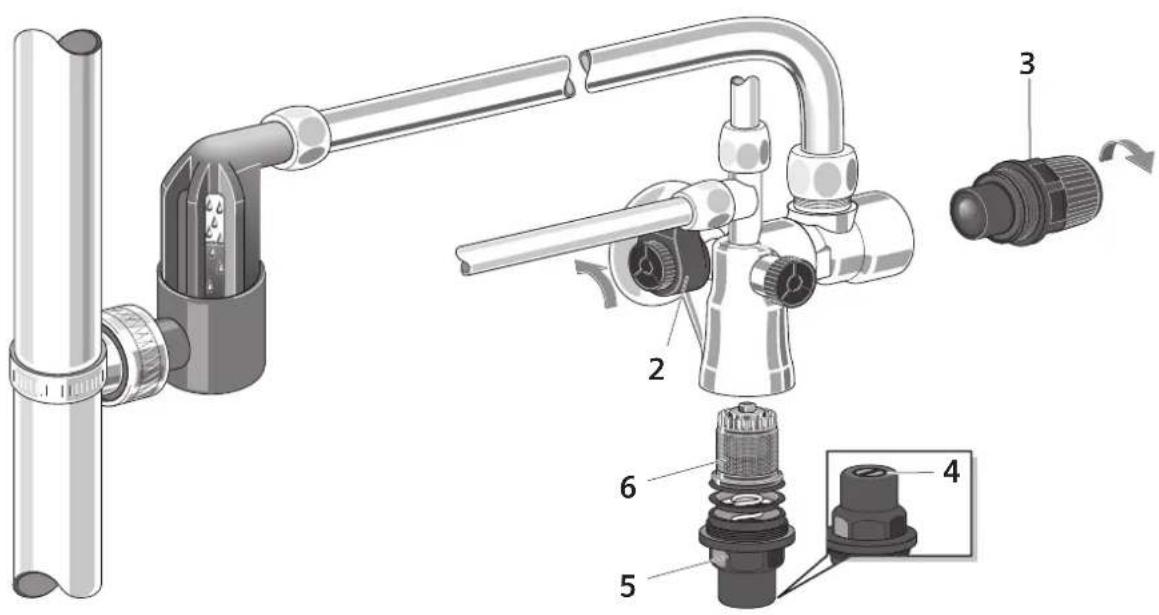
If water is constantly dripping out of the safety valve, it probably requires cleaning. Before servicing the safety valve, the inlet to the water heater must be blocked.
■ Shut off the safety valve 2.
- Open the hot-water tap (to eliminate water pressure in the heater).
To clean the pressure control valve
■ Unscrew the exchangeable cartridge 3.
- Rinse the valve seat and gaskets with cold, clean water.
Screw the exchangeable cartridge 3 firmly back in.
■ Open the safety valve 2.
- Check for leakage.
To clean the pressure reducing valve
■ Mark the position of the adjusting screw 4.
■ Turn the adjusting screw 4 counter-clockwise until the turnstop is reached (to decompress the spring).
■ Unscrew the screw cap 5.
- Use pliers to remove the cartridge 6 of the pressure reducing valve and rinse with cold, clean water.
■ Screw the cartridge 6 back on.
■ Screw on the screw cap 5.
■ Turn the adjusting screw 4 clockwise until the original, marked position is reached.
If water still drips from the safety valve, replace the cartridge.
Technical data
| DG10 | ||
| Capacity | [l] 10,0 | |
| Rated output | [kW] 2 | |
| Rated voltage | [V] | 230 |
| Rated pressure | [MPa (bar)] | 0.9 (9) |
| Weight (filled) | [kg] | 18 |
| Heat-up time | ||
| from 12 °C to 60 °C | [min] | 17 |
| from 12 °C to 75 °C | [min] | 22 |
| Energy efficiency class | A | |
| Hot water heating energy efficiency | [%] | 35.2 |
| Load profile | XXS | |
| Annual energy consumption | [kWh] | 524 |
| Daily energy consumption | [kWh] | 2.461 |
| Sound power level | [dB] | 15 |
Operating instructions
Please read and observe the detailed safety instructions at the start of these instructions!
■ Important: The appliance may never be exposed to frost!

Risk of electric shock!
Switch off the mains voltage supply immediately if a fault occurs.
Immediately shut off the cold water supply to the appliance should it leak.

For reasons of safety the appliance must be checked thoroughly by an engineer every 2 years!
Getting to know your appliance
With this small water heater, you can heat up and store drinking water for domestic use up to 75 °C to meet your requirements.
One or more tap connections (e.g. washbasin + sink) can be supplied with hot-water. You can also obtain cold water from the mixer tap at any time.
The appliance may only be installed in a frost-free room.
Our products are environmentally friendly, recyclable and energy-saving.
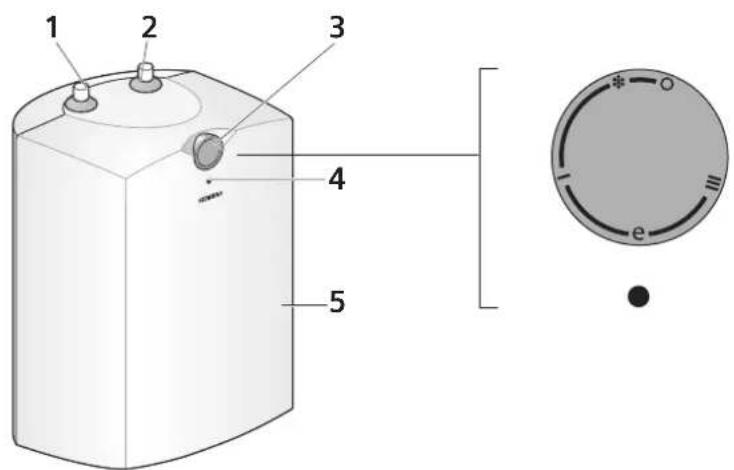
1.
Operating elements
1 Hot water connection (1/2" adapter)
2 Cold water connection (1/2" adapter)
3 Temperature selector switch
4 Pilot lamp
5 Housing
Operating the appliance
- Switch on the heater using the temperature selector switch.
The hot-water temperature can be limited between position "O" and position "III" (see "Limitation of the water temperature", page 11).
Settings
0 Off
* In this position, the appliance is additionally protected against damage due to freezing.
I Recommended setting for optimum energy saving ( ≈ 35 ^ C)
e Setting for the average hot-water requirement, e. g. for washing dishes (at ≈ 55 °C)
III This setting is for very hot water, e. g. for cleaning ( ≈ 75 ^ C)
The specified temperatures are average values. They may vary according to local conditions.
To stop the heater, turn the temperature selector switch to the "O" setting.
Note: Most efficient operation results with the recommended setting I ( ≈ 35^ C). In setting e there is no longer any growth of legionnaire's disease bacteria. Legionnaire's disease bacteria are killed in setting III.
Cleaning
■ Simply wipe the appliance and mixer tap with a damp cloth. Do not use acidic or abrasive cleaning materials.
Maintenance for the customer
Check the safety valve at least once a month.

natural_image
Technical illustration of a mechanical valve assembly with no visible text or symbolsCarry out the check by moving handle 1 to the left until the valve opens and water flows out of the outlet.
If the safety valve does not function as described, switch off the appliance and have the safety valve checked by an engineer.
Emptying the appliance
■ Disconnect the plug from the power supply.
- Close the corner valve.
- Open the mixer tap to equalise the internal appliance pressure.
■ Disconnect the threaded connections at the inlet and outlet of the heater.
■ Empty the appliance via the inlet and outlet.
Decalcifying
If the supply water contains lime, the appliance must be decalcified periodically.
The corrosion protection anode is inspected at the same time and replaced if necessary.

Decalcifying, internal cleaning and repairs to the appliance may only be performed by one of our authorized customer service representatives.
A fault, what to do?

Attention!
Repairs must only be carried out by an authorized technician. Improper repairs can lead to risk of serious injury to the user.
If your appliance does not operate as required, it is often due to a very minor problem. Please check whether you can remedy the fault yourself by using the following guidelines. You will save yourself the costs of an unnecessary visit by customer service personnel.
| Fault Cause Solution Who | |||
| Water is not flowing. The main water tap and/or the corner valve is closed. | Water tap and/or the corner valve is closed. | Check the main water tap and, if necessary, turn on. Check the corner valve and, if necessary, open. | Customer |
| The filter in the water tap is clogged. | Remove the filter and either clean it or decalcify it. | Customer | |
| The desired water temperature is not reached. | Water pressure is too low (a flow pressure of 0.3 bar is the minimum requirement). | Check water pressure. Servicing expert | |
| Remove the filter and either clean it or decalcify it. | Customer | ||
| The hot-water temperature is too low. | The temperature selector switch has not the intended setting. | Check the temperature setting on the temperature selector switch. | Customer |
| The limitation of the water temperature has not the intended setting. | Check the temperature limitation setting (see „Limitation of the water temperature“, page 11). | Servicing expert | |
| Too much hot-water was used in a short space of time. | Wait for the water to reheat and then use the hot water again. | Customer | |
| Water is not heating up. The fuse in the fusebox has tripped/blown. | Check the fuse in the fusebox. Customer | ||
| The temperature selector switch has not the intended setting. | Check the temperature setting on the appliance. | ||
| The safety temperature limiter has probably been activated. | Have the appliance repaired by customerservice. | ||
If the fault could not be eliminated, please call customer service.
Customer Service
We ask you to always provide the E-No. and the FD-No. of your appliance when calling in a customer service engineer. You will find the numbers on the inner side of the fold up operating panel on the small water heater.
Disposal

This appliance is labelled in accordance with European Directive 2012/19/EU concerning used electrical and electronic appliances (waste electrical and electronic equipment – WEEE).
The guideline determines the framework for the return and recycling of used appliances as applicable throughout the EU.
Please ask your specialist retailer about current disposal facilities.
Guarantee
The guarantee conditions for this appliance are as defined by our representative in the country in which it is sold.
Details regarding these conditions can be obtained from the dealer from whom the appliance was purchased. The bill of sale or receipt must be produced when making any claim under the terms of this guarantee.
Kundendienst – Customer Service
European Trade Center Building, 5th floor
1784 Sofia
Tel.: 02 892 90 47
Fax: 02 878 79 72
mailto:informacia.servis-bg@bshg.com
www.siemens-home.bg
CH Schweiz, Suisse, Svizzera, Switzerland
BSH Hausgeräte AG
Central Branch Service
17 km E.O. Athinon-Lamias &
Potamou 20
14564 Kifisia
Unit 1 & 2, 3rd Floor
North Block, Skyway House
3 Sham Mong Road
Tai Kok Tsui, Kowloon
Hong Kong
Tel.: 2565 6151
Fax: 2565 6681
mailto:siemens.hk.service@bshg.com
www.siemens-home.com.hk
HR Hrvatska, Croatia
BSH kućni uređaji d.o.o.
Kneza Branimira 22
10000 Zagreb
Tel.: 01 640 36 09
Fax: 01 640 36 03
mailto:informacije.servis-hr@bshg.com
www.siemens-home.com/hr
LU Luxembourg
www.siemens-home.com/lu
ME Crna Gora, Montenegro
Elektronika komerc
UI. Slobode 17
84000 Bijelo Polje
Tel./Fax: 050 432 575
Mobil: 069 324 812
mailto:ekobosch.servis@t-com.me
MK Macedonia, Makedonija
GORENEC
Jane Sandanski 69 lok. 3
1000 Skopje
Tel.: 022 454 600
Mobil:070 697 463
mailto:gorenec@yahoo.com
PH Philippines
Häfele Philippines, Incorporated
Levi Mariano Avenue, Brgy. Ususan,
Taguig City 1632
Metro Manila
Tel.: 0842 3353
Fax: 0571 3662
mailto:siemens-home@hafele.com.ph
PL Polska, Poland
2034/11-15 Ital Thai Building,
1st Floor, New Petchburi Road
Bangkapi, Huaykwang,
Bangkok, 10310
Tel.: 02 769 7970
Fax: 02 769 7971
Service Call Center
Tel.: 02 351 8995
Spareparts
Tel.: 02 769 7975
www.siemens-home.com/th
TR Türkiye, Turkey
BSH Ev Aletleri Sanayi
ve Ticaret A. S.
Fatih Sultan Mehmet Mahallesi
Balkan Caddesi No: 51
34771 Ümraniye, Istanbul
Tel.: 0 216 444 6688*
Fax: 0 216 528 9188
mailto:careline.turkey@bshg.com
www.siemens-home.com/tr


- Sicherheitshinweise
- Eine Störung, was tun?
- Safety information
- Installation instructions
- Unpacking
- Product description
- Water connection
- Wall mounting
- v. Installation example of 2 tap connections
- Electrical connection
- Exchanging the connecting cable
- Startup
- Attention! Fill the appliance with water first.
- First heat-up
- Limitation of the water temperature
- Maintenance for the qualified professional
- To clean the pressure control valve
- To clean the pressure reducing valve
- Operating instructions
- Getting to know your appliance
- 1.
- Operating elements
- Operating the appliance
- Settings
- Cleaning
- Maintenance for the customer
- Emptying the appliance
- Decalcifying
- A fault, what to do?
- Attention!
- Customer Service
- Disposal
- Guarantee
- Kundendienst – Customer Service
- CH Schweiz, Suisse, Svizzera, Switzerland
- HR Hrvatska, Croatia
- LU Luxembourg
- ME Crna Gora, Montenegro
- MK Macedonia, Makedonija
- PH Philippines
- PL Polska, Poland
- TR Türkiye, Turkey
Brand : SIEMENS
Model : DG10502
Category : Instant water heater and boiler