
3101 - Telephone 3COM - Free user manual and instructions
Find the device manual for free 3101 3COM in PDF.


| Product Type | Business Telephone |
| Brand | 3Com |
| Model | 3101 |
| Dimensions (H x W x D) | Approx. 4.5 x 9.0 x 6.0 inches |
| Weight | Approx. 1.5 lbs (with handset) |
| Power Source | PoE (Power over Ethernet) or AC adapter (RJ9 connector) |
| Display | Backlit LCD alphanumeric display |
| Key Features | Speakerphone, call hold, transfer, conference, redial, mute |
| Audio Codecs | G.711, G.729 (for VoIP models) |
| Network Interfaces | 2 x RJ45 (10/100 Ethernet pass-through) |
| Handset Connector | RJ9 |
| Number of Lines | Up to 2 lines (depending on system) |
| Mounting Options | Desk or wall-mountable |
| Color Options | Charcoal black or gray |
| Compliance | FCC, CE, RoHS |
| Maintenance | Clean with soft, dry cloth; avoid solvents |
| Safety Warnings | Use only approved power supply; do not expose to moisture |
| Spare Parts | Handset, handset cord, base stand, AC adapter (optional) |
| Repairability | Limited user-serviceable parts; refer to authorized service |
| General Information | Compatible with 3Com NBX, VCX, and SIP systems |
Frequently Asked Questions - 3101 3COM
User questions about 3101 3COM
0 question about this device. Answer the ones you know or ask your own.
Ask a new question about this device
Download the instructions for your Telephone in PDF format for free! Find your manual 3101 - 3COM and take your electronic device back in hand. On this page are published all the documents necessary for the use of your device. 3101 by 3COM.
USER MANUAL 3101 3COM
Part Number 900-0470-01 Rev AB Published January 2008
http://www.3com.com/

natural_image
Circular abstract graphic with binary code and circuit-like patterns (no readable text or symbols)3Com Corporation 350 Campus Drive Marlborough, MA 01752-3064
Copyright © 2007-2008, 3Com Corporation. All rights reserved. No part of this documentation may be reproduced in any form or by any means or used to make any derivative work (such as translation, transformation, or adaptation) without written permission from 3Com Corporation.
3Com Corporation reserves the right to revise this documentation and to make changes in content from time to time without obligation on the part of 3Com Corporation to provide notification of such revision or change.
3Com Corporation provides this documentation without warranty, term, or condition of any kind, either implied or expressed, including, but not limited to, the implied warranties, terms, or conditions of merchantability, satisfactory quality, and fitness for a particular purpose. 3Com may make improvements or changes in the product(s) and/or the program(s) described in this documentation at any time.
If there is any software on removable media described in this documentation, it is furnished under a license agreement included with the product as a separate document, in the hardcopy documentation, or on the removable media in a directory file named LICENSE.TXT or !LICENSE.TXT. If you are unable to locate a copy, please contact 3Com and a copy will be provided to you.
UNITED STATES GOVERNMENT LEGEND
If you are a United States government agency, then this documentation and the software described herein are provided to you subject to the following:
All technical data and computer software are commercial in nature and developed solely at private expense. Software is delivered as "Commercial Computer Software" as defined in DFARS 252.227-7014 (June 1995) or as a "commercial item" as defined in FAR 2.101(a) and as such is provided with only such rights as are provided in 3Com's standard commercial license for the Software. Technical data is provided with limited rights only as provided in DFAR 252.227-7015 (Nov 1995) or FAR 52.227-14 (June 1987), whichever is applicable. You agree not to remove or deface any portion of any legend provided on any licensed program or documentation contained in, or delivered to you in conjunction with, this guide.
Portions Copyright 2005-2007 Digium, Inc.
TRADEMARKS
Unless otherwise indicated, 3Com registered trademarks are registered in the United States and may or may not be registered in other countries. 3Com, and the 3Com logo are registered trademarks of 3Com Corporation.
Asterisk and Digium are registered trademarks and Asterisk Business Edition, AsteriskNOW, AsteriskGUI, and Asterisk Appliance are trademarks of Digium, Inc.
Adobe is a trademark and Adobe Acrobat is a registered trademark of Adobe Systems Incorporated. Firefox is a registered trademark of the Mozilla Foundation.
Any other trademarks mentioned in the document are the property of their respective owners.
CONTENTS
ABOUT THIS GUIDE
Conventions 8
Comments 8
1 GETTING STARTED
Configuration Overview 10
Telephone Overview 10
Configuration Options 11
2 BASIC TELEPHONES
MODELS 3101 AND 3101SP
Buttons and Controls 14
Access Buttons 16
Status Lights for System Appearance Buttons 18
Access Button Label 18
3 BASIC TELEPHONE OPERATION
Logging In to Your Telephone 20
Changing Your Password 21
Answering a Call 21
Answering a Second Call 21
Making Calls 21
Making Internal Calls 22
Redialing a Call 22
Making External Calls 22
Class of Service Override 22
Terminating Calls 23
Using the Telephone Display Panel 23
Controlling the Volume 24
Changing Ringing Tones 25
Using the Hands Free Feature 26
Putting a Call on Hold 26
Music on Hold 27
Dialing a New Call While on a Call 27
Answering a New Call While on a Call 27
Transferring a Call 27
Unattended Transfer 27
Attended Transfer 27
Muting Calls 28
Mute Ringer 28
Activating Do Not Disturb 29
Accessing Voice Mail 30
4 FEATURE CODES
Feature Code Overview 32
Using Feature Codes 32
Feature Codes 33
5 STANDARD FEATURES
Viewing the Call Logs 36
Setting up a Conference Call 37
Setting up an Unannounced Conference 37
Setting up an Announced Conference 37
Adding a Recipient to an Existing Conference 38
Creating a Cascaded Conference 38
Dropping Conference Recipients 38
Transferring Your Telephone Settings to Another Telephone 39
Forwarding Calls to Voice Mail 40
Call Waiting 41
Call Forwarding 41
Call Park 42
Ring Groups 43
Ring Group Interaction With Other Features 43
Emergency Telephone Number Dialing Service 44
A TELEPHONE INSTALLATION AND MAINTENANCE
Connecting the Telephone 46
Connecting the Telephone to the 3Com Asterisk Appliance 47
Manually Configuring Telephone Connectivity 48
Attaching and Adjusting the Support Bracket 49
Moving Your Telephone 51
Swapping Telephones 51
Cleaning Your Telephone 51
Troubleshooting Problems 51
INDEX
ABOUT THIS GUIDE
This guide describes how to set up and use a 3Com® 3101 Basic Telephone with a 3Com Asterisk Appliance.

CAUTION: The 3Com telephone system operates over the Ethernet local area network (LAN), not through a traditional telephone connection. Your telephone is connected to the 3Com Asterisk Appliance through an RJ45 Ethernet connector instead of through an RJ11 telephone connection. Your telephone will not work unless it is connected correctly.
For information about installing your telephone, see Telephone Installation and Maintenance. Contact your administrator if you have questions about your telephone connection.
Conventions
Table 1 lists conventions that are used throughout this guide.
Table 1 Icons
| Icon Type Description | |
 | Information note Information about important features or instructions. |
 | Caution Alerts you to potential loss of data or potential damage to an application, system, device, or network. |
 | Warning Alerts you to potential personal injury. |
Comments Send e-mail comments about this guide or about any Voice product documentation to:
Voice_Techcomm_comments@3com.com
Include the following information with your comments:
■Document title
■Document part number (found on the front page)
■Page number
■Your name and organization (optional)

Please address all questions regarding the 3Com software to your authorized 3Com coordinator.
1
GETTING STARTED
This chapter describes the steps you must complete to use your telephone and provides a general description of your telephone. For information about installing your telephone and connecting to the LAN and to the 3Com Asterisk Appliance, see Telephone Installation and Maintenance.
This chapter includes the following topics:
■Configuration Overview
■Telephone Overview
■Configuration Options
| Configuration Overview | This guide includes instructions about how to configure the IP settings manually on your telephone. (SeeTelephone Installation and Maintenance.) For information about how to use a DHCP server to configure telephones, see the 3Com Asterisk Appliance Administrator's Guide.Before you install your telephone, your administrator must assign an Asterisk account to you. This account includes a telephone extension and a voice mailbox. Your administrator also assigns a password that associates your telephone number and a voice mailbox with your account.■If you are logged in, the Display Panel on your telephone shows the current date and time, and your extension.■If you are not logged in, seeLogging In to Your Telephone. |
| Telephone Overview | This guide describes the features available with your telephone, such as telephone button functions and making and forwarding calls.The settings on your telephone, including your extension, personal settings, and system settings, remain the same even when you move your telephone from one Ethernet jack to another, as long as both Ethernet connections are part of the same network.One of the benefits of network-based telephony is portability. Depending on how your administrator has configured the 3Com Asterisk Appliance, you may be allowed to configure another telephone in the system to duplicate your primary telephone simply by logging in to the other telephone using your password (seeTransferring Your Telephone Settings to Another Telephone).Your telephone can provide many features. Some of these features are optional. Your administrator determines which features are available for your telephone. |
Configuration Options
Simple telephone operations (for example, making a call, transferring a call, and putting a call on hold) require no configuration. These operations are described in Chapter 3.
Many features, however, do require configuration (for example, call forwarding). In general, you can configure these features using the Telephone User Interface (TUI). The TUI is a phone-based interface that allows you to manage your user account and telephone by using the telephone keypad. You can enable or disable many features by entering a feature code. Configuration options and prompts appear on the telephone Display Panel. See Chapter 5 for more information about using the TUI.
■Basic telephone operation, such as making calls and putting a call on hold, is described in Chapter 3.
■Features that must be configured, such as call forwarding, are described in Chapter 5.
■ Feature codes are described in Chapter 4.
Some configuration procedures require that you log out of the telephone to change the telephone configuration (for example, setting the ringing tone). Before you can use the telephone, you must be logged in:
■If you are logged in, you hear the dial tone. You can make and receive telephone calls.
If you are not logged in, you hear a high pitch tone. You cannot make or receive telephone calls. If a caller dials your extension, the call goes to voice mail. The telephone's Message Waiting Indicator (MWI) is not lit until you log in to the telephone.
2
BASIC TELEPHONES MODELS 3101 AND 3101SP
This chapter describes the buttons, controls, and features on the 3Com® Model 3101 and Model 3101SP Basic Telephones.
The chapter includes the following topics:
■Buttons and Controls
■Access Buttons
■Status Lights for System Appearance Buttons
■Access Button Label
To verify the model number of your telephone, refer to the label under the phone.
Buttons and Controls
Figure 1 shows the buttons and controls on the Model 3101SP Basic Telephone. The Model 3101 Basic Telephone does not include a microphone, 8, or a speaker button and its indicator light, 10. All other controls are identical on the two telephones.
Figure 1 Model 3101SP Basic Telephone

1 Soft buttons — Use the soft buttons to navigate through Display Panel options. A button's function depends on the option selected. The buttons are, left to right:
■ Slct (Select) — Use this button to select a displayed item. For example, you can use this button to automatically dial a previously placed or received call or a missed call.
■ Back — Use this button to move the cursor backwards one space and delete the current space. You can also use this button to sort displayed items.
■ Exit — Use this button to exit the currently displayed option.
2 Message Waiting Indicator (MWI) — When lit, indicates that you have at least one unreviewed message in your mailbox. Also, this indicator flashes when your telephone rings.
3 Display Panel — Displays the current date and time, telephor messages, Caller ID information (if enabled), and the number of new messages that you have in your mailbox (see Using the Telephone Display Panel for more information about how message status determines the message list).
You can also use the Display Panel to view or enable features available through the Main Menu (see Using the Telephone Display Pane) and with feature codes (see Chapter 4 for information about using feature codes).
4 Scroll buttons (Up, Down, Left, Right) — Perform the following functions:
■ The Up and Down buttons allow you to scroll through the items in the telephone Display Panel.
■ The Left and Right buttons are reserved for future use.
5 Program button — In the center of the scroll buttons, this button displays the Main menu.
6 Message button — Press this button to access your messages through the voice mail system.
7 Hold button — Places a caller on hold. See Putting a Call on Hold
8 Label area for Access buttons — The telephone label for your Access buttons can be printed from this document. See Access Button Label.
9 Microphone (3101SP only) — Activated when the telephone is in speaker phone mode, that is, after you press the 📍 speaker) button. For best results, keep the area around the microphone free of obstructions. To minimize the effects of background noise, the microphone is directional; it performs best when you are directly in front of the telephone.
10 Access buttons—Buttons that are assigned specific features (for example, Transfer) or that control a line for incoming and outgoing calls. See Access Buttons.
11 Speaker button (3101SP only) — Enables you to use the speaker phone feature. Press the ⏻ button before you dial the call, when your telephone is ringing, or while a call is in progress. To turn the speaker off and resume the conversation, pick up the handset.

The Model 3101SP Basic Telephone includes a microphone and supports speaker phone operation. The Model 3101 Basic Telephone does not support speaker phone operation and it does not have a button.
12 Telephone key pad — Use these buttons to dial telephone numbers and to access additional features.
13 Volume down — Lowers the volume of the ringer, the speaker, or the handset. See Controlling the Volume.
14 Mute button — Enables you to prevent callers from hearing what you are saying during a telephone call, although you can still hear them. Press the ⏻ button to turn off the telephone's mouthpiece when you are using the handset or the microphone (3101SP only) when your telephone is in speaker phone mode. To turn off the Mute feature, press the ⏻ button again. The indicator lamp is lit when the Mute feature is enabled. See Muting Calls.
15 Volume up — Raises the volume of the ringer, the speaker, or the handset. See Controlling the Volume.
16 Speaker — Enables you to use the speaker phone feature. Press the button before you dial the call, when your telephone is ringing, or while a call is in progress. To turn the speaker phone off and resume the conversation, pick up the handset.
17 Handset
Access Buttons
Figure 2 displays the Access buttons on the Model 3101 and 3101SP Basic Telephones, which have been assigned default functions.
Figure 2 Access Buttons


1 The first button controls a line for incoming and outgoing calls (System Appearance button; SA1).
2 The second button controls a line for incoming and outgoing calls (System Appearance button; SA2).
3 Feature button — Allows you to access features that are not directly assigned to an Access button on your telephone. For example, you can use the Feature button to enable and disable Do Not Disturb. For more information about feature codes, see Chapter 4.
4 Transfer button — Sends the currently active call to another telephone. See Transferring a Call.
Status Lights for System Appearance Buttons
An Access button that is set up for incoming and outgoing calls is called a System Appearance button. The light beside each System Appearance button indicates the status. See Table2.
Table 2 Status Indicator Lights for System Appearance Buttons
| Light status Line state |
| Off Available for use |
| Steady In use |
| Blinking quickly Ringing |
| Blinking slowly On hold |
Access Button Label
Figure 3 shows the access button label for the 3101 Basic phone. Print this page and cut out the label and affix it to the telephone.
Figure 3 Access Button Label

3
This chapter includes the following topics:
■Logging In to Your Telephone
■Answering a Call
■Answering a Second Call
■Making Calls
■Terminating Calls
■Using the Telephone Display Panel
■Controlling the Volume
■Changing Ringing Tones
■Putting a Call on Hold
■Transferring a Call
■Muting Calls
■Mute Ringer
■Activating Do Not Disturb
■Accessing Voice Mail
Logging In to Your Telephone
Your administrator assigns an extension (telephone number) and initial password to your telephone.
To log in to your telephone:
1 Press Program+ 5 + 6 or press Feature + 410 + 5 + 6.
The Display Panel shows:
Enter Password:
2 Enter your password and press #.
If the password you entered is associated with the telephone extension, you are logged in and the Display Panel briefly shows:
PBX1 Connected
If the password you entered is not associated with the telephone extension or the extension has not yet been assigned to the telephone, the Display Panel shows:
Use Program btn to login
Wrong number or password
In this case, use the following steps to log in to your telephone:
1 Press Program + 5 + 4 or press Feature + 410 + 5 + 4.
The Display Panel shows:
Local Phone Number:
2 Enter your extension and press #.
If the Display Panel shows a previously assigned number that you want to replace, press the middle soft button under the Display Panel to move the cursor back one space. Repeat as necessary and then enter your extension and press #.
3 Enter your password and press #.
Enter Password:
Alternatively, to set a password locally, you can use the Password Stored Locally feature code (434), then enter the password. You can use this method in place of Step 1 above. See Chapter 4 for information about feature codes.
Changing Your Password
You must use the Telephone User Interface (TUI) and change the local password to match the password stored on the call processor by following these steps:
1 Press Program + 5 + 5 or press Feature 410 + 5 + 5.
The Display Panel shows:
Enter Password:
2 Enter your new password and press #. The first digit of the password cannot be zero (0). The minimum password length is 4 digits; the maximum password length is 9 digits.
Answering a Call To answer an incoming call, lift the handset.
Alternatively, if you are using a 3Com 3101SP Basic Telephone, you can press the speaker button.
If your telephone includes multiple access lines, press the Access button for the line on which the new call is arriving (the light next to the button will be flashing).
Unanswered calls are sent to either your call coverage point which, by default, is your voice mailbox or your configured call forwarding destination. See Call Forwarding.
Answering a Second Call
When a new call arrives while you are on a call:
1 Press Hold to put the current call on hold.
2 Press the Access button for the line whose status light is blinking, indicating a new call.
3 To return to the earlier call, hang up the new call, or put it on hold, or transfer it, and then press the Access button for the original call.
Making Calls This section describes standard dialing features.
Making Internal Calls To dial an internal call:
1 Pick up the handset. Alternatively, you can press the Ⓑ button, if your telephone is a Model 3101SP telephone. You hear the dial tone.
2 Dial the extension. Alternatively, you can use the Display Panel to find and dial the name of the person whom you want to call in the call logs.
3 When you complete the call, hang up the handset. If you pressed the Speaker button, press it again to end the call. If you pressed the ☐ button, press it again to end the call.
Redialing a Call To redial a number on your telephone:
- Pick up the handset and then press Feature + 401 to dial the most recent number that you dialed.
■Use the Call Logs on the display panel to redial a recently missed, answered, or dialed call.
Making External Calls To dial an external call:
1 Pick up the handset. Alternatively, you can press the button. You hear the dial tone. If necessary, dial the number required to access an external line (for example, 9). If one of the Access buttons is configured to access an external line directly, you can press that button.
2 Dial the number. Or use the display panel on a 3Com Telephone to scroll to Placed Calls, Received Calls, or Missed Calls.
3 When you finish speaking, hang up the handset. If you pressed the button, press it again to end the call.
Class of Service Override The Class of Service Override feature allows you to apply the capabilities of your own telephone temporarily to another telephone on the same local network.
For example, the telephone in a conference room may be configured to prevent long-distance telephone calls. You may, however, need to place a long-distance call during a meeting. If the permissions included with the Class of Service on your telephone allow long-distance calling, you can use the Class of Service Override feature to apply your telephone features to the conference room telephone for one call only.
To activate the one-call-only Class of Service Override from any telephone:
1 Pick up the handset.
2 Press Feature + 433. The Display Panel prompts you for the required input.
3 Enter your telephone extension.
4 Enter your password and press #.
5 Enter the destination number as you would from your own telephone.
| Terminating Calls | You can terminate a call (hang up) by replacing the handset. Alternatively, if the call is on Speaker, turn the Speaker off by pressing the button. |
| Using the Telephone Display Panel | The Display Panel shows the current date and time, and your extension number. It can also show features that you have enabled. For example, if you enable the feature that forwards all incoming calls to your voice mailbox, the Display Panel shows Fwd Mail.The Display Panel can also list telephone status messages, Caller ID information (if enabled), and the number of new messages (voice, e-mail, and fax) that you have in your mailbox.If the Display Panel contains more than two lines of information, use the up and down scroll buttons to navigate through the display.The list of new messages in the Display Panel depends on the status of each message. A new message can be:Unreviewed — An unreviewed message has never been listened to or acted upon (saved or deleted).Reviewed — A reviewed message has been listened to but has not been acted upon (saved or deleted). A message may reach this state if you listen to the message and then hang up.The Display Panel shows the number of messages in your mailbox (and the Message Waiting Indicator is lit) only if you have at least one unreviewed message. If you review the last new message and do not act on it, the Display Panel shows the date and extension, and MWI is off. If your mailbox then receives a new message, the Display Panel shows the |
following (and MWI is lit): 2 Msgs 1 New. The 2 Msgs include the just received new, unreviewed message and the other message that is new but reviewed. The 1 New indicates the just received new, unreviewed message.
The Display Panel also shows the number of missed calls. Missed calls include unreviewed messages in your mailbox and any other calls that you did not answer. For example, you can configure your default call coverage point to be no coverage. In this case, if you do not answer a call, when the call terminates the caller hears a busy tone and the call is not forwarded or sent to your mailbox. The Display Panel on your telephone showsMissed 1. If you press the first button below the Display Panel, you can scroll through the list of missed calls and to show you the name of the calling party extension. Press the button again to automatically dial the listed extension.
You can also use the Display Panel to view or enable features available through the Main menu and with feature codes (see Chapter 4 for information about using feature codes).
To access the Main menu, press the Program button, which is in the center of the scroll buttons. The display panel shows features:
■User Directory — Not used.
■ Call History — Displays logs of your recent missed, answered, and dialed calls. See Viewing the Call Logs.
■Personal Speed Dial — Not used.
■System Speed Dial — Not used.
■ Advanced Settings — Configures network parameters, sets your telephone password and changes your login status.
■ User Configuration — Configures user settings.
CAUTION: Network parameter options are for administrator use only. Unauthorized changes to network parameters will disconnect your telephone.

Controlling the Volume
Use the Volume Control buttons to raise or lower the volume of the ringer, handset, or speaker.

Adjusting the volume control of one device DOES NOT affect the volume control of the other devices. For example, lowering the volume of the speaker has no effect on the handset volume. Changes you make to any device remain in effect if you reset the telephone to its default settings.
■ Ringer Volume — To raise or lower the volume of the ring, press the up or down Volume Control button repeatedly while your telephone is ringing, until the volume is at the level that you prefer.
- Handset Volume — To raise or lower the volume of the dial tone and the voice level of your callers, lift the handset then press the up or down Volume Control buttons repeatedly until the volume is at the level you prefer. You can change the volume during a conversation or by listening to the dial tone.
■ Speaker Volume — To raise or lower the volume of the speaker, press the Speaker button and then press the up or down Volume Control button repeatedly until the volume is at the level you prefer. You can change the volume during a conversation or by pressing Speaker and listening to the dial tone.
When you press a Volume Control button, the Display Panel shows the volume setting as a series of dark vertical bars. Repeatedly pressing a Volume Control button raises the volume (increases the number of displayed bars) or lowers the volume (decreases the number of displayed bars.
You can also use Feature Codes to adjust the volume. Pressing Feature + 102 raises the volume (increases the number of displayed bars by one). Pressing Feature + 103 lowers the volume (decreases the number of displayed bars by one).
Changing Ringing Tones
You can change the ringing or alert tone of your telephone.
There are 10 choices, which include 9 audible tones and a silent alert. For the silent alert, choose number 10. When you set this alert tone, the display panel shows:
Silence Alert Tone Selec
When the telephone receives a call, there is no audible ringing tone. The Message Waiting Indicator and a System Appearance button flash to indicate that you have an incoming call.
To change the ringing tone:
1 Log out of the telephone; press Program + 5 + 6.
2 Press Program + 5 + 9.
The Display Panel shows which ringing tone the telephone uses, for example:
Alert Tone 1-10:
7
3 Use the middle soft key under the Display Panel to delete the current ringing tone number.
4 Enter a new tone number between 1 and 10 and then press the # key.
5 Log in to the telephone; press Program + 5 + 6 and then enter the telephone's password.
You will hear a new ringing tone the next time you receive a call.
Using the Hands Free Feature
You can use your telephone as an intercom. You can answer internal (intercom) calls without picking up the handset. When you receive an internal call, your telephone sounds a tone and activates the speaker phone.
You cannot use this feature with external calls (a call from outside your local call processor) or Anonymous (blocked caller ID) calls. These calls ring to your telephone as usual.
You can enable and disable Hands Free by using Feature Code 100. See Feature Codes.
Putting a Call on Hold
To put a call on hold:
1 While you are on a call, press the Hold button.
This Display Panel shows:
Hold
2 To return to the call, press the Hold button again or press the appropriate Access button.
Music on Hold
If configured by the administrator, callers on hold hear music while they wait.
Dialing a New Call While on a Call
You can put a call on hold, dial a new call, and toggle between the two calls:
1 Press the Hold button.
2 Press one of the Access buttons not currently being used.
3 When you hear dial tone, dial the second call.
Answering a New Call While on a Call
You can put your current call on hold, answer a second call, and then toggle between the two calls:
1 When a new call arrives, press the Hold button to put the current call on hold.
2 Press the Access button for the incoming call (its light will be flashing).
3 To toggle between the two calls, put the current call on hold and then press the Access button for the call you want to resume.
Transferring a Call
When you are on a call, the Transfer feature allows you to send the call from your telephone to any other internal line. For unattended or attended transfers, if your call permissions allow, you can send the call to an external line.
Unattended Transfer
In an unattended transfer, you transfer the call without notifying the recipient. You can either use the Transfer button or the transfer feature code:
1 While on a call, press Transfer. The call is placed on hold, you hear a dial tone, and the system prompts you enter a destination number.
2 Dial the number to which you want to transfer the call.
3 Press Transfer again or hang up the telephone.
The call is disconnected as soon as the transfer starts, which frees up your line. If the transfer cannot be completed, it is forwarded to the called party's voice mail.
Attended Transfer
In an attended transfer, you announce the call to the recipient. You can either use the Transfer button or the transfer feature code.
To announce a transfer:
1 While on a call, press Transfer. The call is placed on hold, you hear a dial tone, and the system prompts you enter a destination number.
2 Dial the extension number to which you want to transfer the call The call processor dials the call.
3 If the recipient:
a Answers, announce the call. Note that, at this point you cannot return to the original caller.
■ If the recipient wants to take the call, press Transfer. Hang up.
■If the recipient does not want to take the call, hang up the second call and go back to the first call by pressing the Access button on which the call originated.
b Does not answer because the line is busy or unreachable, to return to the original call, hang up the transfer call or press Feature Code 111 to see the original call on Hold. Then press the Hold button to return to the original call.
Muting Calls
You can prevent callers from hearing you by turning off the telephone's microphone when you are using the handset, or when your telephone is in speaker phone mode.
To mute your telephone:
1 While you are on a call, press Mute or press Feature + 101. The light next to the Mute button comes on. Callers cannot hear you.
2 To turn this feature off, press Mute or Feature + 101 again.
Mute Ringer You can prevent the telephone's ringer from ringing by enabling this
feature. By default, the telephone's ringer is enabled (feature disabled). You can enable or disable the telephone's ringer at any time while either on the telephone or on-hook, but the change takes effect on the next incoming call.
If the telephone reboots or is upgraded with new software, the ringer resets to the default ringer enabled (feature disabled) mode.
To mute the telephone ringer:
1 Press Feature + 489. The LCD displays:
Ringer is now muted.
2 To clear the display, lift the handset. The next time you receive an incoming call, the ringer is muted.
3 To turn this feature off, press Feature + 489 again. The LCD displays:
Ringer is now enabled.
4 To clear the display, lift the handset.
Activating Do Not Disturb
When you enable Do Not Disturb, incoming calls immediately go to the call coverage point set by you or your administrator. The default call coverage point is your voice mailbox.
When your telephone is in Do Not Disturb mode:
■An incoming call does not cause your telephone to ring. If you are logged in to multiple telephones using the same telephone number and one of the telephones enables Do Not Disturb, the feature applies to all telephones, that is, an incoming call will not ring on any of the telephones.
■You can use the telephone to dial outgoing calls.
■If you enable Do Not Disturb while one or more calls are ringing, the pending calls are sent to your call coverage point and Do Not Disturb is enabled for all subsequent calls.
If you are a Ring Group member and you enable Do Not Disturb, personal calls go to your call coverage point. However, Ring Group calls always ring on a member's telephone, regardless of the Do Not Disturb setting.
To activate Do Not Disturb:
1 Press Feature + 446.
You can also press Feature + 446 or press the Features Access button, then scroll down the list of features and select Do Not Disturb.
Your telephone is now in Do Not Disturb mode and the display panel shows Do Not Disturb.
2 To disable Do Not Disturb mode, repeat Step 1. The Do Not Disturb message disappears from the display panel.
Accessing Voice Mail To access voice mail directly for a mailbox:
1 Press one of the following:
■Messages button
■ *600* + <extension> + #
■Feature + 600
2 You are prompted to enter the password, which by default is the same as the mailbox number.
4
FEATURE CODES
This chapter describes how to use feature codes on a telephone to enhance the operation of your telephone. A feature code is a sequence of numbers you enter on the telephone keypad to enable a feature that is not mapped to a button.
This chapter includes the following topics:
■Feature Code Overview
■Using Feature Codes
■Feature Codes
| Feature Code Overview | Some common telephone features are mapped to buttons (Transfer, for example). However, the number of features exceeds the number of buttons available on any telephone. Feature codes allow the telephone feature set to be available to all telephones, regardless of the number of buttons on the telephone.Each feature is assigned a unique three-digit feature code. You can invoke a feature by entering the numeric code assigned to a particular feature. For example, you can use a feature code to enable call forwarding and specify a destination number.You can access all telephone's features by pressing the Features Access button. You can then enable a feature using either of the following methods:1 Press the Features Access button.2 Enter the three-digit feature code on the keypad (see Feature Codes).3 Enter any additional values following display panel prompts.Or1 Press the Features Access button.2 Scroll to the feature.3 Press the Select soft button.4 Enter any additional values following display panel prompts. |
| Using Feature Codes | You can invoke a feature by pressing the Feature button and using the telephone keypad to enter the feature code along with any additional information (such as an extension).For example, to enable the Do Not Disturb feature, you can use either of these methods:Press the Feature Access button and use the scroll buttons to find the Do Not Disturb feature listed in the Display Panel. Then press the Slct (Select) button.Press Feature + 446.Some features require additional information. For example, if you want to enable call forwarding, you must designate the extension to which you |
want your calls forwarded. The feature code for call forward (Fwd Universal) is 465. To enable this feature:
1 Press Feature + 465.
The Display Panel shows the prompt FWD Universal Number.
2 Enter the extension to which you want your calls forwarded, in this case, 1001.
If the Display Panel shows a previous entry, use the middle soft key to clear the entry.
3 Press OK or #.
Feature Codes
Table 3 lists the features that you can control with feature codes. Features are listed alphabetically and include the required feature code syntax and, in most cases, a reference for more information. In the syntax, the notation
Table 3 Feature Codes Alphabetical by Feature or Task
| Feature Feature Code Entry Description | ||
| Call Forward Universal | Feature + 465, then | See Call Forwarding. |
| Call History | Feature + 462 | See Viewing the Call Logs. |
| Call Park a Call | Feature + 444, then (or accept the default) | See Call Park. |
| Class of Service (COS) Override | Feature + 433, then, then + #, then | See Class of Service Override. |
| Conference Call | Feature + 430, then, then Feature + 430 | See Setting up a Conference Call. |
| Display Software Version | Feature + 837 | Displays the current version of software running on the telephone. |
| Do Not Disturb (Enable/Disable) | Feature + 446 | See Activating Do Not Disturb. |
| Hands Free | Feature + 100 | Enables or disable the Hands-Free feature. See Using the Hands Free Feature. |
| Hold | Feature + 402 | See Putting a Call on Hold. |
| Logout (phone) | Feature + 128 | |
| Feature | Feature Code Entry | Description |
| Mute | Feature + 101 | See Muting Calls. |
| Mute Ringer | Feature + 489 | See Mute Ringer. |
| OK | Feature + 120 | Displays OK in the Display Panel. Used to make a call without waiting for the call completion time-out value to expire. |
| Password Stored Locally | Feature + 434, then | Stores the password you use to log in to your telephone on the telephone (locally). |
| Program | Feature + 410 | Displays the Program menu in the Display Panel. |
| Redial | Feature + 401 | See Redialing a Call. |
| Release | Feature + 111 | Cancels the current operation. |
| Speaker — On/Off | Feature + 104 | Speak and listen without picking up the handset. |
| Transfer to Voice Mail (Enable/Disable) | Feature + 440 When enabled, transfers all calls to the voice mail. See Forwarding Calls to Voice Mail. | |
| Volume — Up or Down | Feature + 102 to raise the volume or Feature + 103 to lower the volume | Adjusts the volume setting for the current mode:If the handset is in the cradle and the speaker is disabled, adjusts the ring volume setting.If the speaker is enabled, adjusts the speaker volume setting.If the handset is not in the cradle and the speaker is disabled, adjusts the handset volume setting.See Controlling the Volume. |
5
STANDARD FEATURES
This chapter describes the standard telephone features that you can set up and access through the Telephone User Interface (TUI) on your telephone.
This chapter contains the following topics:
■Viewing the Call Logs
■Setting up a Conference Call
■Transferring Your Telephone Settings to Another Telephone
■Forwarding Calls to Voice Mail
Call Waiting
■Call Forwarding
Call Park
■Ring Groups
Emergency Telephone Number Dialing Service
Viewing the Call Logs
You can use the Call History feature to display your call logs. These are the logs of the 10 most recent placed calls, received calls, missed calls and unreviewed calls to and from your telephone. From the call logs you can select calls and the telephone automatically dials them.
To access and use the Call History feature:
1 Do one of the following:
■ Press Feature + 462.
■ Press the Program button and scroll down to Call History.
The Call History menu appears in the Display Panel.
2 Select one of the follow options:
a For placed calls, press 1.
b For received calls, press 2.
c For missed calls, press 3.
d For unviewed missed calls, press 4.
e To clear the all call logs, press 5.
Use the Scroll buttons to navigate through the list. The Display Panel always starts with the oldest call in the category you select. That is, the oldest call appears first and the most recent call appears last.
The Display Panel scrolls through the calls one at a time. After the last call, this message appears in the Display Panel for placed and received calls:
No more call history
This message appears for missed calls:
No more missed calls
The three Soft buttons below the Display Panel have the following functions when viewing the Call History:
■To select a call from the list and dial the call automatically, press the Slct button.
■ To return to the previous menu, press the Back button.
■ To exit the Call History display, press the Exit button.
Setting up a Conference Call
The conference feature enables you to have up to six parties, including the conference originator, on one conference with the capability to extend a conference through cascading. Conferences can be multi-site capable where any endpoint in a conference can be located anywhere within the system.
The following sections describe how to set up an unannounced conference call and an announced conference call. In either type of conference call, if one of the participants hangs up, the other two participants remain connected. The following sections also describe how the conference can drop the last member to join the conference and how to drop the entire conference.
Setting up an Unannounced Conference
In an unannounced conference, you conference in the person without notifying that person:
1 While on a call, press Feature + 430. The system places your caller on hold.
2 Dial the number of the person you want to conference in.
3 Press Feature + 430 again. The three-way conference begins when the recipient answers the call.
Setting up an Announced Conference
In an announced conference, you call the recipient and announce that you want to conference them into a call. The recipient can then decide whether to take the call:
1 While on a call, press Feature + 430. The system places your caller on hold.
2 Dial the extension of the person you want to conference in, then press the OK Access button (or press Feature + 120).
3 When the called party answers, announce the conference.
■ If the recipient wants to take the call, press Feature + 430. Now three people are on the same call.
■If the recipient does not want to take the call, hang up the second call and go back to the first call by pressing the Hold button for that call.
Adding a Recipient to an Existing Conference
While participating in a conference of three to five people, any recipient in the conference can add a new recipient. While a new recipient is being added, the existing recipients in the conference, including the originator, are still able to communicate, but there is no ring back tone associated with the new recipient. If a party other than the originator adds a new recipient, then a cascaded conference is formed. The process to add a recipient is identical to Setting up an Unannounced Conference or Setting up an Announced Conference.
Creating a Cascaded Conference
Once you establish a conference, anyone in the conference, excluding the originator, can create a cascaded conference by initiating a conference call to another party or parties. Those parties in turn can initiate another cascaded conference. For example, telephone P1 (originator) calls telephones P2, P3, P4, P5 and P6 to establish a 6-party conference (called C1). Telephone P3 then calls telephones P7 and P8. Telephone P3 creates a cascaded conference and is the originator of a 3-party conference (called C2). Conference C2 is now cascaded with C1. Telephone P8 then calls P9 to create conference C3 and is cascaded with C2. Cascading can continue until the maximum number of ports on the conference server has been reached.

flowchart
graph TD
    A["1"] --> B["2"]
    B --> C["3"]
    C --> D["4"]
    D --> E["5"]
    E --> F["6"]
    F --> G["7"]
    G --> H["8"]
    H --> I["9"]
    I --> J["P3 is the originator of C2."]
    K["P1 is the originator of C1."] --> A
    L["P8 is the originator of C3."] --> H
    M["P3 is the originator of C2."] --> I
Dropping Conference Recipients
Once a conference has been established, the conference originator can either drop the last party added to the conference or drop the entire conference that the originator initiated. In the example above, if P1 the originator of conference 1 drops All, only P1, P2, P4, P5 and P6 are dropped. P3 is not dropped because it is the originator of conference 2 and remains connected to conference 2.
To drop conference recipients, follow these steps:
1 While on a conference, the conference originator presses the Drop soft (right) button. The Conference Drop window displays in the Display Panel.
2 Scroll to the drop action you want to take, either (1) Last or (2) All, and press the appropriate number on the keypad. The party (Last) or the conference (All) is dropped.
Alternately, you can drop recipients from a conference using the following feature codes:
■ To drop the last party in a conference, enter Feature + 431.
■ To drop all parties in a conference, enter Feature + 435.
If the originator drops the last party in a 3-party conference, the call then becomes a 2-party non-conference call.
Transferring Your Telephone Settings to Another Telephone
This feature enables you to use any 3Com telephone with all your telephone's settings.
To transfer your telephone's settings to an alternate telephone:
1 Log out of your own telephone by pressing Program + 5 + 6.

If your administrator has enabled the Multiple Contacts feature for your extension, you do not have to log out of one telephone before logging into another.
2 Log out of the alternate telephone that you want to use as yours:
a If the telephone is a 3Com Basic or Business telephone, press Program + 5 + 6.
b If the telephone is a 3Com Manager's telephone, press the bottom right soft button (Advanced Settings) + 6.
3 On the alternate telephone, access the Set My Phone Number option of the Advanced Settings menu:
a If the telephone is a 3Com Basic or Business telephone, press Program + 5 + 4.
b If the telephone is a 3Com Manager's telephone, press the bottom right soft button (Advanced Settings) + 4.
The Display Panel shows:
Local Phone Number:
4 On the alternate telephone, enter your own telephone extension:
a Use the delete button to delete the alternate extension's number.
b Enter your own telephone extension number and press #.
5 Log in to the alternate telephone and use your own telephone extension number and password:
a If the telephone is a 3Com Basic or Business telephone, press Program + 5 + 6.
b If the telephone is a 3Com Manager's telephone, press the bottom right soft button (Advanced Settings) + 6.
You are logged into the alternate telephone, which now receives any calls to your own telephone's extension. The alternate telephone's Display Panel shows your own telephone's extension as well as any call history information that was on your own telephone's Display Panel.
6 When you are finished using the alternate telephone, log out:
a If the telephone is a 3Com Basic or Business telephone, press Program + 5 + 6.
b If the telephone is a 3Com Manager's telephone, press the bottom right soft button (Advanced Settings) + 6.
7 Log back into your own telephone by pressing Program + 5 + 6.
Forwarding Calls to Voice Mail
You can forward incoming calls to your voice mailbox by using a feature code.
When you forward incoming calls to your voice mailbox:
■If you are logged in to multiple telephones, each using the same telephone number, and one of the telephones enables forward to voice mail, the feature applies to all telephones — an incoming call is sent to your voice mailbox.
■If you enable forward to voice mail while one or more calls are ringing, whether you are on-hook or off-hook, the pending calls are sent to your voice mailbox and forward to voice mail is enabled for all subsequent calls.
If you are a Ring Group member, personal (non-Ring Group) calls go to your voice mailbox. However, Ring Group calls always ring on a member's telephone, regardless of your personal telephone setting.
To forward incoming calls to your voice mailbox for any telephone (including the Basic telephones, which do not have a FWD Mail button):
■ Press Feature + 440. All future calls transfer automatically to your voice mailbox.
■If you have not enabled this feature code, you can send a call that is ringing (and all subsequent calls) to your voice mailbox by pressing Feature + 440.
■ To disable this feature, press Feature + 440. All calls ring normally.
Call Waiting
The Call Waiting lets you know that another call has arrived on another access line. You hear a distinct ringing tone, if you have not disabled the ringing tone on your telephone, and see the MWI flashing.
1 When you hear a ring tone or see the MWI flashing, press the Hold button to put the current call on hold.
2 Press the Access button for the incoming call.
3 To toggle between the two calls, put the current call on hold and then press the Access button for the call you want.
Call Forwarding
Use the Call Forward Universal feature when you plan to be away from your telephone for an extended period of time. All incoming calls are redirected to another destination unconditionally.
To forward all your calls to another extension:
1 Press Feature + 465 or press the Feature Access button, then scroll down to and select Fwd Universal.
The Display Panel shows:
FWD Universal Number:
2 Use the keypad to enter the telephone number to which you want to forward your calls.
To disable the Call Forward Universal feature so that you can answer calls at your telephone again:
1 Press Feature + 465 or press the Feature Access button, then scroll down to and select Fwd Universal.
The Display Panel shows:
FWD Universal Number:
2 Use the Delete soft key to erase the call forward extension and leave the field empty.
3 Press the # key.
Call Park
Use the Call Park feature to place a call in a holding pattern and make it available for you or for another user to pick up from any telephone on the system by dialing the Call Park extension.
The Call Park feature is useful when the recipient is elsewhere in the building or you want to continue a call on another telephone and transferring the call does not give you enough time to retrieve it.
When you park a call, you assign it a Call Park extension, which you (or another user) use to retrieve it. The default Call Park extension numbers are 6000 through 6099 inclusive. Ask your administrator to verify the Call Park extensions for your location. If the specified Call Park extension is in use or if no extension is specified, the next available Call Park extension.
A call remains parked for 5 minutes. This default value can be adjusted by your administrator. If the call is not answered 5 minutes after it is parked, the user who parked the call is called back. If the user is not available, the parked call is forwarded to the user's call coverage point. To park a call:
1 While you are on a call, press the Call Park button or press Feature + 444. The Display Panel shows a default Call Park extension.
2 Press the Call Park button (or press Feature + 120) to park the call using the default extension, or use the telephone keypad to enter a Call Park extension from the list of extensions at your location. Notify another user about the parked call.
a Select an Access button for outgoing calls and dial the user's extension.
b When the call is answered, tell the user the Call Park extension number, for example 6018.
c Hang up.
The user dials the Call Park number and the system connects the call automatically.
3 To retrieve a parked call yourself:
a Pick up the handset of any telephone on the system.
b Dial the Call Park extension that was assigned to the call.
The system connects you to the parked call.
Ring Groups
Your administrator can establish formal and informal call centers so that incoming calls can be directed to several telephones that have been associated into ring groups.
A call center is a general term that refers to any system that accepts incoming calls to a site, ensures that those calls are sent to the proper destination within the site, and manages database records on call activity and distribution. The call center can be used, for example, as a help desk, a reservations counter, an information hotline, or a customer service center.
Incoming calls that arrive at your company can go either to:
■Your extension and the call coverage point you have set up.
■A ring group that follows the call coverage path assigned by an administrator for that group.
A ring group is a group of telephone extensions that are configured under a virtual extension. Your administrator can configure the ring group so that an incoming call to the virtual extension rings on all the telephones in the ring group simultaneously or in sequence.
Ring Group Interaction With Other Features
This section describes how participation in a ring group interacts with other telephone features. Note the following considerations:
■A ring group call can be added to a conference. The member receiving the call can conference with another extension or with another ring group. Both announced and unannounced conferences are supported (see Setting up a Conference Call).
■A ring group call can be put on hold and taken off hold without losing the caller.
■If a ring group member puts a call on hold, that member can receive other calls.
■A ring group caller on hold will hear ring group Music On Hold.
■If the telephone has Hands Free enabled, an incoming call to a ring group will not be picked up automatically.
■An external call to a private user (someone not in the ring group) can be transferred to a ring group.
■Both attended and unattended call transfers are allowed for calls to a ring group or from a ring group.
■Internal and external callers that are forwarded to voice mail can leave a message and navigate through the voice mail options.
■If a ring group call is routed to a voice mailbox or Auto Attendant call coverage point but the routing fails (for example, because no ports are available), the call is requued for the ring group.
■Each time a call is put back in a ring group queue, it is treated like a new call.
Emergency Telephone Number Dialing Service
3Com telephones provide the capability to dial an emergency telephone number even when the telephone is not logged in to a system. The telephone must be properly configured, connected to an operational system, and the region must support this service. If the system is not operational, an emergency call can be routed (optionally) directly through a PSTN media gateway. Contact your system administrator to determine the appropriate emergency number for your region.
A
TELEPHONE INSTALLATION AND MAINTENANCE
This chapter covers these topics:
■Connecting the Telephone
■Connecting the Telephone to the 3Com Asterisk Appliance
■Attaching and Adjusting the Support Bracket
■Moving Your Telephone
■Swapping Telephones
■Cleaning Your Telephone
■Troubleshooting Problems
Connecting the Telephone
Although the connector layout varies between telephones, all telephones use these symbols to identify the connectors:

Power connection for an AC power adapter.

Network connection. Connects the device to the network. A powered Ethernet cable that conforms to the Power over Ethernet (IEEE 802.3af) standard is acceptable.

Switch port for connecting a computer or other network device to the network.

Handset connector.
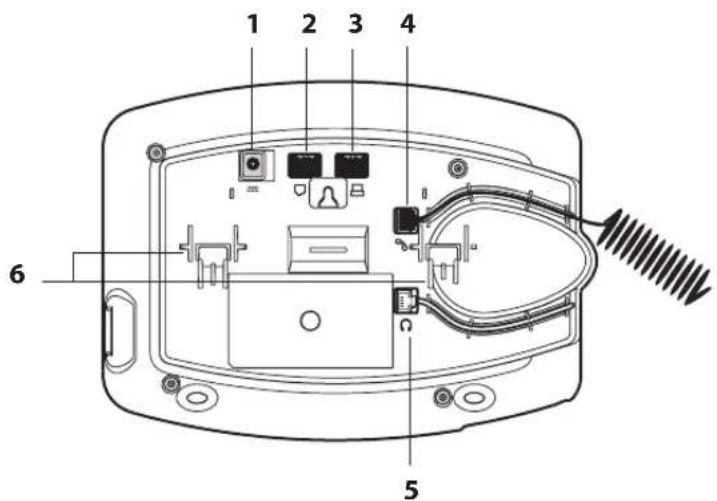
Figure 4 shows underside of a 3102 Business Telephone as an example of possible connection points. Connection details for each type of device are listed on the packing sheet that is shipped with the device.
Figure 4 Underside of the 3102 Business Telephone

CAUTION: The system operates over the LAN, not through traditional telephone wiring. Your telephone connects to the system through an RJ-45 LAN connector instead of an RJ-11 telephone connector. Your telephone will not work unless it is connected properly. Ask your administrator if you have questions about your telephone connection.
The underside of an telephone includes:
1 AC power adapter connection
2 Ethernet connector for connection to the LAN
3 Ethernet connector for an optional connection to your desktop computer.
4 Handset connector
5 Headset connector (not available on 3Com Basic telephones)
6 Tabs for the support bracket

For information about the underside of each telephone, and for information about how to connect any telephone to a Power over Ethernet source, see the packing sheet that comes with the device.
Strain relief clamps are built into the support bracket.
Connecting the Telephone to the 3Com Asterisk Appliance
Connect your telephone to power and to the LAN as described in Connecting the Telephone.
Your Asterisk administrator must assign you a user account that includes your telephone extension and your username and password. Before the telephone can connect to the 3Com Asterisk Appliance, it must have these IP configuration settings defined:
■The telephone IP address
■The subnet mask of your local network
■A default gateway IP address
■The IP address of the 3Com Asterisk Appliance and the IP address of the download server

If your network is configured to use DHCP, the telephone receives its IP configuration automatically. Otherwise, you must configure your telephone manually for network and 3Com Asterisk Appliance connectivity.
Manually Configuring Telephone Connectivity
To configure the IP configuration settings manually on your telephone, use the Program button (see Buttons and Controls) to enter the User Configuration menu (menu option 6).

If your telephone received its IP configuration automatically, follow steps 1 through 3 to set the IP address of the 3Com Asterisk Appliance and your user settings. If your telephone did not receive its IP configuration automatically from a DHCP server, follow all the steps.
1 Press Program + 5 (Advanced Settings) + 1 to select Set Primary PBX IP. Use the keypad to set the IP address of the 3Com Asterisk Appliance.
2 Press Program + 5 (Advanced Settings) + 2 to select Set Secondary PBX IP. Use the keypad to set the IP address of the telephone download program server, which is the same as the IP address of the 3Com Asterisk Appliance.
3 Press Program + 5 (Advanced Settings) + 4 to select Set My Phone Number. Use the keypad to specify the telephone extension. Your administrator must also configure the extension on the 3Com Asterisk Appliance.
4 Press Program + 6 (User Configuration) + 2 to select Configure IP Address. Use the keypad to set the IP address for the telephone, and then press the # key to save your changes. Note that you can press the Program button to back out of a menu choice.
5 Press Program + 6 (User Configuration) + 3 to select Configure SubNetMask and set your network's subnet mask. Note that you can press the Program button to back out of a menu choice.
6 Press Program + 6 (User Configuration) + 4 to select Configure Gateway IP Address and set your telephone's default gateway address. Note that you can press the Program button to back out of a menu choice.
7 Press Program + 6 (User Configuration) + 5 to select Configure NCP IP Address and set the 3Com Asterisk Appliance IP address. Note that you can press the Program button to back out of a menu choice.
8 When you are finished, press the Program button to exit from the configuration menu.
After you manually configure a telephone, the settings are saved in flash memory and retained when you disconnect power from the telephone.

If your telephone received its IP configuration automatically, follow steps 1 through 5 to set the IP address of the 3Com Asterisk Appliance. If your telephone did not receive its IP configuration automatically from a DHCP server, follow all the steps.
Note that these setting may be provided automatically by an address server. See your network administrator for more information.
Attaching and Adjusting the Support Bracket
Figure 5, Figure 6, and Figure 7 show a 3102 Telephone. The instructions apply to all telephones.
Figure 5 Attaching the Support Bracket
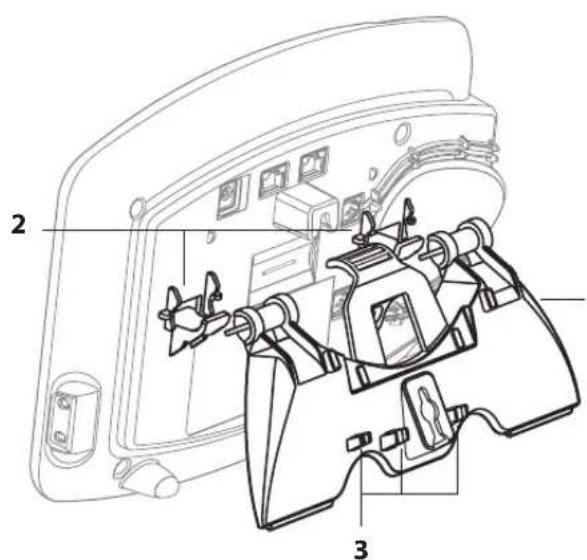
To attach the support bracket, 1, snap the bracket into the mounting supports 2, on the bottom of the telephone.
1 After you connect the cables to the telephone, press the cables into the cable management clamps 3, on the stand.
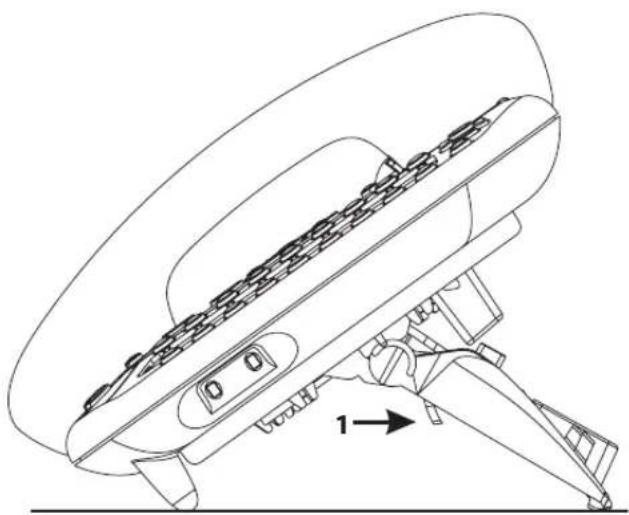
Figure 6 Adjusting the Support Bracket
natural_image
Technical line drawing of a mechanical device with no visible text or symbolsTo adjust the support bracket, press to release the lock tab 1, rotate the bracket to the position that you want, and then release the lock tab.
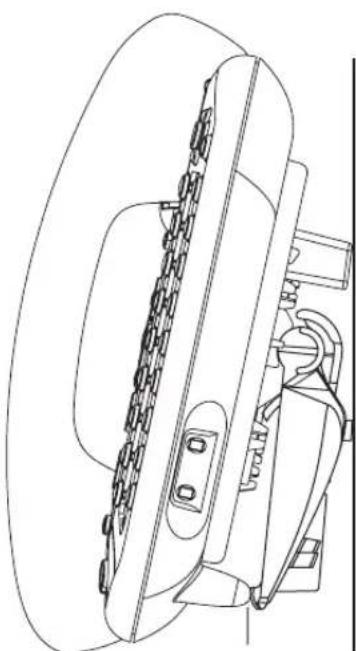
Figure 7 Wall Mounting a Telephone
natural_image
Technical line drawing of a car brake system showing wheel, suspension, and mounting bracket (no text or labels)When you mount a 3Com telephone on a wall, attach the support bracket and adjust it so that the bottom of the support bracket rests against the bottom supports on the telephone, 1.
Safe wall mounting requires 3/4-inch drywall and 1.5-inch drywall screws.
| Moving Your Telephone | Each telephone is uniquely identified by an IP address. You can move your telephone to another location within your calling domain, connect it to any Ethernet jack on the LAN, and still maintain all of your personalized features and extension number. |
| Swapping Telephones | Your administrator assigns a password for your telephone. This password associates your telephone extension (and mailbox) with your account. This may allow you to configure another telephone in the system to duplicate your primary telephone. This means if you are away from your primary telephone (for example, in a different office), you can program the local telephone to use your extension. Any calls made to your extension will ring in both locations and you can access your mailbox from either telephone. See the overview section in the chapter that describes your telephone for more information. |
| Cleaning Your Telephone | Always unplug your telephone from the power source and from the network before you clean it. Use a soft cloth dampened with mild detergent. WARNING:Failure to unplug the telephone before you clean it could result in electrical shock. WARNING:Failure to unplug the telephone before you clean it could result in electrical shock. |
| Troubleshooting Problems | Table 4lists possible problems that you may encounter and the most likely solutions. Where possible, each solution refers to the section in this guide where you can find detailed information. |
Table 4 Possible Problems
| Possible Problem Suggested Solutions | |
| My telephone has no dial tone and the display panel is blank. | ■Verify that the power cord is fully inserted in the correct connector on the underside of the telephone. Use the strain relief tab to prevent the cord from becoming unplugged.■Verify that the Ethernet cables are connected and that each cable is in the proper connection.■Remove and add power to the telephone by unplugging the power cord at the electric outlet and plugging it back in.■If the telephone is powered through a powered Ethernet cable, make sure that power is applied to the cable at its source. |
| I hear a high pitch tone but not a dial tone. | ■You are not logged in to your telephone. |
| My telephone has “locked up.” | ■Your telephone has lost the connection to the system. Remove the Ethernet cord from the jack, and then re-insert it into the jack.■Wait a few seconds. If the telephone display panel still appears to be locked, disconnect the electrical power for your telephone, and then plug it back in. |
| Callers cannot leave messages on my voice mail. | Your mailbox may be full. Log in to your voice mailbox and delete some messages. |
| When I dial 9 or 8 to access an outside line, the display panel shows “All Ports Busy.” | No outside lines are available. Try again in a few minutes. |
| My telephone keeps ringing after I pick up the handset. | ■Your telephone may have lost connection to the system immediately after a call came in. Remove the Ethernet cord from the jack, then re-insert it into the wall jack.■Wait a few seconds. If the telephone continues to ring, disconnect the electrical power for your telephone, and then plug it back in. |
| The display panel shows “Wait for NCP.” | Your telephone may be disconnected from the system. Hang up your telephone and wait a few seconds. Then pick up the handset. If the message still appears on your telephone display panel, contact your administrator. |
INDEX
Numbers
3101 Basic Telephone figure and features 14 line status lights 18 programmable access buttons 16
A
access buttons 3101 Basic Telephone 16 alert tone, changing 25 All Ports Busy message 52 answering a call 21
C
call history viewing 36 call park 42 call waiting 41 calls answering 21 answering a second call 21, 27 dialing a second call 27 dropping 23 forwarding to voicemail 40 making 21 missed 24 muting 28 parking 42 transferring 27
Class of Service overriding 22 cleaning telephones 51 conference call announced 37 cascaded conference 38 dropping recipients 38 setting up 37 unannounced 37 configuration interface options 11 connecting telephones
caution, RJ-45 versus RJ-11 jacks 46 electrical power 46 controls 14
D
dial tone, troubleshooting a Telephone 52
dialing while on a call 27
display panel using 36
Do Not Disturb activating 29
dropping calls 23
E
electrical shock, avoiding 51 emergency phone number dialing service 44
F
feature button 17 feature codes 33
L
line status lights 3101 Basic Telephones 18 logging in 20
M
Main menu see Program button making calls 21 message waiting indicator 3101 and 3101SP Basic Telephones 15 microphone 3101SP Basic Telephone 15 missed calls 24 moving telephones 51 music on hold 27 mute ringer 28 muting calls 28
54 INDEX
MWI
see message waiting indicators
P
parking a call 42
password 20
changing 21
phone settings
transferring to another phone 39
problems
solving 45
Program button 15
programmable access buttons
3101 Basic Telephones 16
R
relocating telephones 51
ringing tone, changing 25
RJ-11 jack caution, avoiding use with telephones 46
RJ-45 jack caution, using instead of RJ11 46
S
silent alert tone 25
speaker button
3101SP Basic Telephone 15
speaker phone
3101SP Basic Telephone 15
using 22
status lights
3101 Basic Telephone 18
support brackets, attaching 49
T
telephones
cleaning 51
connecting 46
logging in 20
moving and swapping 51
passwords 20
transfer button 17
transferring a call 27
attended 27
unattended 27
troubleshooting
list of possible problems 51
V
voice mail
problems with 52
volume
controlling 24
W
Wait for NCP message 52

- 3Com Corporation 350 Campus Drive Marlborough, MA 01752-3064
- UNITED STATES GOVERNMENT LEGEND
- TRADEMARKS
- CONTENTS
- ABOUT THIS GUIDE
- GETTING STARTED
- BASIC TELEPHONES
- MODELS 3101 AND 3101SP
- BASIC TELEPHONE OPERATION
- FEATURE CODES
- STANDARD FEATURES
- A TELEPHONE INSTALLATION AND MAINTENANCE
- Conventions
- 1
- GETTING STARTED
- Configuration Options
- 2
- BASIC TELEPHONES MODELS 3101 AND 3101SP
- Buttons and Controls
- Access Buttons
- Status Lights for System Appearance Buttons
- Access Button Label
- 3
- Logging In to Your Telephone
- Changing Your Password
- Answering a Call To answer an incoming call, lift the handset.
- Answering a Second Call
- Controlling the Volume
- Changing Ringing Tones
- Using the Hands Free Feature
- Putting a Call on Hold
- Music on Hold
- Dialing a New Call While on a Call
- Answering a New Call While on a Call
- Transferring a Call
- Unattended Transfer
- Attended Transfer
- Muting Calls
- Activating Do Not Disturb
- 4
- FEATURE CODES
- 5
- STANDARD FEATURES
- Viewing the Call Logs
- Setting up a Conference Call
- Setting up an Unannounced Conference
- Setting up an Announced Conference
- Adding a Recipient to an Existing Conference
- Creating a Cascaded Conference
- Dropping Conference Recipients
- Transferring Your Telephone Settings to Another Telephone
- Forwarding Calls to Voice Mail
- Call Waiting
- Call Forwarding
- Call Park
- Ring Groups
- Ring Group Interaction With Other Features
- Emergency Telephone Number Dialing Service
- A
- TELEPHONE INSTALLATION AND MAINTENANCE
- Connecting the Telephone
- Connecting the Telephone to the 3Com Asterisk Appliance
- Manually Configuring Telephone Connectivity
- Attaching and Adjusting the Support Bracket
- INDEX
- Numbers
- C
- D
- E
- F
- L
- M
- INDEX
- P
- R
- S
- T
- V
- W
Brand : 3COM
Model : 3101
Category : Telephone