
MiniStation SSD Velocity - External hard drive BUFFALO - Free user manual and instructions
Find the device manual for free MiniStation SSD Velocity BUFFALO in PDF.


| Product Type | External Solid State Drive (SSD) |
| Brand | Buffalo |
| Model | MiniStation SSD Velocity |
| Interface | USB 3.1 (Gen2/Gen1), USB 3.0, USB 2.0 |
| Connector Type | USB 3.1 (Gen2/Gen1)/3.0 Micro-B |
| Maximum Transfer Speed | 10 Gbps |
| Dimensions (W×H×D) | 79 × 8.8 × 115 mm (3.11 × 0.35 × 4.53 in) |
| Power Supply | 5 V ± 5% (via USB bus power) |
| Compatible Operating Systems | Windows 10, 8.1, 7 (32-bit and 64-bit); macOS 10.9 or later (basic support) |
| Formats Supported | NTFS, FAT32, Mac OS Extended (journaled) |
| Encryption Software | SecureLock Mobile2 for Windows (AES256 encryption) |
| Formatting Utility | DiskFormatter2 for Windows |
| Hot-Plug Support | Yes |
| LED Indicator | White (idle), blinking white (active) |
| Safety Warning | Contains chemicals known to the State of California to cause cancer and birth defects. Wash hands after handling. |
| Care Instructions | Do not unplug during data access; do not place objects on top; avoid standby/hibernate while connected. |
| Repairability / Spare Parts | Not user-serviceable. No spare parts available. |
| Included Accessories | USB cable, warranty statement (manual available online) |
Frequently Asked Questions - MiniStation SSD Velocity BUFFALO
User questions about MiniStation SSD Velocity BUFFALO
0 question about this device. Answer the ones you know or ask your own.
Ask a new question about this device
Download the instructions for your External hard drive in PDF format for free! Find your manual MiniStation SSD Velocity - BUFFALO and take your electronic device back in hand. On this page are published all the documents necessary for the use of your device. MiniStation SSD Velocity by BUFFALO.
USER MANUAL MiniStation SSD Velocity BUFFALO
Please make sure to read this manual before using and follow the instructions. If you have any inquiries about the product, contact the number on the warranty statement. Do not discard the manuals, the warranty statement, or the packing box.
Americas: www.buffaloamericas.com
Europe: www.buffalo-technology.com
Asia Pacific: www.buffalo-asia.com
35021256-01
2016.11
Contents
Specifications....3
Diagrams....3
Technical Specifications ....3
Software Installation ....4
Notes 4
Dismounting the Drive ....5
Troubleshooting......6
I can see the MiniStation in Computer (This PC) but I cannot access it . 6
I cannot see the MiniStation 6
My backup program cannot save files to the MiniStation......6
About Formatting....7
Format Types ....7
Notes 7
Formatting with NTFS or FAT32 8
Formatting......8
Formatting with Mac OS Extended....10
Mac OS X 10.11 or later....10
Mac OS X 10.10 and Earlier ....12
SecureLock Mobile2 (For Windows) 15
Features 15
Installation.... 15
Launching SecureLock Mobile2....16
Encrypting Files.... 17
Decrypting Encrypted Files....20
Configuring Settings....24
Uninstallation.... 25
Regulatory Compliance Information 26
For Customers in the United States 26
For Customers in Europe 27
Specifications
Diagrams

1 Power / Access LED
Idle: White
Active: Blinking White
2 USB Connector
Technical Specifications
Check Buffalo's website for information on the latest products and compatible models.
| Interface USB 3.1 (Gen2/Gen1) / USB 3.0 / USB 2.0 | |
| Connector USB 3.1 (Gen2/Gen1) / 3.0 Micro-B | |
| Transfer speed 10 Gbps maximum | |
| External dimensions(excluding protruding parts) | 79 × 8.8 × 115 mm; 3.11 × 0.35 × 4.53 in |
| Power 5 V ± 5% | |
| Compatible OS | Windows 10 (32-bit and 64-bit)Windows 8.1 (32-bit and 64-bit)Windows 7 (32-bit and 64-bit)OS X 10.9 or later * |
* Only basic external hard drive functionality is supported with these operating systems; the utilities from our website may not work.
WARNING:
This product and its components contain chemicals known to the State of California to cause cancer and birth defects, or reproductive harm. Wash hands after handling.
Software Installation
Optional software and manuals for the SSD-PUSU3 are available from the download page below.
http://d.buffalo.jp/ssd-pusu3/
Notes
To avoid damage to data, never do any of the following while data is being accessed:
• unplug the cable connected to the drive
• turn off your computer
- put your computer into standby, hibernate, or sleep mode
Never put anything on top of the MiniStation. It may cause the drive to malfunction.
If Windows displays a message that a high-speed USB device is connected to a non high-speed USB hub, move the drive to a USB 3.1 (Gen2) port for best performance, or click [X] to continue.
Never configure this drive as a destination for virtual memory.
The maximum size of a file on a FAT32 drive is 4 GB. To work with larger files, reformat the drive with NTFS or Mac OS Extended. Please refer to the "About Formatting" section.
Some computers may not recognize this device. If this happens, unplug the USB cable, then plug it in again after a few seconds.
This drive supports hot-plugging.
You can plug or unplug the USB cable while the drive and your PC are on. However, never unplug the cable while data is being accessed. If you unplug the drive while data is being accessed, your data may be damaged or lost.
Do not boot your operating system from this drive.
The first time you connect this drive, it may take about 20 seconds before the power/access LED turns on.
If you use this drive with multiple partitions, format each partition before use.
If your Windows computer will not boot while this drive is connected, then connect the drive to your computer after rebooting Windows. Also, refer to your computer's manual to change the BIOS setting to boot from an internal drive if you want to turn your computer on or off while this drive is connected.
Some computers may display a delayed write when they return from an energy-saving state. If this happens, unplug the drive before putting your computer into the energy-saving mode.
This drive may become hot during use. This is not a malfunction.
This drive is designed to release heat through its case. The surface of the case may become quite hot in normal use. Even when the drive is off, the case may still be warm from standby current.
If the power/access LED does not turn off when you turn off your computer, unplug the USB cable from the drive.
Some computers do not support power saving mode.
Before using this drive with a Mac, reformat it with Mac OS Extended using the disk utility in Mac OS.
Dismounting the Drive
If your computer is turned on, please follow the procedure below to unplug the drive. If your computer is turned off, then it is always safe to unplug the drive. Unplugging the drive incorrectly can corrupt data. Please be careful.
For Windows
1 Click the icon, or in the system tray.
2 When the menu opens, click the device name.

3 A message that indicates you can safely remove the drive will appear.
For Mac
1 Drag this drive's icon to the trash to dismount the drive. Or, click the dismount icon from the sidebar of the Finder to dismount the drive.
2 It's now safe to unplug the drive from your Mac.
Troubleshooting
I can see the MiniStation in Computer (This PC) but I cannot access it
The drive may require formatting. Try using DiskFormatter2. Please refer to the "About Formatting" section below.
I cannot see the MiniStation
Verify that the power/access LED is on. If it is not, check the cable. The MiniStation should be connected to your computer by a USB cable. Check that both ends are correctly plugged in.
My backup program cannot save files to the MiniStation
Reformat your MiniStation with NTFS or Mac OS Extended. FAT32 is limited to 4 GB size files. Please refer to the "About Formatting" section below.
About Formatting
Formatting is the process of preparing a storage device for use on your computer. To format a drive, refer to the procedures below.
Format Types
There are several different format types, each compatible with different operating systems.
NTFS
NTFS formatting is compatible with Windows. Mac OS can read this format but not write to it. It can handle files larger than 4 GB.
FAT32
FAT32 works with most modern operating systems including Windows and Mac OS. It doesn't support the use of files larger than 4 GB.
Mac OS Extended
This is a format for the Mac OS only. It supports use of files that are 4 GB or larger in size. Windows doesn't support this format.
| NTFS FAT32 Mac OS Extended | |||
| Windows | Both reading and writing are supported | Both reading and writing are supported (cannot handle files larger than 4 GB) | Not supported (drive is not recognized) |
| Mac OS X | Only reading is supportedWriting is not supported | Both reading and writing are supported (cannot handle files larger than 4 GB) | Both reading and writing are supported |
Notes
Never unplug the cable, reset, or turn off the computer during the formatting process.
This could result in damage to the drive or other problems. Proper operation cannot be guaranteed if the format process was interrupted.
Formatting will erase all data on the drive. Before formatting, back up any data.
The user is responsible for any data lost due to formatting of the drive.
Don't format the wrong drive! Check the drive letter and partition name carefully. If you format the wrong drive, all data on it will be lost.
Formatting with NTFS or FAT32
- Use a Windows computer to format drives with NTFS or FAT32. Using a Mac is not recommended for these format types.
- Always use DiskFormatter2 to format drives with FAT32. Windows Disk Management will not format drives with FAT32 that are larger than 32 GB.
- FAT32-formatted drives can't save or open files larger than 4 GB. Use a different file system if you work with very large files.
Install DiskFormatter2 software on your Windows computer to start the formatting process described below.
Formatting
1 Download the DiskFormatter2 software.
Refer to the "Software Installation" section of the manual, and go to the download page. Check the check box for the software license agreement, and select "DiskFormatter2".
2 Execute "df2inst.exe" in the downloaded zip file.
3 Connect the drive to be formatted to your computer.
4 Launch the DiskFormatter2 software.
5 Check that the correct drive to be formatted is displayed here. Select a filesystem for the format. See the table below for more information on the available filesystems. To set the name (volume label) for the drive, enter the desired name in "Drive name". Click Format.

| NTFS (to use with Windows)This option is only available when a 2 TB or less drive is connected. | NTFS (MBR) works with Windows.Partition style: MBRSector size: 512 bytesFile system: NTFS |
| NTFS (to use with Windows other than Windows XP)This option is only available when a 3 TB or larger drive is connected.(Windows Vista or later) | Windows NTFS (GPT) partitions can be formatted with partitions larger than 2 TB. Older Windows computers (such as Windows XP) can't read these partitions.Partition style: GPTSector size: 512 bytesFile system: NTFS |
| NTFS (to use with Windows XP)This option is only available when a 3 TB or larger drive is connected. | NTFS (MBR) works with Windows.Partition style: MBRSector size: 4096 bytesFile system: NTFS |
| FAT32 (to use with Windows and Mac OS X) | Drives formatted with the FAT32 file system are compatible with most operating systems. Note that this file system does not support files that are 4 GB or larger in size.Partition style: MBRSector size for models 3 TB or larger: 4096 bytesSector size for models 2 TB or less: 512 bytesFile system: FAT32 |
| Erase Drive | This changes the drive to an unformatted state.Partition style: NoneSector size: 512 bytesFile system: None |
6 Click Yes.

The format may take several minutes to finish. Wait until the screen below is displayed.
7 Click OK.

The drive is now formatted.
Formatting with Mac OS Extended
Follow the procedure for your version of the Mac OS.
- Windows computers don't support Mac OS Extended format. To use the drive with Windows computers, use a different format instead, such as NTFS or FAT32.
• Some drives don't support multiple partitions. If yours is one of them, use only a single partition on the drive.
• For more details on Mac OS Extended, consult your Mac OS Help.
Mac OS X 10.11 or later
1 Click to select the Finder.
2 Select Go - Utilities.

3 Double-click Disk Utility.
4 Click the drive to be formatted.

5 Click Erase.

6 Select Mac OS Extended (Journaled) or OS X Extended (Journaled). Select GUID Partition Map. Click Erase.

7 Click Done.

This finishes the formatting process for this product. Exit the Disk Utility.
Note: If "Do you want to use Volume_name to back up with Time Machine?" is displayed, you may click Use as Backup Disk and Time Machine will use the drive for backup. If you don't want to use it as a dedicated backup drive, click Cancel.

1 Click to select the Finder.
2 Select Go - Utilities.

Finder File Edit View Go Window Help
3 Double-click Disk Utility.
4 Click the drive to be formatted. Check the information for the drive to be formatted. Make sure that this is the correct drive that you want to format!

5 Click Partition. Under "Volume Scheme", select the number of partitions that you want to create on the drive.

6 Click Options.
7 Select Apple Partition Map. Click OK.
Choose a partition scheme appropriate for the way you will use this disk:
○ GUID Partition Table
To use the disk to start up an Intel-based Mac, or to use the disk as a non-startup disk with any Mac with Mac OS X version 10.4 or later.
Apple Partition Map
To use the disk to start up a PowerPC-based Mac, or to use the disk as a non-startup disk with any Mac.
Master Boot Record
To use the disk to start up DOS and Windows computers, or to use with devices that require a DOS-compatible or Windows-compatible partition.
Default
Cancel
OK
8 Select Mac OS Extended (Journaled). Click Apply.
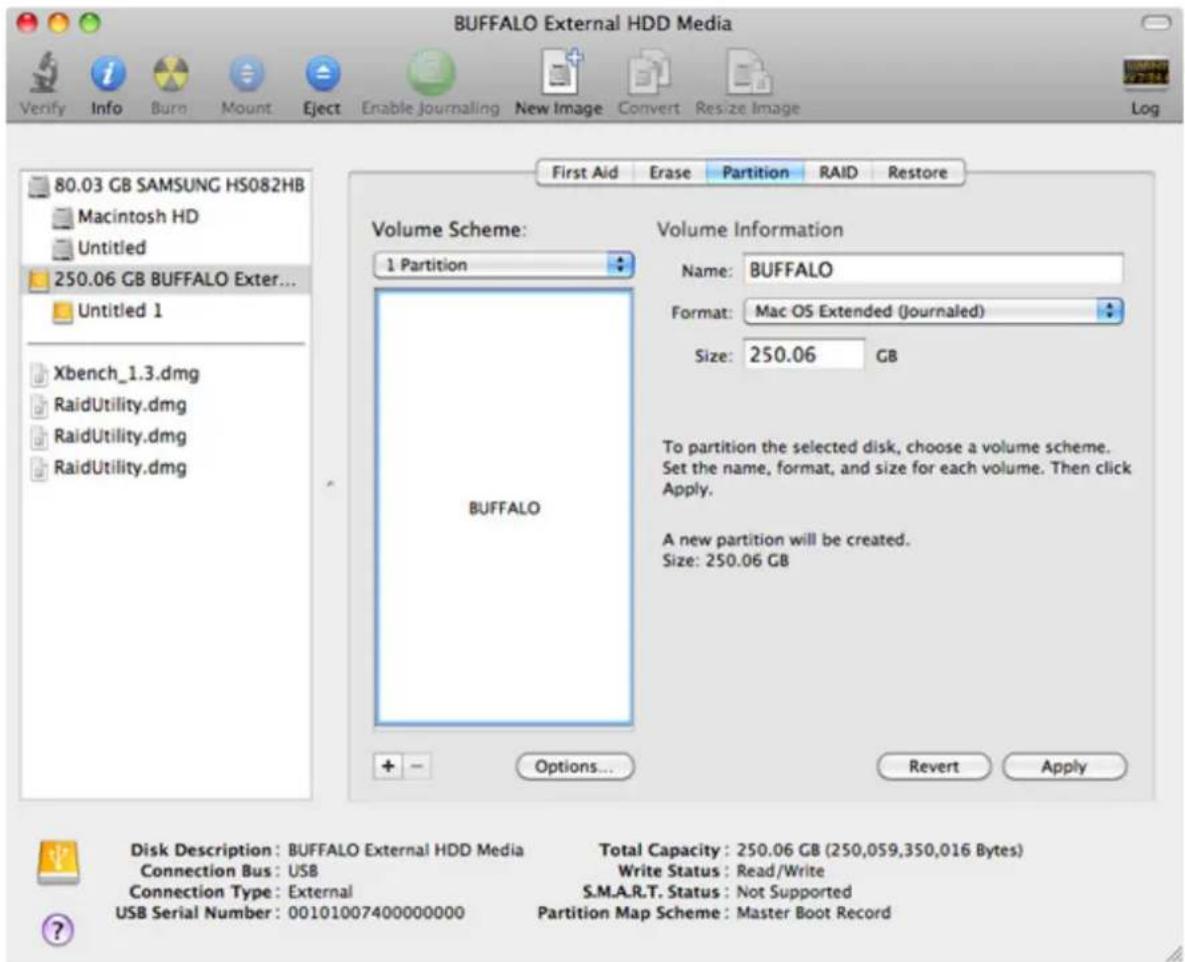
9 Click Partition.

This finishes the formatting process for this product. Exit the Disk Utility.
Note: If "Do you want to use Volume_name to back up with Time Machine?" is displayed, you may click Use as Backup Disk and Time Machine will use the drive for backup. If you don't want to use it as a dedicated backup drive, click Cancel.
SecureLock Mobile2 (For Windows)
SecureLock Mobile2 is a software utility that can easily encrypt and decrypt files.
This software is for Windows.
Features
With SecureLock Mobile2, files can be easily encrypted using a password or pattern. Your data will be protected from anyone who doesn't know the password or pattern.
This application will be installed onto the Buffalo USB drive, and executed from it. It does not need to be installed onto your computer.
Notes:
- SecureLock Mobile2 encrypts files using AES256.
• Once you set a password or pattern, keep it secure.
Anyone who has access to your password or pattern can decrypt your encrypted files.
If you forget your password or pattern, you will not be able to decrypt your encrypted files.
Installation
To install SecureLock Mobile2, follow the procedure below.
This application will be installed onto the Buffalo USB drive.
1 Connect the drive to your device.
2 Download the SecureLock Mobile2 software.
Refer to the "Software Installation" section of the manual, and go to the download page. Check the checkbox for the software license agreement, and select "SecureLock Mobile2".
3 Execute "SecureLockMobile2-XXX.exe" ( ), and follow the directions until the installation is finished.
Note: "XXX" is the version number.
Launching SecureLock Mobile2
To launch SecureLock Mobile2, follow the procedure below.
1 Connect the drive with SecureLock Mobile2 to your device.
2 Double-click the drive in This PC or Computer.

3 Double-click "SecureLockMobile2.exe" ( ) that has been installed onto the drive.

SecureLock Mobile2 is now launched.
Encrypting Files
To encrypt files, follow the procedure below. Encrypted files will be saved to the same Buffalo drive with SecureLock Mobile2 installed.
1 Launch SecureLock Mobile2, referring to the "Launching SecureLock Mobile2" section above.
2 To encrypt a file with a password, drag and drop the file to the "Password" field. To encrypt a file with a pattern, drag and drop the file to the "Pattern" field.
Notes:
- Multiple files can be encrypted at the same time by dragging and dropping them to the application's window below. A maximum of 10,000 files can be encrypted at once.
- If a folder is dragged and dropped to the application's window below, every file in the folder will be encrypted at once.
- The encrypted file's size will be larger than the original file's size because the encrypted file will also contain information for decryption. If the encrypted file would be larger than the available capacity of the drive, the file cannot be encrypted. If the message indicating insufficient capacity appears, increase the available capacity and try again.

3 Enter a password, or draw a pattern to encrypt the file.
When Using a Password to Encrypt
Enter a password, and click Encrypt. You can also enter a hint, which will appear on the password authentication window when decrypting. Entering the hint is optional.
Note: The password may contain up to 16 alphanumeric characters. The hint may contain up to 64 characters.
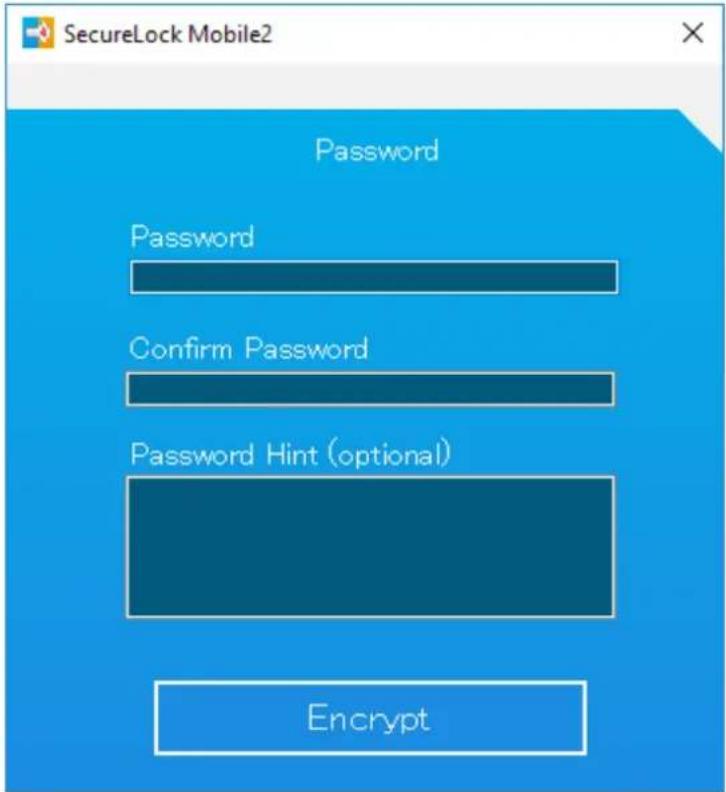
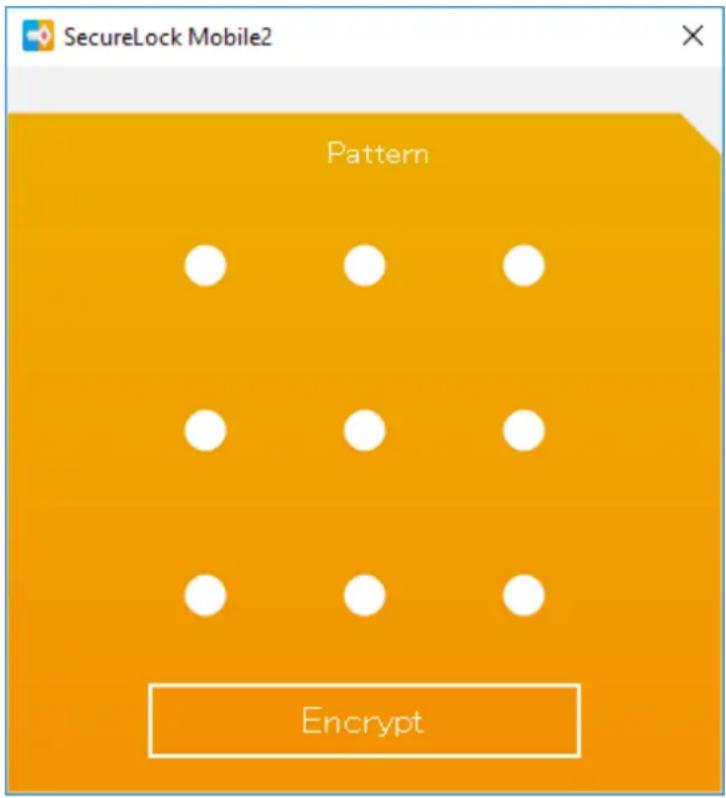
When Using a Pattern to Encrypt
Select dots while keeping the left mouse button held down to draw a pattern. Once the pattern is finished, click Encrypt.
Notes:
- Select at least 2 dots. A dot can be selected only once.
• To reset, click somewhere other than dots.
4 When encryption is finished, the message below will appear.
The encrypted file will be saved into the "SecureLockMobile2" folder of the drive.
To open the folder, click Open file location. To close the window, click OK.
The filename of the encrypted file will be "(the original filename). (filename extension). bufenc".
To decrypt the encrypted file, refer to "Decrypting Encrypted Files" section below.
Notes:
- Please do not edit the encrypted files and the filename extension, ".bufenc". If edited, the files will not be able to be decrypted.
- If the file could not be encrypted, the filename and the reason encryption failed will be displayed on the window below.

Encryption is now finished.
Note: The files can be encrypted by dragging and dropping them onto the "SecureLockMobile2.exe" icon (

) that has been installed onto the drive.
If dragging and dropping the file onto the "SecureLockMobile2.exe" icon, the window from step 3 will be displayed. Follow the procedure from step 3 until the process is finished. (The files cannot be encrypted using a pattern with this method.)
Decrypting Encrypted Files
To decrypt the encrypted files, follow the procedure below. The decrypted files will be saved to the Buffalo USB drive that SecureLock Mobile2 has been installed onto.
1 Launch SecureLock Mobile2, referring to the "Launching SecureLock Mobile2" section above.
2 Open the "SecureLockMobile2" folder that is on the USB drive.
The encrypted files are saved in the "SecureLockMobile2" folder.
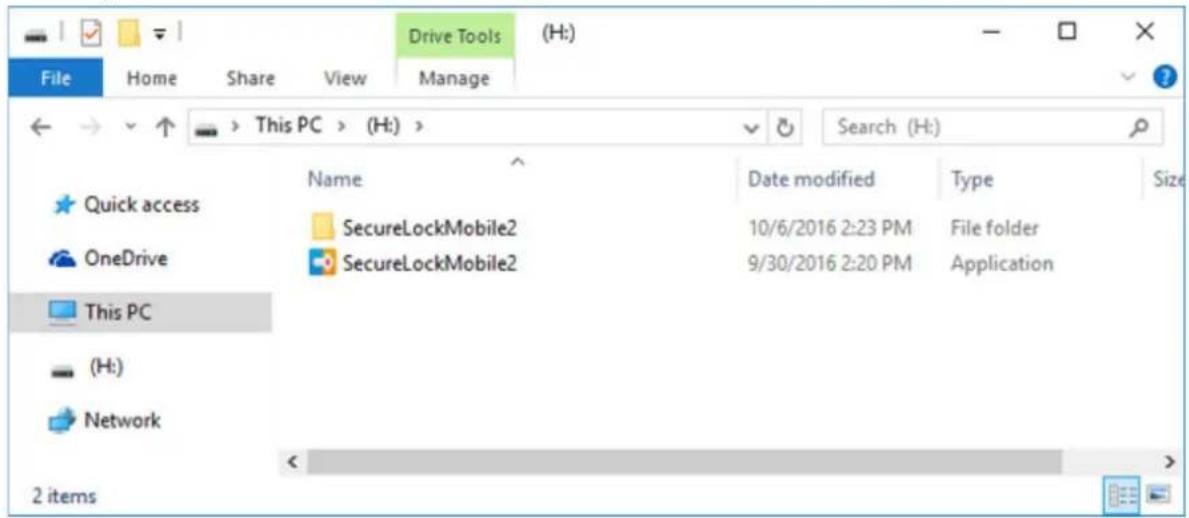
3 Drag and drop the encrypted file, "(the original file name). (filename extension). bufenc" to the application's window in order to decrypt.
Notes:
- Multiple files can be decrypted at the same time by dragging and dropping them to the application's window below. A maximum of 10,000 files can be decrypted at once.
- If a folder is dragged and dropped to the application's window below, every encrypted file in the folder will be decrypted at once.

4 The authentication window will be displayed.
Note: If 5 invalid authentication attempts occur, return to the window from step 3.
When Using a Password to Decrypt
If the window below is displayed, enter the password, and click Decrypt.

When Using a Pattern to Decrypt
If the display below is displayed, draw the pattern.
The decryption process will start when the correct pattern is drawn.

5 When decryption is finished, the message below will appear.
The decrypted file will be saved into the "SecureLockMobile2" folder of the drive.
To open the folder, click Open file location. To close the window, click OK.
The filename of the decrypted file will be "(the original filename).(filename extension)".
Note: If the file could not be decrypted, the filename and the reason decryption failed will be displayed on the window below.

Decryption is now finished.
Note: The files can be decrypted by dragging and dropping them onto the "SecureLockMobile2.exe" icon (

) that has been installed onto the drive.
If dragging and dropping the file onto the "SecureLockMobile2.exe" icon, the window from step 3 will be displayed. Follow the procedure from step 3 until the process is finished.
Configuring Settings
Configure the settings of SecureLock Mobile2 from the window below.
To configure the settings, launch SecureLock Mobile2, referring to the "Launching SecureLock Mobile2" section, and
click " " on the bottom right of the window. When configuration is finished, click OK.

Note: After configuring the settings, a file "SecureLockMobile2.xml" (e.g. ) will be created. Please do not edit or delete "SecureLockMobile2.xml". If edited, the settings will not be reflected properly. If deleted, the settings will be reset to the default.
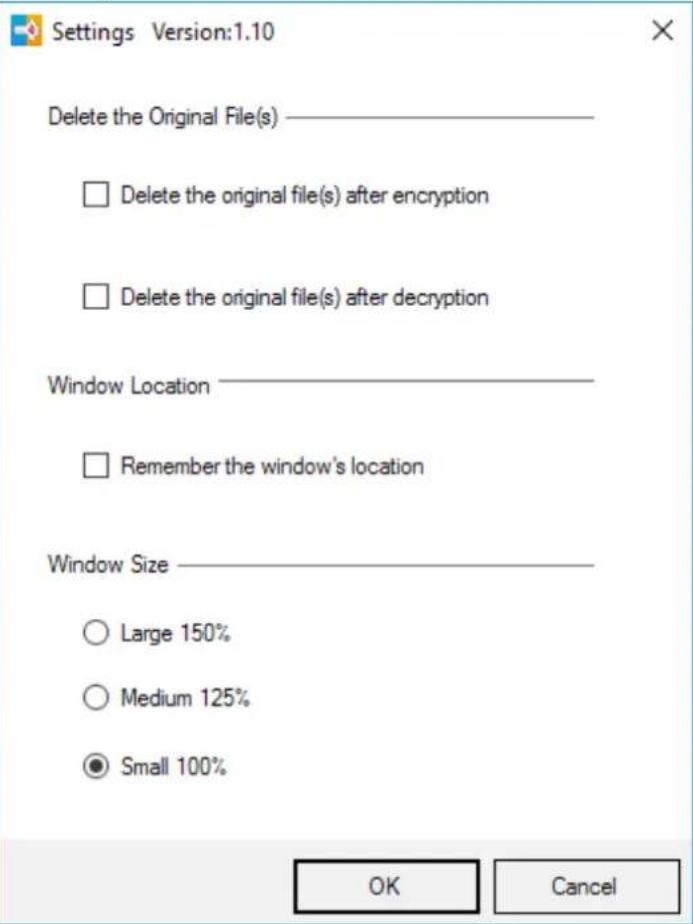
| Delete the Original File(s) | Delete the original file(s) after encryptionIf checked, the original files will be erased after encryption.Delete the original file(s) after decryptionIf checked, the original encrypted files will be erased after decryption. |
| Window Location | If checked, SecureLock Mobile2 remembers where the application window is closed and appears at the same place at the next launch.Note: If the application window was outside of the screen, it will appear within the screen at the next launch. |
| Window Size Select the window's size for SecureLock Mobile2. | |
Uninstallation
To uninstall, delete "SecureLockMobile2.exe" ( ) that has been installed onto the drive. If "SecureLockMobile2."
xml" (e.g. ) is on the USB drive, delete it as well.
Regulatory Compliance Information
For Customers in the United States
FCC Statement
This equipment has been tested and found to comply with the limits for a Class B digital device, pursuant to Part 15 of the FCC Rules. These limits are designed to provide reasonable protection against harmful interference in a residential installation.
This equipment generates, uses and can radiate radio frequency energy and, if not installed and used in accordance with the instructions, may cause harmful interference to radio communications. However, there is no guarantee that interference will not occur in a particular installation.
If this equipment does cause harmful interference to radio or television reception, which can be determined by turning the equipment off and on, the user is encouraged to try to correct the interference by one or more of the following measures:
• Reorient or relocate the receiving antenna.
- Increase the separation between the equipment and receiver.
- Connect the equipment into an outlet on a circuit different from that to which the receiver is connected.
- Consult the dealer or an experienced radio/TV technician for help.
This device complies with Part 15 of the FCC Rules. Operation is subject to the following two conditions: (1) This device may not cause harmful interference, and (2) this device must accept any interference received, including interference that may cause undesired operation.
Only use the cables and accessories that are included in the package. Don't use other accessories or cables unless specifically instructed to in the documentation.
Proposition 65
WARNING:
This product and its components contain chemicals known to the State of California to cause cancer and birth defects, or reproductive harm. Wash hands after handling.
For Customers in Europe
EU Declaration of Conformity

Dansk
Do not use USB cables that are 3 meters or longer to connect USB devices to this MiniStation series.
Only use the cables and accessories that are included in the package. Don't use other accessories or cables unless specifically instructed to in the documentation.
Español


- CONTENTS
- SPECIFICATIONS....3
- ABOUT FORMATTING....7
- SECURELOCK MOBILE2 (FOR WINDOWS) 15
- REGULATORY COMPLIANCE INFORMATION 26
- SPECIFICATIONS
- DIAGRAMS
- TECHNICAL SPECIFICATIONS
- WARNING
- SOFTWARE INSTALLATION
- HTTP://D.BUFFALO.JP/SSD-PUSU3
- NOTES
- DISMOUNTING THE DRIVE
- FOR WINDOWS
- FOR MAC
- TROUBLESHOOTING
- I CAN SEE THE MINISTATION IN COMPUTER (THIS PC) BUT I CANNOT ACCESS IT
- I CANNOT SEE THE MINISTATION
- MY BACKUP PROGRAM CANNOT SAVE FILES TO THE MINISTATION
- ABOUT FORMATTING
- FORMAT TYPES
- NTFS
- FAT32
- MAC OS EXTENDED
- FORMATTING WITH NTFS OR FAT32
- FORMATTING
- 6 CLICK YES
- 7 CLICK OK
- FORMATTING WITH MAC OS EXTENDED
- MAC OS X 10.11 OR LATER
- 5 CLICK PARTITION. UNDER "VOLUME SCHEME", SELECT THE NUMBER OF PARTITIONS THAT YOU WANT TO CREATE ON THE DRIVE
- 6 CLICK OPTIONS
- 7 SELECT APPLE PARTITION MAP. CLICK OK
- 8 SELECT MAC OS EXTENDED (JOURNALED). CLICK APPLY
- 9 CLICK PARTITION
- SECURELOCK MOBILE2 (FOR WINDOWS)
- FEATURES
- INSTALLATION
- LAUNCHING SECURELOCK MOBILE2
- ENCRYPTING FILES
- 3 ENTER A PASSWORD, OR DRAW A PATTERN TO ENCRYPT THE FILE
- WHEN USING A PASSWORD TO ENCRYPT
- WHEN USING A PATTERN TO ENCRYPT
- 4 WHEN ENCRYPTION IS FINISHED, THE MESSAGE BELOW WILL APPEAR
- DECRYPTING ENCRYPTED FILES
- WHEN USING A PASSWORD TO DECRYPT
- WHEN USING A PATTERN TO DECRYPT
- CONFIGURING SETTINGS
- UNINSTALLATION
- REGULATORY COMPLIANCE INFORMATION
- FOR CUSTOMERS IN THE UNITED STATES
- FCC STATEMENT
- PROPOSITION 65
- FOR CUSTOMERS IN EUROPE
- EU DECLARATION OF CONFORMITY
- DANSK
- ESPAÑOL
Brand : BUFFALO
Model : MiniStation SSD Velocity
Category : External hard drive