
Pure Sound Touch - Mp3 player SPC - Free user manual and instructions
Find the device manual for free Pure Sound Touch SPC in PDF.


| Product Type | Multimedia Player / Android Tablet |
| Brand | SPC |
| Model | Pure Sound Touch |
| Screen | 4.3 inch Touch Capacitive IPS |
| Processor | Quad Core ARM Cortex A7 @ 1.3 GHz |
| Operating System | Android 4.4.2 KitKat |
| Battery | Lithium-Polymer 1300 mAh |
| Battery Life | Up to 14 hours music playback (with earphones), up to 5 hours web surfing |
| Charging Time | Approximately 3-4 hours |
| Memory Card Support | microSD up to 32GB (FAT32) |
| Connectivity | Micro USB, USB-OTG, 3.5mm audio jack, Wi-Fi |
| Camera | Front 0.3 MP, Rear 2 MP |
| Audio Formats Supported | MP3, WMA, WAV, APE, FLAC, AAC, OGG, AMR, MID, MP1, MP2 |
| Video Formats Supported | AVI (DIVX/XVID), MKV, FLV, WMV, VOB, 3GP, MOV, M2TS, MP4, MPG, TP, TRP, SVCD, VCD |
| Image Formats Supported | JPG, BMP, PNG, GIF |
| E-book Formats Supported | EPUB, PDF |
| Dimensions | 135 x 71 x 10.9 mm |
| Weight | 127 g |
| Box Contents | Device, USB cable, USB-OTG cable, battery charger, user manual, legal booklet, warranty sheet |
| Maintenance & Care | Do not disconnect during data transfer. Keep away from moisture. Use only included charger. |
| Safety | Follow charging instructions. Do not expose to extreme temperatures. Use original accessories. |
| Spare Parts / Repairability | Battery is internal and not user-replaceable. microSD and USB-OTG allow expandability. |
Frequently Asked Questions - Pure Sound Touch SPC
User questions about Pure Sound Touch SPC
0 question about this device. Answer the ones you know or ask your own.
Ask a new question about this device
Download the instructions for your Mp3 player in PDF format for free! Find your manual Pure Sound Touch - SPC and take your electronic device back in hand. On this page are published all the documents necessary for the use of your device. Pure Sound Touch by SPC.
USER MANUAL Pure Sound Touch SPC
natural_image
Silhouette of a rocket inside a circular frame (no text or symbols)Mini Tablet
This guide includes all the information to make the most out of your SPC Pure Sound Touch.
GET AN SPC ACCOUNT
Free advantages just one click away.
Before going on reading this manual, we strongly recommend you visiting www.spc-universe.com, SO YOU CAN CREATE AN SPC ACCOUNT AND REGISTER YOUR PRODUCT.
By doing this, you will be able to get into SPC universe: an exclusive club where our clients can get incredible offers and discounts and also upgrade or renew their products.
Moreover, having an account means free access to SPC services: tablet and smartphone apps, technical support...
This is SPC. A universe in technology.
BOX CONTENTS
■ SPC PURE SOUND TOUCH
USB cable to charge and connect the device to the computer
USB-OTG cable to connect USB memories, cameras, etc.
Battery charger
User manual
■ Info legal book
Warranty sheet
FEATURES
■ Screen: 4.3" Touch capacitive IPS
■ Processor: Quad Core ARM Cortex A7@1.3GHz
Battery: Lithium-polímer 1300mAh
■ Camera: Front 0.3MPx; Rear 2Mpx
■ Connections: Micro USB / Jack 3.5mm
■ Operating system: Android 4.4.2
■ Other specifications: MicroSD (up to 32GB), Acelerometer, Reproduce música (MP3, WMA, WAV, APE, FLAC, AAC, OGG, AMR, MID, MP1, MP2), Reproduce video (AVI (DIVX/XVID), MKV, FLV, WMV, VOB, 3GP, MOV, M2TS, MP4, MPG, TP, TRP, SVCD, VCD), Reproduce imágenes (JPG, BMP, PNG, GIF), Reproduce texto (EPUB, PDF)
■ Compatible operating systems: Windows XP/Vista/7/8/10, MAC (hasta 10.11), Linux
■ Battery life: 14h listening to music with earphones / 5h of web surfing (estimated medium value)
■ Dimensions and weight: 135x71x10.9mm / 127g
UNIT AND CONTROLS
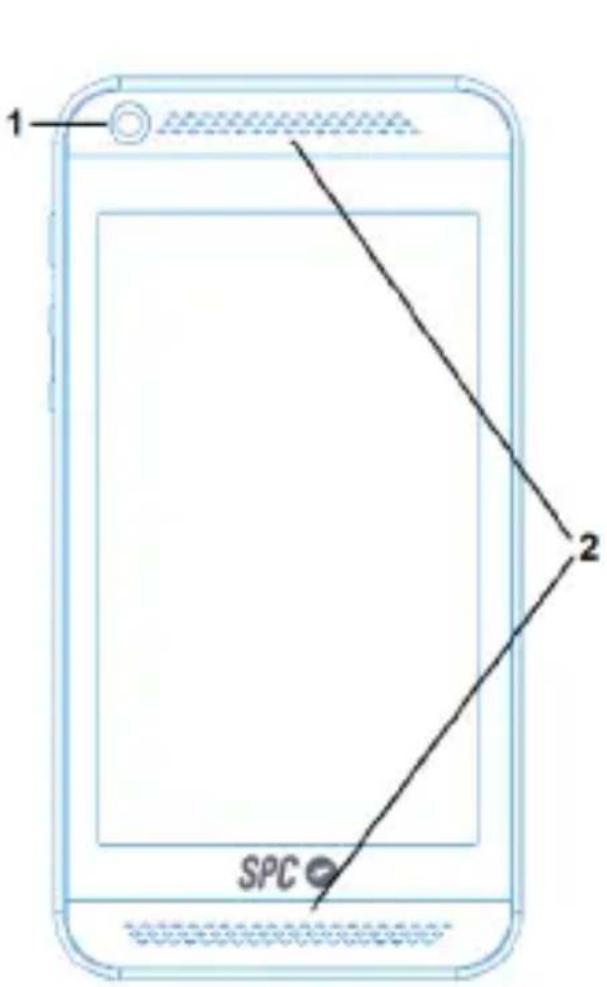

- Front camera
- Speakers
- Micro-USB connector to charge and connect the device to the computer
-
Earphones connector Jack 3.5 mm
-
Rear camera
- Flash
- ON / OFF button
- Volume up
- Volume down
- (Removing the back cover) microSD card slot
CHARGING THE BATTERY
The device has an internal battery. You have to charge it before starting to use it, connecting the device to the battery charger included in the box.
With the device switched off, connect one end of the USB cable in the battery charger and the other end to the device's connector (3). The battery will start to be charging. Charge the battery during around 3-4 hours to ensure a maximum usage time and to lengthen its useful life.
NOTE: If the battery is TOO discharged, it's possible that the device needs some minutes to start charging. If you don't see anything in the display it's possible that it is too discharged. Wait some minutes until the charging process starts.
Do not forget to charge the device before the first use and when the battery icon is empty.
CONNECTION TO THE COMPUTER
With the device switched on, connect it to a computer with the USB cable of the box. The computer will automatically recognise the device.
You will see a notification on the top left of the screen. Automatically will be recognized by the computer
Once the computer has detected the device, it will operate like a portable disk. Therefore, file transfer will be carried out in the same way as with any other storage device (for example, selecting and dropping files to the unit, or copying and pasting files in the unit).
NOTE: Do not disconnect the player during the data copying or deleting process as this could cause the unit to malfunction and damage the software.
Do not copy files or folders with file names too long or strange characters, because it may cause a wrong performance of the device. If so, change the name of the files or folders.
MEMORY CARD AND USB DEVICE INSTALLATION
Insert the microSD memory card (up to 32GB) in the microSD card slot (10) with the contacts of the card inside, and looking at the back. Press until it is fully contained inside the device and you hear a click. To extract the card, press it slightly inwards until you hear a click. The card will pop out of the slot, then you can remove it.
To connect a USB memory or device, connect one end of the USB-OTG cable supplied with the device and the other end into the USB device that you want to connect.
NOTE: You may need to use your finger nail or a slightly long object to help you to insert and remove the card.
The card and USB memory (not included) must be formatted in FAT32.
TURNING ON / OFF THE DEVICE
Switch on the device by pressing the key (7) during some seconds. This process needs some time, you have to wait until it finishes.
The first time you power the unit on, a configuration wizard will appear, follow the steps until the end. Once completed, the main desktop will be shown, where you can see the bottom information bar, some shortcuts to different functions, and the icon to access the menu.
To switch the device off, keep pressing the ⏻ (7) during some seconds. Press “OK” to confirm.
Next time you power it on, the device will go to locking screen, you have to press and move the lock icon 🔒 to the
right position. Then you will see the main desktop, where you can see the bottom information bar, some shortcuts to different functions, and the icon to access the menu.
NOTE: To activate the power saving mode and lock the screen, press the 🔊 (7) key once. The screen will switch off but the device will continue powered on. To activate it again, press once again the key 🔊 (7) and then, move with the finger the lock icon to the right position.
TOUCH SCREEN
- Select a function, option, etc: to select an option, just press on it.
■ Move through a list: when you see in the screen a list of items (folders, files, sub-menus, etc.), you can move through the list by moving the finger from up to down and vice versa.
■ Select an item from a list: just press once on it.
■ Virtual keypad: when you press on a text input field, you will see in the bottom part of the screen a virtual keypad, which allows you to write as with a normal keypad.
■ Back to previous menu: to go back to the previous menu in any of the displays, press on icon ↩. Press it several times if you want to go to the main desktop.
- Go to desktop: To go directly to the main desktop press the 📄 icon of the screen
UNIT OPERATION AND ANDROID™ INTERFACE
The device has Android 4.4 (KitKat) operating system, improving the graphical interface, functions, applications and other features comparing with the previous versions.
The device has 5 different desktops where the shortcuts to some applications and widgets (applications that can show and run in the desktop) are shown as icons. To move from one desktop to another one, just press with the finger on the screen and drag it to left or right position.
The status bar in the top part of the screen shows the system notifications, WiFi network status, battery status, time; and the bottom bar allows you to access to previous screen, to main desktop, and to recent applications.
Moreover you can customize the interface and desktop:
■ Remove an icon or widget, keep pressed them and move them, or drag them to upper position to "X Remove", to remove them.
■ Move an icon or widget, keep pressed on them until it makes its size slightly bigger, and drag it to other empty place from same desktop or any adjacent.
To add a widget, press on the 📄icon to access to main menu and then press on WIDGETS option to show the available ones (this depends on the installed applications). Choose the one you want, keep pressed it and it will appear in the desktop if there is enough space to allocate it.
- You can group icons in folders in the desktop to sort and store direct accesses, widgets, etc. inside them. To do this, hold down an icon and drag it just above the other.
It is also possible to change the desktop background. Press and hold on any desktop space and in the pop up menu, select “Wallpapers”. You can choose between the default animated wallpapers, default background wallpaper gallery, or any picture from the gallery, as last option.
The device has accelerometer to turn the screen automatically if the device's position is horizontal.
 | Menu | Press to show and access the installed applications and system settings |
 | Back | Back to previous menu |
 | Home | Press to go to main desktop. |
 | Recent | Press to switch between the most recent opened applications |
| Advanced menu | Press to go to settings menu and options (only works in some applications) | |
 | WiFi | This icon is shown if the WiFi connectivity is on |
| Battery | Battery status | |
  | Search | Web searching or installed applications quick search |
 | Voice search | Web voice searching |
CONNECTIVITY: WIFI
The device has WiFi to connect and browse Internet when you are in a WiFi network range with Internet connectivity. To activate it:
Access the menu with the ⚙, icon and choose “Settings”. In the first option, ensure that the WiFi is activated, or if isn’t, press on the switch until you see the “ON” word.
The device makes an automatic wireless network search, and it shows the ones it finds in the right side. Select the network to which you want to connect, pressing on it. If it's a secure network, the device will ask you to input the password. Then the device will try to connect to the network, and if satisfactory, under the network name you will see “Connected” word.
You can also add manually a network, from the icon + link in the bottom part
APPLICATIONS
To see the full list of applications and open them, you have to press the icon 📄 from any desktop. Move right and left to move through the different applications screens in case they occupy more than one screen. From this screen you
can also access Widgets section, if you move the finger to the right. You can install these widgets in the desktops (press and hold them and drop in the desktop to place it).
Additionally you can access the applications from the desktops, in case there is the corresponding icon as shortcut.
To install applications, you can do it from any applications store directly, or from a file with "APK" extension from the memory card or internal memory.
NOTE: It is possible that some applications are in English.
MULTIMEDIA
The device has some pre-installed multimedia applications, for music, videos, pictures playing. Inside each application, they will be displayed the files that are found in any of the memories (internal, microSD, USB) of this kind. You can play the files and inside the playing applications, you can do the typical functions (zoom, pause, forward, etc...).
Also, it has a file browser that shows you the different files and folders of the memories.
It also has microphone and voice recording application. The recordings are saved in the root of the internal memory.
With the application “Camera”, you can take pictures using the front camera (also used for video calling)..
SETTINGS
Press on Menu and Settings to access the different configuration options.
| Wi-Fi | Allows to connect to a WiFi network that the device finds or to configure a network manually |
| Bluetooth | Allows the connection through Bluetooth to voice and data transmission |
| Data usage | Shows the data usage in case of using a USB 3G dongle |
| More... Access to other settings of wireless networks | |
| Sound | Allows to configure the volume, notifications and other parameters related with sound |
| Display | Allows to configure parameters related with the display, like brightness and background picture |
| Storage | Shows the space of the different memories that are in the device inserted that time |
| Battery | Shows the battery status and consumption of the different applications |
| Apps | You can manage the different installed applications and the ones that are running |
| Location services | Location services parameters configuration through WiFi network |
| Security | Configuration of locking parameters and device's security |
| Language & input | Language, dictionaries, keyboard and voice synthesis configuration |
| Backup & reset Backup parameters configuration and factory reset | |
| Accounts | User accounts. You have to define at least a Google account to the fully working of the device. Other compatible accounts: Twitter, Exchange, Facebook, Skype... |
| Date & time System time and date configuration | |
| Accessibility | Functions management to help people with visual difficulties |
| Printing Configure printing services as Cloud | |
| Developer options | Options related with development and performance of the device, it's recommended not to modify them |
| About tablet Hardware and software information of the device | |
The information that this guide contains cannot be transmitted, played or distributed in any case without the written authorization of SPC.
COMERCIAL BRANDNAMES
SPC is a registered brandname of Smart Products Connection S.A.
NOTE: SPC reserves the right to modify the information of this guide in any moment. All the information and recommendations that we can find here do not guarantee anything.
BEM-VINDO
Fabricante/Manufacturer/Fabricante: Smart Products Connection S.A.
Marca/Brand/Marca: SPC
Director General/General Manager/Diretor-geral
Esta declaración de conformidad está de acuerdo con la Directiva Europea 1999/5/CE. This declaration of conformity is in compliance with the European Directive 1999/5/EC. Esta declaração de conformidade respeita as normas da Diretiva Europeia 1999/5/EC.
- GET AN SPC ACCOUNT
- BOX CONTENTS
- FEATURES
- UNIT AND CONTROLS
- CHARGING THE BATTERY
- CONNECTION TO THE COMPUTER
- MEMORY CARD AND USB DEVICE INSTALLATION
- TURNING ON / OFF THE DEVICE
- TOUCH SCREEN
- UNIT OPERATION AND ANDROID™ INTERFACE
- CONNECTIVITY: WIFI
- APPLICATIONS
- MULTIMEDIA
- SETTINGS
- COMERCIAL BRANDNAMES
- BEM-VINDO
Brand : SPC
Model : Pure Sound Touch
Category : Mp3 player