
DS-570 - Media player Advantech - Free user manual and instructions
Find the device manual for free DS-570 Advantech in PDF.


| Product Type | Media Player |
| Brand | Advantech |
| Model | DS-570 |
| Dimensions (W x D x H) | 200 x 150 x 30 mm |
| Weight | 0.5 kg |
| Power Supply | 12V DC, 2A |
| Video Output | HDMI 1.4, VGA |
| Audio Output | 3.5 mm jack, HDMI audio |
| Supported Video Formats | MP4, AVI, MOV, MKV |
| Supported Image Formats | JPEG, PNG, BMP |
| Storage | microSD card slot, USB 2.0 |
| Network | Ethernet 10/100, Wi-Fi 802.11 b/g/n |
| Operating Temperature | 0°C to 40°C |
| Mounting | VESA 75 x 75 mm |
| Main Functions | Digital signage, video loop playback, scheduling |
| Maintenance & Cleaning | Wipe with a soft dry cloth; do not use liquids |
| Safety | Keep away from water and heat sources |
| Spare Parts & Repairability | Contact Advantech support for parts; not user-serviceable |
| General Information | Industrial-grade media player for signage applications |
Frequently Asked Questions - DS-570 Advantech
User questions about DS-570 Advantech
0 question about this device. Answer the ones you know or ask your own.
Ask a new question about this device
Download the instructions for your Media player in PDF format for free! Find your manual DS-570 - Advantech and take your electronic device back in hand. On this page are published all the documents necessary for the use of your device. DS-570 by Advantech.
USER MANUAL DS-570 Advantech
natural_image
Illustration of four electronic circuit boards with white outlines on a purple background, no text or symbols present.DS-570
Graphics-Enhanced Digital Signage Player Powered by NVIDIA GeForce GT730M
Copyright
The documentation and the software included with this product are copyrighted 2014 by Advantech Co., Ltd. All rights are reserved. Advantech Co., Ltd. also reserves the right to improve the products described in this manual at any time without notice. No part of this manual may be reproduced, copied, translated, or transmitted in any form or by any means without the prior written permission of Advantech Co., Ltd. Information provided in this manual is intended to be accurate and reliable. However, Advantech Co., Ltd. assumes no responsibility for its use, nor for any infringements on the rights of third parties that may result from its use.
Acknowledgements
Award is a trademark of Award Software International, Inc.
IBM, PC/AT, PS/2, and VGA are trademarks of International Business Machines Corporation.
Intel® and Celeron® are trademarks of Intel Corporation.
NVIDIA® is trademark of NVIDIA Corporation
Microsoft Windows® is a registered trademark of Microsoft Corp.
AMI is a registered trademark of American Megatrends Inc.
ESS is a trademark of ESS Technology, Inc.
UMC is a trademark of United Microelectronics Corporation.
SMI is a trademark of Silicon Motion, Inc.
Creative is a trademark of Creative Technology LTD.
CHRONTEL is a trademark of Chrontel Inc.
All other product names or trademarks are the property of their respective owners.
For more information about this and other Advantech products, please visit our website at http://www.advantech.com/
For technical support and services, please visit our support website at http://support.advantech.com.tw/support/
Part No. 2006S57001
Edition 2
Printed in China February 2015
Product Warranty (2 years)
Advantech warrants the original purchaser that each of its products will be free from defects in materials and workmanship for two years from the date of purchase.
This warranty does not apply to any products that have been repaired or altered by persons other than repair personnel authorized by Advantech, or products that have been subject to misuse, abuse, accident, or improper installation. Advantech assumes no liability under the terms of this warranty as a consequence of such events.
Because of Advantech's high quality-control standards and rigorous testing, most customers never need to use our repair service. If an Advantech product is defective, it will be repaired or replaced at no charge during the warranty period. For out-of-warranty repairs, customers are billed according to the cost of replacement materials, service time, and freight. Please consult your dealer for more details.
If you suspect your product to be defective, follow the steps listed below:
- Collect all information about the problem encountered (for example, CPU speed, Advantech products used, other hardware and software used, etc.). Note anything abnormal and list any onscreen messages displayed when the problem occurs.
- Call your dealer and describe the problem. Please have the manual, product, and any relevant information readily available.
- If your product is diagnosed as defective, obtain an RMA (return merchandize authorization) number from your dealer. This allows us to process your return more quickly.
- Carefully pack the defective product, a completed Repair and Replacement Order Card, and proof of the purchase date (such as a photocopy of your sales receipt) in a shippable container. Products returned without proof of purchase date are not eligible for warranty service.
- Write the RMA number clearly on the outside of the package; then ship the product prepaid to your dealer.
Technical Support and Assistance
- Visit the Advantech website at http://support.advantech.com for the latest product information.
- Contact your distributor, sales representative, or Advantech's customer service center for technical support if you require additional assistance. Please have the following information ready before calling:
– Product name and serial number
– Description of your peripheral attachments
– Description of your software (operating system, version, application software, etc.)
– A complete description of the problem
– The exact wording of any error messages
Warnings, Cautions, and Notes
Warning! Warnings indicate conditions, which if not observed, can cause personal injury!

Caution! Cautions are included to help users avoid hardware damage and data loses.

For example,
"New batteries are at risk of exploding if incorrectly installed. Do not attempt to recharge, force open, or heat the battery. Replace the battery only with the same or equivalent type recommended by the manufacturer. Discard used batteries according to the manufacturer's instructions."
Note! Notes provide additional information.

Battery Information
Batteries, battery packs, and accumulators should not be disposed of as unsorted household waste. Please use public collection systems to return, recycle, or treat these items in compliance with local regulations.
Packing List
Before installation, please ensure that the following items have been shipped:
1 x DS-570 unit
■ 1 x accessory box containing the items listed below
- 1 x power adapter bracket set
- 2 x mount brackets
- 1 x warranty card
- 1 x power adapter
- 1 x China RoHS declaration
Optional Power Cord and Accessories
Part Number Description
1700001524 3-pin power cord (US)
170203183C 3-pin power cord (EU)
170203180A 3-pin power cord (UK)
1700008921 3-pin power cord with PSE approval (Japan)
1700019146 3-pin power cord with CCC approval (China)
Safety Instructions
- Read these safety instructions carefully.
- Retain this user manual for future reference.
- Disconnect this equipment from all AC outlets before cleaning. Do not use liquid or spray detergents for cleaning. Instead, use only a damp cloth.
-
For pluggable equipment, the power outlet socket should be located nearby and easily accessible.
-
Protect this equipment from humidity.
-
Place this equipment on a reliable surface during installation. Dropping or letting the equipment fall can cause damage.
-
The openings on the enclosure are for air convection to protect the equipment from overheating. Do not cover the openings.
-
Ensure that power voltage is correct before connecting the equipment to a power outlet.
-
Position the power cord so that people cannot step on it. Do not place anything over the power cord.
-
All cautions and warnings on the equipment should be noted.
-
If not used for a long time, disconnect the equipment from the power source to avoid damage by transient overvoltage.
-
Never pour liquid into the openings. This can cause fire or electrical shock.
-
Never open the equipment. For safety reasons, the equipment should only be opened by qualified service personnel.
-
If one of the following occurs, have the equipment checked by authorized service personnel:
■ The power cord or plug is damaged.
- Liquid has penetrated the equipment.
■ The equipment has been exposed to moisture.
The equipment is malfunctioning, or does not operate according to the user manual.
■ The equipment has been dropped or damaged.
■ The equipment shows obvious signs of breakage.
-
Do not store this equipment in an environment where the temperature fluctuates below -20 ^ ( -4 ^ ) or above 60 ^ ( 140 ^ ) as this can cause damage. The equipment should be stored in a controlled environment.
-
CAUTION: Batteries are at risk of exploding if incorrectly installed. Replace only with the same or equivalent type recommended by the manufacturer. Discard used batteries according to the manufacturer's instructions.
The sound pressure at the operator position does not exceed 70 dB (A), as per IEC 704-1:1982.
DISCLAIMER: These instructions are provided according to IEC 704-1. Advantech disclaims all responsibility for the accuracy of all statements contained herein.
Contents
Chapter 1 General Introduction ......1
1.1 Introduction 2
1.2 Product Features.... 2
1.2.1 General 2
1.2.2 Display 2
1.2.3 Power Consumption.... 2
1.3 Hardware Specifications .... 3
1.4 Mechanical Specifications.... 4
Figure 1.1 DS-570 mechanical dimensions .... 4
1.5 Power Requirements.... 4
1.6 Environmental Specifications 4
Chapter 2 Hardware Installation ....5
2.1 DS-570 Front and Rear Views 6
Figure 2.1 Front view ...... 6
Figure 2.2 Rear view....6
2.2 DS-570 Front External I/O Connectors 6
2.2.1 Power ON/OFF Button....6
Figure 2.3 Power button 6
2.2.2 USB Connectors 6
Figure 2.4 USB connector 7
Table 2.1: USB Port Pin Assignments....7
2.2.3 Ethernet Connector (LAN) 7
Figure 2.5 LAN connector....7
Table 2.2: LAN Connector Pin Assignments ...... 7
2.2.4 COM Connector 8
Figure 2.6 COM connector 8
Table 2.3: COM Port Pin Assignments....8
2.2.5 Audio Connector 8
Figure 2.7 Audio connector....8
2.2.6 S/PDIF Connector....8
Figure 2.8 S/PDIF connector 8
2.3 DS-570 Rear External I/O Connectors 8
2.3.1 Power Input Connector 8
Figure 2.9 DC input connector....9
2.3.2 VGA Connector....9
Figure 2.10VGA connector 9
Table 2.4: VGA Connector Pin Assignments....9
2.3.3 HDMI Connector 9
Figure 2.11HDMI connector.... 10
Table 2.5: HDMI Connector Pin Assignments ..... 10
2.3.4 DP++ Connector 11
Figure 2.12DP++ connector.... 11
Table 2.6: DP++ Connector Pin Assignments ...... 11
2.3.5 USB Connectors 12
Figure 2.13USB 3.0 connector 12
Table 2.7: USB 3.0 Connector Pin Assignments.... 12
Hardware Installation 13
2.4.1 Memory Installation.... 13
Figure 2.14 Memory module installation.... 13
2.4.2 HDD Installation 14
Figure 2.15HDD installation.... 14
2.4.3 Mini PCIe and SIM Card Installation 15
Figure 2.16Mini PCIe and SIM card installation .... 15
2.4.4 Wireless LAN Antenna Installation 16
Figure 2.17 Wireless LAN antenna installation.... 16
Chapter 3 BIOS Settings....17
3.1 BIOS Introduction.... 18
3.2 Entering Setup 18
3.2.1 Main Setup.... 18 Figure 3.1 Main setup screen.... 18
3.2.2 Advanced BIOS Features Setup.... 19 Figure 3.2 Advanced BIOS Features setup screen.... 19 Figure 3.3 ACPI setup screen.... 20 Figure 3.4 HW monitoring screen.... 21 Figure 3.5 S5 RTC wake setup screen.... 21 Figure 3.6 CPU configuration setup screen.... 22 Figure 3.7 IDE configuration setup screen.... 23 Figure 3.8 Miscellaneous Configuration setup screen.... 24 Figure 3.9 USB Configuration setup screen.... 25 Figure 3.10 Intel® TXE Configuration setup screen.... 25
3.2.3 Chipset BIOS Feature Setup 26
3.2.4 Security BIOS Feature Setup .... 27
Figure 3.11 Security Configuration setup screen .... 27
3.2.5 Boot BIOS Feature Setup .... 28
Figure 3.12Boot Configuration setup screen .... 28
3.2.6 Save & Exit BIOS Feature Setup.... 29
Figure 3.13Save & Exit Configuration setup screen.... 29
Chapter 4 Software....31
4.1 Intel® TXE Driver Installation.... 32
Chapter 1
General Introduction
This chapter gives background information regarding the DS-570 series.
1.1 Introduction
DS-570 is powered by an Intel® Celeron® N2930/J1900 quad-core processor with an integrated NVIDIA GeForce GT730M graphics module for UHD playback. DS-570 delivers advanced graphics performance at low cost to satisfy various signage application requirements.
DS-570 features four display output interfaces (2 x HDMI, 1 x DP++, and 1 x VGA) to accommodate up to four simultaneous display outputs. For superior connectivity, DS-570 supports two mini PCIe interfaces with add-on functions such as wireless networks and TV tuner cards to fulfill various requirements. DS-570 also supports two GLAN, four USB ports (3 x USB 2.0, 1 x USB 3.0), two COM (RS-232) ports, and several audio (SPDIF/line-out and mic-in) ports to facilitate system and application integration.
1.2 Product Features
1.2.1 General
■ Supports an Intel® Celeron® N2930 quad-core 1.86 GHz onboard CPU (CPU TDP up to 7.5 W) or a Celeron® J1900 quad-core 2.0 GHz onboard CPU (CPU TDP up to 10 W)
■ Supports two HDMI (HDMI 1 with CEC support) ports, one DP++, and one VGA for multiple displays
■ Supports two GbE, one USB 3.0, three USB 2.0, and two COM (RS-232) ports
■ Internal 2.5-inch SATA HDD/SSD bay for storage devices
■ Two built-in mini PCIe slots for easy expansion, e.g. Wi-Fi, TV tuner, etc.
■ Easy integration and maintenance
1.2.2 Display
■ Multiple display support
- Can accommodate up to four simultaneous display outputs.
– HDMI and DP++ with a maximum resolution of 4K2K (3840 x 2160 pixels) - Can supports UHD video playback (subject to the video media format and playback software)
1.2.3 Power Consumption
CPU N2930:
– Typical: 10.5 W (w/o expansion)
– Maximum: 15.7 W (w/o expansion)
CPU J1900:
– Typical: 9.7 W (w/o expansion)
– Maximum: 22.6 W (w/o expansion)
1.3 Hardware Specifications
CPU: Intel® Celeron® N2930 quad-core 1.86 GHz onboard CPU, or Celeron® J1900 quad-core 2.0 GHz onboard CPU
■ System Chipset: System-on-Chip solution
BIOS: AMI uEFI 64 Mbit Flash BIOS
System Memory: 2 x DDR3 SODIMM sockets support up to 8 GB of DDR3L 1333 MHz memory (Max. 4 GB per SODIMM socket)
■ Graphics Chipset: NVIDIA GeForce GT730M
■ HDD: Supports 1 x 2.5" SATA HDD (7 mm height only)
■ SSD: Shared with the 2.5" SATA HDD bay (7 mm height only)
■ Watchdog Timer: Supported by Advantech SUSI API
I/O Interface: 2 x RS-232
USB: 1 x USB 3.0 and 3 x USB 2.0-compliant ports
■ Audio: Supports one audio jack, default is mic-in (jack sense also supported), and one S/SPDIF/ line out
Ethernet Chipset: 2 x Intel I211 (Gigabit LAN)
– Speed: 10/100/1000 Mbps
- Interface: 1 x RJ-45 jacks with LED
- Standard: IEEE 802.3z/ab (1000 Base-T) or IEEE 802.3u 100 Base-T compliant
■ Expansion:
- Two internal mini PCIe sockets (full-size mini PCIe2 slot with SIM card support)
Resolution:
– HDMI: Up to 3840 x 2160 @ 30 Hz (UHD)
- DP++: Up to 3840 x 2160 @ 30 Hz (UHD)
– VGA: Up to 2048 x 1536 @ 60 Hz
Caution! For systems with only one RAM module, please insert the module into the SODIMM 1 slot before system bootup.

1.4 Mechanical Specifications
■ Dimensions: 220.0 x 150.0 x 44.2 mm (8.67" x 5.91" x 1.74") (L x W x H)
![247.40 [9.740] 235.40 [9.268] 220 [8.661] 75 [2.953] 55 [2.165] 38 [1.496] 38 [1.496] 76 [2.992] 110 [4.331] Ø7 [Ø0.276] Ø3.50 [Ø0.138] 10 [0.394] Ø3.50 [Ø0.138] 44.20 [1.740] 47.20 [1.858] DC MV DC MV DC MV DC MV DC MV DC MV DC MV DC MV DC MV DC MV DC MV DC MV DC MV DC MV DC MV DC MV DC MV DC MV DC MV DC MV DC MV DC MV DC MV DC MV DC MV DC MV DC MV DC MV DC MV DC MV DC MV DC MV DC MV DC MV 150 [5.906]](/content/2026/05/1032370/images/3600fdfbafeeed909b1a57a829316fbc7bc6417b2d2234f3112ecc84f37011f1.jpg)
Figure 1.1 DS-570 mechanical dimensions
■ Weight: 1.7 kg (3.75 lb)
1.5 Power Requirements
System Power:
- Minimum power input: 19 V DC, 3.42 A
■ RTC Battery: 3 V/195 mAH BR2032
1.6 Environmental Specifications
Operating Temperature: 0 \~ 40 °C (32 \~ 104 °F) / 0 \~ 70 °C (32 \~ 158 °F) with extended temperature RAM and SSD
■ Relative Humidity: 95% @ 40 °C (non-condensing)
■ Storage Temperature: -20 \~ 70 °C (-4 \~ 167 °F)
Vibration Loading During Operation: 1.0 Grms, IEC 60068-2-64, random, 5 \~ 500 Hz, 1 Oct./min, 1 hr/axis.
■ Shock During Operation: 10 G, IEC 60068-2-27, half sine, 11 ms duration
■ Safety: UL, BSMI, CCC, CB, LVD
■ EMC: CE, FCC Class B, BSMI
Chapter 2
Hardware Installation
This chapter describes the DS-570 hardware installation process and external I/O.
2.1 DS-570 Front and Rear Views

Figure 2.1 Front view

Figure 2.2 Rear view
2.2 DS-570 Front External I/O Connectors
2.2.1 Power ON/OFF Button
DS-570 features a power ON/OFF button on the front of the device. Push this button to turn the system on or off. DS-570 also supports the 4-second delay soft power off function.

Figure 2.3 Power button
2.2.2 USB Connectors
On the front of the DS-570 device are two USB 2.0 interface connectors that provide complete plug-and-play and hot-swapping capabilities for up to 127 external devices. The two USB 2.0 interfaces are compliant with USB UHCI specification, Rev. 2.0. The USB ports support plug-and-play installation, which enables users to connect or disconnect a device without turning off the computer.

Figure 2.4 USB connector
Table 2.1: USB Port Pin Assignments
| Pin Signal Name | |
| 1 | VCC |
| 2 USB Data- | |
| 3 USB Data+ | |
| 4 | GND |
2.2.3 Ethernet Connector (LAN)
DS-570 provides two RJ45 LAN interface connectors (1 x LAN at the front and 1 x LAN at the rear) that are fully compliant with IEEE 802.3u 10/100/1000 Base-T CSMA/CD standards. The Ethernet port at the front supports a standard RJ-45 jack connector with LED indicators for denoting its active/link and speed status.

Figure 2.5 LAN connector
Table 2.2: LAN Connector Pin Assignments
| Pin Signal Name | |||
| 1 | M | D | I |
| 2 | M | D | I |
| 3 | M | D | I |
| 4 | M | D | I |
| 5 | GND | ||
| 6 | GND | ||
| 7 | M | D | I |
| 8 | M | D | I |
| 9 | MDI3+ | ||
| 10 | MDI3- | ||
| 11 VCC | |||
| 12 ACT | |||
| 13 | Link100# | ||
| 14 | Link1000# | ||
2.2.4 COM Connector
DS-570 features two D-sub 9-pin connector serial communication interface ports. These ports also support RS-232-mode communication.

Figure 2.6 COM connector
Table 2.3: COM Port Pin Assignments
| Pin Signal Name | |
| 1 | DCD |
| 2 | RxD |
| 3 | TxD |
| 4 | DTR |
| 5 | GND |
| 6 | DSR |
| 7 | RTS |
| 8 | CTS |
| 9 | RI |
2.2.5 Audio Connector
A microphone can be connected to the audio jack (only supports mic-in function).

Figure 2.7 Audio connector
2.2.6 S/PDIF Connector
The S/PDIF port allows users to send digital audio to an amplifier or television, and also supports jack sensing and line-out function.

Figure 2.8 S/PDIF connector
2.3 DS-570 Rear External I/O Connectors
2.3.1 Power Input Connector
DS-570 is equipped with a DC jack header that supports 19 V DC power input.

natural_image
Simple line drawing of a mechanical gear or knob (no text or symbols)Figure 2.9 DC input connector
2.3.2 VGA Connector
DS-570 features one high-resolution VGA interface connected by a D-sub 15-pin connector to support VGA CRT-compatible monitors. The connector provides display resolutions of up to 2048 x 1536 @ 60 Hz.

Figure 2.10 VGA connector
Table 2.4: VGA Connector Pin Assignments
| Pin Signal Name | |||
| 1 | RED | ||
| 2 | G | R | E |
| 3 | B | L | U |
| 4 | NC | ||
| 5 | GND | ||
| 6 | GND | ||
| 7 | GND | ||
| 8 | GND | ||
| 9 | NC | ||
| 10 GND | |||
| 11 NC | |||
| 12 DDC DAT | |||
| 13 H-SYNC | |||
| 14 V-SYNC | |||
| 15 DDC CLK | |||
2.3.3 HDMI Connector
DS-570 features two HDMI connectors that provide all-digital audio/video interfaces for transmitting uncompressed audio/video signals. However, only HDMI 1 supports high-bandwidth digital content protection (HDCP). Thus, all HDMI audio/video devices should be connected to this port. Although HDMI technology can support a maximum resolution of 3840 x 2160p, the actual display resolutions depend on the monitor used.
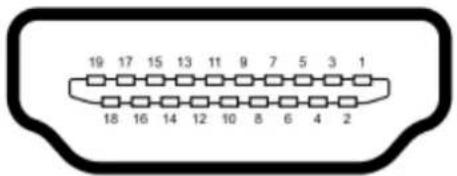
Figure 2.11 HDMI connector
Table 2.5: HDMI Connector Pin Assignments
| Pin Signal Name | |||
| 1 | T | M | D |
| 2 | GND | ||
| 3 | T | M | D |
| 4 | T | M | D |
| 5 | GND | ||
| 6 | T | M | D |
| 7 | T | M | D |
| 8 | GND | ||
| 9 | T | M | D |
| 10 TMDS Clock+ | |||
| 11 GND | |||
| 12 TMDS Clock- | |||
| 13 NC | |||
| 14 NC | |||
| 15 SCL | |||
| 16 SDA | |||
| 17 GND | |||
| 18 +5 V Power | |||
| 19 Detect | |||
2.3.4 DP++ Connector
The DS-570 DP++ connector not only supports DP output, but can also directly output single-link HDMI and DVI signals using a simple passive adapter. Although a maximum resolution of 3840 x 2160p is supported, the actual display resolutions depend on the monitor used.

Figure 2.12 DP++ connector
Table 2.6: DP++ Connector Pin Assignments
| Pin Signal Name | |
| 1 ML_Lane 0 (p) | |
| 2 | GND |
| 3 ML_Lane 0 (n) | |
| 4 ML_Lane 1 (p) | |
| 5 | GND |
| 6 ML_Lane 1 (n) | |
| 7 ML_Lane 2 (p) | |
| 8 | GND |
| 9 ML_Lane 2 (n) | |
| 10 ML_Lane 3 (p) | |
| 11 GND | |
| 12 ML_Lane 3 (n) | |
| 13 CONFIG1 | |
| 14 CONFIG2 | |
| 15 AUX CH (p) | |
| 16 GND | |
| 17 AUX CH (n) | |
| 18 Hot Plug | |
| 19 Return | |
| 20 DP_PWR | |
2.3.5 USB Connectors
On the rear of the DS-570 device are two USB interface connectors (1 x USB 2.0 and 1 x USB 3.0) that provide complete plug-and-play and hot-swapping capabilities for up to 127 external devices. The three USB 2.0 interfaces are compliant with USB UHCI specification, Rev. 2.0, and the USB 3.0 interface is compliant with USB UHCI specification, Rev. 3.0. All USB ports support plug-and-play installation, which enables users to connect or disconnect a device without turning off the computer. Refer to Table 2.1 for USB 2.0 pin assignments.

Figure 2.13 USB 3.0 connector
Table 2.7: USB 3.0 Connector Pin Assignments
| Pin Signal Name | |||
| 1 VBUS | |||
| 2 USB Data- | |||
| 3 USB Data+ | |||
| 4 | GND | ||
| 5 | S | t | d |
| 6 | S | t | d |
| 7 GND_DRAIN | |||
| 8 | S | t | d |
| 9 | S | t | d |
2.4 Hardware Installation
2.4.1 Memory Installation
- Remove the mini PCIe slot cover and HDD cover by loosening the five fixing screws
- Remove the heatsink by loosening the four fixing screws on the front and rear panels, as well as the two fixing screws inside the chassis.
- Insert the memory module into the memory socket.
- Perform the above steps in reverse to reassemble the system.
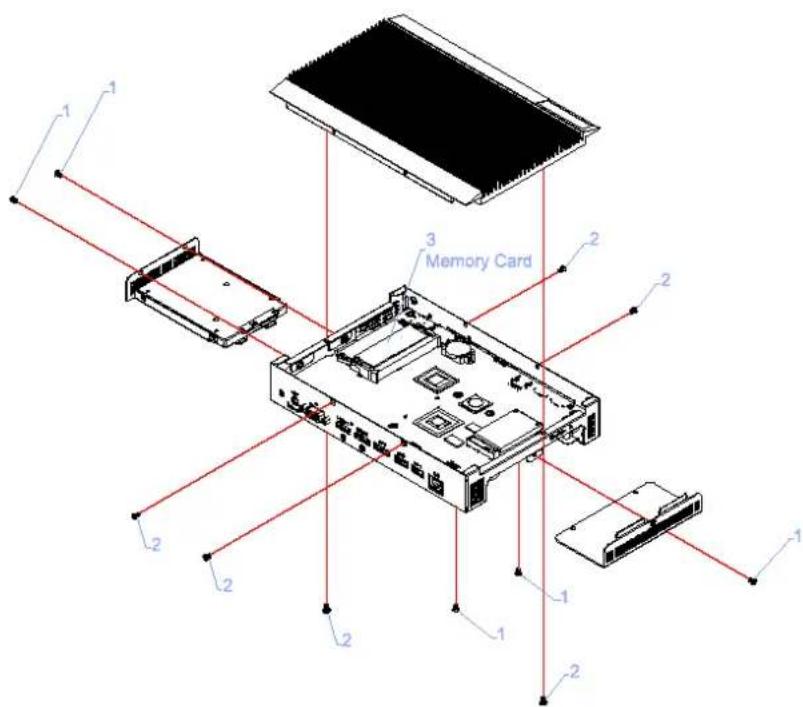
Figure 2.14 Memory module installation
2.4.2 HDD Installation
- Attach the 2.5-inch SATA HDD to the HDD bracket by tightening the four fixing screws.
- Insert the HDD module into the system.
- Reassemble the HDD cover by tightening the two fixing screws.

Figure 2.15 HDD installation
2.4.3 Mini PCIe and SIM Card Installation
- Remove the mini PCIe slot cover by loosening the three fixing screws.
- Insert a mini PCIe card into the card slot or insert a SIM card into the SIM card slot. (Note: The SIM card slot is located under the mini PCIe card slot. Do not mix them up.)
- Reattach the mini PCIe slot cover by tightening the fixing screws.
Note 1 Mini PCIe 1 supports mSATA and mini PCIe cards.

Note 2 The SIM card slot is located under the mini PCIe 2 slot.


Figure 2.16 Mini PCIe and SIM card installation
2.4.4 Wireless LAN Antenna Installation
- Refer to previous sections for instructions regarding removing the mini PCIe slot cover and HDD cover.
- Remove the heatsink by loosening the four fixing screws on the front and rear I/O panels, as well as the two fixing screws inside the chassis. Then loosen the four fixing screws on the front panel to remove the front cover.
- Attach the antenna onto the front I/O panel.
- Reassemble the system.

Figure 2.17 Wireless LAN antenna installation
Chapter 3
BIOS Settings
This chapter explains the BIOS configuration process.
3.1 BIOS Introduction
With the AMI BIOS Setup program, users can modify the BIOS settings and control various system features. This chapter describes the basic navigation of the DS-570 series BIOS setup screens.
AMI BIOS's ROM features a built-in setup program that allows users to modify the basic system configuration. These settings are stored in the flash portion of the CMOS to retain the setup information even when the system is powered off.
3.2 Entering Setup
3.2.1 Main Setup
When initially entering the BIOS Setup Utility, users are presented with the Main setup screen. Users can always return to the Main setup screen by selecting the Main tab.
The Main BIOS setup screen features two main frames. All configurable options are displayed in the left frame. The options presented in blue text can be configured, whereas grayed-out options cannot be configured. In the right frame, the key legend is displayed. The area above the key legend is reserved for text messages. When an option in the left frame is selected, the text color becomes white. This is often accompanied by a text message in the upper right frame.
![Aptio Setup Utility - Copyright (C) 2013 American Megatrends, Inc. Main Advanced Chipset Security Boot Save & Exit BIOS Information BIOS Vendor Core Version Compliancy Project Version Build Date and Time Power Type Memory Information Memory Frequency Total Memory System Date System Time Access Level American Megatrends 5.0,0.9 0.14 x64 UEFI 2.3.1; PI 1.2 D570000MS60X039 06/24/2014 13:08:02 ATX 1066 MHz 2048 MB (LPDDR3) [ked 01/29/2014] [13:49:32] Administrator Set the Date. Use Tab to switch between Date elements. ++: Select Screen ↑↓: Select Item Enter: Select +/-: Change Opt. F1: General Help F2: Previous Values F3: Optimized Defaults F4: Save & Exit ESC: Exit Version 2.16.1242. Copyright (C) 2013 American Megatrends, Inc.](/content/2026/05/1032370/images/205bdb3cb2e78b6e0b950386d955d1cb010d6950a2c84f15b2d504b0806509ff.jpg)
Figure 3.1 Main setup screen
System Time/System Date
Use this option to change the system time and date. Highlight System Time or System Date using the
3.2.2 Advanced BIOS Features Setup
Select the Advanced tab in the DS-570 BIOS Setup Utility to enter the Advanced BIOS setup screen. Highlight any items in the left frame, such as CPU configuration, and press

Figure 3.2 Advanced BIOS Features setup screen
ACPI Settings
System ACPI Parameters
![Aptio Setup Utility - Copyright (C) 2013 American Megatrends, Inc. Advanced ACPI Settings Enable ACPI Auto Configuration [Disabled] Enable Hibernation [Enabled] ACPI Sleep State [S3 (Suspend to RAM)] Lock Legacy Resources [Disabled] Enables or Disables BIOS ACPI Auto Configuration. +: Select Screen ↑↓: Select Item Enter: Select +/-: Change Opt. F1: General Help F2: Previous Values F3: Optimized Defaults F4: Save & Exit ESC: Exit Version 2.16.1242. Copyright (C) 2013 American Megatrends, Inc.](/content/2026/05/1032370/images/1f00cf054ccd4f68a610b841c2adddaaf6dd1c16859f02679c50315ce5c2c160.jpg)
Figure 3.3 ACPI setup screen
Intel® Smart Connect Technology
Intel® Smart Connect Technology settings
- ISCT Notification Control
Enable/disable ISCT support - ISCT WLAN Power Control
Enable/disable ISCT WLAN power support
- ISCT WWAN Power Control
Enable/disable ISCT WWAN power support
– ISCT Sleep Duration Value Format
The ISCT sleep duration value is presented in seconds; the standard time format is not supported
- ISCT RF Kill Switch Type
Software/hardware ISCR RF kill switch type
- ISCT RTC Timer Support
Enable/disable the ISCT RTC timer
■ ITE8528E Super I/O Configuration
System Super I/O chip parameters
■ ITE8528E HW Monitor
Monitor hardware status (PC health status)
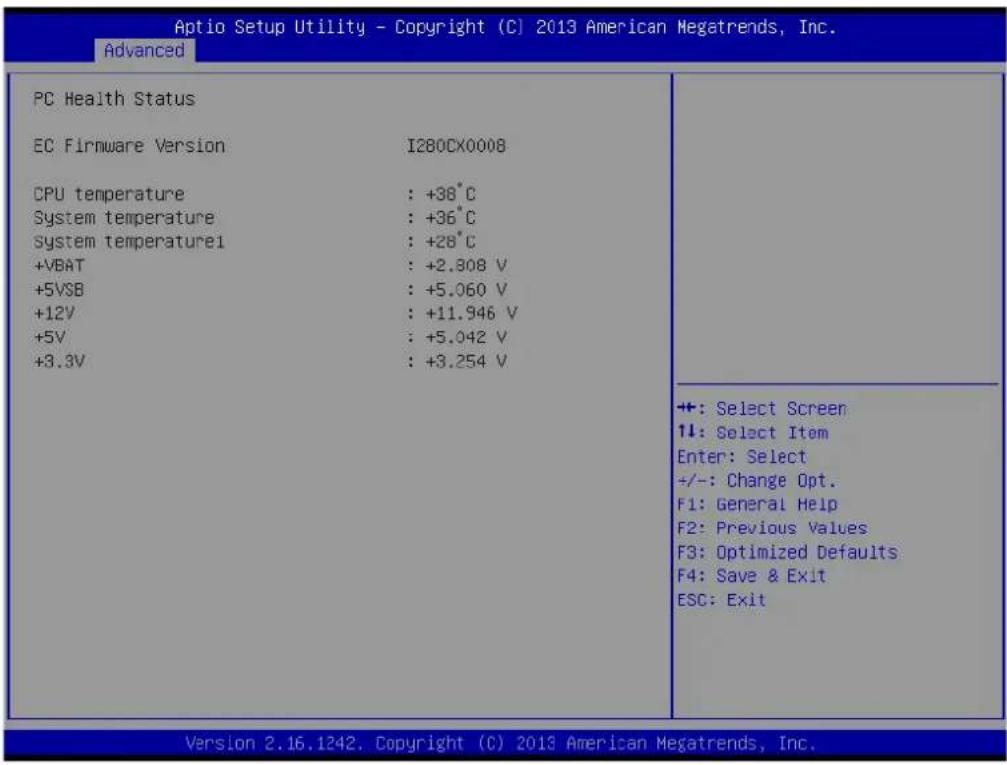
Figure 3.4 HW monitoring screen
S5 RTC Wake Settings
Enable/disable system wake from S5 using RTC alarm
![Aptio Setup Utility - Copyright (C) 2013 American Megatrends, Inc. Advanced Wake system from S5 [Disabled] Enable or disable System wake on alarm event. Select FixedTime, system will wake on the hr::min::sec specified. Select DynamicTime , System will wake on the current time + Increase minute(s) +: Select Screen ↓: Select Item Enter: Select +/-: Change Opt. F1: General Help F2: Previous Values F3: Optimized Defaults F4: Save & Exit ESC: Exit Version 2.16.1242. Copyright (C) 2013 American Megatrends, Inc.](/content/2026/05/1032370/images/782ab0889c35866fd8c4abc43cfaece853f02ec784840e7b2a69a7e36ab869d7.jpg)
Figure 3.5 S5 RTC wake setup screen
Serial Port Console Redirection
Enable/disable Serial Port Console redirection
CPU Configuration
Allows users to adjust the CPU configuration
![Aptio Setup Utility - Copyright (C) 2013 American Megatrends, Inc. Advanced CPU Configuration Socket 0 CPU Information CPU Speed 1667 MHz 54-bit Supported Active Processor Cores [All] Limit CPUID Maximum [Disabled] Execute Disable Bit [Enabled] Hardware Prefetcher [Enabled] Adjacent Cache Line Prefetch [Enabled] Intel Virtualization Technology [Enabled] Power Technology [Energy Efficient] Socket specific CPU Information +: Select Screen ↑↓: Select Item Enter: Select +/-: Change Opt. F1: General Help F2: Previous Values F3: Optimized Defaults F4: Save & Exit ESC: Exit Version 2.16.1242. Copyright (C) 2013 American Megatrends, Inc.](/content/2026/05/1032370/images/f0aa7abc15dbb36d5437b622db602e40b0c0b296112100f9c9da86c2f2b8f96d.jpg)
Figure 3.6 CPU configuration setup screen
PPM Configuration
Enable/disable CPU C state report to OS
■ IDE Configuration
Allows users to adjust the IDE device configuration
![Aptio Setup Utility - Copyright (C) 2013 American Megatrends, Inc. Advanced IDE Configuration Serial-ATA (SATA) [Enabled] SATA Speed Support [Gen2] SATA ODD Port [No ODD] SATA Mode [AHCI Mode] Serial-ATA Port 1 [Enabled] SATA Port1 HotPlug [Disabled] Serial-ATA Port 2 [Enabled] SATA Port2 HotPlug [Disabled] SATA Port1 Not Present SATA Port2 Not Present Enable / Disable Serial ATA +: Select Screen ↑↓: Select Item Enter: Select +/-: Change Opt. F1: General Help F2: Previous Values F3: Optimized Defaults F4: Save & Exit ESC: Exit Version 2.16.1242, Copyright (C) 2013 American Megatrends, Inc.](/content/2026/05/1032370/images/48762636b5b1f3932ba3439972048acc2eddaabf88f789f8073fda8249e79dcf.jpg)
Figure 3.7 IDE configuration setup screen
■ Miscellaneous Configuration
Enable/disable miscellaneous features
– High Precision Timer
Enable/disable the high precision event timer
- PCI Express Dynamic Clock Gating
Enable/disable PCIe dynamic clock gating
- OS Selection
Allows users to select the OS. The selected OS should be specified and employed.
![Aptio Setup Utility - Copyright (C) 2013 American Megatrends, Inc. Advanced Miscellaneous Configuration High Precision Timer [Enabled] PCI Express Dynamic Clock Gating [Disabled] DS Selection [Windows 8.X] Enable or Disable the Hight Precision Event Timer +: Select Screen ↑↓: Select Item Enter: Select +/-: Change Opt. F1: General Help F2: Previous Values F3: Optimized Defaults F4: Save & Exit ESC: Exit Version 2.16.1242. Copyright (C) 2013 American Megatrends, Inc.](/content/2026/05/1032370/images/d2e496371c3afebc20c41abc01fe73064e3fc2a60332e570b7bdf4c6aa1d16d4.jpg)
Figure 3.8 Miscellaneous Configuration setup screen
CSM Configuration
Enable/disable Option ROM execution
USB Configuration
Allows users to adjust the USB configuration
- Legacy USB Support
Enable/disable legacy USB support. The AUTO option disables legacy support if no USB devices are connected. The DISABLE option renders USB devices only available for EFI applications.
-XHCI Hand-Off
This is a workaround for OS without XHCI hand-off support. The XHCI ownership change should be claimed by the XHCI driver.
- EHCl Hand-Off
This is a workaround for OS without EHCl hand-off support. The EHCl ownership change should be claimed by the EHCl driver.
- USB Mass Storage Driver Support
Enable/disable USB mass storage driver support
- USB Transfer Timeout
Allows users to specify the timeout value for Control, Bulk, and Interrupt transfers. The value options available are 1, 5, 10, and 20 seconds.
- Device Reset Timeout
Allows users to specify the USB mass storage device Start Unit Command timeout value. The value options available are 10, 20, 30, and 40 seconds.
- Device Power-Up Delay
Allows auto/manual configuration of the USB mass storage device Start Unit Command timeout value.
![Aptio Setup Utility - Copyright (C) 2013 American Megatrends, Inc. Advanced USB Configuration USB Module Version 8.11.01 USB Devices: 1 Keyboard, 2 Hubs Legacy USB Support [Enabled] XHCI Hand-off [Enabled] EHCI Hand-off [Disabled] USB Mass Storage Driver Support [Enabled] USB hardware delays and time-outs: USB transfer time-out [20 sec] Device reset time-out [20 sec] Device power-up delay [Auto] Enables Legacy USB support. AUTO option disables legacy support if no USE devices are connected. DISABLE option will keep USB devices available only for EFI applications. +: Select Screen 1↓: Select Item Enter: Select +/-: Change Opt. F1: General Help F2: Previous Values F3: Optimized Defaults F4: Save & Exit ESC: Exit Version 2.16.1242. Copyright (C) 2013 American Megatrends, Inc.](/content/2026/05/1032370/images/7f26321a54ab9ea7891fb0828e39eba1ce48752de8e5b056c8f32ad5cd23b1da.jpg)
Figure 3.9 USB Configuration setup screen
■ Security Configuration
Intel® Anti-Theft Technology configuration
![Aptio Setup Utility - Copyright (C) 2013 American Megatrends, Inc. Advanced Intel(R) TXE Configuration TXE [Enabled] TXE HMRFPO [Disabled] TXE Firmware Update [Enabled] TXE EOP Message [Enabled] TXE Unconfiguration Perform Intel(R) Anti-Theft Technology Configuration Intel(R) AT [Disabled] Intel(R) AT Platform PBA [Enabled] Intel(R) AT Suspend Mode [Disabled] Send EOP Message Before Enter OS +: Select Screen ↑↓: Select Item Enter: Select +/-: Change Opt. F1: General Help F2: Previous Values F3: Optimized Defaults F4: Save & Exit ESC: Exit Version 2.16.1242. Copyright (C) 2013 American Megatrends, Inc.](/content/2026/05/1032370/images/502486285141f7cb10baf18a801fd2274bb864270a4834de226c2e6908ad74f1.jpg)
Figure 3.10 Intel® TXE Configuration setup screen
3.2.3 Chipset BIOS Feature Setup
Select the Chipset tab in the DS-570 BIOS Setup Utility to enter the Chipset BIOS setup screen. Users can select any item displayed in the left frame.
North Bridge
North Bridge parameters
- Memory Information
Max TOLUD: Maximum value of TOLUD
South Bridge
South Bridge parameters
- Azalia HD Audio
Azalia HD audio options
- USB Configuration
USB Configuration settings
- XHCI Mode
Enable/disable the XHCI controller
- USB2 Link Power Management
Enable/disable USB2 link power management
- PCI Express Configuration
PCI Express Configuration settings
- LAN1 Control
Enable/disable LAN1
- LAN2 Control
Enable/disable LAN2
- PXE OpROM
Controls .exe files
- Launch PXE OpROM
Enable/disable boot options for legacy network devices
- PCIe Wake
Enable/disable system wake from S5 via PCIe
Select AC power state when power is re-applied after a power failure
- Global SMI Lock
Enable/disable SMI lock
- BIOS Read/Write Protection
Enable/disable BIOS SPI region read/write protection
3.2.4 Security BIOS Feature Setup
Select the Security tab in the DS-570 BIOS Setup Utility to enter the Security BIOS setup screen.

Figure 3.11 Security Configuration setup screen
Administrator Password
Allows users to set the administrator password
User Password
Allows users to set the user password
3.2.5 Boot BIOS Feature Setup
Select the Boot tab in the DS-570 BIOS Setup Utility to enter the Boot BIOS setup screen. Users can select any item displayed in the left frame.
![Aptio Setup Utility - Copyright (C) 2013 American Megatrends, Inc. Main Advanced Chipset Security Boot Save & Exit Boot Configuration Setup Prompt Timeout 1 Bootup NumLock State [On] Quiet Boot [Disabled] Fast Boot [Disabled] Boot Option Priorities Boot Option #1 [UEFI: Built-in EFI ...] Number of seconds to wait for setup activation key. 65535(0xFFFF) means indefinite waiting. +: Select Screen ↑↓: Select Item Enter: Select +/-: Change Opt. F1: General Help F2: Previous Values F3: Optimized Defaults F4: Save & Exit ESC: Exit Version 2.16.1242. Copyright (C) 2013 American Megatrends, Inc.](/content/2026/05/1032370/images/f5e73c38c5262d56ba75aec8064bd06554efef9d2515327e0cdf385f3a207115.jpg)
Figure 3.12 Boot Configuration setup screen
Setup Prompt Timeout
Allows users to specify the number of seconds to wait for a setup activation key. "65535 (0xFFFF)" means wait indefinitely.
■ Bootup NumLock State
Allows users to select the keyboard NumLock state
Quiet Boot
Enable/disable Quiet Boot option
Fast Boot
Enable/disable system boot with only the devices required to launch an active boot option initialized. Does not affect BBS boot options.
■ Boot Option #1
Allows users to specify the system boot order
3.2.6 Save & Exit BIOS Feature Setup
Select the Save & Exit tab in DS-570 BIOS Setup Utility to enter the Save & Exit BIOS setup screen.

Figure 3.13 Save & Exit Configuration setup screen
■ Save Changes and Exit
Exit system setup after saving changes
- Discard Changes and Exit
Exit system setup without saving changes
■ Save Changes and Reset
Reset the system after saving changes
- Discard Changes and Reset
Reset the system without saving changes
■ Save Changes
Save all changes to the setup options
- Discard Changes
- Discard all changes to the setup options
- Restore Defaults
Restore/load default values for all setup options
■ Save as User Defaults
Save changes as User Defaults
- Restore User Defaults
Restore User Defaults for all setup options
- Boot Override
- UEFI
Built-in EFI Shell
- Launch EFI Shell From File System Device
Allows users to launch the EFI Shell application (Shell.efi) from an available file system device
- Reset System With ME Disable Mode MEUD000
ME will execute the temporary disable mode, or ignore if ME ignition is FWMED001
Chapter 4
Software
This chapter explains the OS installation prompts.
4.1 Intel® TXE Driver Installation
For Windows 7, the Windows update KB2685811 must be installed before TXE driver installation.
Notice: For more information about KB2685811, please download the relevant update information from the official Microsoft website, or access the following link:
http://www.microsoft.com/en-us/download/details.aspx?id=38423
Note

We strongly recommend using the FITC tool provided with this kit.
Please ensure to use Intel® TXE FW and system tools from the same kit. Combining different versions may cause unexpected issues.
Please use the SPI Flash parts that adhere to the specifications outlined in the Bay Trail Platform SoC SPI Flash Compatibility Requirements document (IBL# 514482, Section 3)
Please note that the Intel® TXEI driver for Android OS is provided as part of the Android-based UEFI BIOS OS image.
The FPT, TXE Info, and TXE manufacturing tools do not support Windows* 7. Users are required to run TXE manufacturing tools in an EFI Shell or WinPE environment.
Regarding the Windows® 7 OS: The Intel® TXEI driver uses KMDF (WDF) 1.11, which is built into Windows® 8 and 8.1. However, Windows® 7 is not equipped with this driver. Users should install the Kernel-Mode Driver Framework (KMDF), Version 1.1. Otherwise, a yellow bang will appear on the Intel® TXEI device following installation. Please adhere to the instructions provided in the following link: http://www.microsoft.com/en-us/download/details.aspx?id=38423
The Sample Signer reference code does not provide adequate security. Users must add substantial functionalities and modify the software to protect their private key. Intel assumes no liability for lost or stolen private key data and/or systems, nor for any other damage resulting thereof.
The VCN value has been increased to \~8". Consequently, a full FW upgrade from Intel® TXE FW 1.1.0.1089 is possible; however, a downgrade from Intel® TXE FW 1.1.0.1113 to an earlier kit is not possible.
Caution! Before OS installation, the selected OS should be specified and match the OS employed by the BIOS (refer to Figure 3.8).

ADVANTECH
Enabling an Intelligent Planet
www.advantech.com
Please verify specifications before quoting. This guide is intended for reference purposes only.
All product specifications are subject to change without notice.
No part of this publication may be reproduced in any form or by any means, such as electronically, by photocopying, recording, or otherwise, without the prior written permission of the publisher.
All brand and product names are trademarks or registered trademarks of their respective companies.
© Advantech Co., Ltd. 2014

- DS-570
- Copyright
- Acknowledgements
- Product Warranty (2 years)
- Technical Support and Assistance
- Warnings, Cautions, and Notes
- Battery Information
- Packing List
- Optional Power Cord and Accessories
- Part Number Description
- Safety Instructions
- Contents
- Chapter 1 General Introduction ......1
- Chapter 2 Hardware Installation ....5
- Chapter 3 BIOS Settings....17
- Chapter 4 Software....31
- Chapter 1
- General Introduction
- Introduction
- Product Features
- General
- Display
- ■ Multiple display support
- Power Consumption
- CPU N2930:
- CPU J1900:
- Hardware Specifications
- Mechanical Specifications
- Power Requirements
- Environmental Specifications
- Chapter 2
- DS-570 Front and Rear Views
- DS-570 Front External I/O Connectors
- Power ON/OFF Button
- USB Connectors
- Ethernet Connector (LAN)
- COM Connector
- Audio Connector
- S/PDIF Connector
- DS-570 Rear External I/O Connectors
- Power Input Connector
- VGA Connector
- HDMI Connector
- DP++ Connector
- USB Connectors
- Hardware Installation
- Memory Installation
- HDD Installation
- Mini PCIe and SIM Card Installation
- Wireless LAN Antenna Installation
- Chapter 3
- BIOS Settings
- BIOS Introduction
- Entering Setup
- Main Setup
- System Time/System Date
- Advanced BIOS Features Setup
- ACPI Settings
- Intel® Smart Connect Technology
- ■ ITE8528E Super I/O Configuration
- ■ ITE8528E HW Monitor
- S5 RTC Wake Settings
- Serial Port Console Redirection
- CPU Configuration
- PPM Configuration
- ■ IDE Configuration
- ■ Miscellaneous Configuration
- CSM Configuration
- USB Configuration
- - Legacy USB Support
- -XHCI Hand-Off
- - EHCl Hand-Off
- - USB Mass Storage Driver Support
- - USB Transfer Timeout
- - Device Reset Timeout
- - Device Power-Up Delay
- ■ Security Configuration
- Chipset BIOS Feature Setup
- North Bridge
- South Bridge
- Security BIOS Feature Setup
- Boot BIOS Feature Setup
- Save & Exit BIOS Feature Setup
- - Reset System With ME Disable Mode MEUD000
- Chapter 4
- Software
- Intel® TXE Driver Installation
- Note
- ADVANTECH
- www.advantech.com
Brand : Advantech
Model : DS-570
Category : Media player