
TB402410 - Iron SIEMENS - Free user manual and instructions
Find the device manual for free TB402410 SIEMENS in PDF.


| Product Type | Steam Iron |
| Model | TB402410 |
| Brand | Siemens |
| Soleplate | Stainless steel |
| Power | 2400 W |
| Water Tank Capacity | 300 ml |
| Steam Output | Up to 40 g/min |
| Steam Boost | 150 g/min |
| Spray Function | Yes |
| Vertical Steam | Yes |
| Anti-Drip System | Yes |
| Auto Shut-off | Yes |
| Cord Length | 2.5 m |
| Dimensions (W x H x D) | 12.5 x 15.5 x 30.0 cm |
| Weight | 1.35 kg |
| Water Level Indicator | Yes |
| Self-Cleaning Function | Yes |
| Anti-Calcium System | Yes |
| Safety Class | I |
| Color | White/blue |
| Warranty | 2 years |
Frequently Asked Questions - TB402410 SIEMENS
User questions about TB402410 SIEMENS
0 question about this device. Answer the ones you know or ask your own.
Ask a new question about this device
Download the instructions for your Iron in PDF format for free! Find your manual TB402410 - SIEMENS and take your electronic device back in hand. On this page are published all the documents necessary for the use of your device. TB402410 by SIEMENS.
USER MANUAL TB402410 SIEMENS
www.siemens-home.bsh-group.com
Register your product online



| Index | |
| DEUTSCH | 6 |
| ENGLISH12 | |
| NEDERLANDS18 | |
| ESPAÑOL24 | |
| PORTUGUÊS30 | |
| ΕΛΛΗΝΙΚΑ 36 | |
| TÜRKÇE42 | |
| POLSKI48 | |
| РУССКИЙ 54 | |
| العربيya | 65 |
natural_image
Illustration of an open book with blank pages and decorative arrows indicating pages (no text or symbols)Thank you for buying the iQ300 steam iron from Siemens.
Carefully read through the operating instructions for the appliance and safeguard them for future reference.
You can download this manual from the local homepages of Siemens.
Open the leaflet sides

natural_image
Illustration of an open book with blank pages and decorative arrows indicating text (no actual text or symbols)General safety instructions
☐ The iron must not be left unattended while it is connected to the supply mains.
☐ Remove the plug from the socket before filling the appliance with water or before pouring out the remaining water after use.
☐ The appliance must be used and placed on a stable surface.
☐ When placed on its stand, make sure that the surface on which the stand is placed is stable.
☐ The iron should not be used if it has been dropped, if there are visible signs of damage or if it is leaking water. It must be checked by an authorized Technical Service Centre before it can be used again.
☐ With the aim of avoiding dangerous situations, any work or repair that the appliance may need, e.g. replacing a faulty mains cable, must only be carried out by qualified personnel from an Authorised Technical Service Centre.
☐ This appliance can be used by children aged from 8 years and above and persons with reduced physical, sensory or mental capabilities or lack of experience and knowledge if they have been given supervision or instruction concerning use of the appliance in a safe way and understand the hazards involved. Children shall not play with the appliance. Cleaning and user maintenance shall not be made by children without supervision.
- Keep the iron and its cord out of reach of children less than 8 years of age when it is energized or cooling down.
☐ This appliance is designed only for household use up to 2000m above sea level.

CAUTION. Hot surface.
Surface is liable to get hot during use.
Important notices
- This appliance has been designed exclusively for normal household use in a home environment.
- This appliance must be used only for the purposes for which it was designed, i.e. as an iron. Any other use will be considered improper and consequently dangerous.
- The manufacturer will not be held responsible for any damage arising from misuse or improper use.
-
This appliance reaches high temperatures and produces steam during use, this could cause scalds or burns in case of improper use.
-
Do not touch the soleplate! Hold the iron by its handle.
- Do not leave the supply cord hanging over the table or ironing board, to prevent the appliance from falling.
- Do not iron clothing while it is being worn!
-
Never spray or aim the steam at persons or animals!
-
Do not allow the power cable to come into contact with sharp edges or with the soleplate when it is hot.
- Never rest the iron in a horizontal position when the soleplate is hot. Rest it on its heel.
- Do not touch the appliance with wet hands when in operation.
- This appliance is to be connected and used in accordance with the information stated on its characteristics plate.
-
This appliance must be connected to an earthed socket. If it is absolutely necessary to use an extension cable, make sure that it is suitable for 16A and has a socket with an earth connection.
-
In order to avoid that, under unfavourable mains conditions, phenomena like transient voltage drops or lighting fluctuations can happen, it is recommended that the iron is connected to a power supply system with a maximum impedance of 0.28 Ω. If necessary, the user can ask the public power supply company for the system impedance at the interface point.
- The appliance must never be placed directly under the tap to fill the water tank.
- Unplug the appliance from the mains supply after each use, or if a fault is suspected.
- The electrical plug must not be removed from the socket by pulling the cable.
- Never immerse the iron in water or any other fluid.
- Do not leave the appliance exposed to weather conditions (rain, sun, frost, etc.).
Advice on disposal
Our goods come in optimized packaging. This basically consists in using non-contaminating materials which should be handed over to the local waste disposal service as secondary raw materials. Your local town council can give you information about how to dispose of obsolete appliances.

This appliance is labelled in accordance with European Directive 2012/19/EU concerning used electrical and electronic appliances (waste electrical and electronic equipment – WEEE). The guideline determines the framework for the return and recycling of used appliances as applicable throughout the EU.
Description
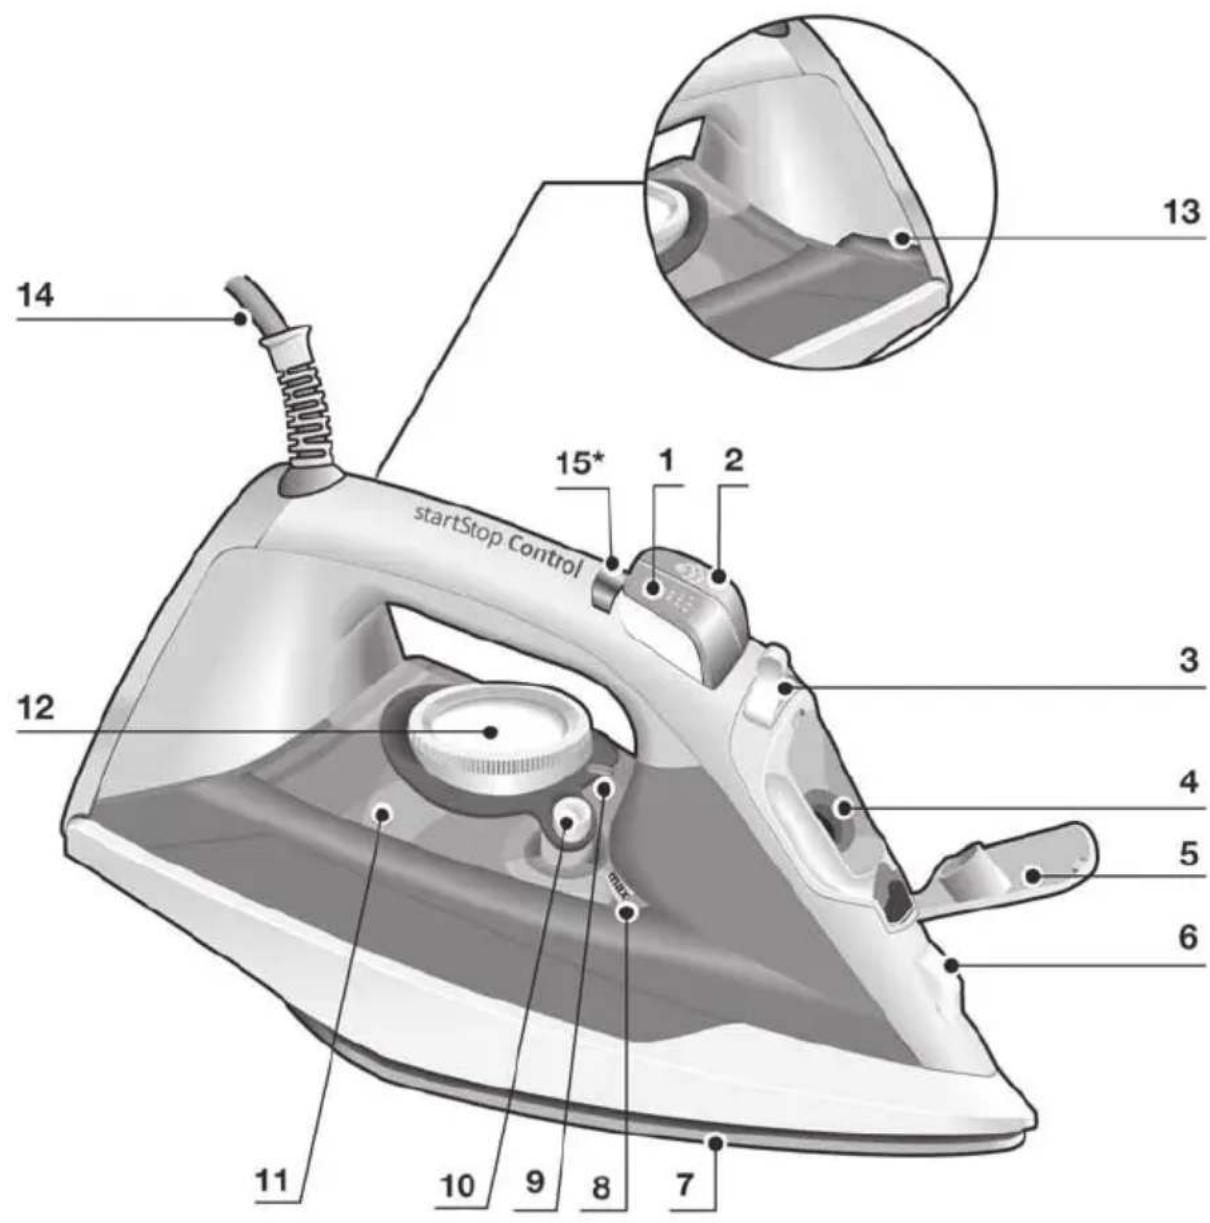
- Spray button
- Shot of steam button
- Steam regulator
- Water inlet
- Water inlet lid
- Spray nozzle
- Soleplate
-
Level mark for maximum filling
-
Temperature index
- "clean" button
- Water tank
- Temperature control
- Pilot light
- Power cord
- "startStop Control" light *
- Descaling liquid *
Before using your appliance for the first time
During it first use the iron may produce certain vapours and odours that will die away after a few minutes.
Using your appliance

1. Filling the water tank
↑ See the leaflet sides
This appliance has been designed to use normal tap water.
- The addition of other liquids, (unless recommended by Siemens) such as perfume, will damage the appliance.
- Do not use condensation water from tumble dryers, air conditioning systems or similar.
Any damage caused by the use of the aforementioned products will make the guarantee void.
Set the steam regulator (3) to the position and unplug the iron from the mains!
- Open the water inlet lid (5).
- Fill the water tank (11). Never fill beyond the level mark for maximum filling (8).
- Close the water inlet lid.
Tip To prolong the optimum steam function, you may mix tap water with distilled water 1:1. If the tap water in your district is very hard, mix tap water with distilled water 1:2.
You can inquire about the water hardness with your local water supplier.

2. Setting the temperature
↑ See the leaflet sides
The temperature control (12) adjusts the temperature of the soleplate (7).
Set the temperature control to the corresponding position by lining it up with the temperature index (9) on the iron.
Temperature Suitable for:
- Synthetics
- Silk – Wool
●●● Cotton
max Linen
The pilot light (13) switches on while the appliance is heating up and switches off as soon as the set temperature is reached. If the temperature of the hot iron drops, you can continue ironing while the iron heats up again to the set temperature.

3. Ironing with steam
↑ See the leaflet sides
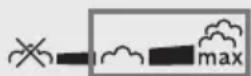
The steam regulator (3) is used to adjust the amount of steam produced when ironing.
Temperature control (12)
Recommended position of the steam regulator (3)



Tip: For better ironing results, iron the last strokes without steam to dry the garment.

4. Shot of steam
↑ See the leaflet sides
This can be used to remove stubborn wrinkles or to press in a sharp crease or pleat.
- Set the temperature control (12) to at least the “●●” position.
- Press the shot of steam button [icon] (2) repeatedly with intervals of at least 5 seconds.

5. Vertical steam
↑ See the leaflet sides
This can be used to remove creases from hanging clothes, curtains etc.
- Set the temperature control (12) to "max".
- Hang article of clothing on a clothes hanger.
- Operate the iron in a vertical position at a distance of 10 cm / 4 in, and press the shot of steam button [💡] (2) repeatedly with pauses of at least 5 seconds.

6. Ironing without steam
↑ See the leaflet sides
This enables the iron to be used for dry ironing.
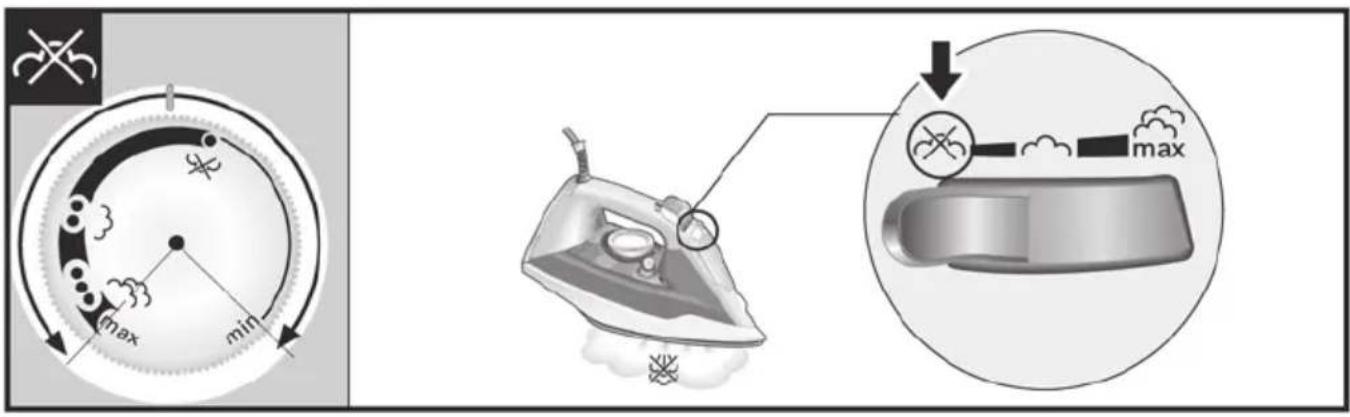
Set steam regulator (3) to the [−position.

7. Drip protection \*
↑ See the leaflet sides
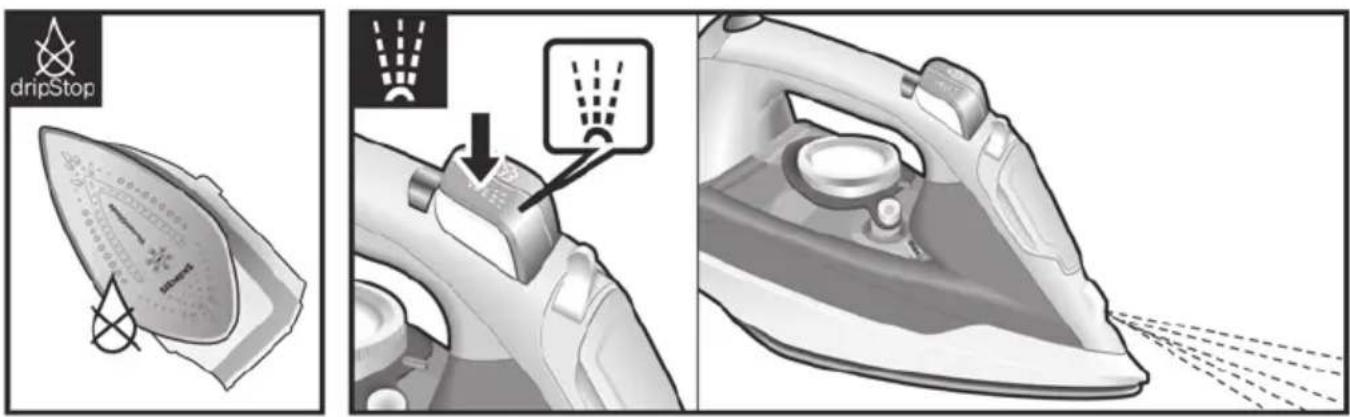
If the temperature is set too low, the steam is automatically switched off to avoid dripping. There may be an audible click when this occurs.

8. Spray
↑ See the leaflet sides
This can be used to remove stubborn wrinkles.
Do not use the spray function with silk.

9. "startStop Control" function \*
↑ See the leaflet sides
The "startStop Control" function makes the iron heat up only while ironing.
Thus, safety and saving energy get increased.
- Plug in the iron.
- "startStop Control" light (15*) flashes while resting, and will show a continuous light while ironing.
-
If the iron is resting for more than 12 seconds, the iron will stop heating automatically.
-
Once ironing is restarted, the iron will heat up again.
Initial heating up process: it is not necessary to grip the handle until the iron heats up to the set temperature. Once reached such temperature, the pilot light (13) goes off.

10. After ironing
↑ See the leaflet sides
- Switch the steam regulator (3) from t_0 to "max" and back again several times (self-cleaning).
- Empty the tank. Hold the iron with the point down and shake lightly.
- Store standing on the rear, not on the base.
- Do not wrap the power cord (14) too tight!

Tips to help you save energy
Steam production consumes the most energy. To help minimise the energy used, follow the advice below:
- Start by ironing the fabrics that require the lowest ironing temperature. Check the recommended ironing temperature in the label on the garment.
- Regulate the steam according to the selected ironing temperature, following the instructions in this manual.
3 Only use steam if necessary. If possible, use the spray function instead.
Try to iron the fabrics while they are still damp and reduce the steam setting. Steam will be generated from the fabrics rather than the iron.
If you tumble dry your fabrics before ironing them, set the tumble drier on the 'iron dry' program. - If the fabrics are damp enough, turn off the steam regulator (3) completely.
- Stand the iron upright during pauses. Resting it horizontally with the steam regulator on generates wasted steam.

Cleaning & Maintenance
↑ See the leaflet sides
Attention! Risk of burns! Always unplug the appliance from the mains supply before carrying out any cleaning or maintenance operation on it.
- If the iron is only slightly soiled, pull out the plug and allow the soleplate (7) to cool down. Wipe the housing and the soleplate with a damp cotton cloth only.
- If the cloth is synthetic, it may melt due to the high temperature on the soleplate, switch off the steam and rub off any residue immediately with a thickly folded, damp cotton cloth.
- To keep the soleplate smooth, you should avoid hard contact with metal objects. Never use a scouring pad, or chemicals to clean the soleplate.

Multiple descaling system
t See the leaflet sides
A self-clean
Each time you use the steam regulator (3), the "self-clean" system cleans the mechanism of scale deposits.
B calc'nClean
The “calc'nClean” function helps to remove scale particles out of the steam chamber. Use this function approximately every 2 weeks if the water in your area is very hard.
① Unplug the iron from the mains socket, set the steam regulator (3) to the [position and fill the water tank (11) with water.
② Set the temperature control (12) to the "max" position and plug in the iron.
3 After the necessary warm-up period, the pilot light (13) goes out. Then, unplug the iron (very important!).
4 Hold the iron over a sink. Press the “clean” button (10) and shake the iron until approximately one third of the water capacity of the tank is evaporated. Boiling water and steam will come out, carrying scale or deposits that might be there.
5 Release the "clean" button, and gently shake the iron for some seconds.
6 Repeat the steps 4 and 5 three times until the tank is empty.
⑦ Then plug the iron in and heat it up again until the remaining water has evaporated.
Push the "clean" button a few times more to clean the valve.
8 Unplug the iron and let the soleplate (7) cool down. Wipe the soleplate with a damp cotton cloth only.
C "calc'nClean" with descaling liquid \*
For deep descaling, it is recommended to use the descaling liquid especially developed by Siemens. This procedure should be carried out every 3 months.
- Fill the water tank (11) with tap water mixed with a measure (25 ml) of the descaling liquid (16 ^* ).
- Then follow the procedure described above in section "calc'nClean" (steps 2 to 8).
The descaling liquid may be purchased from our after-sales service or specialist shops.
Name of accessory: TDZ1101
D anti-calc
The “anti-calc” cartridge has been designed to reduce the build-up of scale produced during steam ironing, helping to extend the useful life of your iron. Nevertheless the “anti-calc” cartridge cannot remove all of the scale that is produced naturally over time.
| Problem Probable cause Solution | ||
| The iron does not heat up. | 1. Temperature control (12) set to minimum.2. The “startStop Control”* system has been activated (“startStop Control” indicator light 16* flashes). The iron is set to stand-by. | 1. Turn to a higher position.2. Grip the handle of the iron to re-start it. |
| The clothes tend to stick. | 1. The temperature is too high. 1. Turn the temperature control (12) down and wait until the iron has cooled down. | |
| Water drips out of the soleplate (7) together with steam. | 1. Temperature control (12) setting is too low.2. Steam regulator (3) is set too high in conjunction with a low temperature.3. You have pressed the shot of steam button (2) repeatedly without waiting for 5 seconds between each press. | 1. Turn the temperature control to a higher setting (between “••” and “max”) and wait until the pilot light (13) goes out.2. Set the steam regulator (3) to a lower setting.3. Wait 5 seconds between each press of the shot of steam button. |
| Steam does not come out. | 1. Steam regulator (3) is set to [×] position.2. The temperature is too low. Anti-drip system is activated. | 1. Set the steam regulator to a higher position.2. Set to a higher temperature if compatible with the fabric. |
| Smoke comes out when connecting the iron for the first time. | 1. This may be caused by the lubrication of some of the internal parts. | 1. This is normal and will stop after a few minutes. |
| Excessive dripping or steaming. | 1. No proper closing of “calc'nClean” system. | 1. Actuate a few times the “clean” button (10). |
| Deposits come out through the holes in the soleplate (7). | 1. Traces of lime scale are coming out of the steam chamber. | 1. Carry out a cleaning cycle (see “calc'nClean” section). |
If none of the above solves the problem, get in touch with an authorised technical service.
natural_image
Illustration of an open book with blank pages and decorative arrows indicating text (no actual text or symbols)natural_image
Illustration of an open book with blank pages and decorative arrows indicating text (no actual text or symbols)natural_image
Illustration of an open book with blank pages and decorative arrows indicating text (no actual text or symbols)natural_image
Illustration of an open book with blank pages and decorative arrows pointing to the pages (no text or symbols)Οδηγίες ασφαλείας
natural_image
Illustration of an open book with blank pages and decorative arrows indicating text (no actual text or symbols)natural_image
Illustration of an open book with blank pages and decorative arrows indicating text (no actual text or symbols)natural_image
Illustration of an open book with blank pages and decorative arrows indicating text (no actual text or symbols)(ال Connectivity) "clean" .10
natural_image
Illustration of an open book with blank pages and decorative arrows indicating text (no actual text or symbols)The image contains no text or characters.
□ حات
natural_image
Illustration of a finger pressing a button with an inset showing the button being inserted (no text or symbols present)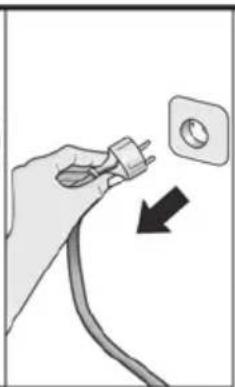
natural_image
Hand holding a plug with a screw socket, pointing to a circular socket (no text or symbols)
natural_image
Mechanical assembly diagram showing a lever and wheel assembly (no text or symbols)
natural_image
Illustration of a steaming iron with an hourglass icon showing downward and leftward arrows (no text or symbols)
natural_image
Illustration of a hand holding an iron with a black X mark, emitting steam (no text or symbols)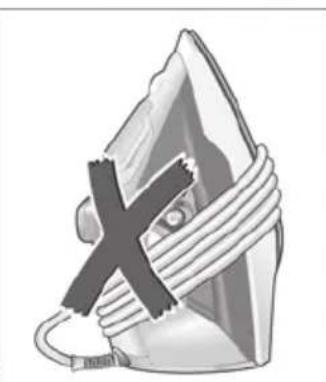
natural_image
Illustration of a broken shoe with a large 'X' symbol on its side (no text or symbols present)
natural_image
Illustration of an iron (£) with a coiled cord, showing steam and a checkmark symbol (no text or labels)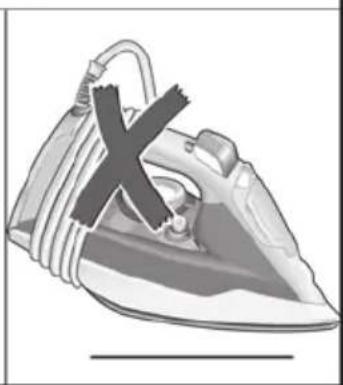
natural_image
Illustration of a steam iron with a black 'X' mark on its side (no text or symbols)


natural_image
Illustration of a hand cleaning a leaf with a cross mark (no text or symbols)
natural_image
Illustration of a bottle and an ear with a crossed-out X mark, no text or symbols present
www.siemens-home.bsh-group.com




- General safety instructions
- CAUTION. Hot surface.
- Important notices
- Advice on disposal
- Description
- Before using your appliance for the first time
- Using your appliance
- Filling the water tank
- Any damage caused by the use of the aforementioned products will make the guarantee void.
- Setting the temperature
- The temperature control (12) adjusts the temperature of the soleplate (7).
- Temperature Suitable for:
- Ironing with steam
- The steam regulator (3) is used to adjust the amount of steam produced when ironing.
- Shot of steam
- This can be used to remove stubborn wrinkles or to press in a sharp crease or pleat.
- Vertical steam
- This can be used to remove creases from hanging clothes, curtains etc.
- Ironing without steam
- This enables the iron to be used for dry ironing.
- Drip protection \*
- Spray
- This can be used to remove stubborn wrinkles.
- "startStop Control" function \*
- The "startStop Control" function makes the iron heat up only while ironing.
- Thus, safety and saving energy get increased.
- After ironing
- Tips to help you save energy
- Cleaning & Maintenance
- Attention! Risk of burns! Always unplug the appliance from the mains supply before carrying out any cleaning or maintenance operation on it.
- Multiple descaling system
- A self-clean
- B calc'nClean
- C "calc'nClean" with descaling liquid \*
- Name of accessory: TDZ1101
- D anti-calc
- Οδηγίες ασφαλείας
Brand : SIEMENS
Model : TB402410
Category : Iron