
CP9331 - Razor Accessories PHILIPS - Free user manual and instructions
Find the device manual for free CP9331 PHILIPS in PDF.


| Product Type | Shaver Accessory Set |
| Compatible Models | Philips RQ1285, RQ1275, RQ1260, RQ1250 |
| Included Items | Beard Styler attachment (RQ111), HQ200 cleaning fluid, cleaning brush, pouch, foldable charger, protection cap |
| Power Supply | 100-240V adapter, output safe low voltage <24V |
| Charging Time | Approx. 1 hour |
| Quick Charge | 5 minutes for one shave |
| Battery Capacity | Up to 60 minutes (RQ1285/RQ1275/RQ1260), 50 minutes (RQ1250) |
| Usage | Wet and dry shaving; trimmer for sideburns and moustache; beard styler for beard styling |
| Shaving Unit | Replacement recommended every 2 years, model RQ12 |
| Cleaning System | Jet Clean System compatible (model RQ1008 or RQ1007) with HQ200 fluid; also rinsable under tap |
| Travel Lock | Activate by holding on/off button for 3 seconds |
| Display | Shows remaining shaving minutes (RQ1285) or charging lights (others); tap symbol for cleaning reminder |
| Dimensions (Shaver) | Approx. 18 x 5 x 6 cm (estimated) |
| Weight | Approx. 200 g (shaver only) |
| Material | Plastic housing, stainless steel shaving heads |
| Water Resistance | Safe for use in bath or shower and cleaning under tap |
| Safety Features | Adapter not to be cut; prohibits immersion of Jet Clean System; keep away from children |
| Environmental | Rechargeable battery removable; recycle at end of life |
| Guarantee | 2-year limited (shaving heads excluded) |
| Accessories Ordering | www.shop.philips.com/service |
Frequently Asked Questions - CP9331 PHILIPS
User questions about CP9331 PHILIPS
0 question about this device. Answer the ones you know or ask your own.
Ask a new question about this device
Download the instructions for your Razor Accessories in PDF format for free! Find your manual CP9331 - PHILIPS and take your electronic device back in hand. On this page are published all the documents necessary for the use of your device. CP9331 by PHILIPS.
USER MANUAL CP9331 PHILIPS
Register your product and get support at www.philips.com/welcome

natural_image
Black and white photo of a Philips electric shaver with water droplets, no visible text or symbols on the device itself.RQ1285 RQ1275 RQ1260 RQ1250
Gebrauchsanleitung
PHILIPS
DEUTSCH 4
ENGLISH 36
natural_image
No sign depicting a faucet with a diagonal line and raindrops, commonly used to indicate no pollution or water safety.Gefahr
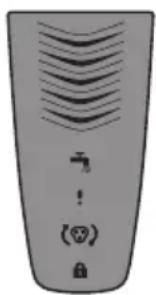
Das Display
- RQ1285
natural_image
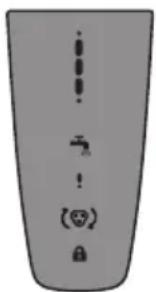
Illustration of a remote control device with no visible text or symbols on the body- RQ1275, RQ1260
- RQ1250
Laden
natural_image
Illustration of a remote control device with ventilation grille and function buttons (no text or symbols)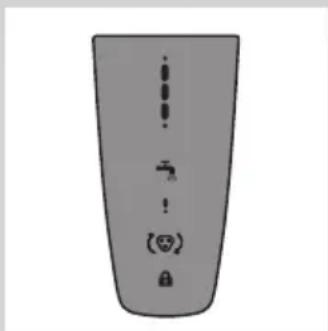
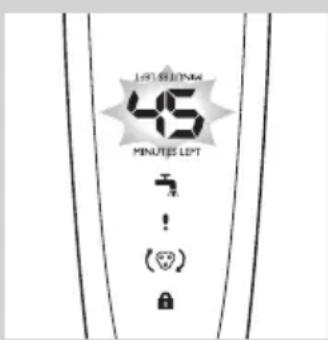
natural_image
Pure electrical circuit lines without any symbolsRQ1275/RQ1260/RQ1250
RQ1285
natural_image
Diagram of a showerhead with water tap and power button, no text or symbols presentRQ1275/RQ1260/RQ1250
natural_image
Diagram of a smart air conditioner with cooling fan and water tap (no text or symbols)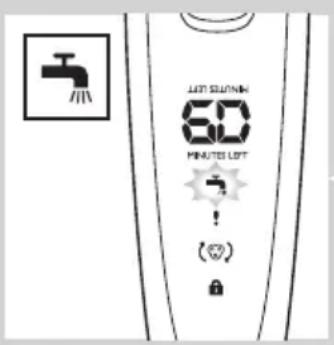
Den Rasierer reinigen
natural_image
Line drawing of a mechanical device with a tool inserted, no text or symbols presentnatural_image
Diagram of a mechanical device with a rotating arrow indicating rotational motion (no text or symbols)natural_image
Diagram of a handheld device with a power outlet connected to a base, showing a black arrow indicating direction (no text or symbols present)natural_image
Line drawing of a vacuum cleaner with a top-mounted blade and a closed lid (no text or symbols)natural_image
Illustration of a person applying facial contour to another person's face, showing different facial expressions (no text or symbols present)natural_image
Diagram showing a device with a light bulb and a cross symbol, indicating mechanical or electrical assembly (no text or labels)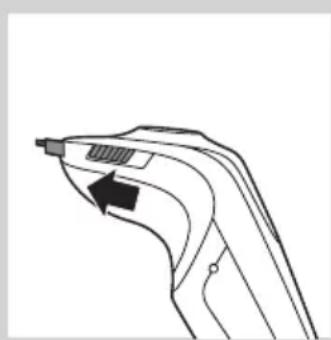
natural_image
Line drawing of a handheld device with a black arrow pointing to a component (no text or symbols)natural_image
Illustration of a hand pouring liquid into a container with a cross symbol, showing an upward arrow (no text or symbols present)natural_image
Illustration of a hand holding a device with a magnified inset showing internal components (no text or symbols)natural_image
Illustration of a hand holding a handheld device with a lightning bolt indicating compression (no text or symbols)natural_image
Line drawing of a man brushing his beard with a comb (no text or symbols)natural_image
Line drawing of a handheld device with a scroll wheel and directional arrow (no text or symbols)natural_image
Illustration of two hands holding a medical or surgical device with directional arrows indicating movement (no text or symbols)natural_image
Line drawing of a person applying makeup to their ear (no text or symbols)natural_image
Line drawing of a man's head and shoulders with a beard (no text or symbols)- Ein Dreitagenbart
natural_image
Line drawing of a man's head and beard (no text or symbols)- Ein Vollbart
natural_image
Line drawing of a male's head and shoulders (no text or symbols)- Ein Schnurrbart
natural_image
Line drawing of a man's head and shoulders with a beard (no text or symbols)- Ein Spitzbart
Wartung
natural_image
Line drawing of a hand using a tool to lift a car's seat (no text or symbols)natural_image
Illustration of a handheld electronic device labeled RQ1008, with no visible text or symbols on the device itself.natural_image
Illustration of a Philips brand electronic device (no text or symbols on the device body)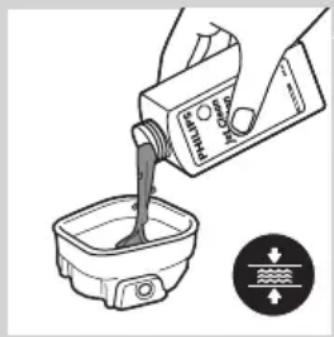
natural_image
Illustration of a hand pouring liquid into a bowl with a water level indicator (no text or symbols)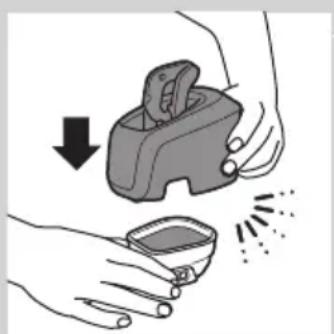
natural_image
Illustration of a hand holding a small container with a downward arrow and emitting powder (no text or symbols)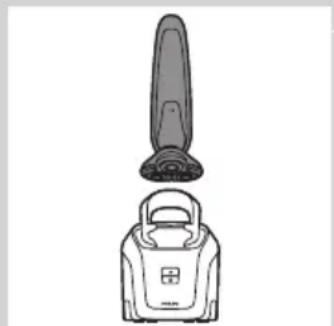
natural_image
Line drawing of a vacuum cleaner with a top-mounted blade and a closed lid (no text or symbols)natural_image
Simple line drawing of a handbag with a handle and decorative base, no text or symbols present.natural_image
Simple line drawing of a mechanical device with a sun icon and gear-like components (no text or symbols)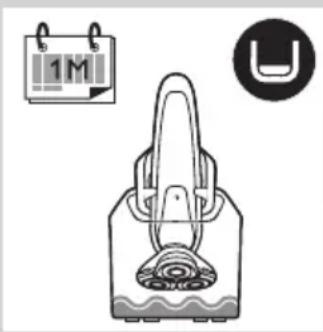
natural_image
Illustration of a handbag with a circular icon showing 'U' and a calendar icon labeled '1M' (no text or symbols on the main diagram)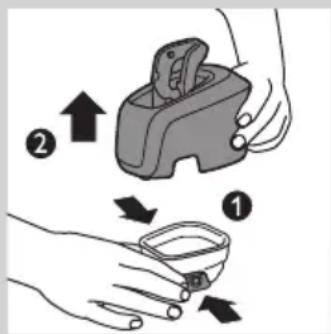
natural_image
Illustration of a hand holding a medical or electronic device with a plug inserted into it, showing internal components (no text or symbols)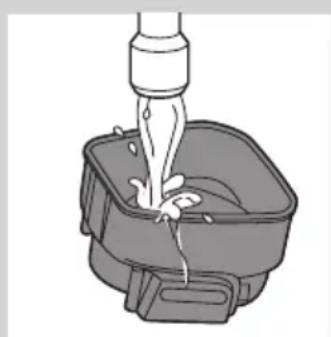
natural_image
Illustration of a faucet dispensing water into a square basin (no text or symbols)natural_image
Illustration of a hand pouring liquid into a small bowl with a directional arrow symbol (no text or labels)natural_image
Illustration of hands holding a device with a downward arrow and a small bowl, no text or symbols presentnatural_image
Illustration of a device with a light bulb and a plus sign, no text or symbols presentnatural_image
Diagram of a hand holding a mechanical device with rotating components (no text or symbols)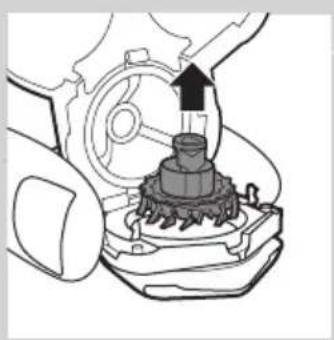
natural_image
Mechanical gear assembly diagram showing a rotating shaft and gear mechanism (no text or labels)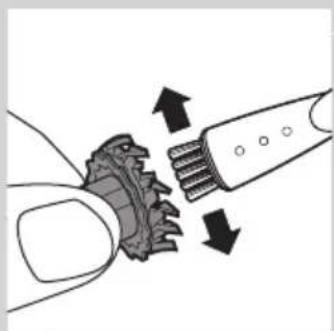
natural_image
Diagram showing a hand holding a gear-like object with arrows indicating motion or force (no text or symbols)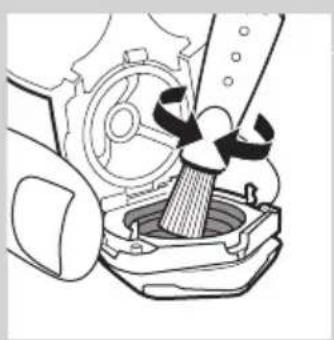
natural_image
Mechanical assembly diagram showing a gear and piston mechanism (no text or symbols)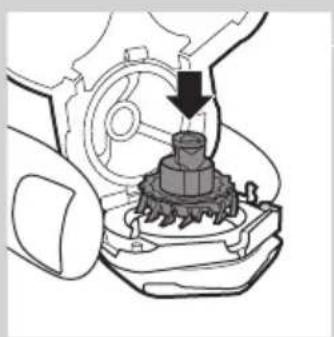
natural_image
Mechanical assembly diagram showing a gear and motor components with an arrow indicating motion direction (no text or labels)natural_image
Mechanical assembly diagram showing a rotating component with a curved arrow indicating motion (no text or symbols)natural_image
Line drawing of a handheld device with a black arrow pointing to the handle (no text or symbols)natural_image
Illustration of a hand pouring liquid into a bottle and a bag, separated by a diagonal line (no text or symbols)natural_image
Line drawing of a tool with an arrow indicating motion (no text or symbols)natural_image
Diagram showing a device with a light bulb and a hand holding a device, with an upward arrow indicating motion or change (no text or symbols present)natural_image
Symbol of a waste bin with crossed lines indicating no waste, and a solid black rectangle below (no text or labels)| Introduction 37 |
| Important 37 |
| General 37 |
| Jet Clean system (RQ1285, RQ1260, RQ1250 only) 39 |
| Compliance with standards 39 |
| General description 40 |
| The display 41 |
| Charging 41 |
| Battery fully charged 42 |
| Battery low 43 |
| Remaining battery capacity 43 |
| Clean shaver 44 |
| Travel lock 44 |
| Blocked shaving heads 45 |
| Charging 45 |
| Charging in the charger 45 |
| Charging in the Jet Clean System (RQ1285, RQ1260/21, RQ1250/21 only) 46 |
| Using the shaver 47 |
| Shaving 47 |
| Using the trimmer 48 |
| Using the Beard Styler attachment (RQ1285/RQ1275 only) 49 |
| Maintenance 51 |
| Cleaning the shaving unit 52 |
| Cleaning the shaving unit in the Jet Clean System (RQ1285, RQ1260/21, RQ1250/21 only) 53 |
| Extra-thorough cleaning method 57 |
| Cleaning the trimmer 59 |
| Cleaning the Beard Styler attachment (RQ1285/RQ1275 only) 59 |
| Storage 59 |
| Replacing the shaving unit 60 |
| Ordering accessories 61 |
| Environment 61 |
| Removing the rechargeable shaver battery 62 |
| Guarantee and support 62 |
| Guarantee restrictions 62 |
| Troubleshooting 62 |
| Additional information 65 |
Introduction
Congratulations on your purchase and welcome to Philips! To fully benefit from the support that Philips offers, register your product at www.philips.com/welcome.
Please read this user manual, as it contains information about the features of this shaver as well as some tips to make shaving easier and more enjoyable.
Important
Read this user manual carefully before you use the shaver and the Jet Clean System and save it for future reference.
Note: In this user manual the term ‘appliances’ refers to the shaver and the Jet Clean System. If your shaver does not come with a Jet Clean System, it refers to the shaver only.
General
Danger
- Make sure the adapter does not get wet.
Warning
- The adapter contains a transformer. Do not cut off the adapter to replace it with another plug, as this causes a hazardous situation.
- These appliances are not intended for use by persons (including children) with reduced physical, sensory or mental capabilities, or lack of experience and knowledge, unless they have been given supervision or instruction concerning use of the appliances by a person responsible for their safety.
- Children should be supervised to ensure that they do not play with the appliances.
- Be careful with hot water when you clean the appliances. Always check if the water is not too hot, to prevent your hands from getting burnt.
natural_image
Prohibition sign showing a faucet crossed out by a diagonal line, indicating no fire or water discharge (no text present)Caution
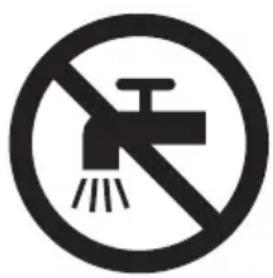
- Never immerse the Jet Clean System and the charger in water nor rinse them under the tap.
- The appliances and accessories are not dishwasher-proof.
- Always place and use the appliances on a surface that is fluid-resistant.
- Use, charge and store the appliances at a temperature between 5^ C and 35^ C.
- Only use the accessories supplied.
- The adapter transforms 100-240 volts to a safe low voltage of less than 24 volts.
- Do not use the appliances and accessories if they are damaged.
- If the adapter or any of the other accessories is damaged, always have it replaced with one of the original type in order to avoid a hazard.
- Water may leak from the socket at the bottom of the shaver when you rinse it. This is normal and not dangerous because all electronics are enclosed in a sealed power unit inside the shaver.
Jet Clean system (RQ1285, RQ1260, RQ1250 only)
Caution
- Only use the Jet Clean System with the original HQ200 cleaning fluid.
- Always place the Jet Clean System on a stable, level and horizontal surface to prevent leakage.
- Never immerse the Jet Clean System in water.
- Empty the cleaning chamber and clean it thoroughly by rinsing it with hot tap water every 15 days.
- The Jet Clean System thoroughly cleans but does not disinfect your shaver, therefore do not share the shaver with others.
- The cleaning chamber of the Jet Clean System is not dishwasher-proof.
- When the Jet Clean System is ready for use, do not move it to prevent leakage of cleaning fluid.
Compliance with standards
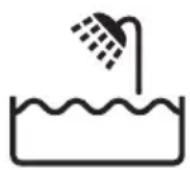
- This shaver complies with the internationally approved safety regulations and can be safely used in the bath or shower and cleaned under the tap.
- These Philips appliances comply with all standards regarding electromagnetic fields (EMF). If handled properly and according to the instructions in this user manual, the appliances are safe to use based on scientific evidence available today.
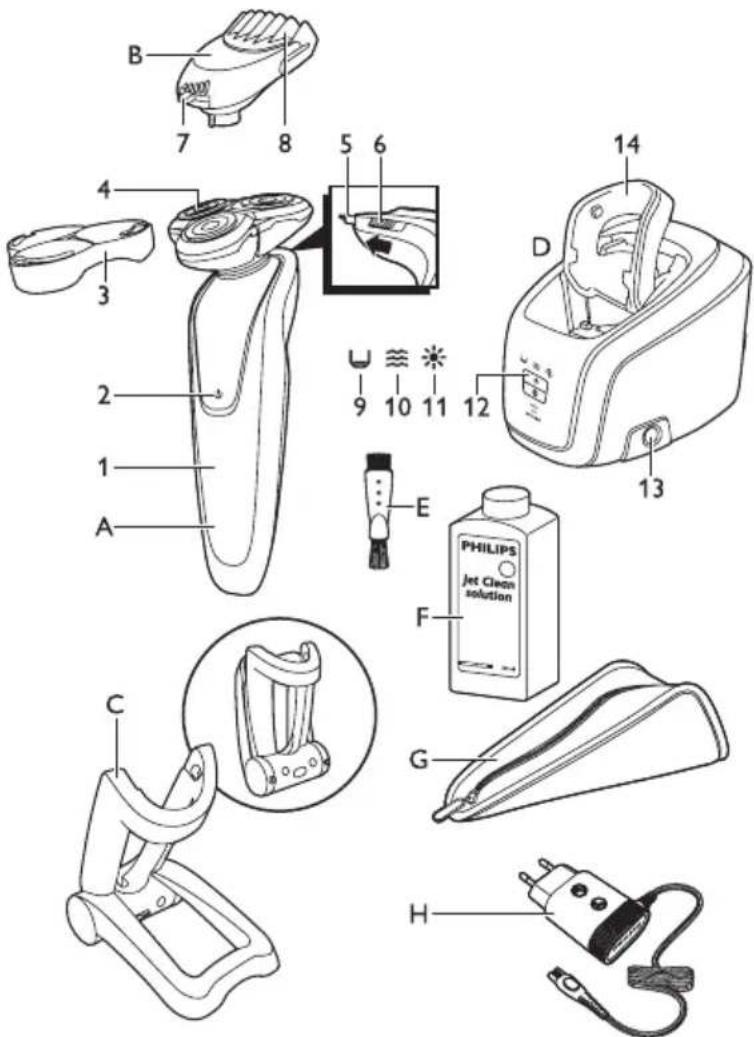
General description (Fig. 3)
A Shaver
1 Display
2 Shaver on/off button
3 Protection cap
4 RQ12 Shaving unit
5 Trimmer
6 Trimmer on/off slide
B RQ111 Beard styler attachment
7 Hair length selector
8 Comb of beard styler attachment
C Foldable charger
D Jet Clean System (RQ1285, RQ1260/21 and RQ1250/21 only)
9 'Cleaning chamber empty' symbol
10 Cleaning symbol
11 Drying symbol
12 Jet Clean System on/off button (RQ1008 only: up/down button for program selection)
13 Cleaning chamber release button
14 Shaver holder
E Cleaning brush
F HQ200 Cleaning fluid (RQ1285, RQ1260/21 and RQ1250/21 only)
G Pouch
H Adapter
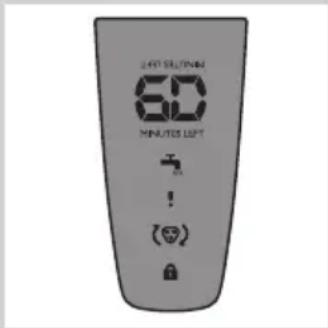
The display
Note: Before you use the shaver for the first time, remove the protective foil from the display.
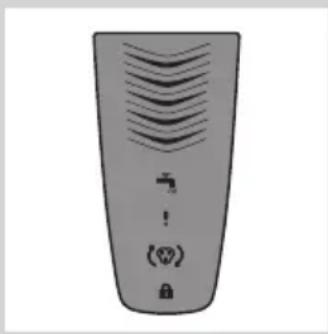
The various shaver types have different displays, which are shown in the figures below.
- RQ1285
natural_image
Front view of a gray remote control device with ventilation grille and control buttons (no text or symbols)- RQ1275, RQ1260
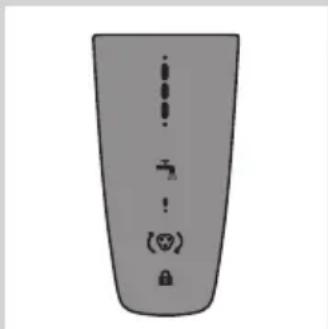
- RQ1250
Charging
- Charging takes approx. 1 hour.
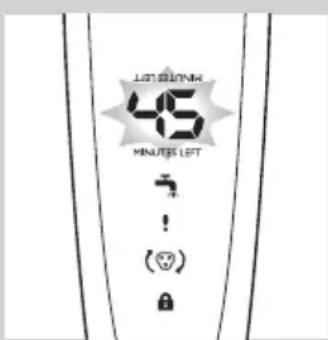
RQ1285
- When the shaver is charging, the minutes indication flashes.
- The shaving minutes increase until the shaver is fully charged.
- Quick charge: When the shaver contains enough energy for one shave, the display shows 5 minutes in red.
natural_image
Diagram of a smart air conditioner unit with cooling fan and water tap (no text or symbols)RQ1275/RQ1260/RQ1250
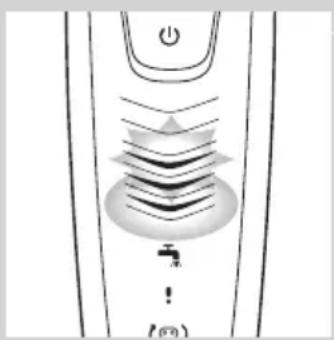
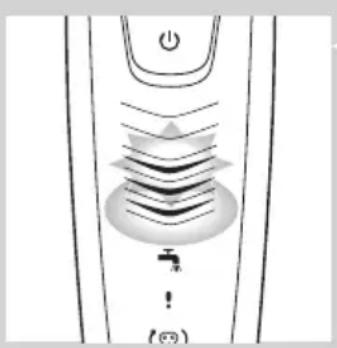
Note: The displays of the various shaver types look different, but the charging lights work in the same way.
- When the shaver is charging, first the bottom charging light flashes, then the second charging light, and so on until the shaver is fully charged.
- Quick charge: When the shaver contains enough energy for one shave, the bottom charging light alternately flashes orange and white.
Battery fully charged
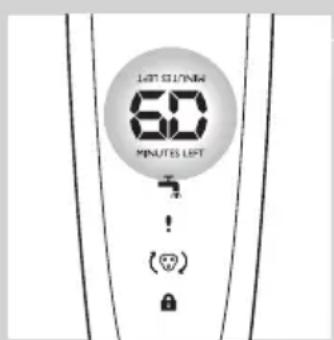
RQ1285
- When the battery is fully charged, the minutes indication lights up continuously. After approx. 30 minutes, the display automatically switches off again.
Note: The shaver is equipped with an intelligent self-learning system that monitors the shaver's energy consumption and converts the remaining battery capacity into shaving minutes. The energy consumption and therefore the remaining number of shaving minutes depend on your skin and beard type and your shaving behaviour (e.g. the use of shaving gel). If the number of shaving minutes of the fully charged shaver is less than 60 minutes, this is completely normal and does not mean that the battery capacity of the shaver has diminished.
natural_image
Diagram of a scientific apparatus with a central oval component and a water tap, no visible text or symbolsRQ1275/RQ1260/RQ1250
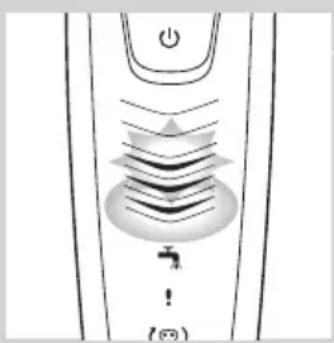
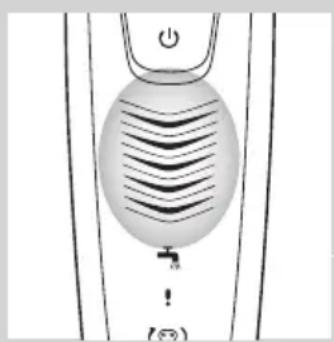
Note: The displays of the various shaver types look different, but the charging lights work in the same way.
- When the battery is fully charged, all charging lights light up continuously. After approx. 30 minutes, the display automatically switches off again.
Battery low
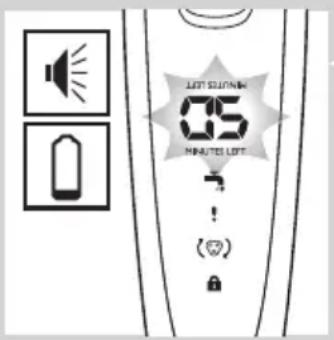
RQ1285
- When the battery is almost empty (when there are only 5 or fewer shaving minutes left), the minutes indication starts to flash.
- When you switch off the shaver, the shaving minutes continue to flash for a few more seconds. You hear a beep when there are no shaving minutes left.
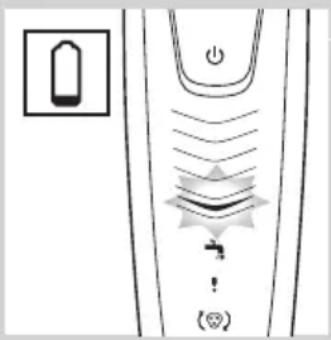
RQ1275/RQ1260/RQ1250
Note: The displays of the various shaver types look different, but the charging lights work in the same way.
- When the battery is almost empty (when there are only 5 or fewer shaving minutes left), the bottom charging light flashes orange.
- When you switch off the shaver, the bottom charging light continues to flash orange for a few seconds.
Remaining battery capacity
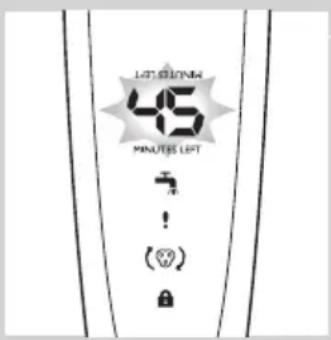
RQ1285
- The remaining battery capacity is indicated by the number of shaving minutes shown on the display.
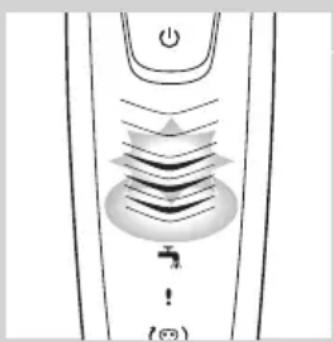
RQ1275/RQ1260/RQ1250
Note: The displays of the various shaver types look different, but the charging lights work in the same way.
- The remaining battery capacity is indicated by the flashing charging lights.
natural_image
Diagram of a smart water level sensor with power input and water tap, no text or symbols present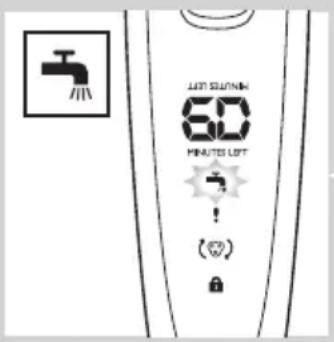
Clean shaver
For optimal shaving performance, we advise you to clean the shaver after every use.
Note: The displays of the various shaver types look different, but show the same symbol.
- The tap symbol flashes to remind you to clean the shaver.
Travel lock
You can lock the shaver when you are going to travel. The travel lock prevents the shaver from being switched on by accident.
Note: The displays of the various shaver types look different, but show the same symbol.
Activating the travel lock
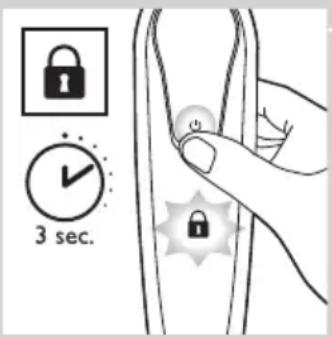
1 Press the on/off button for 3 seconds to enter the travel lock mode.
DRQ1285: The display starts to count down from 3. At 1, the appliance beeps to indicate that it is locked.
The lock symbol lights up on the display. After a few seconds it goes out.
Deactivating the travel lock
1 Press the on/off button for 3 seconds. The motor starts running to indicate that the travel lock has been deactivated.
The shaver is now ready for use again.
Note: When you place the shaver in the plugged-in charger or Jet Clean System, the travel lock is automatically deactivated.
Blocked shaving heads
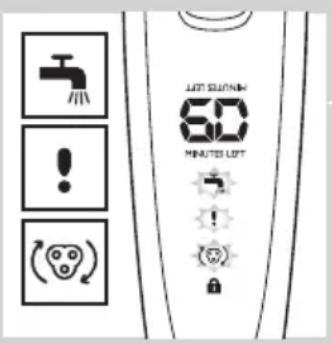
Note: The displays of the various shaver types look different, but show the same symbol.
- If the shaving heads are blocked, the shaving unit symbol, the tap symbol and the exclamation mark flash. In this case, the motor cannot run because the shaving heads are soiled or damaged.
- When this happens, you have to clean the shaving unit or replace it.
- The shaving unit symbol, the tap symbol and the exclamation mark continue to flash until you unblock the shaving heads.
Charging
Charging takes approx. 1 hour.
RQ1285/RQ1275/RQ1260: A fully charged shaver has a shaving time of up to 60 minutes or 20 days.
Note: RQ1285/1275/1260: When the battery is fully charged, the display shows the actual remaining shaving minutes (see section ‘Battery fully charged’ in chapter ‘The display’).
RQ1250: A fully charged shaver has a shaving time of up to 50 minutes or 16 days.
Charge the shaver before you use it for the first time and when the display indicates that the battery is almost empty (see section ‘Battery low’ in chapter ‘The display’).
Quick charge
After the shaver has charged for 5 minutes, it contains enough energy for one shave.
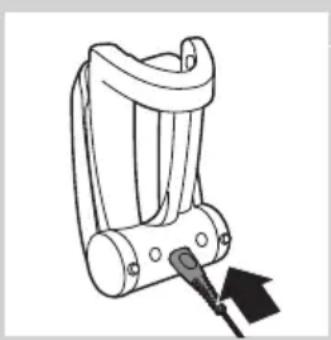
Charging in the charger
natural_image
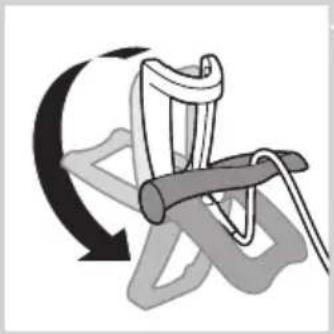
Mechanical component diagram showing a lever and pin (no text or symbols)1 Insert the small plug into the charger.
natural_image
Diagram of a mechanical device with a curved arrow indicating rotational motion (no text or symbols)2 Unfold the charger ('click').
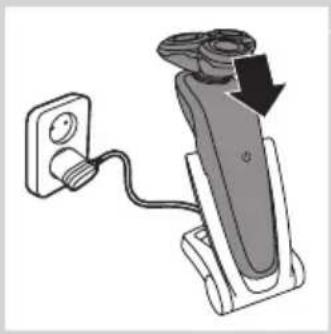
3 Put the adapter in the wall socket.
natural_image
Diagram of a handheld device with a cable and plug, showing a directional arrow (no text or symbols present)4 Put the shaver in the charger.
The display shows that the shaver is charging (see chapter 'The display').
Charging in the Jet Clean System (RQ1285, RQ1260/21, RQ1250/21 only)
natural_image
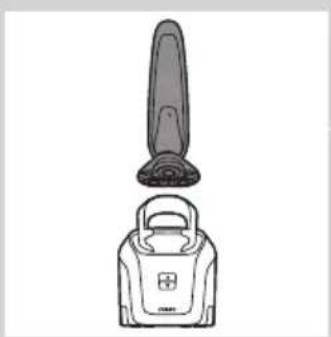
Line drawing of a vacuum cleaner with a top-mounted blade and a closed lid (no text or symbols)1 Put the small plug in the Jet Clean System.
2 Put the adapter in the wall socket.
3 Hold the shaver upside down above the holder with the back of the shaver pointing towards the holder.
Note: The shaver cannot be placed in the Jet Clean System when the protection cap is on the shaving unit.
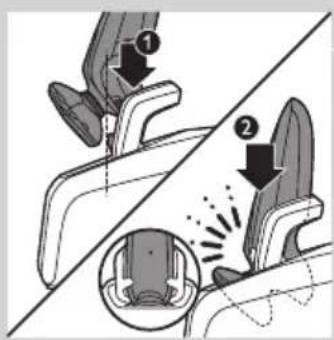
4 Place the shaver body in the holder behind the two clips (1) and press it down until it locks into place (2).
The display shows that the shaver is charging (see section ‘Charging’ in chapter ‘The display’).
Using the shaver
Shaving
Skin adaptation period
Your first shaves may not bring you the result you expect and your skin may even become slightly irritated. This is normal. Your skin and beard need time to adapt to any new shaving system.
We advise you to shave regularly (at least 3 times a week) for a period of 3 weeks to allow your skin to adapt to the new shaver. During this period, use your new electric shaver exclusively and do not use other shaving methods. If you use different shaving methods, it is more difficult for your skin to adapt to the new shaving system.
natural_image
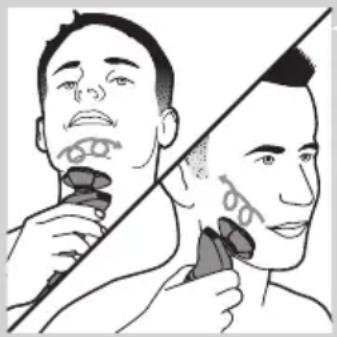
Illustration of a person applying facial contour to another person's face, showing different facial contours (no text or symbols present)1 Press the on/off button once to switch on the shaver. The display lights up for a few seconds.
2 Move the shaving heads over your skin in circular movements.
- Do not make straight movements.
3 Press the on/off button once to switch off the shaver. The display lights up for a few seconds and then shows the remaining battery capacity.
Wet shaving
You can also use this shaver on a wet face with shaving foam or shaving gel. To shave with shaving foam or shaving gel, follow the steps below:
1 Apply some water to your skin.
2 Apply shaving foam or shaving gel to your skin.
3 Rinse the shaving unit under the tap to ensure that the shaving unit glides smoothly over your skin.
4 Press the on/off button once to switch on the shaver.
5 Move the shaving heads over your skin in circular movements.
Note: Rinse the shaver under the tap regularly to ensure that it continues to glide smoothly over your skin.
natural_image
Diagram showing a device with a light bulb and a plus sign, no text or symbols present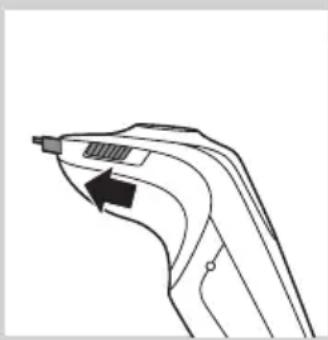
natural_image
Line drawing of a handheld device with a black arrow pointing to the handle (no text or symbols)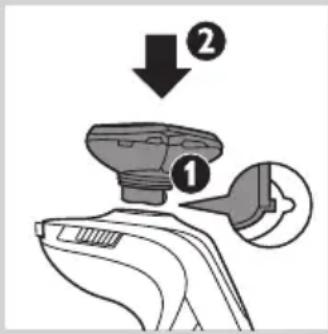
6 Dry your face and thoroughly clean the shaver after use (see chapter ‘Cleaning and maintenance’).
Note: Make sure you rinse all foam or shaving gel off the shaver.
Using the trimmer
You can use the trimmer to groom your sideburns and moustache.
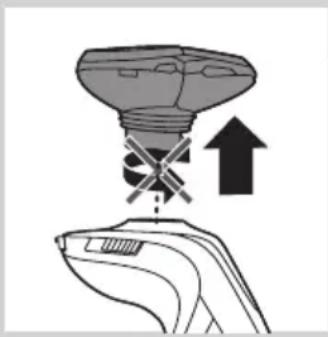
1 Pull the shaving unit straight off the shaver.
Note: Do not twist the shaving unit while you pull it off the shaver.
2 Press the on/off button once to switch on the shaver.
The display lights up for a few seconds.
3 Slide the trimmer slide forwards to slide out the trimmer.
4 You can now start trimming.
5 Slide the trimmer slide backwards to retract the trimmer.
6 Press the on/off button once to switch off the shaver.
The display lights up for a few seconds and shows the remaining battery capacity.
7 Insert the lug of the shaving unit into the slot in the top of the shaver (1). Then press down the shaving unit (2) to attach it to the shaver ('click').
Using the Beard Styler attachment (RQ1285/RQ1275 only)
natural_image
Illustration of a hand pouring liquid into a container with a cross symbol, indicating a process or operation (no text or symbols present)Note: Only use the Beard Styler attachment to trim facial hair (beard, moustache and sideburns). Do not use it to trim body parts below the neckline.
1 Make sure the shaver is switched off.
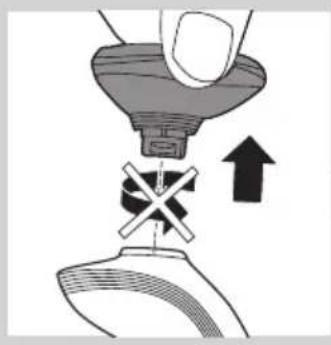
2 Pull the shaving unit straight off the shaver.
Note: Do not twist the shaving unit while you pull it off the shaver.
natural_image
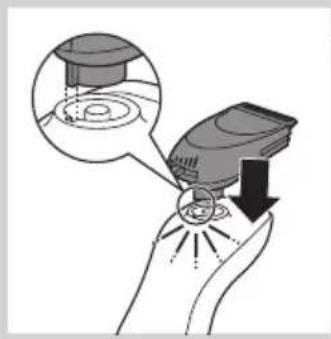
Illustration of a hand holding a medical device with a magnified inset showing internal components (no text or symbols)3 Insert the lug of the Beard Styler attachment into the slot in the top of the shaver (1). Then press down the Beard Styler attachment (2) to attach it to the shaver ('click').
Using the Beard Styler attachment with comb
You can use the Beard Styler attachment with the comb attached to style your beard at one fixed setting, but also at different length settings. The hair length settings on the Beard Styler attachment correspond to the remaining hair length after cutting and range from 1 to 5mm.
natural_image
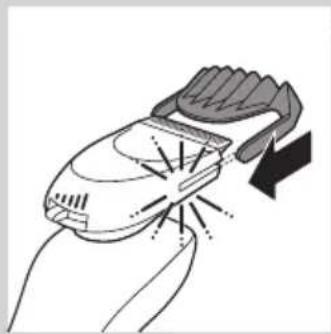
Illustration of a hand holding a handheld device with a lightning bolt indicating compression (no text or symbols)1 Slide the comb straight into the guiding grooves on both sides of the Beard Styler attachment ('click').
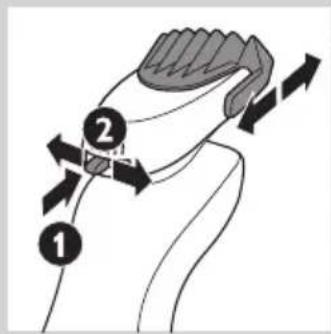
2 Press the length selector (1) and then push it to the left or right (2) to select the desired hair length setting.
natural_image
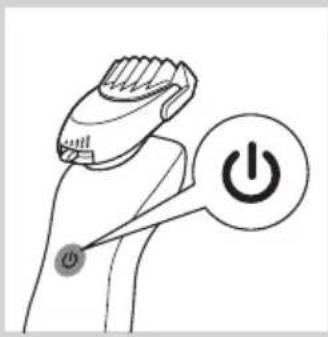
Line drawing of a person using a power shaver with a 'Power' button (no text or symbols on the diagram itself)3 Press the on/off button on the shaver to switch it on.
natural_image
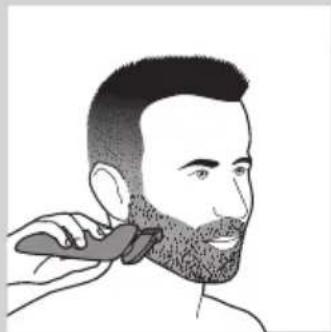
Line drawing of a person brushing their hair with a comb (no text or symbols)4 You can now start styling your beard.
Using the Beard Styler attachment without comb
You can use the Beard Styler attachment without the comb to trim and contour your beard, moustache or sideburns.
natural_image
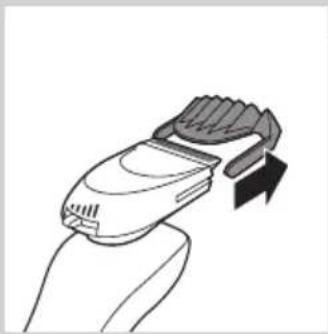
Line drawing of a handheld device with a scroll wheel and directional arrow (no text or symbols)1 Pull the comb off the Beard Styler attachment.
natural_image
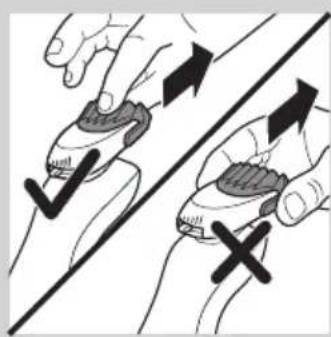
Illustration of two hands holding a device with directional arrows indicating movement or force (no text or symbols)Note: Grab the comb in the centre to pull it off the Beard Styler attachment. Do not pull at the sides of the comb.
2 Press the on/off button to switch on the shaver.
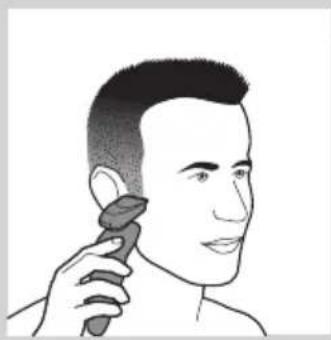
natural_image
Illustration of a person applying makeup to their ear (no text or symbols)3 You can now start to trim and contour your beard, moustache, sideburns or neckline.
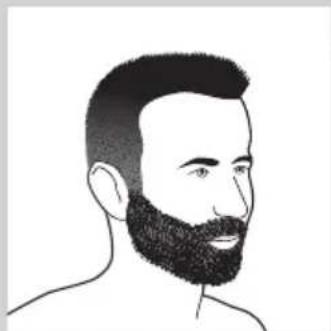
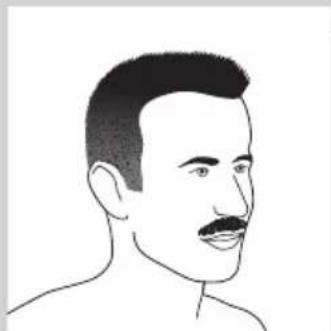
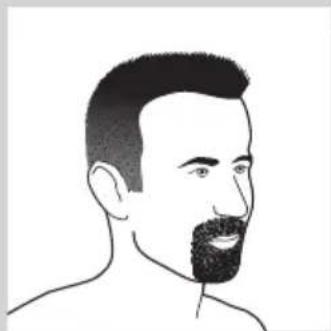
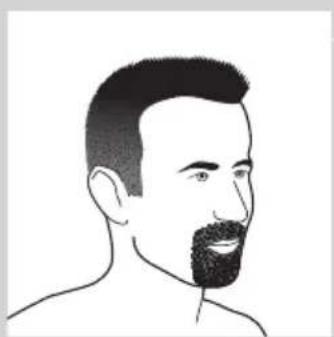
Beard styles
Below you find some examples of beard styles you can create.
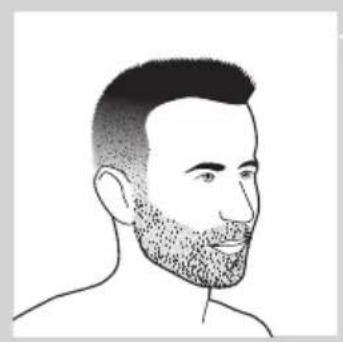
natural_image
Line drawing of a man's head and shoulders with a beard (no text or symbols)- A stubble look
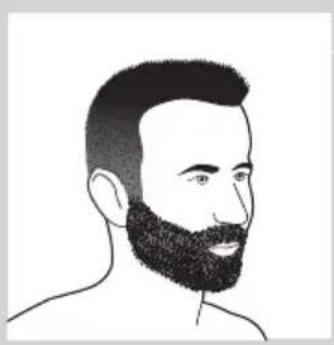
natural_image
Line drawing of a man's head and beard (no text or symbols)- A full beard
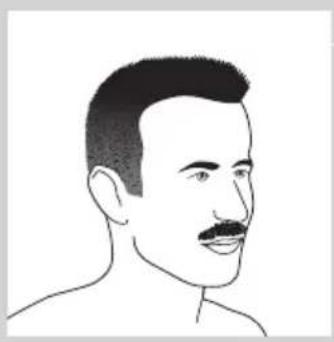
natural_image
Line drawing of a male's head and shoulders (no text or symbols)- A moustache
natural_image
Line drawing of a man's head and shoulders with a beard (no text or symbols)- A goatee
Maintenance
Never use scouring pads, abrasive cleaning agents or aggressive liquids such as petrol or acetone to clean the shaver, its accessories and the Jet Clean System (RQ1285, RQ1260, RQ1250 only).
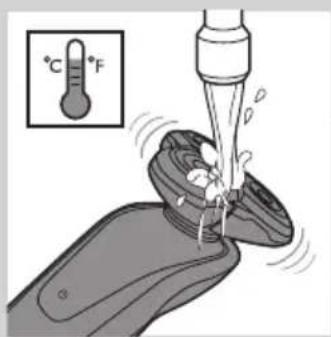
- The best and most hygienic way to clean the shaver is in the Jet Clean System. You can also rinse the shaver under the tap or clean it with the cleaning brush supplied.
natural_image
Line drawing of a hand holding a small object with an arrow indicating rotation (no text or symbols)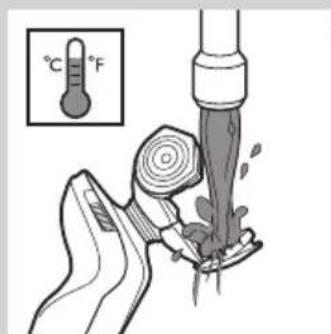
- Be careful with hot water. Always check if the water is not too hot, to prevent your hands from getting burnt.
- Clean the shaver after every shave for optimal shaving performance.
- You can clean the outside of the shaver with a damp cloth.
- Regular cleaning guarantees better shaving performance.
Cleaning the shaving unit
Be careful with hot water. Always check if the water is not too hot, to prevent your hands from getting burnt.
1 Rinse the shaving unit under a hot tap for some time.
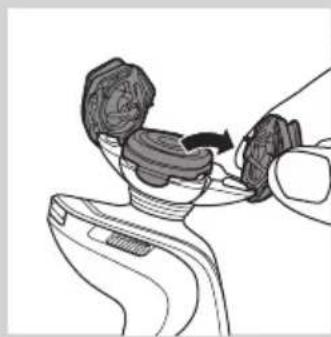
2 Pull open the three shaving heads one by one.
3 Rinse all three shaving heads and all three hair chambers under a hot tap for 30 seconds.
Note: You can also brush the shaving heads and hair chambers with the cleaning brush supplied.
Be careful with hot water. Always check if the water is not too hot, to prevent your hands from getting burnt.
4 Carefully shake off excess water and leave the shaving heads open to let the shaving unit dry completely.
Never dry the shaving unit with a towel or tissue, as this may damage the shaving heads.
Cleaning the shaving unit in the Jet Clean System (RQ1285, RQ1260/21, RQ1250/21 only)
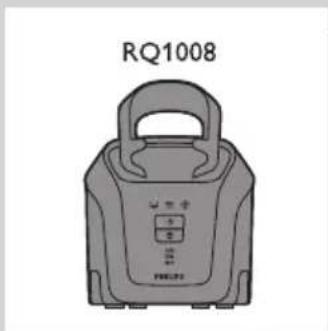
The Jet Clean System comes in two types:
- Type RQ1008 has three cleaning programs: the eco program, the auto program and the intensive program. Press the up/down button to select the cleaning program you prefer.
Note: The eco program has a shorter drying time, to save energy. The intensive program is a more thorough cleaning program.
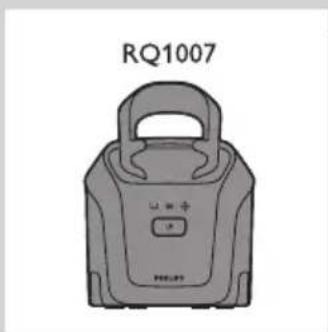
- Type RQ1007 has one automatic cleaning program. When you press the on/off button, the Jet Clean System starts cleaning in the automatic cleaning program.
Preparing the Jet Clean System for use
Fill the cleaning chamber before first use.
1 Put the small plug in the Jet Clean System.
2 Put the adapter in the wall socket.
The holder automatically moves to the highest position.
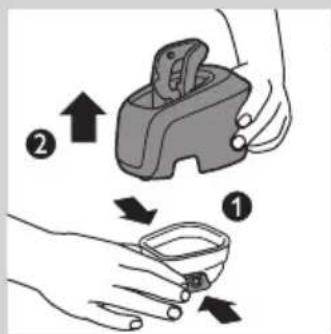
3 Simultaneously press the release buttons on both sides of the cleaning chamber (1). Then lift the Jet Clean System off the cleaning chamber (2).
The cleaning chamber remains behind.
natural_image
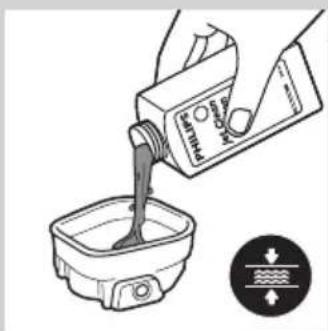
Illustration of a hand pouring liquid into a container with a water level indicator (no text or symbols)4 Fill the cleaning chamber with HQ200 cleaning fluid to a level between the two lines.
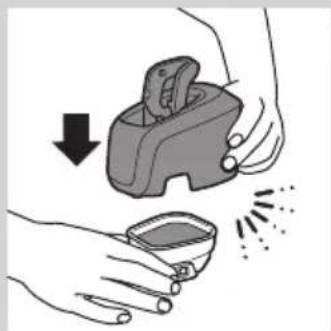
natural_image
Illustration of hands using a tool to remove a small container with liquid, showing a downward arrow and motion lines (no text or symbols)5 Place the Jet Clean System back onto the cleaning chamber.
Make sure the release buttons click back into place.
Using the Jet Clean System
Note: If you use the shaver with shaving foam or shaving gel, we advise you to rinse it under the hot tap before you clean it in the Jet Clean System. This guarantees an optimal lifetime for the cleaning fluid.
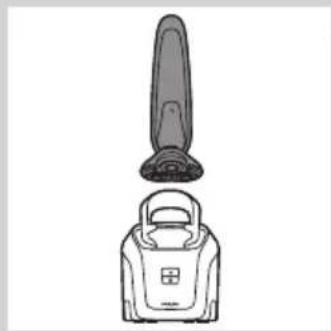
natural_image
Line drawing of a vacuum cleaner with a lid and handle (no text or symbols)1 Hold the shaver upside down above the holder with the back of the shaver pointing towards the holder.
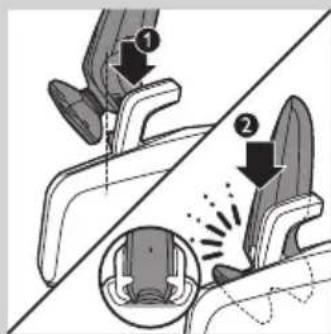
2 Place the shaver body in the holder behind the two clips (1) and press it down until it locks into place (2).
The display shows that the shaver is charging (see chapter 'The display').
3 RQ1008: Press the up/down button to select a cleaning program.
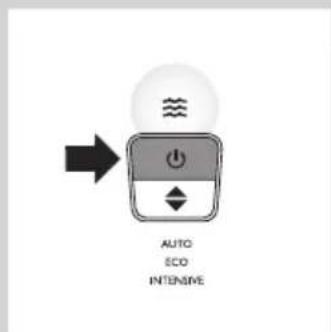
4 Press the on/off button on the Jet Clean System to start the cleaning program.
The shaver display stops showing the charging indication.
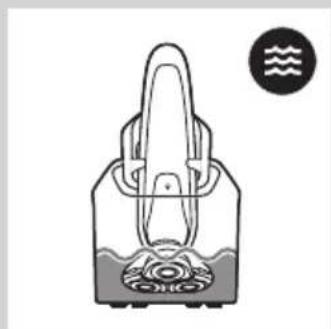
natural_image
Simple line drawing of a handbag with a handle and internal components, no text or symbols present.The cleaning light starts to flash and the shaver is automatically lowered into the cleaning fluid.
The cleaning light flashes throughout the cleaning program, which takes a few minutes.
Note: RQ1007: The cleaning program takes 4 to 6 minutes.
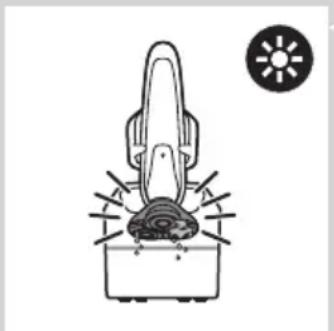
natural_image
Diagram of a mechanical device with a sunburst symbol and no visible text or labels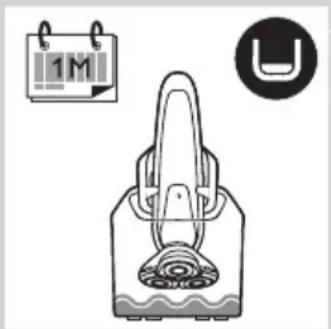
natural_image
Illustration of a hand holding a device with a circular icon showing 'U' and a calendar-like symbol (no text or labels)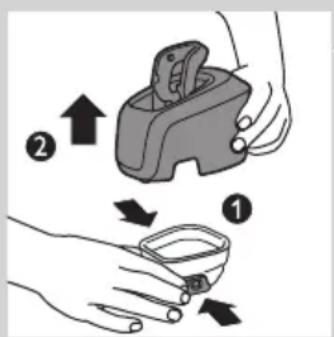
Note: RQ1008: The auto and eco cleaning programs take 4 to 6 minutes. The intensive program takes approx. 35 minutes.
During the first phase of the cleaning program, the shaver automatically switches on and off several times and moves up and down.
During the second phase of the cleaning program, the shaver is placed in the drying position, indicated by the flashing drying symbol. This phase takes approx. 2 hours. The shaver stays in this position until the end of the program.
Note: RQ1008: The drying phase takes 1 hour when you have selected the eco program.
After the cleaning program, the charging indication appears on the shaver display (see chapter 'The display').
Note: If you press the on/off button of the Jet Clean System during the cleaning program, the program aborts. In this case, the cleaning or drying light stops flashing and the holder moves to the highest position.
Note: If you remove the adapter from the wall socket during the cleaning program, the program aborts. The holder remains in its current position. When you put the adapter back into the wall socket, the holder moves to the highest position.
- When the cleaning fluid drops below the minimum level, the ‘cleaning chamber empty’ symbol starts to flash and the holder returns to its starting position.
- If you use the Jet Clean System to clean your shaver every day, you need to refill the cleaning chamber approx. every 15 days.
Cleaning the Jet Clean System
Clean the cleaning chamber every 15 days.
You can wipe the outside of the Jet Clean System with a damp cloth.
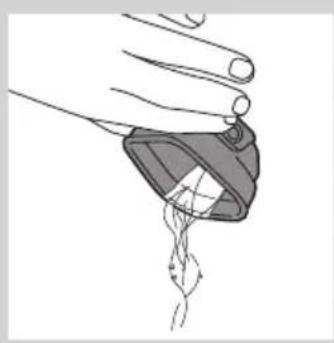
1 Simultaneously press the release buttons on both sides of the Jet Clean System (1). Then lift the Jet Clean System off the cleaning chamber (2).
The cleaning chamber remains behind.
natural_image
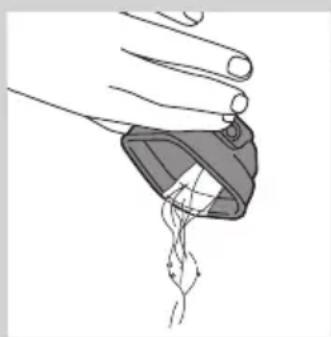
Illustration of a hand holding a small object with a string, no text or symbols present2 Pour any remaining cleaning fluid out of the cleaning chamber.
You can simply pour the cleaning fluid down the sink.
natural_image
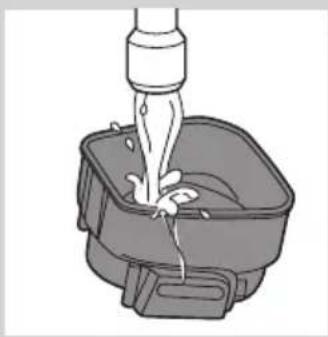
Illustration of a faucet pouring liquid into a square basin (no text or symbols)3 Rinse the cleaning chamber under the tap.
The cleaning chamber is not dishwasher-proof.
natural_image
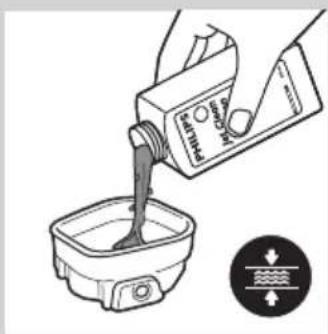
Illustration of a hand pouring liquid into a container with a sensor device (no text or symbols)4 Fill the cleaning chamber with HQ200 cleaning fluid to a level between the two lines.
natural_image
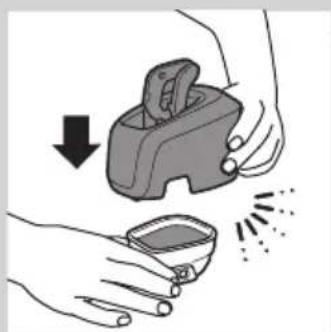
Illustration of hands using a handheld device to clean or store items, with no visible text or symbols.5 Place the Jet Clean System back onto the cleaning chamber.
Make sure the release buttons click back into place.
Extra-thorough cleaning method
Make sure the appliance is switched off.
natural_image
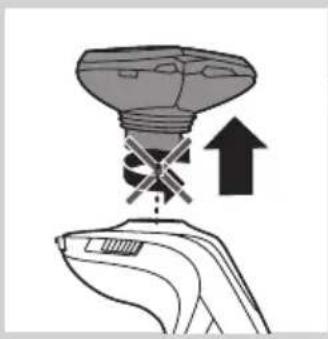
Illustration of a hand holding a device with a light bulb above and an upward arrow indicating motion (no text or symbols)1 Pull the shaving unit straight off the shaver.
Note: Do not twist the shaving unit while you pull it off the shaver.
natural_image
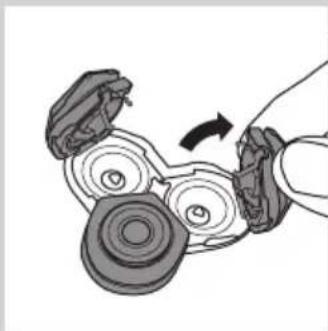
Diagram of a mechanical assembly with rotating components and a hand holding a tool (no text or symbols)2 Pull open the three shaving heads one by one.
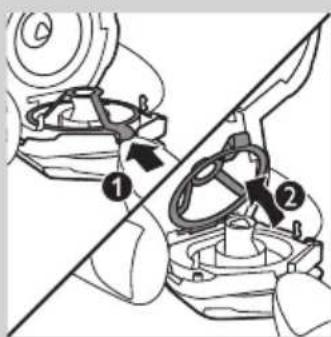
3 Press the retainer release tab (1) until the retainer opens (2).
Note: Do not clean more than one cutter and shaving guard at a time, since they are all matching sets. If you accidentally put a cutter in the wrong shaving guard, it may take several weeks before optimal shaving performance is restored.
natural_image
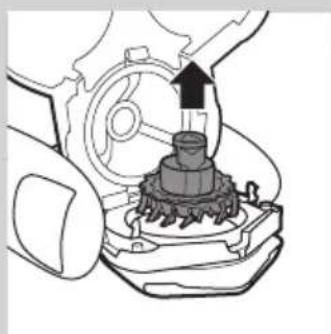
Mechanical gear assembly diagram showing a rotating shaft and gear mechanism (no text or labels)4 Remove the cutter from the shaving guard.
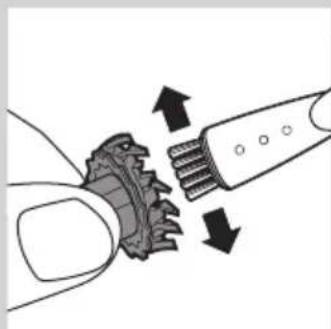
natural_image
Diagram showing a hand turning a gear with arrows indicating motion or force (no text or symbols)5 Clean the cutter with the cleaning brush supplied.
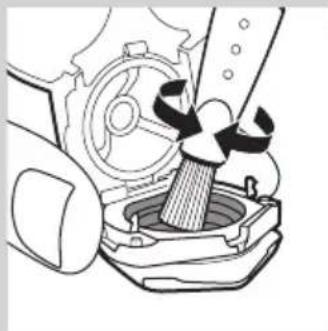
natural_image
Mechanical assembly diagram showing a gear and piston mechanism (no text or symbols)6 Clean the inside of the shaving guard.
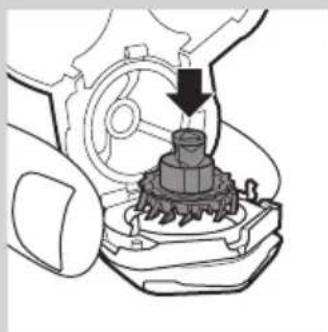
natural_image
Mechanical assembly diagram showing a gear and motor components with an arrow indicating motion (no text or symbols)7 After cleaning, place the cutter back into the shaving guard with the cutter legs pointing downwards.
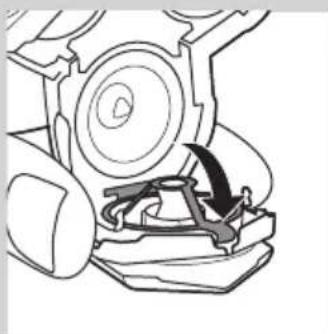
natural_image
Mechanical assembly diagram showing a rotating component with a curved arrow indicating rotation (no text or labels)8 Press down the retainer over the cutter.
9 Close the shaving heads.
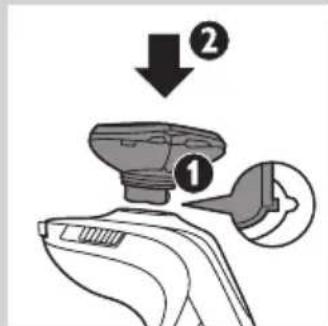
10 Insert the lug of the shaving unit into the slot in the top of the shaver (1). Then press the shaving unit downwards (2) to attach it to the shaver ('click').
Cleaning the trimmer
Clean the trimmer every time you have used it.
natural_image
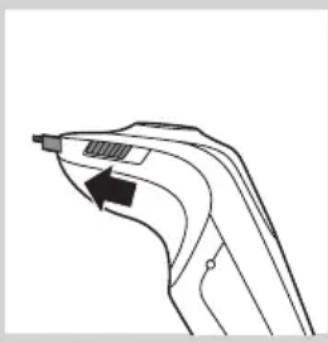
Line drawing of a handheld device with a black arrow indicating direction (no text or symbols)1 Slide the trimmer slide forwards to slide out the trimmer.
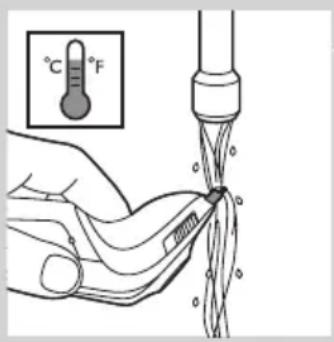
2 Rinse the trimmer under a hot tap for some time.
3 Slide the trimmer slide backwards to retract the trimmer.
Tip: For optimal trimmer performance, lubricate the trimmer teeth with a drop of sewing machine oil every six months.
Cleaning the Beard Styler attachment (RQ1285/RQ1275 only)
natural_image
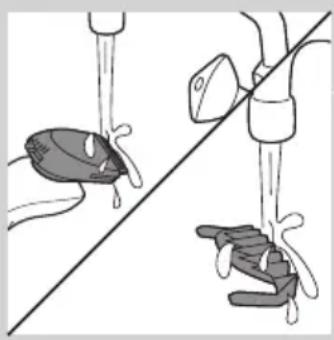
Illustration of a hand washing clothes with a tool, showing two different positions (no text or symbols present)Clean the Beard Styler attachment every time you have used it.
1 Pull the comb off the Beard Styler attachment.
2 Rinse the Beard Styler attachment and the comb separately under a hot tap for some time.
Note: You can also clean the Beard Styler attachment and the comb with the cleaning brush supplied.
3 Lubricate the trimmer teeth with a drop of sewing machine oil every six months.
Storage
natural_image
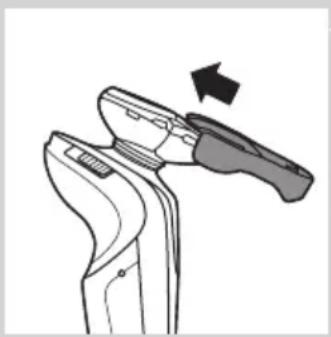
Line drawing of a pliers tool with an arrow indicating motion (no text or symbols)1 Slide the protection cap onto the shaving unit to prevent damage to the shaving heads.
2 You can also store the shaver in the pouch supplied.
Replacing the shaving unit
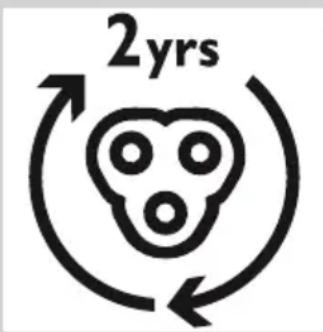
For maximum shaving performance, we advise you to replace the shaving unit every 2 years.
Only replace the shaving unit with an original RQ12 Philips Shaving unit.
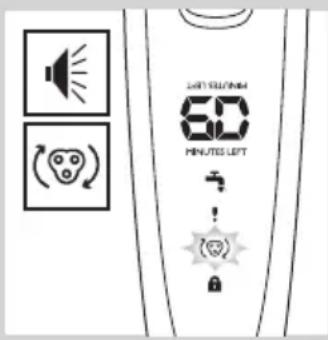
1 The shaving unit symbol flashes (all types) and you hear a beep (RQ1285 only) when you switch off the shaver.
Note: The displays of the different types look different, but show the same symbol.
natural_image
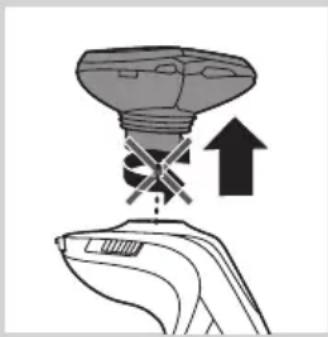
Diagram showing a device with a lamp and a hand holding a device, indicating an upward motion (no text or symbols present)2 Pull the old shaving unit straight off the shaver.
Note: Do not twist the shaving unit while you pull it off the shaver.
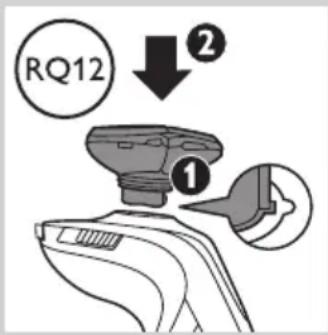
3 Insert the lug of the new RQ12 shaving unit into the slot in the top of the shaver (1). Then press down the shaving unit (2) to attach it to the shaver ('click').
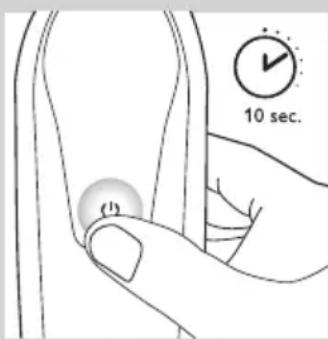
4 To reset the shaver, press and hold the on/off button for approx. 10 seconds.
Note: If you do not reset the shaver at the first replacement reminder, it continues to beep (specific types only) and show the shaving unit symbol at 8 more shaves (specific types only) or until you reset the shaver (specific types only).
Ordering accessories
To purchase accessories for this appliance, please visit our online shop at www.shop.philips.com/service. If the online shop is not available in your country, go to your Philips dealer or a Philips service centre. If you have any difficulties obtaining accessories for your appliance, please contact the Philips Consumer Care Centre in your country. You find its contact details in the worldwide guarantee leaflet.
The following parts are available:
- HQ8505 adapter
- RQ12 Philips Shaving Unit
- HQ110 Philips Shaving Head Cleaning Spray
- HQ200 Philips Cleaning Fluid
- RQ111 Beard Styler attachment
Shaving heads
- We advise you to replace your shaving heads every 2 years. Always replace the shaving unit with an original RQ12 Philips Shaving Unit.
Cleaning
- RQ1285,RQ1260/21,RQ1250/21 only: use Jet Clean Solution (HQ200) for regular cleaning of the shaving heads.
Environment
natural_image
Symbol of a waste bin with crossed lines indicating no waste, and a solid black rectangle below (no text or labels)- Do not throw away the appliances with the normal household waste at the end of their life, but hand them in at an official collection point for recycling. By doing this, you help to preserve the environment.
natural_image
Symbol of a trash bin crossed out by two diagonal lines (no text or numbers present)- The built-in rechargeable shaver battery contains substances that may pollute the environment. Always remove the battery before you discard or hand in the shaver at an official collection point. Dispose of the battery at an official collection point for batteries. If you have trouble removing the battery, you can also take the appliance to a Philips service centre. The staff of this centre will remove the battery for you and will dispose of it in an environmentally safe way.
Removing the rechargeable shaver battery
Only remove the rechargeable battery when you discard the shaver. Make sure the battery is completely empty when you remove it.
Be careful, the battery strips are sharp.
1 Remove the back panel of the shaver with a screwdriver.
2 Remove the rechargeable battery.
Guarantee and support
If you need information or support, visit www.philips.com/support or read the separate worldwide guarantee leaflet.
Guarantee restrictions
The shaving heads (cutters and shaving guards) are not covered by the terms of the international guarantee because they are subject to wear.
Troubleshooting
This chapter summarises the most common problems you could encounter with the appliance. If you are unable to solve the problem with the information below, visit www.philips.com/support for a list of frequently asked questions or contact the Consumer Care Centre in your country.
Problem Possible cause Solution
| The shaver does not shave as well as it used to. | The shaving heads are damaged or worn. | Replace the shaving unit (see chapter ‘Replacement’). |
| Long hairs obstruct the shaving heads. | Clean the shaving heads by following the steps of the extra-thorough cleaning method (see chapter ‘Cleaning and maintenance’). |
Problem Possible cause Solution
| Specific types only: The Jet Clean System has not cleaned the shaver properly, because the cleaning fluid in the cleaning chamber is soiled or the cleaning fluid level is too low. | Clean the shaver thoroughly before you continue shaving. If necessary, clean and refill the cleaning chamber (see chapter ‘Cleaning and maintenance’). | |
| The shaver does not work when I press the on/off button. | The rechargeable battery is empty. Recharge the battery (see chapter ‘Charging’). | |
| Specific types only: The travel lock is activated. | Press the on/off button for 3 seconds to deactivate the travel lock. | |
| The shaving unit is soiled or damaged to such an extent that the motor cannot run. In this case, the shaving unit symbol, the tap symbol and the exclamation mark flash. | Clean the shaving unit or replace it (see chapters ‘Cleaning and maintenance’ and ‘Replacement’). | |
| The temperature of the shaver is too high. In this case, the shaver does not work and the exclamation mark on the display flashes. | Switch off the shaver and let it cool down. As soon as the temperature of the shaver has dropped sufficiently, you can switch on the shaver again. | |
| RQ1285, RQ1260/21, RQ1250/21 only: The shaver is not entirely clean after I clean it in the Jet Clean System. | The cleaning fluid in the cleaning chamber is soiled. | Empty and rinse the cleaning chamber and refill it with new cleaning fluid. |
| The cleaning fluid level is too low. If the fluid volume in the cleaning chamber drops below the minimum level during the cleaning program, the program aborts. The cleaning light and the ‘cleaning chamber empty’ symbol flash at intervals and the holder returns to its starting position. | Refill the cleaning chamber with cleaning fluid to a level between the two lines (see chapter ‘Cleaning and maintenance’). | |
Problem Possible cause Solution
| You have used another cleaning fluid than the original Philips cleaning fluid. | Only use HQ200 Philips Cleaning Fluid. | |
| RQ1285, RQ1260/21, RQ1250/21 only: The Jet Clean System does not work when I press the on/off button. | The Jet Clean System is not connected to the mains. | Put the small plug in the Jet Clean System and put the adapter in the wall socket. |
| You have not placed the shaver in the Jet Clean System properly, so there is no electrical connection between the Jet Clean System and the shaver. | Press the shaver tightly into the holder to lock it into place. | |
| RQ1285, RQ1260/21, RQ1250/21 only: The shaver is not fully charged after I charge it in the charger/Jet Clean System. | You have not placed the shaver in the charger/Jet Clean System properly. | Make sure you press the shaver until it locks into place. |
| The shaver is fully charged, but the display shows less than 60 shaving minutes. | The shaver is equipped with an intelligent self-learning system that monitors the shaver's energy consumption and converts the remaining battery capacity into shaving minutes. The energy consumption and therefore the remaining number of shaving minutes depend on your skin and beard type and your shaving behaviour (e.g. the use of shaving gel). | If the number of shaving minutes of the fully charged shaver is less than 60 minutes, this is completely normal and does not mean that the battery capacity of the shaver has diminished. |
Problem Possible cause Solution
| RQ1008: The operating time of the Jet Clean System is suddenly shorter or longer than it used to be. | You have selected another cleaning program. The Jet Clean System has three cleaning programs: the eco program, the normal program and the intensive program. Each of these programs has a different operating time. | Press the up/down button on the Jet Clean System to select the cleaning program of your preference (see chapter ‘Cleaning and maintenance’). |
| My skin is slightly irritated after shaving. | Your skin has not yet adapted to the new shaving system. | Wait at least 3 weeks to allow your skin to adapt to the new shaver. Do not use different shaving methods during this period, it will be easier for your skin to adapt. |
Additional information
| Type number | RQ1285 | RQ1275 | RQ1260/21 | RQ1260/16 | RQ1250/21 | RQ1250/16 |
| Jet clean system | √ | √ | √ | |||
| HQ200 cleaning fluid | √ | √ | √ | |||
| Beard Styler Attachment | √ | √ |

- Gebrauchsanleitung
- PHILIPS
- Gefahr
- Das Display
- Laden
- RQ1275/RQ1260/RQ1250
- RQ1285
- Den Rasierer reinigen
- Wartung
- Introduction
- Important
- General
- Danger
- Warning
- Caution
- Jet Clean system (RQ1285, RQ1260, RQ1250 only)
- Compliance with standards
- General description (Fig. 3)
- The display
- Charging
- Battery fully charged
- Battery low
- Remaining battery capacity
- Clean shaver
- Travel lock
- Activating the travel lock
- Deactivating the travel lock
- Blocked shaving heads
- Quick charge
- Charging in the charger
- Charging in the Jet Clean System (RQ1285, RQ1260/21, RQ1250/21 only)
- Using the shaver
- Shaving
- Skin adaptation period
- Wet shaving
- Using the trimmer
- Using the Beard Styler attachment (RQ1285/RQ1275 only)
- Using the Beard Styler attachment with comb
- Using the Beard Styler attachment without comb
- Beard styles
- Maintenance
- Cleaning the shaving unit
- Cleaning the shaving unit in the Jet Clean System (RQ1285, RQ1260/21, RQ1250/21 only)
- Preparing the Jet Clean System for use
- Using the Jet Clean System
- Cleaning the Jet Clean System
- Extra-thorough cleaning method
- Cleaning the trimmer
- Cleaning the Beard Styler attachment (RQ1285/RQ1275 only)
- Storage
- Replacing the shaving unit
- Ordering accessories
- Shaving heads
- Cleaning
- Environment
- Removing the rechargeable shaver battery
- Guarantee and support
- Guarantee restrictions
- Troubleshooting
Brand : PHILIPS
Model : CP9331
Category : Razor Accessories