CLM-V55 - Camera Monitor SONY - Free user manual and instructions
Find the device manual for free CLM-V55 SONY in PDF.

| Product Type | Portable LCD Camera Monitor |
| Brand | Sony |
| Model | CLM-V55 |
| Dimensions (W × H × D) | Approx. 129 mm × 88.5 mm × 20 mm (without protrusions) |
| Weight | Approx. 250 g (main unit only) |
| Power Source | Sony M series battery (NP-FM500H, NP-QM71D, NP-QM91D) or AC adaptor AC-PW10AM (not supplied) |
| Battery Life | Approx. 3 h (NP-FM500H), 5 h (NP-QM71D), 8 h (NP-QM91D) |
| Power Consumption | Approx. 5 W |
| LCD Screen Size | 5 inches (type) |
| Screen Resolution | 800 × 480 pixels |
| Screen Aspect Ratio | 15:9 |
| Video Input | HDMI Type A |
| Audio Output | Built-in 0.5 W monaural speaker, 3.5 mm stereo headphone jack |
| Main Functions | Peaking, pixel-by-pixel zoom, marker display (80% / 90%), brightness, contrast, phase, backlight, color temperature adjustments |
| Supplied Accessories | Shoe adaptor (2), HDMI cable (Type A ↔ Type C), sunshade, carrying case, set of printed documents |
| Operating Temperature | 0°C to 40°C |
| Storage Temperature | -20°C to +60°C |
| Cleaning and Care | Screen: soft dry or slightly damp cloth; body: soft dry cloth. Do not use solvents. |
| Safety | Do not expose to rain or moisture; replace battery with specified type; do not open the unit (risk of electric shock). |
| Spare Parts and Repairability | Battery and AC adaptor sold separately; no user-serviceable parts; contact qualified technician. |
| Warranty | Refer to enclosed documents; for EU countries, comply with WEEE directive. |
Frequently Asked Questions - CLM-V55 SONY
User questions about CLM-V55 SONY
0 question about this device. Answer the ones you know or ask your own.
Ask a new question about this device
Download the instructions for your Camera Monitor in PDF format for free! Find your manual CLM-V55 - SONY and take your electronic device back in hand. On this page are published all the documents necessary for the use of your device. CLM-V55 by SONY.
USER MANUAL CLM-V55 SONY
Operating Instructions GB
Mode d'emploi FR
English
Before operating the product, please read this manual thoroughly and retain it for future reference.
WARNING
To reduce fire or shock hazard, do not expose the unit to rain or moisture.
CAUTION
Replace the battery with the specified type only. Otherwise, fire or injury may result.
Do not expose the batteries to excessive heat such as sunshine, fire or the like.
Excessive sound pressure from earphones and headphones can cause hearing loss.

CAUTION
RISK OF ELECTRIC SHOCK DO NOT OPEN

CAUTION: TO REDUCE THE RISK OF ELECTRIC SHOCK, DO NOT REMOVE COVER (OR BACK).
NO USER-SERVICEABLE PARTS INSIDE.
REFER SERVICING TO QUALIFIED SERVICE PERSONNEL.

natural_image
Warning symbol of a lightning bolt inside a triangle (no text or numbers)This symbol is intended to alert the user to the presence of uninsulated “dangerous voltage” within the product’s enclosure that may be of sufficient magnitude to constitute a risk of electric shock to persons.

This symbol is intended to alert the user to the presence of important operating and maintenance (servicing) instructions in the literature accompanying the appliance.
IMPORTANT SAFETY INSTRUCTIONS
- Read these instructions.
- Keep these instructions.
- Heed all warnings.
- Follow all instructions.
- Do not use this apparatus near water.
- Clean only with dry cloth.
- Do not block any ventilation openings. Install in accordance with the manufacturer's instructions.
- Do not install near any heat sources such as radiators, heat registers, stoves, or other apparatus (including amplifiers) that produce heat.
- Do not defeat the safety purpose of the polarized or grounding-type plug. A polarized plug has two blades with one wider than the other. A grounding type plug has two blades and a third grounding prong. The wide blade or the third prong are provided for your safety. If the provided plug does not fit into your outlet, consult an electrician for replacement of the obsolete outlet.
- Protect the power cord from being walked on or pinched particularly at plugs, convenience receptacles, and the point where they exit from the apparatus.
- Only use attachments/accessories specified by the manufacturer.
- Use only with the cart, stand, tripod, bracket, or table specified by the manufacturer, or sold with the apparatus. When a cart is used, use caution when moving the cart/apparatus combination to avoid injury from tip-over.

natural_image
Silhouette of a person climbing a ladder inside a circle (no text or symbols)- Unplug this apparatus during lightning storms or when unused for long periods of time.
- Refer all servicing to qualified service personnel. Servicing is required when the apparatus has been damaged in any way, such as power-supply cord or plug is damaged, liquid has been spilled or objects have fallen into the apparatus, the apparatus has been exposed to rain or moisture, does not operate normally, or has been dropped.
CAUTION
You are cautioned that any changes or modifications not expressly approved in this manual could void your authority to operate this equipment.
Note:
This equipment has been tested and found to comply with the limits for a Class B digital device, pursuant to Part 15 of the FCC Rules. These limits are designed to provide reasonable protection against harmful interference in a residential installation. This equipment generates, uses, and can radiate radio frequency energy and, if not installed and used in accordance with the instructions, may cause harmful interference to radio communications. However, there is no guarantee that interference will not occur in a particular installation. If this equipment does cause harmful interference to radio or television reception, which can be determined by turning the equipment off and on, the user is encouraged to try to correct the interference by one or more of the following measures:
– Reorient or relocate the receiving antenna.
— Increase the separation between the equipment and receiver.
- Connect the equipment into an outlet on a circuit different from that to which the receiver is connected.
- Consult the dealer or an experienced radio/TV technician for help.
This product has been tested and found compliant with the limits sets out in the EMC regulation for using connection cables shorter than 3 meters (9.8 feet).
Notice for the customers in the countries applying EU Directives
The manufacturer of this product is Sony Corporation, 1-7-1 Konan Minato-ku Tokyo, 108-0075 Japan.
The Authorized Representative for EMC and product safety is Sony Deutschland GmbH, Hedelfinger Strasse 61, 70327 Stuttgart, Germany. For any service or guarantee matters please refer to the addresses given in separate service or guarantee documents.
Disposal of Old Electrical & Electronic Equipment (Applicable in the European Union and other European countries with separate collection systems)

natural_image
Symbol of a trash bin crossed out by two diagonal lines (no text or numbers present)
This symbol on the product or on its packaging indicates that this product shall not be treated as household waste. Instead it shall be handed over to the applicable collection point for the recycling of electrical and electronic equipment. By ensuring this product is disposed of correctly, you will help prevent potential negative consequences for the environment and human health, which could otherwise be caused by inappropriate waste handling of this product. The recycling of materials will help to conserve natural resources. For more detailed information about recycling of this product, please contact your local Civic Office, your household waste disposal service or the shop where you purchased the product.
Table of contents
Precaution....8
Before use....10
Checking the accessories....10
Features....11
Identifying the parts....12
Supplying power 14
Attaching the battery....14
Connecting to an AC adaptor....16
Attaching to the camera....17
Attaching to the camera....17
Adjusting the direction of the screen....22
Attaching the sun shade hood 23
Using the monitor....26
Menu and operation....26
Available functions....28
Troubleshooting....32
Specifications....34
Precaution
About the battery pack, AC adaptor and charger
A battery pack, AC adaptor and charger are not supplied.
Use a compatible battery pack or AC adaptor (pages 14, 16).
If you do not have a battery pack or AC adaptor, purchase them separately.
Handling the LCD screen
- Do not leave the LCD screen facing the sun as it can damage the LCD screen. Take care when you place the unit by a window.
- Do not push or scratch the LCD monitor's screen. Do not place a heavy object on the LCD monitor's screen. This may cause the screen to lose uniformity.
- If the unit is used in a cold place, horizontal lines or a residual image may appear on the screen. This is not a malfunction. When the monitor becomes warm, the screen returns to normal.
- If a fixed picture such as a frame of a divided picture or time code, or a still picture is displayed for a long time, an image may remain on the screen and be superimposed as a ghosting image.
- The screen and the cabinet become warm during operation. This is not a malfunction.
- The LCD panel fitted to this unit is manufactured with high precision technology. Thus a very small proportion of pixels may be “stuck”, either always off (black), always on (red, green, or blue), or flashing. In addition, over a long period of use, because of the physical characteristics of the liquid crystal display, such “stuck” pixels may appear spontaneously. These problems are not a malfunction.
On cleaning
Before cleaning
Be sure to remove the battery first.
On cleaning the monitor screen
The monitor screen surface is especially treated to reduce reflection of light. As incorrect maintenance may impair the performance of the monitor, take care with respect to the following:
- Wipe the screen gently with a soft cloth such as a cleaning cloth or glass cleaning cloth.
- Stubborn stains may be removed with a soft cloth such as a cleaning cloth or glass cleaning cloth lightly dampened with water.
- Never use solvent such as alcohol, benzene or thinner, or acid, alkaline or abrasive detergent, or chemical cleaning cloth, as they will damage the screen surface.
On cleaning the cabinet
- Clean the cabinet gently with a soft dry cloth. Stubborn stains may be removed with a cloth lightly dampened with mild detergent solution, followed by wiping with a soft dry cloth.
- Use of alcohol, benzene, thinner or insecticide may damage the finish of the cabinet or remove the indications on the cabinet. Do not use these chemicals.
- If you rub on the cabinet with a stained cloth, the cabinet may be scratched.
- If the cabinet is in contact with a rubber or vinyl resin product for a long period of time, the finish of the cabinet may deteriorate or the coating may come off.
On disposal
- Do not dispose of this unit with ordinary garbage. Do not throw the monitor away with garbage that will be placed in a landfill.
On this unit
- The top of this unit and the ventilation holes and metal parts may become hot after long use. Be very careful if holding this unit during or after use.
Using in an airplane
During take-off and landing, follow the onboard instructions concerning this unit.
Before use
Read this instruction manual together with the instruction manual of your camera.
This unit is not dust-proof, splash-proof or waterproof.
Do not place this unit in the following locations
Regardless of whether this unit is in use or in storage, do not place it in any of the following locations. Doing so may lead to a malfunction.
- Placing this unit in locations subject to direct sunlight such as on dashboards or near a heater may cause this unit to deform or malfunction.
- Locations with excessive vibration
- Locations with strong electromagnetism
- Locations with excessive sand
In locations such as the seashore and other sandy areas or where dust clouds occur, protect the unit from sand and dust. This may lead to a malfunction.
Checking the accessories
Check that the following accessories are supplied. If anything is missing, contact your Sony dealer.
- Shoe adaptor (for auto lock accessory shoe and accessory shoe)
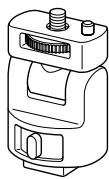
natural_image
Technical line drawing of a mechanical clamp or bracket component (no text or symbols)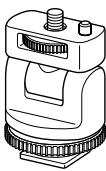
natural_image
Technical line drawing of a mechanical clamp or bracket component (no text or symbols)- Sun shade hood
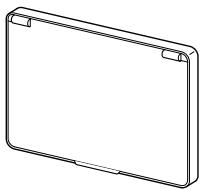
natural_image
Simple line drawing of a rectangular frame with rounded corners and two corner notches (no text or symbols)• HDMI cable (Approx. 45 cm, Type A ↔ Type C)
- Carrying pouch
- Set of printed documentation
Features
This unit is a portable LCD monitor for use with an Interchangeable Lens Digital Camera or an Interchangeable Lens Digital HD Video Camera Recorder with an HDMI terminal and live view mode. It can display HDMI video output from the camera.
The following functions help you to see the image more clearly and take better pictures.
- Wide viewing angle LCD screen
- Useful functions such as peaking and pixel-by-pixel zoom
- Moveable shoe adaptor enables easy removal when using a camera that has an auto lock accessory shoe.
Identifying the parts
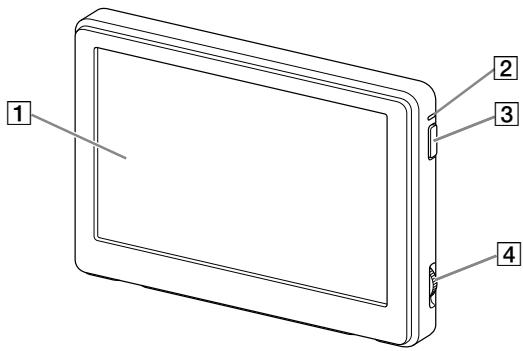
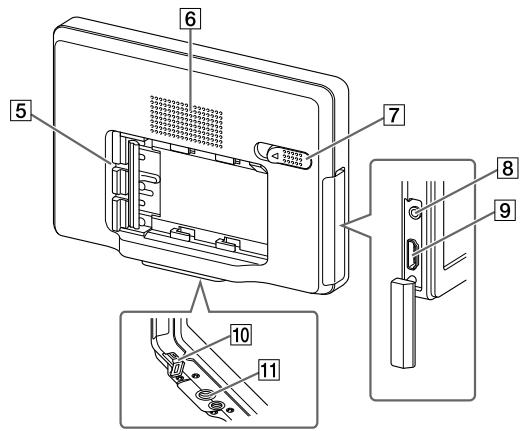
1 LCD screen
2 Power lamp
When the power is on, this lamp lights up or blinks depending on the status of this unit. (Page 15)
3 Power button
Press and hold down to turn this unit on or off.
4 Operation dial
Brings up and operates the menu.
| Press the dial to the left* | Brings up the menu./Executes the selection. |
| Turn the dial | Selects the menu item./Changes the setting value. |
* The function varies depending on the status of this unit.
5 Battery pack terminal
6 Speaker
This is a monaural speaker for checking sound.
7 Battery release lever
8 Headphone jack
You can connect headphones with a 3.5 mm stereo mini-plug to listen to sound.
- No sound comes from the speaker when headphones are connected.
9 HDMI (Type A) jack
10 DC IN jack
11 Tripod receptacle
Supplying power
This unit can be powered by a Sony rechargeable battery pack or a Sony AC adaptor.
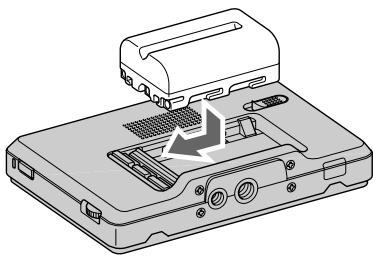
Attaching the battery
The following Sony rechargeable battery packs (not supplied) can be used with this unit. You cannot use other battery packs because this unit will not work properly with them.
- NP-FM500H
- NP-QM71D
- NP-QM91D
Note
- When using the NP-QM71D or NP-QM91D, attach the camera to a tripod first.
Push the battery in gently in the direction shown, then slide it to the left while still pushing.
There is a click as the battery is fixed into place.
natural_image
Illustration of a device with a mechanical component and a highlighted internal structure (no text or symbols)To remove the battery
Slide the battery to the right while sliding the battery release lever to the left.
The battery pack comes away from this unit.

natural_image
Illustration of a computer hard drive with an arrow indicating compression or release (no text or symbols present)Note
- Be careful not to drop the battery while removing it.
To check the remaining battery power
You can check the remaining battery power with the power lamp. When the lamp becomes red, replace the battery pack soon with a fully charged battery pack.
| Lighting status of the power lamp | Status of this unit |
| Green (lit) | Power is on. (Operated by battery) |
| Green (flashing slowly) | Turning on or off. (Operated by battery) |
| White (lit) | Power is on. (Operated by AC adaptor) |
| White (flashing slowly) | Turning on or off. (Operated by AC adaptor) |
| Red (lit) | Battery level is low. |
| Red (flashing rapidly) | Batteries have run out. |
| Off | Power is off. |
Notes
- Do not disconnect or remove the battery or AC adaptor when turning this unit on or off (the power lamp flashes slowly). This may cause malfunction.
- Just before the battery runs out, the power lamp turns red and flashes rapidly. The power to this unit automatically turns off about 10 seconds later.
Battery life
(When using this unit continuously at 25^ C ( 77^ F) with a brand-new battery attached and connecting to the camera via HDMI)
NP-FM500H: Approx. 3 hours
NP-QM71D: Approx. 5 hours
NP-QM91D: Approx. 8 hours
* The battery life may differ from the above depending on operation status and environmental conditions.
Connecting to an AC adaptor
This unit can be powered from the domestic power supply using a Sony AC adaptor such as the AC-PW10AM (not supplied).
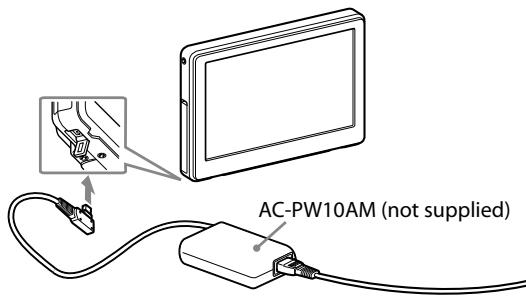
Notes
- A battery pack attached to this unit is not recharged even when an AC adaptor is connected.
- If this unit is connected to an AC adaptor while a battery pack is attached, the AC adaptor power source takes priority.
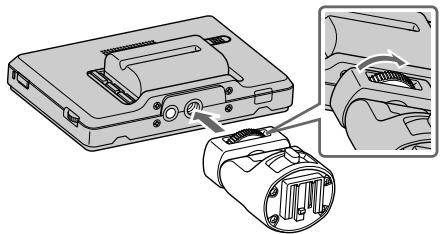
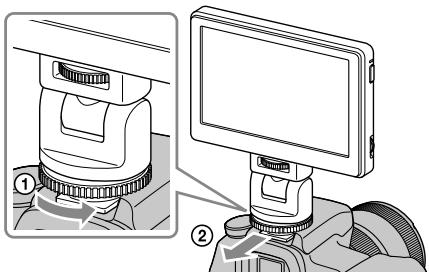
Attaching to the camera
Attaching to the camera
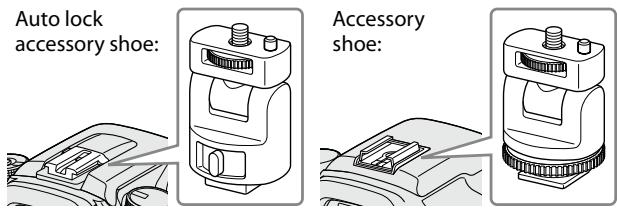
1 Select one of the provided shoe adaptors according to the shape of the accessory shoe on the camera.
Note
- Do not attach a shoe adaptor except for this unit.
2 Insert the tripod screw of the shoe adaptor into the tripod receptacle on the bottom of this unit.
3 Turn the shoe adaptor dial to lock.
natural_image
Diagram of a device with labeled ports and internal components, showing exploded view of internal wiring (no text or symbols present)continued
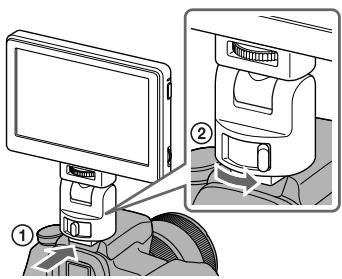
4 Attach (clip) the correct type of shoe adaptor onto the camera shoe, as illustrated.
If using auto lock accessory shoe:
①Insert the foot of the shoe adaptor fully into the auto lock accessory shoe in the direction illustrated.
②Push the lock lever of the shoe adaptor down to the right to fix it firmly to the camera.
Note
- Insert the shoe adaptor fully until it clicks into place.
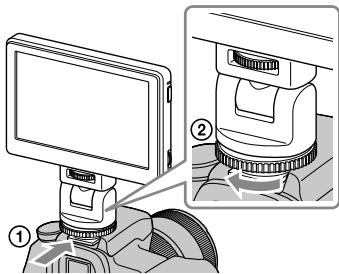
If using accessory shoe:
①Insert the foot of the shoe adaptor fully into the accessory shoe in the direction illustrated.
② Rotate the dial of the shoe adaptor fully to the left to fix it firmly to the camera.
Note
- When attaching to a camera that has an accessory shoe, read the instruction manual of the camera too.
Notes
- If using a camera equipped with a pop-up built-in flash, be careful of the following:
- Always close the built-in flash of the camera. If your camera has a built-in auto flash function, turn that function off.
— Before using the flash, remove this unit from the camera.
- Make sure this unit is firmly fixed to the camera before use to prevent this unit from falling during shooting.
5 Connect this unit to the camera with the HDMI cable supplied.

Tip
- If the cable is not long enough, use a Sony HDMI cable Type A-TypeC (not supplied).
6 Turn on the power to the camera and this unit.
Press and hold down the power button to turn this unit on.
The viewfinder image of the camera is displayed on the LCD screen of this unit. If your camera has an HDMI output setting function, set it to AUTO or 16:9.
Note
When this unit is connected to the camera by the HDMI cable, the following may happen depending on the camera.
- No image appears on the camera's LCD screen.
- The camera switches to playback mode. (Make sure the camera is in shooting mode before taking pictures.)

Tip
- After a certain time in either of the following conditions, the backlight of this unit turns off.
- No HDMI signal is output from the camera
– The HDMI cable is disconnected
Carrying out the following turns the backlight on again.
- Press the operation dial of this unit.
- Operate the camera so that an HDMI signal is output.
- Reconnect the HDMI cable and turn the camera on.
To remove from the camera
Disconnect the HDMI cable and remove this unit as below.
Note
- When removing, be careful not to drop this unit or the camera. It is recommended that you attach the camera to a tripod before removing this unit.
When using an auto lock accessory shoe:
①Push the lock lever of the shoe adaptor down to the left to release the lock.
②Keeping the lock lever pressed to the left, slide the shoe adaptor toward you.
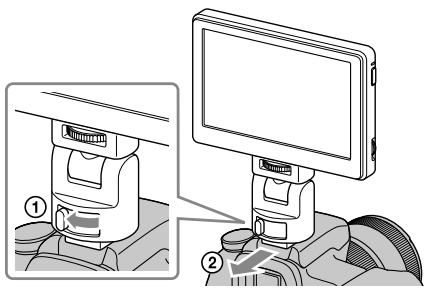
If using accessory shoe:
① Rotate the dial of the shoe adaptor to the right to release the lock.
②Check that the lock is released before sliding the shoe adaptor toward you.
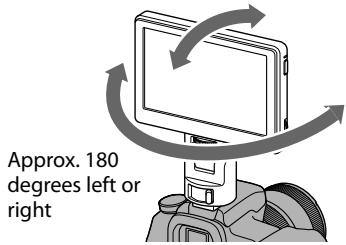
Adjusting the direction of the screen
The pan and tilt function of the shoe adaptor lets you move the screen of this unit in any direction.
Approx. 90 degrees forwards or backwards

Tip
- The moveable range of the shoe adaptor is about 90 degrees forwards or backwards and about 180 degrees left or right.
Notes
- Depending on your battery pack and camera, this unit may interfere with the built-in flash. Do not pan or tilt with excessive force.
- Be careful when you pull the HDMI cable not to stretch it or get it caught in any moveable part.
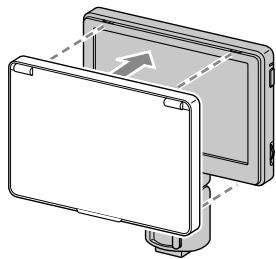
Attaching the sun shade hood
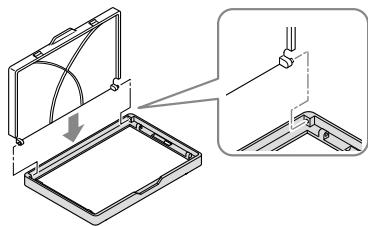
Align the clips on the frame of the sun shade hood with the holes in the outer frame of this unit and attach, as illustrated.
natural_image
Diagram of a computer monitor with an open lid and stand, showing no text or symbolsFit the top part of the panel first and then press in the bottom part of the panel.
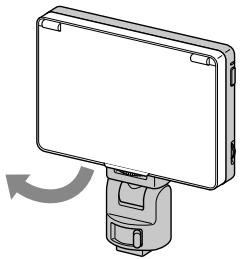
To remove the sun shade hood
Pull the bottom part of the sun shade hood frame towards you to remove it.
natural_image
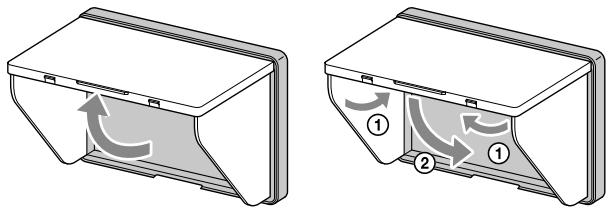
Illustration of a rectangular electronic device mounted on a base with a curved arrow indicating rotation (no text or symbols)To open and close the sun shade hood
Open and close the sun shade hood as illustrated.
natural_image
Two 3D diagrams of a device casing with internal flow arrows, showing directional movement (no text or symbols)If the hood panels come away from the frame
A force applied to the top or side hood panels can detach them from the frame to prevent them from breaking. If this happens, reattach the hood panels as follows.
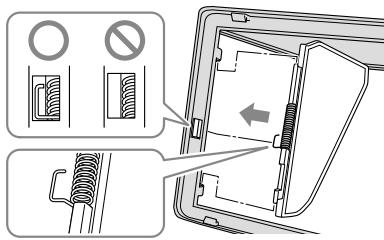
Side panels
Push the projecting end of the spring into the middle groove along the side of the frame, and fit the projections of the side panel into the top and bottom grooves along the side of the frame.
Top panel
Fit the projection of the top panel into the groove along the top of the frame.
natural_image
Technical diagram showing a mechanical assembly with an open frame and a close-up view of a bracket (no text or symbols present)Note
- The side panels only open if the projecting end of the spring is placed correctly into the groove. If the panels do not open, reattach the spring so that its projecting end is in the groove.
Using the monitor
Menu and operation
The functions that can be set with this unit appear as icons in the menu on the right of the screen.

Tip
- The aspect ratio of the LCD panel of this unit is 15:9, so black stripes may appear above and below or on each side of movie images that have an aspect ratio of 16:9, 4:3 or 3:2.
16:9

natural_image
Black-and-white photo of a small striped bird perched on a branch, surrounded by grass (no text or symbols visible)3:2
natural_image
Black-and-white photo of a small insect perched on a plant stem, no visible text or symbols1 Move the operation dial.
The menu appears on the right of the screen.
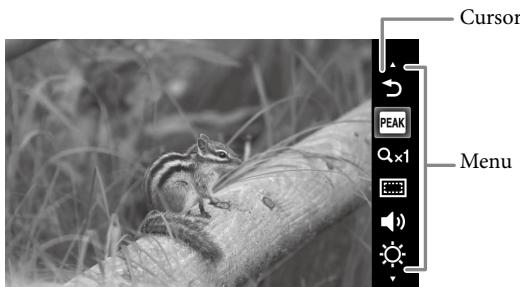
2 Turn the operation dial to align the cursor with the icon of the function you want to use.
3 Press the dial to the left to confirm.
The setup window of the selected function appears.
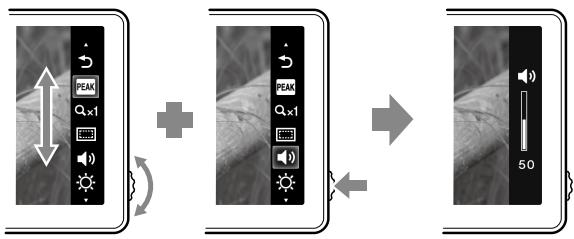
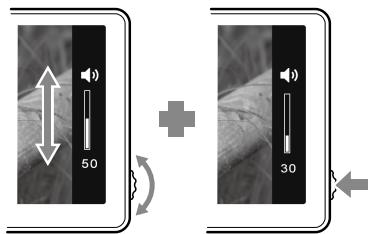
4 Turn the operation dial to select the setup details and press the dial to the left to confirm.
The setting is saved and the setup window disappears.
Tips
- Turn on the peaking function by selecting the peaking icon and confirming. When the peaking function is on, the menu is not shown. To turn the function off, press the operation dial to the left.
- The menu and setup window automatically close in the following cases.
- When the dial is not touched for about one minute.
– When the setup operation is completed.
Available functions
You can set the following functions with this unit.
| Icon | Function Name | Setup details |
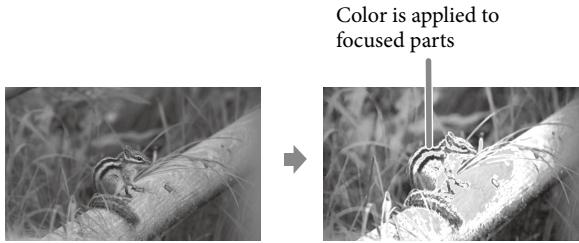
 | Peaking | Displays the focused part of the image in color. (Page 30) |
 | Pixel magnification (Pixel-by-pixel) | Displays the image resolution output from the camera. (If the image resolution is “800 x 480” or over, zooms in on the center of the image.) (Page 30) |
 | TV display area (Marker display) | Displays a grid just inside the angle of view that acts as a guide to the area shown on a LCD screen. (Page 31) |
 | Volume | Adjusts the volume.Settings: 0 (low) to 100 (high)Default: 30 |
 | Brightness | Adjusts the brightness of displayed images.Settings: 0 (dark) to 100 (bright)Default: 50 |
 | Contrast | Adjusts the contrast of displayed images.Settings: 0 (soft) to 100 (sharp)Default: 50 |
 | Color-tone (Phase) | Adjusts the hue of displayed images.Settings: 0 (green) to 100 (violet)Default: 50 |
 | Backlight | Adjusts the brightness of the screen backlight.Settings: 0 (dark) to 5 (bright)Default: 5 |
 | Color temperature | Selects the color temperature and adjusts the white balance of the screen.Settings: 9300K, 7200K, 6500KDefault: 6500K |
 | Exit | Closes the menu. |
Note
- The menu is not shown when the peaking function is on. When setting other functions, set them before turning peaking on.
Tip
- The setting functions of this unit only affect the image displayed on the LCD screen. They do not affect the actual recorded image.
To restore the default settings
1 Turn this unit off.
2 Turn this unit on while holding down the operation dial.
3 Hold down the operation dial and power button for more than 5 seconds.
4 Release the operation dial and power button.
The default settings of this unit are restored.
Peaking
This function displays the whole image in black and white and the focused parts in color. This makes it easier to check which parts are actually in focus whatever the shooting conditions.
Note
- Color may be added to the menu display of your camera, depending on the specifications of this unit. This is not a malfunction.
Tip
- When the peaking function is on, the image displayed on the LCD screen is only for checking the focus. The peaking function does not affect the actual recorded image.
Pixel magnification (Pixel-by-pixel)
This function magnifies the center of the image (800 x 480 pixels) by displaying it pixel by pixel on the whole LCD of this unit. Therefore the higher the image resolution from the camera, the smaller the area magnified.
O1080i/1080p
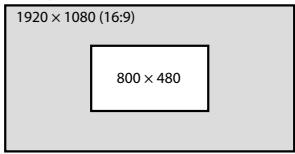
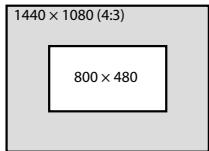
O720p
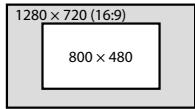
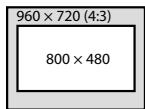
Note
- There is no zoom effect if the image resolution is less than the LCD screen resolution (800 x 480 pixels).
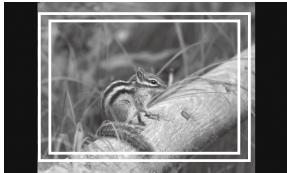
TV display area (Marker display)
This function displays a grid just inside the angle of view that acts as a rough guide to the shooting area. There are two types of grid, 80% and 90% of the angle of view. You can select either one to suit your TV's playback conditions.
(Settings: 80% (16:9), 90% (16:9), 80% (4:3), 90% (4:3))
16:9

natural_image
Black-and-white photo of a striped bird perched on a branch, surrounded by dry grass (no text or symbols visible)4:3

natural_image
Black-and-white photo of a bee perched on a plant stem, no visible text or symbols(The outer marker is 90% and the inner marker is 80%)
Tip
- The grid marker on the LCD screen of this unit is not recorded.
Troubleshooting
Before requesting repairs, carry out one more check. Then, if this unit still does not work properly, contact your Sony dealer.
| Problem | Cause / Countermeasures |
| Cannot remove the battery | The battery lock is not released.→ Slide the battery release lever to the left to remove the battery. (Page 15) |
| No power to this unit | The battery has run out.→ Replace the battery pack. (Page 14)The AC adaptor (not supplied) is disconnected.Reconnect it correctly. (Page 16) |
| Cannot attach this unit to the camera | You are using the wrong type of shoe adaptor.→ Check the camera shoe type and select the correct shoe adaptor. (Page 17) |
| No image appears on the screen of this unit | The camera is in power save mode.→ Carry out some camera function such as half-pressing the shutter button to leave power save mode.The HDMI cable is disconnected.→ Reconnect it properly. (Page 19)The shooting image may not be displayed on this unit when using a camera that does not have the live view function. For details, refer to the instruction manual of your camera. |
| No image appears on the screen of the camera | Depending on your camera, when it is connected to this unit by the HDMI cable, the image may only appear on the screen of this unit. For details, see the instruction manual of your camera. |
| Cannot hear sound | The headphones are connected.→ When the headphones are connected, no sound is output from the speaker of this unit.Make sure the volume of this unit is not set to 0. (Page 28)Make sure the sound setting of your camera is not set to OFF.Some cameras do not output sound.For details, check the instruction manual of your camera. |
| Cannot record | Depending on your camera, it may switch to playback mode when connected to this unit.Switch the camera to shooting mode before taking pictures. |
| The screen is difficult to see | Use the sun shade hood to block sunlight. (Page 23)If the screen is dark, adjust the screen brightness with (backlight) in the menu of this unit. (Page 28) |
| Black stripes appear on the screen | The aspect ratio of the LCD panel of this unit is 15:9, so black stripes may appear depending on the image. (Page 26) |
Specifications
Picture performance
| LCD panel | TFT Normally Black |
| Picture size | 5 type |
| Viewing angle | 90°/90° |
| Efficient picture size (w × h) | Approx. 108 mm × 64.8 mm(4 3/8 in. × 2 5/8 in.) |
| Resolution | 800 × 480 pixels |
| Aspect ratio | 15:9 |
Input/output
Input
| HDMI input jack | HDMI (Type A) (1) |
| DC IN jack | DC 7.6 V |
Output
| Built-in speaker output | Approx. 0.5 W Monaural |
| Headphones output jack | 3.5 Stereo mini jack (1) |
General
| Power | DC 7.2 V Sony M series battery |
| DC 7.6 V AC-PW10AM | |
| Power consumption | Approx. 5 W |
| Dimensions (w/h/d) | Approx. 129 mm × 88.5 mm × 20 mm (5 1/8 in. × 3 1/2 in. × 13/16 in.) |
| (Excluding projecting parts) | |
| Mass | Approx. 250 g (main unit only) (8.9 oz) |
| Operating temperature | Approx. 0 °C to 40 °C (32 °F to 104 °F) |
| Storage temperature | Approx. -20 °C to +60 °C (-4 °F to +140 °F) |
Available signal formats
The unit is applicable to the following signal formats.
| System | Total lines | Active lines | Frame rate | Scanning | Aspect ratio |
| 575/50I (PAL) | 625 | 575 | 25 | 2:1 interlace | 16:9/4:3 |
| 480/60I (NTSC) | 525 | 483 | 30 | 2:1 interlace | 16:9/4:3 |
| 576/50P | 625 | 576 | 50 | Progressive | 16:9/4:3 |
| 480/60P | 525 | 483 | 60 | Progressive | 16:9/4:3 |
| 640x480/60P | 525 | 480 | 60 | Progressive | 4:3 |
| 1080/50I | 1125 | 1080 | 25 | 2:1 interlace | 16:9 |
| 1080/60I | 1125 | 1080 | 30 | 2:1 interlace | 16:9 |
| 720/50P | 750 | 720 | 50 | Progressive | 16:9 |
| 720/60P | 750 | 720 | 60 | Progressive | 16:9 |
| 1080/50P | 1125 | 1080 | 50 | Progressive | 16:9 |
| 1080/60P | 1125 | 1080 | 60 | Progressive | 16:9 |
Design and specifications are subject to change without notice.
Trademark
- is a trademark of Sony Corporation.
- HDMI, the HDMI logo and High-Definition Multimedia Interface are trademarks or registered trademarks of HDMI Licensing LLC.
Français
natural_image
Warning symbol of a lightning bolt inside a triangle (no text or numbers)natural_image
Silhouette of a person climbing a ladder inside a circle (no text or symbols)natural_image
Symbol of a trash bin crossed out by two diagonal lines (no text or numbers present)
natural_image
Technical line drawing of a mechanical clamp or bracket component (no text or symbols)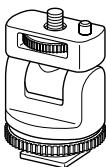
natural_image
Technical line drawing of a mechanical clamp or bracket component (no text or symbols)- Parasoleil

natural_image
Simple line drawing of a rectangular frame with rounded corners and two corner notches (no text or symbols)- Câble HDMI (Environ 45 cm, Type A Type C)
- Étui de transport
- Jeu de documents imprimés
Caractéristiques
natural_image
Illustration of a device with a mechanical component inserted into a base case, showing internal components and a 3D arrow indicating motion (no text or symbols present)natural_image
Illustration of a device with a paper feeding into a tray, showing internal components and an upward arrow (no text or symbols)Remarque
natural_image
Diagram of a device with internal components and an inset view showing internal wiring (no text or symbols)Suite page suivante
Remarque
Remarque
natural_image
Diagram showing two views of a device mounted on a stand, with no visible text or symbols.natural_image
Diagram showing two views of a camera setup with labeled parts (no text or symbols present)natural_image
Diagram of a device with two rectangular panels, one open and one closed, showing internal components and a directional arrow (no text or symbols)natural_image
Diagram of a device with a rotating base and a rectangular panel, no text or symbols presentnatural_image
Two 3D diagrams of a device casing with internal flow arrows, showing directional movement (no text or symbols)Panneau supérieur
natural_image
Technical diagram showing a mechanical assembly with an open frame and a close-up view of a bracket (no text or symbols present)Remarque
natural_image
Black-and-white photo of a small striped bird perched on a branch, surrounded by grass (no text or symbols visible)3:2

natural_image
Black-and-white photo of a small bird perched on a plant stem, surrounded by dry grass (no text or symbols visible)natural_image
Black-and-white photo of a striped bird perched on a branch, surrounded by grass (no text or symbols visible)4:3