
3600 - Digital decoder MEGASAT - Free user manual and instructions
Find the device manual for free 3600 MEGASAT in PDF.


| Brand | Megasat |
| Model | 3600 |
| Product Type | Digital Decoder (Set-Top Box) |
| Dimensions | Approx. 250 x 180 x 50 mm |
| Weight | Approx. 1.0 kg |
| Power Supply | DC 12V / 1A via external adapter |
| Power Consumption | < 10 W (standby < 0.5 W) |
| Video Output | HDMI, Composite (RCA), Scart (optional) |
| Audio Output | HDMI, Analog stereo (RCA), Digital coaxial |
| Tuner | DVB-S/S2 (satellite) or DVB-T2 (terrestrial) – check model variant |
| Electronic Program Guide (EPG) | 7/14 day EPG support |
| Channel Memory | Up to 5000 channels (TV & Radio) |
| Recording | Pause live TV, USB recording (FAT32/NTFS) on external storage |
| Timeshift | Supported (up to 2 hours, depending on USB speed) |
| Media Playback | USB playback: MP4, AVI, MKV, MP3, JPEG, etc. |
| Parental Control | Yes, channel lock with PIN |
| Software Update | Via USB or OTA (if supported) |
| Remote Control | Infrared, included (batteries: AAA x 2) |
| Connection Ports | Antenna In, HDMI, USB 2.0 x 2, Ethernet (optional), IR extender |
| Mounting | Desktop placement, optional wall mount kit |
| Operating Temperature | 0°C to 40°C |
| Storage Temperature | -20°C to 60°C |
| Humidity | 20% - 80% non-condensing |
| Maintenance | Clean with a soft dry cloth; avoid solvents |
| Safety Precautions | Do not expose to rain or moisture; use only supplied adapter |
| Spare Parts / Repairability | Power adapter, remote control; DIY repair not recommended |
Frequently Asked Questions - 3600 MEGASAT
User questions about 3600 MEGASAT
0 question about this device. Answer the ones you know or ask your own.
Ask a new question about this device
Download the instructions for your Digital decoder in PDF format for free! Find your manual 3600 - MEGASAT and take your electronic device back in hand. On this page are published all the documents necessary for the use of your device. 3600 by MEGASAT.
USER MANUAL 3600 MEGASAT
SCAN Search for channels
natural_image
White satellite dish with 'MEGASAT' branding on its side, mounted on a stand (no additional text or symbols visible)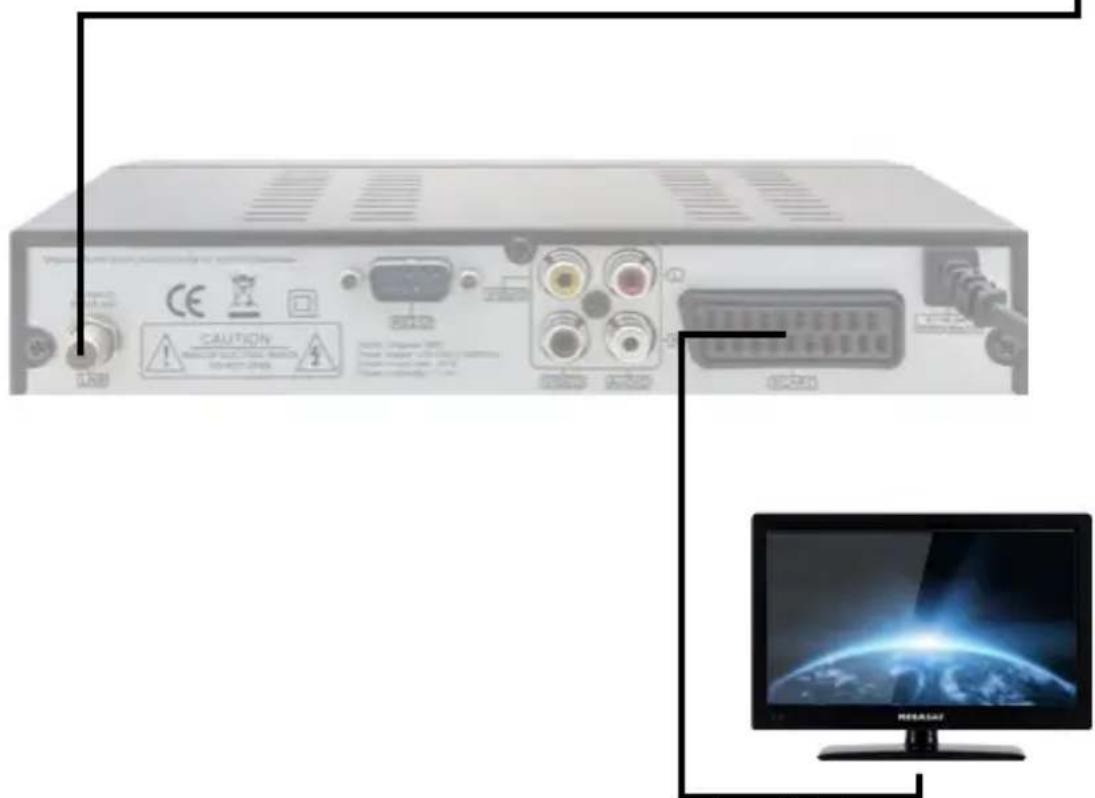
Scart Kabel
4. Hauptmenü
Safety instructions 03
1. Referenz
1.1 Genareal Features 04
1.2 Delivery....04
2. Names and key assignment
2.1 Front view 05
2.2 Rear view 05
2.3 Remote Control 06
3. Connecting the set-top box
3.1 Connecting the set-top box....07
4. Main Menu
4.1 Channel List 08
4.2 Installation 10
4.3 System....15
4.4 Tools....16
4.5 Game....16
5. Additional Information
5.1 Troubleshooting....17
5.2 Specifications....18
Safety instructions
Please read the manual thoroughly before operating the equipment. In case of incorrect or improper handling, the warranty becomes void.
Power supply: Before start please check the correct operation voltage of the power point. The operating voltage of this device is AC 100 \~ 240V,50/60Hz.
Overload: Do not overload a wall outlet, extension cord or adapter, neither use damaged power cord or touch it with wet hand as this may result in electric shock.
Liquid: The device shall not be exposed to dripping or splashing water, and that no objects filled with liquids, such as base, shall be placed on the apparatus.
Ventilation: Keep the slots on top of the receiver uncover to allow sufficient airflow to the unit. Do not put the receiver on soft furnishings or carpets. Do not expose the receiver to direct light or do not place it near a heater or in humid conditions. Do not stack other electronic equipments on top of the receiver.
Risk of ssuffocation: Do not let children play with films or other packaging components, there is a risk of suffocation.
Cleaning: Plug out the receiver from the wall outlet before cleaning. Clean the receiver by a soft cloth or mild solution of washing-up liquid (no solvents).
Connection: Disconnect the receiver from the mains when you connect it to satellite LNB or disconnect it from LNB. Failure would possibly cause damage to the LNB.
Location: Put the receiver indoor in order to avoid lightening, raining or sunlight.
Uncover: Do not remove the cover, to reduce the risk of electric shock. Contact qualified and licensed service personnel to repair the receiver, or contact your dealer.
1. Referenz
1.1 General Features
• DVB-S/DVB-S2 Satellite Compliant
• DiSEqC 1.0, 1.1, (USALS) compatible
- 4-digit display
- 7 button Frontcontrol
• Support SCPC & MCPC receivable from C / Ku-band satellite LNB
• Universal, Single, Single S & C band wideband LNBs
• PAL / NTSC conversion
- Variable aspect ratio (4:3, 16:9) with Pan Vector or Letter Box
- Favorite lists
• Parental Control function
- Screen display with full color resolution
- Teletext and subtitle support (OSD)
- 7 days EPG (Electronic Program Guide) for On-Screen Program Information
- Multilingual menu
1.2 Delivery
- Megasat 3600
- Remote control
- Batteries
- User manual
2. Names and key assignment
2.1 Front view
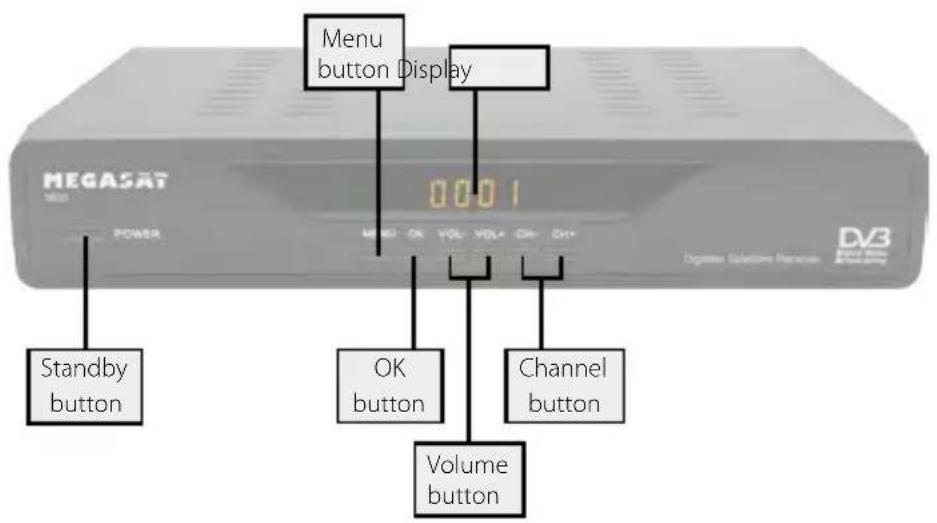
2.2 Rear view
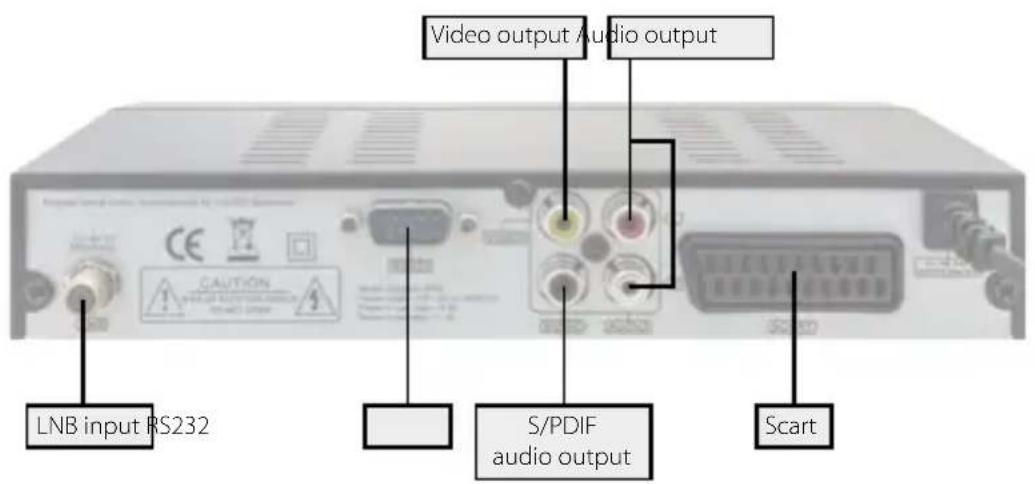
2. Names and key assignment
2.3 Remote control
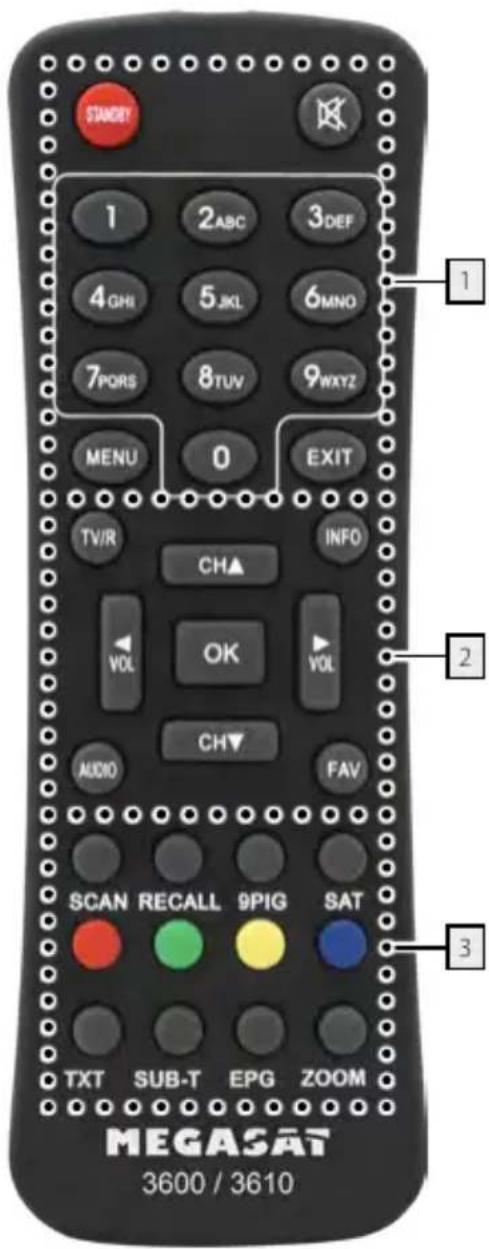
Zone 1
STANDBY Turn on/off the unit
MUTE Muting the sound
NUMERIC KEYS (0\~9) Program Change / Enter numbers
MENU To access the main menu
EXIT Exits the current menu step by step
Zone 2
TV/R Switches between TV and radio reception
INFO Displays information of the current program
CH +/- Switches TV/radio programs (up/down)
VOL +/- Adjust the volume
OK Confirm the current selection / Open the program list
AUDIO Selection or change the audio track
FAV Displays the Favorites list (if favorites available)
Zone 3
SCAN Search for channels
RECALL Switches between the last and current program
9PIG Displays 9 channels on TV screen
SAT Displays the stored satellite list
RED Function key
GREEN Function key
YELLOW Function key
BLUE Function key
TXT Displays the teletext of the respective program
SUB-T Displaying subtitles (if available)
EPG Displays the EPG (Electronic Program Guide)
ZOOM Zoom function of the current program
3. Connecting the set-top box
3.1 Connecting the set-top box
- Connect the coaxial cable to the LNB. (You can connect an LNB directly to the LNB IN, or more LNBs through a DiSEqC switch or multiswitch.
- Connect the Scart cable with your TV.
- Make sure that on your TV is selected corresponding to the input channel (for example, Scart 1).
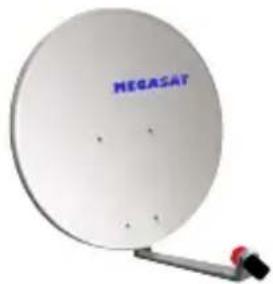
natural_image
White satellite dish with 'MEGASAT' branding on its surface, mounted on a stand (no additional text or symbols visible)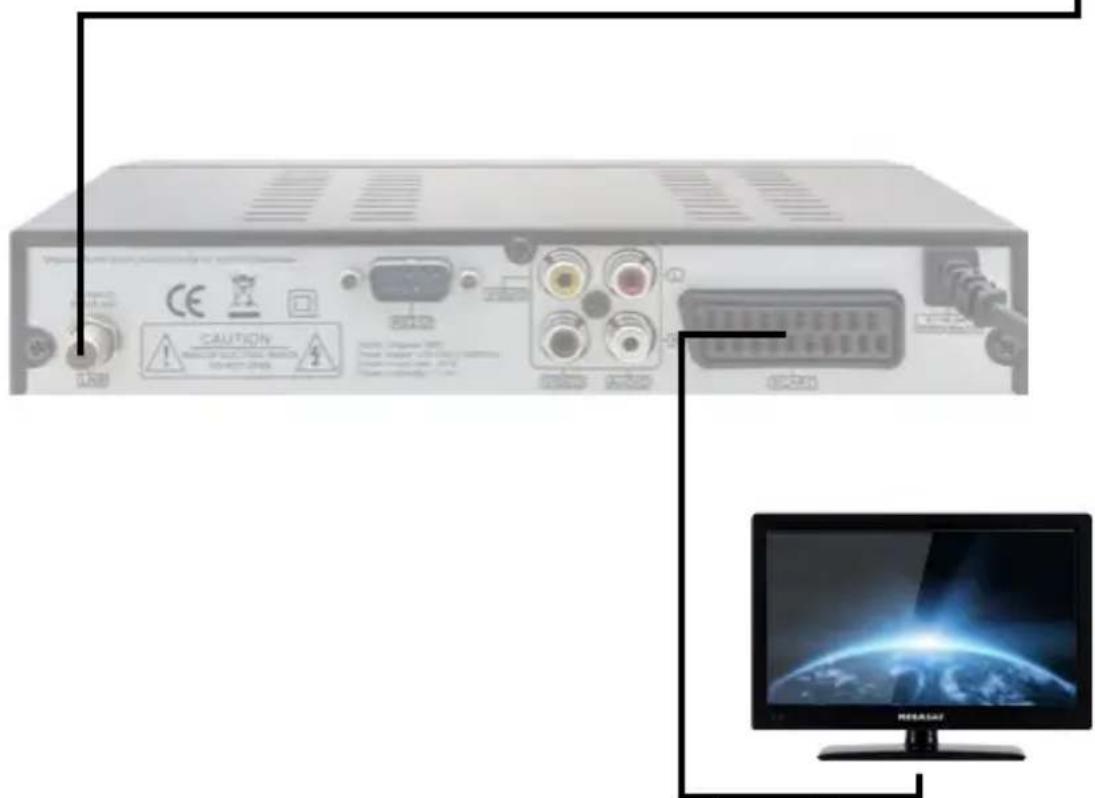
Scart cable
4. Main Menu
After connecting the receiver to other required equipment, turn on the set-top box
Press the MENU button to enter the menu.
The main menu consists of:
- Channel List
- Installation
- System
- Tools
• Game
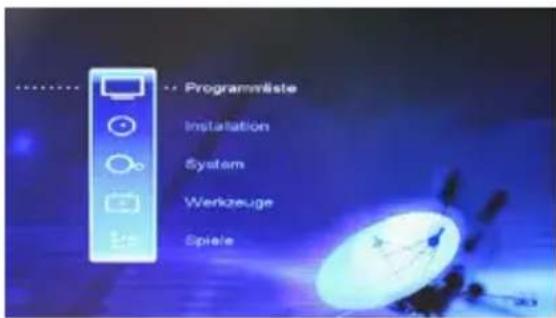
Use the ◀▶ button to select your subject and press OK to confirm your selection and enter that sub menu, press EXIT button you can return to the previous menu.
Note:
The default password for the menu access is: 0000
4.1 Channel List
1. TV Channel List
You can channels lock, skip, move, sort, rename, delete and create favorites lists.
Create favorites
Press the FAV button on the remote control to activate the Favorites feature. Press the ▲▼ buttons to select the particular program and confirm it with OK. Then you will be asked in which favorite list you will save the selected program. Click OK to confirm and exit the menu screen by pressing the EXIT button. Selected favorites are identified by the Heart symbol.
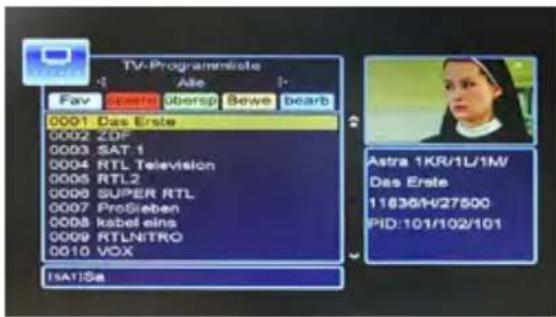
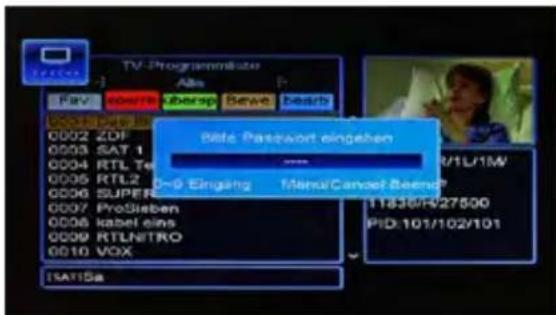
Press the RED button on the remote control to activate the lock function. Here you can lock a program. After press OK button, you are prompted to enter a password. Once you switch to this program, you must enter the password from now on.
Skip
Press the GREEN button on the remote control to activate the skip function. Select a program and press OK to confirm. This program will be skipped from now on, if you scroll through the channel list with the ▲▼ buttons. The program can also be selected directly by using the number buttons.
Move
Press the YELLOW button on the remote control to activate the Move function. Select one or more programs by pressing the OK button. Then press the INFO button to select. Go with the ▲▼ buttons to the desired position and press the OK button. The selected programs are now on the selected position.
Edit
Press the BLUE button to make further edits.
RED button (Sort): Sort Programs from A-Z, Z-A, from freely to encrypted, from locked or standard.
GREEN button (Edit): Here you can rename the channels. Enter with the number keys a name of your choice. if a key is pressed several times, appear more letters, or symbols.
RED button to switch between uppercase and lowercase.
GREEN key to delete characters.
YELLOW button to confirm editing.
BLUE button to cancel.
BLUE button (Delete): Select a channel by pressing OK. The channel is marked with an X symbol. Repeat the process if you want to delete more channels. After pressing the EXIT button you are asked whether you really want to delete the selected channels.
4. Main Menu
2. Radio Channel List
Editing the radio channels are in accordance with the instructions of TV programs.
3. Delete All
Here you can delete all settings and channels and set back to factory condition. If the option is selected and confirmed with OK, you are prompted to confirm this. If you select "YES", all data and settings are reset to the factory preset values . All the settings you have made will go irrevocably lost.
4.2 Installation
1. Antenna Connection
Here you can choose between a fixed or a motorized antenna. In the motorized antenna, an additional DiSEqC motor must be installed. This is available from your dealer.
2. Satellite List
Here you can select the satellite that should be considered in the search process. Confirm the respective satellite with the OK button. The satellite will be marked with a checkmark. The following options are also possible:
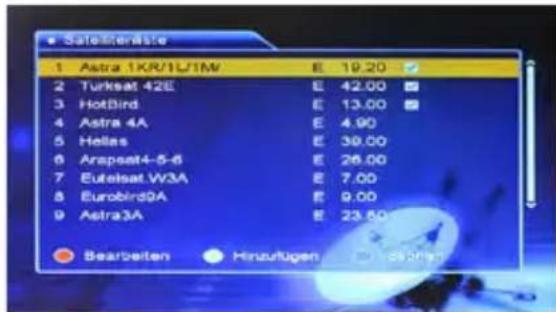
RED button (Edit): Here the name and longitude can be changed. Use the color buttons for more options:
RED button to switch between uppercase and lowercase.
GREEN key to delete characters.
YELLOW button to confirm editing.
BLUE button to abzubrechen.
GREEN button (Add): Here you can add a satellite.
Assign a name and the longitude.
BLUE button (Delete): Select a satellite with the ▲▼ buttons and then press the
BLUE button. The satellite you will delete is marked with an
X symbol. After pressing the EXIT button you will be asked if you want to delete the satellites.
4. Main Menu
3. Antenna Setup (Options only for „Fixed Antenna“)
Here you can make various settings on each satellite.
Satellit
Use the ◀▶ buttons to select a desired satellite.
LNB Freq
Here you can set the LNB type as your satellite system. The default setting (Universal) is true in most cases.
Transponder
Here all available transponders are displayed.
DiSEqC 1.0 / 1.1
When the antenna is operated with a DiSEqC switch, here you can configure the Di-SEqC input (e.g. Port1 = Astra / Port2 = Hobird).
22K
Here, an additional 22 KHz switching value (on/off). When operating a Universal LNB, this function is not available.
Toneburst
The tone-burst signal was developed to allow easy switching between two LNBs and is suitable for the control of relays (two inputs to one output) and for Monoblock LNBs. Select between OFF, A or B.
Polarity
Here you can select between AUTO (automatic), H (horizontal) or V (vertical). AUTO is true in most cases.
Signal Itensity
Indicates the strength of the selected satellite.
Signal Quality
Displays the quality of the selected satellite.
4. Main Menu
3. Antenna Setup (Options only for „motorized antenna“)
Here you can make various settings of the motor controller.
LNB Typ
Here you can set the LNB type as your satellite system. The default setting (Universal) is true in most cases.
Motor Typ
Choose between DiSEqC 1.2 and USALS.
Local longitude
Enter the degree of latitude of the satellite.
Delete All (Active only when you select DiSEqC 1.2)
Delete the current satellite position.
Motor Setup
When activated the motor type USALS, you can select the desired satellite from here. With the motor type DiSEqC 1.2 you can stored up to 63 satellite positions. Select the desired satellite and go with the ▼ key on „Position No. and Save“. Select the first satellite position (eg 1). Now go with the ▼ button to „Save“. Press the ◀▶ buttons to move the dish to the desired position. If the position is reached, press the OK button to stop the rotation. Pressing agin the OK button to save the data. „Goto X“ turns the dish back to the starting position. Recalculation deletes the current satellite position and you can align the dish again.
Limit Setup
Select the West / East Limit (max. rotation of the dish). Select, for example, West Limit and go with the ▼ button „Save“. Press the ◀▶ buttons to move the dish to the desired position. If the position is reached, press the OK button to stop the rotation. Pressing again the OK button to save the data. „Reference“ turns the dish back to the starting position.
4. Main Menu
4. Single Satellite Search
After you set all relevant positions in the antenna settings, you can now search for cahnels of each satellite. you can use various search functions.
Satellite:
Select the satellite to be searched.
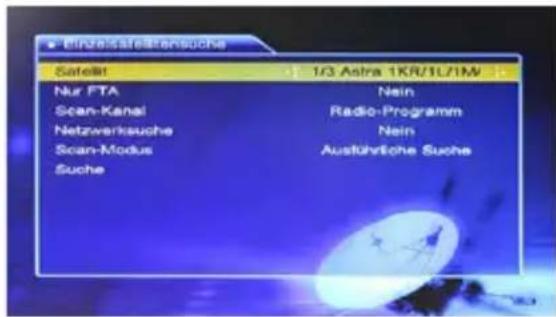
Select here whether all channels (including encrypted) or only free channels are to be searched.
Scan-Channel:
Select the desired search function. Either TV + radio programs, TV programs only, or radio programs only.
Netzwork Search:
Enable this option when there are new transponder possibly, that have not yet entered into the transponder list. The network can search through analysis of data from known transponder, determine the frequency of new transponder. The search process is faster than blind scan, but it can also come about missing channels.
Scan-Mode:
Choose between „Advanced search“ and „Blind Scan“. The advanced search all transponders are stored in the receiver searched. In blind scan the satellite (eg Astra 19.2° East) is searched for all transponders, even those who are not already stored in the list. This process will take some time to complete.
Search:
Start the search by pressing OK.
5. Multi Satellite Search
Compared to the single satellite search all selected satellites are searched at the same time here. Again, the various search functions can be defined.
4. Main Menu
6. TP Liste (Transponder)
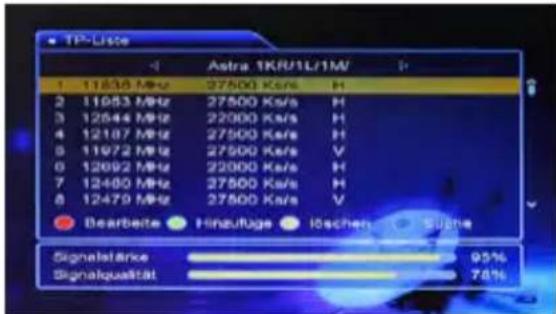
Find all frequency data of the stored transponder. You may edit, add new transponders, delete, and scan the satellite to individual transponders. Use the ◀▶ buttons to select the desired satellite. This appears at the top of the screen.
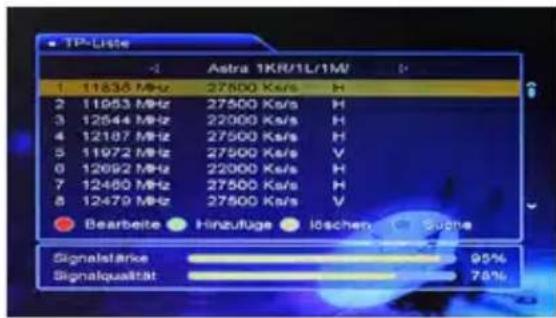
RED button (Edit): Here, a transponder may be edited. Change the frequency, symbol rate, or polarity.
GREEN button (Add): Here you can add a transponder. Then assign the frequency, symbol rate, or polarity.
Yellow button (Delete): Delete an transponder from the list. After press OK button, you will be prompted to confirm the deletion.
BLUE button (Search): Select a transponder with the ▲▼ buttons to select and then press the BLUE button to start searching. Then you will see a note window by various search functions can define (see individual satellites).
4. Main Menu
4.3 System
1. Language
Here, select the desired language in the various areas.
2. TV-System
Here you can select the display mode (eg PAL or NTSC), the Aspect mode (aspect ratio) of 4:3 or 16:9 and the video output RGB or CVBS. The correct settings depend on your TV set.
3. Local Time Setting
Set the desired time. GMT Usage is used for automatic time recording. The summer time can be enabled or disabled.
4. Timer Setting
Program a timer. The set-top box will start at the desired time the preset program. You can program up to 10 positions.
5. Parental Lock
The default password is „0000“. Enable or disable the Menu Lock or Channel Lock. You can only get the password you assigned to the menu or to a channel. In addition, you can specify an age limit. Many stations send an age restriction with the current movie. Set the value to 12 years, and when the current program is only for 16 years, a password must be entered to „unlock“ the channel.
6. OSD Setting
Select the desired options such as Subtitle Display, OSD display duration or transparency.
7. Favorite
Here you can rename the individual favorite lists. Use the ▲▼ buttons to select a list, and press OK to rename it.
8. Other
Various settings such as LNB Power on/off or beep on/off.
9. Sleep Timer
If the timer mode enabled, you can set the time after which the set-top is automatically switched to the standby mode.
4. Main Menu
4.4 Tools
1. Information
Contains various information about the set-top box.
2. Factory setting
You will be asked to enter a password. The default password is „0000“. Then a message box appears and asking if you really want to reset all data in the factory setting. Confirm it with YES or NO to cancel.
3. Upgrade by RS232
Future firmware updates can be loaded via the RS232 interface. On our website www.megasat.tv you will find the current firmware.
4.5 Game
Various games classics.
5. Additional information
5.1 Troubleshooting
You might meet abnormal working of this STB with various reasons. Check the following which may help you.
| Problem Possible causes What to do | ||
| LED on the front panel fail to light up/is not lit. | Main supply cable is not connected. | Check if the main supply cable is plugged into the power socket. |
| No picture or sound. Satellite dish | is not aiming to satellite accurately. No signal or weak signal. The LNB is faulty. The cable is faulty. | Adjust the dish. Check the signal strength indicator in one of the channels search submenus. Check the cable connections, LNB and other equipment connected to LNB & receiver, or adjust dish. Replace the LNB. Replace the cable. |
| Bad picture/blocking error Satellite | dish is not aiming to the satellite accurately. Signal too strong. Satellite dish is too small. LNB noise factor too high. The LNB is faulty. | Adjust the dish. Connect an attenuator to LNB input. Change to a larger dish. Change LNB with lower noise factor. Replace the LNB. |
| No startup menu on screen after turning on STB for the first time. | The system is connected by SCART cable and the TV is not in AV/ EXT mode. | Switch the TV to the appropriate AV input. |
| The remote control is not working. | Battery exhausted. Remote control is not aimed correctly STB is in standby mode. | Change the batteries (both). Aim the remote control at the STB. Check that nothing blocks the front panel. Check if LED indicator on the front panel is showing the time, press the power button to switch off standby mode. |
| You have forgotten your password. | Contact the dealer or Service Provider. They will help you set it up again. | |
| Poor picture quality or Less channels in scanning. | Low LNB power or signal loss in cable. | Change the LNB power to 14V/19V in Antenna setup menu. |
5. Additional information
5.2 Specifications
| Tuner & Demodulator | |
| Frequency Range 950 MHz to 2150 MHz | |
| Input Connector F-Type, IEC 169-24, female | |
| Signal Level -25 bis -65 dBm | |
| RF Impedance | 75Ω, unbalanced |
| IF Band width 55 MHz / 8 Hz (per 5 Msps) | |
| LNB Power & Polarization Vertical : +13 V, | 14 V +/-5 %Horizontal: +18 V, 19 V +/-5 %:max. 500 mA Overload Protection |
| LNB Tone Switch 22 KHz +/- 2 KHz, 0.6 V | +/- 0.2 V |
| DiSEqC Control Version 1.0/1.2 compatibel, Tone Burst A/B | |
| A/V and Data In/Out Connector | |
| TV SCART, Audio/Video RGB / CVBS, Cinch | |
| LNB IF input F type, IEC 169-24 female | |
| Power supply | |
| Input Voltage 100 - 240 V AC, 50/60 Hz, | |
| Power in use 6 W, max. 12 W | |
| Power in standby < 0,5 W | |
| Physical Specifications | |
| Dimensions | 220 x 145 x 46 mm (W/D/H) |
| Weight (net) | ca. 447 g |
| Operating Temperature | 0°C - bis +40°C |
| Storage Temperature | -40°C - bis +65°C |
Note:
Weight and dimensions are not absolutely exact values. Technical details can be changed at any time (according to manufacturer) without prior notice.
Declaration of Conformity
This complies with the following directives / standards is confirmed:
Electromagnetic Compatibility Directive 2004/108/EG
EN 55013: 2001 + A1: 2003 + A2: 2006
EN 55020: 2007
EN 61000-3-2:2006 + A1:2009 + A2:2009
EN 61000-3-3:2008
Low Voltage Directive 2006/95/EG
EN 60065: 2002 + A1: 2006 + A11: 2008
Notes
Status: v1.0 August 2014 // Technical changes, misprints and errors reserved. Megasat Werke GmbH | Industriestraße 4a | D-97618 Niederlauer | www.megasat.tv | info@megasat.tv
- Hauptmenü
- Referenz
- Names and key assignment
- Connecting the set-top box
- Main Menu
- Additional Information
- Safety instructions
- General Features
- Delivery
- Front view
- Rear view
- Remote control
- Zone 1
- Zone 2
- Zone 3
- Connecting the set-top box
- Note:
- Channel List
- TV Channel List
- Create favorites
- Skip
- Move
- Edit
- Radio Channel List
- Delete All
- Installation
- Antenna Connection
- Satellite List
- Antenna Setup (Options only for „Fixed Antenna“)
- Satellit
- LNB Freq
- Transponder
- DiSEqC 1.0 / 1.1
- 22K
- Toneburst
- Polarity
- Signal Itensity
- Signal Quality
- Antenna Setup (Options only for „motorized antenna“)
- LNB Typ
- Motor Typ
- Local longitude
- Delete All (Active only when you select DiSEqC 1.2)
- Motor Setup
- Limit Setup
- Single Satellite Search
- Satellite:
- Scan-Channel:
- Netzwork Search:
- Scan-Mode:
- Search:
- Multi Satellite Search
- TP Liste (Transponder)
- System
- Language
- TV-System
- Local Time Setting
- Timer Setting
- Parental Lock
- OSD Setting
- Favorite
- Other
- Sleep Timer
- Tools
- Information
- Factory setting
- Upgrade by RS232
- Game
- Troubleshooting
- Specifications
- Declaration of Conformity
- Notes
Brand : MEGASAT
Model : 3600
Category : Digital decoder