
HD 760 - Digital decoder MEGASAT - Free user manual and instructions
Find the device manual for free HD 760 MEGASAT in PDF.


| Product Type | Digital Decoder / Satellite Receiver |
| Brand | Megasat |
| Model | HD 760 |
| Dimensions (W x D x H) | 200 x 150 x 45 mm |
| Weight | 0.6 kg |
| Power Supply | 12V DC, 1.5A (via external adapter) |
| Power Consumption | 15 W (max) |
| Video Output | HDMI, Composite (RCA) |
| Audio Output | HDMI, Digital Optical, Stereo RCA |
| Supported Resolutions | 1080p, 1080i, 720p, 576p, 480p |
| Tuner Type | DVB-S2 (Satellite) |
| Number of Tuners | 1 |
| Frequency Range | 950 - 2150 MHz |
| Input Connector | F-type (75 Ohm) |
| USB Port | 1 x USB 2.0 (for firmware updates and media playback) |
| Card Slot | 1 x CI+ slot (for conditional access modules) |
| Remote Control | Included (IR) |
| Operating Temperature | 0°C to 45°C |
| Storage Temperature | -10°C to 60°C |
| Relative Humidity | 20% to 80% (non-condensing) |
| Accessories Included | Remote control, batteries, HDMI cable, power adapter, user manual |
| Maintenance | Clean with a soft, dry cloth. Avoid liquids and abrasives. |
| Safety Warnings | Do not expose to moisture or extreme temperatures. Use only supplied power adapter. |
| Spare Parts & Repairability | Contact Megasat service center for spare parts. Not user-serviceable. |
Frequently Asked Questions - HD 760 MEGASAT
User questions about HD 760 MEGASAT
0 question about this device. Answer the ones you know or ask your own.
Ask a new question about this device
Download the instructions for your Digital decoder in PDF format for free! Find your manual HD 760 - MEGASAT and take your electronic device back in hand. On this page are published all the documents necessary for the use of your device. HD 760 by MEGASAT.
USER MANUAL HD 760 MEGASAT
Safety instructions....03
1. Referenz
1.1 General features 04
1.2 Delivery 04
2. Names and key assignment
2.1 Front view 05
2.2 Rear view 05
2.3 Remote Control 06
3. Connecting the set-top box
3.1 Connecting the set-top box 07
4. First Installation
5. Main Menu
5.1 Programm....10
5.2 Pictures....11
5.3 Installation 12
5.4 Time 12
5.5 Option 12
5.6 System 13
5.7 USB 14
6. Additional Information
5.1 Troubleshooting....16
5.2 Declaration of Conformity 16
5.3 Specifications....17
Safety instructions
Please read the manual thoroughly before operating the equipment. In case of incorrect or improper handling, the warranty becomes void.
Power supply: Before start please check the correct operation voltage of the power point. The operating voltage of this device is AC 100 \~ 240V, 50/60Hz.
Overload: Do not overload a wall outlet, extension cord or adapter, neither use damaged power cord or touch it with wet hand as this may result in electric shock.
Liquid: The device shall not be exposed to dripping or splashing water, and that no objects filled with liquids, such as base, shall be placed on the apparatus.
Ventilation: Keep the slots on top of the receiver uncover to allow sufficient airflow to the unit. Do not put the receiver on soft furnishings or carpets. Do not expose the receiver to direct light or do not place it near a heater or in humid conditions. Do not stack other electronic equipments on top of the receiver.
Risk of ssuffocation: Do not let children play with films or other packaging components, there is a risk of suffocation.
Cleaning: Plug out the receiver from the wall outlet before cleaning. Clean the receiver by a soft cloth or mild solution of washing-up liquid (no solvents).
Connection: Disconnect the receiver from the mains when you connect it to satellite LNB or disconnect it from LNB. Failure would possibly cause damage to the LNB.
Location: Put the receiver indoor in order to avoid lightening, raining or sunlight.
Uncover: Do not remove the cover, to reduce the risk of electric shock. Contact qualified and licensed service personnel to repair the receiver, or contact your dealer.
1. Referenz 2. Names and key assignment
1.1 General features 2.1 Front view
• 5,000 channels of TV and radio programs
• Media Browser (USB 2.0)
• DVB-S2 / S-compatible
• HDMI output (5/6p, /20p, 1080i)
- Channel Lock
• Program information current / next (7 days EPG)
- Parental control for menu
• Signal strength bar display for transponder
- Teletext support
• Lobby in the Ku-band: 10.7 - 12.7 GHz
• LNB control: horizontal / vertical, switching 0-22 kHz.
- Tone burst A / B switching for antenna selection, DiSEqC 1.2
- Selectable satellites settings (ASTRA, HOTBIRD, TURKSAT 2A / 3A etc.)
• Display of signal strength and quality of your antenna settings
- Various options for channel search
• Automatic Satellite search for preset transponders
• Transponder Scan / Network Search
• Automatic search for newly added transponders
- Search option FTA (free-to-air) satellite search and automatic search
• Auto-FEC search (forward error correction)
• Automatic PID correction (except custom PIDs)
• Digital Decoder Properties:
• Video Format PAL
- 32-bit color OSD, 720x576 pixels for PAL
• System switchover (TV / RADIO)
• Storage of the last viewed channel
• LNB short-circuit and overload protection
- IR remote control
1.2 Delivery
• Megasat HD 760
- Remote control
- Batteries
- User manual
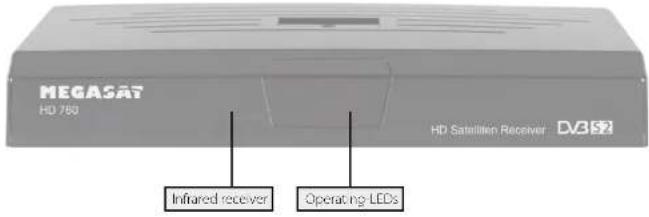
2.2 Rear view
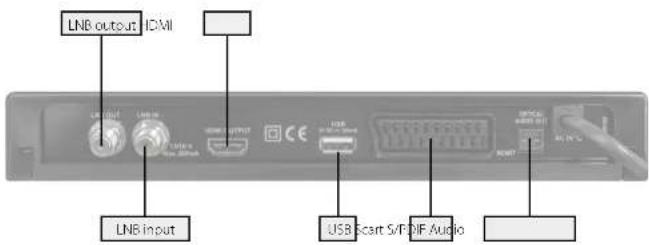
2. Names and key assignment
2.4 Remote control
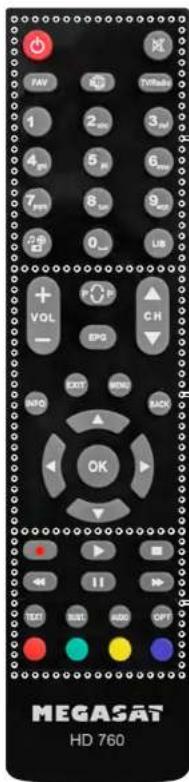
Zone 1
POWER Turn on / off the unit (standby)
MUTE Muting the sound
FAV Enter the favorite lists
No function
TV/Radio Switches between TV and radio reception
Nummernblock (0\~9) Program change / Enter numbers
No function
LIB No function
Zone 2
V+/- Volume control
P+/- Switches TV / radio programs (up / down)
No function
EPG Displays the EPG (Electronic Program Guide)
INFO Displays information about the current program
EXIT Exits the current menu
MENU Enter the main menu
BACK One step back
Navigation keys (Up / Down / Left / Right)
OK Confirm the current selection / open the program list
Zone 3
- No function
▶ Start
■ Stop
Fast reverse
II Pause
▶ Fast forward
TEXT Teletext
SUBT Subtitle
AUDIO Audio
AUDIO Android Language Selection OPT No f
OPT NO FUNCTION DOT Focus
ROT Function key
GRUN Function key
GELB Function key
BLAU Function key
3. Connecting the set-top box
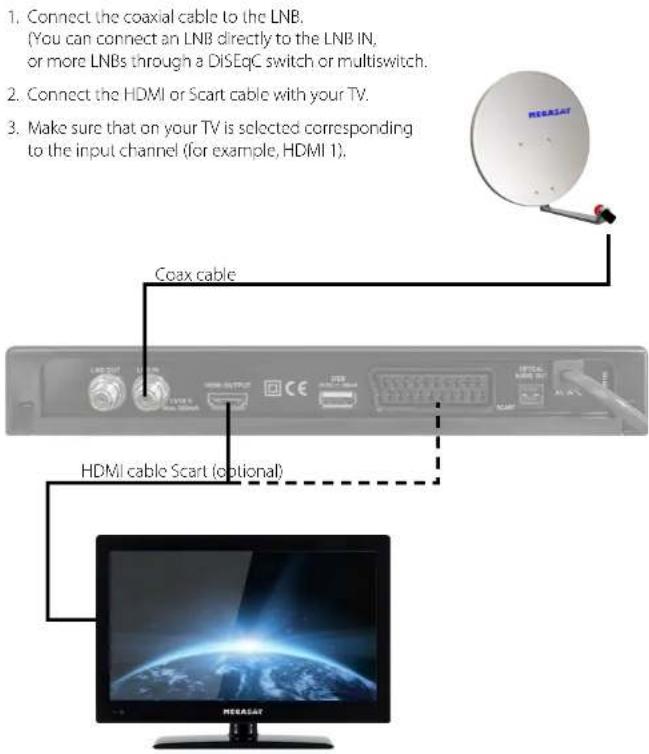
3.1 Connecting the set-top box
- Connect the coaxial cable to the LNB. (You can connect an LNB directly to the LNB IN, or more LNBs through a DiSEqC switch or multiswitch.
- Connect the HDMI or Scart cable with your TV.
- Make sure that on your TV is selected corresponding to the input channel (for example, HDMI 1).
- Connect the coaxial cable to the LNB. (You can connect an LNB directly to the LNB IN, or more LNBs through a DISEqC switch or multiswitch.
- Connect the HDMI or Scart cable with your TV.
- Make sure that on your TV is selected corresponding to the input channel (for example, HDMI 1).
- Connect the coaxial cable to the LNB. (You can connect an LNB directly to the LNB IN, or more LNBs through a DISEqC switch or multiswitch.
- Connect the HDMI or Scart cable with your TV.
- Make sure that on your TV is selected corresponding to the input channel (for example, HDMI 1).
- Connect the coaxial cable to the LNB. (You can connect an LNB directly to the LNB IN, or more LNBs through a DISEqC switch or multiswitch.
- Connect the HDMI or Scart cable with your TV.
- Make sure that on your TV is selected corresponding to the input channel (for example, HDMI 1).
- Connect the coaxial cable to the LNB. (You can connect an LNB directly to the LNB IN, or more LNBs through a DISEqC switch or multiswitch.
- Connect the HDMI or Scart cable with your TV.
- Make sure that on your TV is selected corresponding to the input channel (for example, HDMI 1).
4. First installation 4. First installation
Important: Make sure that the antenna is connected before you turn on the set-top box for initial installation.
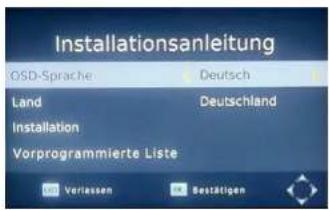
When the set-top box is turned on from standby mode and no channel is stored in the database, the following menu window appears on the screen. It is asked, among other things, according to the menu language (OSD) and the land.
Select the „Preset List“ to load a preset list. Leave the message window to exit. If you want to manually search for programs, select „Installation“.
You can select the desired satellite from the left side of the menu. To start multiple search, you can select by pressing the OK key to select multiple satellites. Please set the correct parameters on the right side of the menu for each satellite. The signal quality is displayed after correct selection.
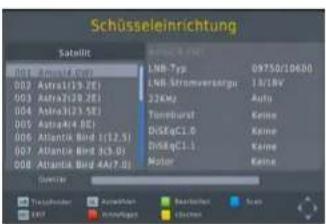
Lib: Show transponder list.
OK: Confirm selection.
Green: Edit the selected satellite.
Blue: Channel search for selected satellite.
Exit: Exit the bowl settings menu.
Red: Add a satellite.
Yellow: Delete the satellite from the satellite list.
Unicable:
When using a unicable system, the LNB type must be set to Unicable. Use the ◀▶ buttons to change the LNB type and select Unicable A. Then press the OK button to access the configuration.
Motor:
Select this antenna type, if you use a motorized antenna. Configure the settings for the engine settings according to your needs. The available options may vary depending on the engine type. If you have made all the settings, press EXIT to return to the satellite selection.
Search programs:
Press the BLUE button to search the selected satellite for programs. Then, a message box appears adapt your search. Usually used to find "Blind Scan" to all programs. Go to "Encrypted" if you want to search only for free or encrypted channels. Confirm with the OK button.
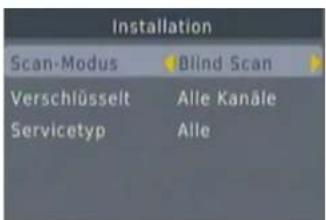
Note: You can press EXIT to cancel or MENU to skip the installation.
The search can take some time. The course you will see at the bottom of the screen.
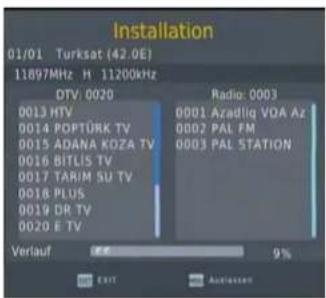
5. Main Menu 5. Main Menu
Press the MENU button to enter the main menu. By using navigation buttons on the remote control, you can move between the various menus. Press the OK button to confirm input or enter a submenu. Press EXIT to always go back to the previous menu.
The following submenus are in the main menu:
- Program
- Picture
- Installation
• Time - Option
- System
- USB
Note:
The default password for menu access is: 000000
5.1 Program
Edit programs
Select „Edit program“ and confirm with OK. Then navigate to a channel you want to edit.
RED button: Select a program by using the RED button and navigate to a desired position. Press OK to move the program to that place.
GREEN button: Select a program with the GREEN button. Now, this program in future will be skipped when browsing through the channel list.
YELLOW button: Select a program with the YELLOW button. If you are switch to that program in the future a password is required.
BLUE button: Select a program with the BLUE key to delete it. You will be prompted whether you want to delete it really. Confirm with OK or to cancel with EXIT.
FAV: Select a program with the FAV button to playce it in favorites list.
INFO (i) button: Press the INFO button to rename a program. Use the letters on the numeric keypad on the screen.
Note: Press the ▶ button to edit radio stations in the same way.
EGP
Here you see the current program information for each channel. Use the ◀▶ buttons to select a channel. Use the ▲▼ buttons to scroll between the respective programs. For more information about the shipment can be found on the right side of the page.
Note:
The guide can also be displayed by pressing the EPG button on the remote control.
Sort
You can sort the channel list as required. The choices are:
- Standard
- For encrypted programs
- By Frequency
- By service name
5.2 Picture
Image ratio
Select the aspect ratio according to your TV. In general, the „AUTO“ by default.
Resolution
Select the resolution that can also play back your TV. If you have a Full HD television, for example, select 1080p (50Hz). On TV sets with a normal HD resolution select 720p.
TV-Format
Choose between PAL and NTSC. European TVs generally use the PAL standard.
Video output
Choose between RGB and CVBS.
5. Main Menu 5. Main Menu
5.3 Installation
Dish / LNB settings
Use this to adjust the settings that are necessary for your satellite set-top box, or for the LNB. The procedure can be found on page 8.
Load settings
Loading from USB: You can load previously saved data from a USB stick.
Copy to USB: Copy your settings on a USB storage you have made in the menu.
If the set-top box is reset to the factory settings, you can be easily
loaded data again.
5.4 Time
Time offset
You can choose between „Auto“ and „Manual“. When „Auto“, the time settings are automatically set via satellite at the exact time. In „Manual“, the time and date are set manually.
Sleep
Select the time after the unit goes into standby mode if no operation is performed on the device. Select OFF, or the time between one and 12 hours.
5.5 Option
OSD Language
Select the language of the OSD.
Subtitle Language
Select the language of the subtitle. The subtitle is displayed only when the station is also available to them.
Audio Language
Select the language of the audio track. Some stations offer a consignment in two languages (e.g. german and english). Select the main language.
Digital Audio
Select the audio output (Off, PCM, RAW HDMI on, RAW).
5.6 System
Child Lock
Some stations offer an age limit. If you specify an age limit here, in the future a password must be entered when you switch to a program of this limitation. Choose between OFF, or 4 to 18 years.
Setting the password
You can enter a new password. First, the current password must be entered. By default upon delivery is: 000000. Then it is possible to create a new one. Assign a 6-digit password and then retype the password.
Restore factory settings
Here you can set the set-top box to factory defaults. After confirming a password prompt appears. Enter the password and press OK to reset the set-top box. Press EXIT to abort.
Information
It includes information about hardware and software status of the set-top box.
Software update
To update a new firmware, select USB upgrade, if you have the latest firmware on a USB storage. Select OAD, to load the update via satellite. The update via satellite may take some time to complete.
5. Main Menu 5. Main Menu
5.7 USB
This menu item allows you to play music, photos or videos from a USB memory device.
Multimedia
In the menu, select either multimedia music, photo, or movie. Depending on what you see or want to hear.
Music: Displays only song in the directory (eg. mp3). Select a track with OK to start playback. Press the YELLOW button to change the play mode. The mode is displayed at the top of the screen. Select between „Repeat a Title“, „Repeat all songs in the folder“ or „Shuffle play“.
Photo: Displays only photos in the directory (eg, jpg). Select a photo with OK to display it in the preview window. The image in fullscreen mode is displayed by pressing the OK button. Press EXIT to return to the overview. Press the PLAY button to start a slideshow of all photos that are in this photo folder. The slideshow settings can also be customized.
Movie: Show only videos in the directory (eg. mp4). Select a video with OK to display it in the preview window. Press the RED button to switch between preview and full screen view.
Configure photo
Diashow time: Set the time until the next picture will be shown.
Diashow mode: Select „accidentally“ or set between 0-59 for the transitions between photos.
Image ratio: Choose between keep or discard aspect ratio. In "discard" the aspect ratio of your TV format is adapted. If you have a 4:3 picture on a 16:9 TV screen, it is stretched in width.
Configure movie
Specific Subtitles: Choose between small, normal and large.
Subtitles BG: Choose between Transparent, gray, yellow/green or white.
Subtitles font color: Choose between white, black, red, blue or green.
Format
You can format the USB memory device. Choose between FAT32 and NTFS. With FAT32, only files with a maximum size of 2GB will be detected. Press OK to start formatting. Again, confirm with OK to really start formatting, or EXIT to cancel.
Note:
When formatting, all data will be permanently deleted from the disk!
6. Additional information 6. Additional information
6.1 Troubleshooting 6.3 Specifications
| Problem Possible causes What to do | |
| The LED does not light Power Adaptor is not connected. Check if the mains cable is plugged into the power socket. | |
| No picture or sound No signal or weak signal. Check the aerial and video connections (scart). | |
| Changes in the settings have not taken effect. | Don Receiver worse vorn Not getrennt und vorner nicht in Bereitschaft geschaltet. Make sure that the box is in standby mode before unplugging it from the mains. |
| The remote control is not working. | The set top box is in standby. Remote control is out of range. Batteries are exhausted. Press the STANDBY button. Check that the remote control range is clear. Replace the batteries with new ones. |
6.2 Declaration of Conformity
This complies with the following directives / standards is confirmed:
Electromagnetic Compatibility Directive 2004/108/EG
EN 55013:2001+A1:2003+A2:2006
EN 55020:2007
EN 61000-3-2:2006 + A1:2009 + A2:2009
EN 61000-3-3:2008
Low Voltage Directive 2006/95/EG
EN 60065:2002+A1:2006+A11:2008
| Main Features | |
| Power requirement 720-240 V~50 Hz | |
| Input frequency 950 - 2150 MHz | |
| Maximum power | 20 W |
| Operating | 5°C to 140°C |
| Storage temperature | -20°C to +70°C |
| Moisture | 75 to 75% relative humidity |
| Dimensions | 240 x 140 x 35 mm |
| Weight | ca. 1000 g |
| Hardware configuration | |
| Main processor MSD7816 | |
| Flash memory | 4 MB |
| DDP-RAM | 64 MB |
| Digitalsystem | |
| DVB-S/S2 | MPG2, MPG4 |
| Demodulation | |
| QPSK rates | 1/2, 3/5, 2/3, 3/4, 4/5, 5/6, 8/9, 9/10 |
| BPSK rates | 3/5, 2/3, 3/4, 5/6, 8/9, 9/10 |
| DVB-S | 1 45 MBitd |
| DVB-S2 | 5-30 MBitd |
| Video | |
| Video | MP @ ML, PAL, 43/16.9 |
| MPEG4 | AVC/H.264 HP@L4 Videodecoder ^2 |
| Profile | |
| MPEG4 H.264/AVC HP@L 4.0, MP@L 4.0 (HD)H.264/AVC MP@L 3.2, HP@L 3.2 (SD)MPEG 2 MP@L, MP@ML (SD) | |
| Audio | |
| MPEG1 | Layer 1 and 2 |
| Samplingfrequenz | 32 kHz, 44.1 kHz oder 48 kHz |
| Tuner | |
| 1 x R ^2 In | IEC-Typ jack (75 Ohm) |
| 1 x R ^2 Out (Loop through) | IEC-Typ jack (75 Ohm) |
| AV and data input / output | |
| Scart | TV-Scart |
| RGB video output | TV-Scart |
| Analog Audio Output | TV-Scart |
| Digital Audio Output | Optical Output |
50304644
Status: v1.0 February 2015 // Technical changes, misprints and errors reserved. Megasat Werke GmbH | Industriestraße 4a | D-97618 Niederlauer | www.megasat.tv | info@megasat.tv
- Referenz
- Names and key assignment
- Connecting the set-top box
- First Installation
- Main Menu
- Additional Information
- Safety instructions
- Referenz 2. Names and key assignment
- General features 2.1 Front view
- Delivery
- Zone 1
- Zone 2
- Zone 3
- First installation 4. First installation
- Unicable:
- Motor:
- Search programs:
- Main Menu 5. Main Menu
- Note:
- Program
- Edit programs
- EGP
- Sort
- Picture
- Image ratio
- Resolution
- TV-Format
- Video output
- Installation
- Dish / LNB settings
- Load settings
- Time
- Time offset
- Sleep
- Option
- OSD Language
- Subtitle Language
- Audio Language
- Digital Audio
- System
- Child Lock
- Setting the password
- Restore factory settings
- Information
- Software update
- USB
- Multimedia
- Configure photo
- Configure movie
- Format
- Additional information 6. Additional information
- Declaration of Conformity
Brand : MEGASAT
Model : HD 760
Category : Digital decoder