TWSL6E202 - Tumble drier ELECTROLUX - Free user manual and instructions
Find the device manual for free TWSL6E202 ELECTROLUX in PDF.

| Product Type | Tumble dryer |
| Brand | Electrolux |
| Model | TWSL6E202 |
| Capacity | 6 kg |
| Drying Type | Condenser with heat pump |
| Energy Efficiency Class | A++ |
| Dimensions (H x W x D) | 850 x 596 x 585 mm |
| Weight | 38 kg |
| Power Supply | 230 V, 50 Hz |
| Rated Power | 700 W |
| Noise Level | 65 dB(A) |
| Drying Programs | Cotton, Synthetics, Delicates, Mix, Wool, Quick 30min |
| Sensor Drying | Yes, with moisture sensors |
| Anti-Crease Function | Yes, 30 min continuous after cycle |
| Filter Type | Lint filter + condenser filter |
| Condenser Cleaning | Automatic cleaning with water |
| Water Tank | Yes, 4 L capacity |
| Direct Drain Option | Yes, with hose connection |
| Child Lock | Yes |
| Delay Start | Up to 20 hours |
| Display | LED with time remaining |
| Spare Parts Availability | 7 years minimum |
| Repair Index | 8.5 / 10 |
| Warranty | 2 years |
Frequently Asked Questions - TWSL6E202 ELECTROLUX
User questions about TWSL6E202 ELECTROLUX
0 question about this device. Answer the ones you know or ask your own.
Ask a new question about this device
Download the instructions for your Tumble drier in PDF format for free! Find your manual TWSL6E202 - ELECTROLUX and take your electronic device back in hand. On this page are published all the documents necessary for the use of your device. TWSL6E202 by ELECTROLUX.
USER MANUAL TWSL6E202 ELECTROLUX
natural_image
Abstract geometric composition with overlapping white circles on a gray background (no text or symbols)CONTENTS
- SAFETY INFORMATION...... 3
- SAFETY INSTRUCTIONS....5
- PRODUCT DESCRIPTION....7
- ACCESSORIES....8
- CONTROL PANEL....9
- PROGRAMME TABLE.... 11
- OPTIONS....15
- BEFORE FIRST USE....16
- DAILY USE....17
- HINTS AND TIPS.... 19
- CARE AND CLEANING....21
- TROUBLESHOOTING....24
- TECHNICAL DATA....25
- INSTALLATION....26
- GUARANTEE 27
WE'RE THINKING OF YOU
Thank you for purchasing an Electrolux appliance. You've chosen a product that brings with it decades of professional experience and innovation. Ingenious and stylish, it has been designed with you in mind. So whenever you use it, you can be safe in the knowledge that you'll get great results every time.
Welcome to Electrolux.
Visit our website for:

Get usage advice, brochures, trouble shooter, service information:
www.electrolux.com

Register your product for better service:
www.registerelectrolux.com

Buy Accessories, Consumables and Original spare parts for your appliance:
www.electrolux.com/shop
CUSTOMER CARE AND SERVICE
Always use original spare parts.
When contacting our Authorised Service Centre, ensure that you have the following data available: Model, PNC, Serial Number.
The information can be found on the rating plate.

Warning / Caution-Safety information

General information and tips

Environmental information
Subject to change without notice.
1. ⚠SAFETY INFORMATION
Before the installation and use of the appliance, carefully read the supplied instructions. The manufacturer is not responsible if an incorrect installation and use causes injuries and damages. Always keep the instructions with the appliance for future reference.
Read the supplied instructions.
1.1 Children and vulnerable people safety

WARNING!
Risk of suffocation, injury or permanent disability.
- This appliance can be used by children aged from 8 years and above and persons with reduced physical, sensory or mental capabilities or lack of experience and knowledge if they have been given supervision or instruction concerning use of the appliance in a safe way and understand the hazards involved.
- Do not let children play with the appliance.
• Children of less than 3 years should be kept away unless continuously supervised. - Keep all packaging away from children.
- Keep all detergents away from children.
- Keep children and pets away from the appliance door when it is open.
- If the appliance has a child safety device, we recommend you activate it.
- Cleaning and user maintenance shall not be made by children without supervision.
1.2 General Safety
- Do not change the specification of this appliance.
- If the tumble dryer is put on top of a washing machine, use the stacking kit. The stacking kit, available from your authorized vendor, can be used only with the appliance specified in the instructions, supplied with the
accessory. Read it carefully before installation (Refer to the Installation leaflet).
- The appliance can be installed as freestanding or below the kitchen counter with correct space (Refer to the Installation leaflet).
- Do not install the appliance behind a lockable door, a sliding door or a door with a hinge on the opposite side, where the appliance door can not be fully opened.
- The ventilation openings in the base (if applicable) must not be obstructed by a carpet.
- Connect the mains plug to the mains socket only at the end of the installation. Make sure that there is access to the mains plug after the installation.
- Ensure you have good ventilation in the installation room to avoid the back flow of gases into the room from appliances burning other fuels, including open fires.
- Exhaust air must not be discharged into a flue which is used for exhausting fumes from appliances burning gas or other fuels. (if applicable)
- If the supply cord is damaged, it must be replaced by the manufacturer, its Authorised Service Centre or similarly qualified persons in order to avoid a hazard.
- Obey the maximum load volume of 8kg (refer to the “Programme chart” chapter).
- Do not use the appliance if industrial chemicals have been used for cleaning.
- Wipe away lint that has accumulated around the appliance.
- Do not run the appliance without a filter. Clean the lint filter before or after each use.
- Do not dry unwashed items in the tumble dryer.
- Items that have been soiled with substances such as cooking oil, acetone, alcohol, petrol, kerosene, spot removers, turpentine, waxes and wax removers should be washed in hot water with an extra amount of detergent before being dried in the tumble dryer.
- Items such as foam rubber (latex foam), shower caps, waterproof textiles, rubber backed articles and clothes or pillows fitted with foam rubber pads should not be dried in the tumble dryer.
- Fabric softeners, or similar products, should be used as specified by the fabric softener instructions.
- Remove all objects from pockets such as lighters and matches.
- Never stop a tumble dryer before the end of the drying cycle unless all items are quickly removed and spread out so that the heat is dissipated.
- The final part of a tumble dryer cycle occurs without heat (cool down cycle) to ensure that the items are left at a temperature that ensures that the items will not be damaged.
- Before maintenance, deactivate the appliance and disconnect the mains plug from the mains socket.
2. SAFETY INSTRUCTIONS
2.1 Installation
- Remove all the packaging.
- Do not install or use a damaged appliance.
- Obey the installation instruction supplied with the appliance.
- Always be careful when you move the appliance because it is heavy. Always wear safety gloves.
- Do not install or use the appliance where the temperature is less than 5°C or higher than 35°C.
- Make sure that the floor where you install the appliance is flat, stable, heat resistant and clean.
- Make sure that there is air circulation between the appliance and the floor.
• Always move the appliance vertically. - The rear surface of the appliance must be put against the wall.
- When the appliance is put in its permanent position, check if it is fully level with the aid of a spirit level. If it is not, adjust the feet until it is.
2.2 Electrical connection

WARNING!
Risk of fire and electrical shock.
• The appliance must be earthed.
- Make sure that the electrical information on the rating plate agrees with the power supply. If not, contact an electrician.
• Always use a correctly installed shockproof socket.
- Do not use multi-plug adapters and extension cables.
- Do not pull the mains cable to disconnect the appliance. Always pull the mains plug.
- Do not touch the mains cable or the mains plug with wet hands.
- Only for UK and Ireland. The appliance has a 13 amp mains plug. If it is necessary to change the fuse in the mains plug, use a 13 amp ASTA (BS 1362) fuse.
- This appliance complies with the E.E.C. Directives.
2.3 Use

WARNING!
Risk of injury, electrical shock, fire, burns or damage to the appliance.
- Use this appliance in a household only.
- Do not dry the damaged items which contain padding or fillings.
- Only dry fabrics which are applicable to dry in the tumble dryer. Follow the instructions on the fabric label.
- If you have washed your laundry with a stain remover start an extra rinse cycle before you start the dryer.
- Do not drink or prepare food with the condensed water/distilled water. It can cause health problems to people and pets.
- Do not sit or stand on the open door.
- Do not dry dripping wet clothes in the tumble dryer.
2.4 Internal light

WARNING!
Risk of injury.
- Visible LED radiation, do not look directly into the beam.
- The type of light bulb or halogen lamp used for this appliance is only for household appliances. Do not use it for house lighting.
- To replace the internal light, contact the Authorised Service Centre.
2.5 Care and cleaning

WARNING!
Risk of injury or damage to the appliance.
- Do not use water spray and steam to clean the appliance.
- Clean the appliance with a moist soft cloth. Only use neutral detergents. Do not use abrasive products, abrasive cleaning pads, solvents or metal objects.
2.6 Compressor

WARNING!
Risk of damage to the appliance.
- The compressor and its system in the tumble dryer is filled with the special agent which is free from fluoro-chlorohydrocarbons. This system must stay tight. The damage of the system can cause a leakage.
2.7 Disposal

WARNING!
Risk of injury or suffocation.
- Disconnect the appliance from the mains supply.
- Cut off the mains cable and discard it.
- Remove the door catch to prevent children and pets to get closed in the appliance.
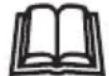
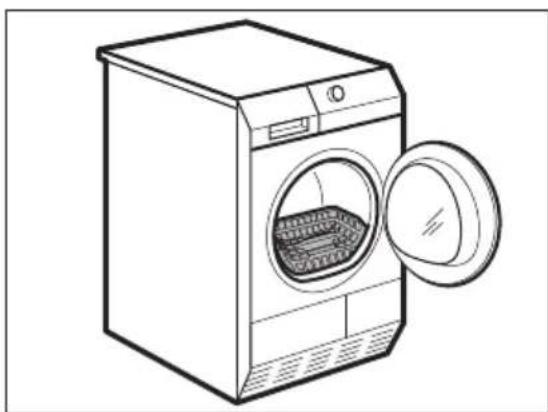
3. PRODUCT DESCRIPTION
1 Water container
2 Control panel
3 Internal light
4 Appliance door
5 Filter
6 The button to open the heat exchanger door
7 Airflow slots
8 Adjustable feet
9 Heat exchanger door
10 Heat exchanger cover
11 The knob to lock the heat exchanger cover
12 Rating plate

The load door can be installed by the user in the opposite side. It can help to easily put and remove the laundry or if there is a limit to install the appliance (see separate leaflet).
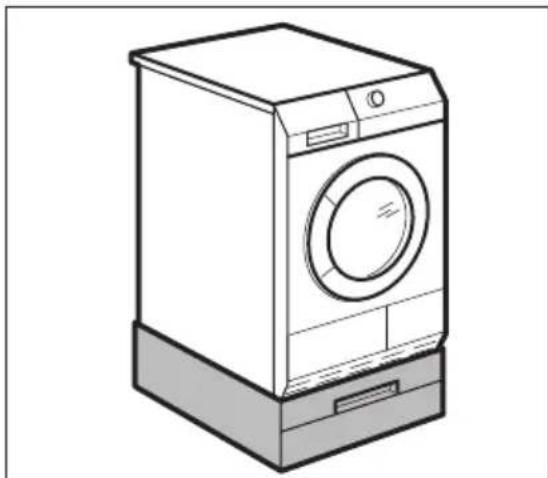
4. ACCESSORIES
4.1 Stacking kit

natural_image
Line drawing of a two-tiered washing machine with front-mounted dish and side-mounted sink, accompanied by icons for washing cloth and square (no text or symbols)Accessory name: SKP11, STA8, STA9
Available from your authorized vendor.
Stacking kit can be used only with the washing machines specified in the leaflet. See the leaflet attached.
Read carefully the instructions supplied with the accessory.
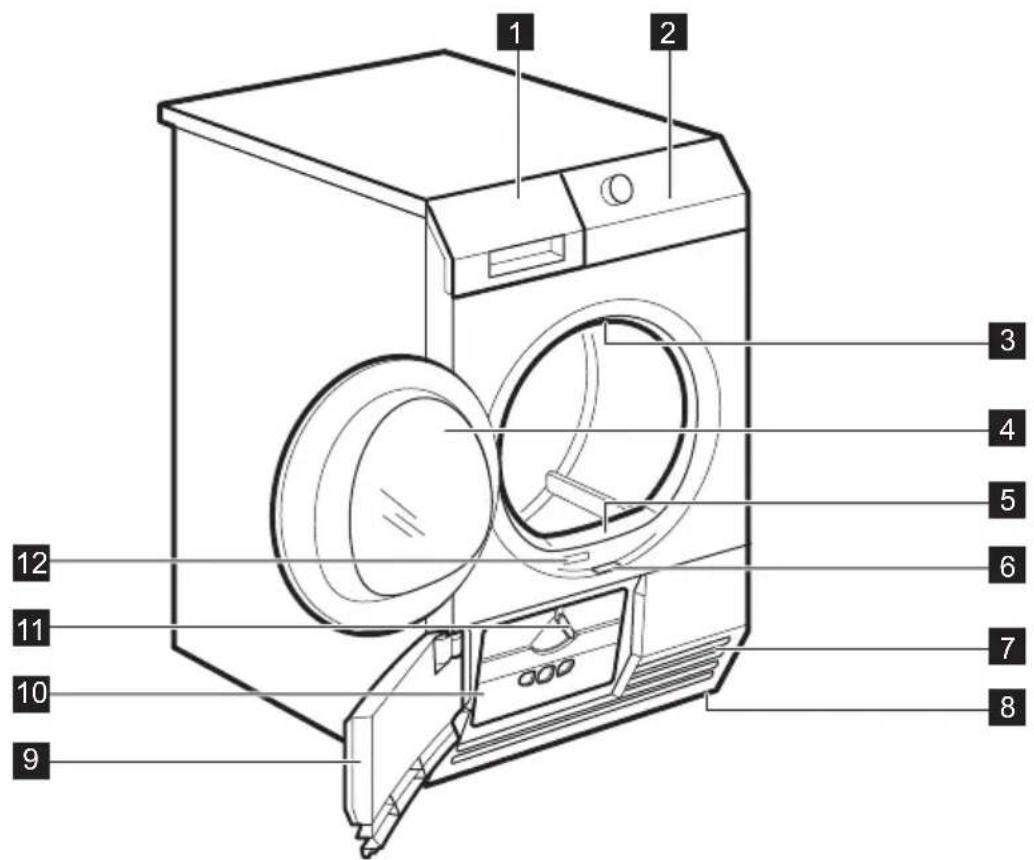
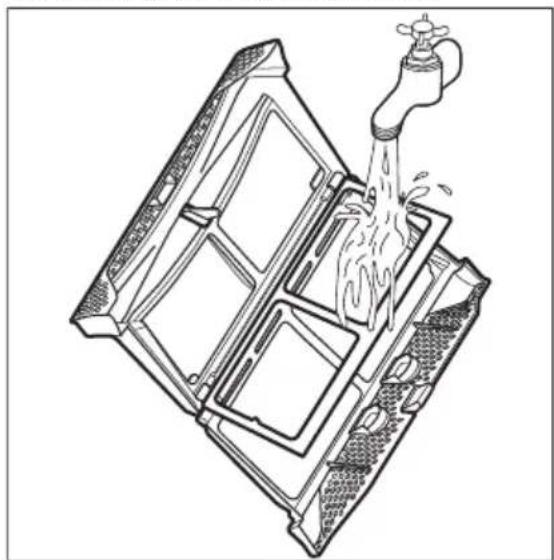
4.2 Draining kit
natural_image
Line drawing of a washing machine connected to a sink with a faucet (no text or symbols)Accessory name: DK11.
It is available from your authorized vendor (can be attached to some types of the tumble dryers)
The accessory for through draining of the condensed water into a basin, siphon, gully, etc. After the installation, the water container is drained automatically. The water container must stay in the appliance.
The installed hose must be on the height from minimum of 50 cm to maximum of 1 m from floor level. The hose cannot be in loop. Decrease the length of the hose if necessary.
Read carefully the instructions supplied with the accessory.
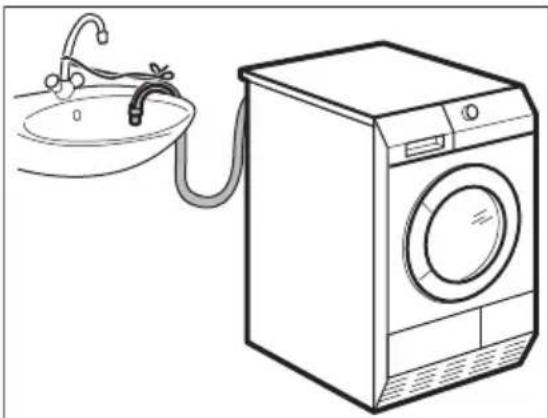
4.3 Pedestal with the drawer
natural_image
Line drawing of a single washing machine with front panel and side base (no text or symbols)Accessory name: PDSTP10.
It is available from your authorized vendor.
To put the appliance higher at the level what helps to easy load and remove the laundry.
The drawer can be used for laundry storage e.g. : towels, cleaning products and more.
Read carefully the instructions supplied with the accessory.
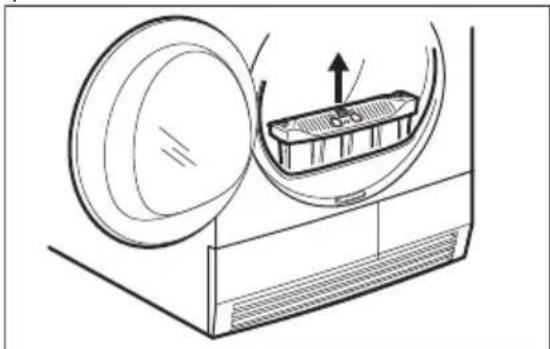
4.4 Drying rack
natural_image
Line drawing of a front-loading washing machine with an open door and lid (no text or symbols)Accessory name: RA5, RA6, RA11, RA12.
It is available from your authorized vendor (can be attached to some types of the tumble dryers). Do the check with the vendor or on the web site if the accessory is compatible with your appliance.
Drying rack accessory let to dry safely in the tumble dryer:
- sport shoes
- wool
- soft toys
- lingerie
Read carefully the instructions supplied with the accessory.
5. CONTROL PANEL
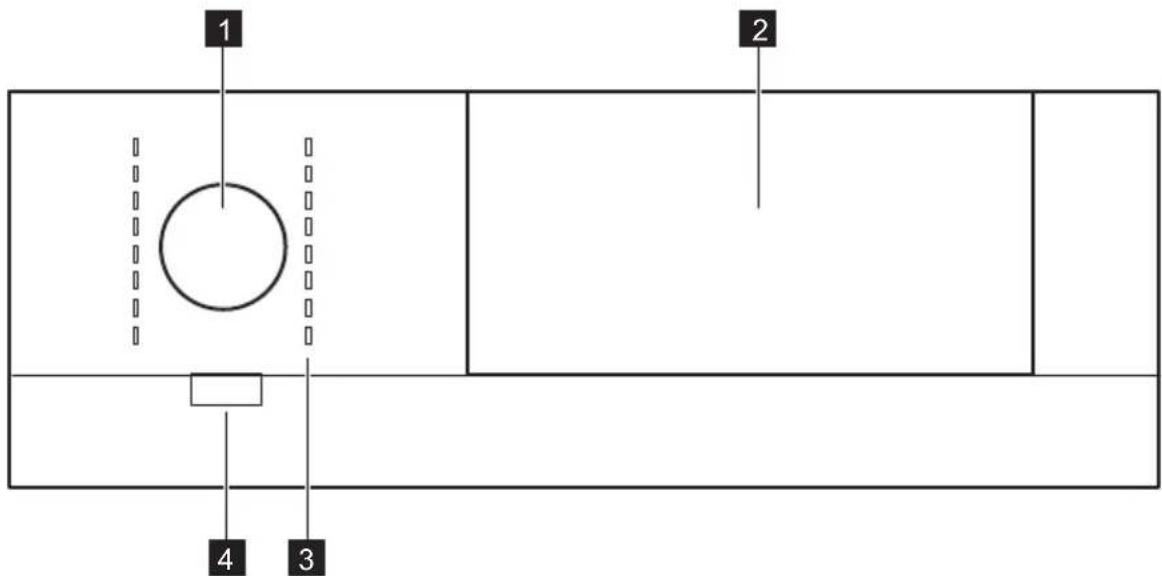
1 Programme dial
2 Touch panel with the display
3 Programme indicators
4 ① On/Off (Ein/Aus) button with the Auto Off function
5.1 The touch panel
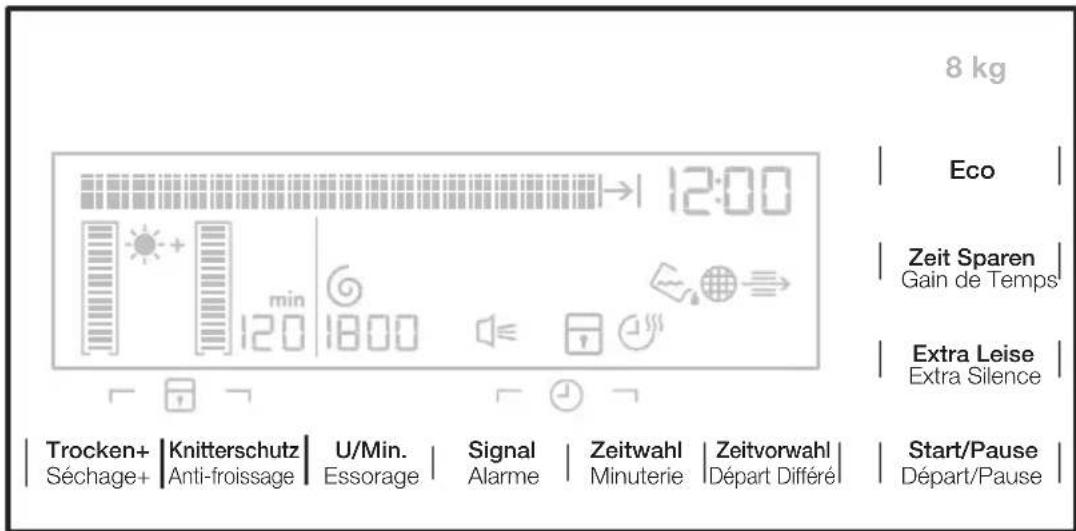
As alternative for the buttons to set the option you must touch the area with the
option name. Each area between the vertical marks senses the user finger.

For accurate selection touch the centre point of the area between the vertical marks. Do not wear gloves when you touch the panel to set the function. Make sure the panel is always clean and dry.
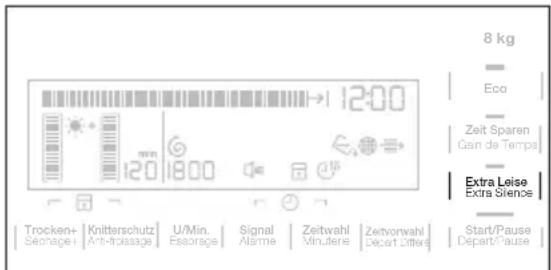
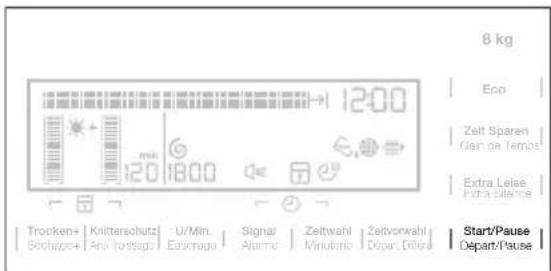
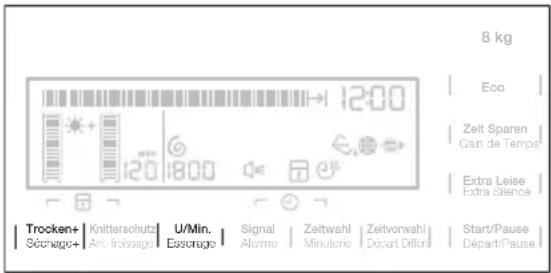
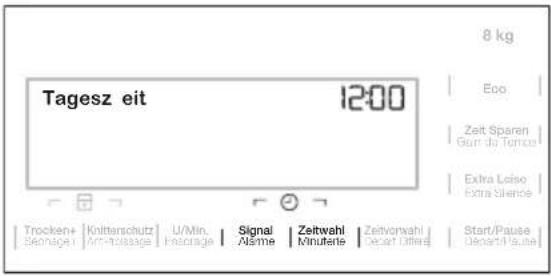
5.2 Display
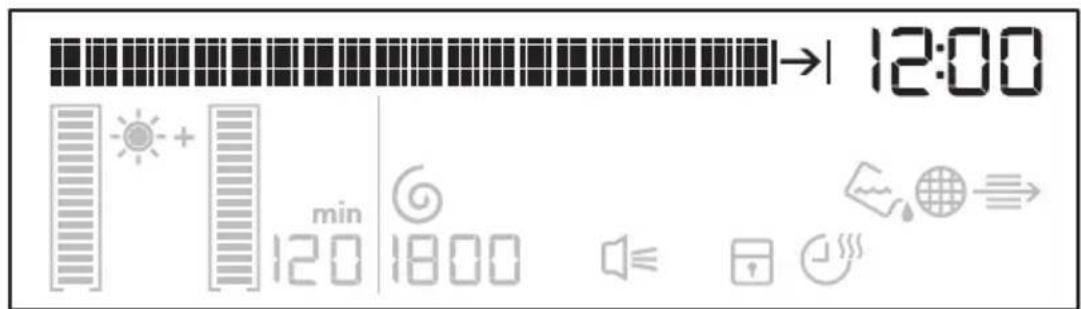
| Symbol on the display Symbol description | |
| Time of day | text bar |
| 12:00 | clock |
| |→|2.00 | cycle time indication |
| →|16:20 | estimated hour of the programme end |
| →|16:30 | estimated hour of the time programme endtime programme interval 10min. — 120min. |
| →|16:50 | estimated hour of the programme end with the delayed startdelay start interval 30min. — 20h. |
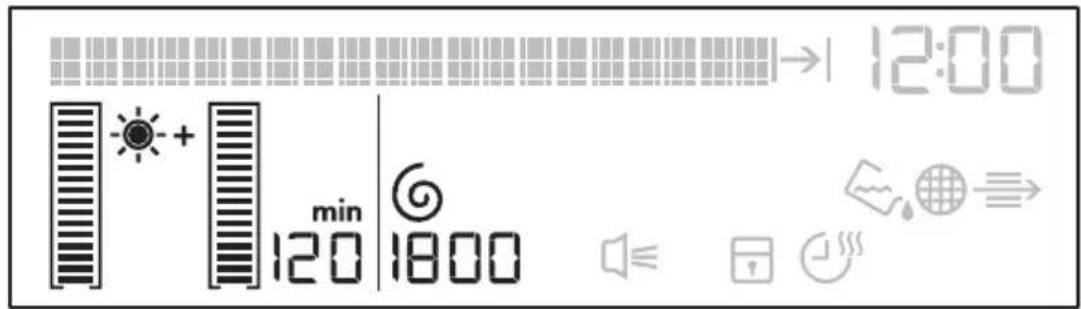
| Symbol on the display Symbol description | |
 | extra laundry dryness: default, moderate, maximum |
 | anti-crease phase duration: default, interval (30min. - 120min.) |
 | laundry was spun at: 800 — 1800 rpm default |
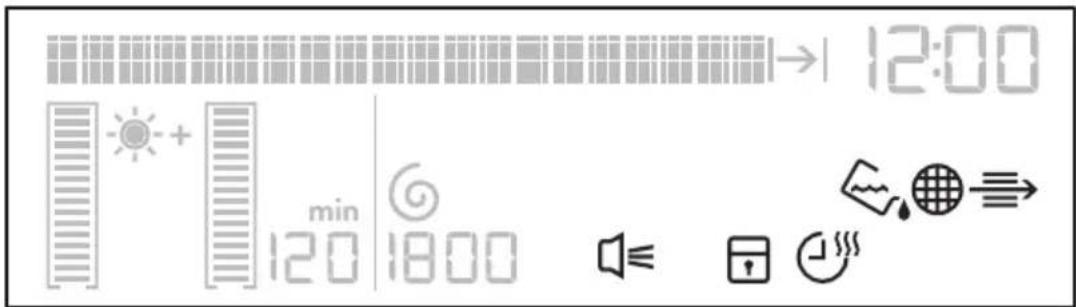
| Symbol on the display Symbol description | |
 | buzzer on |
 | child lock on |
 | time dry option on |
 | indicator: drain the water container |
 | indicator: clean filter |
| [T386] | indicator: do the check of the heat exchanger |
6. PROGRAMME TABLE
 | nes | Load 1) | Properties / Fabric mark | ||
| Cotton (Baumwolle) | |||||
| Extra Dry (Extratrocken) | 8 kg | Drying level: extra dry. |  | ||
| Cupboard Dry (Schrank-trocken) | 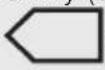 | 2)3) | 8 kg | Drying level: cupboard dry. |  |
| Iron Dry (Bügeltrocken) 2) | 8 kg | Drying level: applicable for iron. |  | ||
| Jeans | 8 kg | Leisure clothing such as jeans,sweat-shirts of different materialthicknesses (e.g. at the neck,cuffs and seams). |  | ||
| Programmes | Load 1) | Properties / Fabric mark | |
| Bed Linen (Bettwäsche) | 3 kg | To dry bed linen such as: single and double sheet, pillowcase, bedspread. |  |
| Duvets (Daunen) | 3 kg | To dry one or two duvet and pillows (with feather, down or synthetic fillings). |  |
| Time (Zeitprogramm) | 8 kg | With this programme you can use the option Time (Zeitwahl) and set the programme duration. |  |
| Extra Quick Mixed (Mix Extra Kurz) | 3 kg | To dry cotton and synthetic fabrics, uses low temperature. |  |
| Synthetic (Mischgewebe) | |||
| Extra Dry (Extratrocken) | 3,5 kg | Drying level: extra dry. |  |
| Cupboard Dry (Schrank-trocken)2) | 3,5 kg | Drying level: cupboard dry. |  |
| Iron Dry (Bügeltrocken) | 3,5 kg | Drying level: applicable for iron. |  |
| Easy Iron (Leichtbügeln) | 1 kg (or 5 shirts) | Easy care fabrics for which a minimum of iron-ing is necessary. The drying results can be dif-ferent from one type of fabric to the other.Shake the items before you put them in the ap-pliance. When the programme is completed, Immediately remove the items and put them on a hanger./ [IMAGE] |  |
| Outdoor | 2 kg | To dry outdoor pieces of clothing, technical, sports, pile fabrics, waterproof and breathable jackets, shell jacket teamed with a removable fleece or inner insulation. | |
| Microfiber (Mikrofaser) | 2 kg | Sportswear, thin and light fabrics, microfiber, polyester, which are not ironed. | |
| Silk/Lingerie (Seide) | 1 kg | To dry silk/lingerie with warm air and gentle movement. |  |
| Programmes | Load 1) | Properties / Fabric mark |
| To dry the cloths made of wool. The cloths be-come soft and cosy. We recommend to re-move the cloths immediately after the pro-gramme end. To increase or to decrease the level of the remaining moisture of the laundry you can use the function Dry Plus (Trocken+). | ||
| Wool (Wolle) 4) | 1 kg |  |
1) The maximum weight refers to dry items.
2) For test institutes only: Standard programmes for tests are specified in the EN 61121 document. If is necessary to correct the remaining moisture level of the laundry, adjust the programme with the Dry Plus (Trocken+) option Clean the filter after each cycle
3) The Cotton (Baumwolle) Cupboard Dry (Schranktrocken) programme is the "Standard cotton programme" and it is suitable to dry normal wet cotton laundry and it is the most efficient programme in terms of energy consumption for drying wet cotton laundry.
4) The wool drying cycle of this tumble drying machine has been tested and approved by The Woolmark Company. The cycle is suitable to dry wool garments, which are labelled "hand wash" provided that the garments are washed in a Woolmark endorsed hand washing cycle and tumble dried according to the instructions issued by the manufacturer. 1780SW13W.
6.1 Programmes and options selection
| Options |
 |
| Options | |||||||
| Programmes1) | Dry Plus (Trocken +) | Anti-crease (Knitter-schutz) | Spun at RPM (U/Min.) | Time Dry (Zeit-wahl) | Eco2) | Time Save (Zeit Spa-ren) | Extra Silent (Ex-tra Le-ise) |
| Bed Linen (Bettwäsche) | ■ | ■ | ■ | ■ | |||
| Duvets (Daunen) | ■ | ■ | ■ | ||||
| Time (Zeitprogramm) | ■ | ■ | ■ | ||||
| Extra Quick Mixed (Mix Extra Kurz) | ■ | ■ | ■ | ■ | |||
| Synthetic (Mischgewebe); Extra Dry (Extratrocken) | ■ | ■ | ■ | ■ | ■ | ■ | |
| Synthetic (Mischgewebe); Cup-board Dry (Schranktrocken) | ■ | ■ | ■ | ■ | ■ | ■ | |
| Synthetic (Mischgewebe); Iron Dry (Bügeltrocken) | ■ | ■ | ■ | ■ | ■ | ||
| Easy Iron (Leichtbügeln) | ■ | ■ | ■ | ■ | |||
| Outdoor | ■ | ■ | ■ | ||||
| Microfiber (Mikrofaser) | ■ | ■ | ■ | ■ | |||
| Silk/Lingerie (Seide) | ■ | ■ | ■ | ||||
| Wool (Wolle) | ■ | ■3) | ■ | ||||
1) Together with the programme you can set 1 or more options.
2) The option is off if the 1 of the options Time Save (Zeit Sparen) or Extra Silent (Extra Leise) is on.
3) Only with the drying rack — see chapter ACCESSORIES
6.2 Consumption Data
| Programme Spun at / residual humidity Drying time | Energy consumption | |
| Cotton (Baumwolle) 8 kg | ||
| Cupboard Dry (Schranktrocken) | 1400 rpm / 50% 189 min. 1,32 kWh | |
| 1000 rpm / 60% 215 min. 1,51 kWh | ||
| Iron Dry (Bügeltrocken) | 1400 rpm / 50% 144 min. 1,04 kWh | |
| 1000 rpm / 60% 164 min. 1,19 kWh | ||
| Synthetic (Mischgewebe) 3,5 kg | ||
| Cupboard Dry (Schranktrocken) | 1200 rpm / 40% 76 min. 0,47 kWh | |
| 800 rpm / 50% 86 min. 0,53 kWh | ||
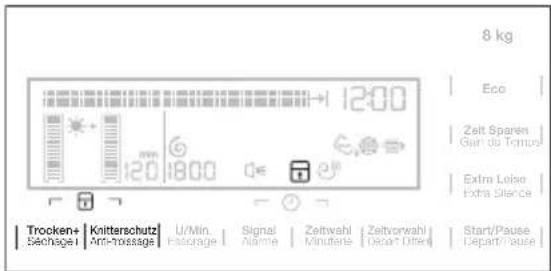
7. OPTIONS
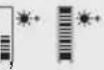
7.1 Dry Plus (Trocken+)
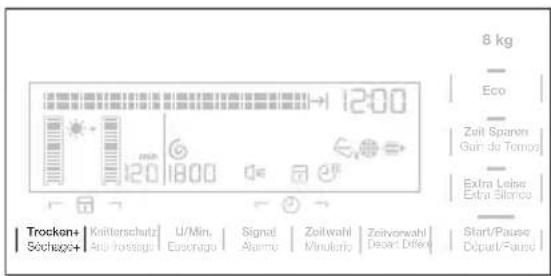
This option helps to get the laundry more dried. There are 3 possible selections:
^* - the default selection which is related to the programme.
- the selection to get the laundry lightly dried.
- the selection to get the laundry more dried.
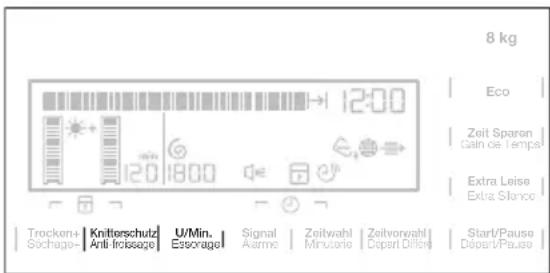
7.2 Anti-crease (Knitterschutz)
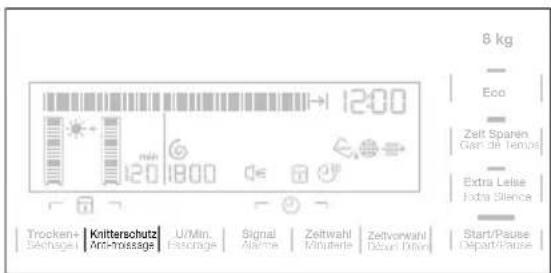
Extends of 30, 60, 90 or 120 minutes the standard anti-crease phase (30 minutes) at the end of the drying cycle. This option prevents laundry from creases. Laundry
can be removed during the anti-crease phase.
7.3 Spun at RPM (U/Min.)

This option helps to set the best condition to dry the laundry.
If you know the initial spin speed when you washed you can use this option. Higher spin speed causes that the laundry contains less water.
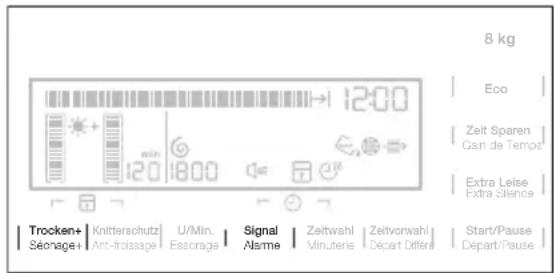
7.4 Buzzer (Signal)
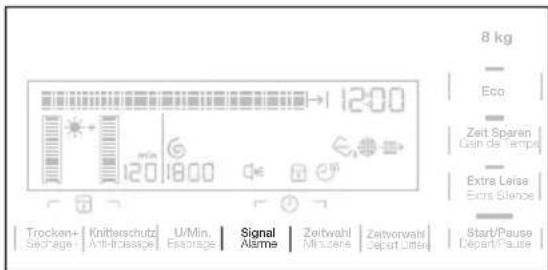
When the buzzer option is activated you can hear the sound at the:
- cycle end
- anti-crease phase start and end
- cycle interruption
The buzzer option is by default always on. You can use this option to activate or deactivate the sound.

You can activate the Buzzer (Signal) option with all programmes.
Operates only with the Time (Zeitprogramm) programme. Lets the user to set special time of drying programme from minimum 10 min. to maximum of 2 hours (in 10 min. steps).
7.6 Delay Start (Zeitvorwahl)


Lets to delay the start of a drying programme from minimum of 30 minutes to maximum of 20 hours.
- Set the drying programme and options.
- Touch the Delay Start (Zeitvorwahl) option field again and again.
The time of the delay come into the view on the display (e.g. 12h if the programme has to start after 12 hours.) - To activate the Delay Start (Zeitvorwahl) option, touch the Start/Pause field.
Time to start decreases on the display.
8. BEFORE FIRST USE
Before you use the appliance for the first time do these operations:
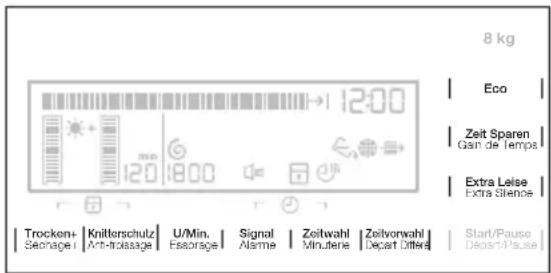
7.7 Eco
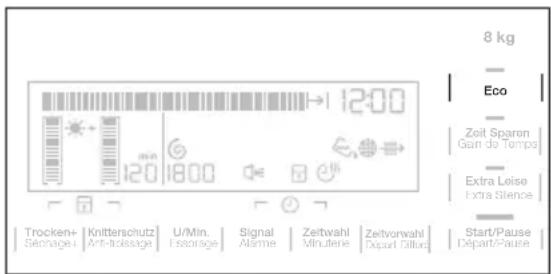
This option is on by default with all the programmes. Does not include the Extra Quick Mixed (Mix Extra Kurz) programme.
The power consumption is at the minimum level.
The option Eco is off if 1 of the options Time Save (Zeit Sparen) or Extra Silent (Extra Leise) is on.
Decreases the time of the cycle without the effect on the drying quality. The cycle time can be shorter by 30% on the cottons and 40% on synthetics. The appliance operates with the higher energy consumption.
7.9 Extra Silent (Extra Leise)
The appliance operates with low noise 62 dB without the effect on the drying quality. The appliance operates slowly with the longer cycle time.
- Clean the tumble dryer drum with a moist cloth.
- Start a short programme (e.g. 30 minutes) with moist laundry.

At the beginning of drying cycle (3-5 min.) there could be a slightly higher sound level. It is because of start of the compressor that is normal for compressor powered appliances such: refrigerators, freezers.
8.1 Language
The first time you turn on the dryer the default language comes into the view on the display. You can confirm it or change the different language from the available languages list.
To set the different language:
-
Turn the programme dial to set your language.
-
Touch the Start/Pause field.
9. DAILY USE
9.1 Preparing the laundry
- Close the zippers.
- Close the fasteners of the duvet covers.
- Do not keep ties or ribbons loose (e.g. apron ribbons). Tie them before you start a programme.
- Remove all items from the pockets.
- If an item has the internal layer made of cotton, turn it inside out. Make sure that the cotton layer is always external
- We recommend that you set the correct programme applicable for the type of fabrics that are in the appliance.
The language is memorised.
8.2 Clock
The first time you turn on the dryer the default time comes into the view on the display. You can confirm or change it.
To set the different time:
- Turn the programme dial to set new hour.
- Touch the Start/Pause field. The hour is memorised.
- Turn the programme dial to set new minutes.
-
Touch the Start/Pause field. The minutes are memorised.
-
Do not put fabrics with strong colours together with fabrics with light colours. Strong colours can bleed.
- Use an applicable programme for cotton jersey and knitwear to prevent the items to shrink.
- Make sure that the laundry weight is not more than the maximum weight that is in the programme table.
- Dry only the laundry that is applicable for tumble dryer. Refer to the fabric label on the items.
| Fabric label Description | |
| Laundry that is applicable for tumble dryer. | |
| Laundry that is applicable for tumble dryer. Set the programme with standard temperature. | |
| Laundry that is applicable for tumble dryer. Set the programme with low temperature. | |
| Laundry that is not applicable for tumble dryer. | |
9.2 Loading the laundry

CAUTION!
Do not lock the laundry in between the appliance door and rubber seal.
- Pull the appliance door.
- Load loosely the laundry.
- Close the appliance door.
9.3 Turning on the appliance
To turn on the appliance:
Push the On/Off (Ein/Aus) button. If the appliance is on, some indications come in to the view on the display.
9.4 Auto Off function
To decrease the energy consumption, the Auto Off function turns off automatically the appliance:
- if the Start/Pause field was not touched in the time of 5 minutes.
• after 5 minutes from the programme end.
Push the ⓄOn/Off (Ein/Aus) button to turn on the appliance. If the appliance is on, some indications come in to the view on the display.
9.5 Setting a programme
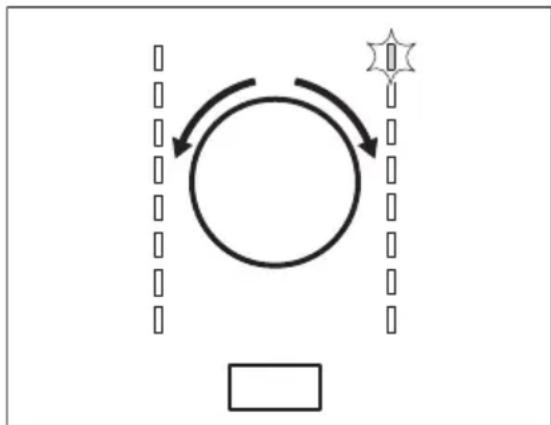
flowchart
graph TD
    A["Circle"] --> B["Star"]
    B --> C["Arrow Right"]
    C --> D["Arrow Down"]
    D --> E["Arrow Left"]
    E --> F["Arrow Up"]
    F --> G["Arrow Left"]
    G --> H["Arrow Right"]
Use the programme dial to set the programme.
The possible time to complete the programme comes into the view on the display.

The drying time you see is related to the load of 5 kg for cotton and jeans programmes. For the other programmes the drying time is related to the recommended loads. The drying time of the cotton and jeans programmes with the load more than 5 kg is longer
9.6 Options
Together with the programme you can set 1 or more special options.
To activate or deactivate the option touch the applicable option field.
When the option is activated the LED above the option field or symbol on the display comes into the view.
9.7 Child lock option
The child lock can be set to prevent the children to play with the appliance. The child lock option locks all push buttons and the programme dial (this option does not lock On/Off (Ein/Aus) button).
You can activate the child lock option:
- before you push the Start/Pause button - the appliance cannot start
- after you push the Start/Pause button - programmes and option selection is off.
Child lock option activation:
- Turn on the dryer.
- Wait approximately 8 seconds.
- Select 1 of the available programmes.
- Touch at the same time and hold down the Dry Plus (Trocken+) and Anti-crease (Knitterschutz) option fields.
The symbol ☐ comes into the view on the display.
- To deactivate the child lock, touch again the above option fields until the symbol goes out of the view.
9.8 Starting a programme
To start the programme:
Touch the Start/Pause field.
The appliance starts and the LED above the touch field does not flash but is stable.
9.9 Programme change
To change a programme:
-
Push the On/Off (Ein/Aus) button to turn off the appliance.
-
Push again the On/Off (Ein/Aus) button to turn on the appliance.
-
Set a new programme.
10. HINTS AND TIPS
10.1 Ecological hints
- Spin good the laundry before drying.
- Use the load volumes which are specified in the programme chart.
- Clean the filter after each drying cycle.
- Do not use fabric softener to wash and then dry. In the tumble dryer laundry becomes soft automatically.
- Use the condensate as distilled water, e.g. for steam ironing. If it is necessary clean the condensate before (e.g. with a coffee filter) to remove possible small pieces of fluff.
9.10 Programme end

Clean the filter and drain the water container after each drying cycle. (See chapter CARE AND CLEANING.)
If the drying cycle is completed, the symbol flashes on the display. If the Buzzer (Signal) option is on, the acoustic signal sounds intermittently for 1 minute.

If you do not turn off the appliance, the crease guard phase starts. Laundry can be removed during this phase.
To remove the laundry:
- Push the On/Off (Ein/Aus) button for 2 seconds to turn off the appliance.
- Open the appliance door.
- Remove the laundry.
- Close the appliance door.
• Always keep the airflow slots on the bottom of the appliance clear.
- Make sure that is good airflow in the appliance installation position.
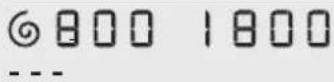
10.2 Adjustment of the remaining laundry moisture degree
To change the default degree of the remaining moisture of the laundry:
- Turn on the appliance.
- Wait approximately 8 seconds.
- Select 1 of available programmes.
- Touch at the same time and hold down the Dry Plus (Trocken+) and Spun at RPM (U/Min.) option fields.
One of the symbols goes into the view on the display:
CO_ - the maximum dry laundry
CO= - the more dry laundry
COE - the standard dry laundry
-
Touch the Start/Pause field again and again until you set necessary degree.
-
To memorise the setting, touch at the same time the Dry Plus (Trocken+) and Spun at RPM (U/Min.) option fields for approximately 2 seconds.
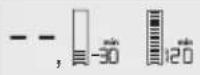
10.3 Deactivating the Water container (Behälter) indicator
-
Turn on the appliance.
-
Wait approximately 8 seconds.
-
Select 1 of available programmes.
-
Touch at the same time and hold down the Dry Plus (Trocken+) and Buzzer (Signal) option fields.
- the Water container (Behälter) indicator: is on and the symbol goes into the view - the water container indicator is permanently on
- the Water container (Behälter) indicator: is off and the symbol ____ goes into the view - the water container indicator is permanently off
10.4 Language
You can change the language each time you want.
To set the different language:
- Turn on the dryer.
-
Wait approximately 8 seconds.
-
Touch at the same time the Anti-crease (Knitterschutz) and Spun at RPM (U/Min.) option fields and hold down.
You see the language name on the display.
-
Turn the programme dial to set the new language.
-
Touch the Start/Pause field. The language is memorised.
10.5 Clock
You can change the clock each time you want.
To set the different time:
- Turn on the dryer.
- Wait approximately 8 seconds.
- Touch at the same time the Buzzer (Signal) and Time Dry (Zeitwahl) option fields and hold down.
Clock digits start to flash on the display.
- Turn the programme dial to set new hour.
- Touch the Start/Pause field.
11. CARE AND CLEANING
11.1 Cleaning the filter
At the end of each cycle the symbol 🌐 Filter (Sieb) is on the display and you must clean the filter.

The filter collects the fluff. The fluff occurs while the cloths are dried in the tumble dryer.
- Open the door. Pull the filter.
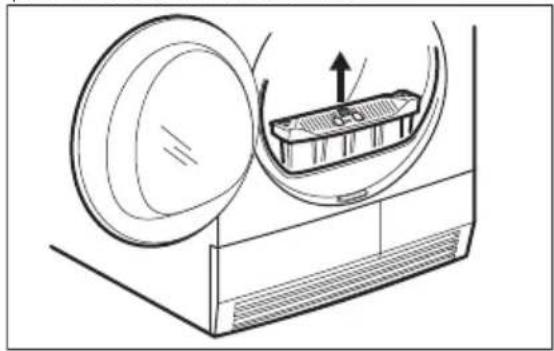
natural_image
Technical line drawing of a mechanical component with a circular base and internal structure (no text or symbols)- Push the hook to open the filter.
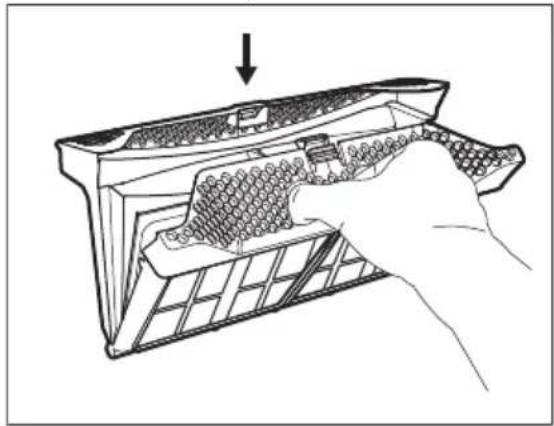
natural_image
Line drawing of a hand inserting into a device into a grid-patterned panel (no text or symbols)- Use a moist hand to clean both parts of the filter.
The hour is memorised.
- Turn the programme dial to set new minutes.
- Touch the Start/Pause field.
The minutes are memorised.
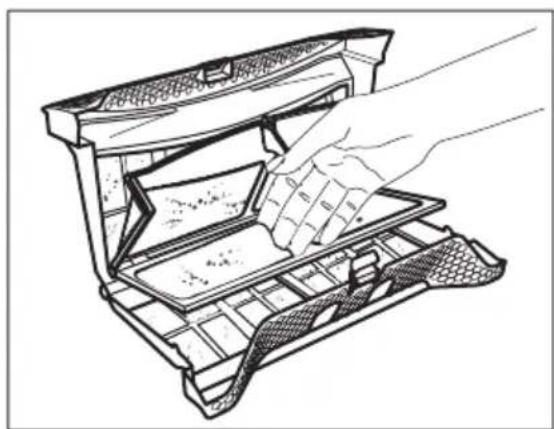
natural_image
Line drawing of a hand inserting a plastic tray into an open drawer (no text or symbols)- If necessary clean the filter with the brush under warm tap water and/or a vacuum cleaner. Close the filter.
natural_image
Technical line drawing of a mechanical device with a faucet pouring liquid into a housing (no text or symbols)- If necessary remove fluff from the filter socket and gasket. You can use a vacuum cleaner. Put the filter inside the filter socket.

natural_image
Line drawing of a hand holding a tool interacting with a car wheel (no text or symbols)11.2 Draining the water container
Drain the condensed water container after each drying cycle.
If the condensed water container is full, the programme breaks off automatically.
The symbol ≈ Water container (Behälter) is on the display and you must drain the water container.
To drain the water container:
- Pull the water container and keep it in horizontal position.
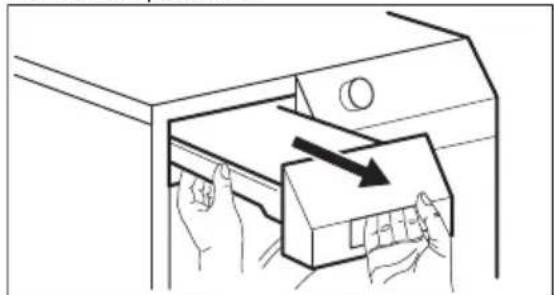
natural_image
Line drawing of hands inserting a box into a drawer with an arrow indicating direction (no text or symbols)- Move the plastic connection out and drain the water into a basin or equivalent receptacle.
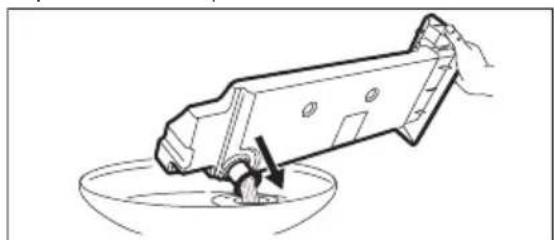
natural_image
Line drawing of a rocket launcher being inserted into a bowl (no text or symbols)-
Move plastic connection in and install water container.
-
To continue the programme press the Start/Pause button.
11.3 Cleaning the heat exchanger
If the symbol Heat exchanger (Kondensator) flashes on the display, do the inspection of the heat exchanger and its compartment. If there is a dirt, clean it.
To do the inspection:
- Open the door. Pull the filter.
natural_image
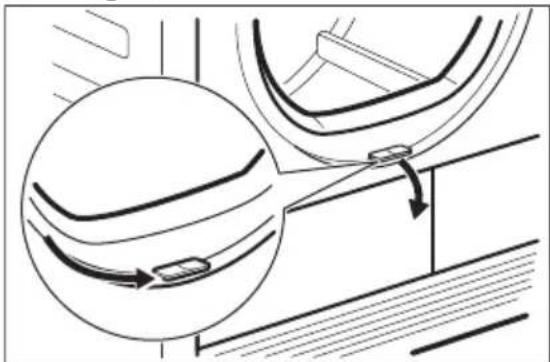
Diagram of a mechanical assembly with a circular component and a rectangular housing, showing internal components (no text or symbols)- Move the release button on the bottom of the door to open the heat exchanger door.
natural_image
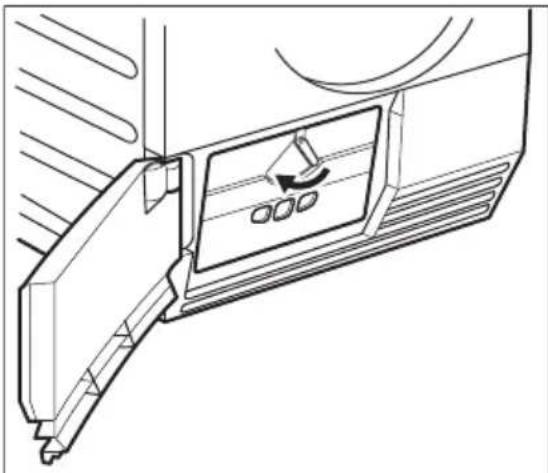
Technical line drawing of a mechanical component with curved arrows indicating motion or force (no text or symbols)- Turn the blockage to unlock the heat exchanger cover.
natural_image
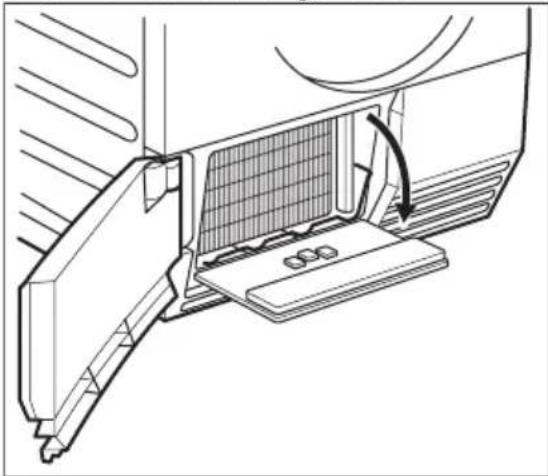
Technical line drawing of a door panel with a control panel and directional arrow (no text or symbols)- Lower the heat exchanger cover.
natural_image
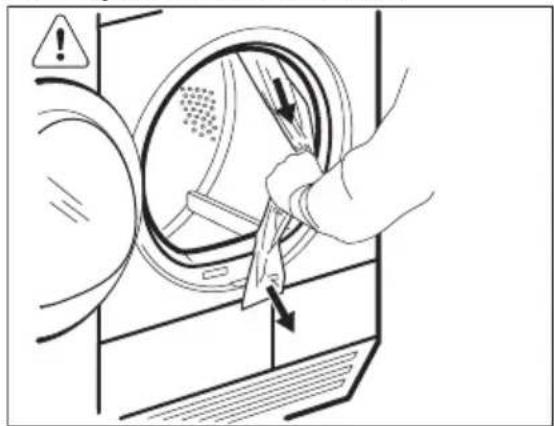
Technical line drawing of a mechanical component with a grid-patterned panel and directional arrow indicating assembly (no text or symbols)- If necessary, remove the fluff from the heat exchanger and its compartment. You can use wet cloth and/or a vacuum cleaner with the brush.

natural_image
Diagram of a hand inserting a cable into a device panel, showing internal components and directional arrows (no text or symbols)- Close the heat exchanger cover.
- Lock the blockage until it snaps.
- Put the filter back.
11.4 Cleaning the drum

WARNING!
Disconnect the appliance before you clean it.
Use a standard neutral soap detergent to clean the inner surface of the drum and drum ribs. Dry the cleaned surfaces with a soft cloth.

CAUTION!
Do not use abrasive materials or steel wool to clean the drum.
11.5 Cleaning the control panel and housing
Use a standard neutral soap detergent to clean the control panel and housing.
Use a moist cloth to clean. Dry the cleaned surfaces with a soft cloth.

CAUTION!
Do not use furniture cleaning agents or cleaning agents which can cause corrosion to clean the appliance.
11.6 Cleaning the airflow slots
Use a vacuum cleaner to remove the fluff from the airflow slots.
- TROUBLESHOOTING
| Problem 1) | Possible cause Remedy | |
| The tumble dry-er does not operate. | The tumble dryer is not connected to mains supply. | Connect in at mains socket.Check fuse in fuse box (domestic installation). |
| The loading door is opened. Close the loading door. | ||
| The On/Off (Ein/Aus) button was not pushed. | Push the On/Off (Ein/Aus) button. | |
| The Start/Pause button was not pushed. | Push the Start/Pause button. | |
| The appliance is in the standby mode. | Push the On/Off (Ein/Aus) button. | |
| Unsatisfactory drying result. | Incorrect programme selection. Do the selection of the applicable programme.2) | |
| The filter is clogged. | Clean the filter.3) | |
| The Dry Plus (Trocken+) option was in minimum level.4) | Change the Dry Plus (Trocken+) option to the moderate or maximum level.4) | |
| Too high volume of the load. Obey the maximum load volume. | ||
| The airflow grill is clogged. Clean the airflow grill in the bot-tom of the appliance. | ||
| Dirt on the humidity sensor in the drum. | Clean the front surface of the drum. | |
| Incorrect remaining laundry moisture degree. | Adjust remaining laundry moisture degree.5) | |
| The heat exchanger is clogged. | Clean the heat exchanger.3) | |
| The loading door does not closed | The filter not locked in the posi-tion. | Put the filter in the correct posi-tion. |
| The laundry is locked between the door and the seal. | Put the load correctly in the drum. | |
| Err (Error) on the display. | You try to change the programme or the option after the start of the cycle. | Turn the tumble dryer off and on.Make the new selection. |
| The option you try to activate is not applicable with the selected programme. | Turn the tumble dryer off and on.Make the new selection. | |
| No drum light | Defective drum lamp. Contact the service centre to re-place the drum lamp. | |
| Abnormally elapsing time on the display. | The time to end is calculated on the basis of the volume and dampness of the laundry. | The automatic procedure — this is not the appliance malfunction. |
| Programme in-active. | The water container is full. Drain the water container, push the Start/Pause button.3) | |
| Drying cycle too short. | Too small laundry volume. Do the selection of time pro-gramme. The time value must be related to the load. To dry 1 item or small quantities of the laundry we recommend to use short times. | |
| The laundry is too dry. Do the selection of time pro-gramme or higher drying level (e.g. Extra Dry (Extratrocken)) | ||
| Drying cycle too long6) | The filter is clogged. Clean the filter. | |
| Too high volume of the load. Obey the maximum load volume. | ||
| The laundry not spun sufficiently. Spin correctly the laundry. | ||
| Very high room temperature - this is not the appliance malfunction. | If possible, lower the room tem-perature. | |
1) If there is an error message on the display (e.g. E51): Turn the tumble dryer off and on. Make a selection of the new programme. Push the Start/Pause button. Does not operate? - contact the service centre and give the error code.
2) Follow the programme description — see PROGRAMME TABLE
3) See chapter CARE AND CLEANING
4) Only dryers with the Dry Plus (Trocken+) option
5) See HINTS AND TIPS chapter
6) Note: After maximum 5 hours the drying cycle ends automatically.
- TECHNICAL DATA
| Height x Width x Depth 850 x 600 x 600 mm (maximal 640 mm) | |
| Max. depth with the appliance door open 1090 mm | |
| Max. width with the appliance door open 950 mm | |
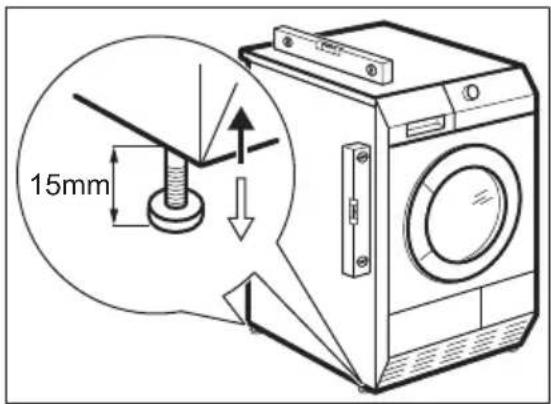
| Adjustable height 850 mm (+ 15 mm - feet regulation) | |
| Drum volume 118 l | |
| Maximum load volume 8 kg | |
| Voltage 230 V | |
| Frequency 50 Hz | |
| Necessary fuse 5 A | |
| Total power 1000 W | |
| Energy efficiency class | A+++ |
| Energy consumption1) | 1,51 kWh |
| Annual energy consumption2) | 176,92 kWh |
| Left-on mode power absorption 0,11 W | |
| Off mode power absorption 0,11 W | |
| Type of use Household | |
| Permitted ambient temperature + 5°C to + 35°C | |
| Level of protection against ingress of solid particles and moisture ensured by the protective cover, except where the low voltage equipment has no protection against moisture | IPX4 |
1) With reference to EN 61121. 8kg of cotton centrifuged at 1000 rpm.
2) Energy consumption per year in kWh, based on 160 drying cycles of the standard cotton programme at full and partial load, and the consumption of the low-power modes. Actual energy consumption per cycle will depend on how the appliance is used (REGULATION (EU) No 392/2012).
14. INSTALLATION
14.1 Unpacking

CAUTION!
Before use all parts of the transport packaging must be removed.
To remove the polystyrene blockages:
- Open the door.
- Pull plastic hose with the polystyrene blockages out from the drum.
natural_image
Illustration of a hand holding a device with arrows indicating motion, no text or symbols present14.2 Feet regulation
It is possible to adjust the height of the tumble dryer. To do that adjust the feet.
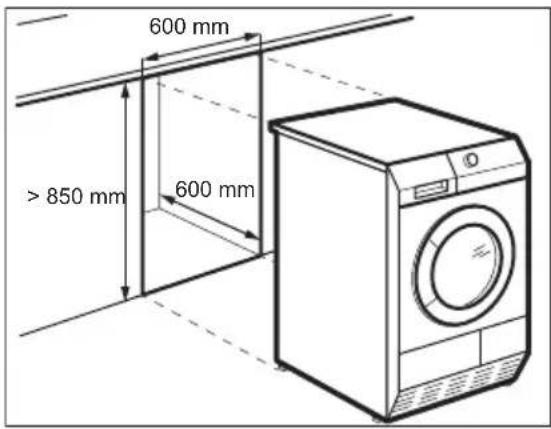
14.3 Installation under a counter
The appliance can be installed as freestanding or below the kitchen counter with correct space (see picture).
15. CH GUARANTEE
Customer Service Centres
| Point of Service | ||
| Industriestrasse 105506 Mägenwil | Le Trési 61028 Préverenges | Via Violino 116928 Manno |
| Morgenstrasse 1313018 Bern | ||
| Zürcherstrasse 204E9000 St. Gallen | ||
| Seetalstrasse 116020 Emmenbrücke |  | |
| St. Jakob-Turm Birsstrasse 320B4052 Basel | ||
| Comercialstrasse 197000 Chur | ||
Spare parts service Industriestrasse 10, 5506 Mägenwil, Tel. 0848 848 111
Specialist advice/Sale Badenerstrasse 587, 8048 Zürich, Tel. 044 405 81 11
Warranty For each product we provide a two-year guarantee from the date of purchase or delivery to the consumer (with a guarantee certificate, invoice or sales receipt serving as proof). The guarantee
covers the costs of materials, labour and travel. The guarantee will lapse if the operating instructions and conditions of use are not adhered to, if the product is incorrectly installed, or in the event of damage caused by external influences, force majeure, intervention by third parties or the use of non-genuine components.
16. ENVIRONMENT CONCERNS
Recycle the materials with the symbol Put the packaging in applicable containers to recycle it. Help protect the environment and human health and to recycle waste of electrical and electronic appliances. Do not dispose appliances marked with the
symbol with the household waste. Return the product to your local recycling facility or contact your municipal office.

For Switzerland:
Where should you take your old equipment?
Anywhere that sells new equipment or hand it in to official SENS collection points or official SENS recycling firms.
The list of official SENS collection points can be found at www.erecycling.ch
INHALTSVERZEICHNIS
- SICHERHEITSHINWEISE....30
- SICHERHEITSANWEISUNGEN....33
- GERÄTEBESCHREIBUNG....35
- ZUBEHÖR....36
- BEDIENFELD....37
- PROGRAMMTABELLE....40
- OPTIONEN....44
- VOR DER ERSTEN INBETRIEBNAHME.... 45
- TÄGLICHER GEBRAUCH.... 46
- TIPPS UND HINWEISE.... 49
- REINIGUNG UND PFLEGE....50
- FEHLERSUCHE....53
- TECHNISCHE DATEN....55
- MONTAGE....56
- GARANTIE....57