HM-Sen-MDIR-O-2 - Motion detector EQ-3 - Free user manual and instructions
Find the device manual for free HM-Sen-MDIR-O-2 EQ-3 in PDF.

| Product Type | Wireless Motion Detector |
| Brand | eQ-3 |
| Model | HM-Sen-MDIR-O-2 |
| Dimensions (approx.) | 100 x 60 x 40 mm |
| Weight (approx.) | 90 g (without batteries) |
| Power Supply | 2 x 1.5V AA batteries (LR06) |
| Battery Life (approx.) | Up to 2 years |
| Detection Method | Passive infrared (PIR) |
| Detection Angle | 120° |
| Detection Range | Up to 10 m |
| Wireless Protocol | HomeMatic proprietary (868.3 MHz) |
| Range (open field) | Up to 100 m |
| Tamper Protection | Yes |
| Mounting | Wall or ceiling mount |
| Operating Temperature | -10°C to +40°C |
| Protection Class | IP20 |
| Main Functions | Motion detection, wireless transmission, status LED, tamper alarm, low battery indication |
| Care and Cleaning | Wipe with a dry, soft cloth. Do not use solvents or abrasives. |
| Safety | Operate within specified temperature range; keep away from moisture; replace batteries with correct type. |
| Spare Parts and Repairability | Batteries are user-replaceable. Other repairs should be done by qualified service personnel. Spare parts available through eQ-3 service. |
| General Information | Compatible with HomeMatic and HomeMatic IP systems. Requires a central control unit (e.g., CCU2/3). |
Frequently Asked Questions - HM-Sen-MDIR-O-2 EQ-3
User questions about HM-Sen-MDIR-O-2 EQ-3
0 question about this device. Answer the ones you know or ask your own.
Ask a new question about this device
Download the instructions for your Motion detector in PDF format for free! Find your manual HM-Sen-MDIR-O-2 - EQ-3 and take your electronic device back in hand. On this page are published all the documents necessary for the use of your device. HM-Sen-MDIR-O-2 by EQ-3.
USER MANUAL HM-Sen-MDIR-O-2 EQ-3
text_image
HomeMaticMounting instruction and operating manual p. 28
S.2
Funk-IR-Bewegungsmelder außen: Wireless infrared motion detector outdoor:
HM-Sen-MDIR-O-2
Printed in Hong Kong
text_image
Technical diagram showing a circular component with rotating arrow and internal battery assembly, labeled D and E.natural_image
Two simple line drawings: a trash bin with cross symbol and a recycling symbol (no text or labels)1. English edition 10/2013
Documentation © 2013 eQ-3 Ltd., Hong Kong
All rights reserved. No parts of this manual may be reproduced or processed in any form using electronic, mechanical or chemical processes in part or in full without the prior explicit written permission of the publisher.
It is quite possible that this manual has printing errors or defects. The details provided in this manual are checked regularly and corrections are done in the next edition. We do not assume any liability for technical or printing errors. All registered trade marks and copyrights are acknowledged.
Printed in Hong Kong
We reserve the right to make changes due to technical advancements without prior notice.
131830 / V 1.0
Table of contents
1 Information about this manual ..... 30
2 Hazard information....30
3 Function 31
4 General system information about HomeMatic 34
5 General information about radio operation. . . 34
6 Inserting and replacing batteries ..... 35
6.1 Inserting batteries....35
6.2 Response once the batteries have been inserted 36
6.3 Walking test 37
6.4 Replacing batteries....37
7 Installation 38
7.1 General notes on mounting 38
7.2 Installation 41
8 Start-up....43
8.1 Teaching-in.....44
9 Other notes on operation 48
9.1 Sensitivity 48
10 Resetting to the initial state ..... 48
11 Maintenance and cleaning ..... 49
12 Technical data 50
1 Information about this manual
Read these instructions carefully before beginning operation with your HomeMatic components. Keep the instructions handy for later consultation!
Please hand-over the operating manual as well when you hand-over the device to other persons for use.
Symbols used:

Attention! This indicates a hazard.

Note! This section contains additional important information!
2 Hazard information

Please do not open the device. It does not contain any parts that can be maintained by the user.
3 Function
The HomeMatic wireless infrared motion detector outdoor is designed primarily for use in applications outside the home. It is particularly effective in saving energy, reducing costs and maximising comfort.
Whenever the HomeMatic wireless infrared motion detector outdoor registers a moving heat source (e.g. a person or an animal) in its detection range and ambient brightness is below the set threshold, it switches on the connected load (e.g. the outdoor lighting) automatically. When the person leaves the detection range, the HomeMatic wireless infrared motion detector outdoor disconnects the load from the mains power supply again after a period of time preset by you. If there is any movement in the detection range during the on phase, the set time restarts from zero.
Decoding circuitry converts the detected status into HomeMatic radio commands.
3.1 Features and functions\*:
- Detection range up to 9 m, detection area approx. 90°
• Suitable for indoor and outdoor applications

The device must only be operated in locations where it is protected from the effects of the weather. Do not expose it to direct contact with rain or water. Avoid exposure to direct sunlight and other sources of heat radiation.
• Variable brightness level for tripping and variable responsiveness
- Brief changes in the level of brightness are filtered out
- Response times can be adapted by changing the minimum transmission interval of the HomeMatic wireless infrared motion detector outdoor and the dwell time of the actuator
• Battery operation, battery life approx. 2 years
• Actuators can be taught-in directly
* Some functions are only available in conjunction with the HomeMatic central control unit, refer to the manual for further information.
3.2 Components, controls and indicators, batteries
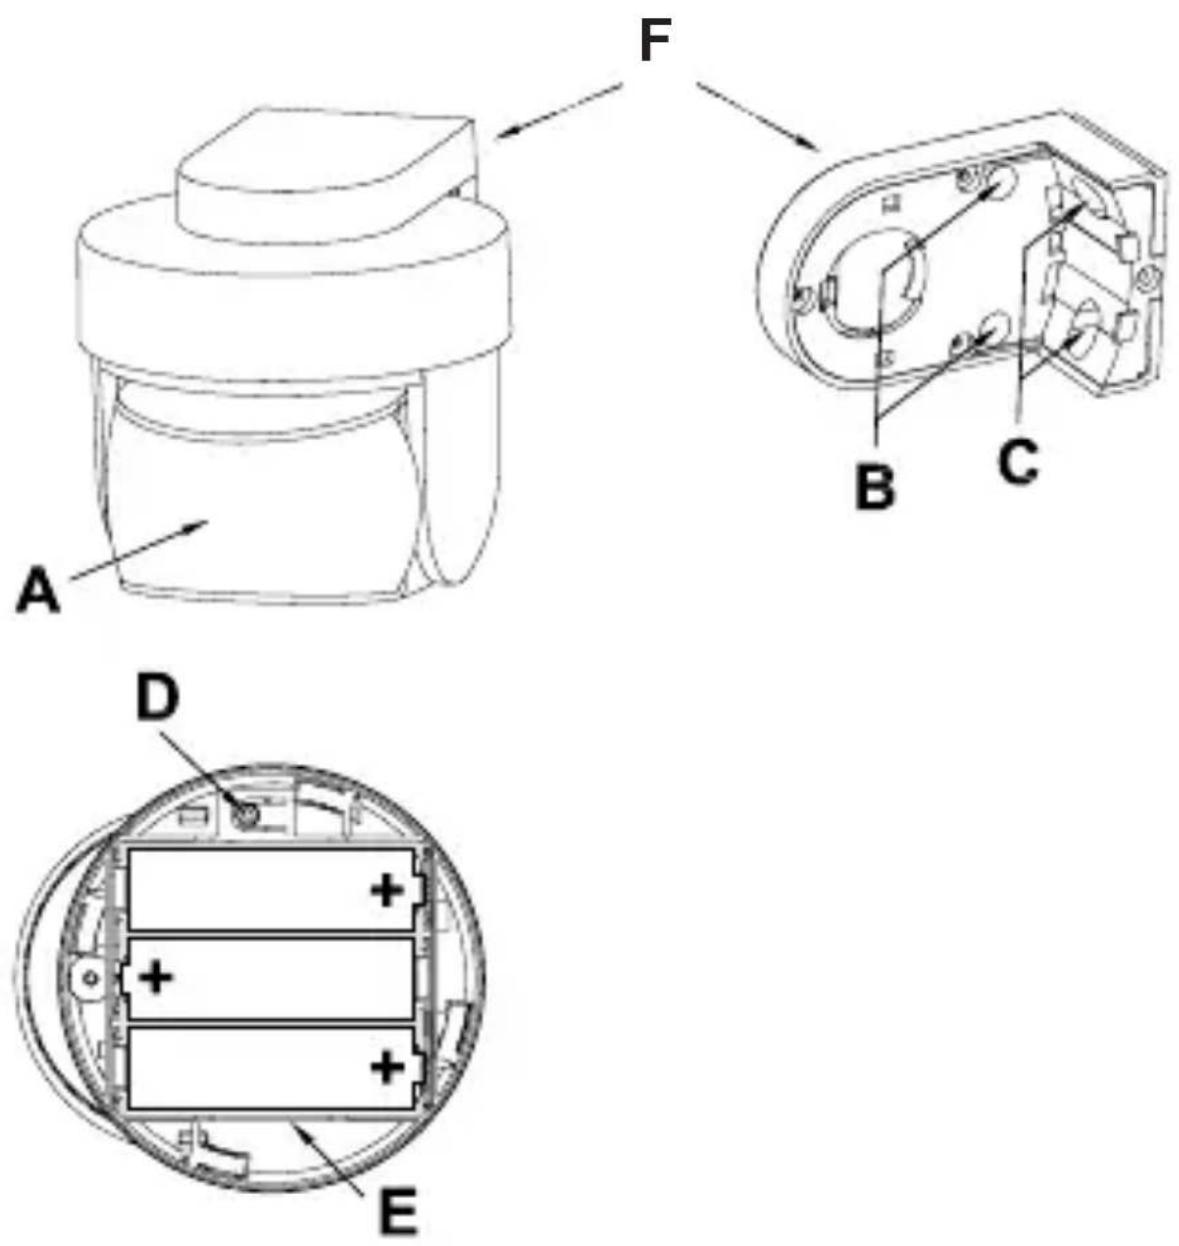
(A) - PIR lens
(B) + (C) - Mounting holes
(D) – Teach-in button
(E) – Battery compartment, batteries: 3 x LR6 / AA / Mignon
(F) - Wall mount
4 General system information about HomeMatic4
This device is a part of the HomeMatic home control system and works with the bidirectional BidCoS ^® wireless protocol.
All devices are delivered in a standard configuration. The functionality of the device can also be configured with a programming device and software. The other resulting functionality and the additional functions that result in the HomeMatic system in cooperation with other components can be found in the separate configuration instructions or the HomeMatic System Manual.
All current technical documents and updates are provided under www.HomeMatic.com.
5 General information about radio operation
The radio transmission is on a non-exclusive transmission path which means that there is a possibility of interference occurring.
Other interfering sources can be caused by switching
operations, electrical motors or defective electrical devices.

The range of transmission within buildings can greatly deviate from open air distances. Besides the transmitting power and the reception characteristics of the receiver, environmental influences such as humidity in the vicinity and local structures also play an important role.
Hereby, eQ-3 Entwicklung GmbH declares that this device conforms with the essential requirements and other installation site as desired conforming with the relevant regulations of directive 1999/5/EG.
The full declaration of conformity is provided under www.HomeMatic.com.
6 Inserting and replacing batteries
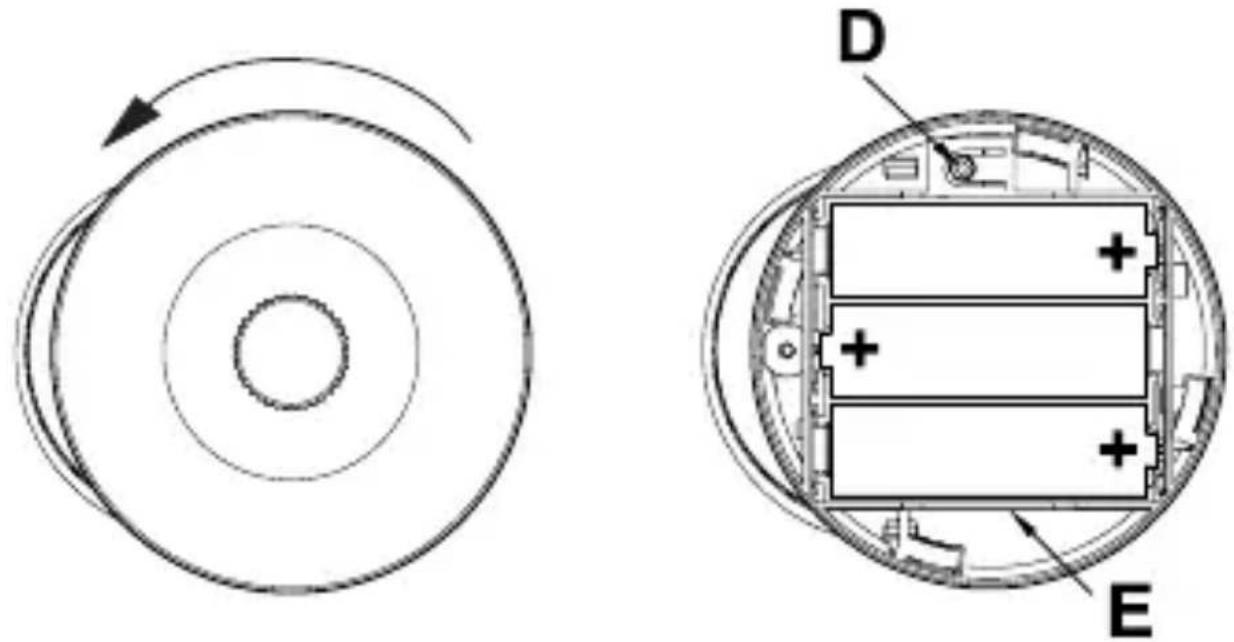
6.1 Inserting batteries
The battery compartment (E) is located on the base unit. To open it, you must remove the base unit from the wall mount (F).
- Turn the cover of the wireless infrared motion detector outdoor anti-clockwise and lift if off.
text_image
Technical diagram showing a circular component with rotational flow and its internal structure, labeled D and E.- Insert the three LR6 (AA) mignon batteries supplied with the device into the battery compartment (E), ensuring that the polarity is correct (see the polarity markings).
- Push the cover down onto the battery compartment (E) and turn it clockwise until it locks into place.
6.2 Response once the batteries have been inserted
Once the batteries have been inserted, initialisation is performed. The LED test display will indicate that initialisation is complete: the LED will light up red, green and orange in that order, for half a second each.
The device LED is located in the PIR lens (A) and is
visible through the lens.
If an error occurs, this is indicated by the LED flashing red. The device LED will then light up orange for a further 30 seconds, which is the time you must wait for the motion detector to become ready for operation.

Once the batteries have been inserted, it will take around 30 seconds before the device will be ready for operation. No motion will be detected during this time.
6.3 Walking test
For up to 10 minutes after the batteries have been inserted, the device LED will indicate a detected movement by lighting up red briefly.
This allows the detection range and sensitivity to be tested at the sensor directly (the latter can only be checked if it has previously been registered and configured via the central control unit).
6.4 Replacing batteries
If the equipment being controlled does not respond when the wireless motion detector is tripped and there is no remediable communication fault (equipment being controlled disconnected from mains, receiver batteries flat), follow the instructions of Chapter 6.1 to
replace the old batteries with a new set of batteries.
You must observe the correct battery polarity.

natural_image
Two simple line drawings: a trash bin with cross lines and a recycling symbol (no text or labels)Used batteries are not to be disposed of with the household waste! Please dispose them at your local battery collection point!
7 Installation
7.1 General notes on mounting
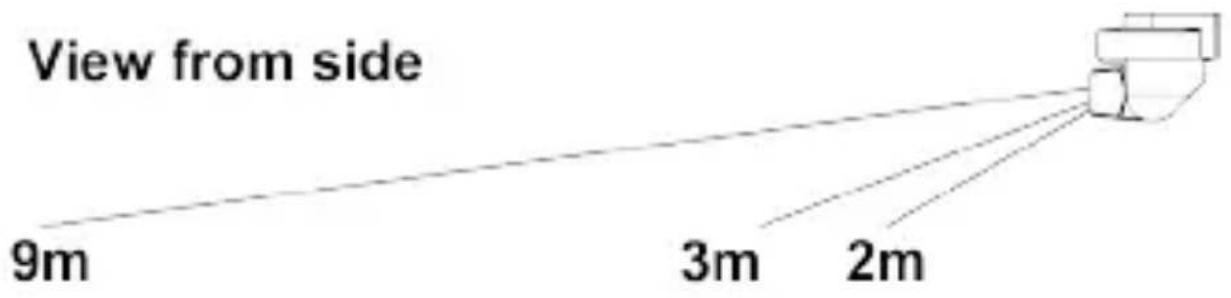
The HomeMatic wireless infrared motion detector outdoor is equipped with a wall mount for wall mounting. The lens of the HomeMatic wireless infrared motion detector outdoor can be rotated through 360° and tilted through 45° in the wall mount. This means that the detection range can be set to virtually any angle to the wall and the floor and even adjusted after installation. Find a suitable mounting location for the motion sensor in the are to be monitored. Follow the instructions in the rest of this document when mounting the sensor. We recommend a mounting height of approx. 2 m for optimum operation.
text_image
View from side 9m 3m 2m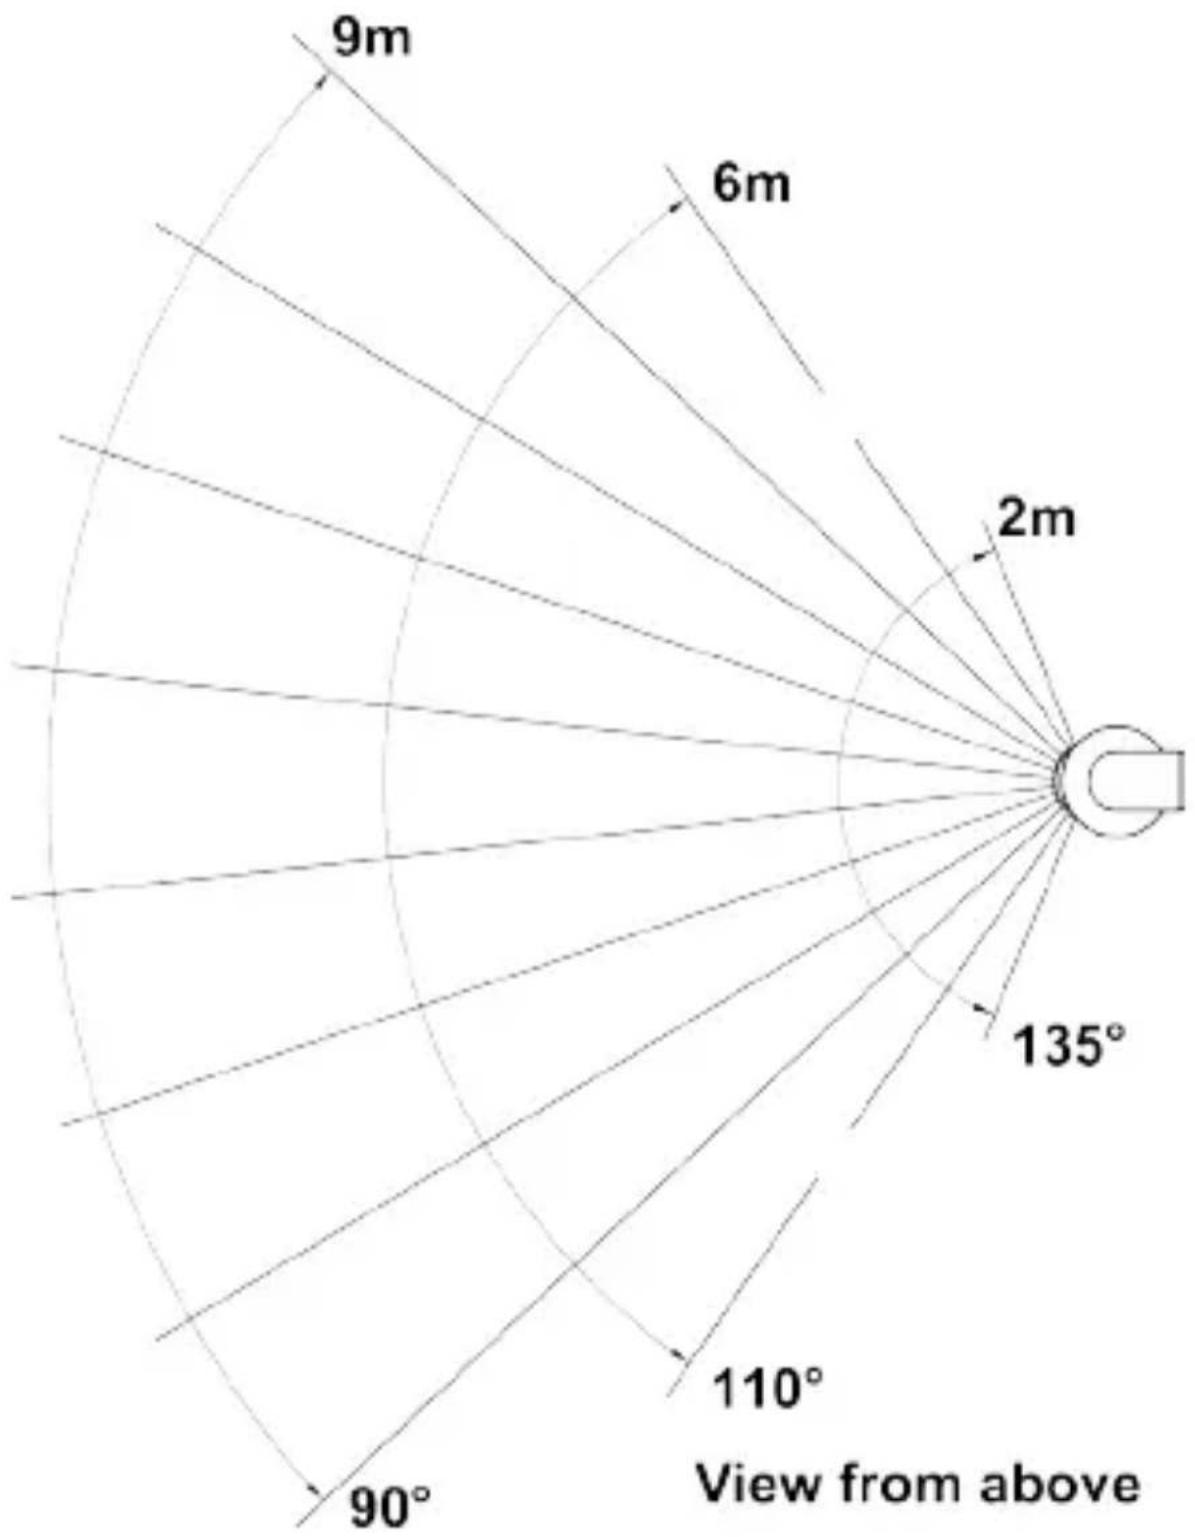
text_image
9m 6m 2m 135° 110° 90° View from above- The detection lens of the HomeMatic wireless infrared motion detector operates on multiple detection levels, each of which has 12 segments. This means that, with an aperture angle of 90^ , a range of up to 9m can be achieved. The total possible detection range is illustrated in the figure on page 37.
- To avoid the detector being triggered inadvertently by pets, for example, keep them away from the detection range if at all possible. If you cannot do this, try to align the detection area accordingly by adjusting the height of the detection lens.
- The effectiveness of the detection procedure depends on the temperature difference between the moving object and the relevant background.
- It is not possible to detect temperature differences through glass.
- The detector responds best to movement across the detection range, i.e. past the motion sensor. The HomeMatic wireless infrared motion detector outdoor is least sensitive to direct movement towards or away from it.
- Select an appropriate mounting location at a height of between 2.0 and 2.5 m.
- When mounting the wireless motion detector,
please ensure that it is not installed directly on or in the vicinity of large metal objects (heaters, aluminium clad walls, etc.), as this would reduce the wireless range.

To reduce the risk of a false alarm being triggered, the motion sensor must not be exposed to direct sunlight, car headlights, etc., nor must it be mounted in the vicinity of a heat source (above a heating appliance, for example). The detection ranges must be aligned against a wall or the floor, but not directly on a window, heater or other heat source.
7.2 Installation

When selecting a mounting location and drilling in the vicinity of switches or socket outlets, check for electrical wires and power supply cables.

The mounting location should be protected from the effects of the weather and not exposed to direct sunlight or other sources of heat radiation.
To install the HomeMatic wireless infrared motion detector outdoor, proceed as follows:
- Position the wall mount (F) with the plane surface upwards at a suitable point (see Section 7.1) on a wall or ceiling.
- Mark through the screw holes where you will make the corresponding bore holes in the wall mount (F).
- Drill holes 5 mm wide and 35 mm deep. Insert the plugs (included in the scope of supply).
- For ceiling mounting, drill through the preformed holes in the wall mount (F) with a 3.2 mm drill.
- Place the wall mount (F) over the holes. Use the screws supplied to attach the mount to the wall.
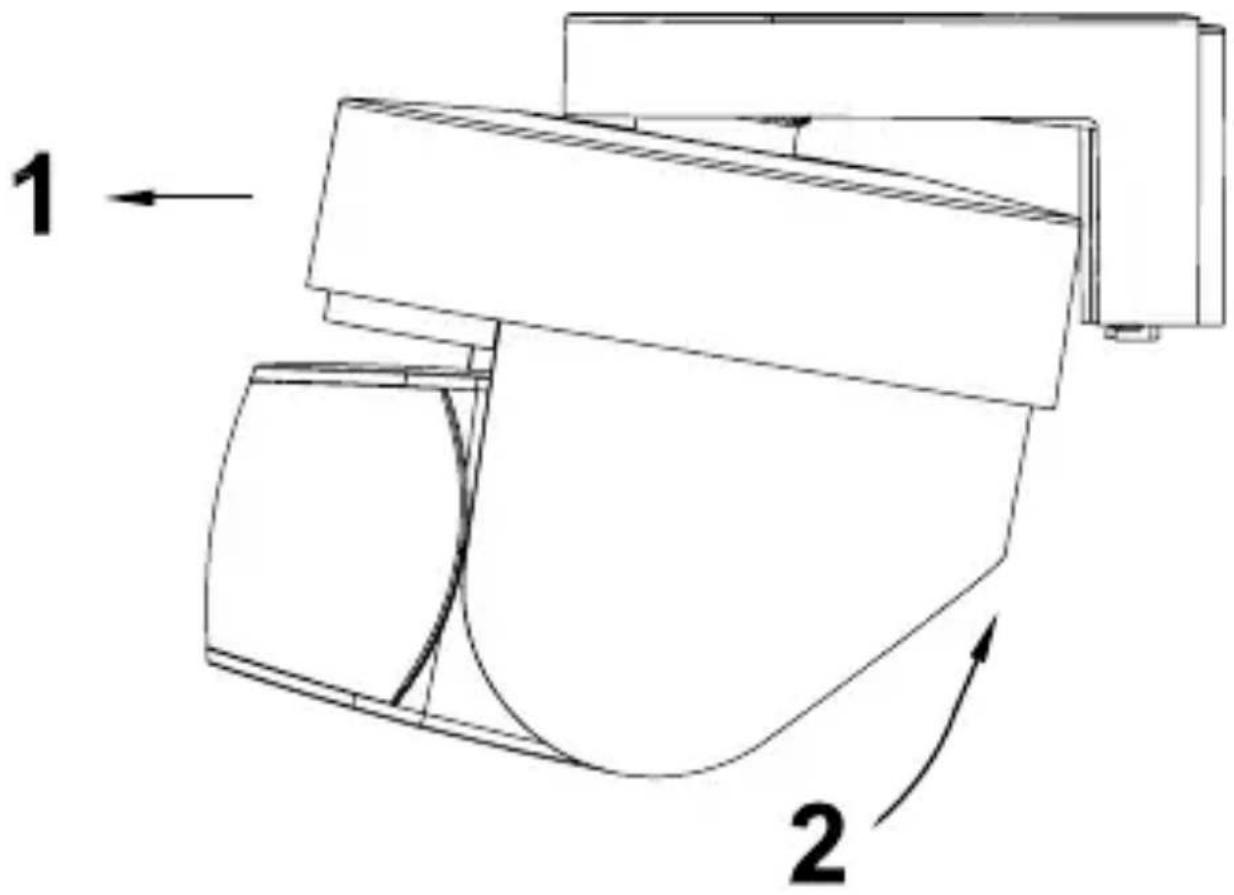
- Then push the HomeMatic wireless infrared motion detector outdoor back into the wall mount (F) until it locks. Insert the device into the designated opening (1) from the front first and then lock it in place at the back (2):
text_image
1 28 Start-up

Duty cycle
The duty cycle is a legally regulated limit of the transmission time of devices in the 868 MHz range. The aim of this regulation is to safeguard the operation of all devices working in the 868 MHz range.
In the 868 MHz frequency range we use, the maximum transmission time of any device is 1 % of an hour (i.e. 36 seconds in an hour). Devices must cease
transmission when they reach the 1% limit until this time restriction comes to an end. HomeMatic devices are designed and produced with 100% conformity to standards. During normal operation, the duty cycle is not usually reached. However, repeated and wireless-intensive teach-in processes mean that it can be in isolated instances during start-up or initial installation of a system. This can happen for example when setting and testing the detection range of taught-in motion sensors. If the duty cycle limit is exceeded, the device may stop working for a brief period. This is due to the fact that permanent transmission is not permitted in the 868 MHz range (maximum transmission time: 36 seconds per hour). Therefore, when this limit is reached, further transmission by the devices must be prevented. Perform a short function check on the device (e.g. by removing and reinserting the batteries). If the check does not restore the device to readiness for operation, it has exceeded the duty cycle and will be ready for operation again in an hour's time.
8.1 Teaching-in

Please read this entire section before starting to carry out the teach-in procedure.

Before being able to use your device with QIVICON, it has to be taught-in to your QIVICON Home Base.
Therefore, please log-in to „My QIVICON“ at www.qivicon.com/login. There, please select „Add device“ and follow the instructions.
The wireless motion detector can be used to control HomeMatic actuators, such as wireless switches. To execute the teach-in procedure, the devices to be connected must be in teach-in mode. The device can be taught-in both without a brightness threshold (i.e. switching in brightness too) and with a fixed brightness switching threshold of approx. 10 lux (switching only in twilight/darkness). The device operates with a minimum transmission interval of 4 min. When directly teaching in the device to a HomeMatic actuator, the duty cycle of the HomeMatic acutator will be set to 5 min. Thus, e.g. an a interruption-free illumination during longer lasting movement is possible. It is possible to configure the response brightness and response sensitivity as well as the minimum transmission interval or further settings of the device from the HomeMatic central control unit.
8.1.1 Teaching-in without a brightness threshold
- Remove the device from the wall mount (F) and open the battery compartment (E).
- Press the teach-in button (D) on the HomeMatic wireless infrared motion detector. The device LED flashes orange. The teach-in procedure can now be cancelled by pressing the teach-in button (D) briefly; this will cause the device LED to light up red.
- The device LED flashes green to indicate that teaching-in has been successful (how long it will flash for depends on how much configuration work has been competed).
- If no teach-in is carried out, teach-in mode will be exited automatically after 20 seconds. If other devices are also in teach-in mode, they will be taught-in.

If the wireless motion detector has already been taught-in to a central control unit and is thus blocked for direct teach-in, it can still be put into teach-in mode as described above. However, direct teach-in is not possible.
8.1.2 Teaching-in taking a brightness threshold into account (approx. 10 Lux)
- Remove the device from the wall mount (F) and open the battery compartment (E).
- Press the teach-in button (D) on the HomeMatic wireless infrared motion detector for approx. 4 seconds until the device LED starts to flash red.
- Press and release the teach-in button (D) on the motion detector. The device LED flashes orange. The teach-in procedure can now be cancelled by pressing the teach-in button (D) briefly; this will cause the device LED to light up red.
- The device LED flashes green to indicate that teaching-in has been successful (how long it will flash for depends on how much configuration work has been competed).
- Push the cover down onto the battery compartment (E) and turn it clockwise until it locks into place. Then push the HomeMatic motion detector back into the wall mount (F) until it locks.
- If no teach-in operations are carried out, teach-in mode will be exited automatically after 20 seconds. If other devices are also in teach-in mode, they will be taught-in.
9 Other notes on operation
9.1 Sensitivity
- If it is operated without the central control unit, every sensor pulse causes the motion detector to trip.
- If the central control unit is used, the response according to the intensity of motion can be set on the unit.
Examples of use:
- Audible signal: insensitive, e.g. 3 pulses per period
- Visual signal: sensitive, e.g. 1 – 2 pulses per period
10 Resetting to the initial state
- Press and hold the teach-in button on the wireless motion detector for at least four seconds. The device LED starts to slowly flash red.
- To reset the device, now press and hold the teach-in button for at least another four seconds. The LED will now start to flash red faster.
- Release the teach-in button to complete the reset procedure; the LED briefly lights up red, green and orange in sequence to confirm that
the reset has been successful.
Possible error messages:
(This error can only occur if you have a central control unit to which you have taught-in the device.) If the LED does not start to flash when the button has been held down for five seconds, but lights up continuously instead, the device cannot be reset. In this case, coding is activated using a system security key that differs from the one supplied with the product. To reset the sensor, you will have to use the configuration software for resetting the central control unit. The procedure to follow is described in the manual for the central control unit software.
11 Maintenance and cleaning
This product is maintenance-free besides possibly requiring a battery change. Maintenance or repairs are only to be done by trained professionals. Clean the products using a soft, clean, dry and lint-free cloth. To remove heavier contamination, make cloth damp with lukewarm water. Cleaning agents that contain solvents are not to be used because they can harm the plastic housing and the labels.
12 Technical data
Radio frequency: 868,3 MHz
Operating temperature: -10^ to +55^
Protocol: BidCoS®
Detection angle: approx. 90°
Detection range: approx. 9 m
Typ. open air range: 100 m
Power supply: 3 x LR6 / Mignon / AA
Batterie life: approx. 2 years
Degree of protection: IP44
Dimensions (W x H x D): 76 x 74 x 90 mm
Subject to technical alterations.
Instructions for disposal
Do not dispose off the device as part of household garbage! Electronic devices are to be disposed off in accordance with the guidelines concerning electrical and electronic devices via the local collecting point for old electronic devices.

The CE sign is a free trading sign addressed exclusively to the authorities and does not include any warranty of any properties.

text_image
e.Q3eQ-3 AG
Maiburger Straße 29
D-26789 Leer
www.eQ-3.com