
C-515 BT - CD Player KENWOOD - Free user manual and instructions
Find the device manual for free C-515 BT KENWOOD in PDF.


| Product Type | CD Player |
| Brand | Kenwood |
| Model | C-515 BT |
| Disc Compatibility | CD, CD-R, CD-RW |
| Playback Modes | Program, Repeat, Random, Intro Scan |
| Outputs | Analog RCA, Optical Digital, Headphone (3.5mm) |
| Remote Control | Included (RC-100) |
| Frequency Response | 20 Hz - 20 kHz ±0.5 dB |
| Signal-to-Noise Ratio | 100 dB |
| Dynamic Range | 96 dB |
| Total Harmonic Distortion | 0.003% (1 kHz) |
| Power Supply | AC 230 V, 50 Hz |
| Power Consumption | 15 W (standby <1 W) |
| Dimensions (W x H x D) | 435 x 105 x 300 mm |
| Weight | 4.8 kg |
| Care Instructions | Wipe with a soft dry cloth; avoid solvents |
| Safety Warnings | Do not open cover; no user-serviceable parts inside |
| Repairability | Spare parts available via authorized service centers |
Frequently Asked Questions - C-515 BT KENWOOD
User questions about C-515 BT KENWOOD
0 question about this device. Answer the ones you know or ask your own.
Ask a new question about this device
Download the instructions for your CD Player in PDF format for free! Find your manual C-515 BT - KENWOOD and take your electronic device back in hand. On this page are published all the documents necessary for the use of your device. C-515 BT by KENWOOD.
USER MANUAL C-515 BT KENWOOD
© B60-5807-08/02 (E, X)
Before applying power
Caution: Read this page carefully to ensure safe operation.
Units are designed for operation as follows.
Australia AC 240 V only
Europe AC 230 V only
Safety precautions
WARNING: TO PREVENT FIRE OR ELECTRIC SHOCK, DO NOT EXPOSE THIS APPLIANCE TO RAIN OR MOISTURE.

CAUTION
RISK OF ELECTRIC SHOCK DO NOT OPEN

CAUTION: TO REDUCE THE RISK OF ELECTRIC SHOCK, DO NOT REMOVE COVER (OR BACK). NO USER-SERVICEABLE PARTS INSIDE. REFER SERVICING TO QUALIFIED SERVICE PERSONNEL.
 | THE LIGHTNING FLASH WITH ARROWHEAD SYMBOL, WITHIN AN EQUILATERAL TRIANGLE, IS INTENDED TO ALERT THE USER TO THE PRESENCE OF UNINSULATED "DANGEROUS VOLTAGE" WITHIN THE PRODUCT'S ENCLOSURE THAT MAY BE OF SUFFICIENT MAGNITUDE TO CONSTITUTE A RISK OF ELECTRIC SHOCK TO PERSONS. |
 | THE EXCLAMATION POINT WITHIN AN EQUILATERAL TRIANGLE IS INTENDED TO ALERT THE USER TO THE PRESENCE OF IMPORTANT OPERATING AND MAINTENANCE (SERVICING) INSTRUCTIONS IN THE LITERATURE ACCOMPANYING THE APPLIANCE. |
The marking of products using lasers
CAUTION
VISIBLE OR INVISIBLE CLASS 1M LASER RADIATION WHEN OPEN. DO NOT VIEW DIRECTLY WITH OPTICAL INSTRUMENTS
Inside this laser product, a laser diode classified as Class 1M laser radiation is contained. Do not view directly with optical instruments.
IMPORTANT SAFETY INSTRUCTIONS
Caution: Read this page carefully to ensure safe operation.
Read Instructions – All the safety and operating instructions should be read before the product is operated.
Retain Instructions – The safety and operating instructions should be retained for future reference. Heed Warnings – All warnings on the product and in the operating instructions should be adhered to.
Follow Instructions – All operating and use instructions should be followed.
-
Cleaning – Unplug this product from the wall outlet before cleaning. Do not use liquid cleaners or aerosol cleaners. Use a damp cloth for cleaning.
-
Attachments – Do not use attachments not recommended by the product manufacturer as they may cause hazards.
-
Water and Moisture – This product shall not be exposed to dripping and splashing – for example, near a bath tub, wash bowl, kitchen sink, or laundry tub; in a wet basement; or near a swimming pool; and the like. Do not place an object containing liquid, such as a flower vase, on the appliance.
-
Accessories – Do not place this product on an unstable cart, stand, tripod, bracket, or table. The product may fall, causing serious injury to a child or adult, and serious damage to the product. Use only with a cart, stand, tripod, bracket, or table recommended by the manufacturer. Any mounting of the product should follow the manufacturer's instructions, and should use a mounting accessory recommended by the manufacturer.
A product and cart combination should be moved with care. Quick stops, excessive force, and uneven surfaces may cause the product and cart combination to overturn.

- Ventilation – Slots and openings in the cabinet are provided for ventilation and to ensure reliable operation of the product and to protect it from overheating, and these openings must not be blocked or covered. The openings should never be blocked by placing the product on a bed, sofa, rug, or other similar surface. This product should not be placed in a built-in installation such as a bookcase or rack unless proper ventilation is provided or the manufacturer's instructions have been adhered to.
2 C-515BT/C-313


-
Power Sources - This product should be operated only from the type of power source indicated on the product. If you are not sure of the type of power supply to your home, consult your product dealer or local power company.
-
CAUTION - Polarization - This product may be equipped with a polarized alternating-current line plug (a plug having one blade wider than the other). This plug will fit into the power outlet only one way. This is a safety feature. If you are unable to insert the plug fully into the outlet, try reversing the plug. If the plug should still fail to fit, contact your electrician to replace your obsolete outlet. Do not defeat the safety purpose of the polarized plug.
-
Power Cord Protection – Power-supply cords should be routed so that they are not likely to be walked on or pinched by items placed upon or against them, paying particular attention to cords at plugs, convenience receptacles, and the point where they exit from the product.
-
Lightning – For added protection for this product during a lightning storm, or when it is left unattended and unused for long periods of time, unplug it from the wall outlet and disconnect the antenna or cable system. This will prevent damage to the product due to lightning and power-line surges.
-
Overloading – Do not overload wall outlets, extension cords, or integral convenience receptacles as this can result in a risk of fire or electric shock.
-
Object and Liquid Entry – Never push objects of any kind into this product through openings as they may touch dangerous voltage points or short-out parts that could result in a fire or electric shock. Never spill liquid of any kind on the product.
-
Servicing – Do not attempt to service this product yourself as opening or removing covers may expose you to dangerous voltage or other hazards. Refer all servicing to qualified service personnel.
-
Damage Requiring Service – Unplug this product from the wall outlet and refer servicing to qualified service personnel under the following conditions:
a) When the power-supply cord or plug is damaged,
b) If liquid has been spilled, or objects have fallen into the product,
c) If the product has been exposed to rain or water,
d) If the product does not operate normally by following the operating instructions.
e) If the product has been dropped or damaged in any way, and
f) When the product exhibits a distinct change in performance – this indicates a need for service.
g) If an abnormal smell or smoke is detected.
- Replacement Parts – When replacement parts are required, be sure the service technician has used replacement parts specified by the manufacturer or have the same characteristics as the original part. Unauthorized substitutions may result in fire, electric shock, or other hazards.
- SafetyCheck – Upon completion of any service or repairs to this product, ask the service technician to perform safety checks to determine that the product is in proper operating condition.
- Wall or Ceiling Mounting – This product should be mounted to a wall or ceiling only as recommended by the manufacturer.
- Heat - This product should be situated away from heat sources such as radiators, heat registers, stoves, or other products that produce heat. Do not place a flaming object, such as a candle or lantern, or near the product.
- PowerLines - An outside antenna system should not be located in the vicinity of overhead power lines or other electric light or power circuits, or where it can fall into such power lines or circuits. When installing an outside antenna system, extreme care should be taken to keep from touching such power lines or circuits as contact with them might be fatal.
- Outdoor Antenna Grounding – If an outside antenna or cable system is connected to the product, be sure the antenna or cable system is grounded so as to provide some protection against voltage surges and built-up static charges. Article 810 of the National Electrical Code, ANSI/NFPA 70, provides information with regard to proper grounding of the mast and supporting structure, grounding of the lead-in wire to an antenna discharge unit, size of grounding conductors, location of antenna-discharge unit, connection to grounding electrodes, and requirements for the grounding electrode.

Notes:
- Item 7 is not required except for grounded or polarized equipment.
- Item 19 complies with UL in the U.S.A.
English 3


Before use
Contents
Caution : Read the pages marked ⚠️ carefully to ensure safe operation.
Before applying power 2
Safety precautions 2
IMPORTANT SAFETY INSTRUCTIONS ......2
Before use ....4
Unpacking 4
How to read this manual 5
Preparing the remote control unit ....5
Connections 6
About MP3 and WMA 8
About USB device 9
Supported iPod 9
Handling discs....9
About SD card 9
Usable D.AUDIO 9
Component names and functions .....10
Basic function ......12
Switching the system on 12
Switching the system to standby mode 12
Volume control 12
Sound control 12
Headphones....12
Using the CD/USB device/SD card ....13
Preparation....13
Playing a CD/ audio file 14
Selecting a desired file by file name
(For audio file only)....14
Programming tracks/fi les 14
Random play 15
Repeat play....15
Changing the display information.... 15
Using the radio 16
Tuning in radio stations 16
Auto preset 16
Manual preset 16
Tuning to a preset radio station 16
Using RDS (Radio Data System).... 17
Changing the RDS display information .... 17
Tuning by Program Type (PTY search) 17
Using the iPod ....18
Playing an iPod 18
Repeat play....18
Random play 18
Using the D.AUDIO ....18
Playback of Digital Audio Player 18
Using the Bluetooth audio ....19
Before use (Pairing function) 19
Playback of Bluetooth audio 19
Using the AUX ....19
Playing an external component....19
Clock/timer operation ......20
Clock setting 20
Timer setting 20
To activate/deactivate the timer 21
Sleep timer setting 21
System setup 22
Adjusting the display brightness (BACKLIGHT).... 22
Adjusting the display contrast (CONTRAST).....22
Setting Auto Power Save (A.P.S.) 22
In case of diffi culty 23
General information 24
Maintenance 24
To install this unit and/or speakers on a wall ..... 24
Specifications 25
Unpacking
Unpack the unit carefully and make sure that all accessories are present.
FM indoor antenna .....(1)
AM loop antenna .....(1)
iPod dock (C-515BT only) .....(1)
Remote control unit
with a built-in button battery ....(1)
AC adapter (AC-18335A) .....(1)
Power cord (For Europe) .....(1)
Power cord (For Australia)....(1)
If any accessories are missing, or if the unit is damaged of
falls to operate, notify your dealer immediately. If your unit
was shipped to you directly, notify your shipper immediately.
Kenwood recommends that you retain the original carton and
packing materials in case you need to move or ship the unit in
the future
Keep this manual handy for future reference.
4 C-515BT/C-313
How to read this manual
The description in this manual is based on the C-515BT, and the C-313 is not equipped with the selectors and functions related to iPod and Bluetooth. The descriptions of the functions available only with the C-515BT are marked with the following symbol.
C-515BT
Most of the functions are designed to be able to operate from the remote control unit.
Preparing the remote control unit
Pull the battery sheet out from the remote control unit to the direction of the arrow.

Operation
When the power cord is plugged in, STANDBY/TIMER indicator is lit. The power turns ON by pressing button on the remote control unit pointing at the remote sensor. When the power comes on, press the button you want to operate.
Remote sensor
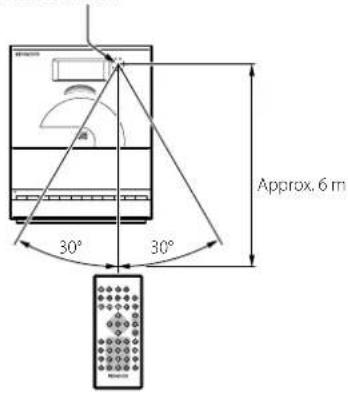

- The supplied battery may have shorter live than ordinary battery due to use during operation checks.
- When the remote-controllable distance gets shorter than before, replace the battery with a new one.
- Placing the remote sensor in direct sunlight, or in direct light from a high frequency fluorescent lamp may cause a malfunction.
In such a case, change the location of the system installation to prevent malfunction.
Changing the battery of the remote control unit
Use a commercially available button battery (CR2025).
1 Insert something narrow like a paperclip into the hole 1 and pull out the battery tray.
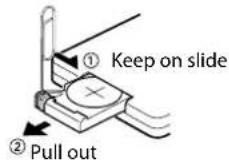
2 Replace the old battery with a new one.

CAUTION
• Lithium battery.
Danger of explosion if the battery is incorrectly replaced. Replace only with the same or equivalent type.
- The battery pack or batteries shall not be exposed to excessive heat such sunshine, fire or the like.
- Keep battery out of reach of children and in original package until ready to use. Dispose of used batteries promptly. If swallowed contact physician immediately.
English 5
Connections
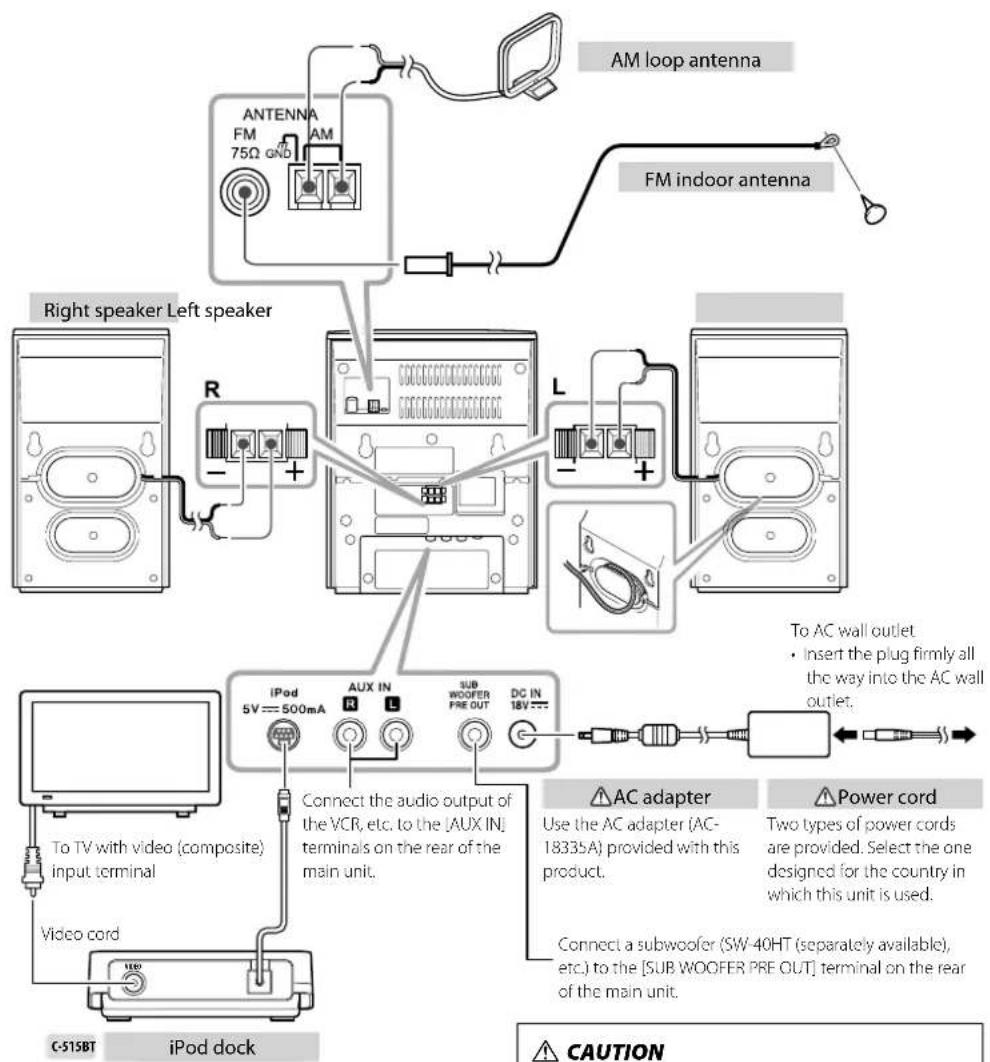
flowchart
graph TD
    A["AM loop antenna"] --> B["FM indoor antenna"]
    B --> C["Right speaker Left speaker"]
    C --> D["R"]
    D --> E["L"]
    E --> F["To AC wall outlet"]
    F --> G["AC adapter"]
    G --> H["Power cord"]
    H --> I["Two types of power cords are provided. Select the one designed for the country in which this unit is used."]
    I --> J["Connect a subwoofer (SW-40HT (separately available), etc.) to the [SUB WOOFER PRE OUT"] terminal on the rear of the main unit.]
    J --> K["Connect the audio output of the VCR, etc. to the [AUX IN"] terminals on the rear of the main unit.]
    K --> L["To TV with video (composite) input terminal"]
    L --> M["Video cord"]
    M --> N["C-515BT iPod dock"]
    N --> O["CAUTION"]
CAUTION
The power in this equipment will not be completely cut off from the wall outlet when the standby switch is turned off. Install the equipment so that the wall outlet is easily accessible and, in case of emergency, immediately unplug the power plug from the wall outlet. Mains plug is used as the disconnect device, it shall remain readily operable and should not be obstructed during intended use.
CAUTION
Be sure to adhere to the following, or proper ventilation will be blocked causing damage or fire hazard (Main unit and AC adapter).
- Do not place a cloth on the system or place it on a carpet or cushion.
- Do not use the system in a poorly ventilated place.
- Do not place any objects impairing heat radiation onto the top of the unit.
- Leave some space around the unit (from the largest outside dimension including projection) equal to or greater than, shown below.
Top panel : 50 cm
6 C-515BT/C-313
Connecting the FM antenna
1 Connect the lead to the [FM 75Ω] terminal.
2 Find the location that gives the best reception.
3 Secure the antenna as high up as possible.
- The antenna supplied with the system is a basic antenna for indoor use. For stable signal reception, the use of an outdoor antenna (commercially available) is recommended. Disconnect the indoor antenna first before connecting an outdoor antenna.

CAUTION
- Since antenna installation necessitates skill and experience, always consult your dealer before installation. The antenna should be placed at a distance from the power distribution wires. Otherwise, an electric shock accident may occur if the antenna falls down.
Connecting the AM antenna
1 Connect the AM antenna cord to the [AM] and [ ± GND] terminals.
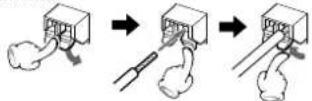
2 Setup the antenna in the position and the direction to be able to receive AM broadcast.

- The antenna supplied with the system is for indoor use. Place it as far away as possible from the system, your TV set, the speaker cords, AC adapter and the power cord, and point it in the direction that provides the best reception.
Connecting the speakers
1 Connect the right speaker to terminal marked 'R', with the red wire to + and the black wire to .
2 Connect the left speaker to terminal marked "L", with the red wire to + and the black wire to -.
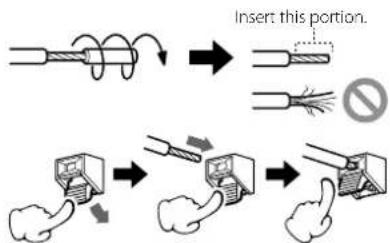
flowchart
graph TD
    A["Insert this portion."] --> B["Line winding"]
    B --> C["Insert disassembly"]
    C --> D["Clamping device"]
    D --> E["Insert clamping device"]
- For optimal sound performance, it is recommended to use the supplied speakers.
- Do not connect more than one speaker to any one pair of +/- speaker terminals.
Connecting the iPod adapter C-515BT
- Connect an iPod adapter, which is provided with your iPod or commercially available in iPod dealers, to the iPod clock of this unit. Note that the iPod adapter is not provided with this unit.
• See page 9 for the supported iPod models.
1 Insert the iPod adapter into unit.
iPod adapter

natural_image
Diagram of a device with an arrow pointing to a component, no text or symbols presentiPod dock
2 Connect your iPod.

natural_image
Illustration of a music player with an inserted slot, no text or symbols presentTo remove iPod adapter
- Insert a thin object such as the tip of a flat-blade screwdriver into the slit on the dock adapter and lift it to remove.
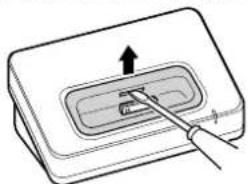
natural_image
Diagram of a device with an arrow pointing to a button, no text or symbols presentAbout MP3 and WMA
The playable MP3/WMA fi le (hereafter called Audio fi le) and the media format have the following limitation. The Audio fi le, which is not conforming to the specification, may not play normally.
Playable Audio fi le
playable MP3 fi le
- File formats: MPEG 1/2 Audio Layer 3 file
- Extension: .mp3
• Transfer bit rate: 8 kbps – 320 kbps
• Sampling frequency: 48/44.1/32/24/22.05/16/12/
11.025/8 kHz
playable WMA fi le
- File format: Windows Media™ Audio compliant
- Extension: .wma
• Transfer bit rate: 32 kbps – 320 kbps
• Sampling frequency: 48/44.1/32 kHz
- Files created using functions in Windows Media™ Player 9 or later cannot be played.
- WMA Professional
- WMA Lossless
- WMA Voice

- Do not attach the extensions to files other than the Audio file. If the extension is attached, the file, which is not the Audio file, will play and outputs a loud noise, causing damage to the speaker.
- The files with copy protection cannot be played.
- Audio files cannot be played depending on the encoding software setting, USB device type, and/or recording conditions.
- The unit may not be compatible with upgrade of compression format standard and additional specifications.
- Audio files encoded using VBR (Variable Bit Rate) may use bit rates that fall outside the supported range. Audio files with bit rates outside the supported range cannot be played.
playable storage media
• CD-ROM, CD-R, CD-RW
• USB device (USB version 1.1/2.0)
• SD, SDHC, mimi SD, micro SD/SDHC card

- CD-RW discs which are quick formatted by the writing software cannot be used.
- When recording to the maximum CD-R/RW media capacity at once, the writing software is set to "Disc at once".
- For details on the available USB devices, refer to
(page 9). - For details on the available SD/SDHC card, refer to
(page 9).
playable CD-R/RW format
• ISO 9660 Level 1/2
• Joliet
8 C-515BT/C-313
playable fi le format of USB device/ SD card
• FAT 16/32
The maximum number of characters for display
- File/Folder name: 30/30 characters
• MP3 ID3 Tag/ WMA Contents property:
32 characters
(The information which can be displayed with this unit:
title, artist name, and album name)

- File/Folder name is the number of the characters including the extensions.
- This unit can display the following versions of MP3 ID3 tag: version 1.0/1.1/2.2/2.3
Limitation of structure for the fi le and the folder
• Maximum number of folders: 255 (including root folder)
- Maximum number of files per folder: 999 (including the number of folders)
Playing order of the audio fi le
- Audio files are played in the order the files are written. You can specify the order of playback by numbering files in a folder and writing them by folder.
Example
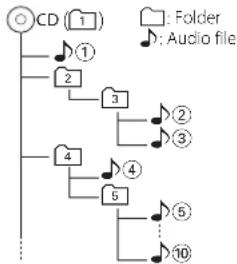
flowchart
graph TD
    A["CD (1)"] --> B["1"]
    B --> C["2"]
    C --> D["3"]
    D --> E["4"]
    E --> F["5"]
    F --> G["6"]
    G --> H["7"]
    H --> I["8"]
    I --> J["9"]
    J --> K["10"]
    style A fill:#f9f,stroke:#333
    style K fill:#bbf,stroke:#333
- Playing order
Playing order after ⬆① play:
→♪②, ♪③, ♪④, ♪⑤...
About USB device
Notes on use of the USB device
This unit can play audio files stored in the flash memory and digital audio player that have a USB port (these devices are referred to as USB devices in this document).
The following restrictions are placed on the types and usage of available USB devices:
Available USB devices
• USB devices belonging to the USB mass storage class.
- USB devices whose maximum current consumption is 500 mA or less.

- USB Mass Storage Class: USB devices that the PC can recognize as an external storage without using any special driver or application software.
- Contact the sales agent as to whether your USB device conforms to the USB mass storage class specs.
- Using an unsupported USB device can result in abnormal playback or display of the audio file. Even if you use the USB device conforming to the above specs, audio files cannot be played normally depending on the type or condition of the USB device.
Supported iPod
C-515BT
Made for
- iPod nano (1st generation)
- iPod nano (2nd generation)
- iPod nano (3rd generation)
- iPod nano (4th generation)
- iPod (4th generation)
- iPod with video
- iPod classic
- iPod touch (1st generation)
- iPod touch (2nd generation)

- Be sure to update the software of your iPod to the latest version.
- The iPod cannot be connected together with its accessories such as the cover or case. Be sure to remove any accessories before connecting the iPod.
• Video output setting of iPod needs to be set on your iPod. - When the iPod is detached from the iPod dock, the TV Out setting of the iPod may sometimes be set to On. Check this setting if the iPod cannot display video.
Handling discs
Handling precautions
Hold a CD taking care not to touch the played surface. (The side without the printed label is the playback side.)
Discs playable on the system
This system can play back a CD (12 cm, 8 cm), CD-ROM, CD-R, CD-RW or the audio part of a CD-EXTRA disc.
Notes on CD-ROM/CD-R/CD-RW discs
If the CD-ROM, CD-R or CD-RW disc in use has a printable label surface, the disc may be unable to be taken out of the system due to sticking of the label surface. To prevent malfunction of the system, do not use such a disc.
Cautions on CD discs
Always use a CD carrying the 0.158 mmHg.
A disc without this marking may be unable to be played back correctly.
The disc rotates at a high speed during playback. Never use a cracked, chipped or greatly warped disc. Otherwise, damage or malfunction of the player may result.
Also, do not use a disc with a non-circular shape as this may result in malfunction.
About SD card
Available SD card
• SD, SDHC, mimi SD, micro SD/SDHC card
• An SD card of 512 MB to 32 GB can be used.

- A special adapter is required for using a mini SD/micro SD card.
• A multimedia card (MMC) cannot be used.
Usable D.AUDIO
To control a Kenwood digital audio player from the main unit or remote control unit, the Kenwood digital audio player connection cable is necessary.
Usable Kenwood digital audio player models
HDD audio player Memory audio player/recorder
HD20GA/MGR-A//M2GD55/M1GD55/
M1GC7/M2GC7
English
9

10 C-515BT/C-313
1 1 Button
To switch the system on or to standby mode.
[STANDBY/TIMER] indicator
Red lighting: Ordinary standby mode
Orange lighting: Timer standby mode
2 2 Source buttons
To select the source you want, or to turn the system on to the selected source.
TUNER BAND button
FM→AM
CD/USB/SD button
CD→USB→SD
D.AUDIO/iPod/Bluetooth button (C-515BT)
D.AUDIO → iPod → Bluetooth
D.AUDIO button (C-313)
D.AUDIO
AUX button
AUX
3 3 ▶/|| button
To start or interrupt playback for CD, audio file, iPod and D.AUDIO.
STOP ■ button
To stop playback for CD, audio file and D.AUDIO.
4 4 /▶▶ buttons
To search forward/backward to next/previous track for CD.
To skip tracks for CD.
To search forward/backward or to skip to the next/previous files for audio files and iPod.
To tune to higher/lower radio frequency or search radio stations for TUNER.
5 MULTI CONTROL ▲/▼/ ◀ /▶ buttons
Press to select a setting item.
ENTER button
Press to enter the selected item.
6 digit 0 - 9/ A - Z buttons
To select a track/fi le number for CD and audio fi le. To select a preset radio station for TUNER.
To enter fi le names in fi le search mode for audio fi les.
7 7 PAIRING button (C-515BT only)
To perform pairing with a Bluetooth device.
7 STEREO/MONO button
To switch between stereo mode and mono mode (on FM band only) for TUNER.
8 RANDOM button
To playback in random order for CD, audio file and iPod.
9 MEMORY/REPEAT button
To auto /manual preset radio stations for TUNER. To repeat one track/fi le or all tracks/fi les for CD, audio fi le and iPod.
10 P.MODE button
To program tracks/fi les for CD and audio fi le.
11 PTY/CLEAR button
To carry out PTY search.
To delete the track/fi le number entered during track/fi le search.
12 FILE SEARCH button
To select a desired file in audio files.
13 TIMER ON/OFF button
To switch the timer on/off.
14 TIMER SET button
To set the clock.
To set the timer.
To set the A.P.S.
15 FOLDER/P.CALL ▲/▼ buttons
To select an album (folder) of audio files and iPod.
To select a preset radio station for TUNER.
16 MUTE button
To interrupt and resume sound reproduction.
17 5 VOLUME ▲/▼ buttons
To increase or decrease the volume.
18 8 X-BASS button
To switch on/off bass enhancement.
19 9 SOUND button
To select the desired sound effect: POP, CLASSIC, ROCK, JAZZ, GAME or FLAT (off).
20 DISPLAY button
To change the time display for CD.
To change the information display for audio files.
To change the display for RDS.
To change the display for clock.
20 BACKLIGHT/CONTRAST button
To switch the display backlight and illumination on
and off
To adjust the display contrast.
21 SLEEP button
To select the sleep time.
6 [▲] button
To open or close the CD door.
10 SD card slot
11 USB connector
12 D.AUDIO input terminal
13 PHONES jack
14 Remote sensor
15 Display
16 Illumination
17 CD door
Standby mode
While the STANDBY/TIMER indicator is lit, a small amount of power is supplied to the system to back up the memory. This is called standby mode. Under the condition, the system can be turned ON by the remote control unit.
Basic function
Switching the system on
Press ⚫TUNER BAND, CD/USB/SD, D.AUDIO/iPod/Bluetooth (C-515BT), D.AUDIO (C-313), AUX button.
The [STANDBY/TIMER] LED will go out. The system will switch to the last selected source or the selected source.
Switching the system to standby mode
Press button.
[STANDBY/TIMER] indicator is lit.
Volume control
Press VOLUME ▲ button to increase, or press VOLUME ▼ to decrease the volume level.
"VOL XX" is displayed. "VOL XX" denotes the volume level.
To switch off the volume temporarily
Press MUTE button.
Playback continues without sound, and "MUTE" is displayed.

• To restore the volume, press MUTE button again or adjust the volume.
Sound control
The sound control system feature enables you to enjoy special sound effects; preset equalizer settings and bass enhancement, providing the best music reproduction.
To switch on preset equalizer settings
Press SOUND button to select the desired sound effect: POP, CLASSIC, ROCK, JAZZ, GAME or FLAT (off).
When an effect other than FLAT is selected, the "EQ" icon appears on the display.
To switch on the bass enhancement
Press X-BASS button.
The icon "X-BASS" appears on the display.

- To switch off X-BASS, press X-BASS button. The icon "X-BASS" disappears.
- EQ and X-BASS functions are not applied to the recording sound.
Headphones
To listen to your stereo with headphones (separately available), use the 3.5 mm phones jack on the main unit.
Connecting headphones mutes the sound from the speakers.

CAUTION
- A warning that excessive sound pressure from earphones and headphones can cause hearing loss.
12 C-515BT/C-313
Using the CD/USB device/SD card
Preparation
Inserting a disc
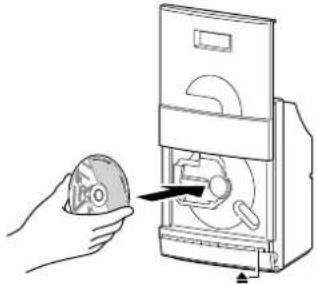
1 Press CD/USB/SD button once or more to select "CD".
2 Press [▲] button to open the CD door.
natural_image
Illustration of a hand holding a circular object next to an open refrigerator with a handle (no text or symbols visible)3 Insert a disc into the disc loader with the label side is facing you.
4 Press [▲] button to close the CD door.
For a CD, the total playtime and total number of tracks will appear in the display. For an audio fi le-CD, the total album number and total fi le number will appear on the display.
Removing a disc
1 Press [▲] button and carefully pull it out.
2 Press [▲] button to close the CD door.
Inserting a USB device
1 Press the button to select standby mode.
2 Insert a USB device to the USB connector on the front panel.

3 Press CD/USB/SD button once or more to select "USB".
"USB" is displayed. The total album number and total file number will appear on the display.
Removing the USB device
1 Press the button to select standby mode.
2 Remove the USB device.
Inserting an SD card
1 Press the button to select standby mode.
2 Insert the SD card into the SD card slot until it clicks.


Insert the SD card so that the label side faces up and the side with a cut comes on the right.
3 Press CD/USB/SD button once or more to select "SD".
The total album number and total file number will appear on the display.
Removing the SD card
1 Press the button to select standby mode.
2 Remove the SD card.

- To ensure good system performance; wait until the unit completely reads the disc/USB device/SD card before proceeding.
- If the disc compartment is not loaded with a disc, "NO DISC" is displayed.
- If the disc is unreadable or there is no playable audio file in the USB device/SD card, "NO DATA" is displayed.
- For audio files, reading time may exceed 10 seconds due to the large number of songs compiled into one disc/USB device/SD card.
- The icon "MP3" appears only when an MP3-file is played. The icon "WMA" appears only when an WMA-file is played.
Playing a CD/ audio fi le
Press ▶/Ⅱ button to start playback.
The track/fi le number and elapsed playing time of the current track/fi le appear on the display.
Basic operations
| Operation type Operation | |
| To stop playback Press STOP ■ button. | |
| To interrupt playback | Press ▶/■ button.Press again to resume playback. |
| To search for a particular passage during playback | Press and hold ◀◀◀ or ▶▶▶ button for more than 2 seconds.Press the ▶/■ button when the desired passage is located. |
| To select a track/ file | Press ◀◀◀ or ▶▶▶ button in play or pause mode. |
| To select a folder (For audio file only) | Press FOLDER/P.CALL ▲ or ▼ button in play or pause mode. |

- For audio file; "DIR:xxx TRK:xxx" appears on the display. "DIR:xxx" indicates album number and "TRK:xxx" indicates the file number.
- The digit buttons, 0–9 on the remote control unit can also be used to select a track/file. Press the digit buttons as shown below:
| CD Audio file | ||
| To select track/file 2 | 2 and ENTER | 2 and ENTER |
| To select track/file 23 | 2 and 3 | 2, 3 and ENTER |
| To select file 120 — | 1, 2 and 0 | |
If the ENTER button is not pressed, the search for the selected track/file will start in 5 seconds.
Selecting a desired file by fi le name (For audio fi le only)
1 In stop mode, press FILE SEARCH button. The icon "F-SEARCH" appears on the display.
2 Press the digit buttons A-Z, 0-9 to input the first character of the file name you want to search.
3 Press ENTER button.
"_" appears and flashes on the next of the first character.
4 Repeat step 2 and 3 to enter the characters until the one before the last character.
5 For the last character, press the digit buttons A-Z, 0-9 to input.
6 Press FILE SEARCH button.
"SEARCHING" appears on the display.
14 C-515BT/C-313
Select one of them with the ◀◀ or ▶▶ button.
7 Press ▶/II button to start playback.

- If the unit finds an appropriate file, the route name and the file name will be scrolled on the display. Press DISPLAY button. Then the album number and track number will be displayed.
- If there is no appropriate file, "NO FILE" is displayed.
Programming tracks/files
Programming tracks/files of a CD/audio file is possible when playback is stopped. Up to 30 tracks can be stored in the memory in any order.
1 In stop mode, press P.MODE button to enter program setting.
The icon "PGM" and "P-01 T--"/ "P-01 T--" appears on the display.
"T--" indicates track number of the CD.
"T--" indicates file number of the audio file.
"P-01" indicates program number.
The icon "PGM" starts flashing.
2 Press MULTI CONTROL ▲ or ▼ button, or digit buttons 0–9 to select the desired track/file.
3 Press ENTER button to store the selected track/file.
The track/fi le number returns to "T--"/ "T--..." and the next program number appears on the display.
4 Repeat steps 2 to 3 to select and store other desired tracks/files in this way.
The icon "PGM" appears on the display.
5 Press ▶/II button to play the programmed tracks/files.

- "PGM FULL" appears on the display, if you attempt to program more than 30 tracks/files.
• Audio files can only be programmed within the same source.
- Now enter the new track/file number with either method below.
- Press the MULTI CONTOL ▲ or ▼ button to select the desired track/file.
- Press the CLEAR button to clear the track/file number programmed. Select the new track/file number using digit buttons "0" to "9" on the remote control unit.
- If you press REPEAT button during programmed playback, the current track or all programmed tracks/files is/are played repeatedly. The icon "REP" or "REP.ALL" and the icon "PGM" appear on the display.
To clear the program
Press P.MODE button.
The icon "PGM" disappears from the display.

• "P" represents PROGRAM.
- The program is automatically cleared as soon as the CD door is opened.
- The function of program setting cannot be used in PLAY/PAUSE mode.
Random play
You can play all the tracks/fi les in random order.
1 During playing, pause or stop mode, press RANDOM button to enable random play mode.
The icon "RDM" appears on the display.
2 To exit random mode, press RANDOM button again.
The icon "RDM" disappears from the display.
Repeat play
You can play the current track/fi le/album or the whole disc/audio fi le repeatedly.
Press REPEAT button in play or pause mode.
Every time the button is pressed, the repeat play changes in the following order:
For CD :
| Repeat mode Icon | |
| Repeat a single track "REP." | |
| Repeat all the tracks *1 | "REP. ALL" |
| Repeat off — | |
For audio fi le :
| Repeat mode Icon | |
| Repeat a single file "REP." | |
| Repeat one album *2 | "REP. ALB." |
| Repeat all the files #1 | "REP. ALL" |
| Repeat off — | |

• *1 All tracks/files are repeated continuously.
- #? This function cannot be used in program mode.
Changing the display information
Press DISPLAY button in play or pause mode.
Every time the button is pressed, the display changes in the following order:
For CD :
| Information Icon | |
| Status display — | |
| The current track elapsed time. | — |
| The current track remaining time. | "REMAIN" |
| The whole disc elapsed time. | "TOTAL" |
| The whole disc remaining time. | "TOTAL RLMAIN" |
| The whole CD time. | — |
For audio fi le :
| Information Icon | |
| Status display — | |
| Album name and file name. | — |
| Tag information (Track, album title and artist name). | — |
| Album number and track number. | — |
Using the radio
Tuning in radio stations
1 Press TUNER BAND button to select the desired waveband: FM or AM.
2 Press and hold ◀◀ or ▶▶ button to tune in to the desired frequency.

- To tune to a weak station, briefly press ◀◀◀ or ▶▶◀ button repeatedly until the display shows the desired frequency or when the best reception has been obtained.
STEREO/MONO
Press the STEREO/MONO button to select mono or stereo mode.
When stereo mode is selected, the icon "STEREO" appears on the display (if current station is FM stereo).

- You are able to select stereo or mono mode in FM band only.
Auto preset
Radio stations can be preset automatically in preset channels.
1 Press TUNER BAND button to select the desired waveband: FM or AM.
2 Press MEMORY/REPEAT button for more than 2 seconds.
The receivable radio stations are preset automatically.
When the Auto preset operation has completed, the unit enters the condition in which preset station P01 is tuned.
Manual preset
You can store up to 30 for FM and 10 for AM radio stations in the memory. When a preset radio stations selected, the preset number appears on the display.
1 Press TUNER BAND button to select the desired waveband: FM or AM.
2 Press |◀◀ or ▶▶| button to tune in to the desired frequency.
3 Press MEMORY/REPEAT button so that "P --" appears on the display.
4 If you want to store the radio station to another preset number, press FOLDER/P.CALL ▲ or ▼, or digit buttons 0–9 to select the desired preset number.
5 Press ENTER button again to store the radio station.
6 Repeat steps 2 to 5 to store other preset radio stations.

- During preset, if no button is pressed within 20 seconds, the system will exit preset mode automatically.
Tuning to a preset radio station
Press FOLDER/P.CALL ▲ or ▼, or digit buttons 0–9 to select the desired preset number.
The preset number and radio frequency appear on the display.

- Press the digit buttons as shown below:
FM AM
To select 1 1 and ENTER 1 and ENTER
To select 2 2 and ENTER 2 and ENTER
To select 10 1, 0 and ENTER 1, 0 and ENTER
16 C-515BT/C-313
Using RDS (Radio Data System)
RDS is a system that transmits useful information (in the form of digital data) for FM broadcasts along with the broadcast signal. Tuners and receivers designed for RDS reception can extract the information from the broadcast signal for use with various functions, such as automatic display of the station name.
RDS functions
PTY (Program TYPE Identification) Search:
Automatically tunes to a station that is currently broadcasting the specified program type (genre).
PS (Program Service Name) Display:
Automatically displays the station name transmitted by the RDS station.
Radio Text function:
Displays the radio text data transmitted by some RDS stations when you press the DISPLAY button. There is "NO TEXT" display if no text data is transmitted.

- Some functions and function names may differ in certain countries and areas.
Changing the RDS display information
While receiving a RDS station, pressing the DISPLAY button changes the contents of the display.
Every time the button is pressed, the display changes in the following order:
Information
| PS (Program Service name) display |
| PTY (Program Type) display |
| RT (Radio Text) display |
| Frequency display and preset number display |
Tuning by Program Type (PTY search)
This function lets you set the tuner to automatically search for stations which are currently broadcasting the type of program (genre) you want to listen to.
1 Press TUNER BAND button to select FM.
2 Press PTY button.
If the current station is with RDS, the program type of the station is displayed.
3 Press FOLDER/P.CALL ▲ or ▼ button to select your desired program type.
Program type table
| Program Type Name Display | |
| News "NEWS" | |
| Current Affairs "AFFAIRS" | |
| Information "INFO" | |
| Sport "SPORT" | |
| Education "EDUCATE" | |
| Drama "DRAMA" | |
| Culture | 'CULTURE' |
| Science | 'SCIENCE' |
| Varied Speech "VARIED" | |
| Pop Music | "POP M" |
| Rock Music | "ROCK M" |
| Easy Music | "EASY M" |
| Light Classical Music | "LIGHT M" |
| Serious Classical Music "CLASSICS" | |
| Other Music | "OTHER M" |
| Weather | "WEATHER" |
| Finance | "FINANCE" |
| Children's Program | "CHILDREN" |
| Social Affairs | "SOCIAL" |
| Religion | 'RELIGION' |
| Phone In | "PHONE IN" |
| Travel | "TRAVEL" |
| Leisure | "LEISURE" |
| Jazz Music | "JAZZ" |
| Country Music | "COUNTRY" |
| National Music | "NATION M" |
| Oldies Music | "OLDIES" |
| Folk Music | "FOLK M" |
| Documentary | "DOCUMENT" |
4 Press PTY button to start searching.

• Under certain receiving conditions, it may take more than 1 minute to complete the search.
- If the desired program type cannot be found, "NO PROGRAM" is displayed, then after several seconds the display returns to the original display.
English 17
Using the iPod
C-515BT
Inserting an iPod
1 Connect a iPod to the iPod dock.
2 Press D.AUDIO/iPod/Bluetooth button once or more to select "iPod".
The icon "iPod" appears on the display.
Playing an iPod
Press ▶/Ⅱ button to start playback.
Basic operations
| Operation type Operation | |
| To interrupt playback | Press ▶/■ button.Press again to resume playback. |
| To search for a particular passage during playback | Press and hold ◀◀ or ▶▶ I button.Release to resume the playback. |
| To select a song. Press ◀◀ or ▶▶ I button. | |
| To select a album *1 | Press FOLDER/P.CALL ▲ or ▼ button. |

• *1 The operation varies depending on the model of iPod.
Model other than iPod touch iPod touch
| The operation is available when one of the following items is selected. | |
| Browse item Selection | |
| Artists, Composers | All Albums |
| Albums, Compilations | All Songs |
| Genres | All Artists |
Repeat play
You can play the current song or the all songs repeatedly.
Press REPEAT button.
Every time the button is pressed, the repeat play changes in the following order:
| Repeat mode | Icon |
| Repeat a single song | — |
| Repeat all songs | — |
| Repeat off | — |
Random play
You can play all the album in random order.
Press RANDOM button.
Each time you press the button, Random Play turns ON or OFF.

- The displayed icon may not match the actual operation with certain iPod models.
18
C-515BT/C-313
Using the D.AUDIO
Playback of Digital Audio Player
Kenwood digital audio player can be connected to play audio files in it.
1 Connect an the player.
Connect a Kenwood digital audio player or iPod* to the [D.AUDIO] connector using an optional cable or adapter. Also read the instruction manual for the connected component.
C-313 can be connected and controlled use for optional iPod adapter PAD-iP7.

2 Press D.AUDIO/iPod/Bluetooth button once or more to select "D.AUDIO".
3 Turn the connected player ON and start playing it.
Basic operations
| Operation type Operation | |
| To stop playback Press STOP ■ button. | |
| To interrupt playback | Press ▶/■ button.Press again to resume playback. |
| To search for a particular passage during playback | Press and hold ◀◀ or ▶▶1 button for more than 2 seconds. |
| To select a track/ file | Press ◀◀ or ▶▶1 button in play or pause mode. |
| To select a folder | Press FOLDER/P.CALL ▲ or ▼ button in play or pause mode. |

- Some control operations may be unavailable depending on the connected player.
Using the Bluetooth audio C-515BT
You can listen to audio files stored in Bluetooth audio player.
Before use (Pairing function)
You need to register your audio player and cell-phone before using it with this unit.
1 Press D.AUDIO/iPod/Bluetooth button once or more to select "Bluetooth".
2 Press PAIRING/STEREO/MONO [PAIRING] button.
3 Search this unit from the pairing target device. When the pairing target device (Bluetooth audio player etc.) detects this unit, it displays "C-515BT".
4 Select and register this unit on the pairing target device.
5 If the pairing target device requests entry of the passkey, enter "0000".
"3", "CONNECTED" is displayed when pairing completes.

- Once a device is paired with this unit, it is not necessary to repeat the pairing operation. This unit can be connected simply by selecting "C-515BT" from the list of the Bluetooth device.
• Note that this unit is not capable of multi-pairing.
Playback of Bluetooth audio
1 Press D.AUDIO/iPod/Bluetooth button once or more to select "Bluetooth".
2 Play the Bluetooth device.
Basic operations
| Operation type Operation | |
| To stop playback Press STOP ■ button. | |
| To interrupt playback | Press ▶/■ button.Press again to resume playback. |
| To search for a particular passage during playback | Press and hold ◀◀ or ▶▶1 button formore than 2 seconds. |
| To select a track/ file mode. | Press ◀◀ or ▶▶1 button in play or pause |

- If the pairing target device does not support the AVRCP profile, the device cannot be controlled from this unit. Operate from the Audio player.
Using the AUX
Playing an external component
An external component can be connected to AUX IN of this unit and played back.
1 Connect an external component.
Connect an external component to the [AUX IN] connector on the rear of this unit.
2 Press AUX button.
3 Start playing the connected external component.
Clock/timer operation
Clock setting
1 Press TIMER SET button.
2 Press MULTI CONTROL ◀ or ▶ button to select "CLOCK" and press ENTER button.
"CLOCK SETTING" appears on the display.
3 Press ENTER button.
The hour indication will start flashing.
4 Press MULTI CONTROL ▲ or ▼ button to set the hours and press ENTER button.
The minute indication starts flashing.
5 Press MULTI CONTROL ▲ or ▼ button to set the minutes and press ENTER button.
When the setting completes, "COMPLETE" is displayed and the unit exits the setup mode automatically.

- The clock setting will be erased when the power cord is disconnected or a power failure occurred.
- The MULTI CONTROL ◀ or ▶ button can be used to move across the setting items.
Timer setting
The system can switch on to CD, USB, TUNER or iPod automatically at a preset time, serving as an alarm to wake you up.
Important!
Before setting the timer, ensure that the clock is set correctly.
1 Press TIMER SET button.
2 Press MULTI CONTROL ◀ or ▶ button to select "TIMER" and press ENTER button.
3 Set the time to start playback.
The icon "ON" starts flashing.
Press MULTI CONTROL ▲ or ▼ button to set timer start hours and press ENTER button to store the setting. Repeat the same procedure to set the minutes.
The icon "OFF" starts flashing.
4 Repeat the step 3 to set the time to stop the timer (off time).
The icon "TIMER" flashes and the source display appears.
5 Press MULTI CONTROL ▲ or ▼ button to select the desired source and press ENTER button to store the setting.
The source switches as follows :
"CD" → "USB" → "SD" → "iPod" → "TU FM" → "TU AM" → ...
When a radio source (FM/AM) is selected, select the preset station number after the above.
6 Press MULTI CONTROL ▲ or ▼ button to set volume level and press ENTER button to store the setting.
7 Press MULTI CONTROL ◀ or ▶ button to select the play mode and press ENTER button to store the setting.
Play mode Function
PLAY The playback begins at the level set with VOLUME.
AI PLAY The volume is increased gradually until the level set with VOLUME.
When the setting completes, "COMPLETE" is displayed and the unit exits the setup mode automatically. The icon "TIMER" appears on the display. The timer is now set.
8 Switch the system to standby mode.
The STANDBY/TIMER indicators also light orange.

- When reached the preset timer, the selected source will play or switch to standby mode after the timer has been activated.
- The MULTI CONTROL ◀ or ▶ button can be used to move across the setting items.
To activate/deactivate the timer
Press TIMER ON/OFF button.
If activated, the icon "TIMER" appears on the display.

- The timer off will not be activated if the starting and stopping time are the same.
Sleep timer setting
If the sleep timer is activated, the system will switch to standby mode after the selected time has expired.
Each press of the SLEEP button decreases the timer period by 10 minutes. The sleep timer can be set up to 90 minutes.
The icon "SLEEP" appears on the display.
The display will change to sleep time display and change as follows:
90 min → 80 min → 70 min → 60 min → 50 min
→ 40 min → 30 min → 20 min → 10 min → OFF
→...
While sleep mode is in active:
To deactivate the sleep timer
Press SLEEP button or press button to turn the power off.

- If timer off and the sleep off are all activated, the system will switch to standby mode by the earlier timer set.
System setup
Adjusting the display brightness (BACKLIGHT)
The brightness of the display backlight can be adjusted and how the display backlight and illuminations of this unit are lit can be selected.
1 Press BACKLIGHT/CONTRAST button.
2 Press MULTI CONTROL ◀ or ▶ button to select "BACKLIGHT" and press ENTER button.
3 Press MULTI CONTROL ◀ or ▶ button to select the backlight setting and press ENTER button to store the setting.
Setting Function
| BACKLIGHT 1 Both the display and illuminations are turned on. |
| BACKLIGIT 2 The display is turned on and the illuminations are turned off. |
| BACKLIGHT 3 The display is turned off and the illuminations are turned on. |
| BACKLIGHT 4 Both the display and illuminations are turned off. |
When the setting completes, "COMPLETE" is displayed and the unit exits the setup mode automatically.
Adjusting the display contrast (CONTRAST)
The contrast of the display can be adjusted.
1 Press BACKLIGHT/CONTRAST button.
2 Press MULTI CONTROL ◀ or ▶ button to select "CONTRAST" and press ENTER button.
3 Press MULTI CONTROL ◀ or ▶ button to adjust the contrast setting and press ENTER button to store the setting.
Setting Function
| 1 □ Decreases the contrast. |
| 2 □□ |
| 3 □□□ |
| 4 □□□□ |
| 5 □□□□□ Increases the contrast. |
When the setting completes, "COMPLETE" is displayed and the unit exits the setup mode automatically.
Setting Auto Power Save (A.P.S.)
A.P.S. stands for Auto Power Save, which is the function that switches this unit OFF when it has not been controlled for more than 30 minutes while its power is ON and the CD and other inputs are in stop mode.
1 Press TIMER SET button.
2 Press MULTI CONTROL ◀ or ▶ button to select "A.P.S." and press ENTER button.
3 Press MULTI CONTROL ◀ or ▶ button to select the A.P.S. setting and press ENTER button to store the setting.
Setting Function
| A.P.S. ON A.P.S. mode is ON. |
| A.P.S. OFF A.P.S. mode is OFF. |
When the setting completes, "COMPLETE" is displayed and the unit exits the setup mode automatically.
When the A.P.S. is ON...
A.P.S. is activated when this unit is in either condition below.
- When the input source is TUNER, AUX, D.AUDIO, Bluetooth or iPod, the volume level is 0 and no button has been pressed for 30 minutes.
- When the input source is CD, USB or SD, the CD player or USB device or SD is in stop mode and no button has been pressed for 30 minutes.

- When the A.P.S. is activated, the display shows flashing "A.P.S." from about one minute before this unit is switched OFF.
22 C-515BT/C-313
In case of diffi culty
Resetting the Microcomputer
The microcomputer may malfunction (unit cannot be operated, or shows an erroneous display) if the power cord is unplugged while the power is ON, or due to some other external factor. If this happens, execute the following procedure to reset the microcomputer and return the unit to its normal operating condition.
When the power is off (standby mode), press and hold down the [SOUND] button on the main unit for more than 2 seconds.
Unplug the AC cord and plug it back in if "FACTORY RESET FINISHED" is appears.
- Please note that resetting the microcomputer will clear the contents of the memory and return the unit to the state it was in when it left the factory.
Check that following guide for problem resolution.
General
No sound.
→ Plug in AC cord securely.
→ Set the VOLUME control to proper sound level.
→ Make sure the source is set to the source you want to operate.
→ Pull out the headphones plug from the headphones jack.
The left and right sound outputs are reverse.
→ Check the speaker connections and location.
The system does not operate by pressing any buttons.
→ Unplug the AC cord and plug it back in.
This unit is turned OFF spontaneously.
→ A.P.S. is set to ON. Set it to OFF.
CD player operation
"NO DISC" is displayed.
→ Insert a disc correctly (label side up).
→ Clean the disc.
→ Use a new or readable disc.
→ Wait until the moisture condensation at the lens has cleared.
USB operation
"NO USB" is displayed.
→ Insert the USB device properly.
Cannot play.
→ Check if the USB mass storage class-compatible digital audio player is turned ON.
iPod operation
"NO iPod" is displayed.
→ Insert the iPod properly.
Does not function properly.
→ Disconnect the iPod and connect it again.
→ Check the software version of the iPod. If it is not the latest one, update it.
SD operation
"NO SD" is displayed.
→ Insert the SD card properly.
Cannot play.
→ Insert an SD card containing music files.
Bluetooth operation
"DISCONNECTED" is displayed.
→ Check if the connected device is compatible with the profile of this unit.
→ Check if the connected device is in available status.
No Sound.
→ With certain audio files, audio playback through Bluetooth is not supported.
D.AUDIO operation
Kenwood digital audio player cannot be controlled from the main unit or remote control unit.
→ Connect using the connection cable (separately available).
→ Check if a compatible model is connected.
Radio reception
Noise in radio.
→ Tune to a correct frequency.
→ Adjust the direction of the FM antenna.
→ Adjust the position and direction of the AM antenna.
→ Increase the distance between the system and TV or VCR.
Remote control unit
Does not function properly.
→ Replace the batteries.
→ Remove the obstacles.
→ Move closer to the system when using the remote control and make sure that you are pointing at unit's remote sensor.
English 23
General information
Maintenance
Cleaning the cabinet
- Use a soft cloth slightly moistened with a mild detergent solution. Do not use a solution containing alcohol, spirits, ammonia or abrasive.
Cleaning discs
- When a disc becomes dirty, clean it with a cleaning cloth, wipe the disc from the center out. Do not wipe in circular motion. - Do not use solvents such as benzene, thinner commercially available cleaners, or antistatic spray intended for analogue records.
Caution on condensation
Condensation (of dew) may occur inside the unit when there is a great difference in temperature between this unit and the outside. This unit may not function properly if condensation occurs. In this case, leave the unit for a few hours and restart the operation after the condensation has dried up.
Be specially cautious against condensation in the following circumstances:
When this unit is carried from one place to another across a large difference in temperature, when the humidity in the room where this unit is installed increases, etc.
Copyright information
Materials recorded from broadcasting, CDs, discs or other recorded materials (music tapes, karaoke tapes, etc.) are protected by the copy right just like the verses and melodies of songs.
The copyright law prescribes that the permission from the copyright owners is required to sell, distribute, transfer or lend the materials recorded from the above recorded materials or to use them on a commercial basis (including background music in shops, etc.).
To install this unit and/or speakers on a wall
Prepare commercially available woodscrews.

1 On a stable pillar or wall, attach a pair of woodscrews at the same interval as the interval between the wall-mount holes of this unit or speaker.

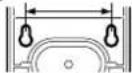
Screw attaching interval Main unit: 120mm (C-313/C-515BT) Speaker: 90mm (C-313) 120mm (C-515BT)
2 Fit the screws into the wall-mount holes on the rear of the main unit or speaker.
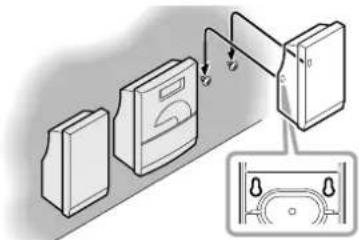
natural_image
Diagram showing a kitchen appliance with a door, drawer, and sink, connected to a close-up view of the interior (no text or symbols present)- The heat radiation from the rear of the main unit may deform or discolor the wall made of certain material.
Be sure to observe the following points when installing the unit on a wall. Otherwise, the product may drop and cause damage or an injury.
- Check the strength of the wall before installation. Do not install on a plywood or plaster board. If you have any doubt related to the wall strength, please consult a specialist.
- Check that the screws are fit securely into the wall-mount holes of the main unit and/or speakers.
• Even after installation, use care so that the unit and/or speakers do not drop due to an accidental contact, etc.
24 C-515BT/C-313
Specifications
Main unit
Amplifi er section
Rated output power
C-515BT 20 W + 20 W (1 kHz, 10% T.H.D., at 8 Ω)
C-313 10 W + 10 W (1 kHz, 10% T.H.D., at 8 Ω)
D.AUDIO/ AUX (Sensitivity/ Impedance) ... 300 mV/10 kΩ
SUBWOOFER PREOUT (Level/ Impedance) .....1 V/10 kΩ
Tuner section
FM tuner section
Tuning frequency range 87.5 MHz \~ 108.0 MHz
AM tuner section
Tuning frequency range 531 kHz \~ 1,602 kHz
CD player section
Laser......Semiconductor laser
Laser wave length 770\~810 nm
Laser power class....Class 1M (IEC)
Over sampling 8 fs (352.8 kHz)
D/A conversion 1 Bit
USB interface
USB standard .... USB 1.1/2.0
Maximum supply current 500 mA
File system FAT 16/32
SD card interface
Format .... SD memory card
Usable SD cards
SD/SDHC, miniSD, microSD/SDHC card
File system FAT 16/32
Bluetooth section (C-515BT)
Technology .... Bluetooth Ver. 2.0 Certifi ed
Profi le ......A2DP (Advanced Audio Distribution Profi le) AVRCP (Audio/Video Remote Control Profi le)
General
Provided AC adapter ....DC 18 V (AC 230 - 240 V, 50 Hz)
Power consumption (Incl. AC adapter)
C-515BT....20W
C-313 16W
Dimensions W: 190 mm
H:238mm
D:143mm
Weight (net) 1.4 kg
Speakers (C-515BT)
Enclosure....Bass-reflex type
Speaker configuration
Woofer 86 mm, cone type
Tweeter 36 mm, cone type
mpedance 8Ω
Maximum input 20 W
Dimensions W:170mm
H:238mm
D:132mm
Weight (net) 1.1 kg (1 piece)
Speakers (C-313)
Enclosure....Bass-refl ex type
Speaker configuration
Full range 86 mm, cone type
Impedance 8Ω
Maximum input 10 W
Dimensions W:130mm
H:238mm
D:133mm
Weight (net) 1.0 kg (1 piece)
iPod dock (C-515BT)
Video output format .... NTSC/PAL
Composite video output level 1 Vp-p (75 Ω)
Dimensions W: 103 mm
H:31mm
D:65mm
Weight (net) 0.16 kg
Notes:
- Kenwood follows a policy of continuous advancements in development. For this reason specifications may be changed without notice.
- Sufficient performance may not be exhibited at extremely cold locations (where water freezes).
Memory back up function
Please note that the following items will be deleted from the unit's memory if the power cord is disconnected from the AC outlet.
- Input selector settings
• Volume level
• Sound control (preset equalizer, bass enhancement)
- Tuner setting
English 25
- Declaration of Conformity with regard to the EMC Directive 2004/108/EC
- Declaration of Conformity with regard to the R&TTE Directive 1999/5/EC
Manufacturer:
Kenwood Corporation
2967-3 Ishikawa-machi, Hachioji-shi, Tokyo, 192-8525 Japan
EU Representative's:
Kenwood Electronics Europe BV
Amsterdamseweg 37, 1422 AC UITHOORN, The Netherlands

English
Hereby, Kenwood declares that this unit C-515BT is in compliance with the essential requirements and other relevant provisions of Directive 1999/5/EC.
Français
• Windows Media is a trademark of Microsoft Corporation registered in the U.S. and other countries.
• The SDHC logo is a trademark.
• The Bluetooth word mark and logos are owned by the Bluetooth SIG, Inc. and any use of such marks by Kenwood Corporation is under license. Other trademarks and trade names are those of their respective owners.
- iPod is a trademark of Apple Inc., registered in the U.S. and other countries.
- "Made for iPod" means that an electronic accessory has been designed to connect specifically to iPod and has been certified by the developer to meet Apple performance standards.
Apple is not responsible for the operation of this device or its compliance with safety and regulatory standards.

Information on Disposal of Old Electrical and Electronic Equipment and Batteries (applicable for EU countries that have adopted separate waste collection systems)
Products and batteries with the symbol (crossed-out wheeled bin) cannot be disposed as household waste.
Old electrical and electronic equipment and batteries should be recycled at a facility capable of handling these items and their waste byproducts.
Contact your local authority for details in locating a recycle facility nearest to you. Proper recycling and waste disposal will help conserve resources whilst preventing detrimental effects on our health and the environment.
Notice: The sign "Pb" below the symbol for batteries indicates that this battery contains lead.



KENWOOD
For your records
Record the serial number, found on the back of the unit, in the spaces designated on the warranty card, and in the space provided below. Refer to the model and serial numbers whenever you call upon your dealer for information or service on this product.
Model Serial
Number

B60 5807 08_02_English.indd 28

09.6.17 9:04:52 AM
- Before applying power
- Safety precautions
- CAUTION
- The marking of products using lasers
- IMPORTANT SAFETY INSTRUCTIONS
- Before use
- Contents
- Unpacking
- How to read this manual
- Preparing the remote control unit
- Operation
- Changing the battery of the remote control unit
- Connecting the FM antenna
- Connecting the AM antenna
- Connecting the speakers
- Connecting the iPod adapter C-515BT
- To remove iPod adapter
- About MP3 and WMA
- Playable Audio fi le
- playable MP3 fi le
- playable WMA fi le
- playable storage media
- playable CD-R/RW format
- playable fi le format of USB device/ SD card
- The maximum number of characters for display
- Limitation of structure for the fi le and the folder
- Playing order of the audio fi le
- About USB device
- Notes on use of the USB device
- Available USB devices
- Supported iPod
- Made for
- Handling discs
- Handling precautions
- Discs playable on the system
- Notes on CD-ROM/CD-R/CD-RW discs
- Cautions on CD discs
- About SD card
- Available SD card
- Usable D.AUDIO
- Usable Kenwood digital audio player models
- [STANDBY/TIMER] indicator
- TUNER BAND button
- CD/USB/SD button
- D.AUDIO/iPod/Bluetooth button (C-515BT)
- D.AUDIO button (C-313)
- AUX button
- STOP ■ button
- ENTER button
- Standby mode
- Basic function
- Switching the system on
- Switching the system to standby mode
- Volume control
- To switch off the volume temporarily
- Sound control
- To switch on preset equalizer settings
- To switch on the bass enhancement
- Headphones
- Using the CD/USB device/SD card
- Preparation
- Inserting a disc
- Removing a disc
- Inserting a USB device
- Removing the USB device
- Inserting an SD card
- Removing the SD card
- Playing a CD/ audio fi le
- Selecting a desired file by fi le name (For audio fi le only)
- Press ▶/II button to start playback.
- Programming tracks/files
- To clear the program
- Random play
- Repeat play
- Changing the display information
- Using the radio
- Tuning in radio stations
- STEREO/MONO
- Auto preset
- Manual preset
- Tuning to a preset radio station
- Using RDS (Radio Data System)
- RDS functions
- PTY (Program TYPE Identification) Search:
- PS (Program Service Name) Display:
- Radio Text function:
- Changing the RDS display information
- Tuning by Program Type (PTY search)
- Press PTY button to start searching.
- Using the iPod
- Inserting an iPod
- Playing an iPod
- Press RANDOM button.
- Using the D.AUDIO
- Playback of Digital Audio Player
- Connect an the player.
- Using the Bluetooth audio C-515BT
- Before use (Pairing function)
- Playback of Bluetooth audio
- Using the AUX
- Playing an external component
- Clock/timer operation
- Clock setting
- Timer setting
- Important!
- Play mode Function
- Switch the system to standby mode.
- To activate/deactivate the timer
- Press TIMER ON/OFF button.
- Sleep timer setting
- Each press of the SLEEP button decreases the timer period by 10 minutes. The sleep timer can be set up to 90 minutes.
- While sleep mode is in active:
- To deactivate the sleep timer
- System setup
- Adjusting the display brightness (BACKLIGHT)
- Adjusting the display contrast (CONTRAST)
- Setting Auto Power Save (A.P.S.)
- When the A.P.S. is ON...
- In case of diffi culty
- Resetting the Microcomputer
- When the power is off (standby mode), press and hold down the [SOUND] button on the main unit for more than 2 seconds.
- Unplug the AC cord and plug it back in if "FACTORY RESET FINISHED" is appears.
- General
- No sound.
- The left and right sound outputs are reverse.
- The system does not operate by pressing any buttons.
- This unit is turned OFF spontaneously.
- CD player operation
- "NO DISC" is displayed.
- USB operation
- "NO USB" is displayed.
- Cannot play.
- iPod operation
- "NO iPod" is displayed.
- Does not function properly.
- SD operation
- "NO SD" is displayed.
- Bluetooth operation
- "DISCONNECTED" is displayed.
- D.AUDIO operation
- Kenwood digital audio player cannot be controlled from the main unit or remote control unit.
- Radio reception
- Noise in radio.
- Remote control unit
- General information
- Maintenance
- Cleaning the cabinet
- Cleaning discs
- Caution on condensation
- Copyright information
- To install this unit and/or speakers on a wall
- Specifications
- Main unit
- Amplifi er section
- Tuner section
- CD player section
- USB interface
- SD card interface
- Bluetooth section (C-515BT)
- Speakers (C-515BT)
- Speakers (C-313)
- iPod dock (C-515BT)
- Notes:
- Memory back up function
- Manufacturer:
- EU Representative's:
- English
- Français
- Information on Disposal of Old Electrical and Electronic Equipment and Batteries (applicable for EU countries that have adopted separate waste collection systems)
- KENWOOD
- For your records
Brand : KENWOOD
Model : C-515 BT
Category : CD Player