
TE100-P1U - Print Server TRENDNET - Free user manual and instructions
Find the device manual for free TE100-P1U TRENDNET in PDF.


| Product Type | Print Server |
| Brand | TRENDnet |
| Model | TE100-P1U |
| Interface | 1x USB 2.0 Type B, 1x RJ-45 10/100 Mbps |
| Network Speed | 10/100 Mbps auto-negotiating |
| USB Ports | 1x USB 2.0 (for printer connection) |
| Supported Protocols | TCP/IP, LPR, IPP, SMB, AppleTalk (legacy) |
| Supported Operating Systems | Windows 10/8/7/Vista/XP, macOS 10.x, Linux |
| Dimensions (W x D x H) | 2.8 x 1.5 x 0.9 inches (71 x 38 x 23 mm) |
| Weight | 1.8 oz (50 g) |
| Power Input | 5V DC, 1A via external power adapter |
| Power Consumption | 2.5W (max) |
| Management | Web-based utility, Print Server Utility software |
| LED Indicators | Power, Link/Activity, USB status |
| Housing Material | Plastic |
| Operating Temperature | 0°C to 40°C (32°F to 104°F) |
| Storage Temperature | -10°C to 60°C (14°F to 140°F) |
| Certifications | FCC, CE |
| Package Contents | TE100-P1U, power adapter, Quick Installation Guide, CD with utility |
| Warranty | 1 year limited |
Frequently Asked Questions - TE100-P1U TRENDNET
User questions about TE100-P1U TRENDNET
0 question about this device. Answer the ones you know or ask your own.
Ask a new question about this device
Download the instructions for your Print Server in PDF format for free! Find your manual TE100-P1U - TRENDNET and take your electronic device back in hand. On this page are published all the documents necessary for the use of your device. TE100-P1U by TRENDNET.
USER MANUAL TE100-P1U TRENDNET
Quick Installation Guide

Table of Contents
English 1
- Before You Start 1
- How to Install 2
- Configure the Print Server 3
- Add the Printer to your PC 5
Troubleshooting 7
1. Before You Start

Package Contents
- TE100-P1U
- Quick Installation Guide Utility CD-ROM
• AC Power Adapter (5V DC, 2.5A)
System Requirements
- CD-ROM Drive
• CPU: 300MHz or above/ 800MHz or above (Windows Vista)
• Memory: 256MB RAM or above/ 512MB RAM or above (Windows Vista - Windows Vista/2003 Server/XP/2000/ME/98SE, Unixware, Linux, Mac OS X
Application
![graph TD A["USB 2.0 Printer"] --> B["Cable/DSL 4-Port Broadband Router (TW100-S4W1CA)"] B --> C["Workstations with Fast Ethernet PCI Adapter (TE100-PCIWN)"] C --> D["Cable/DSL Modem"] D --> E["Internet"] style A fill:#666,stroke:#333 style B fill:#ccc,stroke:#333 style C fill:#fff,stroke:#333 style…](/content/2026/05/1026841/images/d4a1f51748907ae27ca09eb2845c3bfe83cdc92730730950f7926210f07e6fbb.jpg)
*Mac Systems are only compatible with Post-Script printers
2. How to Install
Note: Please power off all printers before connecting them to the print server.

3. Configure the Print Server
Note: The Print Server can be managed using the PS-Utility or a web browser. For Mac users, change your computers IP address to 192.168.0.X (where X is an available number from 2-254). Since the Print Server's default IP address is 192.168.0.1, make sure no other network devices are assigned an IP address of 192.168.0.1. Then enter http://192.168.0.1 in your web browser to access the Print Server's Web Utility.
For Windows Users
- Insert the Utility CD-ROM into your computer's CD-ROM Drive and then click Utility > PS Utility.
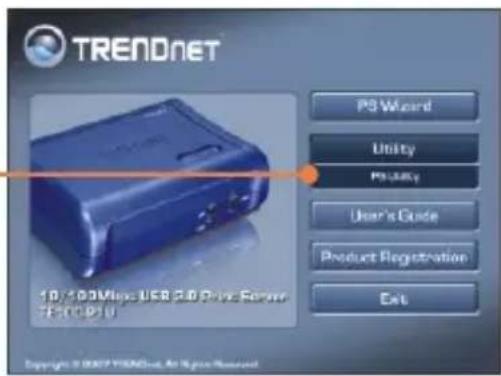
- Follow the InstallShield Wizard instructions. Click Finish.

- Click Start > Programs > PS-Utility, and then click PS-Utility v3.11.

PS-Utility v3.11
- Select the Print Server and click Change IP Address.
Manually assign the IP Address of the Print Server and then click OK. Note: The IP Address must match the network segment of your network.

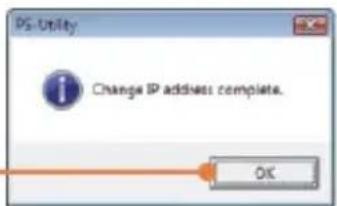
- Click OK.
- Click Show Web Setup.
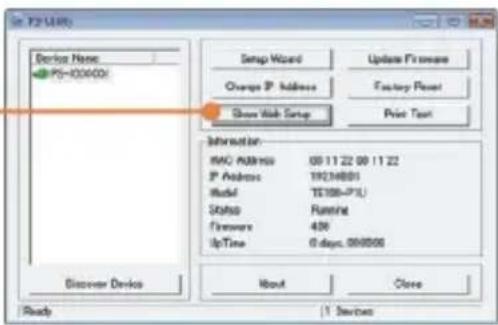
Print Server configuration is now complete.
Register Your Product
To ensure the highest level of customer service and support, please take a moment to register your product Online at: www.trendnet.com/register Thank you for choosing TRENDnet
4. Add the Printer to your PC
Note: For printing instructions for Windows ME and 98SE, please consult the User's Guide included on the Utility CD-ROM.
Windows Vista/2003 Server/XP/2000
- Click PS Wizard and then click Win 2000/XP/Vista.

- Select the print server, select the desired port and then click Add Printer.

- Click Select from manufacturer list. Select the appropriate driver for your printer and then click Next.


Add Printer is now complete.
For detailed information regarding the TE100-P1U configuration and advanced settings, please refer to the User's Guide on the Utility CD-ROM or TRENDnet's website at www.trendnet.com
Q1. The PS Wizard / PS Utility is unable to see my printer server. What should I do?
A1. First, double check your hardware connections; make sure that the print server and printer are powered ON and are properly connected. Second, click Discover. Third, disable any software firewall programs (e.g. ZoneAlarm). If your computer is running Windows XP or Vista, disable the built in firewall program.
Q2. I successfully added a printer to my computer and I can print a test page, but I cannot print anything from Microsoft Word or other applications.
A2. Make sure to set the newly installed network printer as your default printer. Click Start and then click Printers & Faxes, verify that your printer icon has a check on it.
Q3. I configured my print server to automatically receive an IP Address from a DHCP server, and now I cannot go into the Print Server's web utility.
A3. Open PS-Utility v3.11 (See 3. Configure the Print Server) to locate your print server's IP Address. For MAC users, press the Reset button at the back of the TE100-P1U, hold the button for 15 seconds, release the button, and enter http://192.168.0.1 in a web browser to access the web utility feature.
Q4. How do I setup the TE100-P1U on a Mac?
A4. Type in http://192.168.0.1 in you browser to logon to the built-in web configuration.
If you still encounter problems or have any questions regarding the TE100-P1U, please refer to the User's Guide included on the Utility CD-ROM or contact TRENDnet's Technical Support Department.
Certifications
This equipment has been tested and found to comply with FCC and CE Rules. Operation is subject to the following two conditions:
(1) This device may not cause harmful interference.
(2) This device must accept any interference received. Including interference that may cause undesired operation.



Waste electrical and electronic products must not be disposed of with household waste. Please recycle where facilities exist. Check with you Local Authority or Retailer for recycling advice.

NOTE: THE MANUFACTURER IS NOT RESPONSIBLE FOR ANY RADIO OR TV INTERFERENCE CAUSED BY UNAUTHORIZED MODIFICATIONS TO THIS EQUIPMENT. SUCH MODIFICATIONS COULD VOID THE USER'S AUTHORITY TO OPERATE THE EQUIPMENT.
ADVERTENCIA
TRENDnet Technical Support
US · Canada
Toll Free Telephone: 1(866) 845-3673
24/7 Tech Support

Europe (Germany • France Italy Spain Switzerland UK)
Toll Free Telephone: +00800 60 76 76 67
English/Espanol - 24/7
Francais/Deutsch - 11am-8pm, Monday - Friday MET
Worldwide
Telephone: +(31) (0) 20 504 05 35
English/Espanol - 24/7
Francais/Deutsch - 11am-8pm, Monday - Friday MET
Product Warranty Registration
Please take a moment to register your product online.
Go to TRENDnet's website at http://www.trendnet.com/register

- TABLE OF CONTENTS
- ENGLISH 1
- TROUBLESHOOTING 7
- BEFORE YOU START
- PACKAGE CONTENTS
- SYSTEM REQUIREMENTS
- APPLICATION
- HOW TO INSTALL
- CONFIGURE THE PRINT SERVER
- FOR WINDOWS USERS
- PRINT SERVER CONFIGURATION IS NOW COMPLETE
- REGISTER YOUR PRODUCT
- ADD THE PRINTER TO YOUR PC
- WINDOWS VISTA/2003 SERVER/XP/2000
- ADD PRINTER IS NOW COMPLETE
- CERTIFICATIONS
- ADVERTENCIA
- TRENDNET TECHNICAL SUPPORT
- PRODUCT WARRANTY REGISTRATION
Brand : TRENDNET
Model : TE100-P1U
Category : Print Server