
MW 965 FV - Microwave DELONGHI - Free user manual and instructions
Find the device manual for free MW 965 FV DELONGHI in PDF.


| Product Type | Microwave with grill and convection |
| Brand | DeLonghi |
| Model | MW 965 FV |
| Capacity | 32 liters |
| Microwave Power | 900 W |
| Grill Power | 1000 W |
| Convection Power | 1400 W |
| Dimensions (W x D x H) | 595 x 520 x 400 mm |
| Weight | 18 kg |
| Voltage / Frequency | 230 V / 50 Hz |
| Functions | Microwave, grill, convection, combi cooking, defrost, keep warm |
| Control Type | Electronic touch control with display |
| Turntable | Yes, glass turntable |
| Child Lock | Yes |
| Interior Light | Yes |
| Cleaning | Easy-clean interior coating |
| Safety Features | Door interlock, overheat protection, child lock |
| Spare Parts | Turntable, roller ring, filter (replaceable) |
| Repairability | Modular design, serviceable by authorized centers |
| Energy Consumption | Microwave: 900 W, Grill: 1000 W, Convection: 1400 W |
| Warranty | 2 years manufacturer warranty |
Frequently Asked Questions - MW 965 FV DELONGHI
User questions about MW 965 FV DELONGHI
0 question about this device. Answer the ones you know or ask your own.
Ask a new question about this device
Download the instructions for your Microwave in PDF format for free! Find your manual MW 965 FV - DELONGHI and take your electronic device back in hand. On this page are published all the documents necessary for the use of your device. MW 965 FV by DELONGHI.
USER MANUAL MW 965 FV DELONGHI
1.1 Description of oven and control panel ......Page 28 1.1 Important safety warnings ......Page 28 1.2 Technical data Page 30 1.3 Installation and electrical connections ......Page 30 1.4 Standard accessories ......Page 31 1.5 Ovenware....Page 32 1.6 Rules and tips for using the oven ......Page 33
CHAPTER 2 - USING THE CONTROLS AND SETTING THE FUNCTIONS
2.1 Setting the clock Page 34 2.2 Programming cooking ......Page 35 2.3 Quick heat Page 37 2.4 Child safety......Page 37 2.5 Energy saving function ......Page 37
CHAPTER 3 - USING THE OVEN: TIPS AND COOKING TIME TABLES
3.1 Defrosting Page 38 3.2 Heating......Page 39 3.3 Cooking appetizers, first courses....Page 40 3.4 Cooking meat......Page 40 3.5 Cooking side dishes and vegetables ......Page 41 3.6 Cooking fish......Page 42 3.7 Cooking cakes, pastries and desserts ......Page 42 3.8 Cooking using the STEAM function (not all models) ......Page 43 3.9 Programming automatic cooking cycles....pag. 45
CHAPTER 4 - MAINTENANCE AND CLEANING
4.1 Cleaning Page 48 4.2 Maintenance Page 49
CHAPTER 1 - GENERAL
1.1 DESCRIPTION OF OVEN AND CONTROL PANEL
| A Grill element | 5. POWER LEVEL button: to select microwave power level |
| B Control panel | |
| C Microwave outlet cover | 1 = 180W |
| D Steam accessories | 2 = 225W |
| E Inside of door | 3 = 270W |
| F High wire rack | 4 = 450W |
| G Turntable | 5 = 630W |
| H Turntable support | 6 = 720W |
| I Low wire rack | 7 = 900W |
| 6. TIME ADJUST buttons: to set the clock and cooking time | |
| 1. Time and function display | |
| 2. STEAM button | 7. STOP button: to stop cooking and clear settings |
| 3. AUTO MENU button | 8. START button: to start cooking and quick heating |
| 4. FUNCTION button: to select the function | 9. TEMP. button |
1.2 IMPORTANT SAFETY WARNINGS
Read these instructions carefully and keep for future reference.
NB: This oven has been designed to defrost, heat and cook food in the home.
It must never be used for other purposes, modified or tampered with in any way. This microwave oven is not designed for use in a kitchen unit or flush mounted.
1) WARNING: If the door or door seals are damaged, do not use the appliance until it has been repaired by a qualified service engineer (trained by the manufacturer or by the dealer's Customer Service). 2) WARNING: It is hazardous for anyone other than a qualified service engineer to carry out any service or repair operation involving the removal of a cover which gives protection against exposure to microwave energy. 3) WARNING: Liquids and other foods must not be heated in sealed containers since they are liable to explode. Eggs in their shell and whole hard-boiled eggs should not be heated in microwave ovens since they may explode even after microwave heating has ended. 4) WARNING: Accessible parts could become very hot during use. Keep children away from the oven. Do not allow the appliance to be used by persons (including children) with psychological, physical or sensory impairments or with inadequate experience or knowledge, unless closely supervised and instructed by someone responsible for their safety who can ensure they are aware of the dangers associated with inappropriate use. Children must be supervised to ensure they do not play with the appliance. 5) WARNING: when operating in combi mode, the oven becomes extremely hot. Do not allow children to use it without adult supervision. 6) Do not tamper with the safety devices in an attempt to operate the oven with the door open. 7) Do not operate the oven if objects of any kind become lodged between the front panel of the oven and the door. Always keep the inside of the door (E) clean, using a damp cloth and non-abrasive cleaning products. Do not allow dirt or remains of food to accumulate between the front panel of the oven and the door. 8) Do not operate the oven if the power cable or plug is damaged as there is a risk of electric shock. To avoid electric shock, if the power cable is damaged, have it replaced immediately by the manufacturer, an authorised technical assistance centre, or a suitably qualified service engineer. 9) If smoke comes out of the oven, switch off and unplug immediately. Keep the door closed to stifle any
Chapter 1 - General
flames.
10) Use utensils suitable for microwave ovens only. To avoid overheating and the consequent risk of fire, it is advisable to check the oven when cooking food in disposable containers made of plastic, cardboard, or other flammable materials, and when heating small quantities of food. 11) Never place the turntable in water after it has been heated for a long time. The resulting thermal shock would break the turntable. 12) When cooking in "MICROWAVE ONLY" and "COMBI MICROWAVE" modes, you must NEVER preheat the oven (without containing food). NEVER operate it when empty as sparks could be produced. 13) Before using the oven, make sure the utensils and containers chosen are suitable for microwave oven use (see the section on "Ovenware"). 14) The appliance becomes hot when in operation. Never rest anything on top of the oven while in use. Never touch the grill elements inside the oven. 15) When heating liquids (water, coffee, milk, etc.), a delayed action may cause the contents to boil over unexpectedly with a risk of scalds. To avoid this, you should place a plastic spoon or a glass rod in the container before starting to heat liquids. Always take extreme care when handling the container. 16) Do not heat spirits with a high alcohol content, or large quantities of oil. Both types of liquid are flammable! 17) The contents of feeding bottles and baby food jars should be stirred or shaken and the temperature checked before consumption, in order to avoid burns. You should stir or mix the food to guarantee an even temperature. When using commercial bottle sterilisers, ALWAYS make sure the container is filled with the quantity of water specified by the manufacturer before starting heating. 18) Failure to clean the oven could lead to deterioration of the surface. This may shorten the working life of the appliance and create risk situations. 19) Do not use abrasive cleaning products or metal scrapers to clean the glass door of the oven as this could damage the surface and cause breakage. 20) All microwaves are tested and approved in accordance with current electromagnetic safety and compatibility regulations and standards. As a precautionary measure, pacemaker manufacturers recommend wearers to keep a minimum distance of 20-30 cm between an operating microwave oven and the pacemaker in order to avoid possible interference with the pacemaker. If you suspect there may be interference, turn the microwave off immediately and contact the manufacturer of the pacemaker. If the oven overheats (prolonged use, use empty, etc.), the safety thermostat could turn the oven off. After cooling down, the oven will operate as normal. 22) The door and other oven surfaces may become very hot when the oven is in use. 23) This is a household appliance only. It is not intended to be used in: staff kitchen areas in shops, offices, and other working environments; farm houses; by clients in hotels, motels, and other residential type environments; bed and breakfast type environments. 24) The appliance must not be operated by a timer or a separate remote control system. 25) The appliance must be placed and operated with the back next to the wall.
NB: When the oven is used for the first time, a "new" smell and a small amount of smoke may be produced for the first ten minutes or so. This is normal and due to the protective substances applied to the grill element.
1.3 TECHNICAL DATA
External dimensions (LxHxD) 510x320x520
Internal dimensions (LxHxD) 350x210x330
Approximate weight: 18 kg.
For further information, see the rating plate on the appliance.
This appliance complies with EC directive 2004/108/EC on electromagnetic compatibility and European regulation no. 1935/2004 of 27/10/2004 on food contact materials. The product is classified as a Group 2, Class B, ISM appliance. Group 2 includes all ISM (Industrial, Scientific or Medical) appliances in which radio frequencies are generated intentionally and/or used in the form of electromagnetic radiation to treat materials, together with electroerosion equipment. Class B includes equipment for domestic use or on premises directly connected to low voltage electricity supply for supplying buildings for residential use.
POWER OUTPUT
The power output of your oven in WATTS is given on the rating plate of your appliance under the heading MICRO OUTPUT. When you consult tables, always refer to the output of your oven!
It is also useful when consulting microwave recipe books.

On some models, the microwave output power is also given in this symbol, reproduced on the control panel.
1.4 INSTALLATION AND ELECTRICAL CONNECTION
1) Unpack the oven and remove the protective packaging containing the turntable (G), turntable support (H) and accessories. Check that the turntable support (H) is correctly inserted at the centre of the turntable. 2) Clean the inside of the oven with a soft, damp cloth. 3) Check that the oven has not been damaged during transport. Check in particular that the door opens and closes properly. 4) Place the oven on a flat, stable surface at a height of at least 85 cm and out of reach of children as the door may become very hot during cooking. 5) When positioning the oven on the worktop, take care to maintain a gap of approx. 5 cm between the oven and the walls to its rear and sides and a gap of at least 30 cm above the oven (fig. 1). 6) Do not block the air intake vents. In particular, never place anything on top of the oven and make sure the air and steam outlet vents (on the top, bottom and rear of the appliance) are ALWAYS FREE (fig. 2). 7) Place the turntable support (H) in the centre of the circular housing and rest the turntable (G) on top. The turntable support (H) must be inserted into the housing in the centre of the turntable.
NB: never place the oven on or near heat sources (for example, on top of a refrigerator) (fig. 3).
8) The appliance must be connected to a socket with a minimum current rating of 16A. Make sure the household main switch has a minimum rating of 16A to avoid it tripping unexpectedly during operation of the oven. 9) Position the oven in such a way that the power plug and socket are easily accessible.

AIR OUTLET
fig. 2

fig. 3
chapter 1 - general
10) Before you switch on the oven, check that the mains voltage corresponds to that specified on the oven rating plate and that the power socket is properly earthed. The manufacturer declines all responsibility for failure to observe this safety precaution.
11) The majority of modern electronic appliances (TV, radio, stereo systems etc) are shielded from radio frequency (RF) signals. However, certain electronic appliances cannot be shielded from radio frequency signals coming from a microwave oven. You should therefore keep these appliances at least 1-2 metres away from a microwave in operation.
1.5 STANDARD ACCESSORIES

HIGH WIRE RACK
Grill only function:
for all types of grilled food.
TURNTABLE
The turntable must be used for all functions.
STEAM ACCESSORIES (not all models)
Must be used for the "STEAM" function (see page 43)
LOW WIRE RACK
FAN function:
Use for all types of traditional cooking, especially cakes, pastries, and desserts.
COMBI function:
Use for rapid cooking of meat, potatoes, certain risen cakes or desserts, and dishes that require browning on top (e.g., lasagne).
1.6 OVENWARE
In the microwave only and combi with microwave functions, any glass (preferably Pyrex), ceramic, china, or terracotta ovenware may be used provided it has no metal decorations or parts (e.g., gold decorations, metal handles, feet, etc.).
Heat-resistant plastic plates can also be used, but only for "microwave only" cooking.
If you are in doubt as to the suitability of a particular container, carry out this simple test: place the empty container in the oven for 60 seconds at maximum power (microwave only function).
If the container remains cold or heats up only slightly, it is suitable for microwave cooking.
If it becomes very hot (or sparks are produced), the container is not suitable.
When heating up for brief periods, paper napkins, cardboard trays, or disposable plastic plates can be used as a base.
The size and shape of containers must allow them to rotate easily inside the oven.
Metal, wood, cane, and crystal glass containers are not suitable for microwave cooking.
Remember that the microwaves heat the food, not the ovenware. Food can therefore be cooked directly on the serving plate, thus avoiding using and cleaning saucepans.
Always use oven mitts, as the very hot food may transmit heat to the plate.
If the oven is set to "Grill only" or "Fan only", all types of ovenware can be used.
The following table provides useful guidelines for choosing ovenware:
| PyrexG | Pysceram | Terracotta | Aluminium foil | Plastic | Paper or cardboard | Metal containers | |
| "Microwave only" function | NOYESYES | ||||||
| "Microwave + Grill", "Pizza" and "Microwave + Fan" | NONONO | ||||||
| "Grill only" + "Fan only" function | YESNONO | ||||||
| defr. bread AUTO-1 | NONONO | ||||||
| potatoes AUTO-2 | NOYESYES | ||||||
| roast AUTO-3 | NONONO | ||||||
| chicken AUTO-4 | NONONO | ||||||
| fish AUTO-5 | NONONO | ||||||
| cake AUTO-6 | YESNONO |
1.7 RULES AND TIPS FOR USING THE OVEN
Microwaves are a form of electromagnetic radiation. They occur in nature in the form of light waves (e.g., sunlight). In the oven, these waves penetrate food from all directions to heat water, fat, and sugar molecules. Heat is generated in the food itself, while the container warms up as a result of heat spreading from the food only. In microwave cooking, food does not stick to the dish. You can therefore use very little fat and in some cases no fat at all.
As microwave cooking is low fat, microwave-prepared food is considered to be very healthy. Microwave cooking also involves lower temperatures than traditional cooking. It therefore dehydrates foods less, destroys less of their nutritional value, and retains more original flavor.
Fundamental rules for correct microwave cooking
1) Cooking time depends directly on the size and evenness of the food. A casserole will cook faster than a roast because it consists of smaller regular-sized pieces. When you refer to the cooking tables later in this manual, remember that you must increase or reduce cooking time to match the volume of food you are cooking. Always respect standing time, in other words, the length of time you must leave food to "rest" after cooking. Standing time ensures that food is served at an even temperature throughout. The temperature of meat, for example, can rise between 5°C and 8°C (approx. 9°F to 15°F) during standing time. Food can be left to stand inside or outside the oven.
2) Always mix or stir food several times during cooking. This not only ensures even temperature distribution but also reduces cooking time.
3) Turn food over during cooking. This is especially important for meat, whether in large pieces (roasts, whole chickens, etc.) or small pieces (chicken breasts, casseroles, etc.).
4) Pierce foods with skins, shells, or peel (e.g., apples, potatoes, tomatoes, frankfurters, fish, etc.) with a fork at several points to allow steam to escape from inside. This prevents these foods from exploding inside the oven (see fig. 4).
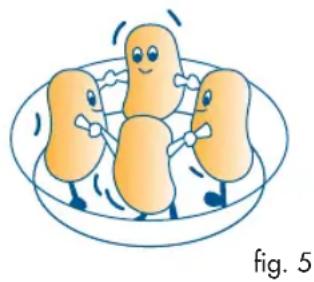
5) If you are cooking a number of portions of the same type of food (e.g., boiled potatoes), arrange the portions in a ring around the outside of an oven-proof dish to ensure they cook evenly (see fig. 5).
6) The lower the temperature at which food is placed in the oven, the longer the cooking time required. Food placed in the oven at room temperature will cook sooner than food coming directly from the refrigerator.
7) Always place dishes and containers in the middle of the turntable.
8) It is perfectly normal for condensation to form inside the oven and near the air outlet vents. To reduce this, cover the food with clear film, greaseproof paper, glass covers or simply an upturned plate. Foods with a high water content (eg. greens and vegetables) cook better when covered. Covering food also helps keep the inside of the oven clean. Use clear film suitable for microwave cooking.
9) Do not microwave cook eggs in their shells (fig. 6). Pressure will build up inside and can cause the egg to explode, even after cooking has finished. Do not heat eggs cooked in their shells. Heat scrambled eggs only.
10) Always open air-tight or sealed containers before placing them in the oven, otherwise pressure will build up inside and may cause them to swell and explode even after cooking has finished.


CHAPTER 2 - USING THE CONTROLS AND SETTING THE FUNCTIONS
2.1 SETTING THE CLOCK
- The first time the appliance is connected to the household electricity supply or after it has been without power for some time, the 'DELO' welcome message is displayed for 2-3 seconds, followed by four dashes (---). To set the time, proceed as follows:
![graph TD A["−"] --> B["+"] C["STOP"] --> D["START/SURK START"] style A fill:#f9f,stroke:#333 style B fill:#ccf,stroke:#333 style C fill:#fff,stroke:#333 style D fill:#fff,stroke:#333](/content/2026/05/1026378/images/61971cb8e295e858ead96e55b36b52a56aa005a75530d619c531dacfcfa66a09.jpg)
1 Press the TIME ADJUST buttons (6) together for at least 2 seconds. (The hour flashes).

![graph TD A["TIME ADJUST"] --> B["-"] A --> C["+"] B --> D["STOP"] C --> E["START / START"]](/content/2026/05/1026378/images/45b562a638bc03e375e04f27666934936c3cf282e6fd486f106c99ccd001c89c.jpg)
2 Press the TIME ADJUST buttons (6) to set the required hour.


3 Press the START button (8). (The minutes flash).

![graph TD A["STOP"] --> B["START / START"] C["TIME ADJUST"] --> D["+"] E["−"] --> F["Switch"] style A fill:#f9f,stroke:#333 style B fill:#ccf,stroke:#333 style C fill:#cfc,stroke:#333 style D fill:#fcc,stroke:#333 style E fill:#ffc,stroke:#333 style F fill:#cff,stroke:#333](/content/2026/05/1026378/images/8d115597f19bc0950f72769b5667f53be701f897af0ba2a947ebd2e5dfc87c81.jpg)
4 Press the TIME ADJUST buttons (6) to set the required minutes.


5 Press the START button (8). (The set time is displayed).

- If you want to change the time set subsequently, repeat the setting procedure described above.
- The current time can be displayed even after having set a function by pressing the TIME ADJUST buttons (6) together for at least 1 second. (The time will be displayed for 2 seconds). • To set longer times, hold the "+" or "-" button down (not together).
2.2 PROGRAMMING COOKING

1 Press the FUNCTION button (4) (function selection) and choose the required function. The corresponding symbols will light up at the bottom of the display. The following functions are available:

| INDICATION | SELECTED COOKING FUNCTION | INDICATION | SELECTED COOKING | FUNCTION |
| microwave only | fan only | |||
| automatic defrost | combi microwave + grill | |||
| grill only | combi microwave + fan | |||
![graph TD A["←"] --> B["TIME ADJUST"] B --> C["-"] B --> D["+"] C --> E["✓"] D --> F["STOP"] D --> G["START / START"]](/content/2026/05/1026378/images/365353992876fc023996ca264d68a735fe7a2feb266b4da95b57689d884bd35a.jpg)
2 Press the TIME ADJUST buttons (6) (not together) to set the cooking time. Always consult the tables in Chapter 3 to establish the correct cooking time.
Note: you can also change the cooking time set DURING cooking by simply pressing the TIME ADJUST buttons (6) (not together).


3 In the functions: microwave only, combined microwave + grill, pizza, combi microwave + fan
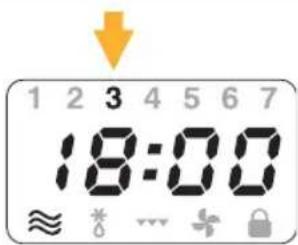
select the microwave power level by pressing the POWER LEVEL button (9) repeatedly until the required power expressed in numbers flashes at the top of the display. Always consult the tables in Chapter 3 to establish the correct microwave power.
Note: • the power level cannot be selected in automatic defrost function.
- you can also change the microwave power level during cooking simply by pressing the POWER LEVEL button (5).
chapter 2 - using the controls and setting the functions
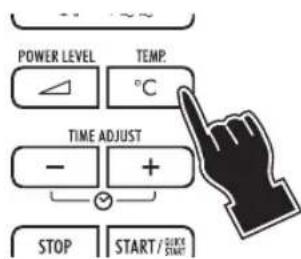
4 In the functions: fan only, combi microwave + fan

Select the required temperature by pressing the TEMP. button (9) repeatedly.
To choose the temperature, always consult the table in chapter 3.
N.B.: once the cooking time has been selected, the cooking temperature can no longer be modified (you must cancel the programme by pressing the STOP button (7) twice).

5 Press the START button (8) to begin cooking. A countdown of time to the end of cooking appears on the display.
Note: If you do not start cooking within 2 minutes, the settings will be automatically cancelled.
For combi microwave + fan only While the oven is preheating, the required temperature is displayed: Once the oven is at temperature, a countdown of the time left until the end of cooking is displayed.

6 The end of cooking is indicated by three beeps and "END" is displayed. Open the door and remove the food. When the STOP button (7) is pressed, or 3 minutes after the end of cooking, the clock is displayed.
Note: • you can open the door to check on cooking at any time.
Microwave emission and operation of the oven cease and will start again when the door is closed and the START button is pressed (8).
- If cooking must be stopped for any reason, this can be done without opening the door by pressing the STOP button (7).
• To finish cooking, proceed as follows:
- If the oven door is open, simply press the STOP button (7) once.
- if the oven door is closed and cooking is in progress, press the STOP button (7) twice.
The clock is displayed again.
- During fan only and microwave + fan cooking, you can check the temperature set previously by pressing the TEMP. button (9). After 2 seconds, the time left until the end of cooking is displayed again.
2.3 QUICK HEAT
This function is perfect for heating small quantities of food and drink.
- Press the START button (8) twice. The oven operates for 2 minutes at maximum power. This function is also useful to complete unfinished cooking.
2.4 CHILD SAFETY
The oven is fitted with a safety device to prevent children from turning it on unintentionally.
To activate the safety device:
- Hold the STOP button (7) down for 3 seconds.
- The appliance emits a short beep and the 📄 on lights up on the display. The oven cannot be turned on. • To deactivate the safety device, hold the STOP button (7) down for 3 seconds.
2.5 ENERGY SAVING FUNCTION
Each year, technological progress requires the production of ever more electricity.
The result is ever greater environmental impact due to the increase in pollutants (CO2, sulphur, etc) and exploitation of non renewable natural resources (carbon, gas, oil).
By reducing the waste of electricity (e.g. by reducing the consumption of the appliance in standby), energy saving is a considerable source of "virtual" renewable energy, immediate and accessible to all.
To reduce consumption of the oven when not in operation.
- If no button is pressed, the display will go off automatically after 10 minutes (the clock settings will be maintained). A scrolling '-' is displayed.
- To turn the display back on, press any button or open the door.
- To deactivate energy saving, hold the POWER LEVEL button (5) down for 7-8 seconds. The appliance emits a beep.
N.B.: to reduce energy consumption in stand-by, the inside light goes off automatically if the door is left open for more than 10 minutes (the function cannot be disabled).
CHAPTER 3 - USING THE OVEN: TIPS AND COOKING TIME TABLES
3.1 DEFROSTING
- Frozen foods in plastic bags, film, or oven ready containers can be placed directly in the oven. Check first that there are no metal objects like staples or ties.
- Certain types of food such as green vegetables and fish do not require defrosting completely before cooking.
- Foods in meat and other sauces defrost quicker and more evenly if they are stirred, turned and/or separated occasionally.
- Meat, fish and fruit all lose liquids during defrosting. Always place these foods in a bowl to defrost them.
- You are recommended to divide meat and place individual pieces in separate bags when freezing. This will save you valuable time during preparation.
- Always respect standing times between defrosting and cooking. Standing time is the time for which you must leave food to "rest" before cooking. Standing time ensures that food has an even temperature throughout when cooking starts.
TABLE OF DEFROSTING TIMES USING THE "AUTOMATIC DEFROST" FUNCTION
| TYPE QUANTITY | TIME minutes | NOTES/TIPS | STANDING TIME | |
| MEAT | ||||
| Roasts (pork, beef, veal, etc) | 1 kg | 29-32 | Turn over halfway through defrosting time. | 20 |
| Steaks, chops, slices | 200 gr | 10-12 | 5 | |
| Stews, goulash | 500 gr | 18-20 | 10 | |
| Mince | 250 gr | 14-16 | See note * | 15 |
| Mince | 500 gr | 11-13 | 15 | |
| Hamburger | 200 gr | 11-13 | 10 | |
| Sausages | 300 gr | 13-15 | 10 | |
| POULTRY | ||||
| Duck, turkey | 1,5 kg | 34-37 | Turn the chicken over halfway through defrosting. At the end of the standing time, rinse under hot water to remove any residual ice. | 20 |
| Whole chicken | 1,5 kg | 34-37 | 20 | |
| Chicken pieces | 700 gr | 19-21 | 10 | |
| Chicken breast | 300 gr | 18-20 | 10 | |
| VEGETABLES | ||||
| FISH | Frozen vegetables do not require defrosting before cooking. | |||
| Fillets | 300 gr | 14-16 | Turn the fish over halfway through defrosting. | 7 |
| Slices | 400 gr | 15-17 | 7 | |
| Whole | 500 gr | 18-20 | 7 | |
| Crayfish | 400 gr | 15-17 | 7 | |
| DAIRY PRODUCTS | ||||
| Butter | 250 gr | 10-12 | Remove tinfoil or metal parts. | 10 |
| Cheese | 250 gr | 11-13 | Do not fully defrost cheese. | 15 |
| Cream | 200 ml | 13-15 | Respect standing time. Remove the cream from the container and place on a plate. | 5 |
| BREAD | ||||
| 2 medium rolls | 150 gr | 2-3 | Put the bread directly on the turntable. | 3 |
| 4 medium rolls | 300 gr | 6-7 | 3 | |
| Sliced bread | 250 gr | 6-7 | 3 | |
| Wholemeal sliced bread | 250 gr | 6-7 | 3 | |
| FRUIT | ||||
| Strawberries, plums, cherries, blackcurrants, apricots. | 500 gr | 13-14 | Mix 2 - 3 times. | 10 |
| 300 gr | 9-10 | Mix 2 - 3 times. | 10 | |
| Raspberries | ||||
| Blackberries | 250 gr | 7-8 | Mix 2 - 3 times. | 6 |
*These indications are suitable for performing the minced meat defrosting test according to standard no. 60705, paragraph 13.3 (see page 2). Turn the food over halfway through the set time. Rest the food to be defrosted directly on the turntable. Refer to the table on page 2 for information on other tests according to standard 60705.
3.2 HEATING
Your microwave oven is at its most useful and efficient when heating up food.
Compared to traditional methods, microwaves save both time and electricity.
- You are recommended to heat food (particularly if frozen) to a temperature of at least 70°C (it must be piping hot!). You will not be able to eat the food at once as it will be too hot, but complete sterilisation will be guaranteed. • To heat precooked or frozen food, always observe the following rules:
- remove the food from metal containers;
- cover with clear film (for microwave use) or greaseproof paper. This will retain all the natural flavour and keep the oven clean. You can also cover with an upturned plate;
- if possible, mix or turn frequently to make the heating process quicker and more even.
- use extreme caution when following times indicated on packaging. Remember that in certain conditions, these times may have to be increased;
- Frozen food must be defrosted before heating starts. The lower the initial temperature of the food, the longer it will take to heat.
TABLE OF HEATING TIMES
| TYPE QUANTITY FUNCTION | POWER LEVEL | TIME minutes | NOTES/TIPS | ||
| SOFTENING | |||||
| • Chocolate/icing | 100 gr | ≈ | 4 | 5 - 6 | Put on a plate. Mix the icing once. |
| • Butter | 50-70 gr | " | 7 | 0',7" - 0',12" | To melt the butter, add 1 minute. |
| FOOD AT REFRIGERATOR TEMPERATURE (5/8°C) TO 20/30°C | |||||
| • Yoghurt | 125 gr | " | 7 | 0',12" - 0',17" | Remove the metal foil. |
| • Baby's bottle | 240 gr | " | " | 0',35" - 0',40" | Heat the bottle without the teat and shake after heating to ensure uniform temperature. Test the temperature of the contents before giving it to the baby! If the milk is at room temperature, shorten the time indicated slightly. If you use powdered milk, mix very well as residual powder could catch fire. Use sterilised milk only. |
| PRECOOKED FOOD AT REFRIGERATOR TEMPERATURE (initial temp. 5/8°C) to about 70°C | |||||
| • Pack of lasagne or filled pasta | 400 gr | " | 7 | 6 - 8 | Packs of commercially available precooked food to be heated to 70°C. Remove from metal packaging and place directly on the serving plate. Cover for best results. |
| • Pack of meat with rice and/or vegetables | 400 gr | " | " | 6 - 8 | |
| • Pack of fish and/or vegetables | 300 gr | " | " | 5 - 7 | |
| • Plate of meat and/or vegetables | 400 gr | " | " | 7 - 8 | Portions of precooked food to be heated to 70°C. The food should be placed directly on the serving plate. Always cover with an upturned plate or clear film. |
| • Plate of pasta, cannelloni or lasagne | 400 gr | " | " | 7 - 8 | |
| • Plate of fish and/or rice | 300 gr | " | " | 6 - 8 | |
| FROZEN FOOD TO BE HEATED/COOKED (initial temp. -18°/-20°C) to about 70°C | |||||
| • Confezione di lasagne o pasta con ripieno | 400 gr | " | 7 | 8 - 10 | Frozen precooked food to be heated to 70°C directly in the pack. If the pack is metal, place the food directly on the serving plate and increase times by a few minutes. |
| • Pack of meat with rice and/or vegetables | 400 gr | " | " | 7 - 8 | |
| • Pack of precooked fish and/or vegetables | 300 gr | " | " | 5 - 7 | |
| • Packs of uncooked fish and/or vegetables | 300 gr | " | " | 10 - 12 | Remove the uncooked food from the pack, place in a container suitable for microwave cooking and cover. |
| • Portions of meat and/or vegetables | 400 gr | " | " | 8 - 10 | Portions of frozen precooked food to be heated to 70°C. Place the frozen food on the serving plate and cover with another upturned plate or Pyrex ovenware. Make sure the centre is hot. If possible mix the food. |
| • Portions of pasta, cannelloni or lasagne | 400 gr | " | " | 9 - 11 | |
| • Portions of fish and/or rice | 300 gr | " | " | 6 - 8 | |
| BEVERAGES AT REFRIGERATOR TEMPERATURE (5/8°C) to about 70°C | |||||
| • 1 cup of water | 180 cc | " | 7 | 1'.30" - 2 | All drinks must be mixed at the end of heating to ensure a uniform temperature. |
| • 1 cup of milk | 150 cc | " | " | 1 - 1'.30" | |
| • 1 cup of coffee | 100 cc | " | " | 1 - 1'.30" | Broth should be covered with an upturned plate. |
| • 1 plate of broth | 300 cc | " | " | 3 - 4 | |
| BEVERAGES AT ROOM TEMPERATURE (20°/30°C) to about 70°C | |||||
| • 1 cup of water | 180 cc | " | 5 | 1 - 1'.30" | All drinks must be mixed at the end of heating to ensure a uniform temperature. |
| • 1 cup of milk | 150 cc | " | " | 0'.30" - 1 | |
| • 1 cup of coffee | 100 cc | " | " | 0'.30" - 1 | Broth should be covered with an upturned plate. |
| • 1 plate of broth | 300 cc | " | " | 2 - 3 | |
3.3 - COOKING HORS D'OEUVRES AND FIRST COURSES
Soups in general can be made with less water because very little water is lost through evaporation in microwave ovens. Add salt at the end of cooking or during standing time because salt has a dehydrating effect.
Note that the time required to cook rice (or pasta) in a microwave oven is more or less the same as required to cook it traditionally on the stove. The advantage of preparing a risotto in a microwave lies in the fact that it does not require continual stirring (two to three times is enough).
| TYPE QUANTITY FUNCTION | POWER LEVEL | TIME minutes | NOTES/TIPS | ||
| •Lasagne | 1100 gr | 7 | 25-30 | Times for raw pasta. For precooked pasta, cook for 8 minutes using the combi MICRO + GRILL function | |
| •Gnocchi (potato dumplings) | 600 gr | 7 | 25-30 | Do not pile dumplings too high. | |
| •Macaroni cheese | 1500 gr | 7 | 20-25 | Boil the pasta separately first. | |
| •Risotto | 300 gr. rice | 7 | 12-15 | Place all the ingredients in a dish for microwave use (for 300g of rice, you need 750g of broth), cover with clear film and cook at maximum microwave power for 12 - 15 minutes. |
3.4 - COOKING MEAT
Cooking time depends directly on the size and homogeneity of the food. Kebabs cook quicker than a joint because the pieces are smaller and of the same size. To keep roasts, chicken and kebabs tender, add 1/2 cup of water when you start cooking.
| TYPE QUANTITY FUNCTION | POWER LEVEL | TIME minutes | NOTES/TIPS | ||
| •Roast meat (pork, beef) | 1000 gr |  | 3 | 55-60 | Leave a little fat to avoid excessive drying.Do not over flavour, turn after 30-35 minutes. |
| •Meat loaf | 800 gr |  | 4 | 30-35 | Mix 500 g of minced beef with egg, ham,breadcrumbs, etc. Add a little oil and whitewine. Turn over halfway through cooking. |
| •Meat loaf | 900 gr | [44WK] | 5 | 20-22 | Vedi nota * |
| •Whole chicken | 1200 gr |  | 5 | 65-70 | Pierce the skin to allow the fat to drain. See note **. Turn over halfway through cooking. |
| •Chicken pieces | 700 gr |  | 5 | 45-50 | Stir once during cooking. |
| •Kebabs | 600 gr | [7423] | 4 | 30-35 | Turn over halfway through cooking. |
| •Goulash | 1500 gr |  | 7 | 40-42 | Do not cover. Stir 2-3 times. |
| •Chicken breasts | 500 gr | [24C3] | 5 | 10-12 | Turn over halfway through cooking. |
| •Veal or pork chops | 2 pieces | [TC40] | - | 22-27 | Use the wire rack. Preheat the oven for 3minutes. Turn over halfway through cooking asthe grill radiates the heat through the top partof the oven only. |
| •Sausages | 2 pieces |  | - | 28-32 | |
| •Hamburgers | 2 pieces | [62GX] | - | 28-32 |
* These indications are suitable for performing the minced meat cooking test according to standard no. 60705, paragraph 12.3.3. Cover the container with clear film for microwave use. Refer to the table on page 2 for information on other tests according to standard 60705. **These indications are suitable for performing the cooking tests according to standard no. 60705, paragraph 12.3.6.
3.5 - COOKING SIDE DISHES AND VEGETABLES
Compared to traditional cooking methods, vegetables retain more of their natural colour and nutritional goodness when cooked in a microwave oven. Before cooking, wash and clean the vegetables.
Cut larger vegetables into evenly sized pieces. Add 5 dessertspoons of water for every 500 g of vegetables (fibrous vegetables need more water). Vegetables cooked using the MICROWAVE ONLY function must always be covered with clear film. Mix at least once halfway through cooking and add a little salt at the end only.
Important: The cooking times in the table are purely indicative and depend on weight, the temperature of the food before cooking and the size and texture of the vegetables.
| TYPE QUANTITY FUNCTION | POWER LEVEL | TIME minutes | NOTES/TIPS | ||
| •Asparagus | 500 gr | ≈ | 7 | 9-11 | Cut into 2 cm pieces |
| •Artichokes | 300 gr | ≈ | 7 | 10-12 | Use of artichoke bottoms is preferable. |
| •Green beans | 500 gr | ≈ | 7 | 11-13 | Cut into pieces |
| •Broccoli | 500 gr | ≈ | 7 | 7-9 | Divide into individual florets |
| •Brussels sprouts | 500 gr | ≈ | 7 | 7-9 | Leave whole |
| •White/green cabbage | 500 gr | ≈ | 7 | 7-9 | Leave whole |
| •Red cabbage | 500 gr | ≈ | 7 | 7-9 | Leave whole |
| •Carrots | 500 gr | ≈ | 7 | 9-11 | Cut into equal sized pieces |
| •Cauliflower | 500 gr | ≈ | 7 | 11-13 | Divide into florets |
| •Cauliflower cheese | 1000 gr | ≈ | 7 | 25-30 | Times for raw cauliflower. If precooked, 12 minutes of combi with grill are enough |
| •Sedano | 500 gr | ≈ | 7 | 7-9 | Divide into pieces |
| •Aubergines | 800 gr | ≈ | 7 | 6-8 | Dice |
| •Grilled aubergines | 2 slices | ... | - | 12-15 | Use the wire rack. Turn over halfway through cooking. |
| •Baked aubergines with parmesan cheese | 1300 gr | ≈ | 7 | 9-11 | The aubergines can be fried or grilled first. |
| •Leeks | 500 gr | ≈ | 7 | 6-8 | Leave whole |
| •Champignon mushrooms | 500 gr | ≈ | 7 | 6-8 | Leave whole. No water required. |
| •Onions | 250 gr | ≈ | 7 | 5-7 | Whole of a similar size. No water required. |
| •Spinach | 300 gr | ≈ | 7 | 6-8 | Cover after washing and draining |
| •Peas | 500 gr | ≈ | 7 | 10-12 | |
| •Fennel | 500 gr | ≈ | 7 | 12-14 | Cut into quarters |
| •Gratin tomatoes | 800 gr | ≈ | 2 | 20-25 | Ideally the same size |
| •Peppers | 500 gr | ≈ | 5 | 9-11 | Cut into pieces |
| •Grilled peppers | 2 quarters | ... | - | 12-15 | Use the wire rack. Turn over halfway through cooking |
| •Stuffed peppers | 1400 gr | ≈ | 5 | 25-30 | Preferably the short squat kind |
| •Potatoes | 500 gr | ≈ | 5 | 8-10 | Cut into equal sized pieces |
| •Roast potatoes (fresh) | 500 gr | ≈ | 2 | 25-30 | Mix 1-2 times. |
| •Roast potatoes (frozen) | 600 gr | ≈ | 2 | 30 | Mix 1-2 times. |
| •Gratin potatoes | 1100 gr (totals) | ≈ | 4 | 30-35 | See note * |
| •Courgettes | 500 gr | ≈ | 5 | 7-9 | Leave whole |
* These indications are suitable for performing the cooking tests according to standard no. 60705, paragraph 12.3.4. Refer to the table on page 2 for information on other tests according to standard 60705.
3.6 - COOKING FISH
Fish cooks fast and with excellent results. It can be flavoured with a little butter or oil (or not at all).
Cover with clear film. Cut skin before cooking. Arrange fillets evenly. Do not cook fish breaded with egg.
| TYPE QUANTITY FUNCTION | POWER LEVEL | TIME minutes | NOTES/TIPS | ||
| •Fillets | 300 gr | ≈ | 4 | 7-9 | Cover with film |
| •Slices | 300 gr | ≈ | 4 | 9-11 | Cover with film |
| •Whole | 500 gr | ≈ | 4 | 10-12 | Cover with film |
| •Whole | 250 gr | ≈ | 4 | 7-9 | Cover with film |
| •Slices | 400 gr | ≈ | 4 | 9-11 | Cover with film |
| •Crayfish | 500 gr | ≈ | 4 | 9-11 | Cover with film |
| •Baked fish | 600 gr | ≈ | 2 | 35-40 | Add oil, a clove of garlic, a little white wine and water. Do not cover. |
3.7 - COOKING CAKES, PASTRIES AND FRUIT
At low power, cakes rise much more than with traditional cooking. As they do not form a crust, the surface should preferably be garnished with cream or icing (chocolate for example). Keep covered after cooking as they tend to become dry faster than those cooked in a traditional oven. If cooked with the peel, fruit should be pierced and kept covered. It is important to observe the standing time (3 - 5 minutes).
| TYPE QUANTITY FUNCTION | POWER LEVEL | TIME minutes | TEMPERATUR | NOTES/TIPS | ||
| Walnut cake | 700 gr |  | - | 35-40 | 180 | It can be accompanied by any type of cream |
| Sacher cake | 850 gr |  | - | 35-40 | 180 | Fill with jam |
| Pineapple cake | 800 gr |  | - | 35-40 | 180 | The pineapple slices can be spread on the bottom of the cake tin or cut into pieces and worked into the dough |
| Apple cake | 1000 gr |  | - | 35-40 | 180 | The apples should be used to decorate the surface |
| Coffee cake | 750 gr |  | - | 35-40 | 180 | Excellent filled with cream |
| Zabaglione | 300 gr | [KBBT] | 5 | 1'-1'.30" | - | Whisk every 30 minutes |
| Cooked pears | 300 gr |  | 7 | 2-3 | - | Cut the pears into quarters |
| Cooked apples | 300 gr |  | 7 | 3-4 | - | Cut the apples into slices |
| Egg custard | 750 gr |  | 7 | 12-14 | - | These indications are suitable for performing the cooking tests according to standard no. 60705, paragraph 12.3.1. |
| Sponge cake | 475 gr |  | 7 | 4-6 | - | These indications are suitable for performing the cooking tests according to standard no. 60705, paragraph 12.3.2. Refer to the table on page 2 for information on other tests according to standard 60705. |
3.8 - COOKING USING THE STEAM FUNCTION (NOT ALL MODELS)
This function can be used to:
- steam cook all types of food such as vegetables, fish, eggs, etc.
Turn the oven on in steam mode.
1. Remove the glass turntable (G) and turntable support (H) from inside the oven.
2. Pour 200/400 cc of water into the plastic container, then rest it on the metal base of the steam accessory.


3. Put the food inside the steam accessory, resting it on the metal base or plastic divider if you are cooking two dishes at the same time. Close the accessory with the metal lid, making sure it rests correctly on the plastic edge of the container.

![graph TD A["Sensor Technology"] --> B["STEAM"] B --> C["AUTO MENU"] C --> D["FUNCTION"]](/content/2026/05/1026378/images/58e156b5e740fec2805b9d5570cca753b1b95221d9288a33d9e5c48b58929a0d.jpg)
4. Press the STEAM button (2). The LED alongside the button comes on.
![graph TD A["−"] --> B["+"] C["STOP"] --> D["START/START"] E["✓"] --> B F["Hand icon"] --> B](/content/2026/05/1026378/images/a25241a9061fe40b345d45dbe07207154cc244e2f57e5845832d0a6037fa6a3c.jpg)
5. Press the TIME ADJUST buttons (6) (not together) to set the cooking time. Always consult the tables in Chapter 3 to establish the correct cooking time. Note: you can change the cooking time set even DURING cooking by simply pressing the TIME ADJUST buttons (6) (not together).
Chapter 3 - Using the Oven: Tips and Cooking Time Tables
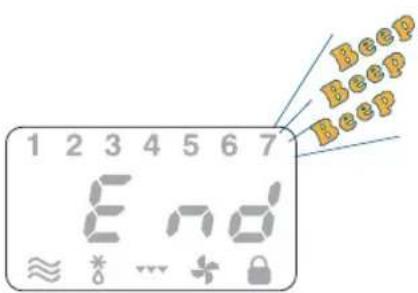
6. The end of cooking is indicated by three beeps and "END" is displayed.
Open the door and remove the food. When the STOP button (7) is pressed or 3 minutes after the end of cooking, the clock is displayed.
Important: during cooking, very hot steam is produced inside the accessory.
When lifting the lid, take care to avoid burns caused by puffs of steam.
Hold the accessory by the plastic base only and lift the lid by the top handle, avoiding contact with metal parts of the accessory.
COOKING WITH STEAM
This accessory can be used to cook food with the moist heat of boiling water, without direct contact between the food and the water which would lead to a loss of nutrient salts.
The STEAM accessory has a metal lid which blocks passage of the microwaves. The microwaves heat the water in the plastic part only, the water generates steam and this cooks the food.
Use 200 cc of water for cooking times of less than 12 minutes and 400 cc for longer periods.
Never use the accessory with less than 200 cc of water in the container (empty) to avoid damage or electrical discharges within the steam accessory.
If the water evaporates completely before the end of cooking, add a further 200 cc of water to the container.
The times indicated in the table are an average and must be adjusted to take account of these simple fundamental rules.
• cooking times depend on the size of the food. Vegetables cut in pieces will cook faster than whole vegetables. - food brought to room temperature cooks more rapidly than food taken directly from the refrigerator. - the outcome of the cooking always depends on the quality and freshness of the product. - do not use the accessory if visibly damaged, broken or warped.
Do not cook without using the lid and metal base.
COOKING TIMES
| TYPE QUANTITY COOKING TIME | ||
| Whole courgettesCourgettes in piecesCauliflowerPotatoes in piecesWhole potatoesSlice of salmonSalmon troutChicken breasts | 400 gr400 gr450 gr500 gr500 gr350 gr400 gr300 gr | 15 minutes12 minutes23 minutes20 minutes25 minutes13 minutes13 minutes13 minutes |
chapter 3 - using the oven: tips and cooking time tables
The metal base has a rubber gasket around the edge

The gasket can be easily removed to clean the accessory. After cleaning, it must obligatorily be replaced in the original position.
NEVER USE THE ACCESSORY WITHOUT THE RUBBER GASKET CORRECTLY INSERTED AROUND THE EDGE OF THE METAL BASE (its absence could damage the accessory or result in the production of sparks during use).
3.9 PROGRAMMING AUTOMATIC COOKING CYCLES

1 Press the AUTO MENU button (3) and choose the required function. The corresponding message is displayed. The following functions are available:
A1: bread defrost
A2: potatoes
A3: roast
A4: chicken
A5: fish
A6: cake


Chapter 3 - Using the oven: tips and cooking time tables

2 Confirm the automatic function by pressing the START button (8).

3 Set the required quantity of food to be cooked by pressing the AUTO MENU button (3) (certain functions only).

4 Press the START button (8) to begin cooking. A countdown of time to the end of cooking appears on the display.

Note: If you do not start cooking within 2 minutes, the settings will be automatically cancelled.
In function A6 (cake), when the START button (8) is pressed, the oven preheats with hot air for 5 minutes (without food).

![graph TD A["0"] --> B["STEAM"] B --> C["0"] D["AUTO MENU"] --> E["FUNCTION"]](/content/2026/05/1026378/images/ef72d6d818fc012ae126384d0d008a72b903165a23fd13183feb1e8bf38b76fe.jpg)
At the end of preheating, place the cake in the oven.
When the START button (8) is pressed (or automatically after 1 minute), the oven starts up in the required function and a countdown of the time left until the end of cooking is displayed.
Chapter 3 - Using the oven: tips and cooking time tables

The end of cooking is indicated by three beeps and "END" is displayed.
Open the door and remove the food. When the door is opened, a further cooking time is displayed in case the food is undercooked.
To begin the extra cooking, press the START button (8).
When the STOP button (7) is pressed or 3 minutes after the end of cooking, the clock is displayed.
Note: • You can open the door to check on cooking at any time.
Microwave emission and operation of the oven cease and will start again when the door is closed and the START button is pressed (8).
- If cooking must be stopped for any reason, this can be done without opening the door by pressing the STOP button (7).
• To finish cooking, proceed as follows:
- If the oven door is open, simply press the STOP button (7) once.
- If the oven door is closed and cooking is in progress, press the STOP button (7) twice.
The clock is displayed again.
This function simplifies certain types of cooking/heating. Just select the appropriate category and weight of food to be cooked.
The categories are divided as follows:
A1. Bread defrost: ideal to make defrosted bread hot and fragrant. Place the bread on the low wire rack directly on the turntable, select the weight and press the START button (8).
A2. Potatoes: ideal to cook traditional jacket potatoes.
Wash the potatoes well, pierce them with a fork and place them directly on the turntable. Select the weight and press the START button. Serve filled with butter or cheese.
A.3 Roast: ideal for cooking meat traditionally.
Place the meat in a Pyrex dish on the low wire rack (add a little water to keep it moist), select the weight and press the START button (8). Turn the meat halfway through the cooking time.
A.4 Chicken: ideal for cooking chicken whole or in pieces.
Place the chicken in a Pyrex dish on the low wire rack directly on the turntable, select the weight and press the START button (8). Turn the chicken over halfway through the cooking time.
A.5 Fish: ideal for cooking fish traditionally.
Place the fish in a Pyrex dish, add a glass of water and place on the low wire rack. Press the START button (8). The preset time corresponds to a fish of about 500 g.
A.6 Cake: ideal for cooking cakes automatically.
Preheat the oven without food for 5 minutes. Place the cake tin on the low wire rack and press the START button.
CHAPTER 4 - CLEANING AND MAINTENANCE
4.1 CLEANING
Before cleaning or maintenance, always unplug the appliance from the mains and wait until cold.
To keep your appliance in the best possible condition, clean the door and inside and outside of the oven with a damp cloth and neutral soap or washing up liquid.
Always keep the microwave outlet cover (C) free from grease or splashes of fat. Note: your oven is painted. Do not use abrasives, steel wool or sharp metal utensils. When cleaning the outside of the oven, do not allow water or liquid detergent to penetrate the air and steam outlet vents on the top of the appliance. You should not use alcohol, abrasive detergents, or ammonia based detergents to clean the surface of the door.
To ensure perfect closure, always keep the inside of the door clean. Do not allow dirt or remains of food to accumulate between the front panel of the oven and the door.
Do not use steam cleaners to clean the inside of the oven.
Clean the air intake vents at the back of the oven regularly to keep them free of dust and dirt.
From time to time, remove the turntable (G) and support (H) for cleaning. Also clean the bottom of the oven.
Wash the turntable and support with water and neutral soap (they can be washed in a dishwasher).
Never plunge the hot turntable into cold water. The sudden change in temperature could cause it to crack.
The turntable motor is sealed.
However, when cleaning the bottom of the oven, take care to avoid water from entering under the Turntable support (H).

Important information for correct disposal of the product in accordance with EC Directive 2002/96/EC.
At the end of its working life, the product must not be disposed of as urban waste.
It must be taken to a special local authority differentiated waste collection centre or to a dealer providing this service.
Disposing of a household appliance separately avoids possible negative consequences for the environment and health deriving from inappropriate disposal and enables the constituent materials to be recovered to obtain significant savings in energy and resources. As a reminder of the
Household appliances must be disposed of separately. The product is marked with a crossed-out wheeled dustbin symbol.

4.2 MAINTENANCE
In case of malfunction or defective operation, contact a technical service center authorized by the manufacturer. However, before contacting us, it is worth performing the following simple checks.
| PROBLEM | CAUSE/SOLUTION |
| The oven does not work. | Reset the electronic control by unplugging the appliance from the mains for at least 1-2 minutes.The energy saving function may have been activated (display off). Press any button.The door is not correctly closedThe plug is not correctly inserted in the socketNo current from socket (check the household fuse).The child safety device has been activated ( symbol displayed). |
| Condensation on the support surface, inside the oven or around the door | When cooking food containing water, it is completely normal for steam generated inside the oven to be given off and condense inside the oven, on the cooking surface or around the door. |
| Sparks inside the oven | Never turn the oven on without food when using microwave or combi functions.When using the above functions, do not use metal containers or bags or packs with metal staples. |
| The food does not heat or cook properly | Select the correct function or increase cooking time.The food was not completely defrosted before cooking. |
| The food burns | Select the correct function or reduce cooking time. |
| The food does not cook evenly | Stir food during cooking.Remember that food cooks better if cooked into evenly sized pieces.The turntable is blocked. |
| 'FRIL' is displayed. | The temperature in the oven cannot be regulated.Contact customer services. |
NOTE: If the oven light burns out, you can continue using the appliance without issue. To replace the bulb, contact an authorized service center.


- CHAPTER 2 - USING THE CONTROLS AND SETTING THE FUNCTIONS
- CHAPTER 3 - USING THE OVEN: TIPS AND COOKING TIME TABLES
- CHAPTER 4 - MAINTENANCE AND CLEANING
- CHAPTER 1 - GENERAL
- DESCRIPTION OF OVEN AND CONTROL PANEL
- IMPORTANT SAFETY WARNINGS
- FLAMES
- TECHNICAL DATA
- POWER OUTPUT
- INSTALLATION AND ELECTRICAL CONNECTION
- STANDARD ACCESSORIES
- HIGH WIRE RACK
- TURNTABLE
- STEAM ACCESSORIES (NOT ALL MODELS)
- LOW WIRE RACK
- COMBI FUNCTION
- OVENWARE
- RULES AND TIPS FOR USING THE OVEN
- FUNDAMENTAL RULES FOR CORRECT MICROWAVE COOKING
- SETTING THE CLOCK
- PROGRAMMING COOKING
- QUICK HEAT
- CHILD SAFETY
- ENERGY SAVING FUNCTION
- DEFROSTING
- HEATING
- COOKING HORS D'OEUVRES AND FIRST COURSES
- COOKING MEAT
- COOKING SIDE DISHES AND VEGETABLES
- COOKING FISH
- COOKING CAKES, PASTRIES AND FRUIT
- COOKING USING THE STEAM FUNCTION (NOT ALL MODELS)
- THIS FUNCTION CAN BE USED TO
- TURN THE OVEN ON IN STEAM MODE
- COOKING WITH STEAM
- PROGRAMMING AUTOMATIC COOKING CYCLES
- CHAPTER 4 - CLEANING AND MAINTENANCE
- CLEANING
- MAINTENANCE
Brand : DELONGHI
Model : MW 965 FV
Category : Microwave