
SAT>IP Receiver - Digital decoder MEGASAT - Free user manual and instructions
Find the device manual for free SAT>IP Receiver MEGASAT in PDF.


| Product Type | Digital SAT>IP Receiver / Decoder |
| Brand | Megasat |
| Model | SAT>IP Receiver (ZIP 51005I) |
| Operating System | Android 2.2 Froyo |
| Processor | Skyvia Sy8860, ARM926EJ-S 600 MHz |
| RAM | 256 MB DDR2 SDRAM |
| Flash Memory | 256 MB NAND Flash |
| Video Output | Up to 1080p HD |
| Video Output Interfaces | HDMI 1.3, Composite Video/Audio (RCA) |
| Audio Output | HDMI, Optical S/PDIF, Composite Audio |
| Network Connectivity | 10/100 Mbps Ethernet, Wi-Fi via USB dongle (optional) |
| USB Ports | 2x USB 2.0 (5V, 500mA) |
| Card Reader | SD/SDHC/MMC/MS/MS-Pro |
| IR Remote Control | Built-in IR receiver + IR extender port |
| Power Supply | DC 12V, 1.5A (external adapter 175-250V AC, 50/60Hz) |
| Power Consumption | On: 3.3W, Standby: <0.5W |
| Dimensions (L x W x H) | 130 x 100 x 32 mm |
| Supported File Systems | FAT16/FAT32/NTFS |
| Multimedia Playback | Video, Music, Photo (various formats) |
| Internet Applications | YouTube, Picasa, DLNA DMR (Sky DMR) |
| Channel Scanning | Auto and Manual scan via SAT>IP server |
| Electronic Program Guide (EPG) | Yes |
| Package Contents | Receiver, Power Adapter, HDMI Cable, Remote Control (2x AAA batteries), Composite AV Cable, IR Extender, Ethernet Cable, User Manual |
Frequently Asked Questions - SAT>IP Receiver MEGASAT
User questions about SAT>IP Receiver MEGASAT
0 question about this device. Answer the ones you know or ask your own.
Ask a new question about this device
Download the instructions for your Digital decoder in PDF format for free! Find your manual SAT>IP Receiver - MEGASAT and take your electronic device back in hand. On this page are published all the documents necessary for the use of your device. SAT>IP Receiver by MEGASAT.
USER MANUAL SAT>IP Receiver MEGASAT
Megasat SAT > IP Receiver, playing TV programs from SAT > IP Server. The video resolution of playback DTV reaches up to 1080p HD video with fluent control, and the embedded Android OS make it easy to use. The Multimedia playback function and built-in Internet media application provides more additional experience and fun to bring Medias to life.
Verpackungsinhalt
OK Taste: pop up the program list, use Up/down key to select a program, and press OK.
Einstellungen
natural_image
Black MEGASAT satellite device with visible ports and label (no readable text beyond branding)Stand: v1.0 Juli 2013

USER MANUAL
Safty Instructions....03
Introduction....03
Package contents 03
Installation 04
Front panel 04
Rear panel 05
Left panel 05
Remote control 06
First time setup 07
Watch TV programm 08
Home Menu....09
SAT>IP TV 10
Channel Organizer....11
Programmguide 12
Channel search 12
Auto scan....13
Manual scan....13
Multimedia 14
Video player 14
Music player....14
Photo playback....15
Application 16
Firmware upgrade 16
Picasa 16
Sky DMR 17
YouTube 17
Settings....18
Specifications 20
Informations 21
Safty InstructionsC
This S18 has been designed and manufactured to satisfy the international safety standards. Please read the following safety precautions carefully before operating this receiver.
Main Supply:
Before operating, please check the units operating voltage is 175\~250V AC 50/60Hz.
Overload:
Do not overload a wall outlet, extension cord or adapter, neither use damaged power cord or touch it with wet /and as this may result in electric shock.
Liquid:
The receiver shall not be exposed to dripping or splashing water, and that no objects filled with liquids, such as base, shall be placed on the apparatus.
Ventilation:
Keep the slots on top of the receiver uncover to allow sufficient airflow to the unit. Do not put the receiver on soil, furnishings or carpets. Do not expose the receiver to direct light or do not place it near a heater or in humid conditions. Do not stack other electronic equipments on top of the receiver.
Risk of suffocation:
Do not let children play with films or other packaging components, there is a risk of suffocation.
Cleaning:
Plug out the receiver from the wall outlet before cleaning. Clean the receiver by a soft cloth or mild solution of washing-up liquid (no solvents).
Connection:
Disconnect the receiver from the mains when you connect it to satellite LN3 or disconnect it from LNB. Failure would possibly cause damage to the LNB.
Location:
Put the receiver indoor in order to avoid lightening, raining or sunlight.
Uncover:
Do not remove the cover, to reduce the risk of electric shock. Contact qualified and licensed service personnel to repair the receiver, or contact your dealer.
Introduction
Megasat SAT > IP Receiver, playing TV programs from SAT > IP Server. The video resolution of playback DTV reaches up to 1080p HD video with fluent control, and the embedded Android OS make it easy to use. The Multimedia playback function and built-in Internet media application provides more additional experience and fun to bring Medias to life.
Package contents
Please check the player and accessories in the package:
- 1x Megasat SAT > IP Receiver 6. 1x IR extender cable
- 1x Power adapter
- 1x HDMI cable
- 1x Remote control unit 8. 1x Ethernet cable
- 2x AAA batteries 9. 1x User manual
- 1x Composite video/audio jack cable
Megasat Werke GmbH | Industriestraße 4a | D-97618 Niederlauer | www.megasat.tv | info@megasat.tv
Installation
Place this player in the flat surface without obstacle to IR sensor in the front panel. Do not expose it to rain, fog or dusty area. Do not place heavy items over the power cable, HDMI cable or AV cable. Do not use wet hand or metal to touch the player. Do not use the other power adapter which is not from the product package.
This device is a SAT>IP player which must work with SAT>IP server. Please install this device in the same local area network with your SAT>IP server.
Front panel
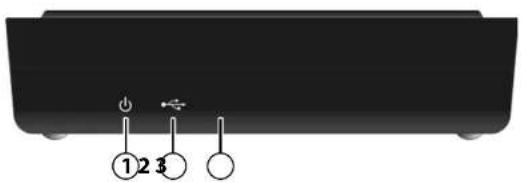
- Power lamp: it lights blue when power on, and lights red in standby mode.
- USB lamp: it blinks green when USB device is reading.
- IR sensor: the IR sensor is inside the front panel. Make sure that there are no obstacles between remote controller and the front panel.
Rear panel
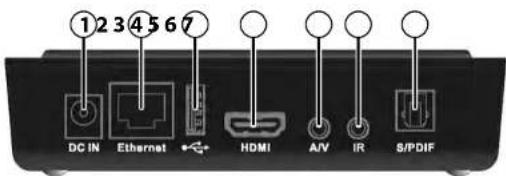
1.DC IN: it connects the DC input of the Power Adapter.
2. Ethernet: connect Ethernet cable for the network function. This device and the SAT>IP server must be in the same Local Area Network and same network domain, so this device can watch SAT>IP programs from server. Several functions on this player require Internet connection, therefore it is recommended that the network environment passing through the Internet.
3. USB port: insert USB Storage to USB port to browse and playback.
4. HDMI port: this port is to connect with HDMI A/V receiver or HDMI TV set.
5.A/V port: this port is for the Composite video input (yellow) and audio (white & red) of TV set. If the HDMI is unplugged, this port will output audio/video immediately.
6. IR port: this port is for the IR extender cable. When the bundled IR extender is plugged, it is enabled and the internal IR receiver is disabled.
7. S/PDIF: this is the optical digital output for audio.
Left panel
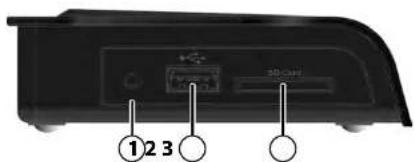
- Reserved button: this button is reserved.
- USB port: Insert USB Storage to USB port to browse and playback.
- SD Card socket: Insert the SD card to card reader to browse and playback.
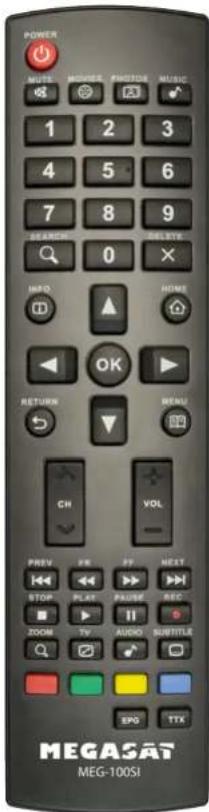
Remote control
-
POWER: Power on/Suspend
-
MUTE: mute
-
MOVIES: Hotkey to view the movie file
-
PHOTOS: Hotkey to view the photo file
-
MUSIC: Hotkey to view the music file
-
NUMBER KEY: number 0, 1 to 9
-
SEARCH: open the search function
-
DELETE: delete
-
INFO: select the media source
-
HOME: return to home menu
-
◇: direction key UP, LEFT, RIGHT, DOWN
-
OK: confirm the option or enter the folder
-
CH : select next/previous TV channel
-
VOL +/-: increase/decrease volume
-
PREV: Previous file/section
-
FR: Fast Reverse
-
FF: Fast Forward
-
NEXT: Next file/section
-
STOP: Stop
-
PLAY: Playback
-
PAUSE: Pause the current playback
-
REC: no funktion
-
ZOOM: Zoom In/out
-
TV: go to TV program immediately
-
AUDIO: open the audio
-
SUBTITLE: open the subtitle menu
-
RED/Green/Yellow/Blue: hot key
-
EPG: open the EPG menu
-
TTX: open Teletext screen
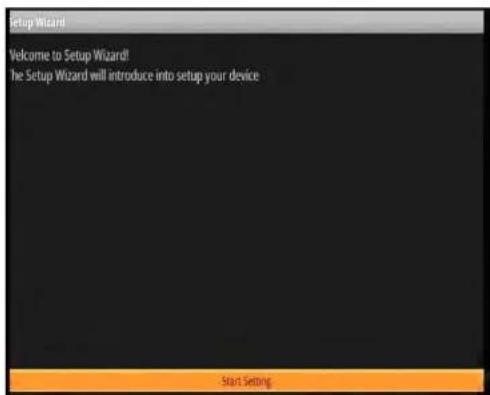
When the device is powered on in the first time, or after firmware upgrade, or after a factory default setting, the device will go to setup wizard. Select "Start Setting" to begin. After this wizard, the device is ready to work with the SAT>IP server!
- Menu language: select the menu language.
• Network controls settings: choose Wi-Fi or Ethernet connection for this device.
• Wi-Fi: if USB WLAN dongle is inserted, enable this option.
- Wi-Fi settings: connect the WLAN to your wireless access point. Please refer to the last chapter to setup explanation.
- Ethernet: enable this option for Ethernet connection.
- Ethernet Configuration: generally, you select "Dhcp" to connect. For more explanation, check the last chapter of this manual.
- Display settings
• Over scan adjust: press left/right key to adjust the visible area to fit the TV screen. Press OK to confirm.
- Aspect ratio: select this value according to your TV screen. For 4:3, select "Pan Scan 4:3" or "Letter Box 4:3". For 16:9, select "Wide Screen 16:9" or "Original".
- Scan: Select "Auto Scan" or "Manual Scan" to begin the channel search. Before channel search, make sure the device is in the same network domain as the SAT>IP server, and SAT>IP server is turned on. Generally, you select "Auto Scan" to continue.
Watch TV program
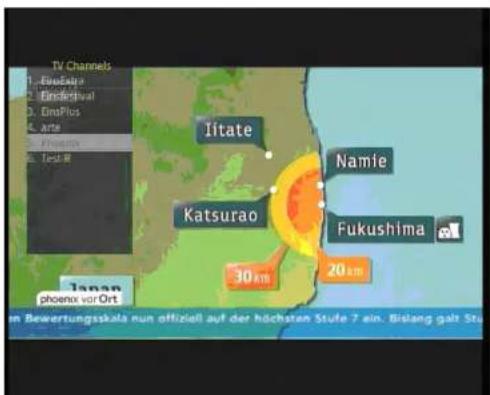
When the Channel scan is completed, the device will go to TV program. After that, the device will go to TV program when it's power on, or you pressing "TV" key on the remote control.
When you watching TV program, press the keys on the remote control:
OK key: pop up the program list, use Up/down key to select a program, and press OK.
Red key/Audio key: pop up the audio list to select an available audio in the program.
Blue key/Subtitle key: pop up the audio list to select an available subtitle in the program.
REC key: press it to start recording current program. Press "Stop" key to stop the recording. In the recording, the TV program can't be changed.
INFO: pop up the program information, press twice to show the current program guide.
EPG: go to "Program Guide" page.
TTX: open the Teletext in the current program, use direction keys to navigate, "RETURN" key to exit.
CH</> : change the TV program.
VOL +/- : adjust the volume.
Home menu
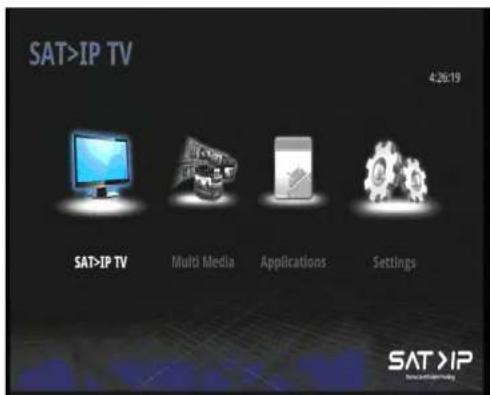
When the device is booted up, the home menu will be displayed. Select the item to enter:
SAT>IP TV: watch the TV streams from SAT>IP TV server.
Multimedia: play video/music/movie on the plugged SD card or USB Flash disk.
Applications: open the applications and upgrade firmware.
Settings: setup the detail settings for the device.
SAT > IPTV
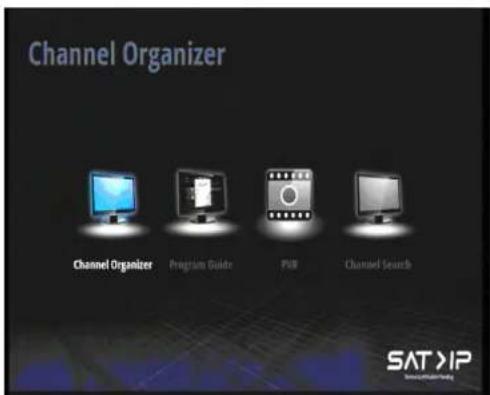
In the SAT>IP TV page, select the option for its function:
Channel Organizer: watch the DTV and edit the TV channel list
Program Guide: open the DTV program guide
PVR: no functions
Channel Search: scan the DTV channel from SAT>IP server
Channel Organizer
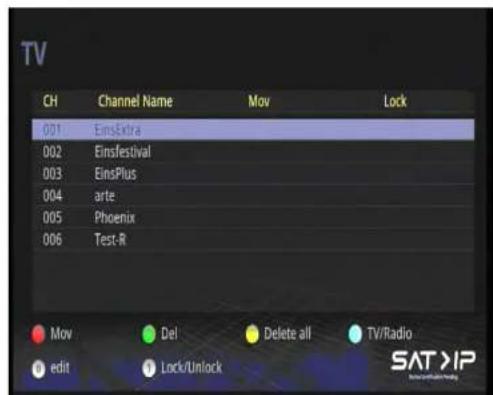
In the menu, press the direction key to highlight the channel in the channel list and press the hotkey to operate.
Red key: Move the highlighted channel
Green key: Delete the highlighted channel
Yellow key: Delete all channels
Blue key: Switch to TV or Radio
0: Edit the channel name
1: Lock the channel, the password "0000" is required to lock the channel.
Programguide
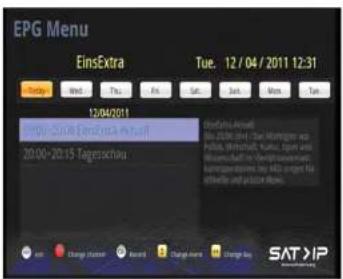
Watch the Electronic Program Guide (EPG). The schedule recording can be set on the EPG list.
Return: press "Return" to exit this page
Red key: open the channel list to select another channel.
Up/Down key: press up/down key to change the event for a single day
Left/Right key: press left/right key to change to another week day
Channel search
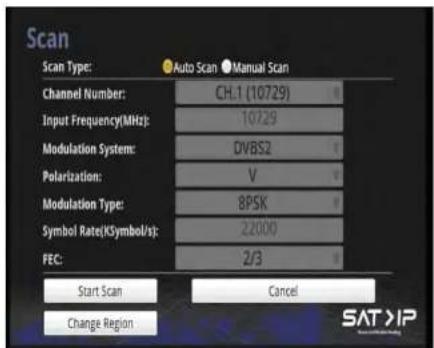
Select "Auto Scan" or "Manual Scan" to begin the channel search. Before channel search, make sure the device is in the same network domain as the SAT>IP server, and SAT>IP server is turned on.
Auto scan
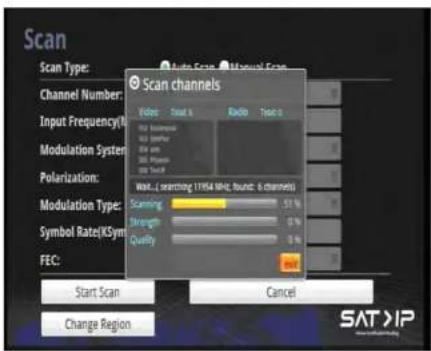
Select "Start Scan" to scan the DTV channel. Wait for the scanning complete. If you want to change a different region, select "Change Region" to select it on the list.
Manual scan
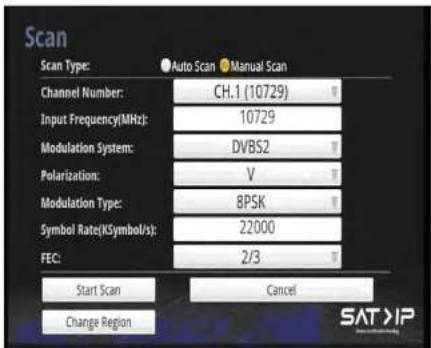
Select "Manual Scan", and setup the parameters to scan. Select "Start Scan" to scan the channel. You may need to contact the operator for the parameters.
Multimedia
The media files in the SD card or USB Flash Disk can be playback on this device. Insert the SD card or USB Flash Disk to the device, and select Video Player, Music Player or Photo Player to play the media files.
Video Player
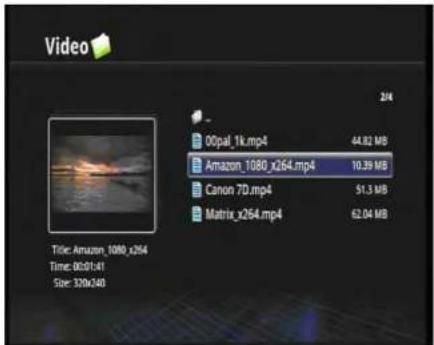
Select the storage in the list to browse. Press the up/down key to select the file. Press Ok to play the highlighted file. When play the video file, you can control the playback like fast forward, fast reverse, pause and etc. Please refer to the remote control page.
Music Player
Select the storage in the list to browse. Press the up/down key to select the file. Press Ok to play the highlighted file. When play the music file, you can control the playback like fast forward, fast reverse, pause and etc. Please refer to the remote control page.
In the music playback page, you can select the icons to forward, reverse, and pause the music. Select the icons in the right to view the file list, and switch on shuffle and repeat mode. Put the photo files in the same folder to display along as music playback in alphanumeric order.
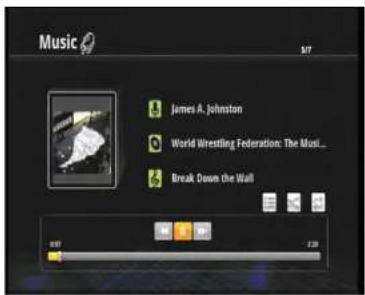
Photo playback
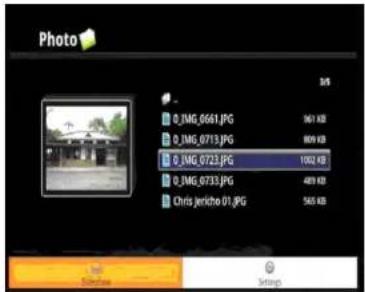
Click the "Photo" icon to browse the photo files. While playing the photo, press right/FF key or left/FR key to next/forward photo. Press up/down key to rotate the photo. Press zoom key to zoom in the photo and press the direction key to move the viewable area. Press "Info" key to watch the photo information.
Slideshow:
press the menu key to raise the sub-menu and click "Slidedhow". The photos in this folder will be playback one by one. Select "Settings" to setup the detail settings.
Slideshow settings:
- Slideshow interval: select the time between photos.
• Slideshow transition: select the effect like fade-in, interlace etc. - Repeat slideshow: check the option to repeat the slideshow.
• Background music: check the option to play slideshow with background music. - Select background music: select the music folder to play back as the background music.
Application
This device provides additional functions for Internet media and home media application. Select each item to enter its page to apply the function.
Firmware upgrade
Copy the firmware file *fw to USB storage or SD card and insert it to the device, and select "Browse", and the device would be found on the pop up window, and then select "Upgrade now" to begin the upgrading.
Picasa
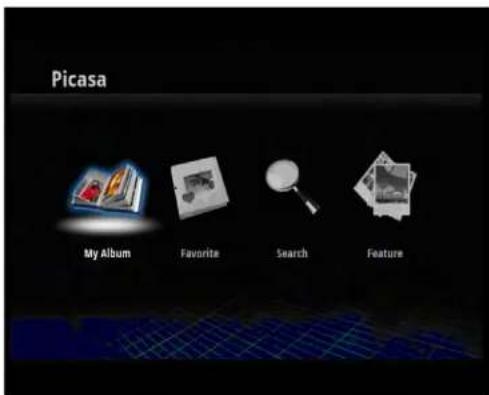
Select this option to enter PicasaTM page. Select the icons to access these functions.
My Album: input your Account name and password to login PicasaTM.
Favorite: add users in the list and look their album later.
Search: type in keyword to search it.
Feature: browse and look the pictures.
Sky DMR
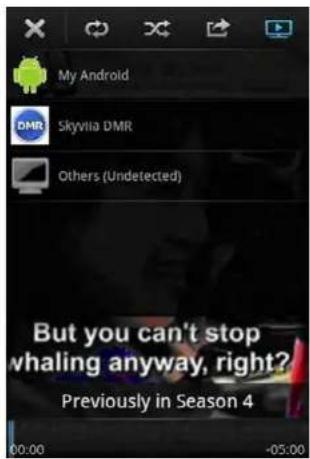
Enter this page and the device will stay in DMR mode (Digital Media Renderer). The DMR function works with DLNA® DMC (Digital Media Controller), which is usually a cell phone, will command the DMR device to locate and playback the media. For example, run the "iMediaShare" software on Android phone or iPhone, and select the local media/Internet media channel, and select "Skyvila DMR" as the output device (as the screenshot), and then the device will find the media and play it on the TV screen. Before enabling DMR function, make sure your cell phone and the device are in the same local network. Besides "iMediaShare", the other DMC class software can perform the same function with this device.
YouTube
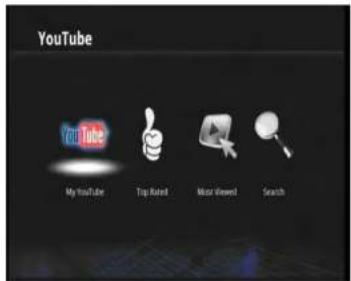
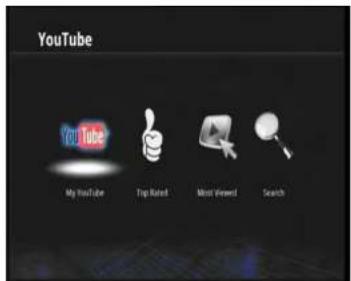
In this page, you can watch YouTube videos.
My YouTube: login your YouTube account to watch your video.
Top Rated: watch the list of top rated video.
Most Viewed: watch the list of most viewed video.
Search: input keyword to search the video.
Settings
Enter this page for detail settings.
- Menu language: select the language for the menu.
- Date & time: setup the time for this device.
- Set date: setup the day, month and year.
- Select time zone: select your time zone.
- Set time: setup the hour and minute.
- Use 24-hour format: select 12-hour or 24-hour format.
- Select date format: select the date format.
- Power save: select the idle time to turn off the device.
• Network controls:
- Wi-Fi: enable it if the WLAN dongle is inserted on the device. The WLAN USB dongle must be inserted first. Contact the supplier of this device for the supported model of USB WLAN dongle.
• Wi-Fisettings:
• WPS: select Push button or PIN code to continue
- Push button: press the WPS button on your wireless Access Point and then press it on the menu to establish the wireless connection. The press-button sequence can be reversed.
- PIN code: enter the WPS-PIN code (8-digit number) the same as the WPS-PIN code on your wireless Access Point.
- W-Fi networks list: the available wireless network names will be scanned and listed. Press up/down key to select it and "OK" to connect it. The pass phrase would be required to connect an encrypted wireless network.
- Add Wi-Fi network: input wireless network name, security type and passphrase to connect to the wireless network manually.
- Ethernet: enable it to connect the LAN.
- Ethernet Configuration: choose the connection type depending on your network environment.
- DHCP: if there is a broadband router in the network, generally it has a DHCP server and you can choose this option to get the IP Address automatically.
- Static IP: if the manual IP setup is required in the network, select this to input IP address for the device, Netmask, Gateway and DNS.
- PPPoE: if the PPPoE is required, select it and input username/password to connect it.
- Display
• Video out: select the resolution for HDMI output.
- Brightness: press left/right key to move the cursor on the bar, and the screen brightness changes in real-time. Select the proper brightness and press OK to apply.
- Contrast: press left/right key to move the cursor on the bar, and the screen contrast changes in real-time. Select the proper contrast and press OK to apply.
- Saturation: press left/right key to move the cursor on the bar, and the screen saturation changes in real-time. Select the proper saturation and press OK to apply.
- Hue: press left/right key to move the cursor on the bar, and the screen hue changes in real-time. Select the proper hue and press OK to apply.
- Over scan adjust: press left/right key to move the cursor on the bar, and the screen size changes in real-time. Move the cursor until the display area fits the screen and press OK to apply.
- Aspect ratio: select this value according to your TV screen. For 4:3, select "Pan Scan 4:3" or "Letter Box 4:3". For 16:9, select "Wide Screen 16:9" or "Original".
- Sound:
- Audio digital output: select the digital audio output interface and format. For S/PDIF, connect to optical/TOSLINK input on your audio receiver/amplifier. For HDMI, connect to HDMI input on your audio receiver/amplifier, and connect HDMI from output to TV set. The connection would be device -> HDMI receiver -> HDMI TV set.
- HDMI PCM: the audio will output through HDMI in 2-CH LPCM format.
- S/PDIF PCM: the audio will output through S/PDIF in 2-CH LPCM format.
- S/PDIF Raw data: the audio will output in bit-stream, raw data output through S/PDIF. In order to decode the audio, your audio receiver/amplifier must support the respective format of the playing audio to decode the audio, or otherwise the audio won't be output.
- HDMI Raw data: the audio will output in bit-stream, raw data output through HDMI. In order to decode the audio, your audio receiver/amplifier must support the respective format of the playing audio to decode the audio, or otherwise the audio won't be output.
- Storage:
- Storages: the available space/capacity of the inserted SD card and USB storage are displayed.
- Internal storage: the available space is displayed.
- Applications:
- Unknown sources: check it to install apps manually from USB storage or SD card.
- Manage applications: the installed apks and its size are displayed in this page. To uninstall an apk, select it to uninstall it.
• Development: it is not necessary to check this option which is for debugging.
- Firmware upgrade: copy the firmware file *.fw to USB storage or SD card and insert it to the device, and select "Browse", and the device would be found on the pop up window, and then select "Upgrade now" to begin the upgrading.
- Defaults: select this option to reset the device to factory default.
- About: display the information such as Ethernet MAC Address, firmware version (Build number) and etc.
Specifications In
| Component Model ZIP | 51005I | |
| System Android 2.2 Proyo | ||
| CPU Skyvia Sy8860 | AFM926EJ-5 600 MHz CPU | |
| RAM DDR2 SDRAM 128 | MB x2 | |
| FLASH NAND FLASH 256 | MB | |
| Disk format FAT16/FAT32/NTFS | ||
| Subtitle Chinese / English / Europe / UTF8 | ||
| Video output Up to 109 | 0p I ID decode & video output | |
| Aspect ratio Pan Scan 43 / Letterbox 43 / 169 | ||
| Interface Video/Audio | HDMI 1.3 | Composite Video/Audio |
| USB | USB 2.0 x2, 5V, 500 mASupport USB external HDD, USB Flash Disk,USB Mouse/Keyboard | |
| Card reader | S/O/SOHC/MMC/MS/MS-Pro card reader | |
| Ethernet | 10/100 Mbps, RI-45 x1 | |
| IR Receiver | Built-in IR-Receiver x1IR extender port x1 | |
| Power socket DC jack | ||
| Playback | Video | Mainstream video formats |
| Audio | Mainstream audio formats | |
| Subtitle srt, sub: smr, ss | ass, jdx+sub, DVD subtile | |
| Music | Mainstream music formats | |
| Music tag | IIDS tag with cover art display | |
| Photo format | JPG (48x49 to 8176x8176 Pixel), BMP, PNG, GH | |
| Playback Source | USB Storage | |
| Local Network Application | LAN DLNA DVR | |
| Internet Application | Internet Photo | P case |
| Internet Video | YouTube | |
| Housing | Lamp | Power lamp: Power On/blue, Standby/redUSB lamp: blinking/USB activity |
| Power rating + 12V, 1.5 A | ||
| Power consumption | Power on: 3.3 W (USB device consumption not included)Standby: under 0.5 W | |
| Size | 130 x 100 x 32 mm (L/W/H) | |
| Requirement | Temperature Operating | temperature: 0°C ~ +40 °CStorage temperature: -10 °C ~ +60 °C |
| Humidity 5~85% Non Condensing (Operating)5~95% Non-Condensing (Storage) | ||
| Certification | CF | |
Note:
Weight and dimensions are not absolutely exact values.
Technical details can be changed at any time (according to manufacturer) without prior notice.
Declaration of Conformity
This complies with the following directives / standards is confirmed:
Electromagnetic Compatibility Directive 2004/108/EG
EN 55013:2001+A1:2003+A2:2006
EN 55020:2007
EN 61000-3-2:2006 + A1:2009 + A2:2009
EN 61000-3-3:2008
Low Voltage Directive 2006/95/EG
EN 60065:2002+A1:2006+A11:2008
Notes
- Verpackungsinhalt
- Einstellungen
- Safty InstructionsC
- Main Supply:
- Overload:
- Liquid:
- Ventilation:
- Risk of suffocation:
- Cleaning:
- Connection:
- Location:
- Uncover:
- Introduction
- Package contents
- Installation
- Front panel
- Rear panel
- Left panel
- Remote control
- Watch TV program
- Home menu
- Programguide
- Channel search
- Auto scan
- Manual scan
- Multimedia
- Music Player
- Photo playback
- Application
- Firmware upgrade
- Picasa
- Sky DMR
- YouTube
- Settings
- Note:
- Declaration of Conformity
- Notes
Brand : MEGASAT
Model : SAT>IP Receiver
Category : Digital decoder