WAP-V6000 - Media player TEAC - Free user manual and instructions
Find the device manual for free WAP-V6000 TEAC in PDF.

User questions about WAP-V6000 TEAC
0 question about this device. Answer the ones you know or ask your own.
Ask a new question about this device
Download the instructions for your Media player in PDF format for free! Find your manual WAP-V6000 - TEAC and take your electronic device back in hand. On this page are published all the documents necessary for the use of your device. WAP-V6000 by TEAC.
USER MANUAL WAP-V6000 TEAC
natural_image
Black TEAC wireless device with two antennas and a digital display showing 'WAP-V6000' (no readable text beyond branding)Copyright Notices
Copyright (c) 2009 by TEAC Europe GmbH – All Rights Reserved.
The Product "TEAC WAP-V6000" (hereinafter referred to as the "Product") includes Open-Source software packages. These Open-Source software packages are subject to specific licenses, disclaimers and notices, which are reproduced on the CD-ROM provided with the Product (see "Licenses.txt"). Please refer to those licenses, disclaimers and notices for your exact rights hereunder as well as to the following Open-Source Notices.
The source code of Open-Source software packages is available for download under http://www.wap-opensource.teac.de
Additionally TEAC offers to provide the source code of the Open-Source software packages to you on CD-ROM for a fee for the physical act of transferring a copy, such as the cost of the media and shipping, upon written request to TEAC Europe GmbH, code “Source-Code”, Bahnstraße 12, 65205 Wiesbaden, Germany. This offer is valid for a period of three years from the distribution of this product by TEAC.
Open-Source Notices
Part of this product's software (this program) is free software: you can redistribute it and/or modify it under the terms of the respective GNU General Public License or GNU Lesser General Public License as published by the Free Software Foundation, either version 2 (or 2.1 respectively) of the License, or (at your option) any later version.
This program is distributed in the hope that it will be useful, but WITHOUT ANY WARRANTY; without even the implied warranty of MERCHANTABILITY or FITNESS FOR A PARTICULAR PURPOSE. See the respective GNU General Public License or GNU Lesser General Public License for more details.
You should have received a copy of the GNU General Public License and the GNU Lesser General Public License along with this program. If not, see http://www.gnu.org/licenses/.
Portions of this product's software are copyright © 2006-May-12 The FreeType Project www.freetype.org. All rights reserved.
Portions of this product's software are available under the Mozilla Public License 1.1 (MPL 1.1). Any modification or contribution to such portions of this software are available in Source Code form under the terms of the Mozilla Public License 1.1 via the internet under TEAC's website as mentioned above.
Portions of this product's software are subject to the following disclaimer: THIS SOFTWARE IS PROVIDED BY THE COPYRIGHT HOLDERS AND CONTRIBUTORS "AS IS" AND ANY EXPRESS OR IMPLIED WARRANTIES, INCLUDING, BUT NOT LIMITED TO, THE IMPLIED WARRANTIES OF MERCHANTABILITY AND FITNESS FOR A PARTICULAR PURPOSE ARE DISCLAIMED. IN NO EVENT SHALL THE COPYRIGHT HOLDER OR CONTRIBUTORS BE LIABLE FOR ANY DIRECT, INDIRECT, INCIDENTAL, SPECIAL, EXEMPLARY, OR CONSEQUENTIAL DAMAGES (INCLUDING, BUT NOT LIMITED TO, PROCUREMENT OF SUBSTITUTE GOODS OR SERVICES; LOSS OF USE, DATA, OR PROFITS; OR BUSINESS INTERRUPTION) HOWEVER CAUSED AND ON ANY THEORY OF LIABILITY, WHETHER IN CONTRACT, STRICT LIABILITY, OR TORT (INCLUDING NEGLIGENCE OR OTHERWISE) ARISING IN ANY WAY OUT OF THE USE OF THIS SOFTWARE, EVEN IF ADVISED OF THE POSSIBILITY OF SUCH DAMAGE.
Contents
Copyright Notices....2
Dear User, 5
About This Manual....5
After unpacking....5
Safety Information 6
Controls and connectors ....7
Infrared (IR) Remote Control....8
Table of remote control buttons 9
Remote Control battery installation....10
Installation....11
Connections....11
Connection Diagram 11
Start-Up 12
Setup Menu....14
Wired Network Setup....14
Wireless Network Setup....15
Advanced Network Setup 17
Connect WAP-V6000 to computer directly....17
Wired Network....17
Wireless Network....17
HDD Installation, Configuration and File Management......18
Hard Disk Drive Installation....18
WAP-V6000 HDD Format Wizard....20
Copy files from USB Storage Device to WAP-V6000 (Local HDD) ......21
Copy/Delete files from computer to WAP-V6000 (Local Hard Disk) ......23
Samba Server function....23
Network Protocols to Play Media....25
UPnP Mediaserver installation on computer....25
Other access solutions for networked resources....25
NFS protocol....25
Samba Client Protocol....28
Play Multimedia Files ....31
Music....31
Supported Music Formats ......31
To Play Music 32
Photos....36
Supported Photo Format....36
To view photos....36
Playing a Photo Slideshow 38
Controlling Photo Playback 38
Viewing Photo Information ....38
Photo Viewing Effect 38
Viewing Photos While Music is Playing (BackGround Music)......40
View Photo in Thumbnails Mode....43
Video....44
Supported Video Formats....44
To play video....45
Control Video Playback 47
Video Viewing Effects 48
Subtitles and Languages/Audio-Tracks....49
Video Resume Playing 50
DVD Menu Navigation....52
Web Browser....53
To open the Web Browser....53
Using the Remote Control for Browser navigation....53
Tool bar of the browser....54
Opening a web page....54
Internet Media....57
Play Internet Radio - Live 365™....57
Play Internet Radio - My Radio....59
Play Internet Video - My Video....60
Viewing Youtube Content....62
Add/Delete the Internet Radio/TV Station Lists....63
BitTorrent Downloader....64
Enabling the BitTorrent Function....64
BitTorrent Management....68
Removing Completed Download Files....69
Firmware Upgrade and Reset to Default....70
Upgrade by Using USB Flash Disk 70
Reset to Default 70
Miscellaneous Settings....71
System Setup....71
Bit Torrent Setup....77
Trouble Shooting....78
Advice on location, care and safety....81
Specifications: 83
CE – Declaration of conformity....84
Notes on WEEE....84
Dear User,
we are pleased that you have chosen a wireless media player from TEAC media systems and congratulate you on this choice.
With your TEAC media systems WAP-V6000 you have acquired a modern piece of wireless audio technology that is in equal measure attractive and of high quality. We are sure that this product will provide useful service and a lot of fun over the coming years.
... your TEAC media systems team!
About This Manual
The TEAC media systems WAP-V6000 User Manual gives you a step-by-step explanation of how to install WAP-V6000 Media Player. Use this information to set up and configure WAP-V6000.
This manual is provided in PDF format on the Installation CD-ROM.
Your computer must have the free Adobe Acrobat Reader or OpenOffice installed in order to view and print PDF files.
After unpacking
After unpacking you should first check that the contents are complete.
There should be:
●WAP-V6000 Wireless AV Player
●Remote control (2 AA batteries included)
●Power cable
●Category 5 (CAT5) Ethernet cable
●Composite (CVBS) Video cable and Audio cable (3 RCA plugs each ends)
●HDMI cable
●WAP-V6000 Installation CD, including TEAC media systems WAP-V6000 User Manual in PDF format and Twonkymedia Server Software
●4 Screws (for HDD)
Safety Information
ATTENTION: Failure to follow these safety instructions could result in fire, electric shock, or other injury or damage.
●Read these instructions
- Keep these instructions
●Heed all Warnings
●Follow all instructions
●Do not use this apparatus near water.
●Clean only with dry cloth
- Do not install near any hear sources such as radiators, stoves, or other apparatus (including amplifiers) that produce heart.
●Unplug this apparatus during lightning storms or when unused for long periods of time.
ATTENTION: To reduce the risk of electronic shock, pull out the mains plug before removing the cover!
ATTENTION: The device can display static images, which can cause “burn in” of certain displays. Avoid leaving static images (such as photos or paused videos) onscreen for long periods of time.
ATTENTION : This device should be used only indoors in well-ventilated areas. To reduce the risk of fire, electric shock, or interference, do not expose this appliance to rain, liquid, moisture, excessive hear, or naked flame.
Tip: please visit www.teac.de to check for new firmware for your WAP-V6000. New firmware contains latest corrections and often it adds essential new features into your device!
-- We do recommend, always to update for the latest firmware! --
TEAC is always active to offer you the best possible features for your WAP-V6000!
Controls and connectors
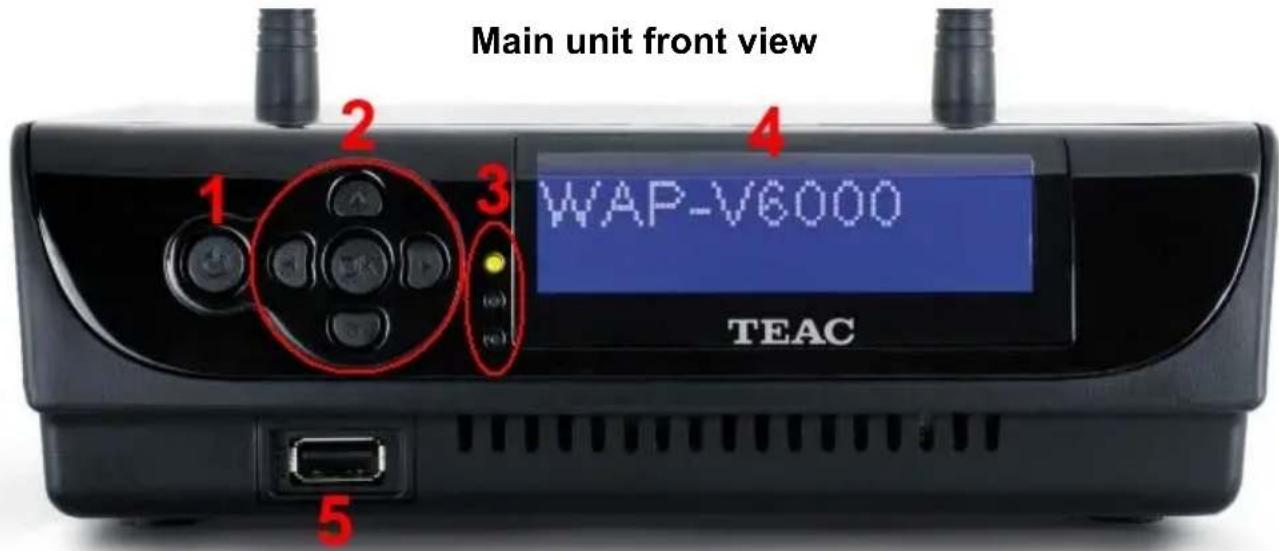
1 = Standby Button 4 = LC-Display
2 = Navigation Buttons 5 = USB Host
3 = Indication LEDs:
Power/Standby, HDD, Network
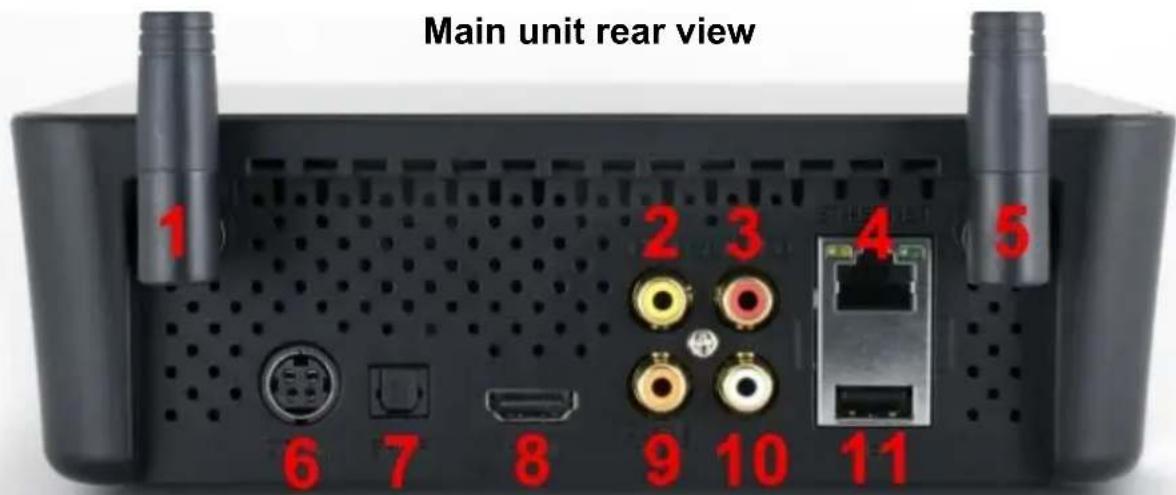
1 = Wlan Antenna 1 7 = S/PDIF Optical Digital Output
2 = Composite Video Output 8 = HDMI Output
3 = Audio Output Right Channel 9 = S/PDIF Coaxial Digital Output
4 = Ethernet Lan Terminal 10 = Audio Output Left Channel
5 = Wlan Antenna 2 11 = USB Host
6 = Connector for Power Supply
Infrared (IR) Remote Control
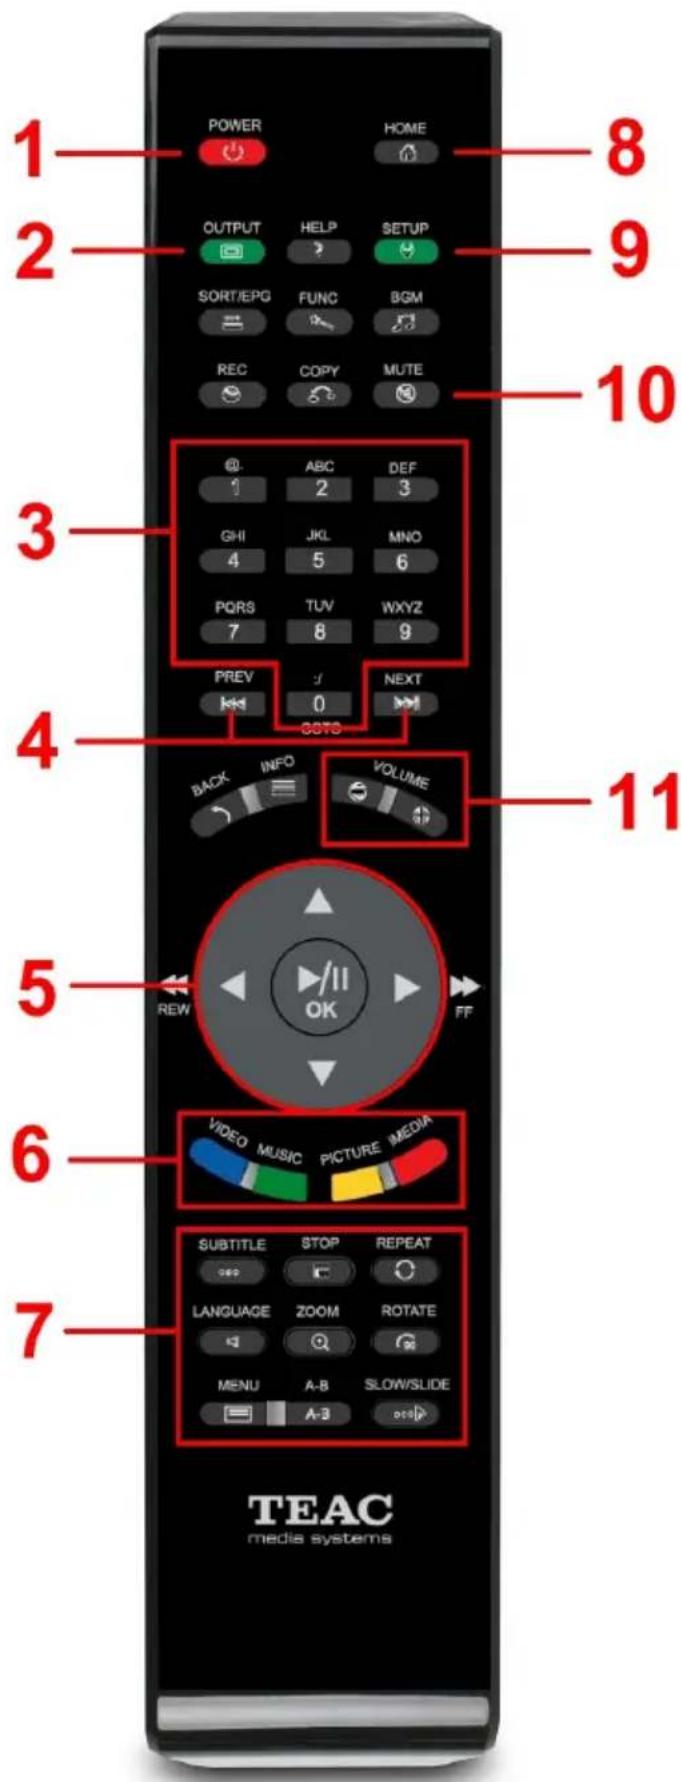
1 = STANDBY / ON
2 = Video OUTPUT selection
3 = Number keys
4 = PREVIOUS / NEXT track
5 = Navigation keys
6 = Function selection
7 = Playback options
8 = Main menu HOME button
9 = SETUP
10 = Audio MUTE button
11 = Volume control
natural_image
Two black remote control boxes with visible battery cells and indicator lights, shown from top and side (no text or symbols)Battery compartment
Table of remote control buttons
| Button FUNCTION DESCRIPTION | |
| POWER Turn On/Off “WAP-V6000”. | |
| HOME Hotkey to return to Main Menu. | |
| MUTE Mute audio output. | |
| OUTPUT Switch the video output type | |
| COPY Copy USB content into local HDD | |
| MENU Go to the Menu of DVD films. | |
| A-B Set/Cancel A-B repeat mode. | |
| SLOW | Slow forward / backward the media with speed 1/2x, 1/4x,1/8x... |
| ZOOM Zoom video or photo. | |
| REPEAT | 1. Video & Music: Repeat current file or Repeat all files in this folder or cancel repeat function.2. Photo: Repeat Background music. |
| STOP Stop the media playing. | |
| DISPLAY | Display media info. Pressing twice will show more info. about video. |
| BACK | 1. Press to return to previous folder or setup page.2. Save/cancel wireless setting in wireless setup page. |
| PREV | 1. Skip to the previous page when browsing media files.2. Skip to the previous file when playing media files. |
| NEXT | 1. Skip to the next page when browsing media files.2. Skip to the next file when playing media files. |
| VIDEO Press to jump to VIDEO mode | |
| MUSIC Press to jump to MUSIC mode | |
| PICTURES Press to jump to PHOTO mode | |
| iMedia Press to jump to Internet Media mode | |
| DIRECTIONS | 1. Press “LEFT” to stop current mode return to former layer;Press “RIGHT” to enter a selected folder or server.2. Video Mode: Press “UP” or “DOWN” to choose other file3. Photo Mode: Move picture in “zoom” mode or rotate picture in “rotate” mode4. Music Mode: Press “UP” to skip to previous music file or press “DOWN” to skip to next music file. |
| OK/Play Pause 1. Play or pause media files | |
| 2. Enter the highlight item. | |
| REWIND Fast backward the media file with speed 2x, 4x, 8x... | |
| FORWARD Fast forward the media file with speed 2x, 4x, 8x... | |
| SUB & LANG | Select different subtitles and languages when playing video file. |
| VOLUME+/- Increase/Decrease the volume. | |
| BGM | 1. Add/Remove a music file as background music.2. Add/Remove a music station from “My Media” as background music. |
| NUMBERS | 1. Input number with the key value.2. Go to 00%-99% progress of current video or music file. |
| RECORD Record stream into HDD | |
| :/ Go to the specif ed time of current file. | |
| SORT | Sorting all the files in one folder and re-arrange in alphabetical order |
| SETUP Hotkey to | Setup Menu. |
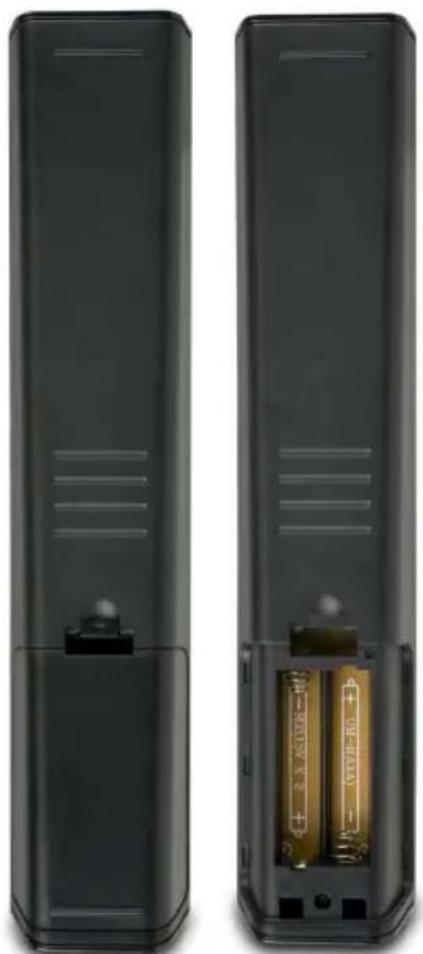
Remote Control battery installation
The RC is powered by two “Micro” AAA batteries. A fresh set of batteries can achieve several weeks of normal usage.
We do recommend to utilize common Alkaline Batteries.
●The battery compartment is placed at the back of the RC cabinet.
●The battery cover slider can be unlocked by slight shifting down the cover lock and pulling out the cover. After unlocking, the cover can easily be removed.
- Please care to insert the batteries according to the markings in the battery case and on the batteries itself. Wrong polarity might damage the RC.
- Then insert the battery cover back on the opening and press-in until you recognize it was locked again.
●The remote control now is ready to use.
Note: It is possible to utilize rechargeable AA-type batteries (NiMH or NiCd). However, rechargeable batteries have higher self-discharge and less cell tension, causing shorter operation time. Therefore we do not recommend to use rechargeable batteries.
Installation
Following descriptions explain how to install the WAP-V6000 with basic setup. Install your WAP-V6000 in this order:
- Connect WAP-V6000
- Set Up WAP-V6000
- Install software on your computer from Installation CD
- Configure your Twonkymedia Server to work with the WAP-V6000
Connections
Make sure you have the appropriate cables for connecting. Take care to watch the colors of the plugs on the cable.
For Video, WAP-V6000 offers digital HDMI or analogue Composite connections.
For Audio, beside the audio that goes through the digital HDMI connection, there are digital S/P-DIF coaxial and optical connections as well as analogue stereo line outputs.
Note: If your audio system is connected by digital outputs, please go to Setup System Setup Audio Setup □□
for configuration.and set the audio output WAP-V6000 to Digital mode.
For Network, you may have an Ethernet cable (Lan) plugged into the unit or connect by the wireless system (wlan). Neither will interfere with the other, but only one network can be accessed at a time (wired or wireless).
Connection Diagram
Following is a connection example with network and UPnP devices.
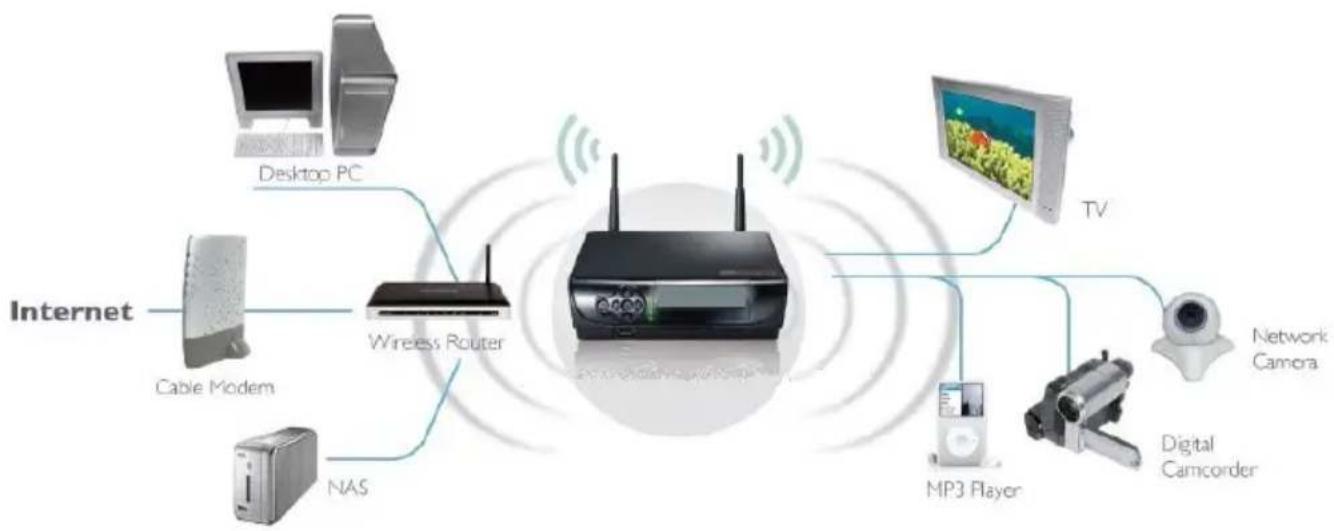
flowchart
graph LR
    A["Internet"] --> B["Cable Modem"]
    A --> C["NAS"]
    A --> D["Desktop PC"]
    A --> E["Wireless Router"]
    E --> F["TV"]
    E --> G["MP3 Player"]
    G --> H["Digital Camcorder"]
    H --> I["Network Camera"]
    E --> J["Wireless Router"]
Start-Up
Follow these steps to start-up your WAP-V6000
Turn on the TV Screen. Set the video sources selector on your TV to match the connection from your WAP-V6000. For example, if you used HDMI, set the TV to use “HDMI” Input.
- Turn on WAP-V6000. The LED on the front panel of the WAP-V6000 lights up to show that it is powered on.
- Check the TV display. The default display of WAP-V6000 is Composite(CVBS). If you use HDMI, take the remote control and push OUTPUT Key. You can cycle through the TV modes to get the appropriate display output.
- Wait a few seconds for the start up page to show up, and it will turn into the Main Menu.

The start up page will last for only few seconds, and then go to the Main Menu. If there is still no video output after the start up page appears, please make sure the WAP-V6000 and the TV are in the same mode. If not, please cycle through the OUTPUT key on the remote control, wait few seconds during each cycle to establish the next mode.
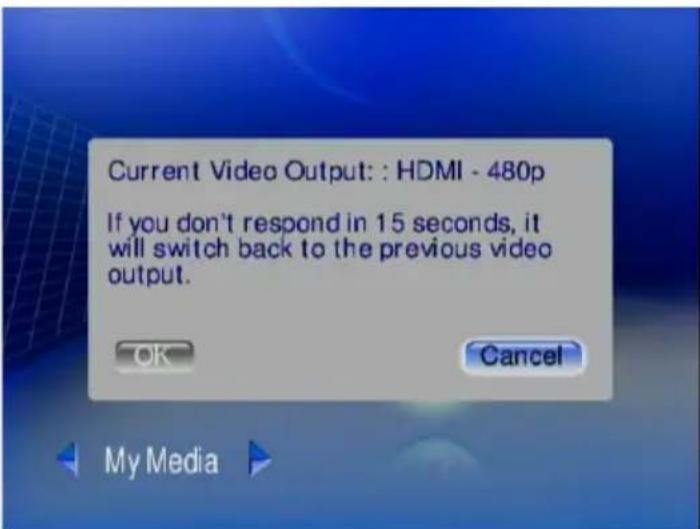
Note: When you cycle through the "Output" Key, the WAP-V6000 will tell you which mode you are at. Above is an example of cycling to "HDMI" mode. Please press "OK" if HDMI mode is what you want to select. It will switch to the original mode automatically if idle for 15 seconds.
- After reaching the main menu for the first time, we do recommend you to setup your WAP-V6000 to fully suit your system environment.
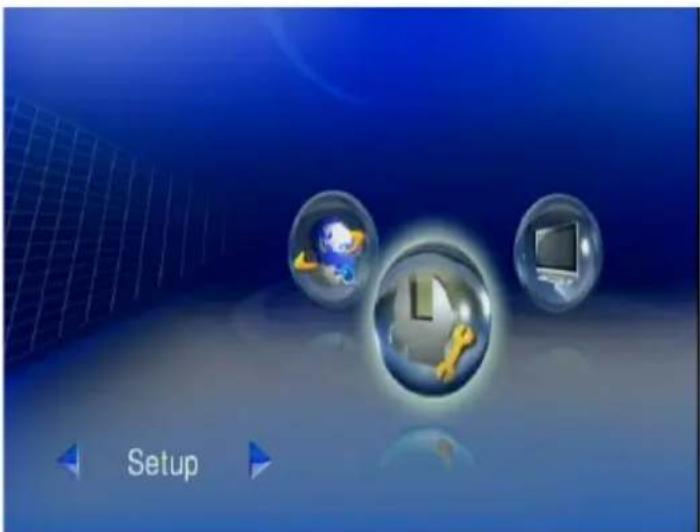
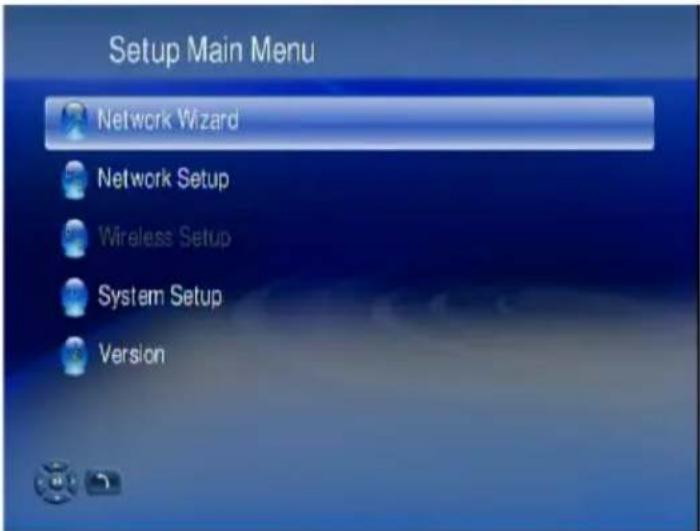
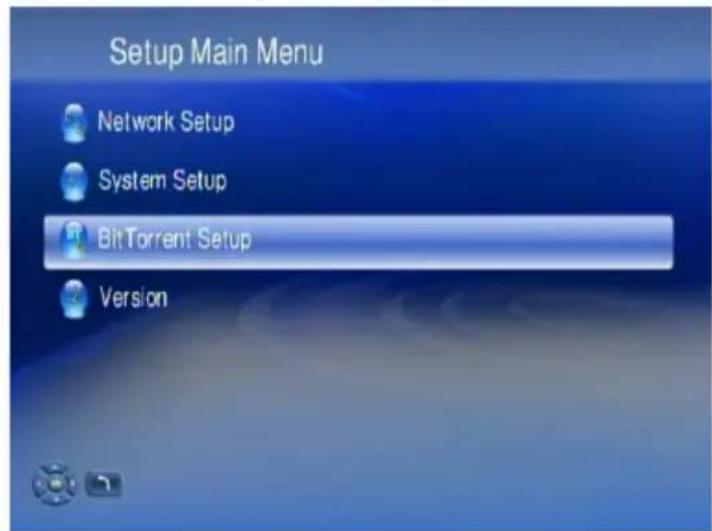
Setup Menu
For setup, simply press the SETUP hotkey on the remote control or select "Setup" from the main menu by LEFT/RIGHT and confirm by OK button.
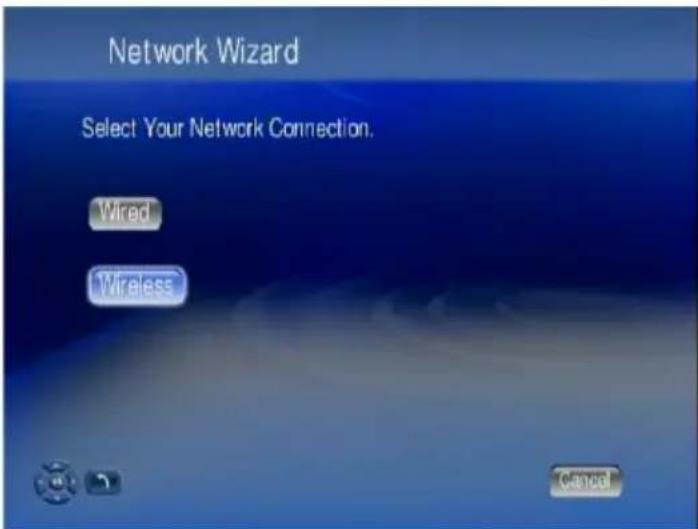
In Setup Main Menu, select Wired or Wireless to set up for your network.
Wired Network Setup
- Select Network Wizard from set up main menu to start setup wizard
- Select "Wired" and follow the on screen instructions.

Note: If you connect to a network using DHCP, WAP-V6000 automatically detects your network. If you don't connect using DHCP, go back to set up main menu and select Network Set Up. You may have to enter your IP address, net mask, gateway, and DNS addresses.
Wireless Network Setup
Attention: WAP-V6000 supports present wlan standards 802.11b, 11g and 11n. A wireless connection of 802.11b or 802.11g standard can work well if you want to play music or view photos. For demanding video streaming, especially when streaming HD contents, a wired Lan or high performance 802.11n Wlan connection between the mediaserver and WAP-V6000 is recommended. Please check your wlan router's standard to know about its possible limitations.
- Press "Setup" hotkey on the remote control or select "SETUP" mode from the Main Menu.
- Select "Network Wizard" from set up main menu to start setup wizard
- Select "Wireless" and follow the on screen instructions.
- WAP-V6000 displays all available networks, navigate on the menu and choose the one you want.
![ESSID Device List 1 foreign Network 2 my Network 3 another Network [2 / 3] Refresh Back Cancel](/content/2026/05/1025559/images/bca9b1740ecea7bc17b056e3fe895e036d67a73fce9b6ced1f7ac34e2c5a652e.jpg)
-
WAP-V6000 detects the network type automatically; click "Next" and then "Save" to apply setting.
-
If the network you choose is encrypted, a "Lock" icon displays on the network.

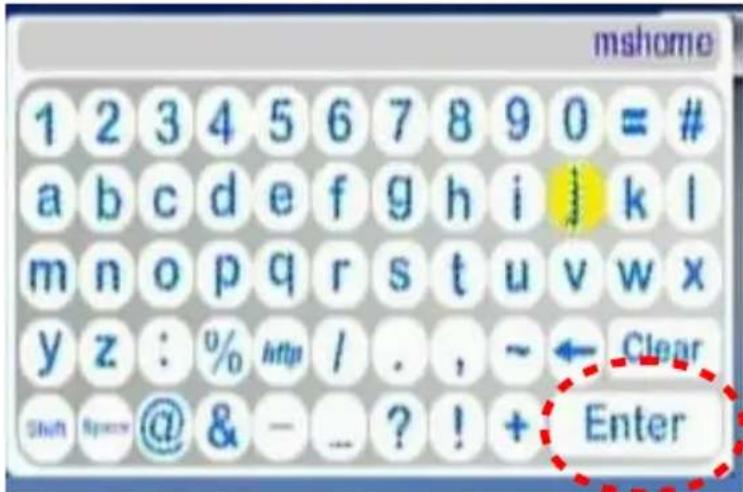
- Select "Key Value", and have your password ready to enter.
- Input your password and choose "Enter" to save.
- Follow the onscreen instructions to complete the setting.
Note: With each network, there are signal strength indicators in 3 colors; red, yellow and green. It is recommended to play high-bit-rate video only when the signal turns into green or to re-adjust the two antennas of WAP-V6000 accordingly.
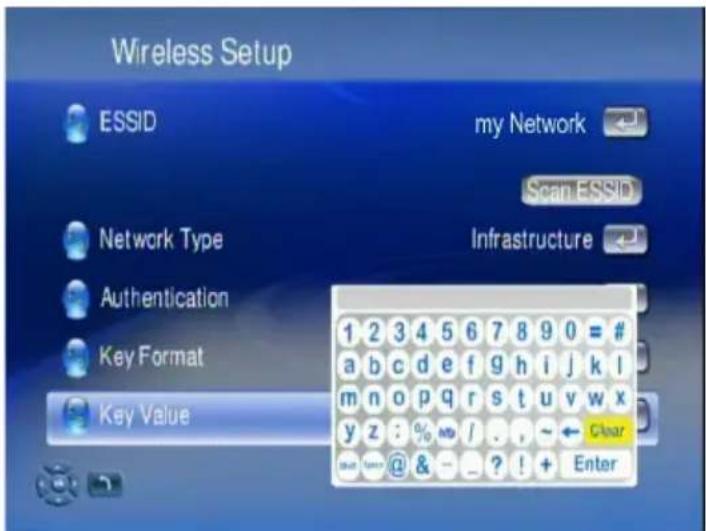
When Wireless Network is hidden
If you can't find the ESSID (Network Name) on the "ESSID Device List", follow these steps to configure wireless network manually.
- Select Wireless Setup.
- Select Network type as "Infrastructure" mode.

- Press "Back" to accept the setting or press "OK" to change the setting.
- Enter a value of up to 32 characters for the SSID by on-screen keyboard.
- Input other related information such like "Authentication", "Key Format", and proper "Key Value" of this hidden wireless network.
- Press "Back" or "Left" buttons to leave the wireless setup page and save the configurations.
Advanced Network Setup
Connect WAP-V6000 to computer directly
This item gives you a description on how to connect the WAP-V6000 directly to your computer instead of getting involved in the local area network.
Wired Network
- Connect the LAN cable to the LAN port of both WAP-V6000 and the computer.
- Go to WAP-V6000, press Setup hotkey or select "Setup Main Menu".
- Follow on screens instructions to complete Wired Network settings.
Note: In this case, use a LAN cross cable type.
Wireless Network
- Press Setup hotkey or select "Setup Main Menu".
- Select "Wireless Network Setup", and set 'Network Type' as "Ad-hoc" mode.

- Configure an ESSID with software as you wish.
- You may choose to configure security settings for this connection or not.
- Press "BACK" button on remote control to save the settings.
- Go to your computer to configure your computer to wireless network.
Note: a Wlan Ad-hoc-direct connection can be used by just TWO users at a time!
HDD Installation, Configuration and File Management
Hard Disk Drive Installation
WAP-V6000 supports 3.5" SATA HDD as internal storage. By installing the HDD inside, you can copy and delete media files via computer to local HDD and record streams to HDD.
Attention: We recommend you to have a new HDD to install. You can chose to let WAP-V6000 automatically format the HDD to EXT3 and erase your existing files.
Follow the instructions below to set up HDD.
- Make sure WAP-V6000 is turned off.
- Lay the unit upside-down on the working surface.
Attention: to avoid scratches on the cover's top surface, lay the case cover upside-down on a soft cloth!
- Use a screw driver to unscrew the 4 screws at the bottom.
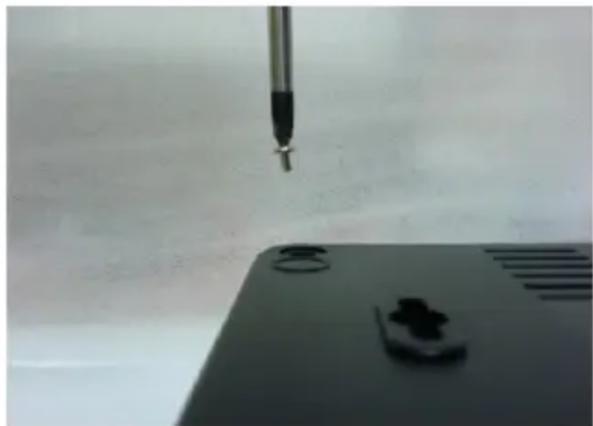
natural_image
Close-up of a pen tip above a black electronic device with a small component, against a plain background (no visible text or symbols)- Remove the top cover from bottom tray.

natural_image
Transparent plastic electronic component with multiple ports and mounting holes (no visible text or symbols)-
Insert the HDD into the case cover as below direction.
-
Put the HDD on the cover and fix the HDD firmly by the WAP-V6000 accessory HDD screws in the four holes.
-
Connect the SATA data cable from HDD to the WAP-V6000 board.
-
Connect the HDD power cable from HDD to the WAP-V6000 board.
-
Re-install the bottom tray to the top cover of the WAP-V6000 by its 4 original screws.
-
Now you can operate your WAP-V6000 again, including the installed HDD.
WAP-V6000 HDD Format Wizard
After HDD installation is completed, WAP-V6000 will detect your HDD compatibility and perform formatting if necessary. Follow below steps to complete the format process.
- Turn on WAP-V6000 and your TV.
- HDD Format Wizard will detect if your HDD is formatted for best compatibility.
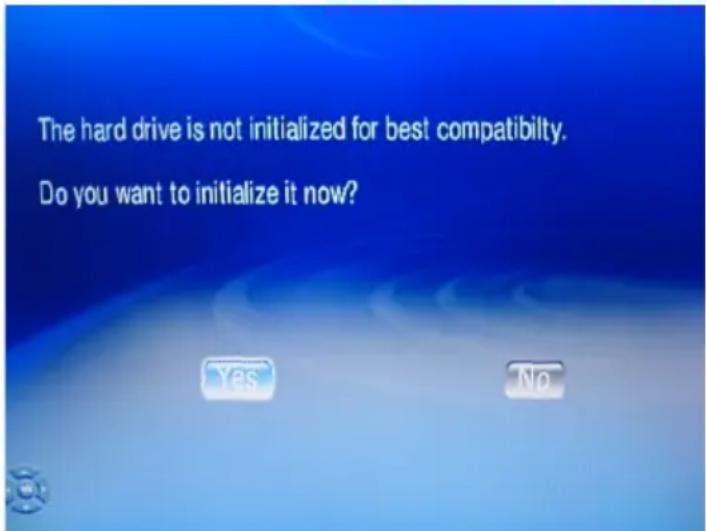
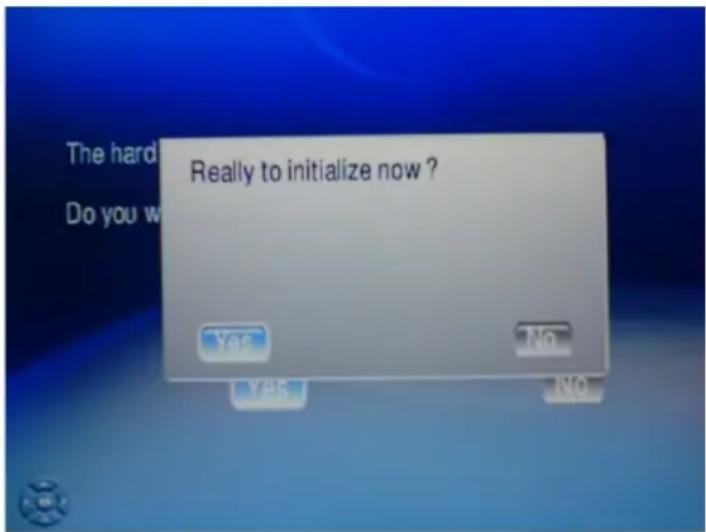
- Click "Yes" if you are sure you want to initialize the process. If you do not want to format the HDD, go to "No".
- Wait few seconds for the process to be complete.
- The Main Menu automatically appears after format is finished.
ATTENTION: WAP-V6000 supports Samba Server (copying files from computer) with hard disks formatted by WAP-V6000 HDD format wizard. If you skip HDD format wizard, the samba server will be disabled.
ATTENTION: After formatting, the all media files on this HDD will be deleted. Please backup your files before you install the HDD into WAP-V6000.
ATTENTION: WAP-V6000 will format your HDD as EXT3 format for best performance. This file format can not be recognized by Windows system originally.
Note: By default, WAP-V6000 will check the format of the HDD if the HDD was initialized by WAP-V6000 with EXT3 format. The data in the HDD, which is not with EXT3 file system, may still be able to be played by WAP-V6000. This way, functions like copy via USB and network will NOT be working.
There is a setting option to avoid HDD format checking after power-on. Please go to Setup □ System Setup □ Hard Disk Share for configuration.
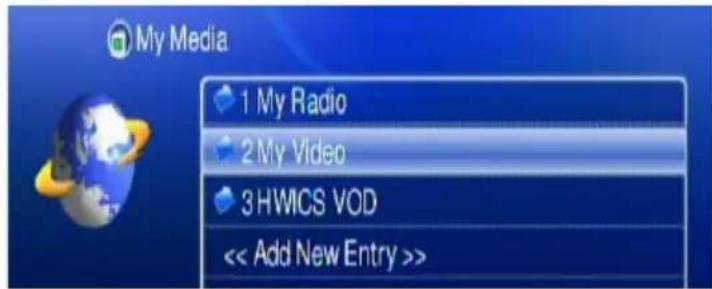
Copy files from USB Storage Device to WAP-V6000 (Local HDD)
Once the WAP-V6000 is installed with a local HDD, you can copy files from USB storage device through USB hosts, or copy and delete files from computer through LAN.
Follow below steps to copy files from USB storage device.
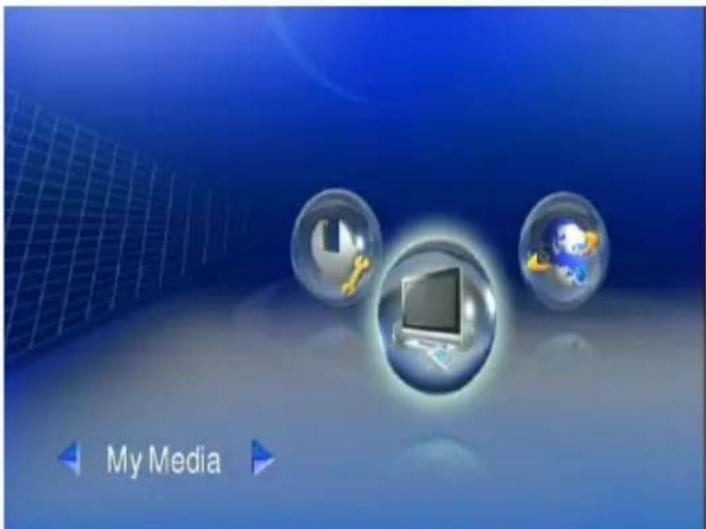
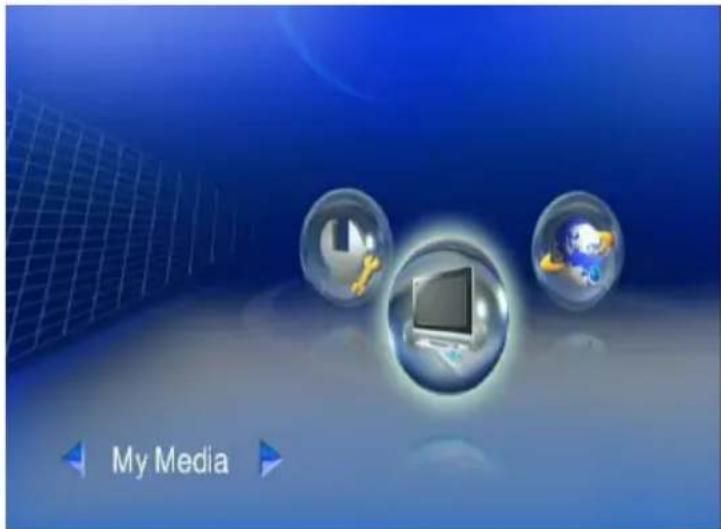
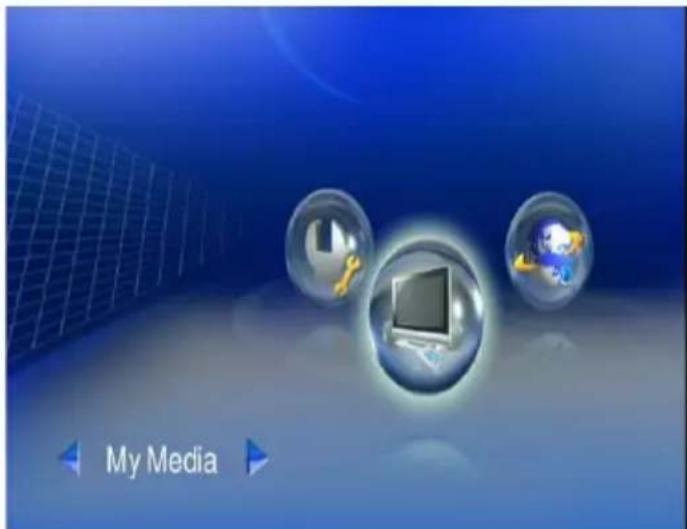
- Go to "My Media" at Set Up Main Page
- Select the name of your USB Storage device from the server list.
![[10] NB: chan_ph: [11] Wid DMS (BIRDY_MKV_test) [12] AND [13] And PC - TVeracy Media Server [14] Wid DMS (BIRDY_MKV_test) IP : 192.168.2.94 [12 / 14]](/content/2026/05/1025559/images/154260ec4aa24e4dfddfc7c9a6bba71a7ab98f697f28f57640600e3a0dca7fda.jpg)
- Highlight the file you want to copy, and then press COPY key on the remote control.
![AND 1 test 002.mkv 2 Recycled [1 / 2]](/content/2026/05/1025559/images/b2d5a25d363da6499b491e1cab9954b263fd360f9999e2d7ea35958f792a78b9.jpg)
- The WAP-V6000 will ensure you whether you want to copy, press "Yes" if you want to move on.
![Copy all files in the USB device to the hard drive? Yes No [1 / 2]](/content/2026/05/1025559/images/e6cd2d0e4c095b1be6015608e5d89ba345af43f0c5624aabdd2f59c7edeb17c2.jpg)
Note: The WAP-V6000 only support USB hosts copy to local HDD, you are not able to delete files copied to HDD by using this feature.
Copy/Delete files from computer to WAP-V6000 (Local Hard Disk)
WAP-V6000 supports Samba protocol. You can copy/delete files on each WAP-V6000 internal HDD available in your local network by using your computer.
Samba Server function
WAP-V6000 supports a Samba server function which shares your local storage space with client computer over the network. For computer with Windows OS, it's well known as "My Network Places".
The following is an example on how to do this through Microsoft Windows XP.
- Click "My Network Places" icon on your computer.
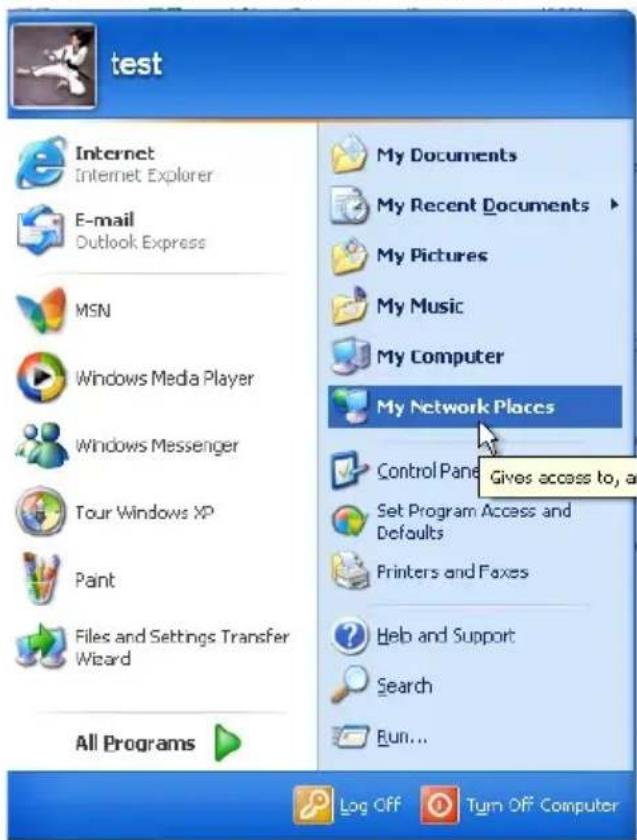
- Click "Entire Network"
- Click "Microsoft Windows Network" and "MShome"
- The default WAP-V6000 Local HDD location is "MShome", double click it and you will see the WAP-V6000 (ShareHDD) icon.
- Double click the WAP-V6000 (ShareHDD) icon, a login menu pops up.
- Input the default user name and password. By default, WAP-V6000 is using "admin" for user name and password.
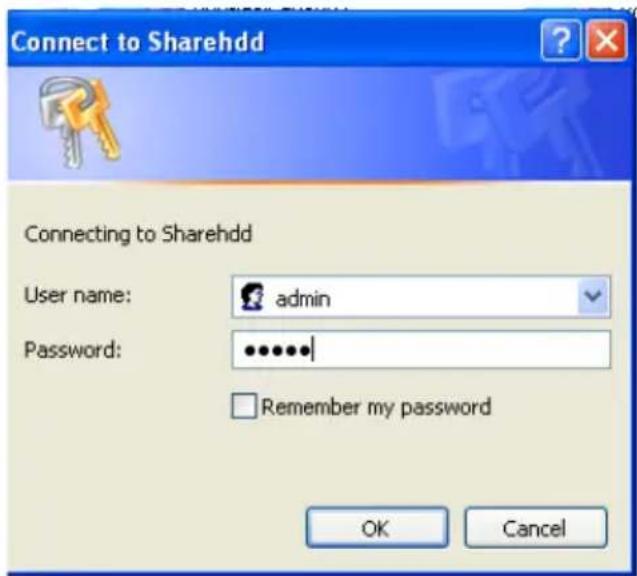
- After login is successful. Now you can copy/delete media files between your computer to WAP-V6000 local HDD by using your computer mouse.
Note: please go to "System Setup" □ "Harddisk Share Setup" for setup options on SMB server.
Network Protocols to Play Media
To browse and playback the audio, photo and video media files stored on your computer (connected to your network) or NAS, WAP-V6000 offers various access solutions like NFS, SMB and UPnP.
UPnP Mediaserver installation on computer
For UPnP access to your media files, a media server software is required. The media server is beneficial to have the media contents sorted according your individual requirements, independent from their “physical” arrangements in subdirectories. E.g. for audio files, the mediaserver can refer to ID3 tags in the files to have them sorted by various categories like album, artist, genre etc. The UPnP mediaserver access ensures full data safety on your computer without direct data access as required for SMB or NFS. With WAP-V6000, the TwonkyMedia Server software is provided on the installation CD.
Attention: WAP-V6000 cannot find and playback your media files stored on a networked computer by UPnP (without using SMB/NFS) without the UPnP mediaserver installed. Before looking for UPnP mediaserver contents from your network computer, ensure properly installed mediaserver software!
Other access solutions for networked resources
Firstly, have the IP address and the subfolder name of your target source ready (e.g. your NAS' IP and the sub folder of the NAS), below are two options of approaching your target source by NFS and by SMB protocol.
NFS protocol
The NFS protocol allows the WAP-V6000 to access media files on NAS (Network Attached Storage) without the using of other UPnP server.
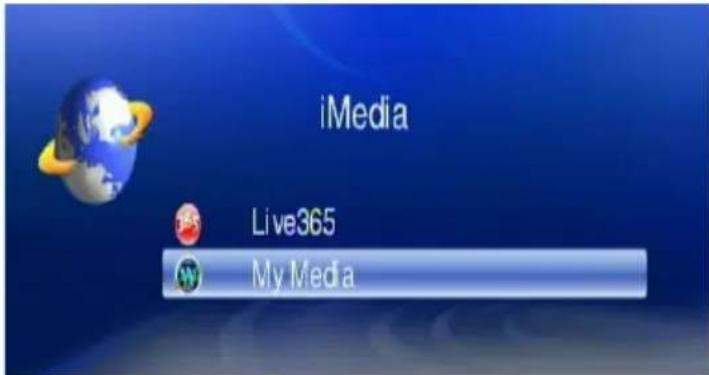
- Select and enter "iMedia" from the Main Page.
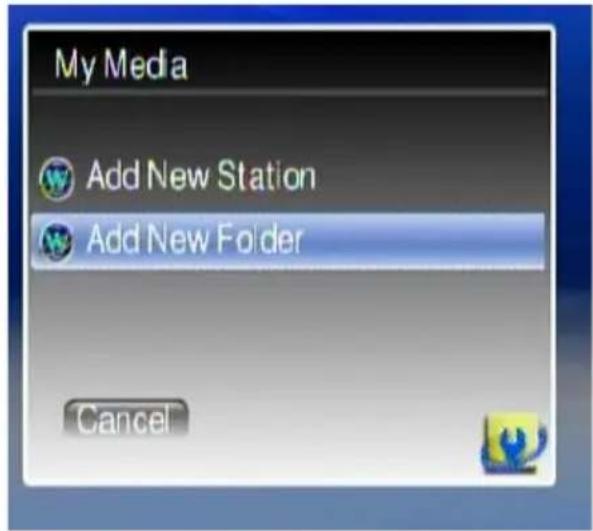
- Select "My Media" and enter "Add New Entry". Edit Dialogue will pop up.
![iMedia Live365 My Media Bit Torrent IP : 192 168.2 188 DNS : 168.95.1.1 Gateway : 192.168.2.1 My Media 1 My Video 2 Sky Radio << Add New Entry >> [3 / 3] My Media Add New Station Add New Folder Cancel](/content/2026/05/1025559/images/5230b1af4d05d24c0d01be9fe4d479872b6d0e8d737c964b02d7edf96b6d6be5.jpg)
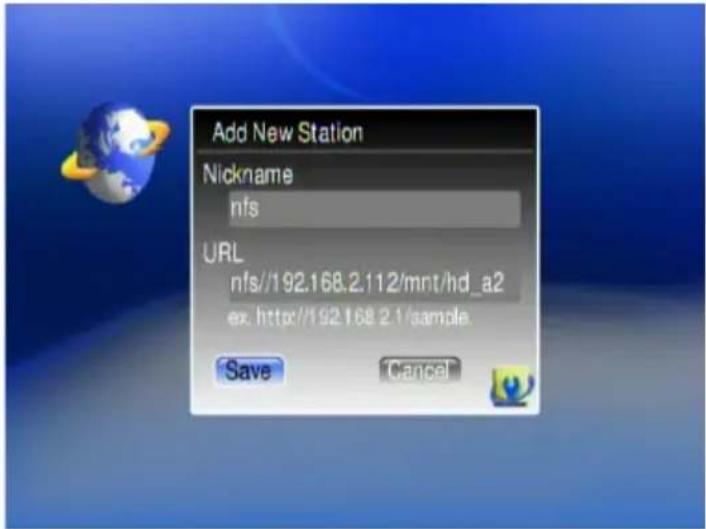
- Key in the nickname (for example "nfs") and the URL of your target source.
The url link must be in following arrangement.
nfs://ip/export_directory
(for example, nfs//192.168.2.112/mnt/hd_a2)
The 192.168.2.112 is the IP address of the NAS you want to approach, and
the mnt/hd_a2 is the sub folder name of your target source.
- After the URL is saved, go back to the menu of "My Media", and you will find the protocol at "My Media" list.
![My Media 1 My Video 2 Sky Radio 3 nfs << Add New Entry >> [3 / 4]](/content/2026/05/1025559/images/78d3c22cf84d06449b155438bee84c0c861a83352d59cdc11e24b34c081b7486.jpg)
- Enter into the menu, and select the files you want to play. In this case, you don't need to put in any username or password.
Samba Client Protocol
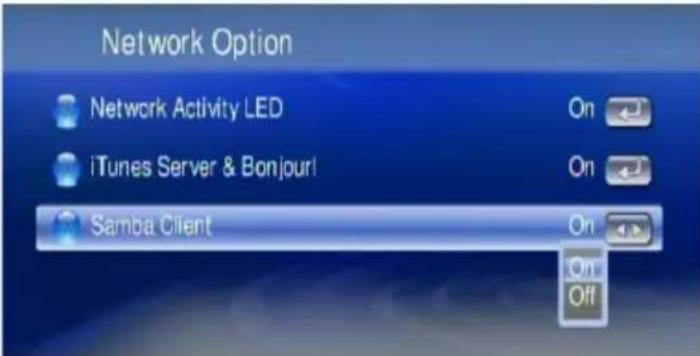
The Samba Client allows the WAP-V6000 to access media files from samba shares on computers on the network. Go to Setup -> System Setup -> Other Settings -> Network Option -> Samba Client to turn on this option.
As long as the network is linked, there is no additional set up to enable this feature. Following steps show how to access media through the Samba Client Protocol.
- Get into "My Media" in the main menu.
- All available sources will be shown on the same menu list layer (including local HDD, USB storage, UPnP Server and folders at local area network (those you can find through your Windows computer at the path of "My neighborhood")
![Local HDD UPnP server Samba client [01] HDD Disk 1 [02] MediaServer [03] CH3SNAS_amIGO [04] Another DMS (NB) [05] ANDY-PC: Andy: [06] NB: chan_ph: [07] NextoneDMS 123 [08] Another DMS (MEDIASERVER2) [09] USER-FEDIM7YCDN [3 / 28] Total 28 sources found = Samba client protocol = UPnP Server](/content/2026/05/1025559/images/db2b0616b05d7f45438cc9a68b9f4b38ab0eaa56cbcaefa3e051e2153cd86ff6.jpg)
- Get into the source you want to select.
Note: Since sources from UPnP server or Samba client will be found at the same layer, you may have 2 different approaches of same sources at one menu list. You can compare the 2 approaches of Samba client and UPnP server to the same NAS as seen above.
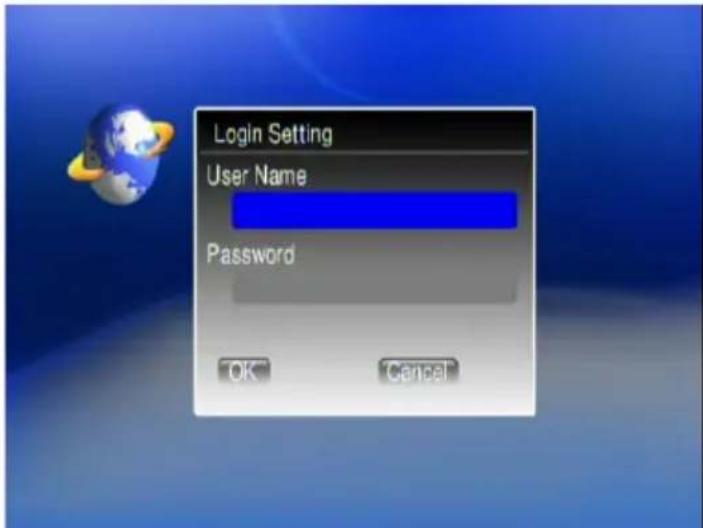
- When access the NAS through Samba client, if there is request to key in user name and password, the dialogue will pop out. Key in User name and Password to login NAS.
- After input of username and password, you can get into your target source and select the media files you want to play.
![CH3SNAS_AMIGO 1 web_page 2 Volume_1 [1 / 2]](/content/2026/05/1025559/images/a8959e4bbe73a12c0c0afd6da0d6296dcaa409af1e52020f3035d1ef6cc7f797.jpg)
Note: The performance of high bit rate files (>30 Mbps) might have some lag through Samba Protocol, therefore we don't suggest to play high bit rate files with this protocol.
Play Multimedia Files
Music
Supported Music Formats
| Format File Extension | |
| AAC+ AAC, MP4, M4A | |
| AAC-LC AAC, MP4, M4A | |
| AC3 / Dolby Digital 5.1 Down mixing AC3 | |
| AC3 Pass through AC3 | |
| DTS Pass through DTS | |
| LPCM WAV, PCM | |
| MP3 MP3 (ID3 tag supported) | |
| MP3Pro MP3 | |
| OGG Vorbis OGG | |
| WMA WMA, ASF | |
| WMA Lossless WMA, ASF | |
| WMA Voice | WMA, ASF |
| WMA Pro | WMA, ASF |
To Play Music
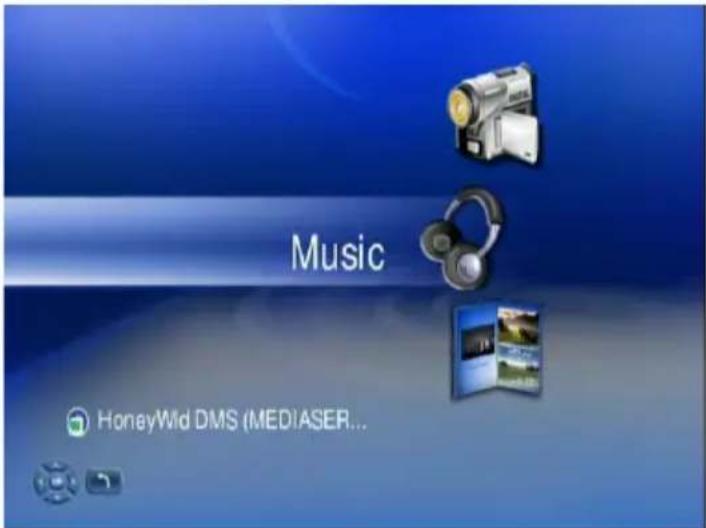
- Select "My Media" from Main Menu to enter server list, or press MUSIC hotkey on remote control.
- All available file sources will be listed on the My Media list, including files stored at Twonkymedia server in your computer, at USB flash stick, at USB external Hard disk drive, local hard disk drive or at other UPnP servers. Please select the media you like to use and press the OK button on the remote control.
Remark: When you want to play music on other UPnP Servers, please make sure the UPnP function for each device is enabled correctly.
- Select MUSIC mode and press "OK" to enter music mode.
- If you select Twonkymedia server, the music files will organize by "Album", "Artist", or "Genre" etc., automatically for your convenience; or you can select "All Music" to see all music files. You may also select "Files" to view the music files that organized in several subfolders as on your computer.
![Audio 1 Album 2 All Music 3 Artist 4 Genre 5 My Folder [1 / 5]](/content/2026/05/1025559/images/70c8368d14ac0d7ecabc0cc9274ceeb2cb7d43100d3e7594c907b0be85a91acd.jpg)
- Please use "Up" and "Down" buttons on the remote control to navigate those folders, and select the entry by press OK or "Right" button on the remote control. OK on a music track will start playback.


Note: icon stands for a folder; icon stands for a file.
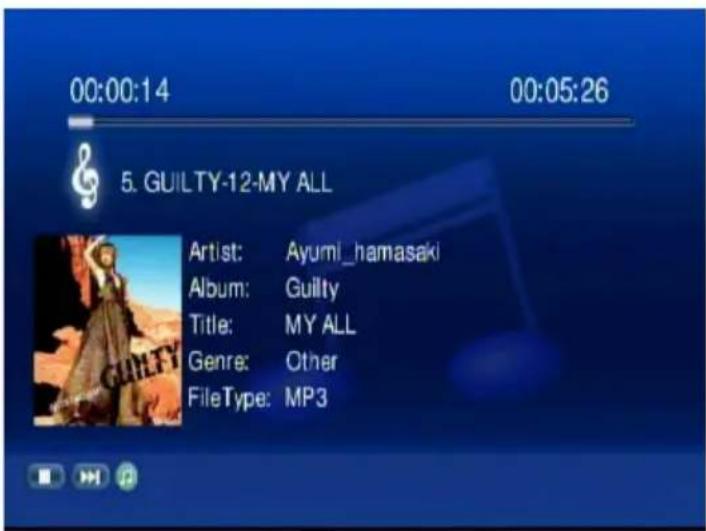
- On the screen, you can see related information about ID3 data of the music such as “Artist”, “Album”, “Title”, and “Genre”. If it contains the of the Album cover, it will also be shown on music playback screen.
Note: During music playback, you can jump back to list screen by pressing the BACK button. In the list screens, you can navigate to find another music track for next playback, without interrupting the current music playback! Current music track is especially marked to find it in the list if required.
Cover pictures: WAP-V6000 supports cover display for each audiofile with ID3 tag. To achieve cover display, you can import a cover picture into each audio file, using your PC. This and more ID3 tasks can be proceeded comfortably by a well-known freeware software, e.g. MP3tag (Win), ID3X (MAC) or EasyTAG (Linux).
Please note: there are some programs which support audiofiles and related cover pictures, like WMP, iTunes or Amarok, but they have an incompatible solution based on an internal directory to store cover pictures separate from audiofiles, but not in the audiofile's ID3 tags. These pictures do not appear if you open the audiofile by other applications or WAP-V6000.
If you want to have the cover pictures available for your WAP-V6000 and also for your portable audio devices, simply import the cover pictures into the ID3 tags.
Controlling Music Playback
Use the remote to PLAY, PAUSE, or STOP music playback. Controlling music playback will be as easy as controlling your TV set.
Play and Pause
Press "PLAY" button while music is playing you can pause the music by pressing "PLAY" button again can resume the music

Pause Music

Play Music
Volume Control
Press "Vol+" or "Vol-" buttons to control the volume

Mute
Press "Mute" button to mute or un-mute the music.

Mute music

Un-mute music
Skip to Next or Previous File:
Press "Next" or "Down" buttons to skip to next music file.
Press "PREV" or "UP" buttons to skip to previous music file.

Fast Forward:
Press “>>(FF)” button to fast forward the music file. Press several times to switch the speed.

Fast Rewind:
Press “<<(REW)” button to fast backward the music file. Press several times to switch the speed.

Repeat and Repeat All
You can turn on the repeat function to continuously play individual music or music within a folder.
Repeat Once:
Press "Repeat" button once to repeat playing current music file.

Repeat All:
Press "Repeat" button twice to repeat all music files in current folder.

Repeat Off:
Press "Repeat" button for three times to disable the repeat mode.

Photos
Supported Photo Format
| Format File Extension | |
| BMP BMP | |
| EXIF SUPPORT JPEG, JPEG, JPE, TIFF, TIF | |
| GIF GIF | |
| JPEG JPEG, JPG | |
| JPEG2000 JPG, JPEG, JPE | |
| PNG PNG | |
| TIFF TIFF, TIFF | |
| Windows Media Photo WDP, HDP | |
To view photos
- Select "My Media" from Main Menu to enter server list, or press "PHOTO" hotkey on remote control.
-
All available file sources will be listed on the server list, including files stored at Twonkymedia server in your computer, at USB flash stick, at USB external Hard disk drive, local hard disk drive or at other UPnP servers. Please select the media server you want to use and press the OK button on the remote control.
-
Select "PHOTO" mode and press "OK", or press "PHOTO" hotkey to enter photo mode.
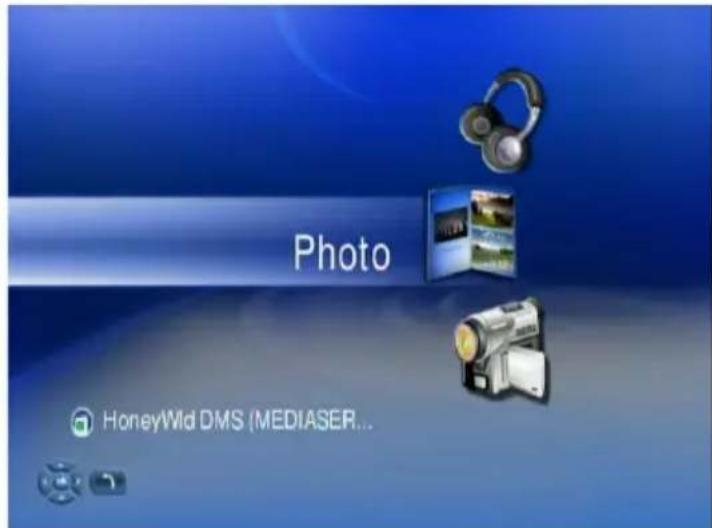
4 If you select "Twonkymedia server", you may select "Files" to view the image files that organized in several subfolders as on your computer, or select "All Photos" to see all shared image files. Please use "Up" and "Down" buttons on the remote control to navigate those folders, and select the option by press OK or "Right" button on the remote control.
![Image 1 All Images 2 My Folders [1 / 2]](/content/2026/05/1025559/images/5aa4dccedadc3afcba1584ebfefaed523885194bb51bc2a4b9f32b205decd4a3.jpg)
5 Select the folder that contains the image files or the subfolders you want, and press OK, or "Right" button on the remote control to play it.

natural_image
Close-up of white orchid flowers with green leaves against a bright sky (no text or symbols visible)
stands for a folder;

icon stands for a file.
Playing a Photo Slideshow
To start playing a photo slideshow (all photos in one folder), you need to press OK Button twice(!!) on the remote to enable this function.
- Navigate to the first photo of each folder and press OK button to view this photo.
- Press again the OK button if you want to enable Photo Slide Show feature. The PLAY icon will display when the Photo Slide Show is enabled.
- Press STOP button to stop the function. The "Pause" icon will be displayed when the Photo Slide Show is stopped.
4.
Controlling Photo Playback
Play, Pause and Stop
Press OK button on the image files list to enable slideshow playing. Press STOP button to stop it.
Skip to Next or Previous File:
Press "Next" or "Down" buttons to skip to next video file.
Press "PREV" or "UP" buttons to skip to previous music file.
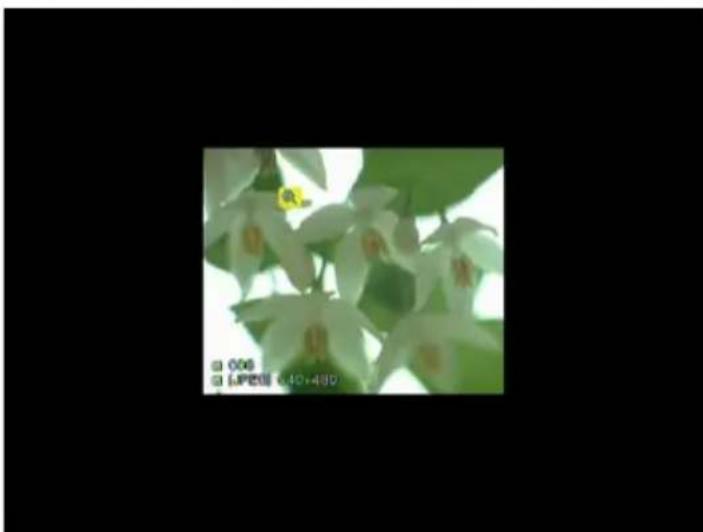
Viewing Photo Information
Press "Info" button to get image information.
![■ Image013 ■ [JPEG] 720x370](/content/2026/05/1025559/images/0a475b6bd5f396851e35a57b2b2fa2adad73f3b61f8fa6a15554ad7a4aadcf2f.jpg)
Photo Viewing Effect
Zoom in and Zoom Out
Press ZOOM button while viewing the photo that you want to manipulate,.
- Press "Zoom" button and press "Left" button to enlarge the image.

natural_image
Person holding a tree in a forest setting, with a yellow icon featuring a magnifying glass (no text or symbols visible)- When the image screen is larger than TV screen, press "Zoom" again and press "directions" buttons to move the image.

natural_image
Close-up of a person's face with blurred background (no visible text or symbols)- Press "Zoom" button and press "Right" button to shrink the image
natural_image
Close-up of white orchid flowers with green leaves against a black background (no text or symbols visible)Rotate:
Press "Rotate" button while viewing the photo to enable rotate function.

natural_image
Aerial view of agricultural fields with misty valleys and a clear blue sky, showing no visible text or symbols.Viewing Photos While Music is Playing (BackGround Music)
The WAP-V6000 is capable of displaying photos and playing background music simultaneously. Follow below steps to add music to "BGM" (Back Ground Music) list.
1. Enter music files list
![All Music 1 001 2 001 3 001 4 001 5 01 DRIVE 6 01 DRIVE 7 01 DRIVE 8 01 DRIVE 9 01 The Song Of Life (New Version) [1 / 60]](/content/2026/05/1025559/images/8152f86dd834e33abaa001ba4b355337aa385234151a401b1dee00d56a9c40ae.jpg)
- Use "Up" and "Down" buttons on the remote control to navigate music files, and press "BGM" hotkey on remote control to invoke "BGM" tool bar.
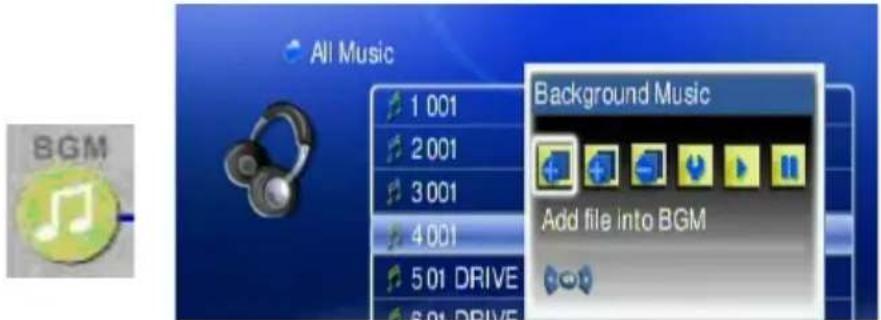
Possible BGM options are:
add single track to BGM, add complete album to BGM, delete track from BGM, BGM list view and BGM PLAY or BGM PAUSE.
- Press "Right" and "Left" buttons to select options on "BGM" tool bar, and press "OK".
- The music files that been added to "BGM" list will display with "BGM" icon.

![All Music 1 001 2 001 3 001 4 001 5 01 DRIVE 6 01 DRIVE 7 01 DRIVE 8 01 DRIVE 9 01 The Song Of Life (New Version) Background Music Add all files into BGM [4 / 240]](/content/2026/05/1025559/images/48bafae6057eba78e2018984f3ba4ae3bde7b556f6fe67c995614ef53a8b3eb6.jpg)
Add music to BGM list. Music added successfully

- To play BGM files, please select "BGM PLAY" button on "BGM" tool bar; to stop playing BGM, please select "BGM PAUSE" button.
- To remove music files from BGM list, please select "delete" icon on the file you want to remove.
- To check the selection for BGM, please select "BGM list" icon to view all music files in the list.
![BGM 1 01 10 10.5 4 4.1 Opel Corsa 2 02 TAKE ON ME 3 02 Scorchio [1 / 3]](/content/2026/05/1025559/images/751fa864c3b6583592d6f5422ad87f7344b86f8122918d531b3c01bcf84db299.jpg)
- After BGM setting is complete, you can go to "Photo" folder to view photo, and press "BGM" hotkey to evoke the BGM function.
![JPEG 1 00.jpg 2 00342_blue.jpg 3 00354_pie.jpg 4 00483_unmp.jpg 5 00587_acd.jpg 6 00653_fractardesign.jpg 7 00678_vancouverdusk.jpg 8 00814_epicfalls.jpg 9 00912_endlessblue.jpg [7 / 51]](/content/2026/05/1025559/images/5c8a179183a59b9ad8c7f319353b2c5c8c475690ba9ece81d82d5130bf8689b2.jpg)
View Photo in Thumbnails Mode
You can view thumbnails of several photos at a time. To enable the thumbnail mode, please do the following:
- Go to "Setup Main Menu".
- Select "Other Settings".
- Choose "Thumbnail" on "Photo Display Setup" Menu.
- After go back to the folder, you will now view several photos displayed at a time.
![ph64473.wb1.jpg 1 2 3 4 5 6 [1 / 95]](/content/2026/05/1025559/images/7c1c098cf7e6133fe3bc451bd8382a564325f39bd7d97e4a284aef85eeba225f.jpg)
Video
Supported Video Formats
| Format File Extension | |
| DivX 3 AVI, DivX | |
| DivX 4 AVI, DivX | |
| DivX 5 HD AVI, DivX | |
| DivX 5 SD AVI, DivX | |
| DivX 6 HD AVI, DivX | |
| DivX 6 SD AVI, DivX | |
| H. 264 AVC MPEG4 part 10 (HD) MPG, MP4, MOV, AVI | |
| H. 264 AVC MPEG4 part 10 (SD) MPG, MP4, MOV, AVI | |
| MJPEG AVI | |
| MPEG-1 MPG, MPEG, DAT | |
| MPEG-2 HD MPG, MPEG | |
| MPEG-2 SD MPG, MPEG | |
| MPEG-2 VOB MPG, MPEG, VOB | |
| MPEG-4 part 2 ASP MP4, AVI | |
| VC-1 HD 1080i WMV | |
| VC-1 HD 720p | WMV |
| WMV 9 | WMV, ASF |
| WMV HD 1080i | WMV, ASF |
| WMV HD 720p | WMV, ASF |
| WMVPro | WMV, ASF |
| XviD AVI, MP4 | |
| HD 1080i/p | AVI, MP4, MOV |
| DVD | ISO, IFO |
To play video
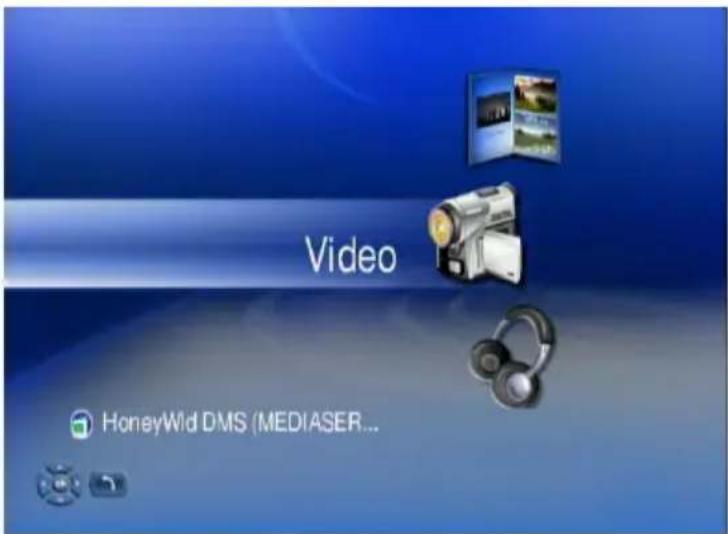
- Select "My Media" from Main Menu to enter server list, or press "VIDEO" hotkey on remote control.
-
All available file sources will be listed on the server list, including files stored at TEAC media systems media server in your computer, at USB flash stick, at USB external Hard disk drive, local hard disk drive or at other UPnP servers. Please select the media server you want to use and press "OK" button on remote control.
-
Select VIDEO mode and press "OK", or press "VIDEO" hotkey to enter video mode.
- If you select "TEAC media systems DMS", you may select "My Folder" to view the video files that organized in several subfolders as on your computer, or select "All Videos" to see all shared video files. Please use "Up" and "Down" buttons on the remote control to navigate those folders, and select the option by press "OK" or "Right" button on the remote control.
![Video 1 All Videos 2 My Folders [1 / 2]](/content/2026/05/1025559/images/8127c840838afc8bd26a0e7e4d9bd1f302d459e0422e1ca3cbaeb2c63bab7226.jpg)
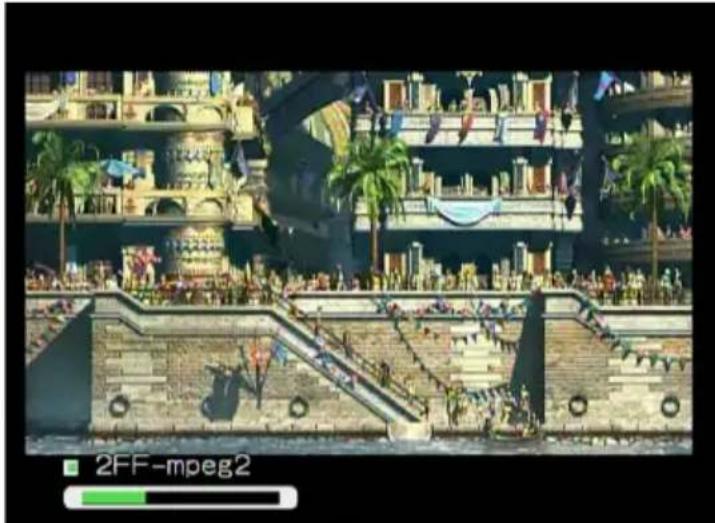
- Select the folder that contains the video files or the subfolders you want, and press "OK", "Play", or "Left" button on the remote control to play it.
natural_image
Illustration of a cityscape with people, buildings, and waterfront (no visible text or symbols)Note: icon stands for a folder; icon stands for a file.
Control Video Playback
Volume Control:
Press "Vol+" or "Vol-" buttons to control the volume

Mute:
Press "Mute" button to mute or un-mute the video.
Pause and Play:
Press OK button while video is playing you can pause the music by pressing OK button again can resume the music
Skip to Next or Previous File
Press "Next" or "Down" buttons to skip to next video file.
Press "PREV" or "UP" buttons to skip to previous music file.
Fast Forward:
Press “>>(FF)” button to fast forward the video file. Press several times to switch the speed.

Rewind:
Press “<<(REW)” button to fast backward the video file. Press several times to switch the speed.

Slow Forward
Press "Slow" button to slow forward the video file. Press several times to switch the speed.

Slow backward
Press "Slow" button and press "Left" button to slow backward the video file. Press "Left" button several times to switch the speed.

Viewing Video Information
Press "Info" button to get video information.

Video Viewing Effects
Zoom in and Zoom Out:
While video is playing, press ZOOM button to enable zoom in/ zoom out function.
- Press "Zoom" button and press "Left" button to enlarge the video screen.

natural_image
Person holding a magnifying glass over a forest background (no visible text or symbols)- When the video screen is larger than TV screen, press "Zoom" again and press "directions" buttons to move the video screen.

natural_image
Close-up of a person's face with blurred background (no visible text or symbols)- Press "Zoom" button and press "Right" button to shrink the video screen
natural_image
Floral arrangement with pink, yellow, and white flowers against a black background (no text or symbols)Repeat and Repeat All
You can turn on the repeat function to continuously play individual video or video within a folder.
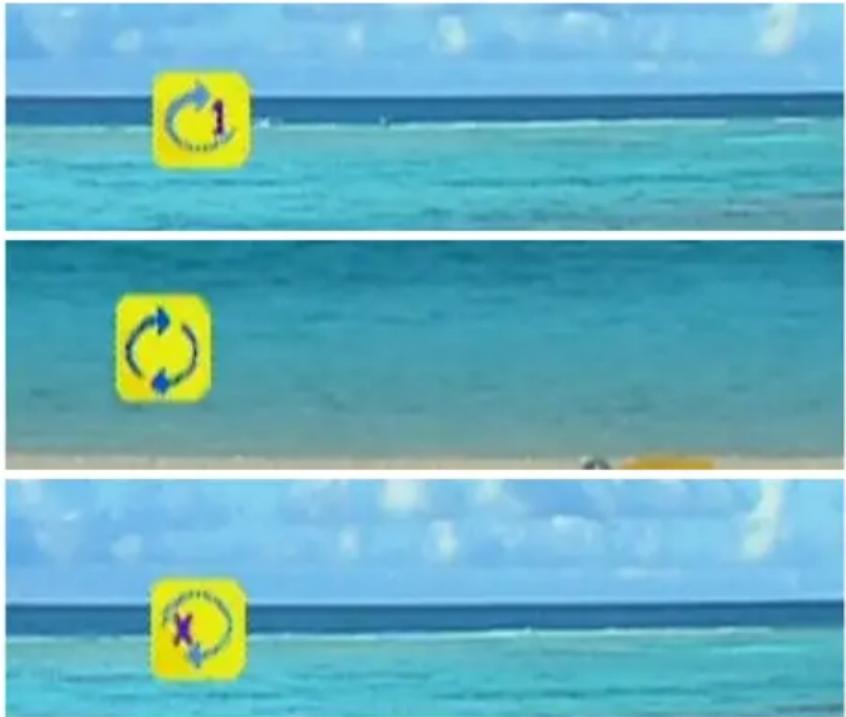
Press "Repeat" button once to repeat playing current video file.
Press "Repeat" button twice to repeat all video files in current folder.
Press "Repeat" button for third time again to disable the repeat mode.
Subtitles and Languages/Audio-Tracks
If you are playing “VOB” files or “AVI” files, “SUB” button and “LANG” button are available for the subtitle and language switching. Press “LANG” to change different languages or audio tracks that are included in “VOB” files; and press “SUB” button to change different subtitles in both “VOB” and “AVI” files.
Note: To use Subtitles, make sure that it is in the same folder as your video file and that the files are both named exactly the same.
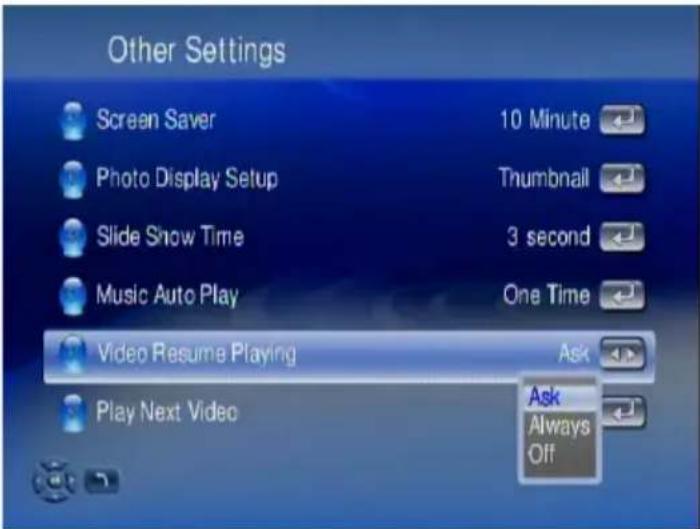
Video Resume Playing
The WAP-V6000 supports resume video playing to the previous point where the video is interrupted. The device needs to keep powered on to enable this function.
![Do you want to resume the playing? Yes No [1 / 2]](/content/2026/05/1025559/images/11c77ee88e3faf248e303d5d3667ce93d82442b4fb933a3c6f3ae1ecf7e0cf90.jpg)
The default setting is that it will ask you every time whether you want to resume the playing when you are back to the interrupted file. If you want to change the setting, please follow below instructions:
- Go to "System Set Up"
- Select "Other Setting", and highlight "Video Resume Playing".
You can disable the setting or make it always on without asking.
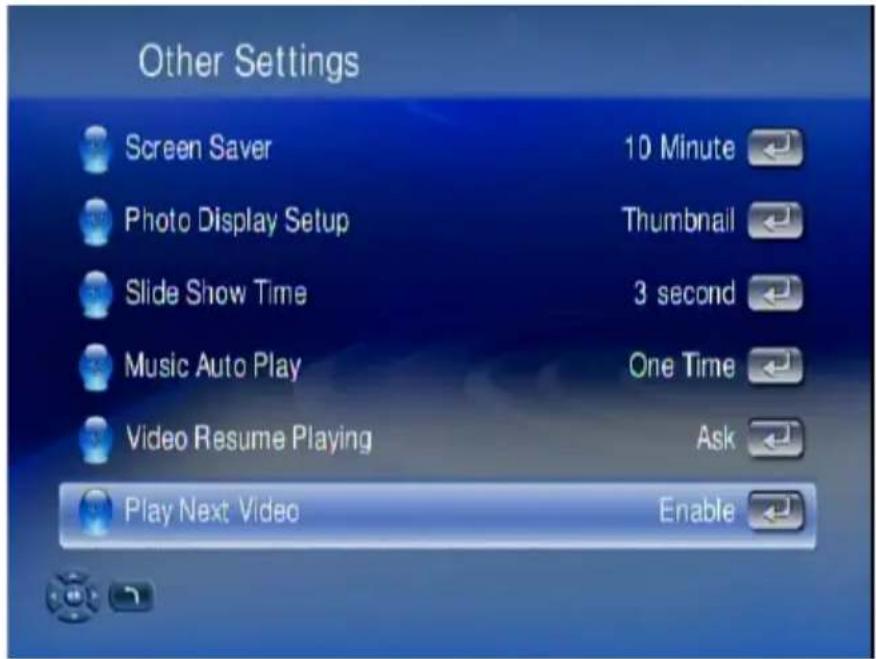
Play Next Video Automatically
The default setting is the all the video files in one folder will be played continuously until the last file and then return to the main menu.
If you want to play only the selected file and then return to the main menu, please go to "Other Settings" and set "Play Next Video" to disable the function.
Search Video
The WAP-V6000 provides two options to seek the video frame. One is to seek by percentage of total file length; and the other is to seek by time.
Seek by Percentage
While video is playing, you can press the numeric keys on the remote control to Jump to your destination. For example, when you press “7” + “0”, you will jump to 70% of the total file length.

Seek by Time
Firstly, press "0" of the numeric keys on the remote control to enter into time seek mode. Then you can input the time frame you want to search.
![Goto: 00:0_ [hh:mm] 0:00:09/0:01:31 WmV/HD](/content/2026/05/1025559/images/682b40cbf82b928db6575a0ddbc948c26d47fcb848ca11142b3052fcd5defa94.jpg)
DVD Menu Navigation
The WAP-V6000 support viewing DVD files as you are playing a DVD menu. Follow below steps to enable DVD menu navigation feature.
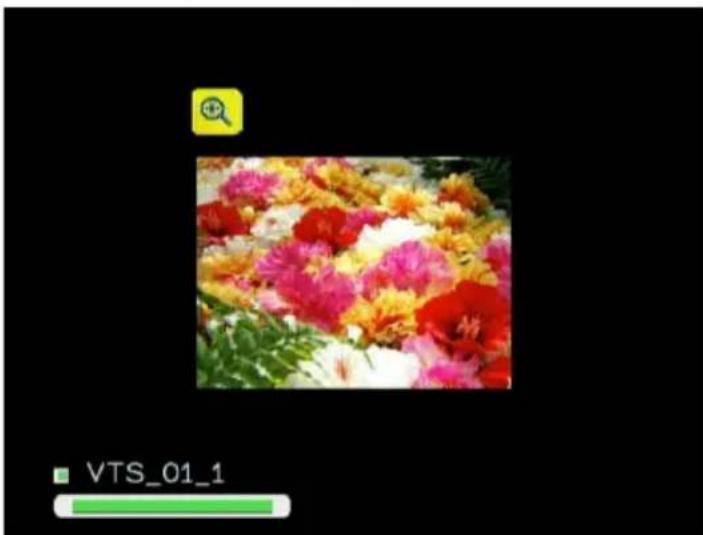
- When you select a DVD file, choose the item with disk icon and press OK
![VIDEO_TS 1 VIDEO_TS 2 VTS_01_0 3 VTS_01_1 4 VTS_01_2 5 VTS_01_3 6 VTS_01_4 7 VTS_01_5 8 VTS_02_0 9 VTS_02_1 [1 / 11]](/content/2026/05/1025559/images/ed1847b80fe1016892b7690215f047d2a4d510e1d5d294aac8474381c6fcde16.jpg)
- The Menu will appear. Use the navigation buttons on the remote control to select the item you want.

Web Browser
To open the Web Browser
Wherever you stay in the user interface, press 'Home' button on the remote control to return to the main menu as shown below. Select the icon which shows 'Web Browser' and press 'ok'.
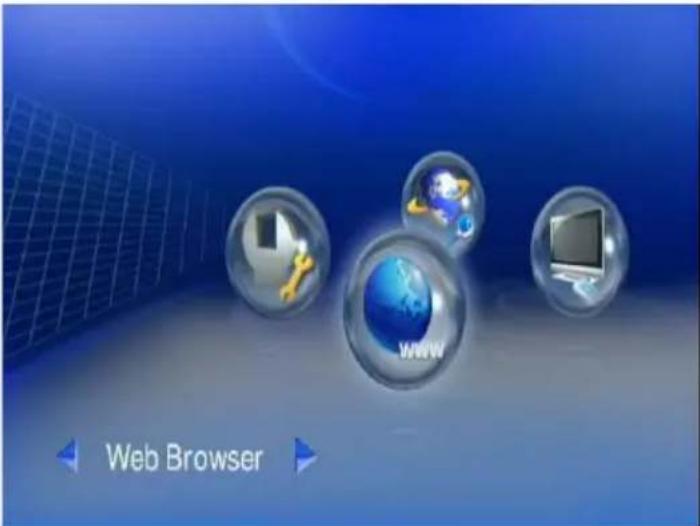
The homepage of the web browser will be displayed, then you can surf the web using the remote control or keyboard and mouse.
An optional USB keyboard and mouse can be plugged to facilitate the web surfing.
You can EXIT from the web browser by selecting 'Exit' or pressing Back button on the remote control.
Using the Remote Control for Browser navigation
While using the remote control, the key definition is as follows:
| KEYPAD FUNCTION DESCRIPTION | |
| BACK | Escape from the browser and return to the main menu. |
| VIDEO Left-click | k of the mouse |
| MUSIC | Press to enter keyboard mode and press again to be back to mouse mode. |
| iMedia Right-click | ck the mouse. |
| DIRECTIONS To move the cursor. | |
| OK/Play Left-click or Enter | |
| SUB & LANG | Select different subtitles and languages when playing video file. |
| NUMBERS | Equivalent to the numbers or characters on the keyboard. |
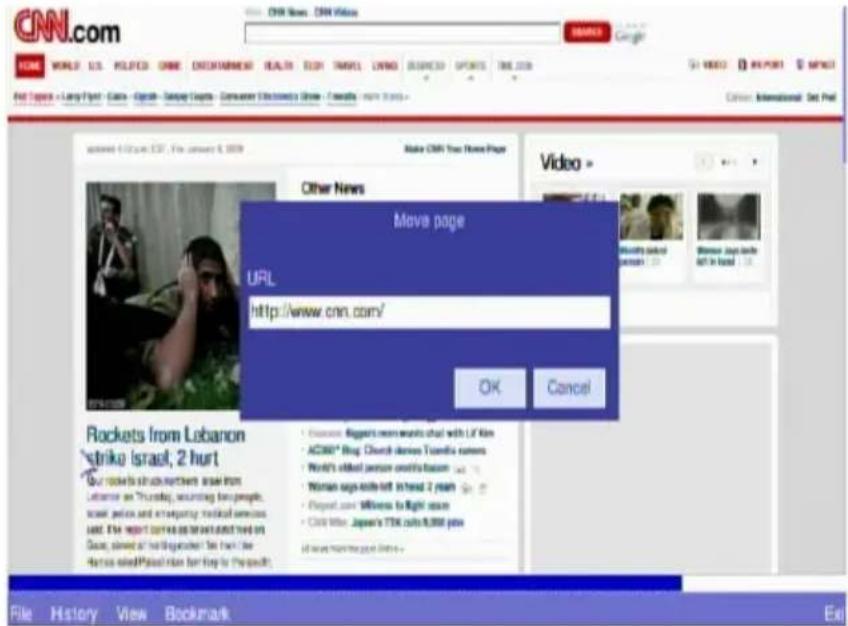
Tool bar of the browser

Opening a web page
Press 'File' → 'Move page' → Enter the web address you like to go.
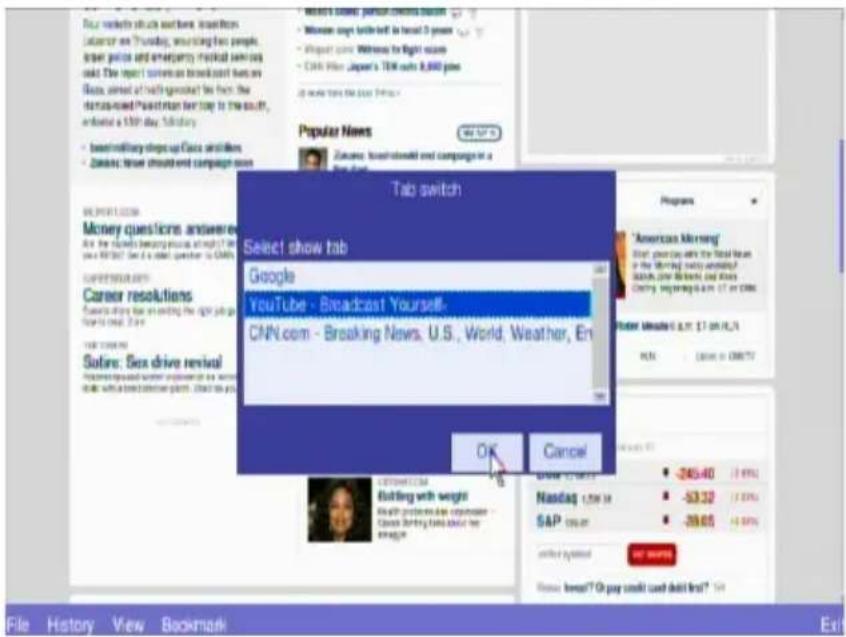
Tab function
Tabs can be opened and switched when you like to look at different web pages more efficiently.
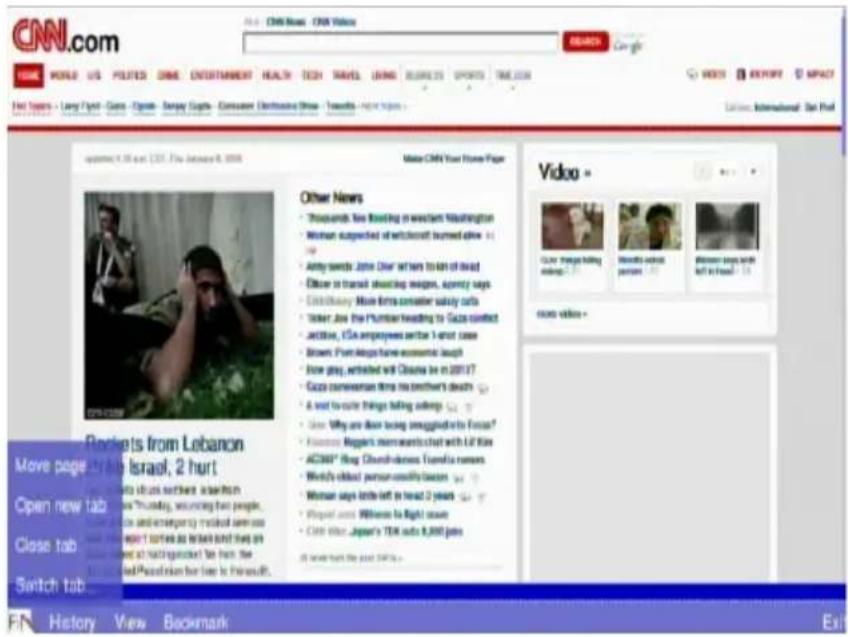
Press 'File' → 'Switch tab' → Select a tab to be opened.
Previous, Next and Home Pages
Press 'History' → 'Back' or 'Forward' or 'Home'.
View of the pages
The web page being loaded can be stopped or reloaded by choosing the icon from 'View'. Text size can be changed, and the whole page can be zoom in or out for more convenient view by the users.
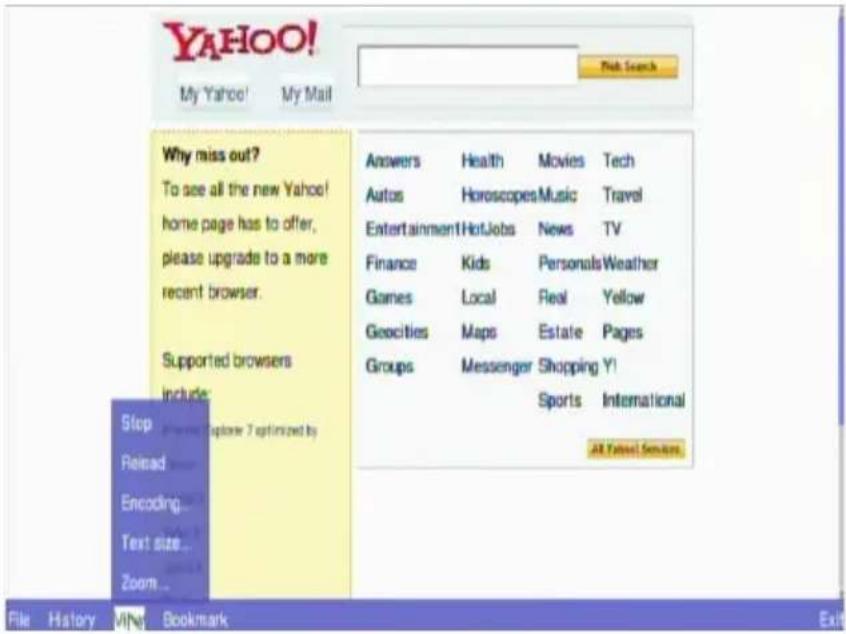
Bookmark function
Bookmarks can be added, loaded and deleted by using 'Bookmark'

Live365™ is an Internet radio service that provides unlimited on-demand access to thousands of radio stations. The audio is streamed directly over the Internet.
Follow below steps to access the radio stations:
- Make sure your network setting is correct and be able to access internet.
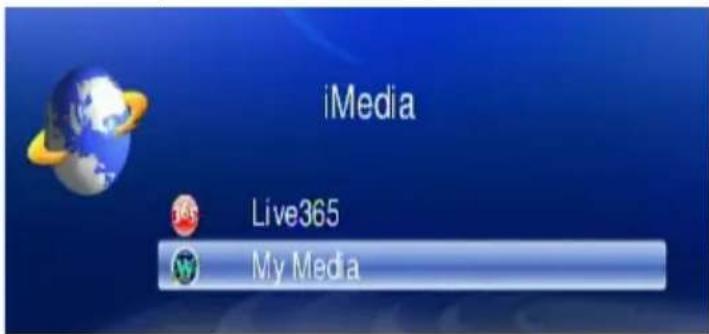
- Select "media" from main menu or press "media" button on the remote control.
- Select "Live 365" and press "OK" button on remote control.

- Select a catalog you prefer from list, or select "All Broadcasts" to browse all radio stations.
![Live365 1 All Broadcasts 2 My Presets 3 Recommendations 4 Editor's Picks 5 Indy/Official 6 Professional 7 Free Stations 8 Alternative 9 Blues [1 / 31]](/content/2026/05/1025559/images/36399eb32277fedb7d188c4b91c8497ddb5df50e504cfaa3855cf893283ba2bf.jpg)
- Select a radio station from list, and press "OK", "Play", or "Left" button to play it.
![All Broadcasts 10 BlackGospel Radio 11 THAT 70's CHANNEL 12 WKTZ-FM Jones College 13 Old Christian Radio HB 14 Absolutely Country 15 Modern Rock Classics 16 eXTreme Gospel 17 EDGEWATER RADIO - 18 CRIME TIME OTR [15 / 54]](/content/2026/05/1025559/images/098d21fa20d66e79d685e9e59d334f7c6131ff1e7dd34a0210d599dd605cf901.jpg)
Note: stands for a web radio station.
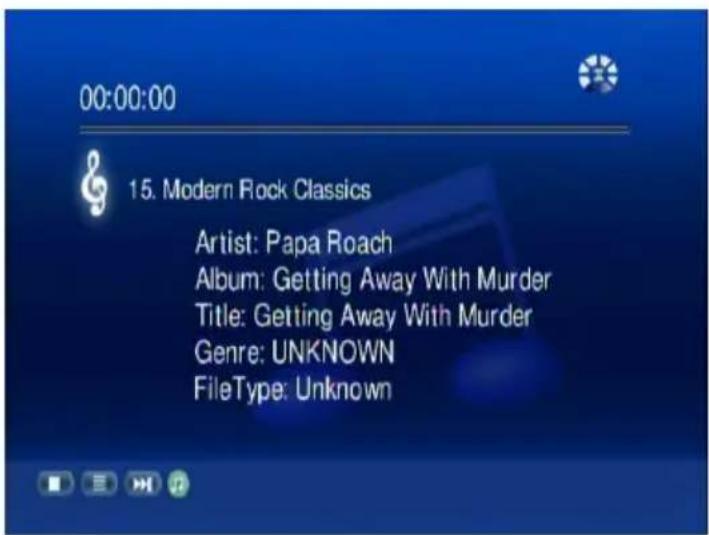
Live365- Playing
Play Internet Radio - My Radio
- Make sure your network setting is correct and be able to access internet
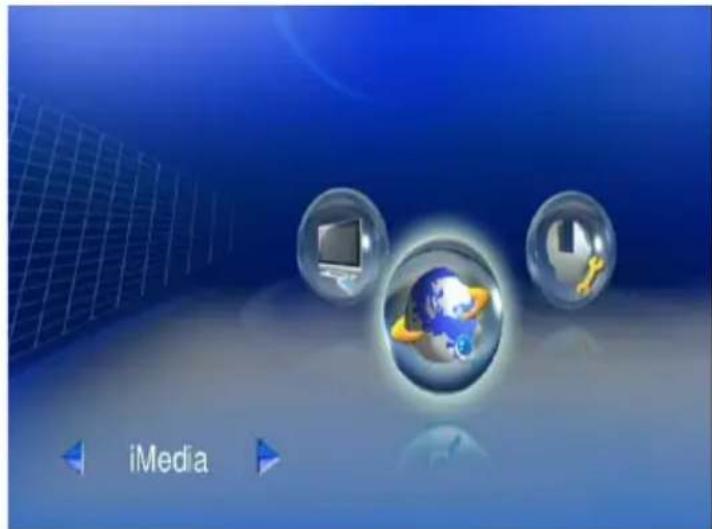
- Select "iMedia" from main menu or press "iMedia" button on the remote control.
- Select "My Media" and press "OK" button on remote control.
- Select "My Radio" and press "OK" to enter.

- There are some radio stations listed as default; you can select one of the stations from list and play it.
- You can also add your favorite radio station manually by select "Add New Entry".

- Select "Add New Station" or "Add New Folder" to configure a new radio station or Folder; then enter related information of this new radio station or Folder.
Play Internet Video - My Video
- Make sure your network setting is correct and be able to access internet
- Select "iMedia" from main menu or press "iMedia" button on the remote control.
- Select "My Media" and press "OK" button on remote control.
- Select "My Video" and press "OK" to enter.
- There are also some internet video stations listed as default; you can select one of the stations from the list and play it.

Note: stands for a web video station.
You can press the Zoom key on the remote, and zoon in/out icon will show up. . Press "right" or "left" on the navigation button to enlarge or reduce the screen
Screen enlarged

Screen reduced
Viewing Youtube Content
You can use the WAP-V6000 to view Youtube content.
To view YouTube content, follow these steps:
- Make sure your network setting is correct and be able to access internet
- Select "iMedia" from main menu or press "iMedia" button on the remote control.

- Select "Youtube" and press "OK" button on remote control.

WAP-V6000 lists the Youtube content in 7 categories, Choose the item you will view and press "OK".
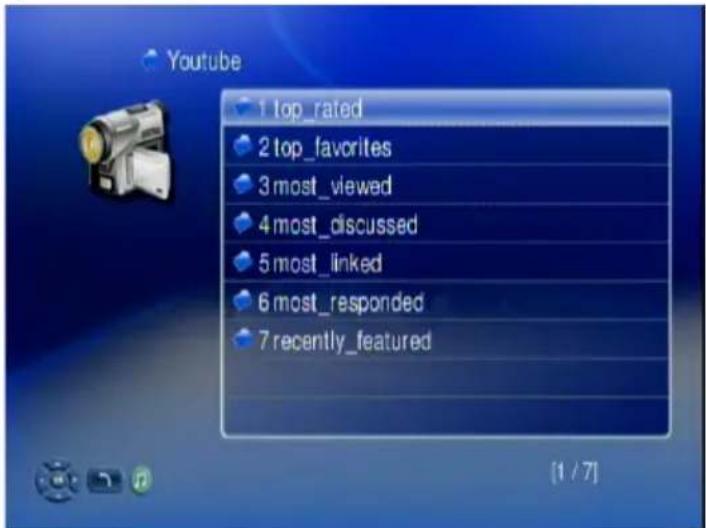
Note: The Youtube content on WAP-V6000 is streamed from www.youtube.com
Add/Delete the Internet Radio/TV Station Lists
You can manage the iMedia list at the WAP-V6000 onscreen menu.
- Go into the "Favorites".
- Press the MENU key on the remote control. The Menu list will pop up. You can now add. modify, delete and backup your list iMedia list.
![My Video 1 News 2 Sport 3 Education 4 Music 5 Localizat 6 Entertain << Add New Menu Add Entry Modify Entry Del Entry Backup List Restore List Clean List [1 / 7]](/content/2026/05/1025559/images/c1cfdb5f2c596ccba7fab97b795845e62970e9fbdaeaeeafb9abe40e41d7a560.jpg)
BitTorrent Downloader
The model WAP-V6000 incorporates the BitTorrent download function. Make sure the local 3.5" HDD is already installed before enabling this feature. (Please refer to HDD Installation as mentioned in this operation manual).
Enabling the BitTorrent Function
After the HDD is installed, follow below steps to start the download.
- Go to the "Setup Main Menu", and highlight "BitTorrent Setup"
- Select "Enable BitTorrent".
- The option, Max Upload Connection, is to prevent the traffic of your outgoing network from being too heavy, and keep a high CPU efficiency of the device.
- The option, Max Upload Rate and Max Download Rate, is for users to utilize available bandwidth according to individual network management.
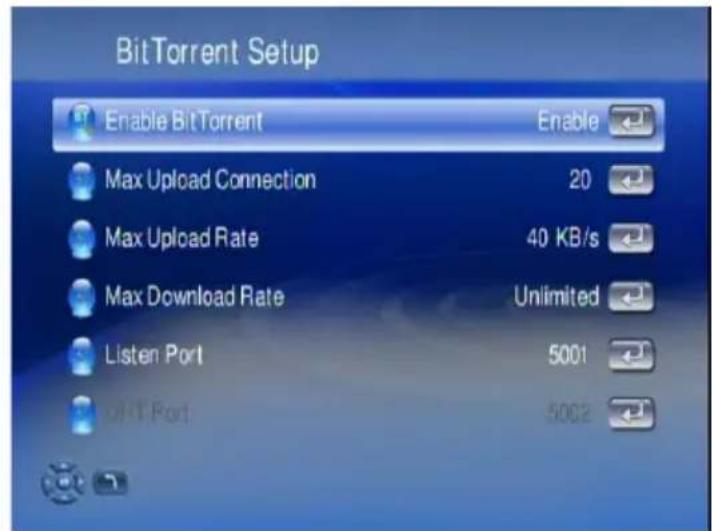
- The option, Listen Port and DHT Port, is for users to configure the maximum network efficiency, which are correspondent to the configuration of local NAT and Routers.
Add New Torrent Seed and Start Downloader
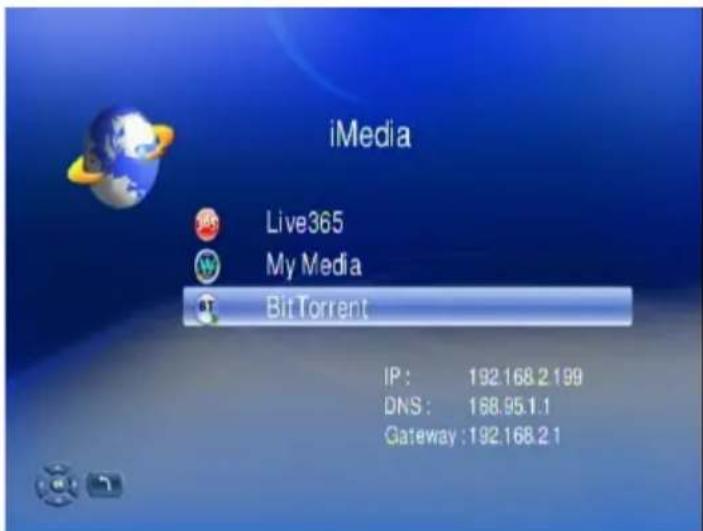
- Go to "iMedia" and select "BitTorrent"
Have your .torrent seed file ready at USB storage or local HDD. Insert your USB storage to the WAP-V6000, Enter into "BitTorrent".
- Select "Add New Torrent" and press "OK"
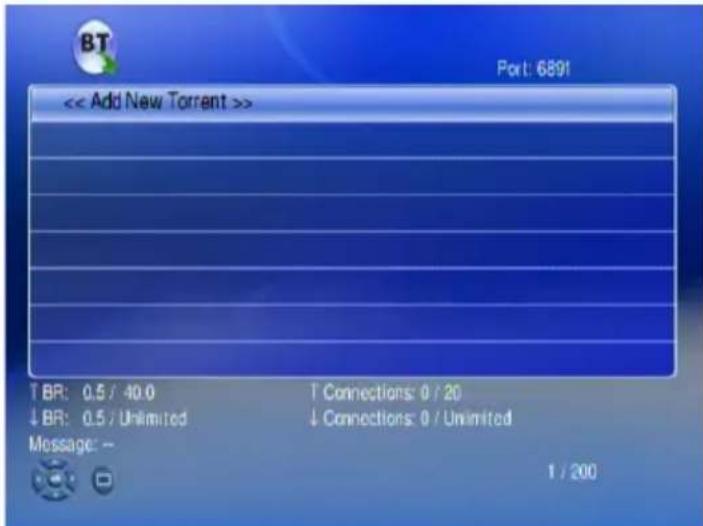
- Enter into the location where the .torrent file to be selected is stored.
![[01] HDD Disk 1 [02] USB Disk 1 IP : 192.168.2.160 [2 / 2]](/content/2026/05/1025559/images/cb6e2de13e46085084a66221a5db4767a3c1b743d5d0d2d4c85a8c400612c44e.jpg)
- Select the torrent files and press "OK".
![Torrent OK 1 Fedora-9-x86_64-Live-KDE.torrent 2 Fedora-9-i386-DVD.torrent 3 Fedora-9-i686-Live.torrent 4 Fedora-9-i686-Live-KDE.torrent 5 Fedora-9-x86_64-DVD.torrent 6 Fedora-9-x86_64-Live.torrent 7 XP_SP3.torrent 8 100.torrent [1 / 8]](/content/2026/05/1025559/images/e4a06dd101c90227c8753b2c8ba8f6f5d74731fb1dceefdd4f7c7bdcc427ae33.jpg)
- New downloading activity will appear on the menu.
Make sure that WAP-V6000 is connected to Internet, to keep Bit Torrent active.
The downloaded files will be stored in the path: MyMedia\HDD Disk 1\bt, please refer to the following screenshots.
![[01] HDD Disk 1 [02] MediaServer2(Zyxel) [03] MediaServer [04] FCHU-PC: Ichu: [05] birdy [06] NB: chan_ph: [07] DMS (MEDIASERVER2) [08] CH3SNAS_amigo [09] USER-FEDIM7YCDN IP : 192.168.2.160 [1 / 31]](/content/2026/05/1025559/images/a165b88d1727678f0268674ecbf2218de770059def667211f3bc69bccf6b7012.jpg)
![HDD Disk 1 1 Music 2 Photo 3 Video 4 bt 5 HD.Club- Alisan. Trailer -80Mbps.mpg 6 pvr [4 / 6]](/content/2026/05/1025559/images/0231d7955a5da789e02a7ca321d5dc1862330af3676fee9ee2983afb37511c01.jpg)
![bt 1 session 2 Fedora-9-i686-Live-KDE 3 Fedora-9-i686-Live 4 Fedora-9-x86_64-Live-KDE [1 / 4]](/content/2026/05/1025559/images/8959aefb6ea85aeff8eecab942407da09b7c02ad567482b9eec170368be90c83.jpg)
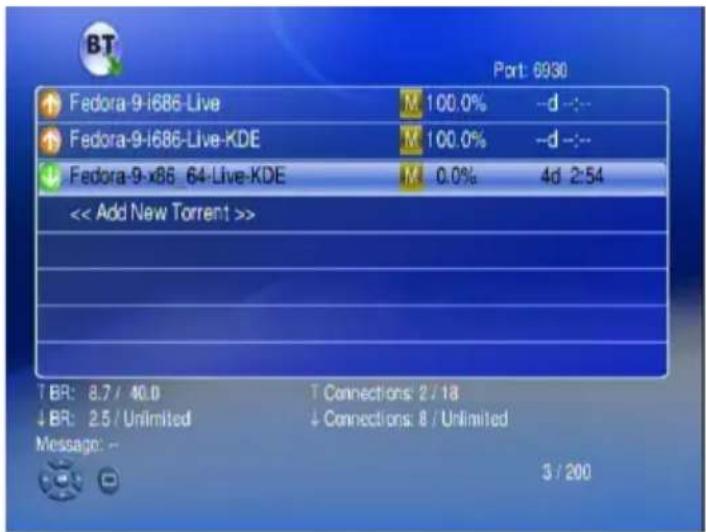
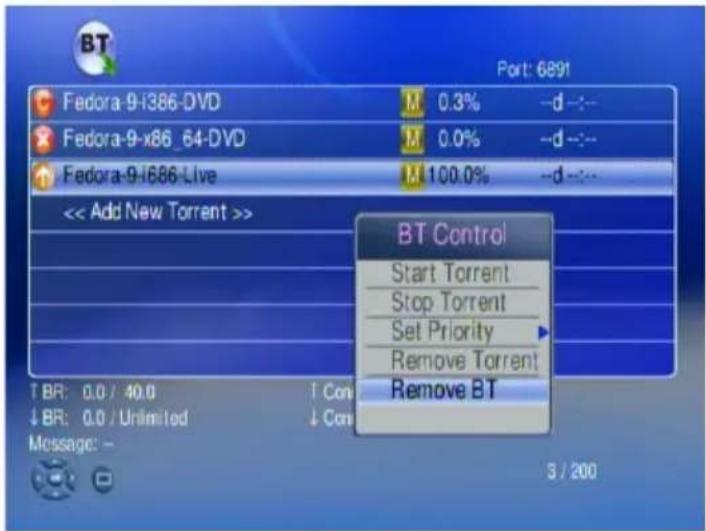
BitTorrent Management
The BitTorrent Control Menu offers you the ability to start, stop, set priority and remove the files. You can press MENU key on the remote control to enter the control menu.
- Use Navigation key to select the torrent files you want to manage.
- Press "MENU" key in the remote control, the "BT Control" Menu will appear.
- Use Navigation key on the remote to select the function you want to perform.
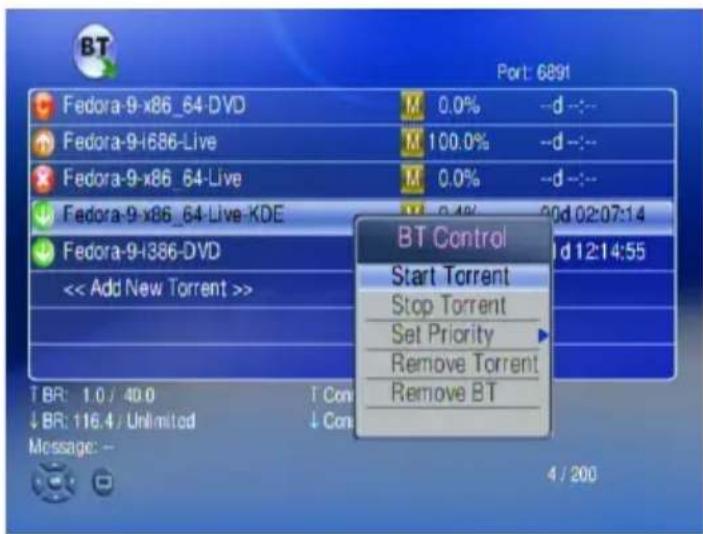
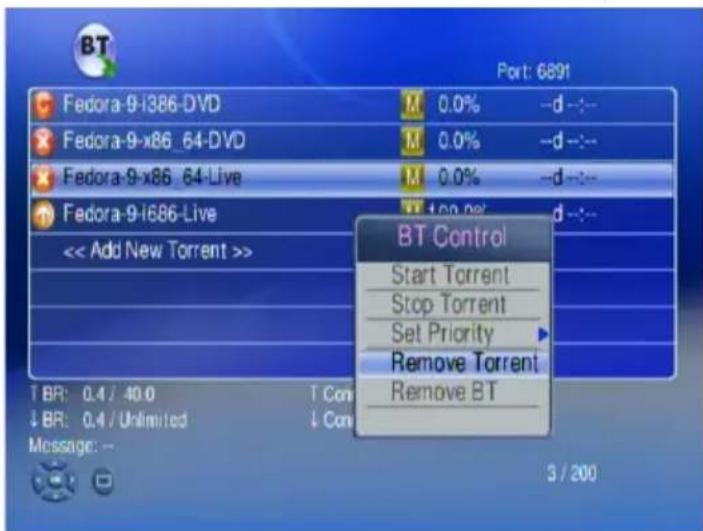
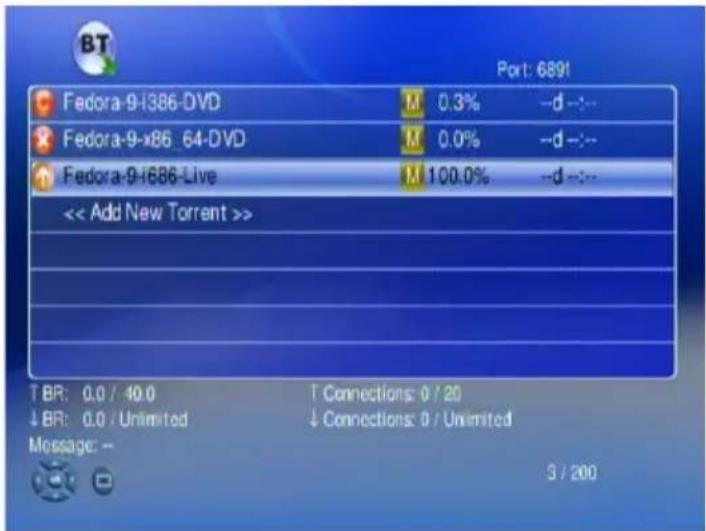
Removing Torrent files
On the "BT Control" Menu, you can highlight the torrent files and select "Remove Torrent" to remove the torrent files which are downloading.
Removing Completed Download Files
If the files have been downloaded completely, there may be some other data along with the main torrent files. You can highlight the files and press “OK” to view all the data contents.
- Highlight the download completed files
To view all the data contents press OK.
You can press "Display" key on the remote to view the files info.
- If you want to remove all the data, you can highlight the files and select "Remove BT" and remove all the data which have been stored at local HDD.
Firmware Upgrade and Reset to Default
Upgrade by Using USB Flash Disk
WAP-V6000 supports using USB storage for updates. Follow the steps below to check for product updates:
- Have your USB storage ready, download by computer the latest firmware from www.teac.de to USB storage.
- Insert the USB flash to the USB port of WAP-V6000.
- Go to "Set Up Main Menu" "Version" and choose 'Firmware upgrade"
- Choose "USB Upgrade", the system will automatically search available firmware code on your attached USB storage.
- Follow the onscreen instructions to complete the upgrade.
- When the upgrade is successfully finished, WAP-V6000 will reboot automatically.
ATTENTION: Do not power off the system or remove the USB storage while the upgrade process is running.
Reset to Default
You can restore all configurations to factory default settings by following below steps:
-
Go to "Set Up Main Menu" "Version", and choose "Reset to Default"
-
Make sure you want to do so, then press "OK" button to restore system to default settings.
ATTENTION: Restoring WAP-V6000 to its default settings will erase the network set up and media sever configuration. You will need to set up WAP-V6000 again to run on your network and to access media files.
Miscellaneous Settings
The user interface language and other settings in your WAP-V6000 are configured in the “System Setup” of the “Setup Main Menu”. Please select the item that you want to configure and press OK button or “Right” button on remote control to enter the related sub-page. After configuration, press Back button or “Left” button to leave the setup menu and save the configurations that you changed.
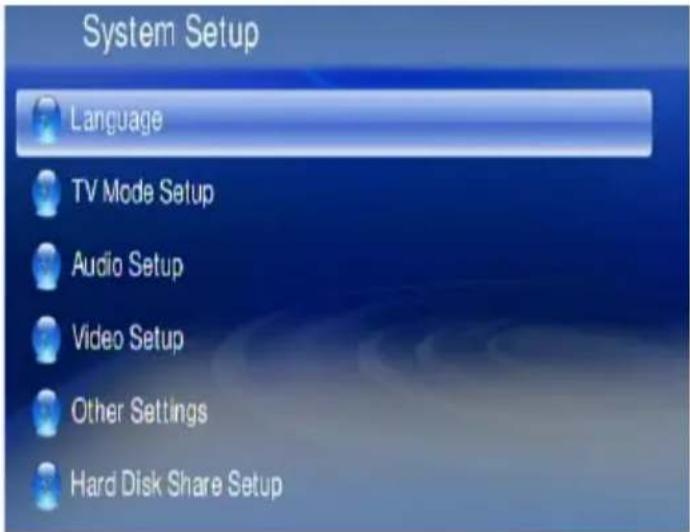
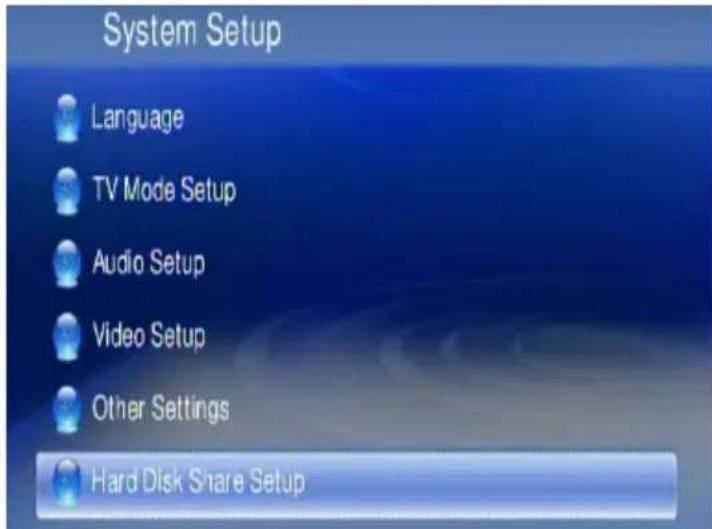
System Setup
If you want to change the configuration of your setup, you can select the "Setup" from Main Page, and select "System Setup" from Setup Main Menu. You can select, configure or adjust Language, TV mode, Audio, Video and other settings here.
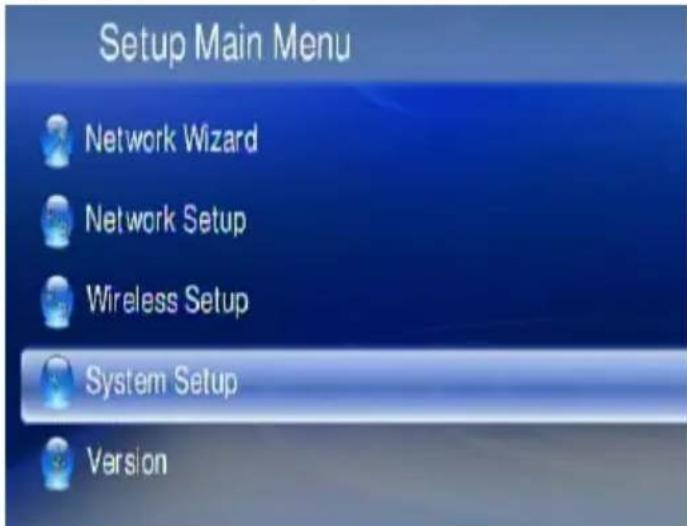
Below table is a brief description for the System Setup selection.
| Item Name Settings Action | ||
| Language Language Select | ||
| TV Mode Setup | TV System/ Video Output/Video Scale | Configure |
| Audio Setup | Digital Audio Output/AnalogAudio Output | Configure |
| Video Setup | Brightness/ Contrast/ HUE/Saturation | Adjust |
| Other Setting | Screen Saver/ Photo DisplayMode/ Slide Show Time/ BGMusic | Configure |
| HardDisk Share Set Up User Name / Password Configure | ||
Language
Here you can chose your preferred user interface language.
Language Table
| Item Name Settings Action | ||
| Language | English/German/French/Italian/Spanish/Portugese/Turkish/Netherlandish/Serbian/Hewbrew/Traditional Chinese | Select |
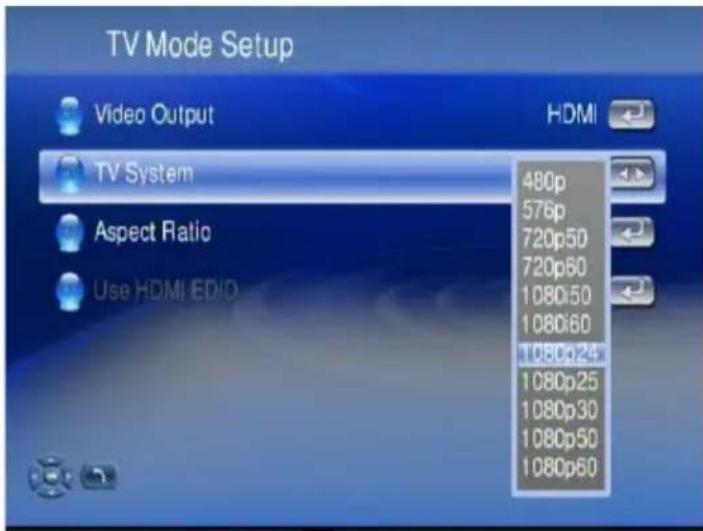
TV Mode Setup
This provides you a menu to change the TV mode setting, including the Video output, TV system and aspect ratio.
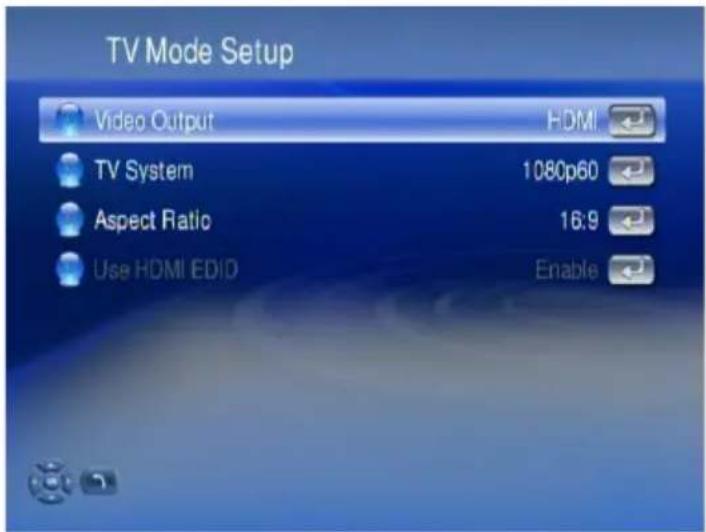
TV Mode Setup Table
| Item Name Settings Action | ||
| Video Output P-S | CAN YPbPr/ S-Video/ HDMI Select | |
| TV System | NTSC/480p/720p60/1080i60/1080p24/1080p60 | Select |
| Aspect Ratio 4:3 | PS/ 16:9/ 4:3 LB Select | |
Note: For some video film which is with 24 frames per second, you may see poor quality on the display. Please select 1080p24 as the TV output mode, and make sure your TV set support 1080p24 before the trial.
Audio Setup
Please make sure the Digital Audio Output mode (SPDIF-PCM / SPDIF-RAW) is turned on, if you are connecting the Optical/Coaxial cable.
Audio Setup Table
| Item Name Settings Action | ||
| Digital Audio Output ON | / OFF Select | |
| Analog Audio Output | STEREO / MONO R / MONO L / MIX MONO | Select |
| DTS SPDIF RAW (pass through) - | ||
| AAC | SPDIF PCM / SPDIF RAW | Select |
| AC3 | SPDIF PCM / SPDIF RAW | Select |
| WMA PRO | SPDIF PCM / SPDIF RAW | Select |
Note: For DTS (Digital Theater System) audio tracks, the device passes it through digital audio output port (Optical or Coaxial cable) to an external decoder.
Video Setup
The Video Setup provides you settings to enhance the video quality to best match with other sources on your screen.
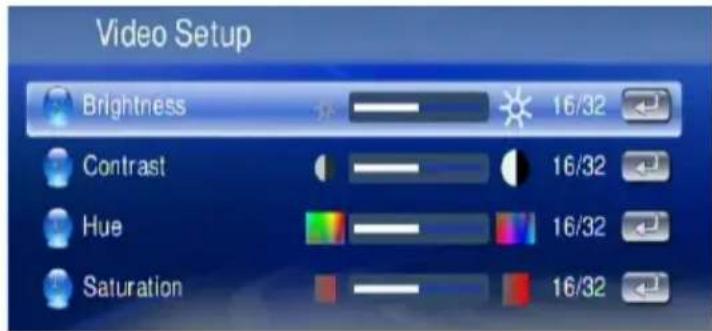
Video Setup Table
| Item Name Settings Action | ||
| Brightness 0 ~ 32 Adjust | ||
| Contrast 0 ~ 32 Adjust | ||
| HUE 0 ~ 32 Adjust | ||
| Saturation 0 ~ 32 Adjust |
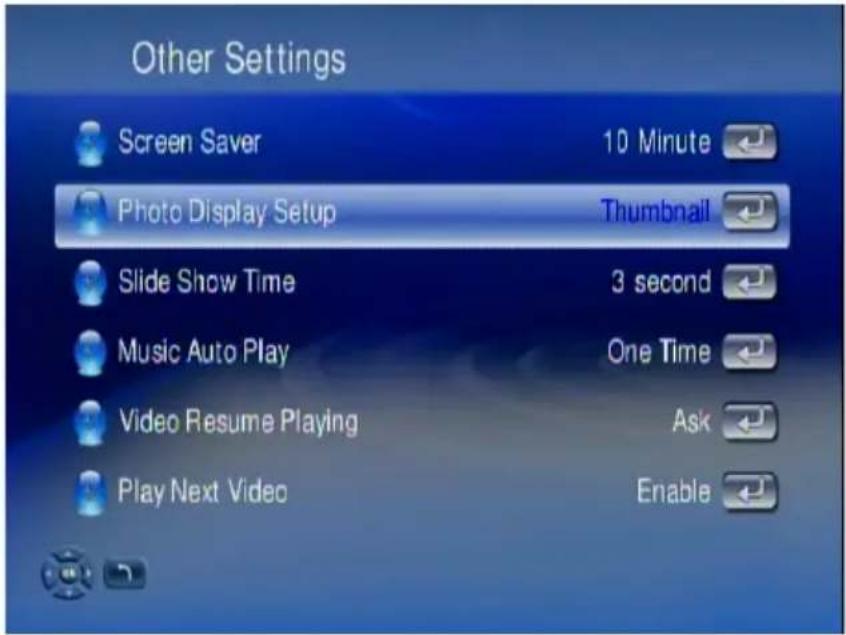
Other Settings
The "Photo Display Setup", "Video Resume Playing" and "Play Next Video"
Are explained in the related chapters for media playback. In “Other Settings” you also can configure the “Screen Saver Time”, “Slide Show Time” and “Music Auto Play” functions.
The Advanced Setting can setup the Network Activity LED and the LCD screen.
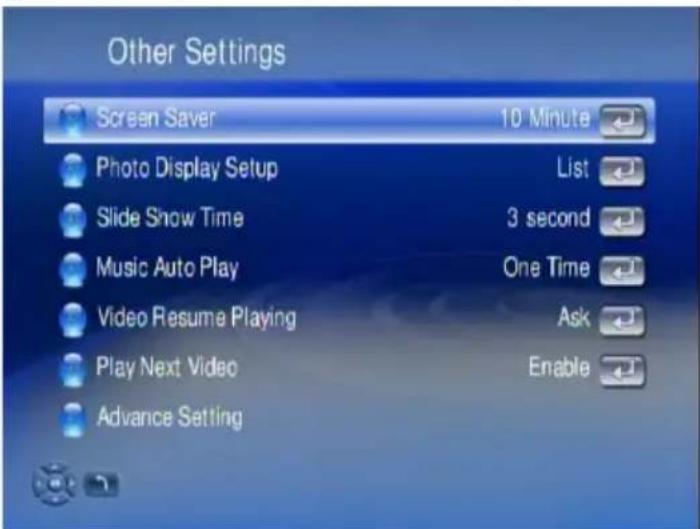
Other Settings Table
| Item Name Settings Action | ||
| Screen Saver OFF/ 1 min | ~30 min Select | |
| Photo Display Setup List | / Thumbnail Switch | |
| Slide Show Time 1 sec ~ | 3 min Select | |
| Music Auto Play Repeat | All/ OFF/ One Time Select | |
| Video Resume Playing Ask/Always/Off Switch | ||
| Play Next Video Enable/ | Disable Switch | |
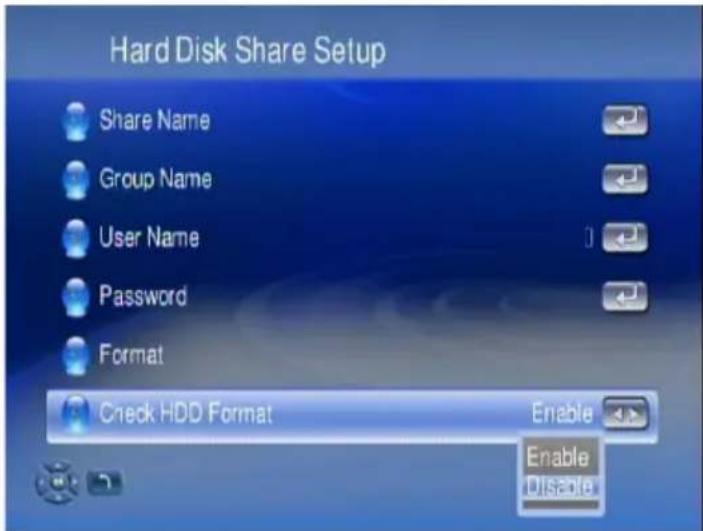
Hard Disk Share Setup
If you have installed a Hard Disk Drive into your WAP-V6000, you can see the "Hard Disk Share Setup" here to configure your HDD Settings.
You can rename the default Share Name, Group Name, User Name and Password by onscreen keyboard.
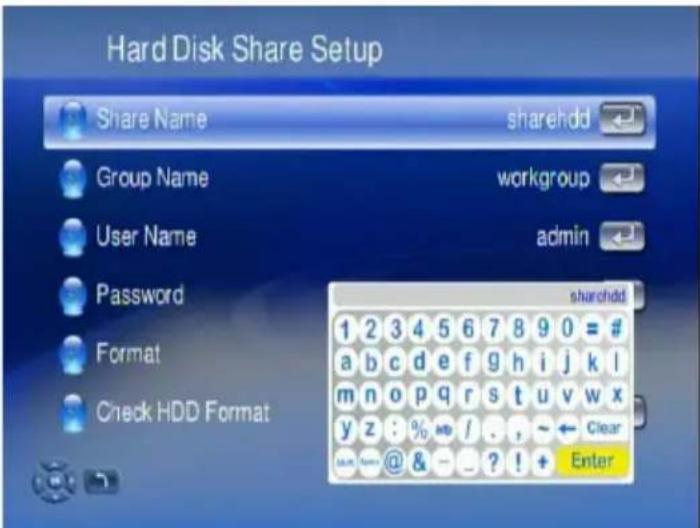
To format the HDD, select the "Format" function.
Check HDD Format: The device will check the HDD format every time it is powered on. This can be disabled by selecting the option below.
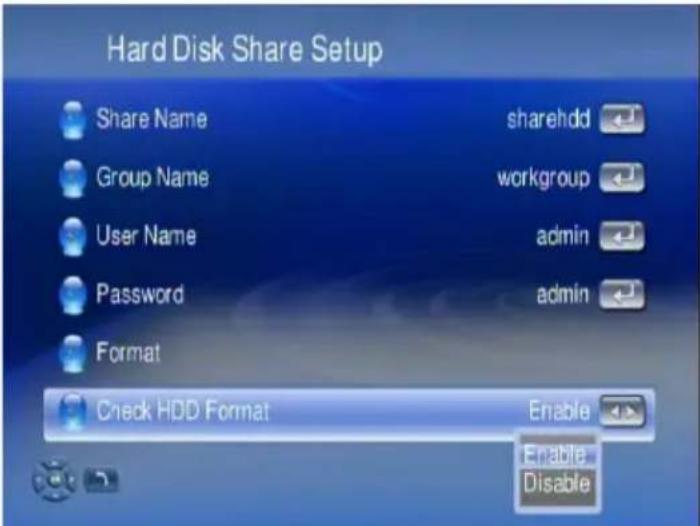
Note: Please remember if you have disabled this function, in case you need new formatting of the HDD, once you replaced the HDD in your WAP-V6000!
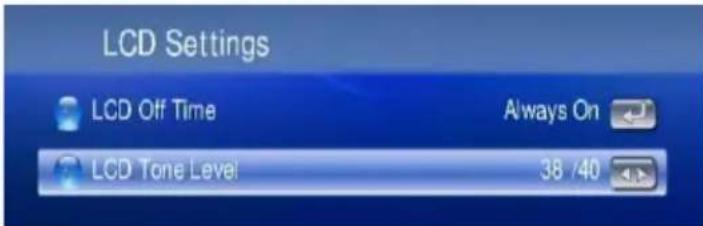
LCD Settings
Here, the contrast of the front LCD panel text display can be adjusted.
Bit Torrent Setup
Go to Setup Bit Torrent Setup to configure the relevant items.
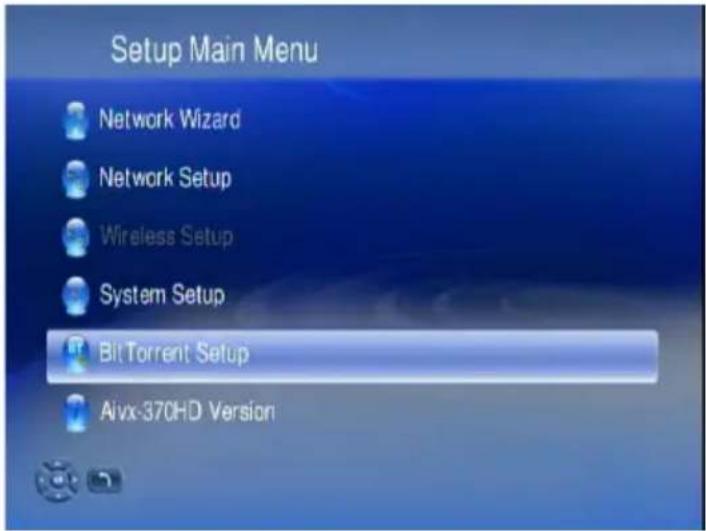
The items to be configured are listed as follows:
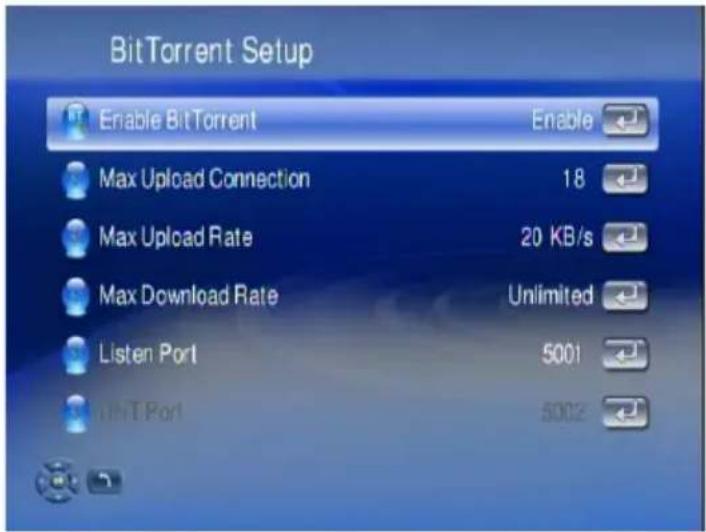
Enable Bit Torrent
The Bit Torrent function can be turned off by this option.
Max Upload Connection
To limit a maximum number of bit torrends at a time to comply with the performance of your network or your internet connection.
Trouble Shooting
No Television display or Poor Display.
- Make sure your TV is turned on and switched to the correct input.
- Make sure WAP-V6000 is turned on and switched to the correct TV mode.
-
If the TV Mode that you are using is not the right one for your television, you may not be able to see the display on television. To fix this problem, push "Output" key on the remote control. You can cycle through each of the possible TV modes to find and select the correct one.
-
Make sure you are using the correct video cables and that they are connected firmly to WAP-V6000 and to your TV.
-
The Power cords for WAP-V6000 and your TV are securely connected to a working power source.
Unstable Display with 1080p24 films
For some video film which is with 24 frames per second, you may see poor quality on the display. Please select 1080p24 as the TV output mode, and make sure your TV set support 1080p24 before the trial.
No Audio Output with films with DTS encoded audio track.
WAP-V6000 does not decode audio with DTS format, but pass through to S/PDIF for external AV amplifier. For the films with DTS sound tracks, pls enable 'Digital Audio Output' and use an external decoder.
WAP-V6000 does not find my network.
If you use wireless networks, make sure that the Wireless Network Name (SSID) and the security settings of WAP-V6000 and media server match exactly. If you use wired network, make sure the cable hooked correctly.
WAP-V6000 does not find the UPnP media server.
- Verify that the TwonkyMedia Server software was installed on your computer.
- Verify that WAP-V6000 and the computer running the software are on the same subnet and that they can communicate with each other. In most cases, this means that the first three fields of the two IP address should be the same.
- Make sure you have setup the media server for importing media files.
TwonkyMedia Server can only be seen for a short time
Some firewall or antivirus software may cause failures of the UPnP communications between WAP-V6000 and the Media Server. Please configure your firewall setting to allow the access of "UPnP" and Media Server.
If you disable the firewall or antivirus applications while testing Media Server access, your computer is not protected! Therefore we do recommend to setup carefully.
WAP-V6000 does not receive a valid IP Address
- Verify that a working DHCP server is on your network. computers on the network should get IP addresses in the correct range.
- You can use a Static IP Address of there is a problem connecting to the server.
- If you are using a wireless network, verify that WAP-V6000 is associated with the correct SSID, and that the WEP settings on WAP-V6000 match the setting on your access point.
No Subtitle when playing "mpeg2" files
Please make sure to enable the “subtitle” function by press “subtitle button” every time when you are watching mpeg2 video files; also please enable this function with each mpeg2 video file that has subtitle file with it.
No Subtitle when playing "mpeg2" files after pressing "subtitle" button
Please make sure the conversation of the mpeg2 video file has begun before pressing “subtitle” button.
No Subtitle when playing "mpeg2" files
Please note if you have enabled the "Transcoding" function, the subtitle function might not work for some video files.
Fast forward or slow forward is not working
Please note if you have enabled the “Transcoding” function, the “fast forward”, “fast backward”, “slow forward”, and “slow backward” functions will not work due to limitation.
Can not add music files to BGM list?
Please make sure you did not add more than 500 music files to BGM list since the capacity of BGM list is 500 files.
Can not find Firmware Upgrade file in the USB device
Please check if you put the latest firmware file under root directory of USB device, or WAP-V6000 system can not find it.
Top cover can not be disassembled to install an HDD.
Please make sure all four screws are completed loosen and taken away from the screw holes.
Performance of video playing is irregular
If you use wireless connection, the playing performance can be affected by the wireless environment, you may try to enable the “Transcoding” function to make the video playing smoother.
External Enclosure USB HDD is not detected
External Enclodue USB HDD may require too high current from USB port. In such a case please use an external power supply for the External Enclosure USB HDD.
Advice on location, care and safety
● To connect your WAP-V6000 with power supply system, please make sure to have a socket close to your sound-system.
- If the WAP-V6000 is not in use for a longer period of time, be sure that the power source is disconnected from your system.
- Do not use alcohol, benzene, thinner or acids to clean the cabinet.
- Do not place your WAP-V6000 near radiators, airconditioning or radio-controlled systems.
●Avoid leaving the WAP-V6000 in permanent strain such as direct sunlight, extreme moist or dryness, exceptional cold or heat, mechanical vibrations or shock.
- Do not touch the player with bare hands if the built-in battery is leaking. In this case, contact service center for help since the liquid may remain in the player. If your body or clothes has been contacted with the battery liquid, wash it off thoroughly with water. Also, if some of liquid gets into your eyes, do not rub your eyes but immediately wash them with clean water, and consult a doctor.
●Never use the player while driving a car or using other vehicles to avoid traffic accidents. This is also content of the law of some countries. Even while walking it may be dangerous especially when crossing the street.
●Hearing experts' advice against the constant use of personal stereos played at high volume. Constant exposure to high volumes can lead to hearing loss. If you should experience ringing in the ears or hearing loss, discontinue use and seek medical advice.
●Never disconnect the player from computer during downloading, uploading and formatting to avoid failures and losses of data.
- Only use batteries, charging adapters, and accessories which were approved from TEAC for using it with a certain device model. Using other types of equipment may void the approval for use, and/or warranty claims. Furthermore there may be dangerous implications. Please ask in case your vendor for approved accessories.
● Supplied or connected to units cabling is subject to wearout. Especially carrying it in trouser pockets or other insufficient carrying cases, bending it, strong pulling, or buckling it, may lead to premature failure and to damages. Please ensure correct handling and keep the cabling carefully furled in cases which will void stresses to it. Whenever cables are disconnected never pull the cable. Pull the plug instead.
●The supplied batteries are subject to wearout. Their capacity and therefore their life time depend on the number of charge/decharge cycles. And even without using them there is a deterioration of capacity. Changes in temperature like high or low temperatures, mechanical stress (like dropping
down) or other environmental influences may reduce the capacity of the batteries. So use batteries within the limits of the specification only and take them out of the device, if it is not used for a longer period of time or run from wall outlet.
●Prior to take batteries out of the unit, you have to switch off the device and disconnect it from the charging adapter. Check charging adapters for their model number prior using it for charging the device.
●Avoid losses of data by regularly making backups of your data.
●Do not open the cabinet, contact qualified personnel only.
●For service staff: Never open cabinet, when speaker system is connected to 230 V AC power supply system.
●CAUTION !! Power ON / OFF switch does not separate mains power!
●Deliberate harm to the equipment is not covered by the guarantee.
- Please contact your dealer in case of technical problems.
Specifications:
●Wireless AV Player with infrared (IR) remote control
●On/Standby, Volume and all control funktions driven by remote control
●Battery case for 2x AAA-Batteries
●LC-Display and navigation buttons on main unit for funktions control and audio playback without TV screen
- User interface language selection: GB, D, F, I, E, P, TR, NL, SRB, HE, CN.
●Playback sources: optional Harddisk (internal, SATA), USB, Lan, Wlan.
- Video: output up to 1080p, quick search via forward or percentage jump function, automatic play of files in order.
●Formats: DivX3,4,5-SD/HD,6-SD/HD, H264, MPG, MP4, MOV, AVI, TS, DAT, VOB, WMV, ASF, ISO, IFO, MKV (Matroska), DVD menu, subtitle.
●Audio: with track info (ID3 Tags, Albumcover, Filename etc.)
●Track search during running music playback!
●Formats: AAC, MP4, M4P, AC3, DTS (passthrough), WAV, PCM, MP3 (ID3), MP3pro, WMA (voice, Lossless, Pro), ASF, Flac, FLAC 24/96.
●Photo: Zoom-/Rotate funktions, Diashow with background music (BGM)!
●Formats: BMP, JPG/JPEG/JPE (EXIF), JPEG2000, TIF/TIFF (EXIF), GIF, PNG, WDP, HDP.
●Network: access by NFS, Windows resources (SMB), UPnP-Mediaservers.
- Internet: Web-Browser, Download-Torrent, Internet-Radio: z.B. Live365, Internet-Video: e.g. YouTube, Internet-Photo and many more.
- Connections: Audio: Line Out, S/PDIF digital output optical+coaxial; Video: Composite, HDMI 1.1; USB: USB 2.0 at Front/Rear (2x), supports FAT32 and NTFS file systems; Network: Ethernet, Wlan (802.11b-11n up to 300Mbps).
● Frequency range: 20 - 20.000 Hz, S/N > 95 dB
●Mains: 110-230 Volt \~ 50/60 Hz, Standby consumption 5 W (230 V)
●Dimensions: Wireless AV Player: 192 x 180 x 62 mm
IR remote control: 220 x 43 x 22 mm
- Accessories (inkl.): Installations CD with Twonkymedia UPnP-Mediaserver, Audio/Video- and HDMI- and internal HDD Sata/power cablesl.
- System requirements: internal SATA harddisk (optional) or USB storage or network connection Lan/Wlan; audiosystem Stereo/Surround; Video-Display with Composite/HDMI Input.
CE – Declaration of conformity
We herewith declare, the TEAC media systems WAP-V6000 wireless audio player complies with the following norms or normative documents:
EMC directive 1999/5/EC
ETSI EN 301 489-1 V1.6.1:2005, ETSI EN 301 489-17 V1.2.1:2002; EN 55022:2006: EN 61000-3-2:2006, EN 61000-3-3:1995 + A1:2001 + A2:20, EN 61000-4-2:1995 + A1:1998 + A2:20, EN 61000-4-3:2002 + A1:2002, EN 61000-4-4:2004, EN 61000-4-5:1995 + A1:2001, EN 61000-4-6:1996 + A1:2001, EN 61000-4-11:2004; ETSI EN 300 328 V1.7.1:2006; EN 55024:1998 + A1:2001 + A2:2003, EN 61000-3-2:2006, 61000-3-3:1995 + A1:2001 + A2:2005, IEC 61000-4-2:1995 + A1:1998 + A2:2000, 61000-4-3:2002 + A1:2002, IEC 61000-4-4:2004, IEC 61000-4-5:1995 + A1:2000, 61000-4-6:1996 + A1:2000, IEC 61000-4-8:1993 + A1:2000, IEC 61000-4-11:2004
LVD directive 2006/95/EC
EN 60950-1: 2001+A11
This statement is based on the test reports of an EMV - laboratory.
All texts and illustrations were produced with greatest care. TEAC media systems cannot however accept any legal or other responsibility for any remaining incorrect information and its consequences.
Changes in specifications and features may be made without notice or obligation Company and product names provided herein are trademarks of their respective companies.ve owners. Contents, designs and specifications may change without notice.
In case there is audible noise, possibly caused be strong radio waves (e.g. by mobile phones) we recommend to turn down the volume control of the unit.
If you have special questions to the product and cannot find a solution in this introduction, you can look for more informations at our homepage Thank you!
www.teac.de
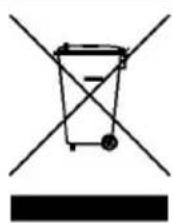
Notes on WEEE
The device may not be disposed of with household rubbish. This appliance is labelled in accordance with European Directive 2002/96/EG concerning used electrical and electronic appliances (waste electrical and electronic equipment - WEEE). The guideline determines the framework for the return and recycling of used appliances as applicable throughout the EU. To return your used device, please use the return and collection systems available to you.