PAS-210 II - Pregnant Omnitronic - Free user manual and instructions
Find the device manual for free PAS-210 II Omnitronic in PDF.


| Product Type | Passive PA Speaker |
| Model | PAS-210 II |
| Brand | Omnitronic |
| Speaker Size | 10" woofer + 1" tweeter |
| Power Handling (RMS) | 200 W |
| Power Handling (Peak) | 400 W |
| Impedance | 8 Ω |
| Frequency Response | 60 Hz - 20 kHz |
| Sensitivity (1W/1m) | 95 dB |
| Crossover Frequency | 3.5 kHz |
| Connectors | 2x Speakon NL4MP, 2x 1/4" TS |
| Dimensions (HxWxD) | 510 x 320 x 300 mm |
| Weight | 12 kg |
| Material | Plywood with black carpet covering |
| Grille | Steel with foam backing |
| Mounting | 36 mm pole mount, flying points |
| Usage | PA systems, live sound, fixed installations |
| Maintenance | Wipe with dry cloth; avoid moisture |
| Safety | Use proper stands; secure against tipping |
| Spare Parts | Available through Omnitronic service centers |
Frequently Asked Questions - PAS-210 II Omnitronic
User questions about PAS-210 II Omnitronic
0 question about this device. Answer the ones you know or ask your own.
Ask a new question about this device
Download the instructions for your Pregnant in PDF format for free! Find your manual PAS-210 II - Omnitronic and take your electronic device back in hand. On this page are published all the documents necessary for the use of your device. PAS-210 II by Omnitronic.
USER MANUAL PAS-210 II Omnitronic
natural_image
Black audio amplifier speaker with mesh grille and circular button (no visible text or symbols)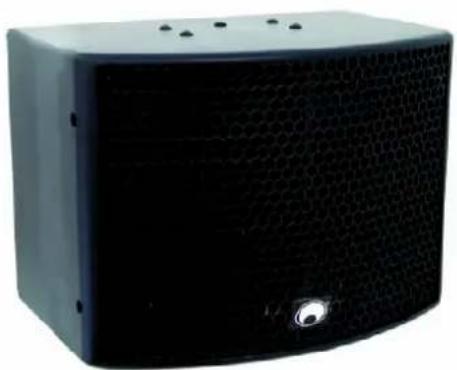
natural_image
Black rectangular speaker with mesh grille and small circular button (no visible text or symbols)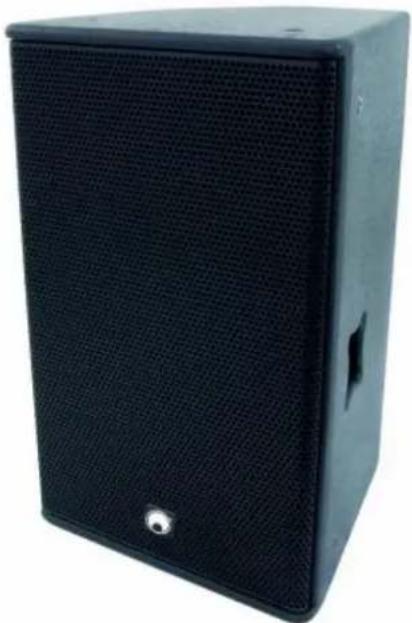
natural_image
Black audio amplifier speaker with mesh grille and side button (no visible text or symbols)Inhaltsverzeichnis
EINFÜHRUNG 3
SAFETY INSTRUCTIONS......21
OPERATING DETERMINATIONS....22
Legal instructions 23
Information on hearing loss....24
START-UP 24
Choosing an appropriate power amplifier 24
Operation modes.... 25
Choosing appropriate connection cables.... 26
Connections 26
INSTALLATION 26
Overhead installation 27
Stacking....30
Satellite-systems 30
Installation on a stand or speaker stand 30
Installation on a wall-mounting.... 32
Suspended installation 32
OPERATION....35
CLEANING AND MAINTENANCE 35
TECHNICAL SPECIFICATIONS.... 36
This user manual is valid for the article numbers 11039424, 11039426, 11039435
Deutsch
INSTALLATION
natural_image
Line drawing of a tripod-mounted speaker with a circular vent and adjustable arm (no text or symbols)natural_image
Technical line drawing of a mechanical bracket with a circular component mounted on top (no text or symbols)natural_image
Diagram of five speaker units with hanging chains and a 90-degree angle indicator (no text or symbols on devices)Vorgehensweise:
natural_image
Three identical line drawings of a speaker tower with circular speakers and mounting feet (no text or symbols)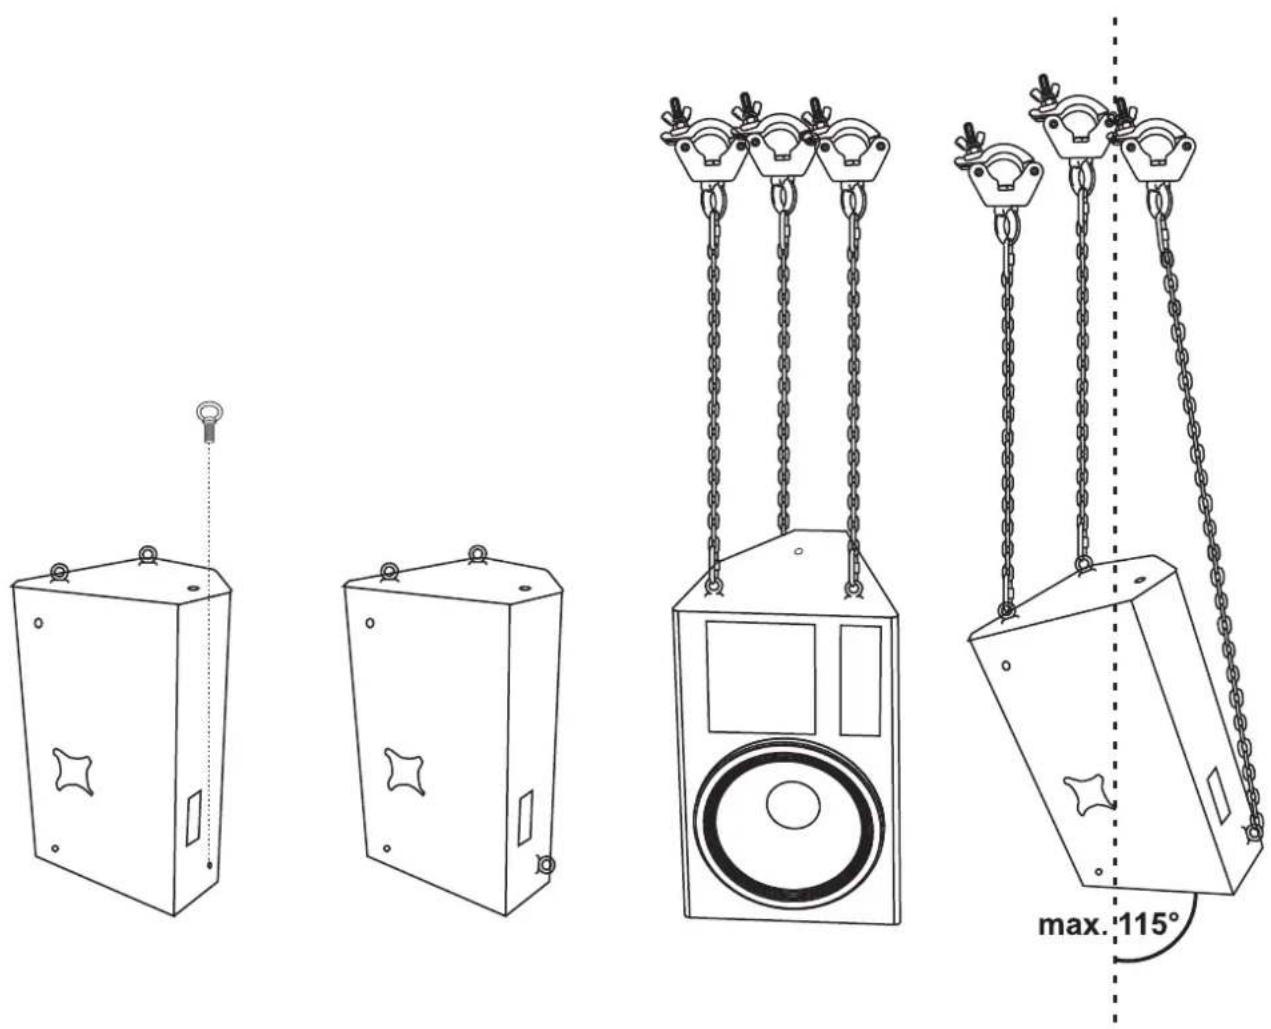
Clusters/Line Arrays:
Keep this device away from rain and moisture! Never open the housing!
For your own safety, please read this user manual carefully before you initially start-up.
Every person involved with the installation, operation and maintenance of this speaker-system has to
- be qualified
- follow the instructions of this manual
- consider this manual to be part of the total product
- keep this manual for the entire service life of the product
- pass this manual on to every further owner or user of the product
- download the latest version of the user manual from the Internet
INTRODUCTION
Thank you for having chosen an OMNITRONIC speaker-system. If you follow the instructions given in this manual, we are sure that you will enjoy this speaker-system for a long period of time.
Unpack your speaker-system.
SAFETY INSTRUCTIONS
This speaker-system has left our premises in absolutely perfect condition. In order to maintain this condition and to ensure a safe operation, it is absolutely necessary for the user to follow the safety instructions and warning notes written in this user manual.

Important:
Damages caused by the disregard of this user manual are not subject to warranty. The dealer will not accept liability for any resulting defects or problems.
Please make sure that there are no obvious transport damages. Should you notice any damages on the connection panel or on the casing, do not take the speaker-system into operation and immediately consult your local dealer.

DANGER OF BURNING!
The materials used in this speaker-system are normally flammable. If B1 is required at the installation place, the surface must be treated with an appropriate fire retardant in regular intervals.

DANGER TO LIFE!
A crashing speaker-system can cause deadly accidents. All safety instructions given in this manual must be observed.
English
Please note that speaker-systems could move due to bass-beats and vibrations. Furthermore, unintended pushes from DJs, musicians or the audience present further risk. This is why the speaker-system must always be secured against moving or the respective area has to be blocked.
Before the speaker-system is switched on all faders and volume controls have to be set to "0" or "min" position.
CAUTION: Turn the amplifier on last and off first!

HEALTH HAZARD!
By operating speaker-systems with an amplifier, you can produce excessive sound pressure levels that may lead to permanent hearing loss.
Keep away children and amateurs!
There are no serviceable parts inside the speaker-system. Maintenance and service operations are only to be carried out by authorized dealers.
OPERATING DETERMINATIONS
This speaker-system is a passive system which can be used for permanent installations or for mobile use. This product is only allowed to be connected with an appropriate power amplifier and was designed for indoor use only.
The maximum power of the speaker-system must never be exceeded. When operating the speaker-system, please make sure that the loudspeakers always sound well. When distortions can be heard, either the amplifier or the loudspeaker is overloaded. Overloads can quickly lead to amplifier or speaker damage. In order to avoid damage, please reduce the volume immediately when distortions can be heard. When speaker-systems are destroyed by overload, the guarantee becomes void.
By operating speaker-systems with an amplifier, you can produce excessive sound pressure levels that may lead to permanent hearing loss. Please refer to the explanations under "Legal instructions".

WARNING!
Speaker-systems must only be operated by trained persons.
Danger of Life due to crashing speaker-systems or hearing loss due to excessive sound pressure levels! The different local conditions have to be considered in terms of safety rules.
When using smoke machines, make sure that the speaker-system is never exposed to the direct smoke jet and is installed in a distance of 0.5 meters between smoke machine and speaker-system.
The ambient temperature must always be between -5^ C and +45^ C. Keep away from direct insulation (particularly in cars) and heaters.
This speaker-system must only be installed at a solid, plane, anti-slip, vibration-free, oscillation-free and fire-resistant location.
Please note: when using this speaker-system in public or industrial areas, a series of safety instructions have to be followed that this manual can only give in part. The operator must therefore inform himself on the current safety instructions and consider them.
Before installing the system, make sure that the installation area can hold a minimum point load of 5 times the system's load (e.g. weight 20 kg - point load 100 kg).
The speaker-system must never be installed higher than 100 cm without secondary attachment.
For overhead use (mounting height >100 cm), always fix the speaker-system with an appropriate safety bond.

DANGER!
This speaker-system must never be installed on a wall-mounting because the secondary attachment cannot be fixed.
This speaker-system may only be installed on top of another speaker-system if both systems are lashed up with each other via appropriate clamping belts and protected against flipping over.

DANGER!
This speaker-system must only be suspended by experienced and trained persons - Danger to Life due to crashing speaker-systems!
If the original speaker-system is equipped with an appropriate flange:
This speaker-system can be installed on top of a subwoofer (satellite system), on a speaker stand, an appropriate stand or an appropriate wall-mounting. The carrying capacity of the distance-tube, the speaker stand, the stand or the wall-mounting must never be exceeded.
The satellite system must always provide enough stability. The subwoofer's base surface must always be sufficiently dimensioned in relation to the top speaker in order to prevent tilting over.
Operate the speaker-system only after having familiarized with its functions. Do not permit operation by persons not qualified for operating the speaker-system. Most damages are the result of unprofessional operation!
Speaker-systems must never be transported with cranes.
Never stack heavy objects on this speaker-system. Persons must never climb onto this speaker-system.
Never use solvents or aggressive detergents in order to clean the speaker-system! Rather use a soft and damp cloth.
Please consider that unauthorized modifications on the speaker-system are forbidden due to safety reasons!
If this speaker-system will be operated in any way different to the one described in this manual, the product may suffer damages and the guarantee becomes void. Furthermore, any other operation may lead to dangers like crashes, hearing loss etc.
Legal instructions
Operating an amplification system can produce extremely high noise levels that may cause a permanent hearing loss. The legal instructions for using an amplification system vary from country to country. The user must always inform himself on the legal instructions valid in his country and apply them to his situation.
Always monitor the sound pressure level when operating an amplification system in discotheques, concerts etc. Never exceed the permissible noise level exposures as specified by your authorities. The monitoring of the noise levels must be documented in an appropriate way.
In Germany, the following instructions are binding:
Hearing damage caused by high noise levels can be treated as physical injury and persecuted by law.
Please note that the organizer is responsible for keeping to a specified noise level. If this noise level will be exceeded, the event may be cancelled immediately.
If the organizer does not fulfil his safety duties, he is reliable by civil law for any damages occurred, e.g.: Pay the treatment costs of the damaged person.
English
Pay a smart money to the damaged person.
Economic damage caused can be demanded from the operator of the amplification system.
If hired persons work with amplification systems: the noise levels of music events are almost always too high. This is why the entrepreneur has to set up warning signs and provide hearing protectors. The staff has to use these.
Please note: OMNITRONIC cannot be made liable for damages caused by incorrect installations and excessive noise levels!
Information on hearing loss
More and more young people suffer from hearing loss of 25 decibel or more, mainly caused by loud music from portable cassette recorders and CD players or discotheques.
Everybody operating amplification systems should know to what sound pressure levels he exposes his or the audience's hearing. As an average levels between 75 and 105 dB(A) in the discotheque or 95 and 115 dB(A) at a rock concert are reached. Individual peaks can exceed the pain level at 130 dB(A). Such levels are typical for motor chainsaws or jack hammers.
| Overview on the different noise levels | |
| 10 dB Heartbeat | 80 dB Heavy traffic or telephone ringing |
| 20 - 30 dB Whisper 90 dB Pneumatic drill | |
| 40 dB Average home 100 dB Power mower | |
| 50 dB Light traffic 120 dB Boom box in car | |
| 60 dB Normal conversation 130 dB Pain level | |
| 70 dB Vacuum cleaner 140 dB Jet plane 30 meters overhead | |
It is important to know that doubling the power increases the noise level by 3 dB. The human hearing does only recognize a doubling of the sound level when the noise level is increased by 10 dB. Damaging the hearing does not depend on the sound level but on the noise level and starts way before the pain level.
Many people deceive themselves by thinking that noise is something they can get accustomed to. It is possible that a positive opinion of a certain noise can reduce the physiological reaction, but the slow impacts on the inner hearing must not be neglected: over stimulation and continuous elimination of the Cortic organ's hair cells.
The reason why some people have got accustomed to a certain noise level and are no longer disturbed is that they have already suffered a hearing damage. This damage make the insensitive to those frequencies forming the loudest part of the noise. Getting accustomed to noise does not mean anything other than trying to get along with the hearing loss in everyday life. The hearing loss itself cannot be healed, it can only be compensated by hearing aids.
Subjectively, the hearing loss feels like dampened ears. This effect weakens with the time, but a loss in hearing sensitivity often remains.
In order to relax the hearing sufficiently, the noise level should not exceed 70 dB(A) for 10 hours. Higher noise levels during this relaxing period can prevent the relaxation and promote a permanent hearing damage (Tinitus) or hearing loss.
Therefore: Whoever wants to maintain his hearing should use hearing protectors!
START-UP
This speaker-system must only be connected with an appropriate power amplifier. The amplifier power must correspond with the speaker-system power. An amplifier with too little power can also destroy a speaker-system with a higher power range.
Choosing an appropriate power amplifier
Before starting with the installation, you must clarify how many speaker-systems you would like to install in the room.
English
In order to increase the sound pressure level two speaker-system pairs should be connected with the power amplifier. Please note that the impedance is only half the value when you connect two speaker-systems with one channel of the power amplifier. Please make sure that the power amplifier is qualified for this operation mode.
When connecting further speaker-system pairs (e.g. 3 pairs) to the same power amplifier, the impedance lowers even further. You must always make sure that the power amplifier is qualified for the new impedance. If the impedance of the speaker-system is lower than the lowest allowed amplifier impedance, the amplifier and the speaker-systems may be damaged.
Furthermore, you must define the operation mode for your system. If the power amplifier is to be used in stereo-mode, the power is lower as in e.g. mono bridged mode.
The following descriptions refer to OMNITRONIC power amplifiers. You may also use other appropriate power amplifiers.
Operation modes
Stereo operation
Normal operation mode of an amplifier, in which every channel gets its own signal. The most commonly used mode of amplifiers is stereo-operation at 4 ohms. Make sure that the operation-mode-switch is correctly set.
Calculation number of speakers - impedance
E.g. 1 speaker à 8 ohms = 8 ohms
2 speakers à 8 ohms = 4 ohms (parallel)
2 speakers à 8 ohms = 16 ohms (in line)
3 speakers à 8 ohms = 2.66 ohms (parallel), only for amplifiers capable of handling 2 ohms
2 speakers à 8 ohms = 24 ohms (in line)
4 speakers à 8 ohms = 2 ohms (parallel), only for amplifiers capable of handling 2 ohms
N.B.:
The input-impedance of the speaker-systems should at least be the same or even higher than the output-impedance of the amplifier.
Parallel operation
Possibility to run the amplifier in mono-mode, i.e. via one input channel. In parallel operation mode, the voltage remains the same, the current is doubled. Consequently, the output impedance is limited to the minimum value of one individual channel.
Connect the input signal to the input-plug CH-1.
Make sure that the amplifier is disconnected from the mains before you set the operation-mode-switch to parallel.
Bridge the red pole sockets of Output Channel 1 and Output Channel 2.
Connect your speakers to the Speaker-socket Output CH-1.
Caution! Before switching on your amplifier, please refer to the explanations under Operation.
Adjust the level with the gain-control CH-1 on the frontpanel.
Bridging
Possibility to run the amplifier in mono-mode, i.e. via one input channel. In bridged operation mode, the current remains the same, the voltage is doubled. Consequently, the output impedance is doubled.
For stereo-operation, 2 amplifiers are needed.
Connect the input signal to the input-plug CH-1 on the rearpanel.
Make sure that the amplifier is disconnected from the mains before you set the operation-mode-switch on the frontpanel to Bridge.
Connect your speakers to the red Speaker-socket Mono Bridged.
Caution! Before switching on your amplifier, please refer to the explanations under Operation.
Adjust the level with the gain-control CH-1 on the frontpanel.
Choosing appropriate connection cables
The speaker-system must only be connected via a sufficiently dimensioned cable. Too thin cables lead to cable heatup or enormous power loss and loss in sound-quality.
For all speaker-systems up to 400 Watts, we recommend a cable diameter of 2.5 mm^2 , for all other speaker-cables 4 mm^2 .
A high damping factor of your amplifier supplies a clear sound reproduction. Unnecessarily long and thin cables will influence the damping factor and thus the low frequencies in a negative way. In order to safeguard good sound quality, the damping factor should lie around 50. The longer a cable has to be, the thicker it should be.
In this respect, a damping factor of 200 will be reduced to 47 (8 Ohms) when using a 10 m long, 2.5 mm ^2 speaker cable. The power loss at 8 Ohms is 1.63 %, at 4 Ohms 3.25 % and at 2 Ohms even 6.5 %.
The maximum cable length is 30 meters!
Connections
SPEAKER OUT
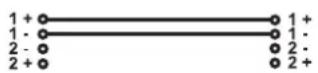
Your speaker-system is equipped with 4-pole, lockable Speaker-sockets. For locking the connection turn the plug to the right. For unlocking pull the unlock button and turn the plug to the left and pull it out of the socket.
Connection Speaker-socket
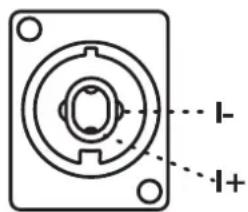
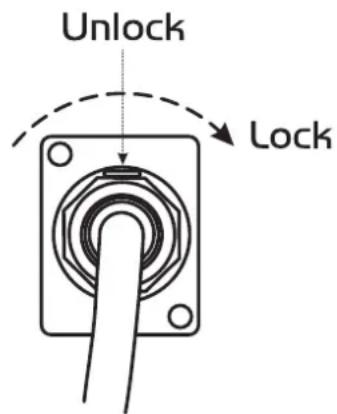
INSTALLATION
This speaker-system must only be installed at a solid, plane, anti-slip, vibration-free, oscillation-free and fire-resistant location.
Before installing the system, make sure that the installation area can hold a minimum point load of 5 times the system's load (e.g. weight 20 kg - point load 100 kg).
The speaker-system must never be installed higher than 100 cm without secondary attachment.
Install the desired number of speaker-systems in the room.
Every speaker-system features two transportation handles. The speaker-system should be carried without force by two persons of the same size. Carrying the speaker-system as one person alone should be avoided as the high weight and the strain could lead to back damages and torsions. Please note that all speaker-systems with more than 25 kg weight must be transported with two persons.
Installing and orienting the speaker-system
When installing the speaker-system on e.g. a stage, microphones and turntables should always be located behind the speaker-systems. In this way, you can avoid dangerous and unpleasant feedbacks. If you cannot install the speaker-systems this way, the microphones and turntables should be located as far away as
English
possible from the speaker-systems. When using the speaker-system as monitor-system make sure to avoid feedbacks.
The speaker-systems of a PA-system are normally located left and right to the stage. Do not install the speaker-systems on the stage, but rather on appropriate tables or platforms in front of the stage.
In order to produce a clear sound, the speaker-systems should be installed in a way that they throw the sound over the audience's heads. A Full Range speaker-system should be installed at listeners' eye level. Please refer to the safety instructions under Installation.
Loudspeaker combinations need to be installed bass-middle-high (from bottom to top). Make sure that the membranes of all speakers are in one line vertically and horizontally. Only in this way all frequency ranges are produced at the same time and without any time or phase delays.
Always install the speaker-systems in a way that a minimum distance of three meters to the audience is kept. This is the only way to avoid hearing damage for unreasonable listeners. Block the area in front of the speaker-systems with appropriate means.
Avoiding feedbacks
One of the most frequent problems when operating speaker-systems are feedbacks. They can be recognized by howling and growling loudspeakers. Feedbacks are created then a signal is recorded by a microphone, amplified, played back by a loudspeaker and then again recorded by the microphone.
The prerequisite for feedback is that the played back signal is louder than the original signal. A feedback never covers the whole frequency range but only one overboosted frequency.
Make sure that you install especially the monitor-speakers so far away from the microphone that another recording of the microphone signal is impossible.
Extreme levels like feedbacks, bass-hum or the beats of a dropping microphone can destroy the loudspeakers within very short time and produce immediate hearing damage. Such extreme levels must be avoided at any rate. We recommend to use appropriate equalizers and Compressor/limiters.
Installing the speaker-cables
Connect the speaker-systems among each other using the inputs and outputs. Connect the cable of the first speaker-system with the Speaker-socket Output CH-1 and Output CH-2 of the amplifier. The signal will be transmitted to the individual speaker-systems.
Always treat the cables carefully and protect them from damages during transportation.
Install the cables always in a structured way and protect them from damage.
The cables must be installed in a way that no person can stumble over them. Always fix the cables with an appropriate tape.
Both cables should be of the same kind.
Both cables should have the same length.
Both cables should be installed directly (no loops, S-shaped overlengths)
Always install the cables far away from power cables (never closely parallel)
Never put heavy objects like speaker-systems, flightcased etc. on cables.
Never wind up cables tightly around the elbow, but rather sleek with an interior diameter of 20 to 30 cm.
Overhead installation
If this speaker-system will be installed in a mounting height higher than 1 meter (e.g. on the stage, on a stage element or on a framework) we speak of overhead installation. For overhead installation, the speaker-system must always be secured with an appropriate secondary attachment.
Safety bonds are allowed as secondary attachment for all speaker-system up to a maximum weight of 60 kg. Heavier speaker-systems must be secured via appropriate measures based on individual calculations.
English
Please note: when using this speaker-system in public or industrial areas, a series of safety instructions have to be followed that this manual can only give in part. The operator must therefore inform himself on the current safety instructions and consider them.

DANGER TO LIFE!
Please consider the valid standards and national regulation during the installation! The installation must only be carried out by an authorized dealer!
The installation of the speaker-system has to be built and constructed in a way that it can hold 10 times the weight for 1 hour without any harming deformation.
The installation must always be secured with a secondary safety attachment, e.g. an appropriate catch net. This secondary safety attachment must be constructed in a way that no part of the installation can fall down if the main attachment fails.
When rigging, derigging or servicing the speaker-system staying in the area below the installation place, on bridges, under high working places and other endangered areas is forbidden.
The operator has to make sure that safety-relating and machine-technical installations are approved by an expert before taking into operation for the first time and after changes before taking into operation another time.
The operator has to make sure that safety-relating and machine-technical installations are approved by an expert after every four year in the course of an acceptance test.
The operator has to make sure that safety-relating and machine-technical installations are approved by a skilled person once a year.
Procedure:
The speaker-system should be installed outside areas where persons may walk by or be seated.
IMPORTANT! OVERHEAD RIGGING REQUIRES EXTENSIVE EXPERIENCE, including (but not limited to) calculating working load limits, installation material being used, and periodic safety inspection of all installation material and the speaker-system. If you lack these qualifications, do not attempt the installation yourself, but instead use a professional structural rigger. Improper installation can result in bodily injury and or damage to property.
The speaker-system has to be installed out of the reach of people.
Caution: Speaker-systems in overhead installations may cause severe injuries when crashing down! If you have doubts concerning the safety of a possible installation, do NOT install the speaker-system!
Before rigging make sure that the installation area can hold a minimum point load of 10 times the speaker-system's weight.
Secondary attachment:

Please note: the speaker-system must always be secured via three appropriate eye-bolts and three appropriate safety bonds.
The eyelets must always hold at least 12 times the weight of the speaker-systems.
For overhead use, always install a safety bond. You must only use safety bonds complying with DIN 56927, quick links complying with DIN 56926, shackles complying with DIN EN 1677-1 and BGV C1 carbines. The safety bonds, quick links, shackles and the carbines must be sufficiently dimensioned and used correctly in accordance with the latest industrial safety regulations (e.g. BGV C1, BGI 810-3).
English
Please note: for overhead rigging in public or industrial areas, a series of safety instructions have to be followed that this manual can only give in part. The operator must therefore inform himself on the current safety instructions and consider them.
The manufacturer cannot be made liable for damages caused by incorrect installations or insufficient safety precautions!
Please note: Before installing the eye-bolts, make sure that the thread is always in perfect condition and free from dirt etc.
Install the eye-bolts in the threaded holes of the speaker-system. The eye-bolts must be tightened until stop position, hand-tight and without any tools.
Insert the quick links of the safety bonds in the eye-bolts of the speaker-system. Pull the safety bonds over a safe fixation spot. Insert the end in the quick link and tighten the safety screw.
The maximum drop distance must never exceed 20 cm.
A safety rope which already hold the strain of a crash or which is defective must not be used again.

DANGER TO LIFE!
Before taking into operation for the first time, the installation has to be approved by an expert!
English
Stacking
This speaker-system may only be installed on top of another speaker-system if both systems are lashed up with each other via appropriate clamping belts and protected against flipping over.
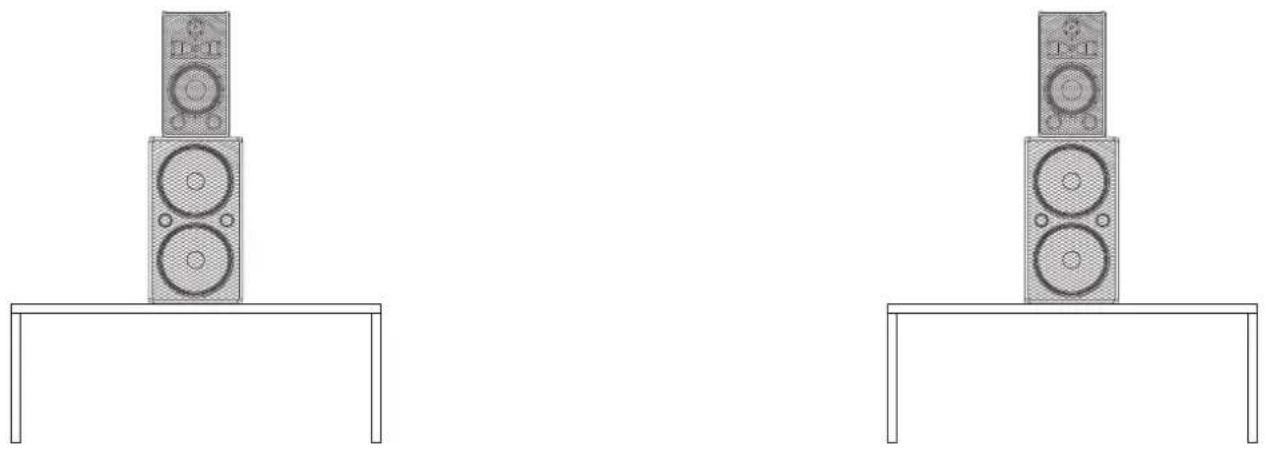
Please refer to the instructions under Secondary attachment.
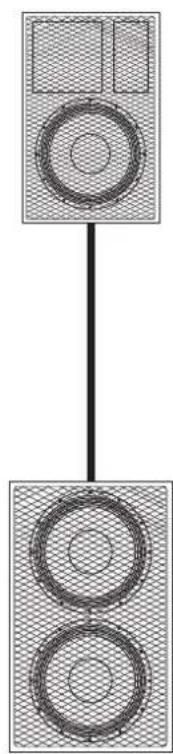
Satellite-systems
natural_image
Diagram of a speaker emitting sound waves into two circular filters (no text or symbols)A satellite-system is a system where a speaker-system with flange is installed on top of a subwoofer.
The satellite system must always provide enough stability. The subwoofer's base surface must always be sufficiently dimensioned in relation to the top speaker in order to prevent tilting over.
The subwoofer and the top speaker must only be connected via an appropriate distance tube and flange.
The carrying capacity of the distance-tube must never be exceeded.
A satellite system or a combination of speaker system/speaker stand or speaker system/stand must only be installed on the ground!
When choosing the installation-spot, please make sure that such an installation has to be installed in a way that no person can enter the area below the system! Make sure that the respective area is blocked.
An unintended movement of the load has to be avoided - also in case of fire!
The installation is only allowed on carrying areas. In some cases, an appropriate substructure, e.g. via an balancing foot, has to be created.
The system must never be moved before the top speaker is uninstalled!
When choosing the installation material, optimum dimensions have to be chosen in order to secure maximum safety.
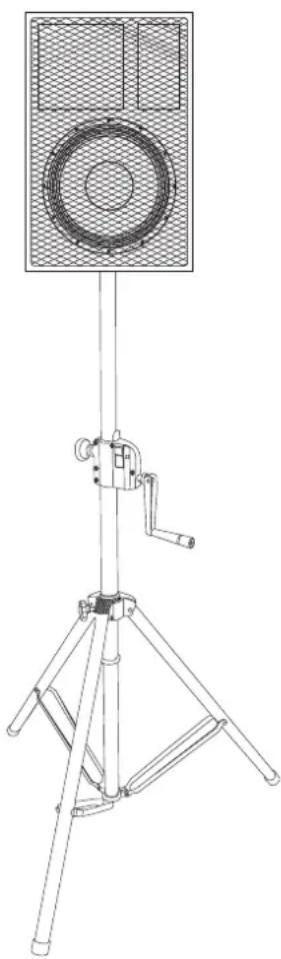
Installation on a stand or speaker stand
The speaker-system may only be installed on a stand or speaker stand if the original speaker-system is equipped with an appropriate flange.
Stands or satellite systems must only be installed on a plane area with a maximum inclination angle of 5°.
Caution: Speaker-systems installed on stands or satellite systems may cause severe injuries when crashing!
English
When using stands or satellite systems under the influence of horizontal forces, e.g. through wind, the standing safety can be impaired. This is why additional safety measures like attaching ballast weights have to be taken.
If inclined tension cables or prolonged outriggers are used, the area of danger has to be marked or even be blocked.
natural_image
Line drawing of a tripod-mounted speaker with a mesh grille and adjustable arm (no text or symbols)Before lifting or lowering the telescopic tubes, you must alway block a safety area around the stand or satellite system. This safety area must have a diameter of 1.5 times the maximum height.
Lifted telescopic tubes always have to be secured with a secondary securing!
The total weight of the installation (=total weight of all individual parts) must never exceed the maximum load of the installation area.
The stand has to be installed out of the reach of people.
An unintended movement of the load has to be avoided - also in case of fire!
The installer is responsible for adhering to the carrying capacity given by the manufacturer, the safety requirements and the qualification of possible co-workers.
When people are located below the load, all necessary safety measures have to be taken in order to avoid injury.
The personell has to be instructed on the content of the user manual and on the dangers related with operating stands.
Depending upon the individual installation spot, all necessary measures against movement and for securing the standing safety have to be created.
The installation is only allowed on carrying areas. In some cases, an appropriate substructure, e.g. via an balancing foot, has to be created.
The system must never be moved before the top speaker is uninstalled!
When choosing the installation material, optimum dimensions have to be chosen in order to secure maximum safety.
Loosen the fixation screws of the legs. Pull the legs out until the cross struts stand at a 90^ angle to the legs. Tighten the fixation screws of the legs.

DANGER!
If installing on slippery surfaces, the legs must be secured with screws or nails via the provided holes or a anti-slippery mat has to be used.
Installation of the TV-pin (only for stands)
Attach an appropriate TV-pin to the top end of the stand and fasten it with the handle at the side.
Installation of the speaker-system
Caution: The loads have to be installed in a balanced way.
Caution: The carrying capacity of the stand or speaker stand must never be exceeded!
Install the speaker-system via the flange on the speaker stand or via the TV-pin on the stand.
Make sure that the maximum lifting height of the tube is never exceeded.
Lifted telescopic tubes always have to be secured with a secondary securing!
English
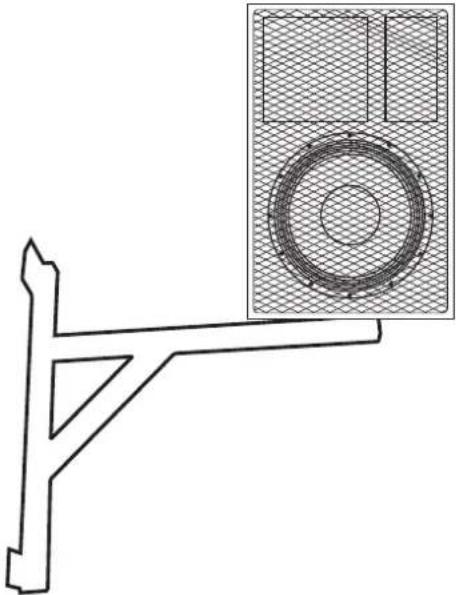
Installation on a wall-mounting
The speaker-system may only be installed on a wall-mounting if the original speaker-system is equipped with an appropriate flange.
When installed on a wall-mounting, the speaker-system must always be secured with a safety bond.
natural_image
Technical line drawing of a mechanical bracket with a speaker mounted on top (no text or symbols)Before attaching the speaker-system, make sure that the installation area can hold a minimum point load of 10 times the installation's weight (e.g. 13 kg weight - 130 kg point load).
The durability of the installation depends very much on the material used at the installation area (building material) such as wood, concrete, gas concrete, brick etc. This is why the fixing material must be chosen to suit the wall material. Always ask a specialist for the correct plug/screw combination indicating the maximum load and the building material.
The wall-mounting must always be installed via all fixation holes. Do only use appropriate screws and make sure that the screws are properly connected with the ground.
Procedure:
Step 1: On the wall-mounting, there are the holes for the installation.
Step 2: Hold the wall-mounting onto the location where it is to be installed.
Step 3: Mark the boreholes with a pen or a suitable tool.
Step 4: Drill the holes.
Step 5: Hold the wall-mounting in the desired position and tighten the screws.
Step 6: Insert the eye-bolts into the threaded holes. The eye-bolts must be tightened until stop position, hand-tight and without any tools.
Step 7: Install the speaker-system on the wall-mounting.
Step 8: Insert the quick links of the safety bonds in the eye-bolts of the speaker-system. Pull the safety bonds through the wall-mounting's safety eyelet. Insert the end in the quick link and tighten the safety screw.
The wall mounting's maximum service life must never be exceeded.
Suspended installation

DANGER!
This speaker-system must only be suspended by experienced and trained persons - Danger to Life due to crashing speaker-systems!
Trained persons are e.g. Head Rigger, Lightcrew head etc.
If you lack these qualifications, do not attempt the installation yourself, but instead use a professional structural rigger.
If you have doubts concerning the safety of a possible installation, do NOT install the speaker-system!
The speaker-system has to be installed out of the reach of people.
The installation material must always hold at least 12 times the weight of the speaker-systems.
English
Please note:
You must never install one speaker-system under another!
When deinstalling the speaker-system, make sure that you insert the original screws in the threaded holes!
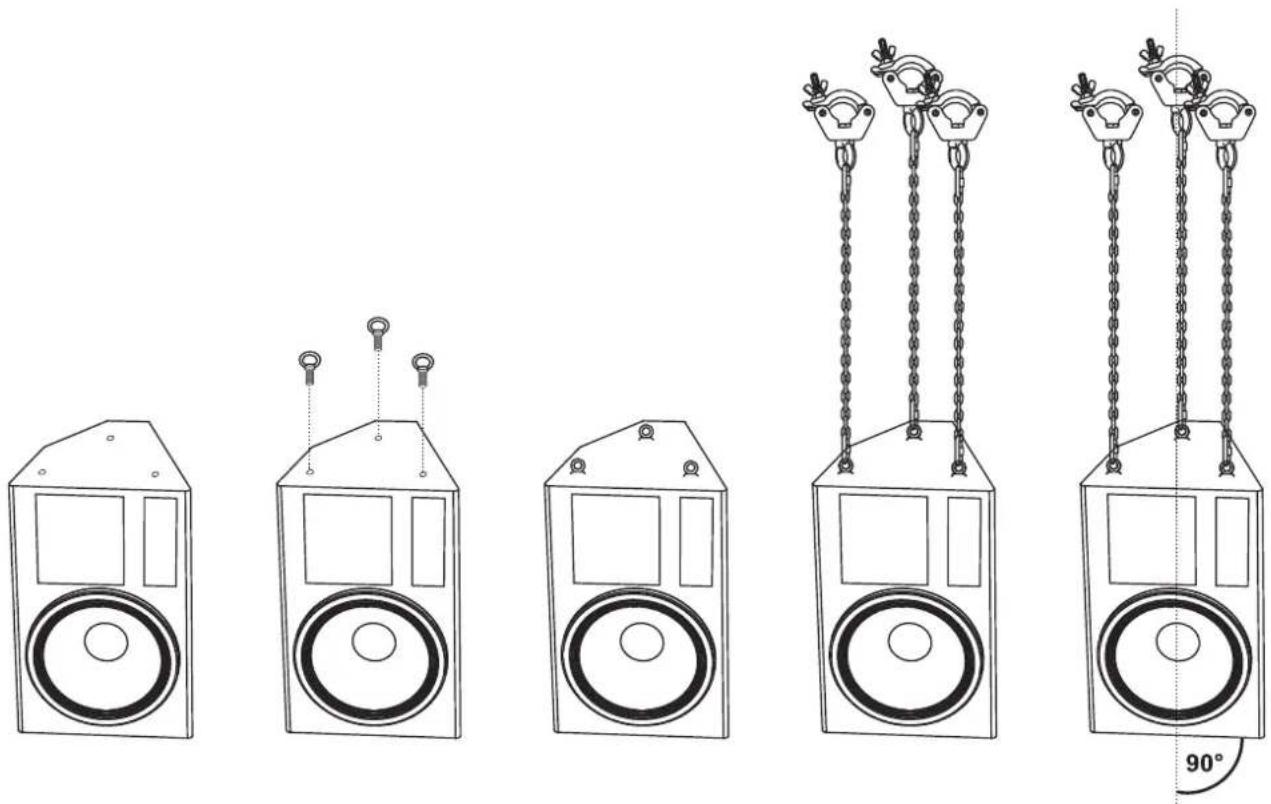
Horizontal suspension:
Please note:
The horizontal installation must always be carried out via three eye-bolts and appropriate chains. The speaker-system must always be installed absolutely planar (vertical angle 90^ , horizontal angle 0^ ).
natural_image
Diagram of five different speaker models with hanging chains and a 90-degree angle indicator (no text or symbols present)Procedure:
Step 1: Unscrew the allen screws with a suitable allen key.
Step 2: Install the eye-bolts in the threaded holes of the speaker-system. The eye-bolts must be tightened until stop position, hand-tight and without any tools.
Step 3: Install the the screw-on chain link in the first and last chain link and tighten the fixation screw.
Step 4: Install the chain with the screw-on chain link at the installation eyelet of the ring coupler and tighten the fixation screw.
Step 5: Install the chain with the lower screw-on chain link at the eye-bolt of the speaker-system and tighten the fixation screw.
Step 6: Install the speaker-system in the trussing.
English
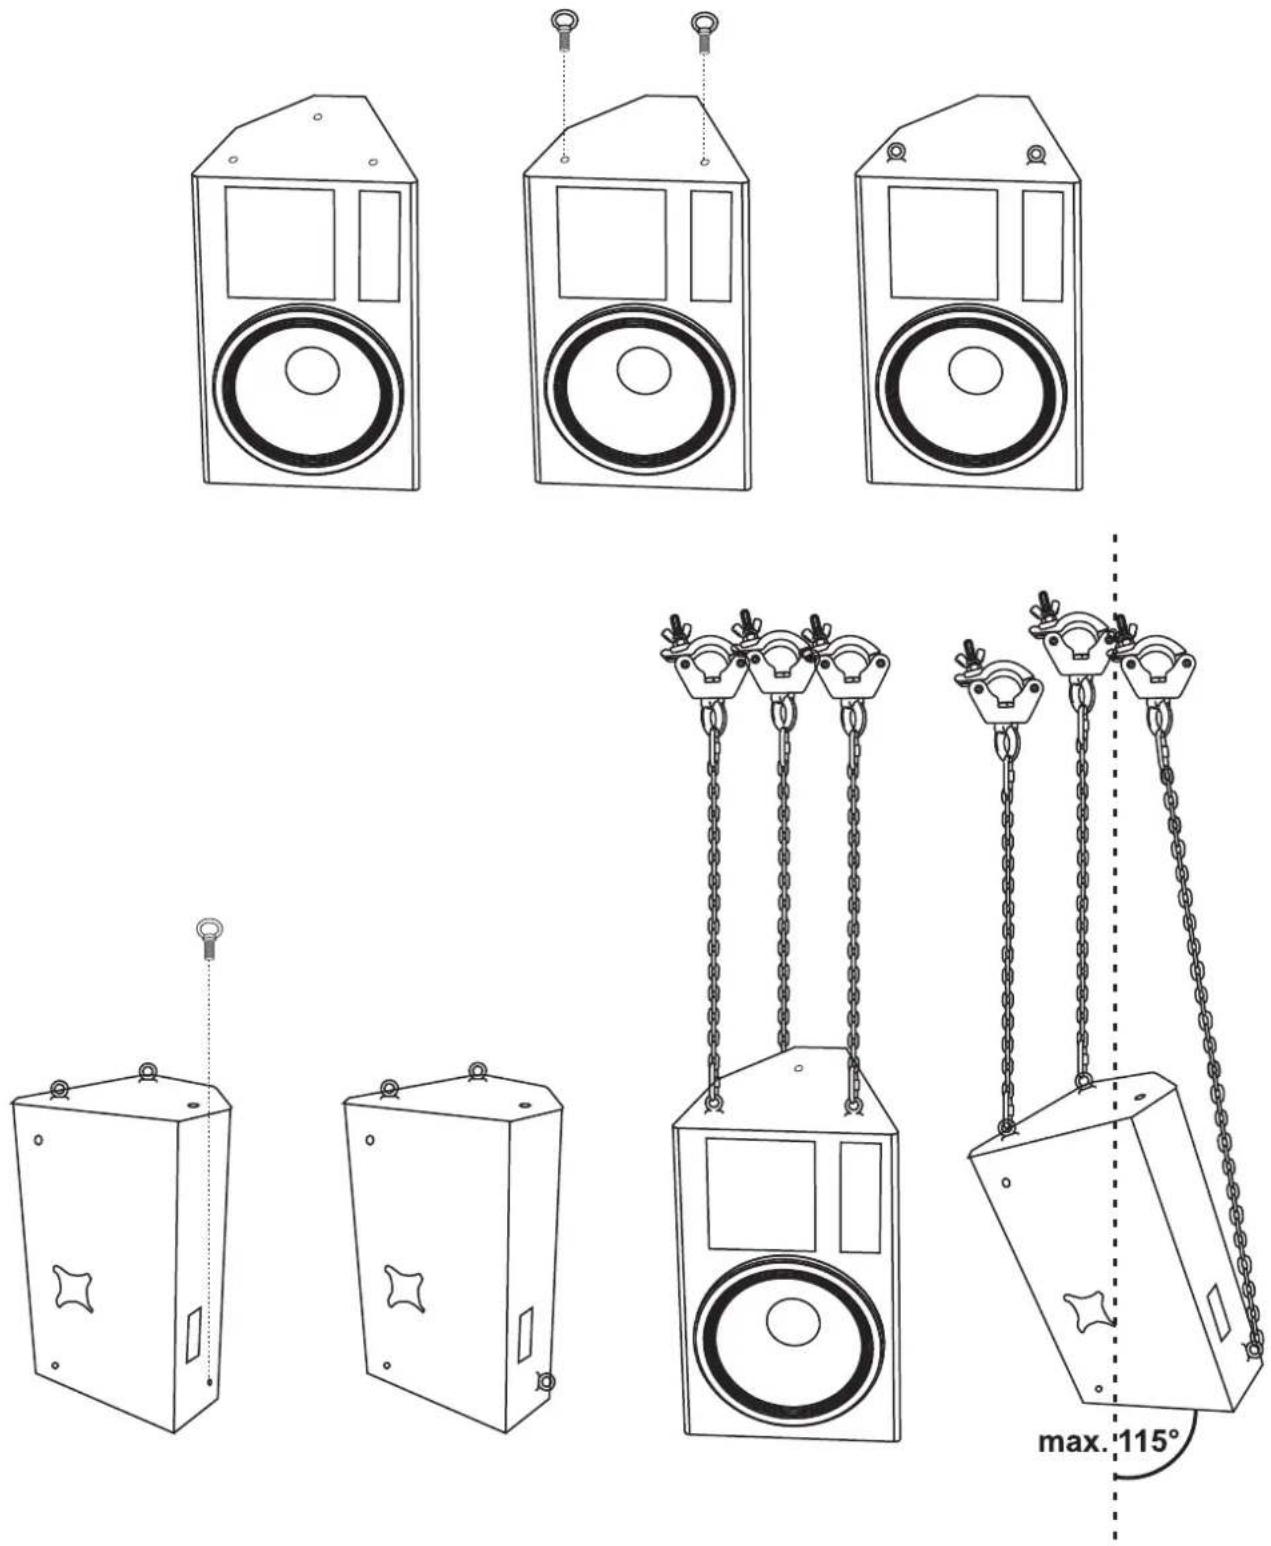
Tilted suspension:
Please note:
The tilted installation must always be carried out via two eye-bolts on top and one at the rear. The speaker-system can be tilted in a maximum vertical angle of 115^ or maximum horizontal angle 25^ .
Clusters/Line Arrays:
Only use certified Flyware of renowned manufacturers. All instructions in the user manuals of the individual components must be adhered to. Only use the components and accessory recommended by the manufacturer. The used Flyware must be installed in such a stable way that it can never fail.
OPERATION
After having connected your amplifier to the mains, turn both gain controls counter-clockwise to Min-position. The last device to be switched on is the amplifier. The "ON" and "PROTECT" LED light up now. If it does not, check if the amplifier is connected to the mains correctly.
After the turn-on delay the speakers are activated (PROTECT-LED is off).
After having set the volume controls of the pre-amplifier in null-position, turn the gain controls of your amplifier to mid-position. You must not hear any loud humming. If there is humming nevertheless, check the connecting cables between the pre-amplifier and the amplifier (switch off components before). Now adjust the volume with the gain controls CH-1 and CH-2.
Caution! Increase the level of each channel only so far that the CLIP-LED lights up shortly. Thus, you avoid that the output signal is distorted and your speakers are damaged.
When operating the speaker-system, please make sure that the loudspeakers always sound well. When distortions can be heard, either the amplifier or the loudspeaker is overloaded. Overloads can quickly lead to amplifier or speaker damage.
In order to avoid damage, please reduce the volume immediately when distortions can be heard. When speaker-systems are destroyed by overload, the guarantee becomes void.
Always check the sound pressure level with a meter in order to keep to the threshold.
If you want to switch off the system, switch off the amplifier first and then the pre-amplifiers in order to avoid acoustic shocks on the speakers.
CLEANING AND MAINTENANCE
The operator has to make sure that safety-relating and machine-technical installations are inspected by an expert after every four years in the course of an acceptance test.
The operator has to make sure that safety-relating and machine-technical installations are inspected by a skilled person once a year.
The following points have to be considered during the inspection:
1) All screws used for installing the speaker systems or parts of the speaker system have to be tightly connected and must not be corroded.
2) There must not be any deformations on housings, fixations and installation spots (ceiling, suspension, trussing).
3) The electric power supply cables must not show any damages, material fatigue (e.g. porous cables) or sediments. Further instructions depending on the installation spot and usage have to be adhered by a skilled installer and any safety problems have to be removed.
4) If the speaker-system is installed overhead, the inspection must include if the eye-bolts are still well tightened. Otherwise the eye-bolts have to be tightened handtight again.
5) If the speaker-system is secured via clamping belts, the inspection must include if the clamping belts are still well fixed. Otherwise fix clamping belts again.
We recommend a frequent cleaning of the speaker system. Please use a soft lint-free and moistened cloth. Never use alcohol or solvents!
There are no serviceable parts inside the speaker system. Maintenance and service operations are only to be carried out by authorized dealers.
If the speaker system distorts, one of the loudspeakers may be defective. Test the speaker system once more with another amplifier. If the sound remains distorted, the speaker system should not be operated any more in order to prevent further damage. Please contact your dealer.
If clacking sounds are heard from the speaker system, screws may have loosened due to the continuous vibrations. The speaker system should be checked by a specialist. Especially for public use, the speaker system should be checked before every operation so that the speaker system and the speakers in the systems are always well fixed.
English
Should you need any spare parts, please use genuine parts.
Should you have further questions, please contact your dealer.
TECHNICAL SPECIFICATIONS
| 11039420 PAS-208 1 | 1039421 PAS-228 11039422 | PAS-210 | |
| Rated power: 150 W RMS 1 | 80 W RMS 200 W RM$ | ||
| Program power: 300 W 360 | W 400 W | ||
| Components: 8" woofer, 1" | horn 2x 8" woofer, 2x 3" | tweeter 10" woofer, 1" horn | |
| Connections: 2 Speaker sockets | 2 Speaker-sockets | 2 Speaker sockets | |
| Sensitivity (1 W/m): | 97 dB (1 W, 1 m) | 93 dB | 97 dB (1 W, 1 m) |
| Max. SPL (1 m): | 122 dB (1 m) | 115 dB | 123 dB (1 m) |
| Impedance: | 8 Ω | 4 Ω | 8 Ω |
| Frequency range: | 70 Hz - 20 kHz | 67 Hz - 18 kHz | 60 Hz - 20 kHz |
| Dispersion angle (1 kHz): | 90° x 40° | 50-100° x 55° | |
| Dimensions (H x W x D): | 400 x 250 x 250 mm | 355 x 490 x 340 mm | 530 x 325 x 295 mm |
| Weight: | 9 kg | 14 kg | 17.5 kg |
| 11039424 PAS-212 1 | 1039426 PAS-215 110 | 39435 PAS-1202ND | |
| Rated power: | 300 W RMS 400 W RMS 350 W RMS | ||
| Program power: 600 W 800 W 700 W | |||
| Components: | 12" woofer, 1" horn | 15" woofer, 1" horn | 12" neodym woofer, 1" driver |
| Connections: | 2 Speaker sockets 2 S | Speaker sockets 2 Speaker | ser sockets |
| Sensitivity (1 W/m): | 98 dB (1 W, 1 m) | 99 dB (1 W, 1 m) | 105 dB (1 W, 1 m) |
| Max. SPL (1 m): | 125 dB (1 m) | 127 dB (1 m) | 130 dB (1 m) |
| Impedance: | 8 Ω | 8 Ω | 8 Ω |
| Frequency range: | 58 Hz - 20 kHz | 50 Hz - 20 kHz | 100 Hz - 18 kHz |
| Dispersion angle (1 kHz): | 50-100° x 55° | 50-100° x 55° | 30° x 25° (HxV) |
| Dimensions (H x W x D): | 620 x 375 x 400 mm | 695 x 440 x 410 mm | 600 x 575 x 705 mm |
| Weight: | 25 kg | 28 kg | 43 kg |
Please note: Every information is subject to change without prior notice. 23.03.2009 ©
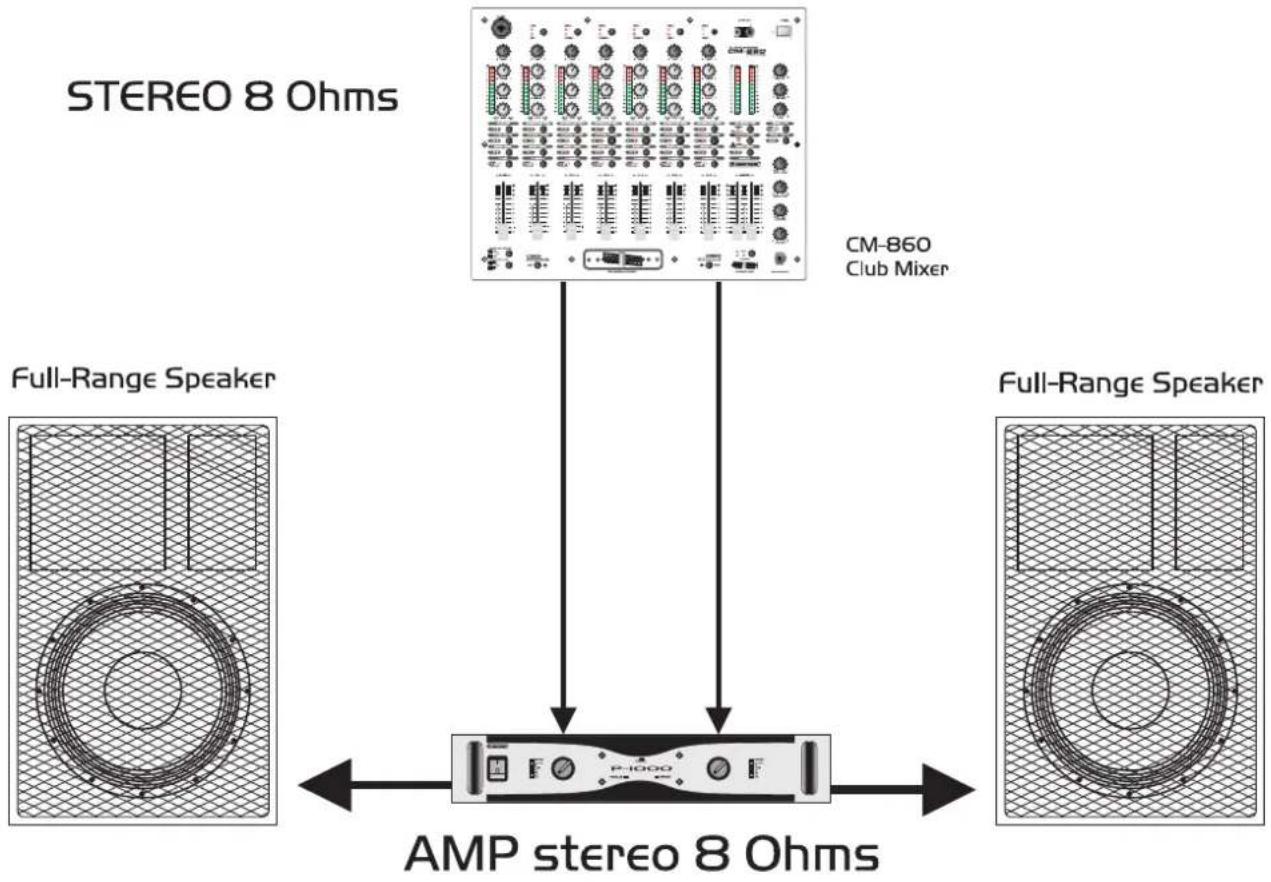
flowchart
graph TD
    A["Full-Range Speaker"] --> B["AMP stereo 8 Ohms"]
    C["STEREO 8 Ohms"] --> D["CM-860 Club Mixer"]
    B <--> D
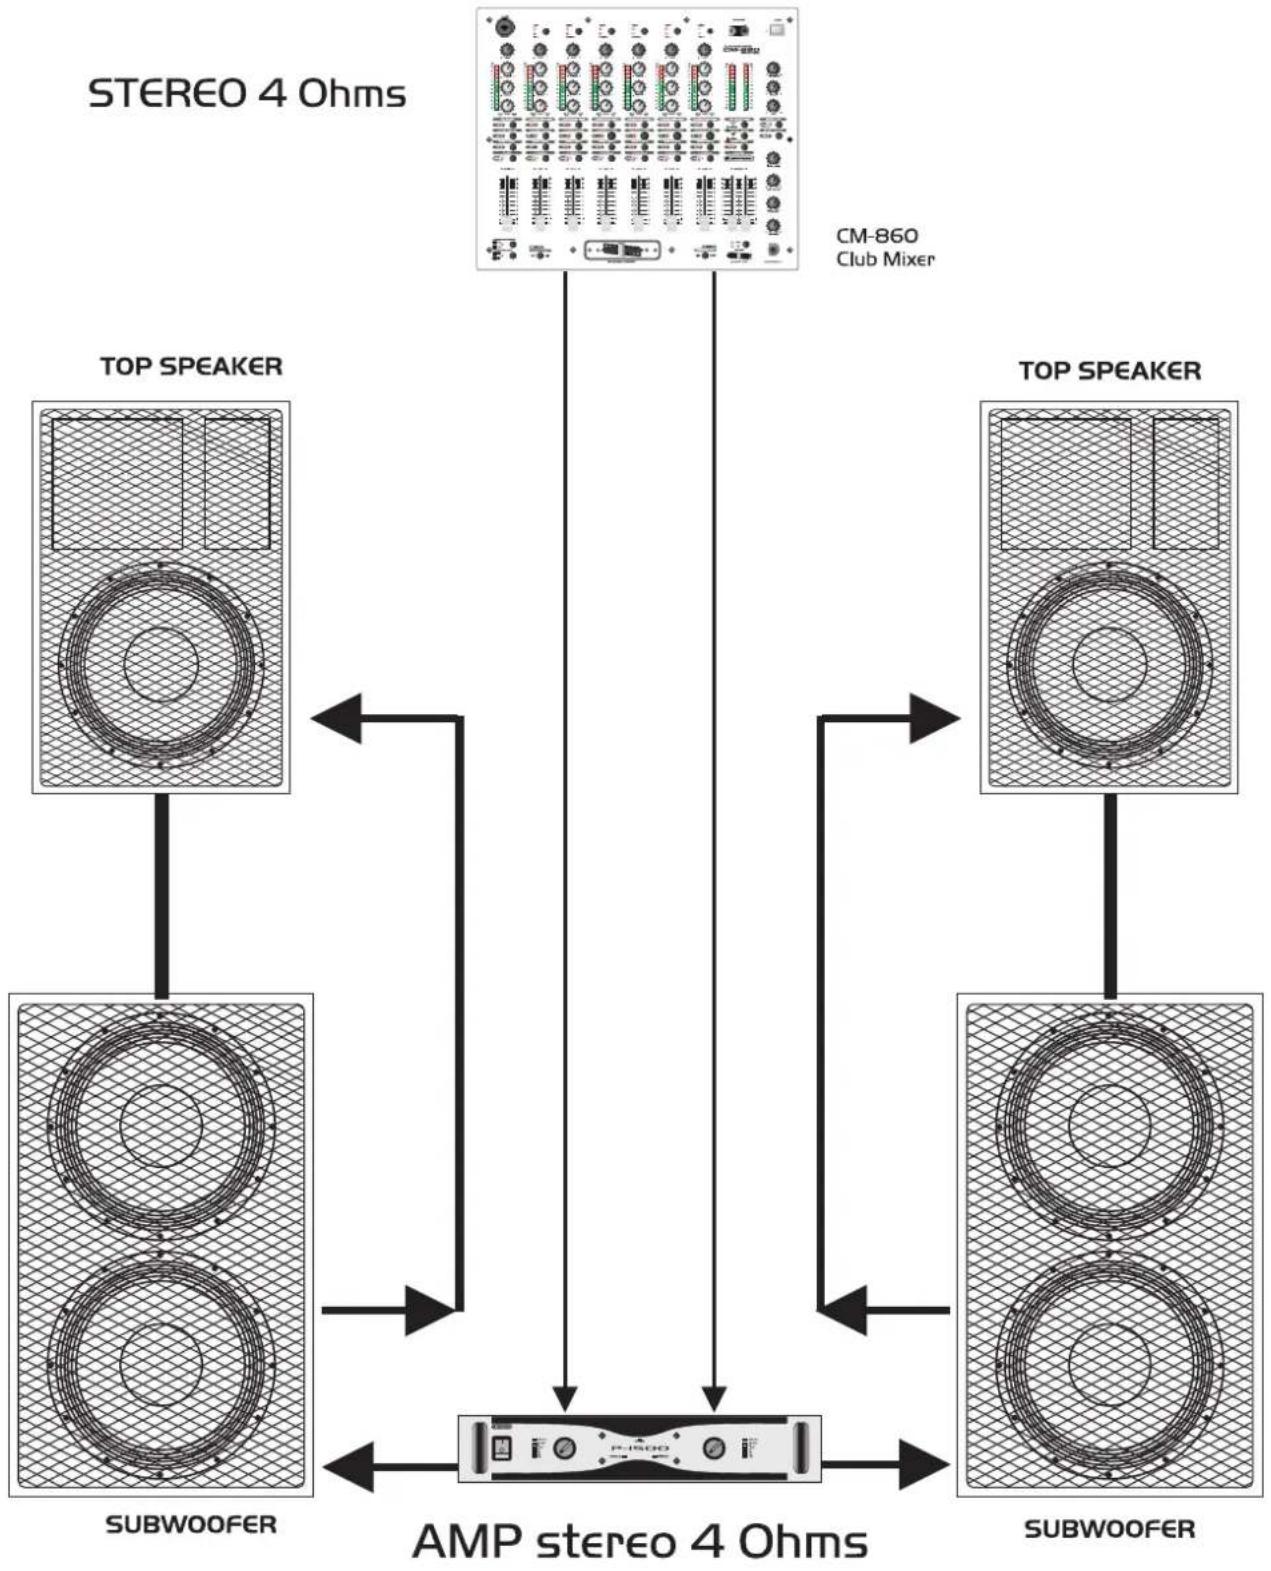
flowchart
graph TD
    A["STEREO 4 Ohms"] --> B["CM-860 Club Mixer"]
    B --> C["AMP stereo 4 Ohms"]
    C --> D["SUBWOOFER"]
    C --> E["TOP SPEAKER"]
    C --> F["TOP SPEAKER"]
    C --> G["SUBWOOFER"]
    style A fill:#f9f,stroke:#333
    style B fill:#ccf,stroke:#333
    style C fill:#cfc,stroke:#333
    style D fill:#fcc,stroke:#333
    style E fill:#cff,stroke:#333
    style F fill:#ffc,stroke:#333
    style G fill:#fcc,stroke:#333
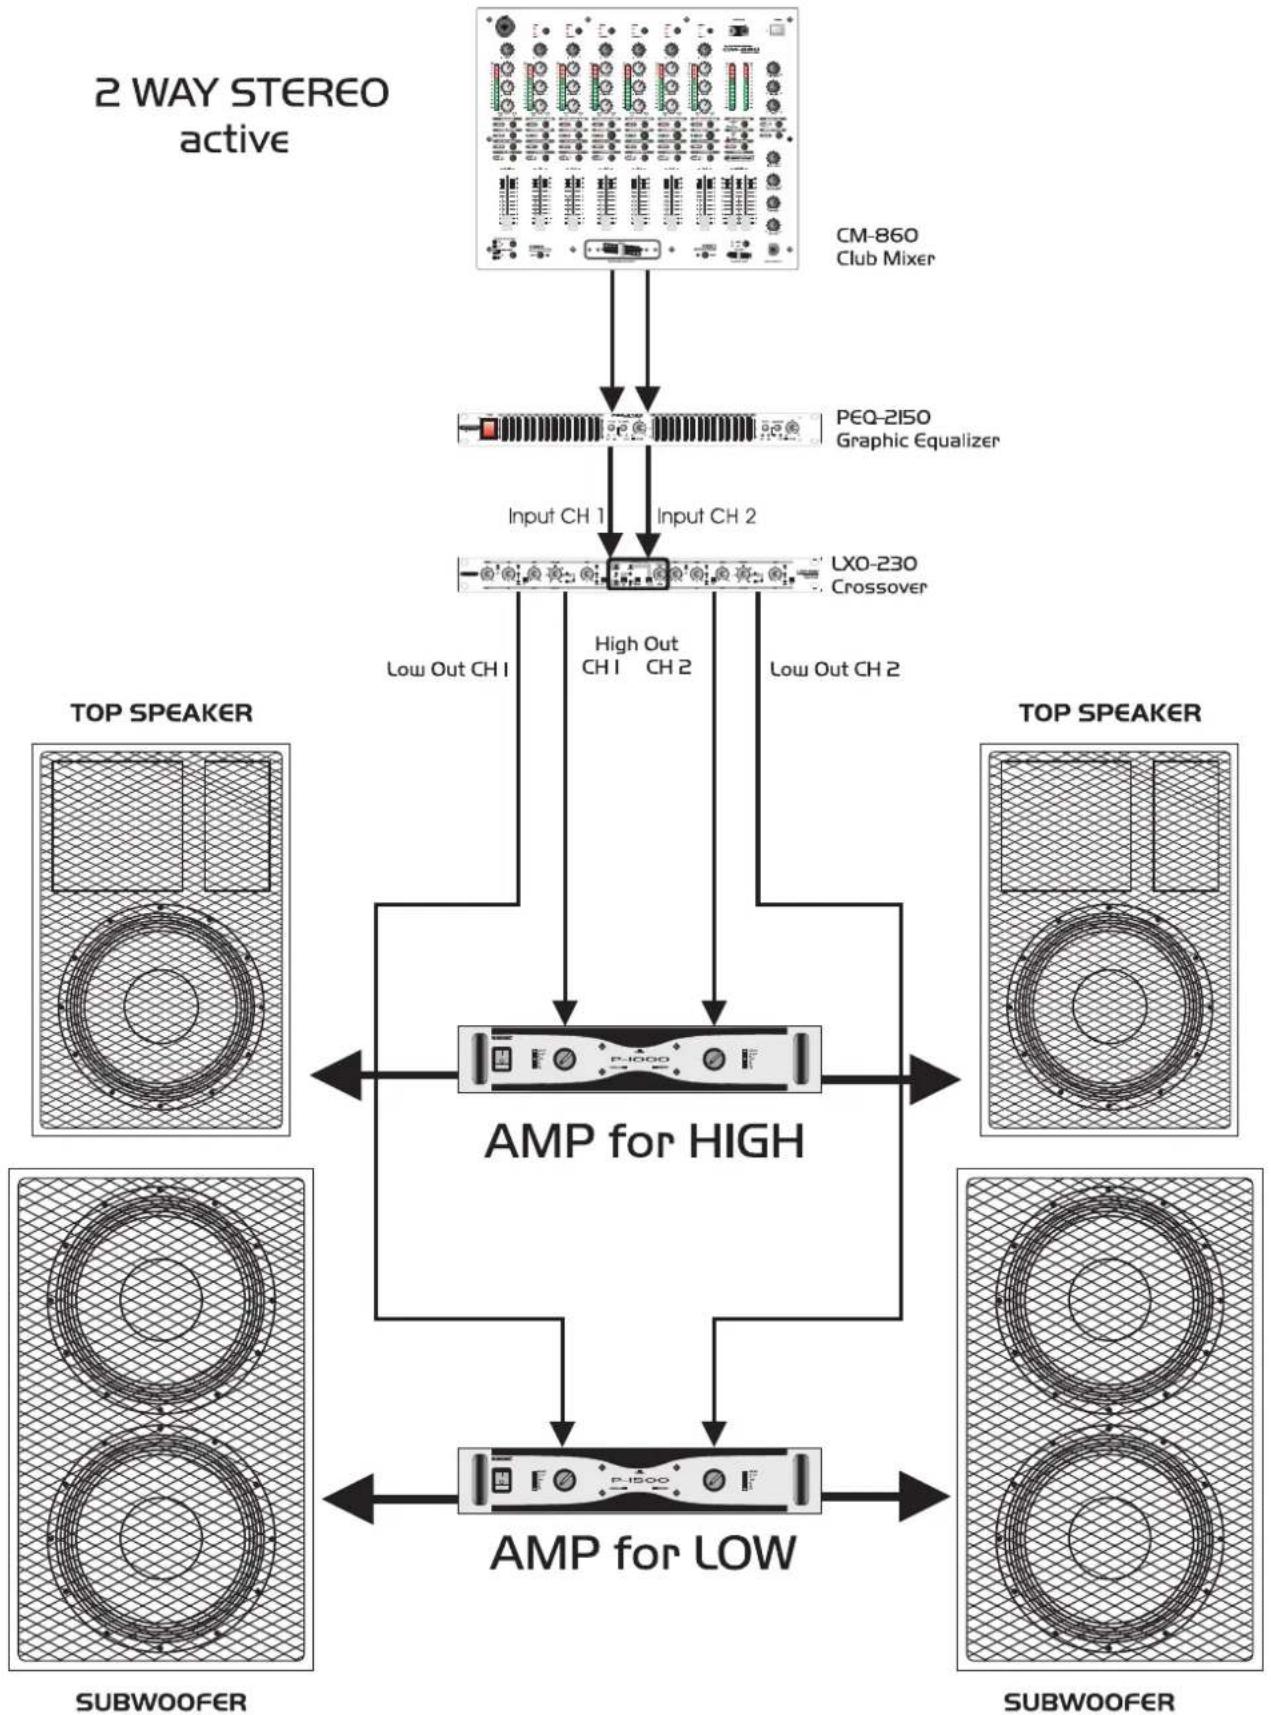
flowchart
graph TD
    A["2 WAY STEREO active"] --> B["CM-860 Club Mixer"]
    A --> C["PEQ-2150 Graphic Equalizer"]
    C --> D["Input CH 1"]
    C --> E["Input CH 2"]
    D --> F["High Out CH1 CH 2"]
    E --> F
    F --> G["Low Out CH 1"]
    F --> H["Low Out CH 2"]
    G --> I["AMP for HIGH"]
    H --> I
    I --> J["AMP for LOW"]
    K["TOP SPEAKER"] --> I
    L["TOP SPEAKER"] --> I
    M["SUBWOOFER"] --> I
    N["SUBWOOFER"] --> I
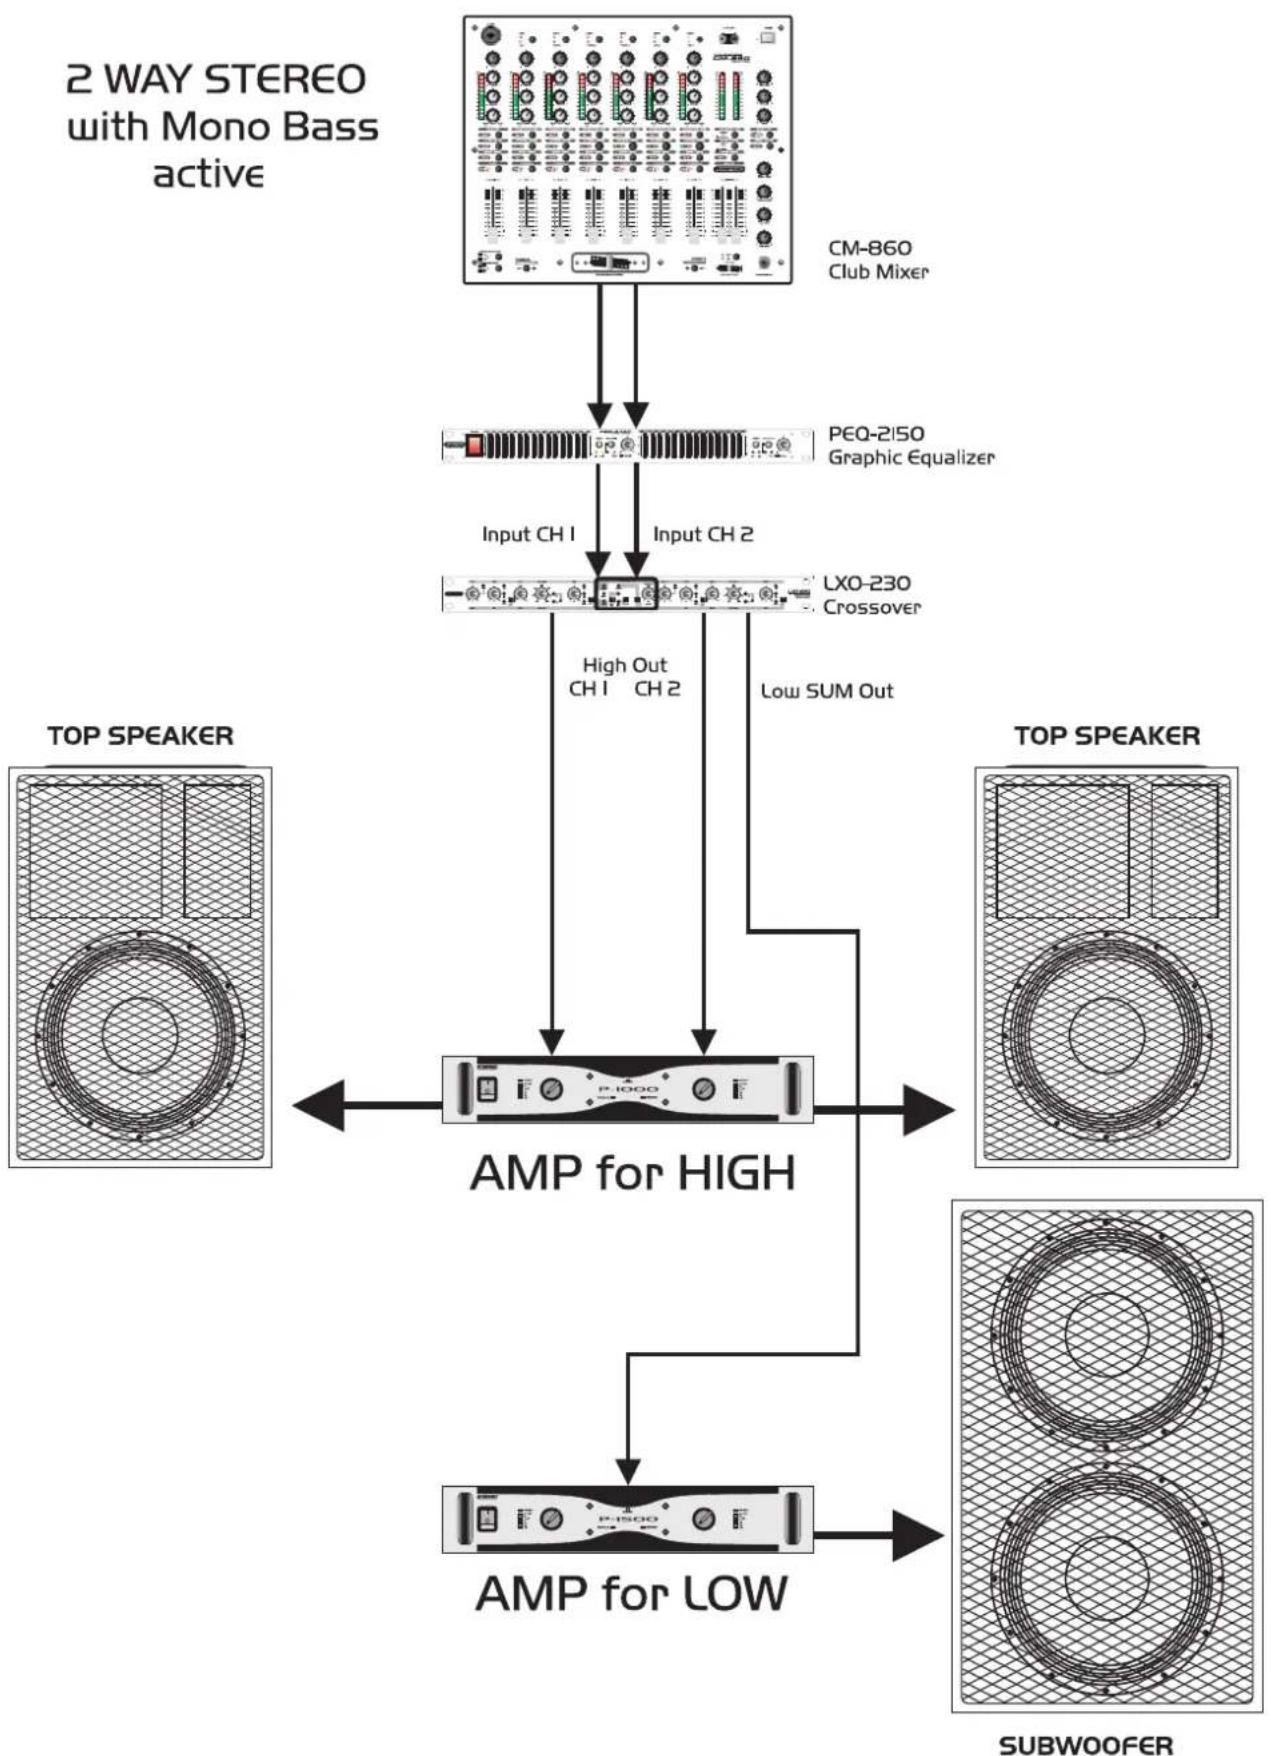
flowchart
graph TD
    A["2 WAY STEREO with Mono Bass active"] --> B["CM-860 Club Mixer"]
    B --> C["PEQ-2150 Graphic Equalizer"]
    C --> D["Input CH 1"]
    C --> E["Input CH 2"]
    D --> F["LXO-230 Crossover"]
    E --> F
    F --> G["High Out CH 1 CH 2"]
    F --> H["Low SUM Out"]
    G --> I["AMP for HIGH"]
    H --> I
    I --> J["AMP for LOW"]
    K["TOP SPEAKER"] --> I
    L["TOP SPEAKER"] --> J
    M["SUBWOOFER"] --> J
3 Way Active
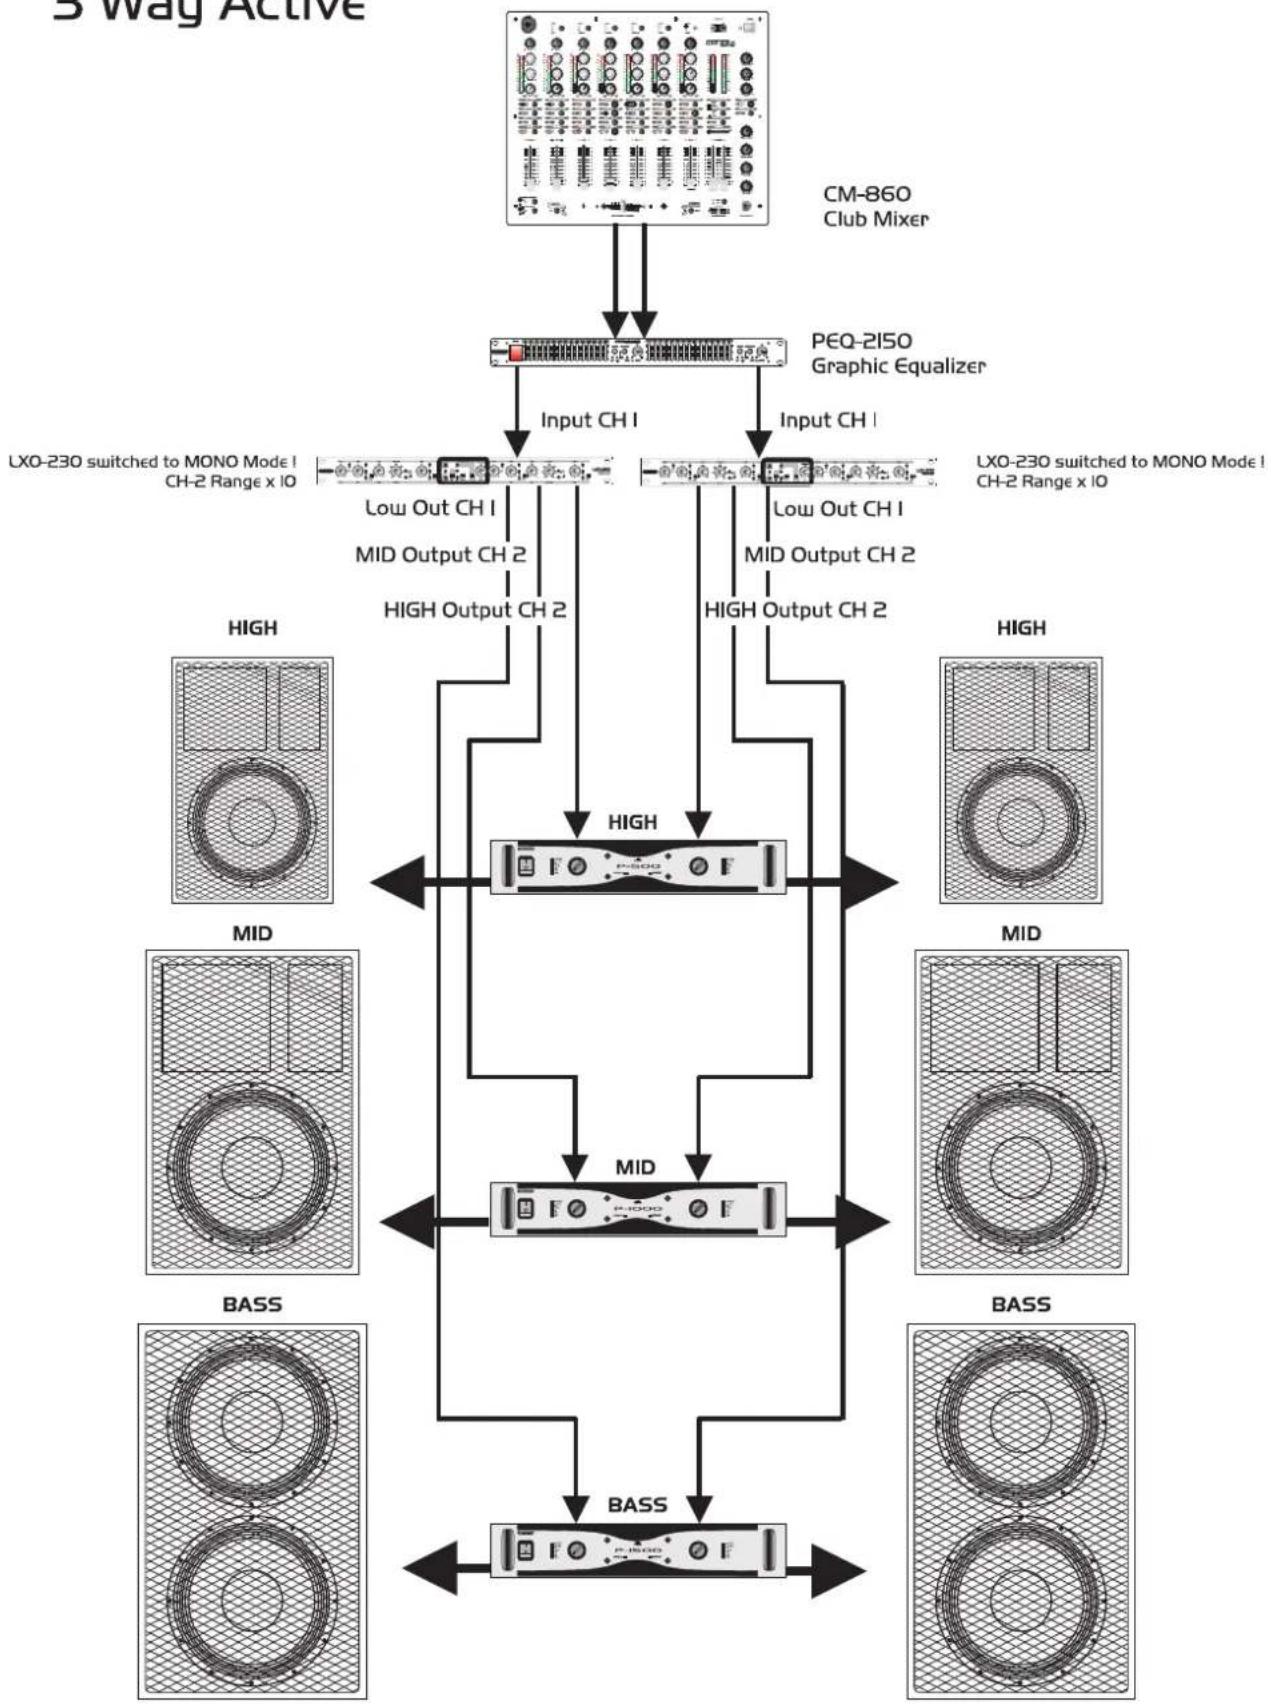
flowchart
graph TD
    A["CM-860 Club Mixer"] --> B["PEQ-2150 Graphic Equalizer"]
    B --> C["Input CH I"]
    B --> D["Input CH I"]
    C --> E["LXO-230 switched to MONO Mode I CH-2 Range x IO"]
    D --> F["LXO-230 switched to MONO Mode I CH-2 Range x IO"]
    E --> G["Low Out CH I"]
    E --> H["Low Out CH I"]
    E --> I["MID Output CH 2"]
    F --> J["MID Output CH 2"]
    G --> K["HIGH"]
    H --> L["HIGH"]
    I --> M["HIGH"]
    J --> N["HIGH"]
    K --> O["MID"]
    L --> P["MID"]
    M --> Q["BASS"]
    N --> R["BASS"]
    O --> S["BASS"]
    P --> T["BASS"]
    Q --> U["BASS"]
    R --> V["BASS"]


- Inhaltsverzeichnis
- Deutsch
- INSTALLATION
- Vorgehensweise:
- Clusters/Line Arrays:
- INTRODUCTION
- SAFETY INSTRUCTIONS
- Important:
- DANGER OF BURNING!
- DANGER TO LIFE!
- English
- HEALTH HAZARD!
- OPERATING DETERMINATIONS
- WARNING!
- DANGER!
- Legal instructions
- Information on hearing loss
- START-UP
- Choosing an appropriate power amplifier
- Operation modes
- Stereo operation
- Calculation number of speakers - impedance
- N.B.:
- Parallel operation
- Bridging
- Choosing appropriate connection cables
- Connections
- SPEAKER OUT
- Installing and orienting the speaker-system
- Avoiding feedbacks
- Installing the speaker-cables
- Overhead installation
- Procedure:
- Secondary attachment:
- Stacking
- Satellite-systems
- Installation on a stand or speaker stand
- Installation of the TV-pin (only for stands)
- Installation of the speaker-system
- Installation on a wall-mounting
- Suspended installation
- Please note:
- Horizontal suspension:
- Tilted suspension:
- OPERATION
- CLEANING AND MAINTENANCE
Brand : Omnitronic
Model : PAS-210 II
Category : Pregnant