
MM-XHD7 - Media player Fantec - Free user manual and instructions
Find the device manual for free MM-XHD7 Fantec in PDF.


| Product Type | Media Player |
| Brand | Fantec |
| Model | MM-XHD7 |
| Dimensions (W x D x H) | 200 x 150 x 40 mm |
| Weight | 500 g |
| Power Supply | DC 12V, 2A |
| Video Output | HDMI 1.4 |
| Audio Output | HDMI, Optical, Analog RCA |
| Supported Video Formats | MPEG-2, MPEG-4, AVI, MKV, MOV, MP4, WMV, 3GP, FLV, RMVB |
| Supported Audio Formats | MP3, WMA, AAC, WAV, OGG, FLAC, APE |
| Supported Image Formats | JPEG, BMP, PNG, GIF |
| Network Connectivity | Ethernet (RJ-45), WiFi 802.11 b/g/n |
| USB Ports | 2 x USB 2.0 |
| Memory Card Slot | SD/MMC |
| Internal Storage | None (supports external) |
| Remote Control | Included |
| OS Support | Embedded Linux |
| Cleaning and Maintenance | Wipe with a soft, dry cloth. Do not use liquid cleaners. |
| Safety | Use only the included power adapter. Keep away from moisture and heat sources. |
| Spare Parts and Repairability | Contact Fantec support for authorized service centers. Do not disassemble. |
| General Information | Full HD 1080p playback. Supports subtitles. Multi-format compatibility. |
Frequently Asked Questions - MM-XHD7 Fantec
User questions about MM-XHD7 Fantec
0 question about this device. Answer the ones you know or ask your own.
Ask a new question about this device
Download the instructions for your Media player in PDF format for free! Find your manual MM-XHD7 - Fantec and take your electronic device back in hand. On this page are published all the documents necessary for the use of your device. MM-XHD7 by Fantec.
USER MANUAL MM-XHD7 Fantec
1.1 Preface....2
1.2 Packing List....3
1.3 Cautions 4
1.4 Connection....6
1.5 Power On / Off 9
2. Remote control.... 10
3. System Start-up....12
3.1 HDD Format 12
3.2 TV Mode....12
4. Main Menu.... 13
5. Movie Playback 14
5.1 Quick start.... 14
5.2 Thumbnail view 14
5.3 List view 14
5.4 Playback options 15
6. Photo Playback 17
6.1 Quick start.... 17
6.2 Thumbnail view 17
6.3 List view 17
6.4 Playback options 18
7. Music playback.... 19
7.1 Quick start.... 19
7.2 Thumbnail view 19
7.3 List view 20
7.4 Playback options 20
8. Text playback....21
8.1 Quick start 21
8.2 Playback options 21
9. Flash playback 22
9.1 Quick start 22
10. Network playback.... 23
10.1 Quick start 23
10.2 Streaming via UPnP 23
10.3 NetRadio 27
10.4 Picasa 32
10.5 Flickr 33
11. File playback 34
11.1 Quick start 34
12. Copy and Delete function 35
12.1 Copy mode....35
12.2 Delete mode....36
13. Settings.... 37
13.1 Quick start 37
13.2 Display Settings.... 38
13.3 Language Settings 38
13.4 Photo Settings 39
13.5 Movie Settings.... 39
13.6 Music Settings 40
13.7 Text Settings 40
13.8 Default Settings.... 41
13.9 About 41
13.10 Upgrade 42
13.11 Network setup....42
14. Upgrading the Firmware 46
1. Introduction
1.1 Preface
Thank you very much for purchasing FANTEC FULL HD MEDIA PLAYER. We hope you will enjoy using it as a great home entertainment partner. This player has the following functionality.
A/V Output
• HDMI V1.3 for high-definition video and digital audio
- Composite & component video and stereo audio for analogue audio-visual connection
• S/PDIF optical & coaxial interface for high-fidelity digital audio
- Adjustable video output (NTSC, PAL, 480i, 480p, 576i, 576p, 720p, 1080i, 1080p)
Multimedia Playback
• Supports major audio, video and image file formats (1080p HD video decoding)
- Movie format: AVI/MKV/XVID/DIVX/TS/MTS/M2TS/MPG/MP4/MOV/VOB/ISO/IFO/DAT/RM/RMVB/FLV/DVD MENU Playback/DVD ISO Playback /H.264/AVCHD Supports SRT, SSA, ASS, SMI, SAMI, TXT, SUB, SUB+IDX, MKS subtitle format NOTE: Subtitle and Video must have the same name, (e.g. 123.avi and 123.srt) Supports fast forward, rewind, pause, previous song, next song, audio switching, subtitle switching, loop playback, time search operation
- Music format: MP3/WMA/WAV/AAC/FLAC/Digital downmix Supports dynamic lyrics display of music (lyrics and music should have same name) Supports built-in album art display for music Supports fast forward, rewind, pause, previous song, next song, loop playback
- Photo format: HD JPEG/BMP/GIF/TIF/PNG Photo slide show with background music Supports zoom, move and rotate
- Text format: Supports .TXT file Supports switching of diverse backgrounds style, text font, color Supports manual wrap, flip, and automatic wrap browsing When View pictures or read the text, you can listen to music at the same time
- File system format: NTFS, FAT32
Network Feature
• A/V streaming via UPnP Media Server
- Internet Radio
- Picasa access
- Flickr access
File Copy and Delete
• Supports copying & delete files among USB devices, Memory Card and HDD
USB 2.0 Support
• USB DEVICE port (for computer connection)
• USB HOST port x 2 (for USB storage devices)
• SD / SDHC/MMC/MS/MS Pro Card Reader
Note: All the information contained in this manual was correct at the time of publication. However, as our engineers are always updating and improving the product, your device's software may have a slightly different appearance or modified functionality than presented in this manual.
1.2 Packing List
| Part | Quantity |
| Player | 1 |
| USB cable | 1 |
| Remote Control | 1 |
| Remote Control Battery | 2 |
| AC/DC adaptor | 1 |
| Quick start guide (printed) | 1 |
| Driver CD (with User Manual) | 1 |
| Warranty card | 1 |
Note:
The actual contents in the package might be different from the packing list in this manual.
1.3 Cautions
The FANTEC FULL HD MEDIA PLAYER design and manufacture has your safety in mind. In order to safely and effectively use this player, please read the following before usage.
1.3.1 Usage Cautions
User should not modify this player. If commercial hard disk is being used, the environmental temperature should be within +5 °C \~ +35 °C.
1.3.2 Power
The player's power voltage: DC 12V.
When using this player, please connect the supplied AC adapter or AC adapter cable to the player's power jack. When placing the adapter cable, make sure it can not get damaged or be subject to pressure. To reduce the risk of electric shock, unplug the adapter first before cleaning it. Never connect the adapter to the player in a humid or dusty area. Do not replace the adapter or cable's wire or connector.
1.3.3 Radio Interference
- If not properly shielded, almost all electronic devices will get radio interference. Under some conditions, your player might get interference.
- The design of this player has followed the FCC/CE standard, and has followed the following rules:
(1) This player may not cause harmful interference;
(2) This player could accept some interference received including interference that may
cause undesired operation.
1.3.4 Repair
If the player has a problem, you should take it to an appointed repair center and let the specialists do the repair, never repair the player yourself, you might damage the player or endanger yourself or your data.
1.3.5 Disposing of the Player
When you dispose of the player, be sure to dispose it appropriately. Some countries may regulate disposal of electrical device, please consult with your local authority.
1.3.6 Hard Disk Cautions
The player uses an internal hard disk for data storage, in normal case, format or repair is not required.
- Physical impact may create bad sector in the hard disk, you can use CHKDSK to fix the problem.
- All data stored in the player may be lost due to physical impact, electrical shock,
power lost, HDD format etc. Please backup your data.
- It is suggested to do defragment after a long period of usage.
- Regularly backup the data in the hard disk so that it can be recovered in the event of data corruption or loss. Our company takes no responsibility for loss of data stored on the hard disk.
1.3.7 Others
When using this player, please do not let the player come into contact with water or other liquid, if water is accidentally spilled on the player, please use a dry cloth to absorb the spillage.
Electronic products are vulnerable, when using please avoid shaking or hitting the player, and do not press the buttons too hard.
Do not let the player come into contact with water or other liquid.
Do not disassemble the player, repair the player or change the design of the player, any damage done will not be included in the repair policy.
Do not press the buttons of the player too hard.
Avoid hitting the player with hard object, avoid shaking the player, and stay away from magnetic fields.
During electrostatic discharge and the strong electromagnetic field, the product will malfunction, then unplug the power cable and the product will return to normal performance next time it is powered on.
1.4 Connection
1.4.1 Connecting the Power Supply
(1) Follow the picture and connect the AC adaptor to the player's DC IN jack;
(2) Follow the picture and plug in the AC adaptor to the power outlet.

natural_image
Diagram showing a wall-mounted power plug connected to a cable with a small indicator box (no text or symbols present)1.4.2 Connecting to a PC
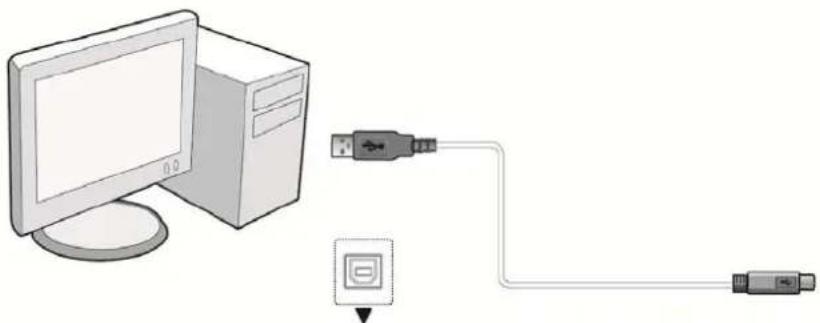
(1) Make sure the player is powered on;
(2) Plug in the squarish connector of the USB cable to this player's USB Mini DEVICE port;
(3) Plug in the rectangular connector of the USB cable to computer.
In this way, you can manage content on the built-in HDD of the player on your local PC.
natural_image
Illustration of a desktop computer connected to a USB port and cable (no text or symbols)1.4.3 Connecting a USB Device or Memory Card
(1) Make sure the player is powered on;
(2) Plug in the USB stick or USB HDD etc. to the USB HOST port of this player.
(3) Insert the memory card into the card slot properly.
In this way, you can browse contents of external USB devices or memory cards.

flowchart
graph TD
    A["USB Device"] --> B["USB Cable"]
    B --> C["USB Cable with USB Port"]
    C --> D["USB Cable with USB Gate"]
    D --> E["CARD"]
1.4.4 Connecting to a TV
1.4.4.1 A/V OUT
(1) Follow the picture and plug in the 3 colour connector to the player's A/V OUT jack;
(2) Follow the picture and plug in the 3 colour connector to the TV's A/V IN jack.
In this way, you can enjoy the content in the player on TV or other display devices.

natural_image
Diagram of a computer setup with monitor, tower, and three connected cables (no text or symbols)1.4.4.2 Y/Pb/Pr Component OUT
(1) Follow the picture and plug in the 3 colour connector to the player's Y/Pb/Pr jack;
(2) Follow the picture and plug in the 3 colour connector to the TV's Y/Pb/Pr jack.
Audio Connection while using Y/Pb/Pr Video out:
First method: use the audio output from the A/V OUT jack;
Second method: use the audio output from the S/PDIF Coaxial or Optical jack.

natural_image
Diagram of a computer setup with monitor, tower, and connected cables (no text or symbols)1.4.4.3 HDMI OUT
(1) Follow the picture and plug one connector on your HDMI cable to the player's HDMI jack;
(2) Follow the picture and plug the other connector on your HDMI cable to the TV's HDMI jack. Note: The HDMI cable is an optional accessory sold separately. In this way, you can have the highest quality video and audio via a single cable.

natural_image
Diagram of a computer monitor connected to a USB port via cable (no text or symbols)1.4.5 Connecting to an Digital Amplifier
(1) Follow the picture and plug in the Toslink or the Coax connector to the player's S/PDIF Optical or Coaxial jack;
(2) Follow the picture and plug in the other connector on your optical fibre / coax to the digital audio device (digital amplifier or decoder).
Note: Optical fibre or coax cable is not supplied.
In this way, you can enjoy powerful Digital Surround or MPEG sound

natural_image
Diagram showing audio equipment connections: two speakers, a CD, and an audio jack connected via a cable (no text or symbols present)1.4.6 Connecting to a LAN
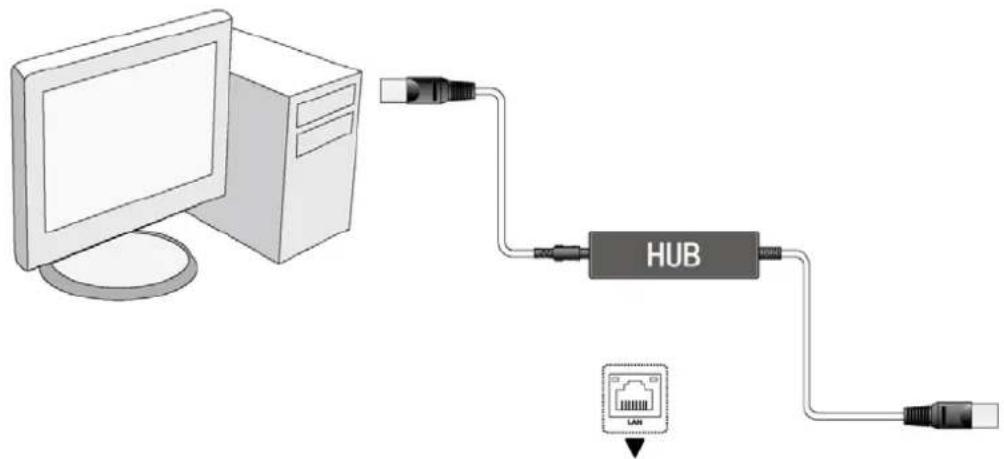
To connect to a LAN (Local Area Network) you require a cat5, cat5e or cat6 network cable (not supplied).
(1) Connect one of the crystal plugs on the cable to the player's RJ45 LAN socket;
(2) Connect the other crystal plug on the cable to a RJ45 LAN port on your router, switch, or hub devices.
1.5 Power On / Off
Power On
After connecting the DC IN jack and press the power button on the rear panel, the player will soon enter the home screen, and the power indicator will turn blue.
Power Off
Press the power button on the rear panel, the player will enter power off mode.
2. Remote control
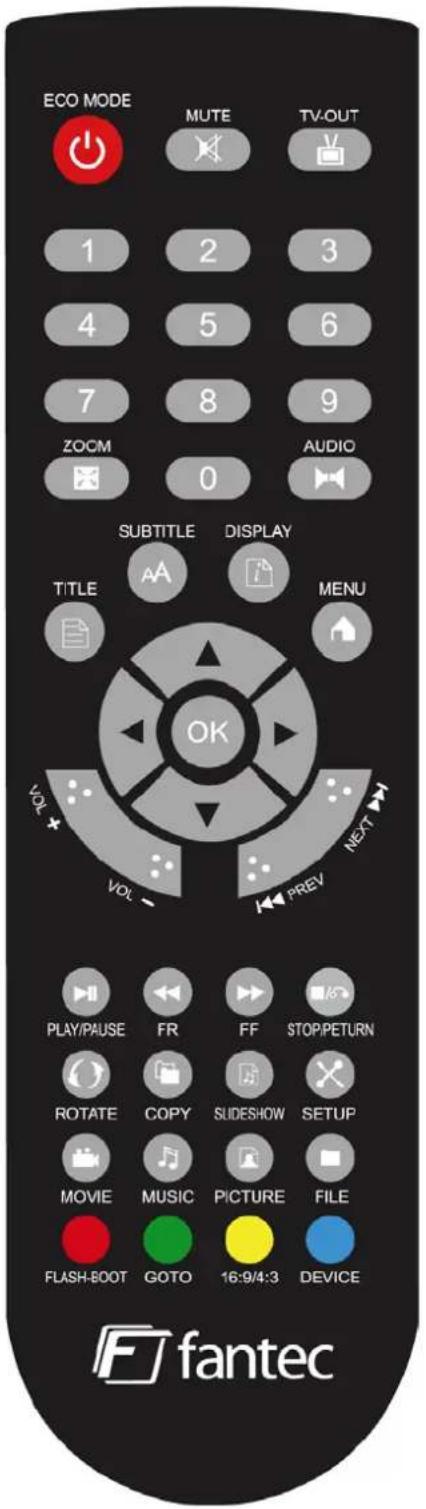
All procedures in this manual can be carried out using the remote control buttons.
See the following for details on each button and its function:
| Button | Photo | Function | |
| 1 | ECO MODE |  | Turns the internal HDD On/Off, to save energy during playback of internet radio, USB drive or memory card. |
| 2 | MUTE |  | Enables/ Disables the sound |
| 3 | TV-OUT | Selects TV Video output:NTSC: 480i,480P,720P,1080i, 1080PPAL: 576i,576P,720P,1080i, 1080P | |
| 4 | Numeric buttons |  | Press to enter IP-address |
| 6 | AUDIO | Change audio track if existing | |
| 7 | TITLE |  | Return to DVD menu in DVD ISO or Video_TS playback |
| 8 | SUBTITLE | Subtitle on or off | |
| 9 | DISPLAY |  | - Press to open the tool bar during playback for additional functions |
| 10 | MENU | Go to Main Menu | |
| 11 | Navigation buttons |  | Select item up, down, left or right |
| 12 | OK | Press "OK" to confirm | |
| 13 | VOL +/ VOL - |  | Increase or decrease the volume |
| 14 | NEXT/PREV | Page up/Down or Next/Previous file | |
| 15 | PLAY/PAUSE | Begin playback/confirm selection/pause playback | |
| 16 | FR |  | Fast rewind |
| 17 | FF | Fast forward | |
| 18 | STOP/RETURN | Stop playing, Return to previous step | |
| 19 | ROTATE |  | Rotate selected photo |
| 20 | COPY | Enables to copy single files or folders between different devices | |
| 21 | SLIDESHOW | Enables the slideshow playback mode of pictures and music. | |
| 22 | SETUP |  | Enter the OSD Setup Menu |
| 23 | MOVIE | Press the button to enter the movie menu. All movie files are shown in the directory structure | |
| 24 | MUSIC |  | Press the button to enter the music menu. All Music files are shown in the directory structure |
| 25 | PICTURE | Press the button to enter the picture Menu. All Picture files are shown in the directory structure | |
| 26 | TXT | Press the button to enter the File Menu. All the files are shown in the directory structure |

| 27 | FLASH-BOOT |  | Loads embedded options in flash files. Please press FLASH-BOOT during flash file playback to load the option interface. |
| 28 | GO TO |  | Go to a specified time duringvideo playback |
| 29 | 16:9/4:3 |  | Change the TV mode duringvideo playback |
| 30 | DEVICE |  | InMain Menupress to switch between the HDD, USB drive and card reader |
3. System Start-up
3.1 HDD Format
For users who wish to install a new SATA HDD into the player, please refer to the following procedures to format the hard disk on the player before usage.
At first you must format the hard disk of the player at a PC. Format your HDD in NTFS or in FAT32 with a FAT32 format tool, like Swissknife or EASEUS Partition Master or use the Windows formatting tool.
3.2 TV Mode
Connect and set up media player and TV, then connect to power and turn on turn on. After a few seconds the media player enters the Main Menu.
Note: All available external storage devices are shown in blue colour on the right
upper corner of the Main Menu.

4. Main Menu
The Main Menu contains 8 functions.
The icons are:


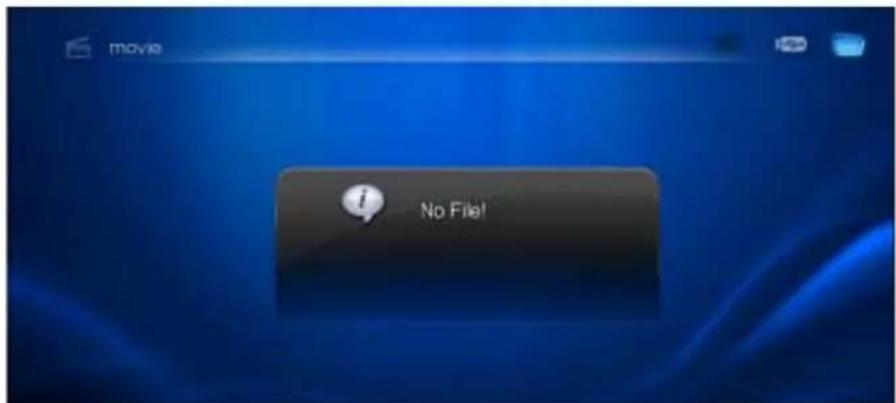
The cursor highlights at any option. Press "OK" button to enter the selected function. If any empty device is connected to the player, a screen with "No file" will be displayed.
5. Movie Playback
5.1 Quick start
Press "LEFT/RIGHT" button on the remote to select the Movie Icon. Press "OK" to enter into movie thumbnail or movie list menu.
(1). Press "UP/DOWN/LEFT/RIGHT" button to select the movie stored on the HDD. Press "OK" to play the selected movie
(2). Press "STOP/RETURN" button to return to the Movie preview interface. Press again to return to the Main Menu.
5.2 Thumbnail view
Press the "MOVIE" button on remote control to enter the movie thumbnail interface. The movie sorting order is according to the options under "Setting", "Movie setup" and "Sorting". When the cursor highlights one movie, "Duration", "File size" and "File type" will be shown on the left information bar.

5.3 List view
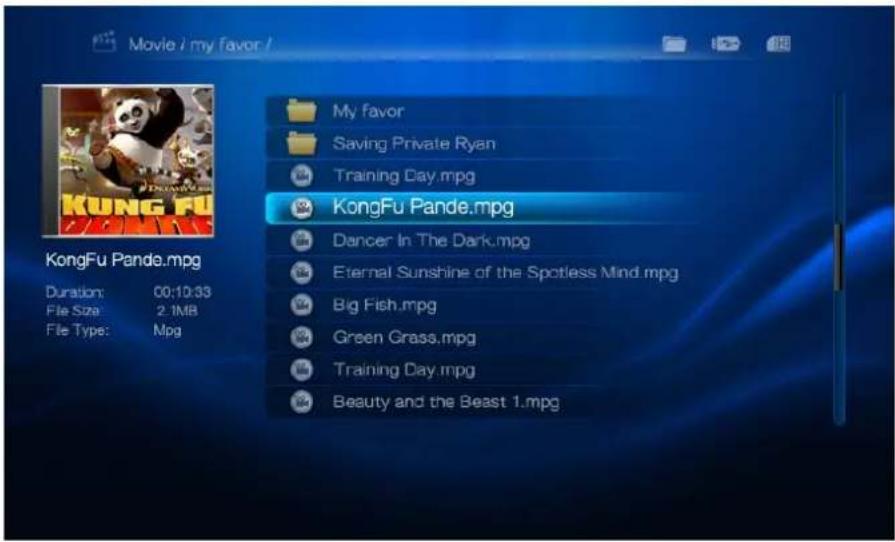
Press the "MOVIE" button on remote control to enter the movie list interface. The movie sorting order is according to the options under "Setting", "Movie setup" and "Sorting". When the cursor highlights one movie a preview window and "Duration", "File size" and "File type" will be shown on the left information bar.
5.4 Playback options
5.4.1 Movie Tool bar
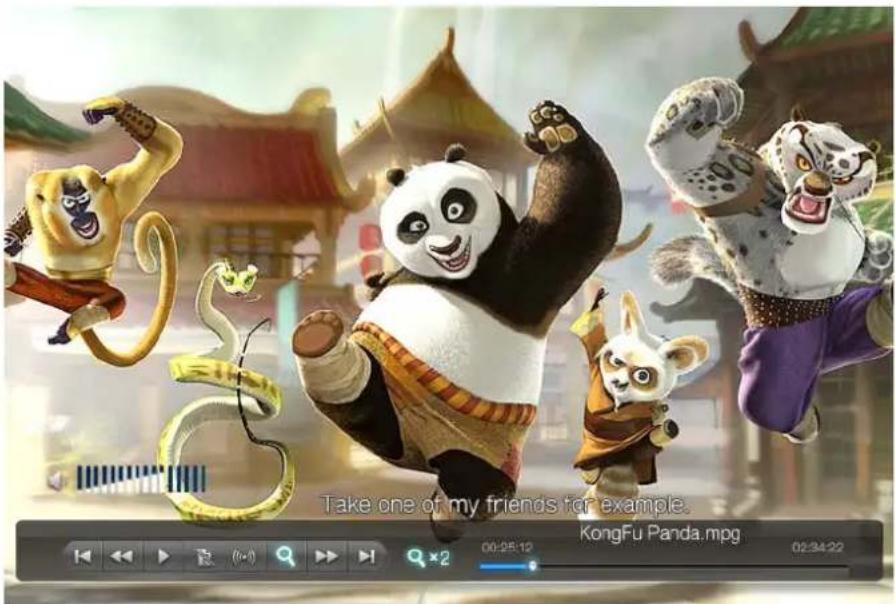
Press the "DISPLAY" button on the remote control during movie playback. The movie info bar will pop up on the bottom of the screen. Previous, fast rewind, play/pause, subtitle, audio, zoom, fast forward and next option are available. The tool bar will fade out after 5 seconds without any operation. Press the "LEFT/RIGHT" button to select the function and press "OK" to confirm.
5.4.2 Movie GO TO function
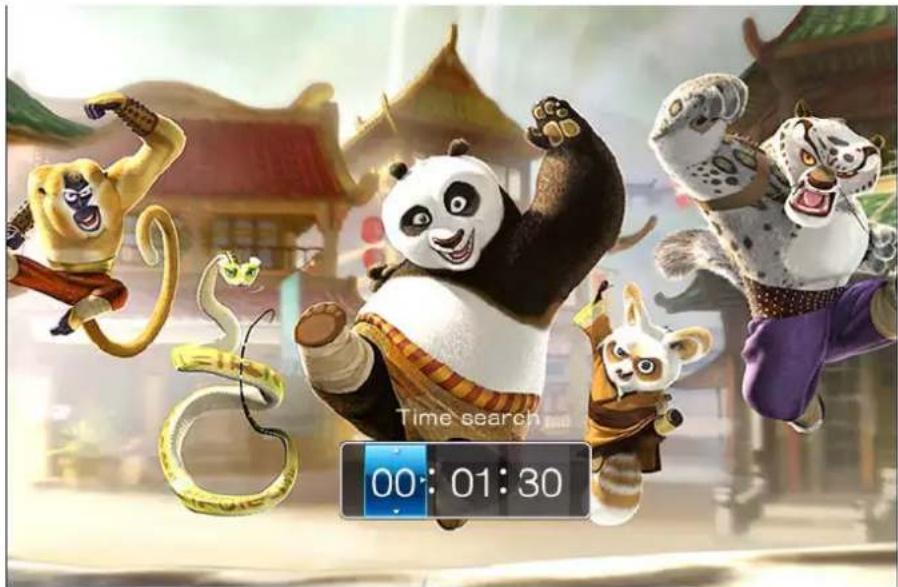
Press “GOTO” button on the remote control during movie playback. The time selection interface will pop up on the bottom of the screen. At this interface you can enter the time in order to go to a specific time of the movie. The selected time should not longer than the total time of the file.
5.4.3 Movie resume play function
If you interrupt a movie playback by pressing the STOP/RETURN button, you can resume watching this movie at the position you left it. To skip the resume play please select "x" in order to start the movie from the beginning.
To enable or disable this automatic bookmark function, please go to Settings, Movie setup and select Resume Play.

6. Photo Playback
6.1 Quick start
Press "left/right" button on the remote to select the Photo Icon. Press "OK" to enter into photo thumbnail or photo list menu.
(1). Press "UP/DOWN/LEFT/RIGHT" button to select the photos stored on the HDD. Press "OK" to play the selected photo
(2).Press "STOP/RETURN" button to return to the Photo preview interface. Press again to return to the Main Menu.
6.2 Thumbnail view
Press the "PICTURE" button on remote control to enter the photo thumbnail interface.
The photo sorting order is according to the options under "Setting", "Photo setup" and "Sorting". When the cursor highlights one picture, "File size", "File Typ", "Resolution and "Date" will be shown on the left information bar.

6.3 List view
Press the "PICTURE" button on remote control to enter the photo list interface. The photo sorting order is according to the options under "Setting", "Photo setup" and "Sorting". When the cursor highlights one picture, "File size", "File Type", "Resolution and "Date" will be shown on the left information bar.

6.4 Playback options
6.4.1 Photo Tool bar
Press the "DISPLAY" button on the remote control during photo playback. The photo info bar will pop up on the bottom of the screen. Previous, play/pause, rotate, zoom, background music on/off, picture effects and next options are available. The tool bar will fade out after 5 seconds without any operation. Press the "LEFT/RIGHT" button to select the function and press "OK" to confirm.

6.4.2 Slideshow with music
Please copy pictures and music files into the same folder. Then enter the Photo menu and enter the depending folder. Now first press the "SLIDESHOW" button and afterwards the "DISPLAY" button on the remote control. The photo info bar will pop up on the bottom of the screen. Select the music icon to enable the background music.
If you press the SLIDESHOW button directly under Photo menu, all content stored on the HDD, USB or Card will be played in alphanumeric order.
Note: The slideshow mode is design for a simultaneous playback of JPEG picture files and MP3 music files.
7. Music playback
7.1 Quick start
Press "LEFT/RIGHT" button on the remote to select the Music Icon. Press "OK" to enter into music thumbnail or music list menu.
(1). Press "UP/DOWN/LEFT/RIGHT" button to select the music file stored on the HDD. Press "OK" to play the selected music file.
(2).Press "STOP/RETURN" button to return to the Music preview interface. Press again to return to the Main Menu.
7.2 Thumbnail view
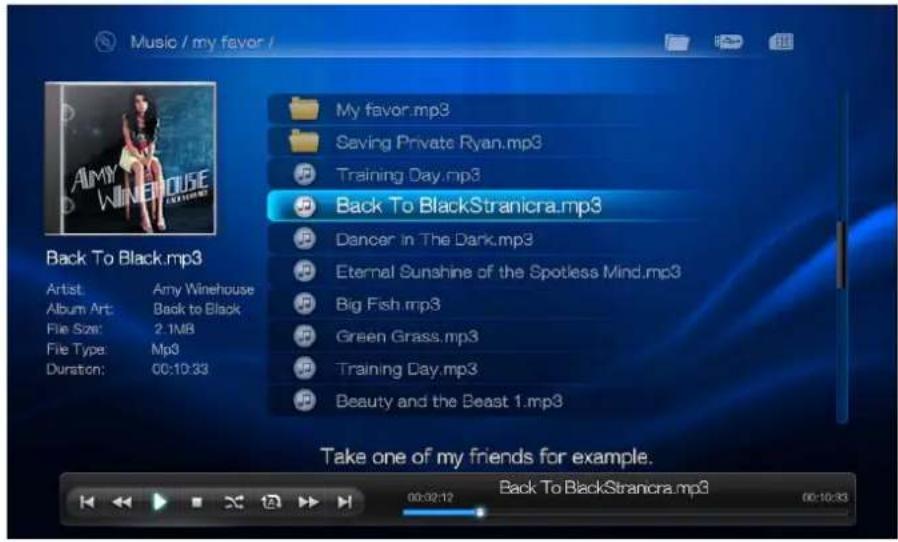
Press the "MUSIC" button on remote control to enter the music thumbnail interface. The music sorting order is according to the options under "Setting", "Music setup" and "Sorting". When the cursor highlights one title, "Artist", "Album", "File size", "File Type" and "Duration" will be shown on the left information bar.

7.3 List view
Press the "MUSIC" button on remote control to enter the photo list interface.
The music sorting order is according to the options under "Setting", "Music setup" and "Sorting". When the cursor highlights one title, "Artist", "Album", "File size", "File Type" and "Duration" will be shown on the left information bar.
7.4 Playback options
7.4.1 Music Tool bar
Press the "DISPLAY" button on the remote control during music playback. The music info bar will pop up on the bottom of the screen. Previous, fast rewind, play/pause, stop, shuffle/continuous, repeat, fast forward and next option are available. The tool bar will fade out after 5 seconds without any operation. Press the "LEFT/RIGHT" button to select the function and press "OK" to confirm.
Repeat options:

Repeat off,

Repeat All,

Repeat directory,

Repeat song
8. Text playback
8.1 Quick start
Press "LEFT/RIGHT" button on the remote to select the Text Icon. Press "OK" to enter into text list menu.
(1).Press "UP/DOWN/LEFT/RIGHT" button to select the text file stored on the HDD. Press "OK" to play the selected text file.
(2).Press "STOP/RETURN" button to return to the text list interface. Press again to return to the Main Menu.

8.2 Playback options
8.2.1 Text Tool bar
Press the "DISPLAY" button on the remote control during text playback. The text info bar will pop up on the bottom of the screen. Previous, fast rewind, play/pause, zoom out, zoom in, background music, fast forward and next option are available. The tool bar will fade out after 5 seconds without any operation. Press the "left/right" button to select the function and press "OK" to confirm.
Our Mission.txt
Amlogic is a leading fabless semiconductor company that provides advanced solutions for video, audio and image processing for wide range of consumer applications including TVs, Digital Picture Frames, Home Media Centers and Set-top-Boxes. Amlogic provides a total integrated solution to its customers so that they can bring the most compelling products to consumers in record time. In this partnership, Amlogic customers have the confidence and ability to focus on their core business competency. Amlogic's advanced networking technology further extends the user experience beyond the consumer devices to the internet, therefore ushering in a new era of connected consumer electronics devices to every home and everyone.
1/4

9. Flash playback
9.1 Quick start
Press "LEFT/RIGHT" button on the remote to select the Flash Icon. Press "OK" to enter into flash list menu.
(1). Press "UP/DOWN/LEFT/RIGHT" button to select the flash file stored on the HDD. Press "OK" to play the selected flash file.
(2).Press "STOP/RETURN" button to return to the flash list interface. Press again to return to the Main Menu.

Note: The FLASH-BOOT mode is designed for embedded option of flash files.
10. Network playback
10.1 Quick start
Press "LEFT/RIGHT" button on the remote to select the Network Icon. Press "OK" to enter into network menu.
(1). Press "LEFT/RIGHT" button to select the network options. Press "OK" to enter the selected option.
(2). Press "STOP/RETURN" button to return to the network options interface. Press again to return to the Main Menu.
10.2 Streaming via UPnP
A built-in UPnP (Universal Plug and Play) client has been integrated on the system, which allows the FANTEC FULL HD media player to auto-detect UPnP Media Servers on the network. You can browse and stream media files from them.
10.2.1 Installing the UPnP server on your PC
There're a lot of free and commercial UPnP Media Server software, such as Windows Media Connect, Windows Media Player 10/11/12, XBMC Media Center (Linux/Mac/Windows), MediaTek (Linux), etc. Please install one of them on your computer. In the following chapters, we will take Windows Media Player 11 on Microsoft Windows XP SP2 for an example.
10.2.2 Share media files on your PC with Windows Media Player 11
The Media Sharing feature of Windows Media Player 11 lets you enjoy the contents of your Windows Media Player library from anywhere in your home.
Open Windows Media Player 11, click Library -> Add Library -> Advanced Options to add or remove media files from the library.

Click Library -> Media Sharing, then you can allow or deny devices to access the media library. Click Allow to authorize your player.

Then please close the Media Payer 11 and control if the UPNP service is running. Click Network icon on your desktop and all PC and UPNP deceives in your network are displayed.

flowchart
graph TD
    A["Administrator"] --> B["PC"]
    C["Administrator: Administrator"] --> D["UPnP"]
Note: You don't have to start Media Player 11, once it is configured you just have to turn on your PC and all the content listed in the Library will be available in the network.
10.2.3 Access Media Streaming with UPnP
Connect your player to you local network (Ethernet or wireless) and configure the network as described under NETWORK SETUP in this manual. Then visit the UPNP menu of the player.

Select one of the options for network streaming: Movie, Photo, Music or Text.

Enter into Movie, Photo, Music or Text to browse or play the content shared by Windows Media Player 11. The directories and files displayed will be the same as in Windows Media Player 11.

Note: Firewalls may prevent your player to communicate with your computer. Please open the ports manually and add your player to the 'trusted' list, or disable the firewall temporarily.
10.3 NetRadio
A built-in internet radio client has been integrated on the system, which allows the FANTEC FULL HD media player to play thousands of internet radio music stations. Visit NetRadio menu to access your favorite stations, access to all available stations, delete or search function.

10.3.1 NetRadio stations
If you visit the NetRadio for the first time, all available stations are listed. Please use UP/DOWN button to navigate or use "LEFT/RIGHT" button to switch to the next page. Please press "OK" button to enter your preferred genre.

All available stations are listed. Please use "UP/DOWN" button to navigate or use "LEFT/RIGHT" button to switch to the next page. Please press "OK" button to enter your preferred station.

Please enter into the last sub-menu and browse or play the available internet radio stream.
10.3.2 NetRadio Favorites
If you have entered the last sub menu of the NetRadio, please press the "COPY" button to add the selected internet radio stream to the favorites list.
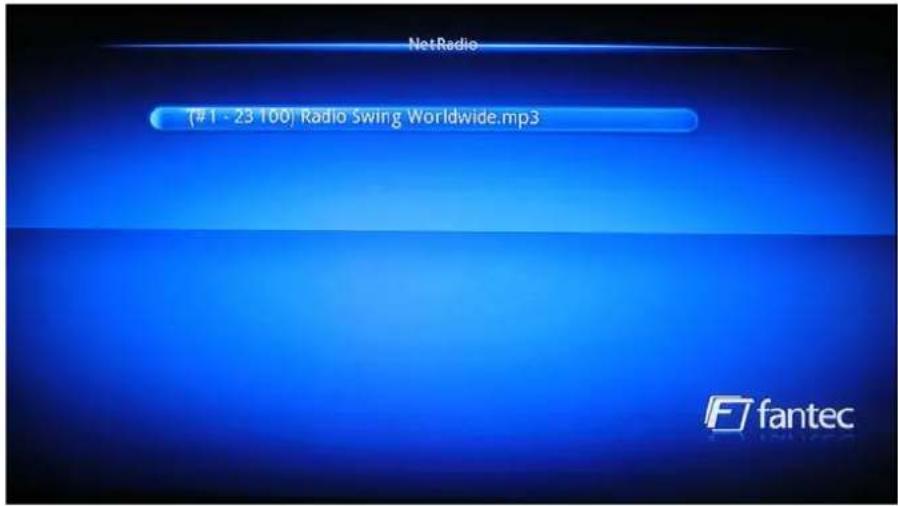
For example: Select the stream “Radio Swing Worldwide.mp3” and press “COPY” to add it to Favorites.
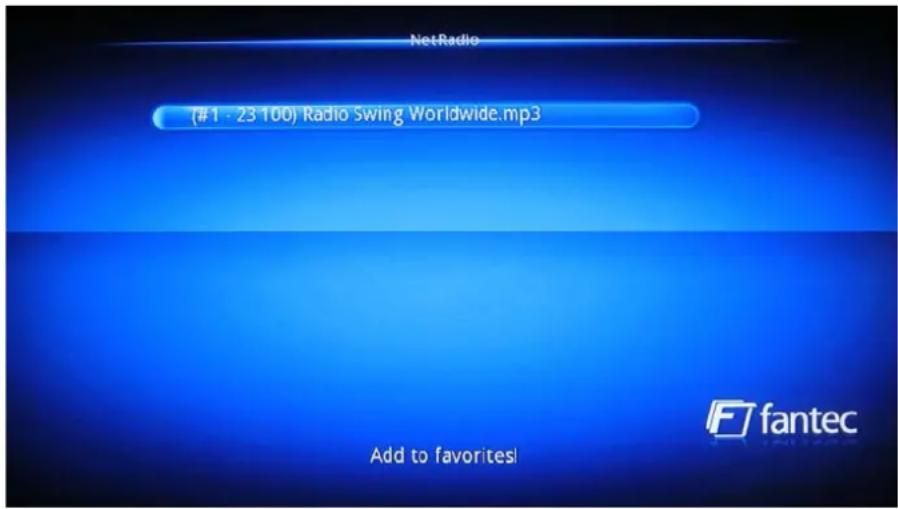
To visit the FAVORITES list please press the "RETURN" button. All favorites are listed under this icon:

To visit the NetRadio, please go to this icon:

10.3.3 NetRadio Delete function
To delete a stream from your FAVORITES list, please go to this icon:

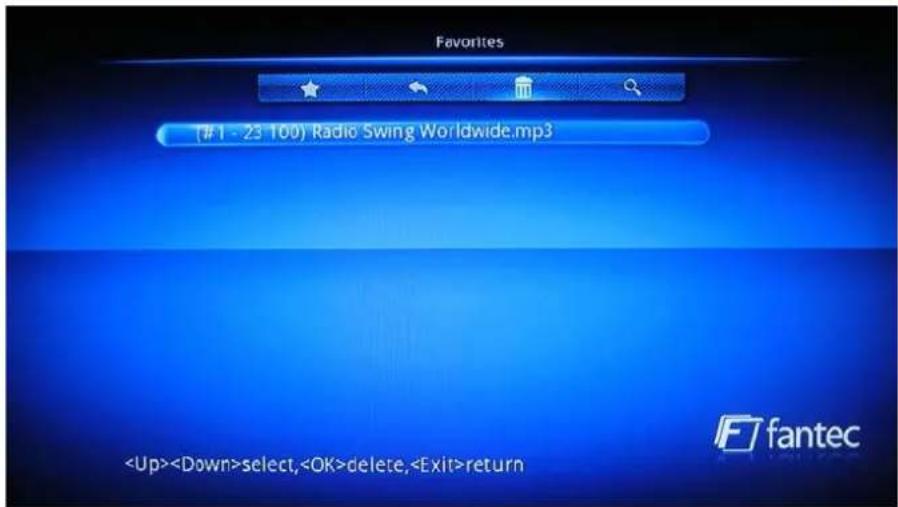
Then select the stream that should be deleted and press "OK" button to delete it.

10.3.4 NetRadio Search function
To search for internet radio stations please go to this icon:

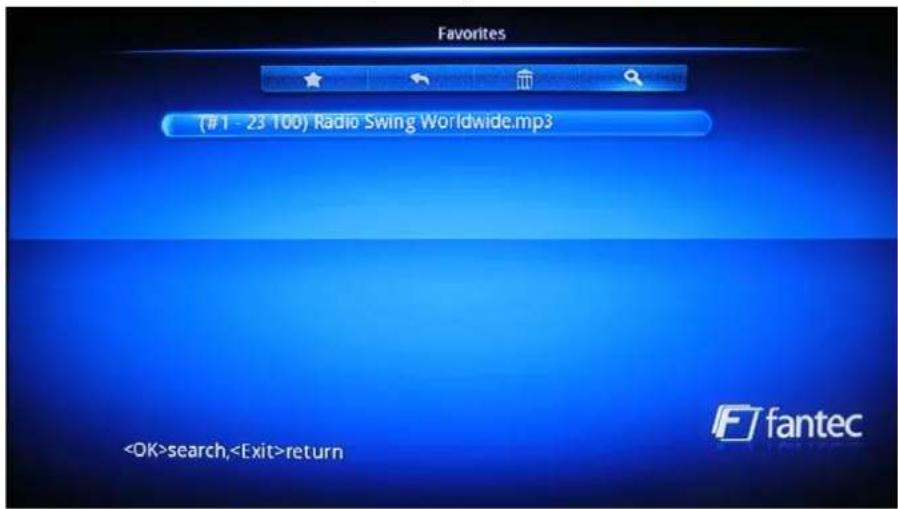
Please enter the name of the internet radio station by the use of the virtual keyboard. You can change the letter and the special character interface with the "@#&" button and confirm with the "Submit" button. Then the player will display all available station that are matching your search request.

Note: At the first time you press "OK" button to enter into the NetRadio menu, the Favorites menu will appear on your TV screen.
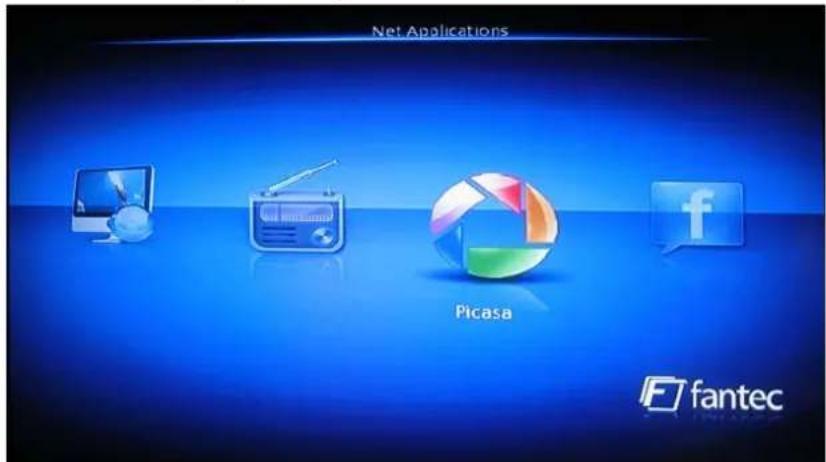
10.4 Picasa
A built-in Picasa client has been integrated on the system, which allows the FANTEC FULL HD media player to access to your private PICASA account.
Visit Picasa menu on the player and press "OK" button.
If there is no account existing, you have to enter your access data first.
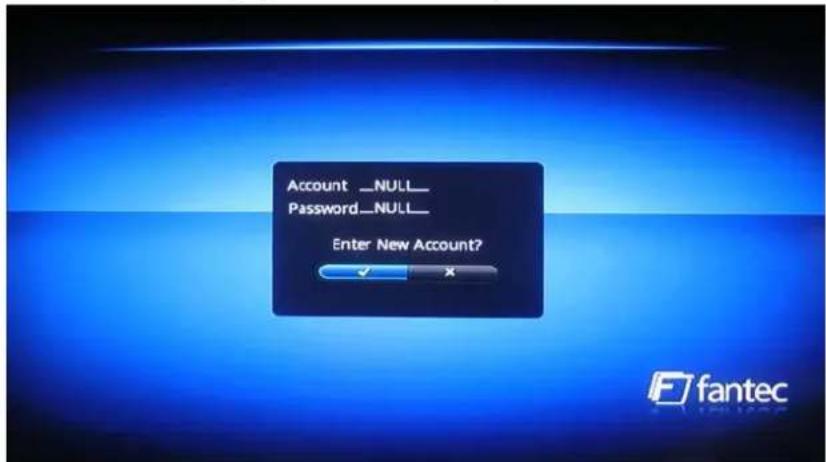
Enter your Picasa username and password data via the virtual keyboard and then you can browse your online account. You can change the letter and the special character interface with the “@#&” button and confirm with the “Submit” button.

10.5 Flickr
A built-in Flickr client has been integrated on the system, which allows the FANTEC FULL HD media player to access to your private Flickr account.
Visit Flickr menu on the player and press "OK" button.

If there is no account existing, you have to enter your access data first.

Enter your Flickr username and password data via the virtual keyboard and then you can browse your online account. You can change the letter and the special character interface with the “@#&” button and confirm with the “Submit” button.

11. File playback
11.1 Quick start
In File playback mode you can play all supported files stored on you device. It contains all function that where mentioned in Movie, Photo, Music, Text and Flash playback mode. It is the recommended playback mode.
Press "left /right" button on the remote to select the File Icon. Press "OK" to enter into file list menu.
(1). Press "UP/DOWN/LEFT/RIGHT" button to select the file stored on the HDD. Press "OK" to play the selected file.
(2).Press "STOP/RETURN" button to return to the file list interface. Press again to return to the Main Menu.

12. Copy and Delete function
12.1 Copy mode
Please select the FILE icon on the Main menu and enter into File list menu. Now you can navigate and select the folder or file that should be copied. Then press "COPY" button on the remote control to open the Copy menu and "OK" to select one of the available destinations devices (HDD, USB, Card).
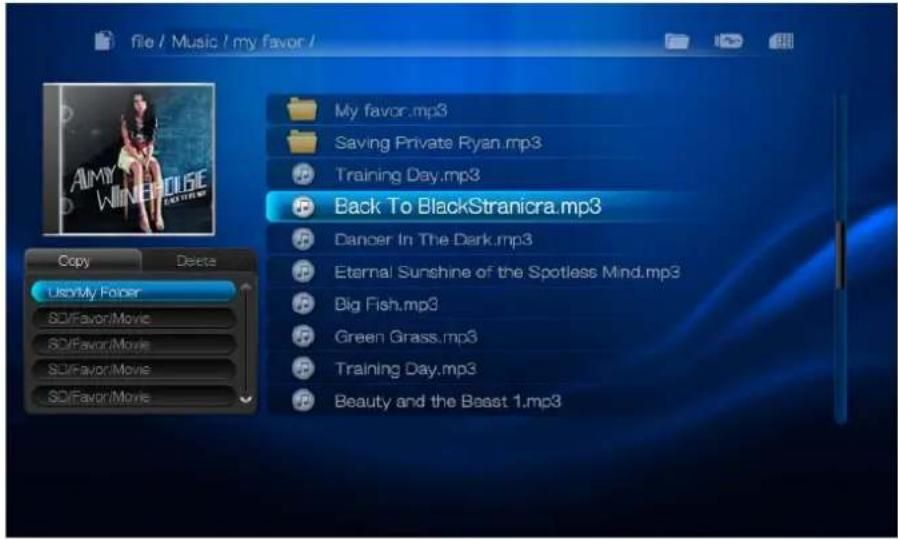
With the "LEFT/RIGHT" button your can browse the destination device. If you have selected the destination path, press "OK" to begin the copy process.

After the copy process is finished, you can exit the Copy function by pressing the "STOP/RETURN" button.

12.2 Delete mode
Please select the FILE icon on the Main menu and enter into File list menu. Now you can navigate and select the folder or file that should be deleted. Then press "COPY" and "RIGHT" button on the remote control to enter the Delete menu and "OK" to activate the delete function. Then press "OK" to start the delete process or "RIGHT" to cancel.

After the delete process is finished, you can exit the Delete function by pressing the "STOP/RETURN" button.

13. Settings
13.1 Quick start
Press "LEFT/RIGHT" button on the remote to select the Settings Icon. Press "OK" to enter into setup menu.
(1).Press "UP/DOWN/LEFT/RIGHT" button to select the options. Press "OK" to enter into the sub-menu.
(2).Press "UP/DOWN/LEFT/RIGHT" button to select the options. Press "OK" to confirm and exit into the settings menu.
(3).Press "STOP/RETRUN" button to return to the Main Menu.

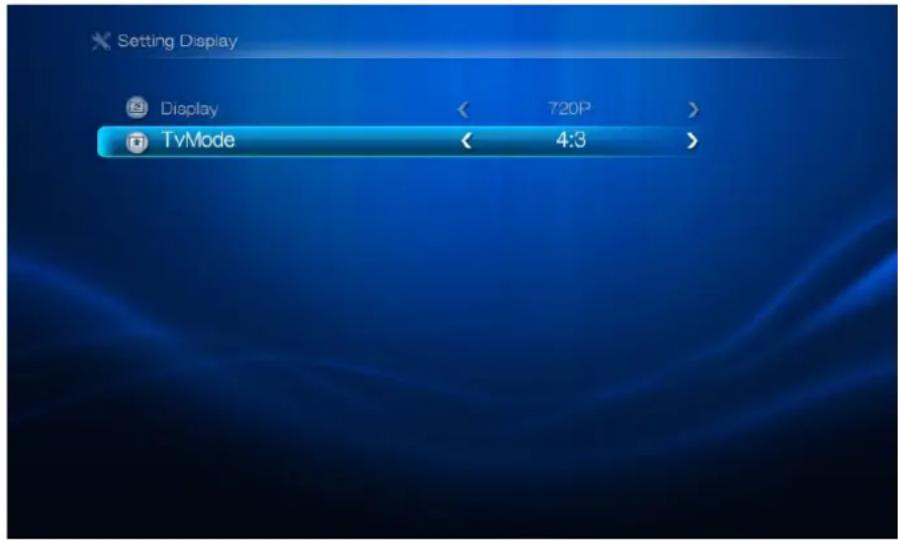
13.2 Display Settings
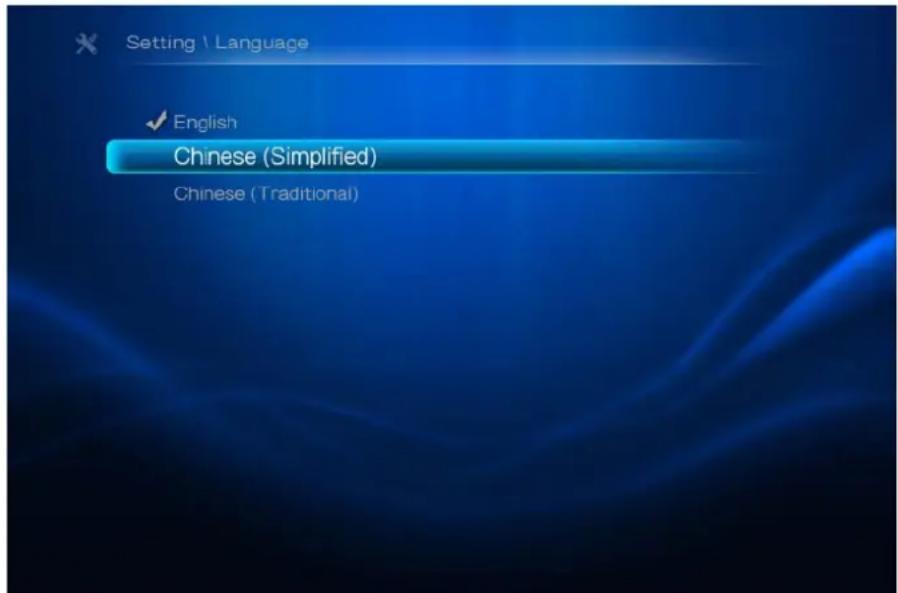
13.3 Language Settings
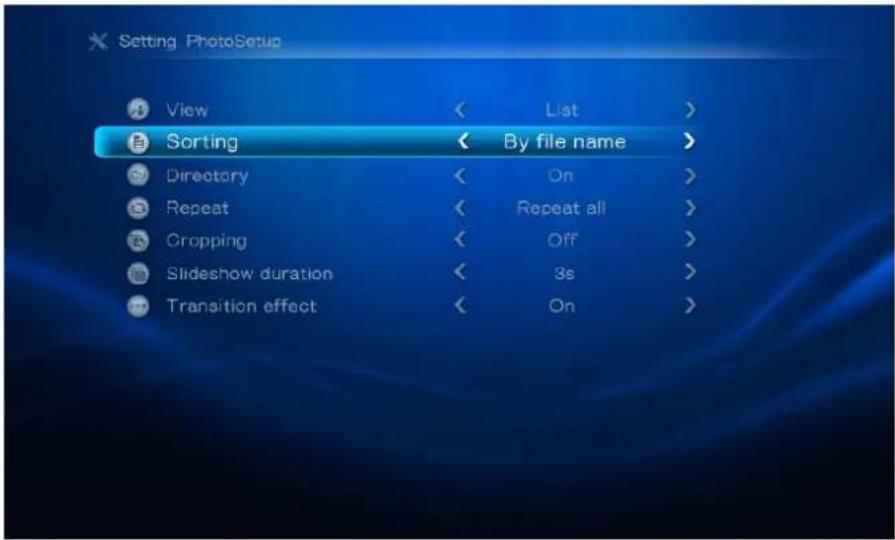
13.4 Photo Settings
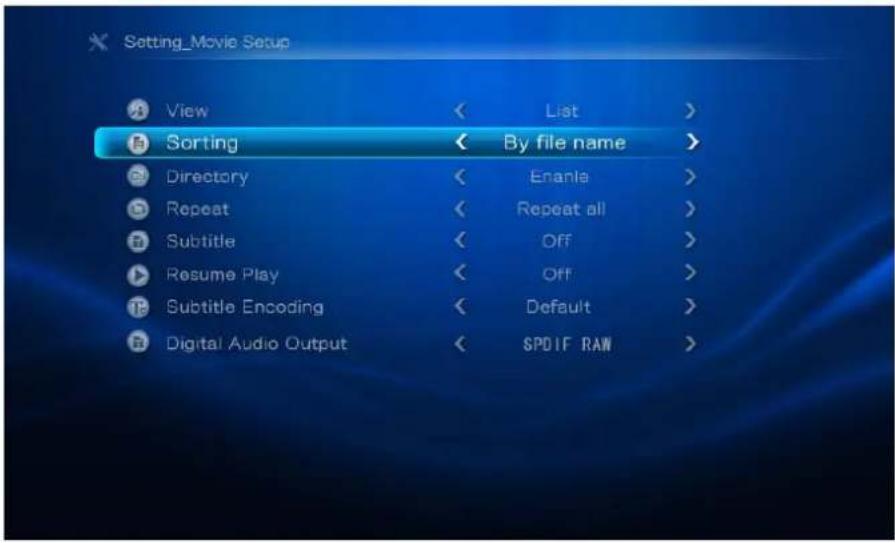
13.5 Movie Settings
13.6 Music Settings

13.7 Text Settings

13.8 Default Settings

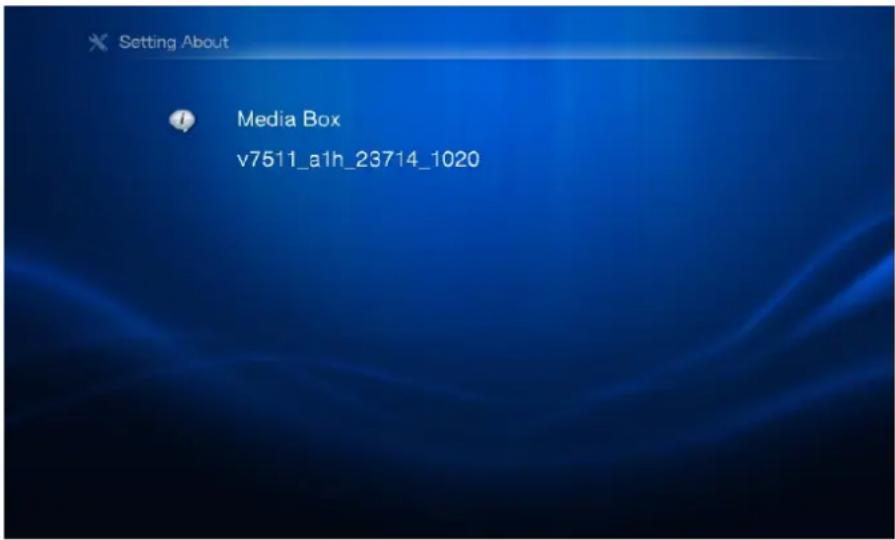
13.9 About
13.10 Upgrade

13.11 Network setup
13.11.1 Setting WiFi Auto


13.11.2 Setting WiFi Manual

Enter your data via the virtual keyboard. You can change the letter and the special character interface with the "@#&" button and confirm with the "Submit" button.

13.11.3 Setting Ethernet DHCP

13.11.4 Setting Ethernet Manual

Enter your IP network setting by the use of the numeric button of the remote control and confirm with "OK" button.
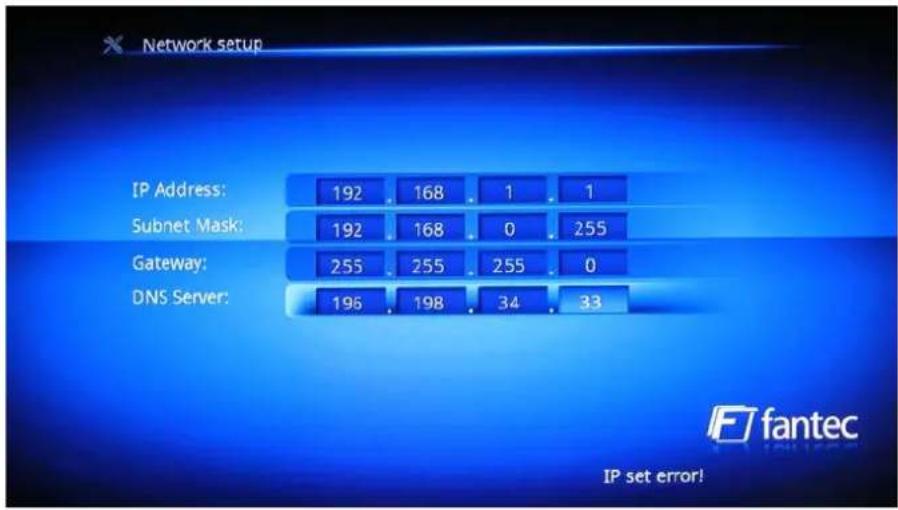
13.11.5 Current Net Property

13.11.6 PPPoE Dail

Enter your Account and Password data via the virtual keyboard and then you can use your online account. You can change the letter and the special character interface with the "@#&" button and confirm with the "Submit" button.

Note: If your internet access is already available by your router or modem, you don't have to configure the PPPoE settings again.
14. Upgrading the Firmware
The firmware is the operating system (OS) installed on the device. Firmware upgrades can bring new features, improvements and bug fixes.
Download the latest firmware from www.fantec.de.
Step 1: Prepare the USB pen
You will need a USB pen for firmware upgrade. Make sure that the device is empty! Please copy the firmware file to the root directory of the device. Do not change the file name.
Step 2: Power on the FANTEC media device and connect it with TV.
Step 3: Connect the USB pen
Plug the USB pen into one of the slots of the media device.
Step 4: Enter SETTINGS, UPGRADE and select LOCAL UPDATE.
The firmware installation will start after a minute. You will see the upgrade process on the TV screen.
Please wait for about 1 minute until the installation is completed. Then the device will restart itself.
Note:
Do not turn off the power during installation.
Do not unplug the USB pen during firmware installation.


- Remote control.... 10
- System Start-up....12
- Main Menu.... 13
- Movie Playback 14
- Photo Playback 17
- Music playback.... 19
- Text playback....21
- Flash playback 22
- Network playback.... 23
- File playback 34
- Copy and Delete function 35
- Settings.... 37
- Upgrading the Firmware 46
- Introduction
- Preface
- A/V Output
- Multimedia Playback
- Network Feature
- File Copy and Delete
- USB 2.0 Support
- Packing List
- Note:
- Cautions
- Usage Cautions
- Power
- Radio Interference
- Repair
- Disposing of the Player
- Hard Disk Cautions
- Others
- Connection
- Connecting the Power Supply
- Connecting to a PC
- Connecting a USB Device or Memory Card
- Connecting to a TV
- A/V OUT
- Y/Pb/Pr Component OUT
- HDMI OUT
- Connecting to an Digital Amplifier
- Connecting to a LAN
- Power On / Off
- Power On
- Power Off
- Remote control
- System Start-up
- HDD Format
- TV Mode
- Main Menu
- Movie Playback
- Quick start
- Thumbnail view
- List view
- Playback options
- Movie Tool bar
- Movie GO TO function
- Movie resume play function
- Photo Playback
- Quick start
- Thumbnail view
- List view
- Playback options
- Photo Tool bar
- Slideshow with music
- Music playback
- Quick start
- Thumbnail view
- List view
- Playback options
- Music Tool bar
- Repeat options:
- Text playback
- Quick start
- Playback options
- Text Tool bar
- Our Mission.txt
- Flash playback
- Quick start
- Network playback
- Quick start
- Streaming via UPnP
- Installing the UPnP server on your PC
- Share media files on your PC with Windows Media Player 11
- Access Media Streaming with UPnP
- NetRadio
- NetRadio stations
- NetRadio Favorites
- NetRadio Delete function
- NetRadio Search function
- Picasa
- Flickr
- File playback
- Quick start
- Copy and Delete function
- Copy mode
- Delete mode
- Settings
- Quick start
- Display Settings
- Language Settings
- Photo Settings
- Movie Settings
- Music Settings
- Text Settings
- Default Settings
- About
- Upgrade
- Network setup
- Setting WiFi Auto
- Setting WiFi Manual
- Setting Ethernet DHCP
- Setting Ethernet Manual
- Current Net Property
- PPPoE Dail
- Upgrading the Firmware
- Step 1: Prepare the USB pen
- Step 2: Power on the FANTEC media device and connect it with TV.
- Step 3: Connect the USB pen
- Step 4: Enter SETTINGS, UPGRADE and select LOCAL UPDATE.
Brand : Fantec
Model : MM-XHD7
Category : Media player