
iP56 - Car Mount IHOME - Free user manual and instructions
Find the device manual for free iP56 IHOME in PDF.


| Product Type | Car Phone Mount |
| Brand | iHome |
| Model | iP56 |
| Material | ABS plastic, silicone grip |
| Mounting Method | Dashboard adhesive pad or vent clip |
| Compatibility | Smartphones up to 6.5 inches |
| Dimensions | 5.2 x 3.8 x 4.1 inches |
| Weight | 3.5 oz (100 g) |
| Color | Black |
| Rotation | 360-degree ball joint |
| Adjustment | One-touch release, adjustable arms |
| Installation | Tool-free, peel and stick or clip-on |
| Power Source | None (passive mount) |
| Key Features | Universal fit, secure grip, easy one-hand operation |
| Safety | Non-obstructive vent clip, anti-slip pad |
| Cleaning | Wipe with damp cloth, mild soap, avoid solvents |
| Storage | Store in dry place, avoid extreme temperatures |
| Warranty | 1-year limited warranty |
| Package Contents | Mount, vent clip, adhesive pad, user manual |
| Repairability | Replaceable adhesive pads, clips available |
Frequently Asked Questions - iP56 IHOME
User questions about iP56 IHOME
0 question about this device. Answer the ones you know or ask your own.
Ask a new question about this device
Download the instructions for your Car Mount in PDF format for free! Find your manual iP56 - IHOME and take your electronic device back in hand. On this page are published all the documents necessary for the use of your device. iP56 by IHOME.
USER MANUAL iP56 IHOME
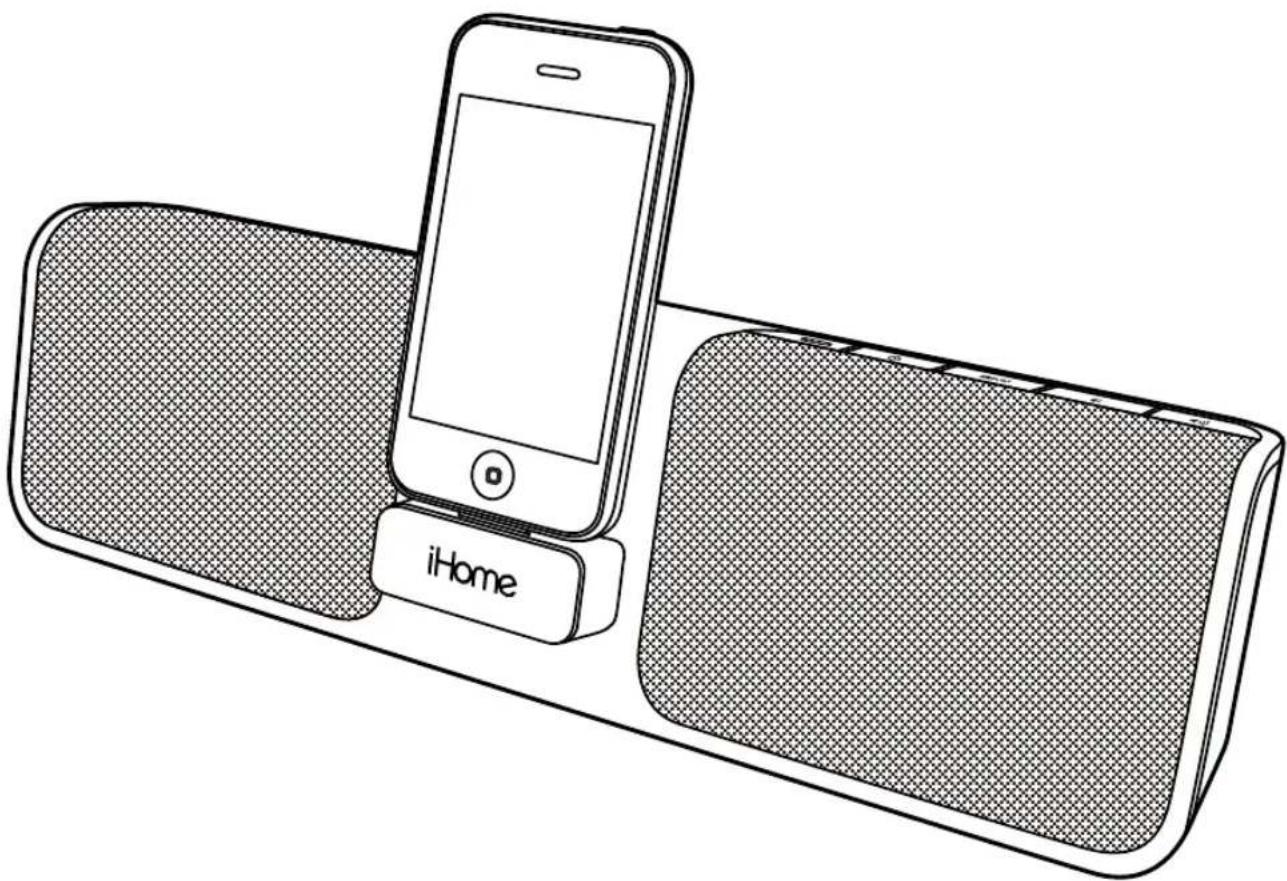
Portable Rechargeable Speaker System for your iPhone® and iPod®
natural_image
Line drawing of a smartphone connected to an iHome brand electronic device (no text or symbols on the device itself)Questions? Visit www.ihomeaudio.com
Table of Contents
iP56 Quick Start 1
Controls and Indicators 2
Using the iP56 3-4
A Consumer Guide to Product Safety 5
Trouble Shooting 6
Warranty Information 7
FCC Information
This device complies with Part 15 of the FCC Rules, operation is subject to the following two conditions: (1) This device may not cause harmful interference, and (2) this device must accept any interference received, including interference that may cause undesired operation.
This equipment complies with the limits for a Class B digital device as specified in Part 15 of FCC Rules. These limits provide reasonable protection against radio and TV interference in a residential area.
However, your equipment might cause TV or radio interference even when it is operating properly. To eliminate interference you can try one or more of the following corrective measures:
- Reorient or relocate the receiving antenna.
- Increase the distance between the equipment and the radio or TV.
- Use outlets on different electrical circuits for the equipment and the radio or TV.
- Consult your dealer or an experienced radio/television technician if the problem still exists.
Modifying or tampering with your system's internal components can cause a malfunction and might invalidate the system's warranty and void your FCC authorization to operate it.
This Class B digital apparatus complies with Canadian ICES-003.
- Place the unit on a level surface away from sources of direct sunlight or excessive heat.
- Protect your furniture when placing your unit on a natural wood and lacquered finish. A cloth or other protective material should be placed between it and the furniture.
- Clean your unit with a soft cloth moistened only with mild soap and water. Stronger cleaning agents, such as Benzene, thinner or similar materials can damage the surface of the unit.
iP56 Quick Start
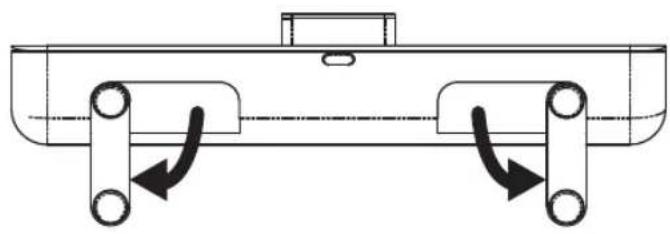
1:Stand
natural_image
Technical diagram of a mechanical component with two rotating arms and a central shaft (no text or symbols)Fold out the stand feet on the bottom of the iP56, then turn unit up right for operation.
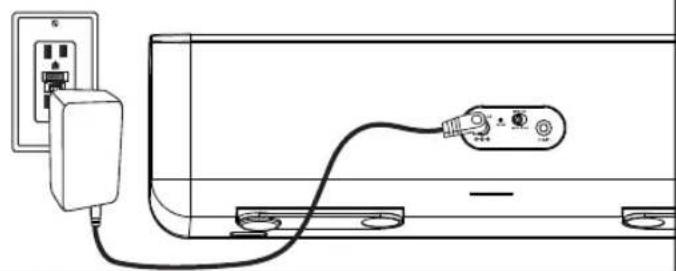
2:AC adapter
natural_image
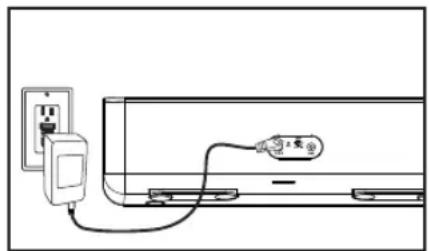
Line drawing of a cable being inserted into a device (no text or symbols present)Plug the AC adapter into the DC jack on the rear of the iP56 and the other end into a working outlet. The internal battery (and docked iPhone/iPod) will charge.
3:iPod/iPhone
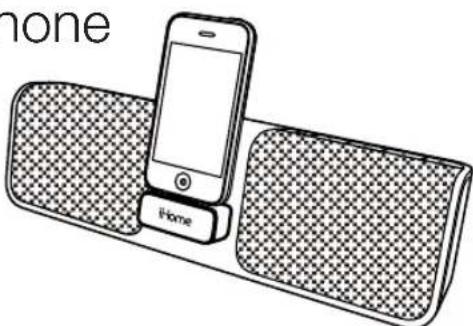
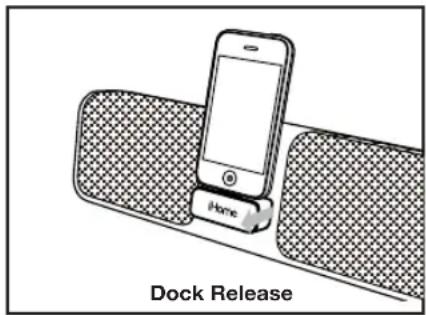
Press on the iHome name to release the retracting dock on the front of the unit. Gently dock your iPhone or iPod. Press the Button to turn the iP56 on. Access iPod play mode on your iPhone or iPod to listen to audio. When connected to AC power or when the internal battery is fully charged, the dock will charge your iPhone or iPod until completely charged.
Controls and Indicators
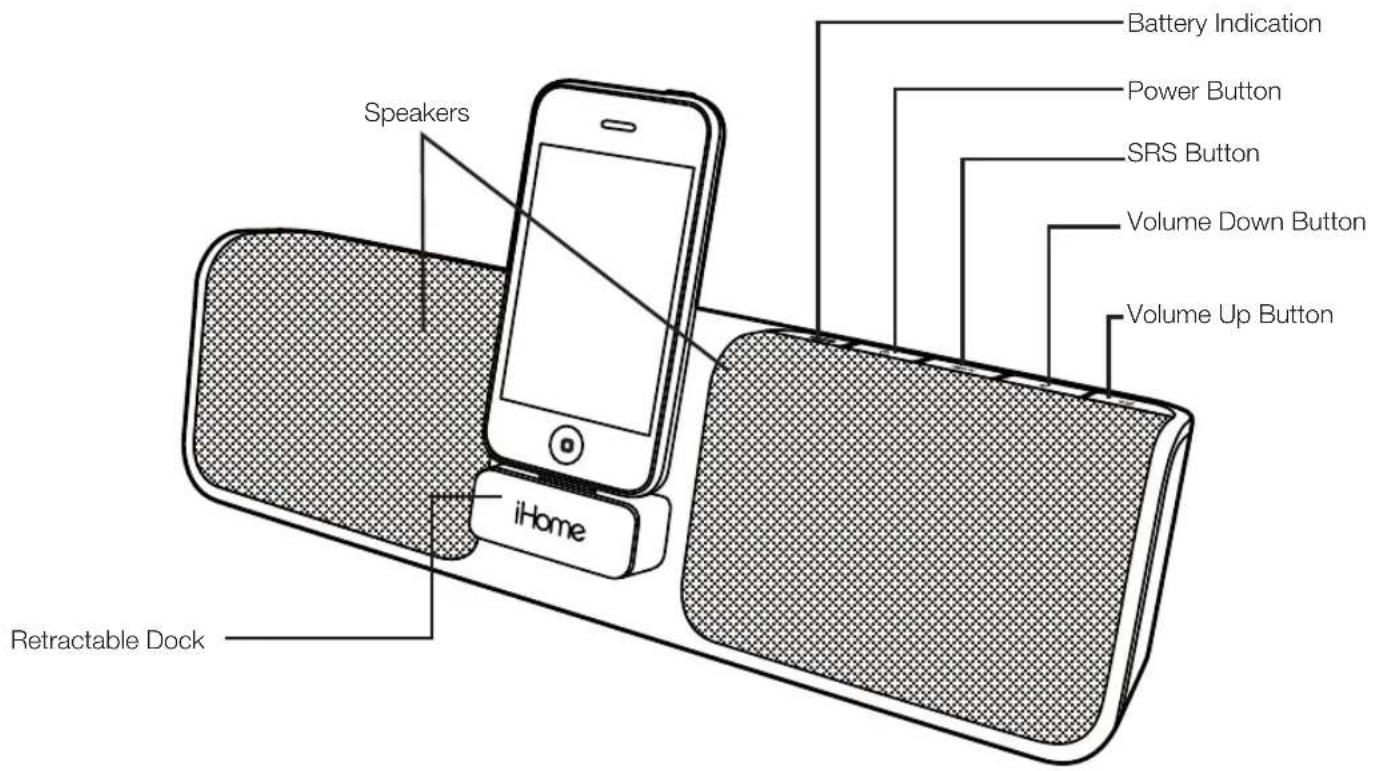
Front Panel
Rear Panel
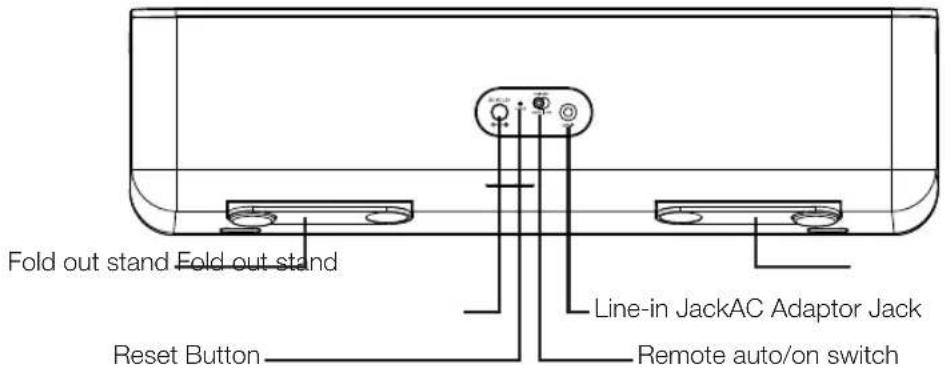
Using the iP56
Charging & Playing iPhone and iPod
The iP56 has a retracting dock to play and charge your iPhone or iPod while connected to AC power (it will ALSO charge when operating on the internal rechargeable battery and iP56 is powered on). The dock will charge your iPhone or iPod until completely charged then stop charging.
- Make sure the unit is connected to a working power source (AC adaptor is connected or internal battery is charged).
- Press on the iHome name below the dock to release and access the dock (press back into unit when not in use).
- Gently press your iPhone or iPod onto the dock. Do not force or use undue pressure. Make sure your iPhone or iPod is not in a case or "skin".
- Press the ⏻ Button located on top of the iP56 to turn the unit on. Place your iPhone or iPod in play mode. Press the 🔊 or 🔺 Buttons located on top of the unit to adjust the system volume. Press the SRS™ Button for enhanced bass response.
Note: Docking an already playing iPhone or iPod will also turn the iP56 on.
Charging the Internal Battery
The iP56 has an internal rechargeable lithium ion battery. The battery condition indicator is located on top of the unit. When fully charged, the indicator will glow steadily. When
the battery needs charging, the indicator will flash. To charge, connect the iP56 to a working AC outlet.
End-Of-Life Battery Disposal Instructions
The iP56 uses an internal Lithium-ion battery that may be recharged hundreds of times and should last the lifetime of the device. The rechargeable battery is also recyclable. The battery is permanently sealed inside the unit and is not consumer replaceable. If you find that the battery in your iP56 will no longer maintain a charge, please contact us at www.ihomeaudio.com for repair information. DO NOT attempt to replace the battery yourself. If you decide that you do not want to have your unit repaired, please do not dispose of the unit with your normal household trash. Contact your local recycling center for information on the proper disposal of products containing rechargeable batteries. In addition, many electronics stores, possibly including the store where you purchased your unit, are now accepting used electronics products containing recyclable batteries and other hazardous materials, for proper disposal and/or recycling.
Caution: The Battery used in this device may present a risk of fire, explosion or chemical burn if mistreated
Battery shall not be exposed to excessive heat such as fire, or the like. Do not use or charge the battery if it appears to be leaking, discolored, deformed, or in any way abnormal. Do not leave your battery discharged or unused for extended periods of time. When batteries are misused, they may explode or leak, causing burns and personal injury. If your battery leaks, use normal precaution and cease using the product right away.
Using the iP56
Using the Aux Line-in Jack
The iP56 has an aux line-in jack located on the back of the unit to play other audio devices.
- Connect one end of a standard 3.5mm audio cable (available at www.ihomeaudio.com) to the aux line-in jack and the other end into the headphone or line-out jack on your audio device.
- Press the ⏻ Button on the iP56 to turn it on. Make sure your device is turned on, too.
- Put your device into play mode. Press the 🔊 or 🔍 Buttons to adjust the system volume. You may need to adjust the volume on your device, too.
- Press the ⏻ Button to turn the iP56 off. Remember to turn your device off, too.
Note: Do not play an audio device through the aux line-in jack while an iPhone or iPod is playing in the dock or you will hear both at once.
Using the Remote auto/on switch
The iP46 has a remote auto/on switch located on the back of the unit. Slide the switch to the AUTO position to save battery power when traveling or operating on the internal battery. AUTO disables remote operation when operating on the internal battery. Slide switch to ON position for normal remote operation
Resetting the iP56
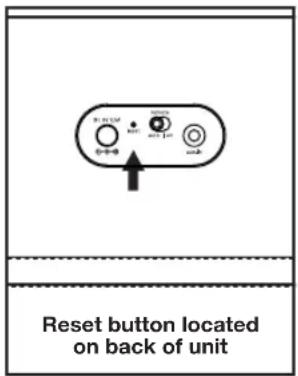
Your iP56 was designed with a special surge protection circuit to prevent permanent damage to the unit in the event of an unexpected power surge. If your unit appears to be 'locked up' and is not operating normally, and you know that the battery is properly charged, use a straightened paper clip, toothpick, or similar object to press the RESET button, located on the back panel next to the AC jack. This will unlock the unit and restore the original factory default settings.
A Consumer Guide to Product Safety
IMPORTANT SAFETY INSTRUCTIONS
When used in the directed manner, this unit has been designed and manufactured to ensure your personal safety. However, improper use can result in potential electrical shock or fire hazards. Please read all safety and operating instructions carefully before installation and use, and keep these instructions handy for future reference. Take special note of all warnings listed in these instructions and on the unit.
-
Water and Moisture – The unit should not be used near water. For example: near a bathtub, washbowl, kitchen sink, laundry tub, swimming pool or in a wet basement.
-
Ventilation – The unit should be situated so that its location or position does not interfere with its proper ventilation. For example, it should not be situated on a bed, sofa, rug or similar surface that may block ventilation openings. Also, it should not be placed in a built-in installation, such as a bookcase or cabinet, which may impede the flow of air through the ventilation openings.
-
Heat – The unit should be situated away from heat sources such as radiators, heat registers, stoves or other appliances (including amplifiers) that produce heat.
-
Power Sources – The unit should be connected to a power supply only of the type described in the operating instructions or as marked on the appliance.
-
Power-Cable Protection – Power supply cables should be routed so that they are not likely to be walked on or pinched by items placed upon or against them. It is always best to have a clear area from where the cable exits the unit to where it is plugged into an AC socket.
-
Cleaning – The unit should be cleaned only as recommended. See the Maintenance section of this manual for cleaning instructions.
-
Objects and Liquid Entry – Care should be taken so that objects do not fall and liquids are not spilled into any openings or vents located on the product.
-
Attachments – Do not use attachments not recommended by the product manufacturer.
-
Lightning and Power Surge Protection – Unplug the unit from the wall socket and disconnect the antenna or cable system during a lightning storm or when it is left unattended and unused for long periods of time. This will prevent damage to the product due to lightning and power-line surges.
-
Overloading – Do not overload wall sockets, extension cords, or integral convenience receptacles as this can result in a risk of fire or electric shock.
-
Damage Requiring Service – The unit should be serviced by qualified service personnel when:
A. the power supply cable or plug has been damaged.
B. objects have fallen into or liquid has been spilled into the enclosure.
C. the unit has been exposed to rain.
D. the unit has been dropped or the enclosure damaged.
E. the unit exhibits a marked change in performance or does not operate normally.
-
Periods of Nonuse – If the unit is to be left unused for an extended period of time, such as a month or longer, the power cable should be unplugged from the unit to prevent damage or corrosion.
-
Servicing – The user should not attempt to service the unit beyond those methods described in the user's operating instructions. Service methods not covered in the operating instructions should be referred to qualified service personnel.
Questions? Visit www.ihomeaudio.com
or call 1-800-288-2792 Toll Free
Trouble Shooting
| Symptom Possible Problem | Solution | |
| Unit doesn't respond (no power) | AC adaptor isn't plugged into a wall outlet or the connector is not plugged into the power supply jack on the back of the dock | Plug the AC adaptor into a wall outlet and plug the connector into the supply jack on the unit |
| Wall outlet is not functioning or switched off | Plug another device into the same outlet to confirm the outlet is working. Make sure any associated power switch is ON | |
| Battery is weak/ dead | Charge internal battery by connecting AC adaptor to working outlet until battery indicator glows steadily. | |
| iPod/iPhone does not dock properly | iPod/iPhone not docked properly | Remove your iPod/iPhone from the dock and check for obstruction on the connectors in the dock and on your iPod/iPhone. Make sure there is no “skin” or case on the iPod/iPhone. Then reseat it in the dock. |
| iPod/iPhone does not respond to the unit | iPod/iPhone is not docked properly | Remove your iPod/iPhone from the dock and check for obstruction on the connectors in the dock and on your iPod. Then reseat it in the dock. |
| Your iPod/iPhone software is too old | Upgrade software on your iPod/iPhone via iTunes | |
| iPod/iPhone is locked up | Please make sure your iPod/iPhone is working properly before docking into the unit. Please refer to your iPod/iPhone manual for details. | |
| Using 1 ^st or 2 ^nd generation iPod, iPod shuffle or other devices. | Unit cannot control those iPod models or other devices. Use the Line-in jack to play these devices. | |
| iPod/iPhone does not come on immediately | If your iPod/iPhone is not used for some time, it may enter deep sleep mode | Press the Menu button on your iPod/iPhone |
| iPod/iPhone battery is run down or is too weak | Charge your iPod/iPhone for about 5 minutes | |
| Unit operation is erratic | Unit requires reset | Insert the end of a paperclip or similar into the Reset port located next to the AC jack and press in for a few seconds to restore the unit to factory default settings. Doing so will overwrite any current settings. |
| Remote control doesn't work | Battery is weak or dead | Replace with new battery |
| Remote Control is too far away or not aimed properly toward the device | Point the Remote Control toward the unit and use within 15 feet of the unit. | |
| Remote switch is in AUTO position | Move Remote switch to ON position | |
Limited 1 Year Warranty Information
iHome Products, a division of SDI Technologies Inc. (hereafter referred to as SDI Technologies), warrants this product to be free from defects in workmanship and materials, under normal use and conditions, for a period of 1 Year from the date of original purchase.
Should this product fail to function in a satisfactory manner, it is best to first return it to the store where it was originally purchased. Should this fail to resolve the matter and service still be required by reason of any defect or malfunction during the warranty period, SDI Technologies will repair or, at its discretion, replace this product without charge (except for a \20.00 charge for handling, packing, return UPS/postage, and insurance). This decision is subject to verification of the defect or malfunction upon delivery of this product to the Factory Service Center listed below. The product must include proof of purchase, including date of purchase. The fee for service without proof of purchase is \40.00.
Before returning this product for service, please first replace the batteries (if applicable) with fresh ones, as exhausted or defective batteries are the most common cause of problems encountered.
If service is still required:
- Remove the batteries (if applicable) and pack the unit in a well padded, heavy corrugated box.
- Enclose a photocopy of your sales receipt, credit card statement, or other proof of the date of purchase, if within the warranty period.
- Enclose a check or money order payable to the order of SDI Technologies, for the sum of \20.00 (\40.00 without proof of purchase).
- Send the unit prepaid and insured, to the Factory Service Center listed below.
Consumer Repair Department
SDI Technologies Inc.
1330 Goodyear Drive
El Paso, TX 79936-6420
Disclaimer of Warranty
NOTE: This warranty is valid only if the product is used for the purpose for which it was designed. It does not cover (i) products which have been damaged by negligence or willful actions, misuse or accident, or which have been modified or repaired by unauthorized persons; (ii) cracked or broken cabinets, or units damaged by excessive heat; (iii) damage to digital media players, CD's or tape cassettes (if applicable); (iv) the cost of shipping this product to the Factory Service Center and its return to the owner.
This warranty is valid only in the United States of America and does not extend to owners of the product other than to the original purchaser. In no event will SDI Technologies or any of its affiliates, contractors, resellers, their officers, directors, shareholders, members or agents be liable to you or any third party for any consequential or incidental damages, any lost profits, actual, exemplary or punitive damages. (Some states do not allow limitations on implied warranties or exclusion of consequential damages, so these restrictions may not apply to you.) This warranty gives you specific legal rights, and you may also have other rights which vary from state to state.
Your acknowledgement and agreement to fully and completely abide by the above mentioned disclaimer of warranty is contractually binding to you upon your transfer of currency (money order, cashier's check, or credit card) for purchase of your SDI Technologies product.
© 2010 SDI Technologies, Inc. All rights reserved
Questions? Visit www.ihomeaudio.com or call 1-800-288-2792 Toll Free
iHome®
- Table of Contents
- FCC Information
- iP56 Quick Start
- Controls and Indicators
- Using the iP56
- Charging & Playing iPhone and iPod
- Charging the Internal Battery
- End-Of-Life Battery Disposal Instructions
- Caution: The Battery used in this device may present a risk of fire, explosion or chemical burn if mistreated
- Using the Aux Line-in Jack
- Using the Remote auto/on switch
- Resetting the iP56
- A Consumer Guide to Product Safety
- IMPORTANT SAFETY INSTRUCTIONS
- Limited 1 Year Warranty Information
- Consumer Repair Department
- iHome®
Brand : IHOME
Model : iP56
Category : Car Mount