
TV-IP651WI - Security Camera TRENDNET - Free user manual and instructions
Find the device manual for free TV-IP651WI TRENDNET in PDF.


| Product Type | Wireless N Day/Night PTZ Internet Security Camera |
| Model | TV-IP651WI |
| Dimensions (W x D x H) | 112 x 110 x 130 mm (4.4 x 4.3 x 5.1 in) |
| Weight | 485 g (1.1 lb) |
| Power Supply | Input: 100-240V AC, 50/60Hz, 0.5A; Output: 12V DC, 1.25A external adapter |
| Power Consumption | Max. 7.2 Watts |
| Image Sensor | 1/5" CMOS |
| Lens Focal Length | 4 mm, F/No. 1.5 |
| Minimum Illumination | 0 lux (IR on) |
| Night Vision Range | Up to 7.5 meters (24.6 ft) with built-in IR LEDs |
| Pan / Tilt Range | Pan: -170° to +170° (340° total); Tilt: 90° up, 25° down (115° total) |
| Auto-Patrol Preset Positions | 24 |
| Video Resolution | 640 x 480 (VGA) at 20 fps; 320 x 240 at 30 fps; 160 x 120 at 30 fps |
| Video Compression | MJPEG |
| Digital Zoom | 4x |
| Wireless Standards | IEEE 802.11b/g/n (2.4 GHz, up to 150 Mbps) |
| Wireless Security | WEP 64/128-bit, WPA/WPA2-PSK |
| Antenna | 1 x detachable 2dBi dipole (Reverse-SMA connector) |
| Network Interface | 10/100 Mbps Fast Ethernet (RJ-45) |
| Audio | Built-in omnidirectional microphone, one-way audio |
| Motion Detection | Yes, with configurable sensitivity and detection areas |
| Event Notification | Email alerts and FTP upload on motion detection |
| Privacy Mode | Enabled/disabled via privacy button on camera |
| LED Indicators | Power (blue), Link/Activity (orange) |
| Operating Temperature | 0°C to 40°C (32°F to 104°F) |
| Storage Temperature | -25°C to 70°C (-13°F to 158°F) |
| Humidity | Max. 90% (non-condensing) |
| Certifications | CE, FCC |
| Warranty | 3 years limited |
| Maintenance and Cleaning | Clean with a soft, dry cloth. Do not use liquids or solvents. |
| Repairability and Spare Parts | Contact TRENDnet support for repairs. Spare parts include detachable antenna and power adapter. |
Frequently Asked Questions - TV-IP651WI TRENDNET
User questions about TV-IP651WI TRENDNET
0 question about this device. Answer the ones you know or ask your own.
Ask a new question about this device
Download the instructions for your Security Camera in PDF format for free! Find your manual TV-IP651WI - TRENDNET and take your electronic device back in hand. On this page are published all the documents necessary for the use of your device. TV-IP651WI by TRENDNET.
USER MANUAL TV-IP651WI TRENDNET
natural_image
White smart home security camera with antenna and control panel (no visible text or symbols)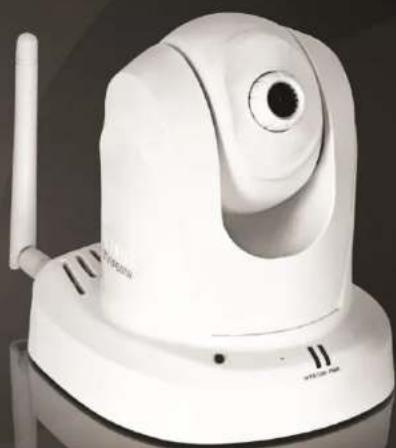
natural_image
White remote control camera with antenna and wireless signal (no visible text or symbols)Wireless N PTZ Internet Camera
Wireless N Day/Night PTZ Internet Camera
TV-IP651W/ TV-IP651WI
TRENDnet User's Guide
Table of Contents
Contents
Product Overview ....1
Package Contents .... 1
Features 1
Product Hardware Features....2
Installaon....3
Wired Connecon 3
WPS Connecon....3
Wall mount installaon....4
Starng the Setup Wizard ....5
Conguraon....10
Viewing Video 10
Viewing Camera Sengs....11
System 12
Video 12
Audio 12
Wireless....12
Network....13
Acve Users....13
Conguring Camera Sengs 13
System 13
Video 14
Audio 14
Wireless....15
Network....16
User 17
Date/Time 17
Moon Detecon....17
Upload....18
Day/Night Mode (for TV-IP651WI).... 20
Tools 21
FTP Server Test....21
E-mail Test....21
Restart....21
Factory Reset 22
Firmware Upgrade 22
Backup and Restore 22
How to setup/access the camera remotely....23
Technical Specicaons 26
Troubleshoong 29
Product Overview
natural_image
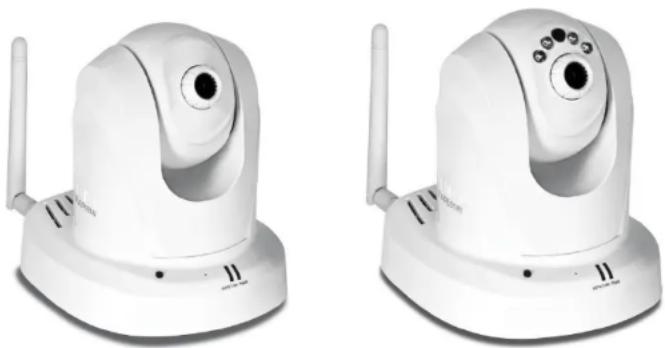
Two white wireless camera devices with visible antennas and control buttons, shown from different angles (no text or symbols)TV-IP651W TV-IP651WI
Package Contents
In addition to your camera, the package includes:
• Multi-Language Quick Installaon Guide
• CD-ROM (Utility & User's Guide)
• Network cable (1.5m / 5)
• Power adapter (12V DC, 1.25A)
If any package contents are missing or damaged, please contact the retail store, online retailer, or reseller/distributor that the item was purchased.
Features
TV-IP651W
The Wireless N PTZ Internet Camera, model TV- IP651W, provides security over a large area. Pan the camera side-to-side a remarkable 340 degrees and It up-and-down 115 degrees from any Internet conncon.
Wireless n technology provides unsurpassed wireless coverage and improved streaming video quality. Add this camera to your wireless network at the touch of a buon with Wi-Fi Protected Setup (WPS).
Record 640 x 480 pixel (VGA) video at up to 20 frames per second (fps). Manage up to 32 TRENDnet cameras with the included complimentary camera management soware. Advanced features include adjustable moon detecor recording areas, email alerts, scheduled recording sessions, pan/lt Auto-Patrol, date-and-me overlays, one-way audio, an adjustable lens, and four mes digital zoom. A wall/ceiling mounng kit is included and the camera's o white housing blends into most environments.
TV-IP651WI
The Wireless N Day/Night PTZ Internet Camera, model TV- IP651WI, provides day and night security over a large area. Pan the camera side-to-side a remarkable 340 degrees and It up-and-down 115 degrees from any Internet conncon.
Record indoor video in complete darkness for distances of up to 7.5 meters. Wireless n technology provides unsurpassed wireless coverage and improved streaming video quality. Add this camera to your wireless network at the touch of a buon with Wi-Fi Protected Setup (WPS).
Record 640 x 480 pixel (VGA) video at up to 20 frames per second (fps). Manage up to 32 TRENDnet cameras with the included complimentary camera management soware.
Advanced features include adjustable moon detecon recording areas, email alerts, scheduled recording sessions, pan/lt Auto-Patrol, date-and-me overlays, one-way audio, an adjustable lens, and four mes digital zoom. A wall/ceiling moung kit is included and the camera's o white housing blends into most environments.
Product Hardware Features
Rear Panel View

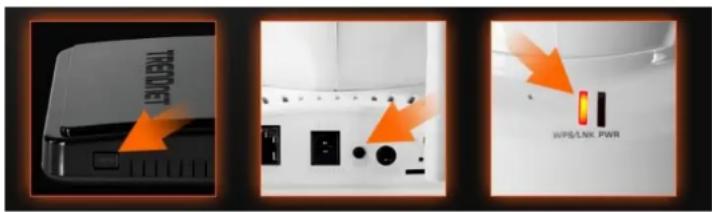
• LAN Port – Connect Ethernet cables to your wired network devices.
- Power Port – Connect the included power adapter from your camera to an available power outlet.
Note: Use only the adapter that came with your camera.
- Reset Buon – Use an item such as a paperclip to push and hold this buon for 3 seconds and release to reset your camera to its factory defaults.
- WPS (Wi-Fi Protected Setup) – Push and hold this buon for 3 seconds to acvate WPS. The buon LED is blinking green when WPS is acvated.
- Antenna – 2dBi detachable antenna
Front Panel View

- IR LED – Built-in 4 IR LED for night vision uses. (for TV-IP651WI)
• Light Sensor – Detects the light source to turn IR on or o. - Focus Ring – Turn to adjust the focus of the camera.
- Microphone – Built-in microphone for audio can be turn on or o.
- Privacy buon – Turns the camera on/o when necessary.
- Power - This LED indicator is solid blue when your camera is powered on. Otherwise if this LED indicator is o, there is no power to your camera.
- Link – This LED indicator is blinking orange when there is conneccon/data to your camera.
Installaon
Wired Connecon
1. Connect the Ethernet Cable
If you intend to use the network camera as a wired device, connect one end of the included Ethernet cable into the Ethernet port on the rear panel of the camera and connect the other end to an available port on your network. If you prefer to use the camera on a wireless network, see below for instrucons on connecng the power adapter.

natural_image
Line drawing of a hand holding a device connected to a mounted device (no text or symbols visible)2. Aach the Power Supply
Aach the included power supply to the DC 12V 1.25A receptor on the rear panel of the camera and then connect it to a wall outlet or power strip. A blue LED will light up under the lens indicang that the camera has power.

natural_image
Line drawing of a hand using a screwdriver to adjust or install a device (no text or symbols visible)WPS Connecon
An alternative method of connecng your camera to your network is by using WPS. WPS is a quick, simple and secure method of adding devices to a network. If you have a router which supports WPS follow the steps below, otherwise, please use the wired mode of seng up the camera.
1. Aach the Power Supply

natural_image
Line drawing of a hand using a screwdriver to adjust or install a mechanical component (no text or symbols present)- Press the WPS buon on your wireless device then press the WPS buon on the camera.
Wall mount installaon
To each the metal plates carry out the following:
- Remove the two rubber pads under the base of the Camera.
- Slide the metal plate onto the base of the camera, making sure that the two holes on the base of the camera align with the two screw holes on the base of the camera.
- Secure the metal plate to the base of the Camera with the two screws provided.
- The camera can now be mounted to the ceiling or a wall. See the diagram below for more informaon.

Starng the Setup Wizard
Insert the included CD-ROM into your CD/DVD drive. The Install Wizard program will run automacally.
Note: If the Install Wizard does not run, you may have autorun disabled on your machine. In this case, browse to the CD drive and run InstallWizard.exe to begin the installaon wizard.
Begin by selecng Setup Wizard and follow the on-screen steps to connue the installaon.

When the installaon of the Setup Wizard is complete, run the Setup Wizard:
-
Click Start > Programs > TRENDnet > SetupWizard > SetupWizard. The TRENDnet Setup Wizard appears.
-
Connect an RJ-45 cable from a switch/router to the Ethernet port on the back of the camera and connect the AC power adapter to the camera. Click Next to proceed.

- From the list of cameras that appears, select the camera you wish to conjure and click Next to connue. If your camera is not listed, ensure that it is connected to both power and the network and click to re-scan the network for your camera.

TRENDnet User's Guide
TV-IP651W / TV-IP651WI
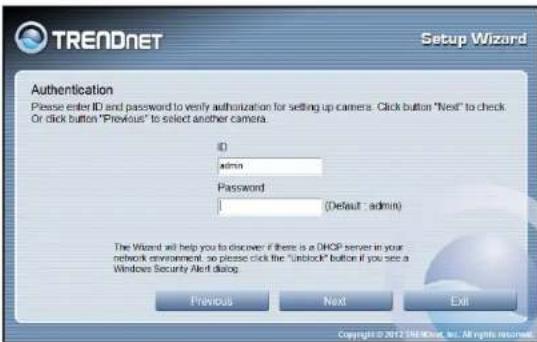
- Login to your camera by entering the ID and Password. By default, both the ID and Password are set to admin. Click Next to connue.
- Enter a name for the camera in the Camera Name eld. The name will be used to identify your camera on the network. Enter the correct me for the camera for the me zone it is in. If your camera is in the same me zone as the computer you are using, click the icon to copy the local me to the camera. Click Next to connue.

- It is strongly recommended that you change your password to secure the camera from being accessed by others. Check the Change Password box and enter the new password in both password elds to conrm the new password. Click Next to connue.

- Select a conneccon opon: (example uses DHCP conneccon type) PPPoE: Select this opon if your camera is directly connected to a DSL modem and your ISP requires a PPPoE authencaon to the Internet. DHCP: Select this opon if your camera is connected to a router and DHCP is enabled. Fixed IP: Select this opon if your camera is directly connected to a DSL modem and your ISP has supplied you with a xed IP for your Internet conneccon.
Select the radio buon for your conncon type and click Next to connue.

TRENDnet User's Guide
TV-IP651W / TV-IP651WI
- Select whether you want to use the camera over an wireless conncon or on a wired conncon. Click No, I don't want to use wireless for the camera. Then click Next to connue. (skip to step 12 for wireless conguraon)

- A summary screen of the sengs you have chosen appears. Click Next to connue.
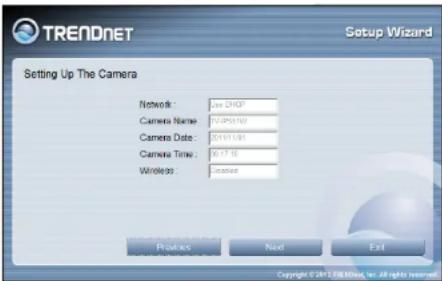
- Aer the Setup Wizard congures the camera, the wizard starts to setup process.

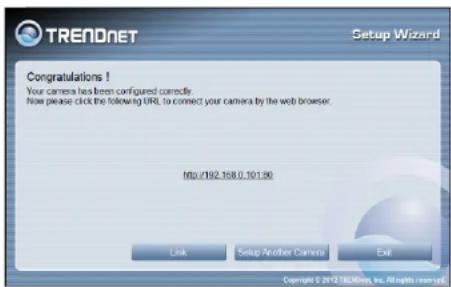
- When the Setup Wizard has nished, the conguration is complete and the following screen appears:

You are now ready to use your camera.
Click the IP address link or the link buon to access the camera's advanced conguraon page.
TRENDnet User's Guide
TV-IP651W / TV-IP651WI
- When selecng the wireless setup choose "I want to use wireless for the camera, click Next to connue.

Wireless Connecon
- Find the access point (AP) or wireless router you wish to connect to from the Available AP drop down menu.
- In most cases you should leave the Channel set to Auto as the AP will determine the channel of operaon.
- Select the type of authencaon and encrypon required by the access point and enter the Key required to connect.

- A summary screen of the sengs you have chosen appears. Click Next to connue.

- Aer the Setup Wizard congures the camera, a screen prompting you for the conncon method appears.

Check the radio buon for the method of conncon you want to use for your camera and click Next to connue.
TRENDnet User's Guide
TV-IP651W / TV-IP651WI
15. Connecng over wireless
Disconnect the Ethernet cable from the camera and wait for 1 minute for the camera to turn to wireless mode then click Next to connue.
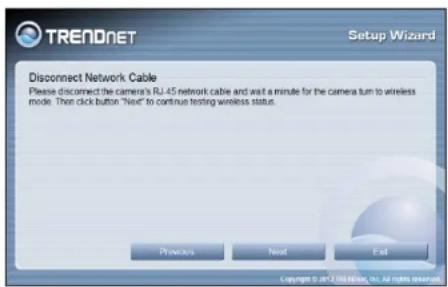
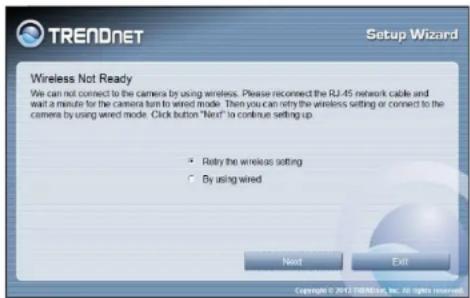
When the Setup Wizard has nished, the conguraon is complete. If there is no wireless conncon found, the following screen will appear:
When the Setup Wizard has nished, the conguraon is complete. If there is a wireless conncon found, the following screen will appear:
Conguraon
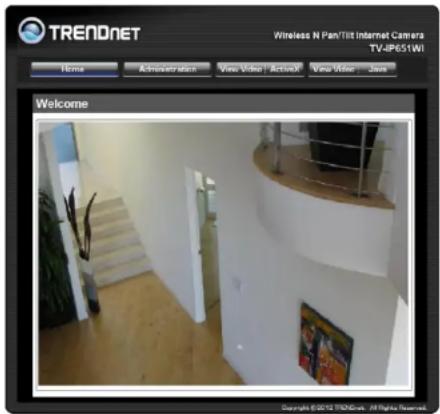
Aer compleng the Setup Wizard, you are ready to use your camera. The camera's built-in Web conguraon ulity is designed to allow you to easily access and congure your TV-IP651W or TV-IP651WI camera. Open a web browser such as Internet Explorer® and enter the IP address of your camera. To log in, use the User name admin and the password you created in the Setup Wizard. If you did not create a password, the default password is admin. Aer entering your password, click OK.

The home page for the TV-IP651W or TV-IP651WI appears.
Viewing Video
Click VIEW VIDEO | ACTIVEX or VIEW VIDEO | JAVA to begin viewing live video from your camera.
VIEW VIDEO | ACTIVEX
Windows users who do not have Java installed can choose AcveX mode to view video. Internet Explorer will prompt you to install AcveX when you click on the VIEW VIDEO | ACTIVEX link. Mac users must use the Java mode to view video
![TRENDNET Wireless N Pan/Tilt Internet Camera TV-IP651WI Home Administration View Video - ActiveX View Video | Java View Video - ActiveX Mode TV-IP651WI Upload Image: ON OFF [OFF] Email Image: ON OFF [OFF] Zoom 2.1 2.2 2.3 2.4 Audio ON OFF Night Mode ON OFF Pan Degree 1 Tilt Degree 1 (undefined undefined) up Left Home Right Down Preset Position 0 Home (174,40) Set Clear Go To Switch Stop Copyright © 20/11 TRENDNET. All Rights Reserved.](/content/2026/05/1017663/images/5839806f52277afa4137f202b5af851625aa89207dabe813686dc0bc84f152f1.jpg)
TRENDnet User's Guide
TV-IP651W / TV-IP651WI
VIEW VIDEO | JAVA
Please make sure that you have the latest version of Java installed on your machine to ensure proper operaon when viewing video in Java mode. The Java applicaon can be downloaded from Sun's website free of charge (hp://www.java.com)
![TREADNET Wireless N Pan/Tilt Internet Camera TV-IP651WI Home Administration View Video ActiveX View Video Java View Video - Java Mode TV-IP65192 11-23-2011 11:24 AM Upload Image: ON OFF [OFF] E-mail Image: ON OFF [OFF] Zoom VT KZ OK OK Audio ON OFF Night Mode ON OFF Pan Degree 1 Tilt Degree 1 (174,43) Up Left Home Right Down Preset Position 0 Home (174,43) Set Color Run To Sitting Stop Copyright © 2011 NetNet. All rights reserved.](/content/2026/05/1017663/images/7b5244cc1d8ce8343496f9310fd73ccd2ed1e1687e961dd5e06586a58a70f8f8.jpg)
Viewing Camera Sengs
To view camera sengs:
- Login to the camera
- Click ADMINISTRATION. The system status screen appears.
From the menu on the le side of the screen, select an opon under the STATUS heading.

TRENDnet User's Guide
TV-IP651W / TV-IP651WI
System
This screen shows the Camera Name, Locaon, Model, Firmware Version, MAC Address, IP Address, Ethernet Link Status, Speed and Duplex type.

Video
This screen shows the details of the video capture sengs including Video Resoluon, Compression Rate, Frame Rate, Frame Size and Light Frequency.

Audio
This screen shows whether audio is enabled and the volume level of the audio.

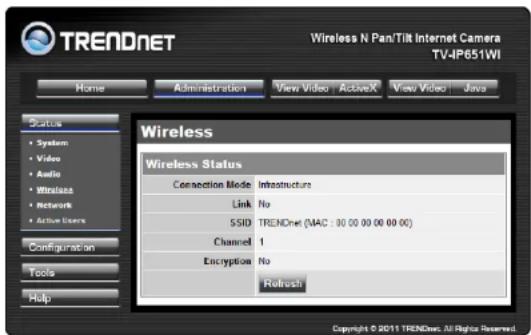
Wireless
This screen shows the conncon mode, link status, SSID name, channel and encrypon status.
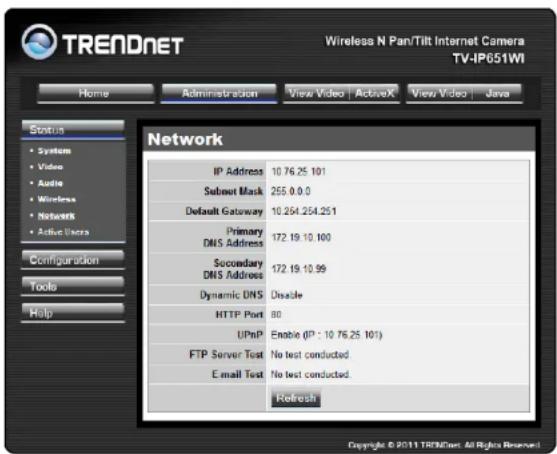
Network
This screen shows various network stascs related to your camera including IP Address, Subnet Mask and Default Gateway.
Acve Users
This screen shows whether there are any acve users logged on to the camera viewing live video.

Conguring Camera Sengs
The TV-IP651W/TV-IP651WI allows you to make conguraon changes from anywhere by connecng to the camera using a standard web browser.
To congure camera sengs:
- Login to the camera as described in the secon Using the web-based conguraon interface.
- Click ADMINISTRATION. The system status screen appears.
- Click CONFIGURATION from the menu on the le side of the screen. The System conguraon screen is displayed. You can then click on any of the menu items on the le of the screen under the Conguraon menu to modify sengs.

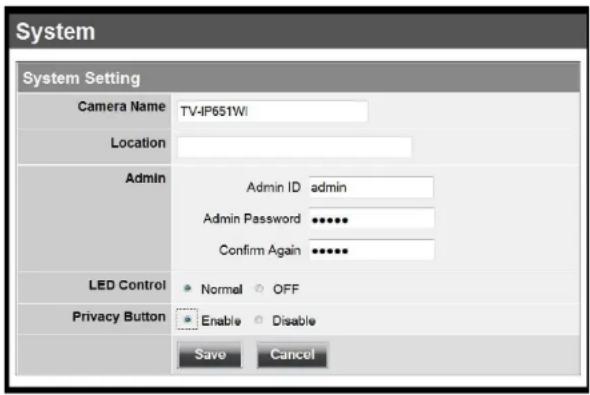
System
- Camera Name: This is the name used to identify your camera on your network.
- Locaon: You can enter a descripon of the place where the camera is.
- Admin: In this eld you can change the administrator user name and password. (Max. password length is 8 characters)
- LED Control: Seng this to Normal will display the lights on the front of the camera indicang power and network acvity. Seng this to OFF will turn o both lights on the front of the camera.
TRENDnet User's Guide
TV-IP651W / TV-IP651WI
- Privacy buon: When privacy feature is enabled, you can turn on and o the privacy mode by pressing the Privacy buon for 5 seconds. When privacy feature is disabled, the privacy buon will not take acon.
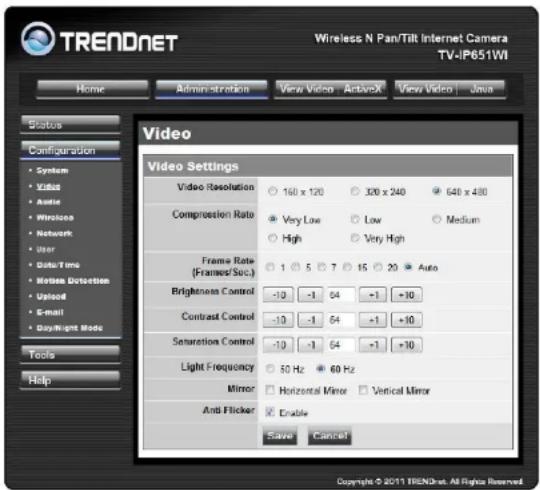
Video
- Video Resoluon: Select from one of the three resoluons. Higher values provide beer quality but at the expense of higher bandwidth requirements on your network or internet conneccon.
- Compression Rate: Select a compression rate. Higher rates of compression will reduce network load at the expense of lower image quality.
- Frame Rate (Frames/Sec.): Select the number of frames per second you would like for your video. Higher rates provide smoother video but require more bandwidth on your network or internet conncon.
- Brightness Control: Allows you to control the brightness level. Enter a value between 1 and 128.
- Contrast Control: Allows you to control the contrast level. Enter a value between 1 and 128.
-
Saturaon Control: Allows you to control the saturaon level. Enter a value between 1 and 128.
-
Light Frequency: Select the correct frequency (50Hz/60Hz) to reduce the amount of icker.
- Mirror: Choose whether to mirror the image horizontally or vertically.
• An-Flicker: Check the box to enable an-icker.
Audio
• Audio: Choose whether to Enable or Disable the camera audio feed.
• Volume: Select the volume percentage level.

Wireless
- Connecon Mode: Infrastructure is a wireless conncon using an access point as a transmission point of all wireless devices. Ad-Hoc is a wireless connection used without an access point, where your TV-IP651W or TV-IP651WIs directly connected to your PC. This is done using the on-board wireless adapter on the TV-IP651W or TV-IP651Wlconnected to a wireless adapter on the PC.
- SSID: Service Set Idener. This is an idener for your network. Manually enter the SSID of your wireless network or select it from the drop down menu. You can click Site Survey to see a list of wireless networks within range and further details of their sengs.
- Wireless Channel: When using Infrastructure mode, the channel is specified by the access point and the channel will not be selectable on this menu. When using Ad-Hoc mode, you can specify on which channel you want to communicate with the camera.
- Encrypon Type: It is highly recommended that you encrypt the conneccon. In Infrastructure mode, select an encrypon type and enter details where
applicable as you have specified on the access point. If you intend to use Ad-Hoc mode, you can specify here the encrypon type and preshared key that you want to use to connect from the PC.

TRENDnet User's Guide
TV-IP651W / TV-IP651WI
Network
• IP Address Mode: Choose a method to assign an IP address to your camera.
- Fixed IP – If you want to assign a stac or xed IP address to the camera, you may do so here. Your network administrator should be able to provide you with the necessary details to complete this secon.
- Dynamic IP (DHCP) – Allows a DHCP server to automacally assign the camera a network address.
-
PPPoE – If you are using a PPPoE conneccon, enter your user name and password here
-
Dynamic IP: Enter the Domain Name Server addresses which translate names to IP addresses.
- Dynamic DNS: The Dynamic DNS feature allows you to host a server (e.g. web server, FTP or Game server) using a domain that you own with a dynamically assigned IP address. Many ISPs assign IP addresses dynamically i.e. the IP address changes each me you connect and disconnect. Using a Dynamic DNS service provider, you can connect to your camera no maer what your IP address. Enter the details of your dynamic DNS service provider here.
- HTTP Port: You may congregate a second HTTP port that will allow you to connect to the camera using a standard web browser. The port can be set to a number other than the default TCP ports 80. A corresponding port must be opened on the router. For example, if the port is changed to 1010, users must type "hp://192.168.0.100:1010" instead of only "hp://192.168.0.100".
- uPnP & uPnP Port Forwarding: Enable these to set your camera as a universal plug n play device on your network.

TRENDnet User's Guide
TV-IP651W / TV-IP651WI
User
- User Access Control: Enable this to allow user accounts to connect to the camera. This opon also enable/disable the authencaon for direct view.
For Java mode: hp://camera_ip_address/tvjview.htm
For AcveX mode: hp://camera_ip_address/tvaview.htm
(eg. hp://192.168.10.30/tvaview.htm to view the camera live image directly)
- Dene Users: You can create new user accounts here. Enter a user name and password and select whether the user is allowed to upload or email an image from the camera.
- Delete User: Select a user from the drop down menu and click the Delete buon to remove a user account from the camera.

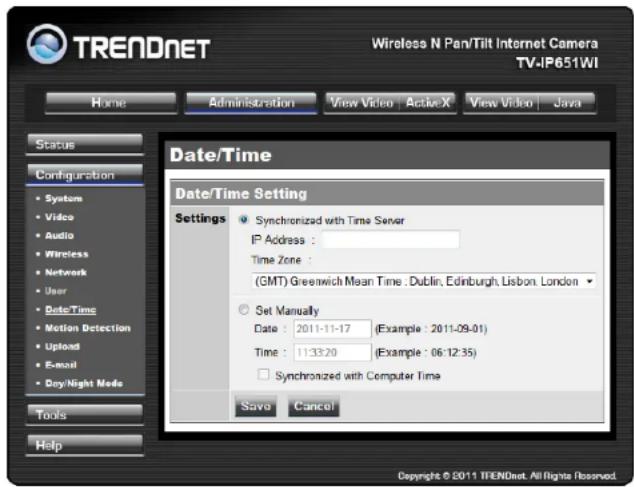
Date/Time
- Synchronized with Time Server: If you have an internet me server or have an NTP server designated on your network, you can specify the IP address of it here. Ensure that you select the correct me zone for the camera also.
- Set Manually: If you prefer to manually set the me for the camera, select this mode. You can check the box Synchronized with Computer Time to set the me on the camera to be the same as the computer you are on.
Moon Detecon
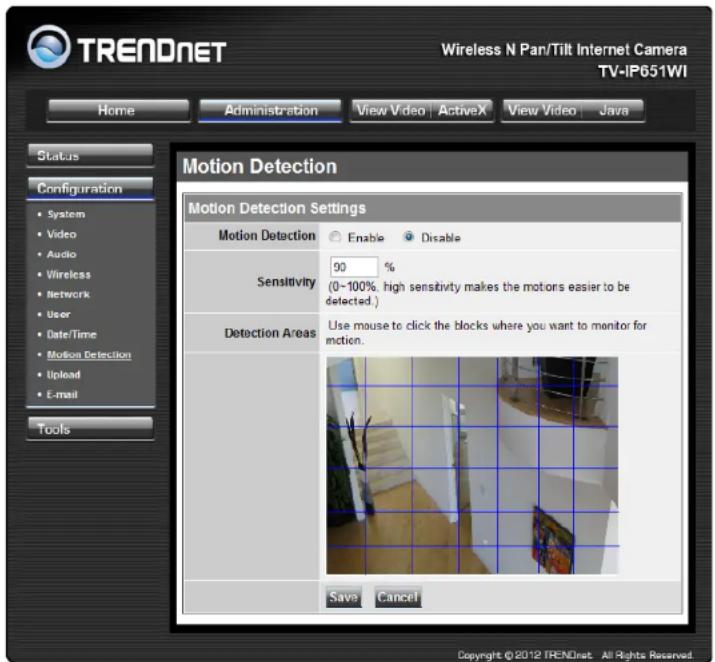
- Moon Detecon: Select whether to Enable or Disable moon detecon. This will allow your camera to perform dierent funcons when acvity has been detected in the parts of the screen that you specify.
- Sensitivity: Set a percentage level to determine how sensitive the camera is to acvity.
TRENDnet User's Guide
TV-IP651W / TV-IP651WI
- Detecon Areas: From the live image shown on this screen, you can le-click on blocks of the grid shown to indicate which parts of the screen you would like to monitor for moon.
Upload
On this screen you can enter details of an FTP Server that you want to upload images from the camera to.
• Host Address: The IP address of the FTP Server
• Port Number: The port number to connect to the FTP on, default port is 21.
• User Name: The user name of the FTP account.
- Password: The password for the user account on the FTP.
- Directory Path: The path you want the les to be uploaded to on the FTP.
- Passive Mode: If the camera is behind a firewall, you might wish to enable Passive mode to allow the camera to upload the pictures.
- Time Schedule: Check Enable upload image to FTP server to enable the Upload funcon.
Always: Selecting this option allows snapshots to be uploaded to your FTP as soon as you click Save.
- Schedule: Selecting this option allows you to congregate specific messages when you want the snapshots to be uploaded to your FTP server.
- Moon Detecon: Selecting this opon sets the camera to upload images upon detectable of moon.
- Manual Operaon: Selecting this opon means the user is responsible for taking a snapshot from the camera to upload.
- Video Frequency: Users can select in frames per second (1, 2, 3 or auto, in auto this could go to 4). The user can also select a duraon for each frame from 1 to 65535 seconds.
- Base File Name: Enter the prex for the lename of each snapshot taken by the camera.
- File: If Overwrite is selected, only a few images will be constantly refreshed, depending on how many snapshots you choose to have sent. Select Date/Time Sux and the pictures will be named with a date and me also. Select a Sequence Number Sux up to 1024 and all the pictures will be numbered from 1-1024. Up to 1024 pictures can be congured. Picture number 1025 will reset to number 1.

This secon allows you to conjure the email nocaoon sengs of your camera.
- SMTP Server Address: The domain name or IP address of your external mail server.
- SMTP Port Number: The port number of your mail server, usually this is port 25.
- Sender's Email Address: The e-mail address of the person sending the camera snapshots.
- Recipient's E-mail Address: The e-mail address of the person receiving the camera snapshots.
- User Name: The user name of the sender's email account for SMTP authencaon.
- Password: The password of the sender's account for SMTP authencaon.
- Use SSL-TLSS/STARTTLS: If your mail server supports SSL-TLSS or STARTTLS, you can select one of these methods to create an encrypted conncon to the mail server.
- Time Schedule: Check Enable e-mail image to e-mail account to enable the me schedule funcon.
Always: Selecting this option will allow snapshots to be emailed when you click Save.
Schedule: Selectng this opon allows you to congure specie mes when you want the snapshots to be emailed.
○ Moon Detecon: Selecting this opon sets the camera to e-mail images upon detect of moon. - Manual Operaon: Selecting this opon means the user is responsible for taking a snapshot from the camera to e-mail.

Day/Night Mode (for TV-IP651WI)
This secon lets you conjure the Day/Night vision modes on the IP camera.
- Auto: The camera automatically detects the level of light and selects night vision or normal mode.
- Manual: Night mode can be selected on the view video AcveX and Java tabs.
• Always Day Mode: Day mode is always selected. - Always Night Mode: Night mode is always selected. This opon is best used areas of low lightng.
- Day Mode Schedule: using the me tabs 00:00 \~ 00:00, it is possible to select mes for normal mode. Times outside this will be in night mode. The mes need to be entered in a 24 hour format. For example, 08:00 \~ 18:30.

TRENDnet User's Guide
TV-IP651W / TV-IP651WI
Tools
FTP Server Test
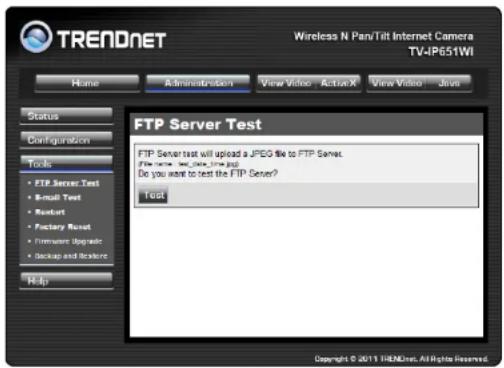
When you have set up the FTP Server in the conguraon secon, you can use this screen to test that the FTP Server sengs are correct. Pressing the Test buon will make a conncon to the FTP Server and upload a le called test_date_me.jpg to the FTP. If the le is not there, you should check that you have entered the FTP details correctly in the conguraon secon.
E-mail Test
When you have set up an e-mail account in the conguraon secon, you can use this screen to test that the E-mail sengs are correct. Pressing the Test buon will make the camera send a test e-mail to the address specied in the conguraon secon. If you do not receive the test e-mail, you should check that you have entered the e-mail details correctly in the conguraon secon.

Restart
If you should need to restart the IP camera, you can do this from this screen. Clicking Yes will initiate a reboot sequence on the camera. When you restart the camera you will lose your conneccon to it. Wait 1 minute before aempng to reconnect to the camera so that it has me to go through its boot up sequence. Restarng the camera will retain the conguraon sengs you have entered.

TRENDnet User's Guide
TV-IP651W / TV-IP651WI
Factory Reset
If you should need to restore the camera to the factory sengs, you can do it from this screen. Clicking Yes will initiate a reboot sequence on the camera. When the camera restarts, you will lose your conncon to it. The username and password will also both be set back to the default admin. Wait 1 minute before aempng to reconnect to the camera so that it has me to go through its boot up sequence.
Note: Factory reset will erase the current conguraon sengs on the camera. You should back up the sengs rst if you wish to keep them. See the Backup and Restore secon for more informaon.

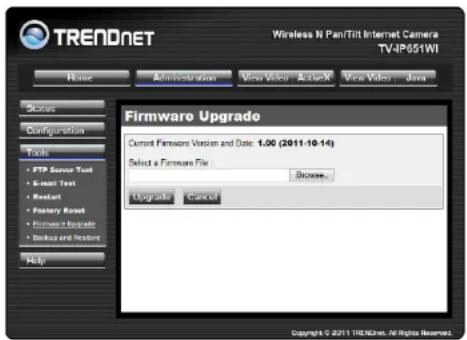
Firmware Upgrade
Click the Browse buon and locate the rmware le you saved on your computer and choose Open. When you are ready, click the Upgrade buon to begin the rmware upgrade.
Note: Upgrading the rmware is a sensitive process. Be sure that you have the correct rmware for your model of camera and do not disconnect the power during the upgrade process.

Backup and Restore
When you have set up the camera and you are sased with the sengs, you can backup the sengs to a le for future reference. If you should change the sengs and want to revert back to the previous sengs, you can do so on this page. To backup the conguraon, click Backup and select a locaon to save the le, then choose Save. To restore sengs from a conguraon le, click Browse and locate the backup conguraon le on your hard drive then click OK. Click Restore to complete the process.
How to setup/access the camera remotely
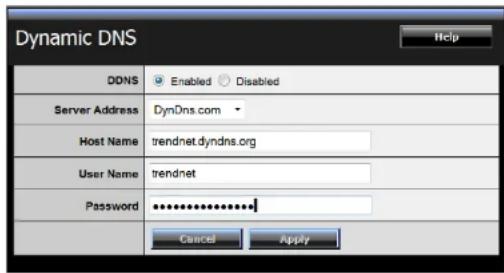
You can either setup the Dynamic DNS conncon via camera itself or your home router. An account from any of the listed DDNS providers is required prior to this operaon.
Congure DDNS on your Camera
- Go to Camera's DDNS Seng page, click Enable to acvate the feature. Then select a DDNS provider from the list.
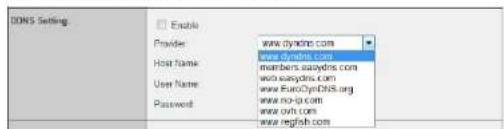
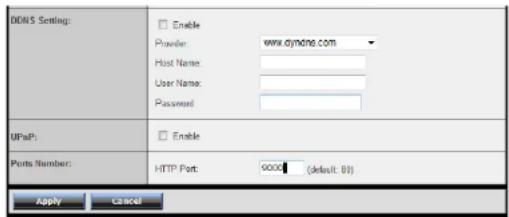
- Enter your DDNS's the Host Name, User Name and Password.

- In the Port Number secon, assign an HTTP port of the camera. The default HTTP Port on the camera is 80. The example shows above is using port number 9000.
- Open another web browser and go to your Router's Web Conguraon page. (In the example, TRENDnet's TEW-651BR Wireless N router is used)
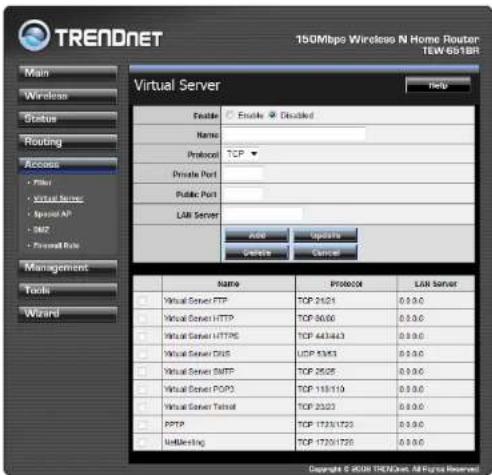
- Go to Virtual Server* secon and create a new entry.
Enable: Click Enable
Name: Enter the applicaon name (eg. CameraName)
Protocol: Select TCP
Private Port: The HTTP port that you assign on your Camera.
Public Port: The port used on remote side to access to your Camera.
LAN Server: The local IP address of your Camera.

TRENDnet User's Guide
TV-IP651W / TV-IP651WI
Then click Add to add the applicaon.
* Please refer to your router's user's manual for detail Virtual Server seng. Some router might use Port Forwarding or Special applications for this funcon. The setup steps should be very similar.
| Name | Protocol | LAN Server | |
| Virtual Server FTP | TCP 21/21 | 0.0.0.0 | |
| Virtual Server HTTP | TCP 80/80 | 0.0.0.0 | |
| Virtual Server HTTPS | TCP 443/443 | 0.0.0.0 | |
| Virtual Server DNS | UDP 53/53 | 0.0.0.0 | |
| Virtual Server SMTP | TCP 29/25 | 0.0.0.0 | |
| Virtual Server POPS | TCP 110/110 | 0.0.0.0 | |
| Virtual Server Token | TCP 23/23 | 0.0.0.0 | |
| PPTP | TCP 1723/1723 | 0.0.0.0 | |
| NetMeeting | TCP 1728/1720 | 0.0.0.0 | |
| ✓ | IP Camera | TCP 9000/9000 | 192, 193, 1, 101 |
- Open another web browser and enter your DDNS domain and camera's port number. hp://yourDomainName:PortNumber

- Camera's login page will appear.
Congure DDNS on your router
- Go to Camera's DDNS → Ports Number secon, assign a HTTP port for your camera and click Apply.
- Login to your router's web conguraon page.
- Find the Dynamic DNS conguraon secon.

- Enable DDNS, II out the following informaon and then click Apply.
TRENDnet User's Guide
TV-IP651W / TV-IP651WI
- Go to Virtual Server* secon and create a new entry.
Enable: Click Enable
Name: Enter the applicaon name (eg. Camera Name)
Protocol: Select TCP
Private Port: The HTTP port that you assign on your Camera.
Public Port: The port used on remote side to access to your Camera.
LAN Server: The local IP address of your Camera.

Click Add to add the applicaon.
* Please refer to your router's user's manual for detail Virtual Server seng. Some router might use Port Forwarding or Special applications for this funcon. The setup steps should be very similar.
- Open another web browser and enter your DDNS domain and camera's port number.
hp://yourDomainName:PortNumber

- The camera login page will appear.
Technical Specicaons
TV-IP651W
| Camera | |
| General | Sensor: 1/5" CMOS SensorBoard LensFocal Length: 4mmF/No: 1.5Minimum illuminaon: 1 luxFocus Depth: 20 cm ~ innityView:Horizontal: 38.0 degreesVercal: 28.7 degreesDiagonal: 46.5 degreesDigital Zoom: 4x |
| Audio | Built-In omni-direconal microphoneSensitivity: -38dB +/- 3dB (5 meters max.)Frequency: 100~20000HzS/N: >60dBFormat: PCM |
| Pan & Tilt | Pan: -170° ~ +170°Tilt: up 90°and down 25°Auto-Patrol preset posions: 24 |
| Hardware | |
| Network | IEEE 802.3u 10/100Mbps Auto-MDIX Fast Ethernet |
| LED | Power, Link/Act |
| WPS Buon | Push to enable WPS |
| Reset Buon | Reset to factory default |
| Privacy Buon | Privacy mode on/o |
| Power Consumpon | Max. 6.12 Was |
| Power | Input: 100~240V, 50/60Hz 0.5A |
| Output: 12V, 1.25A external power adapter | |
| Dimension | 112 x 110 x 130 mm (4.4 x 4.3 x 5.1 in.) |
| Weight | 485 g (1.1 lb) |
| Temperature | Operang: 0°C ~ 40°C (32°F ~ 104°F)Storage: -25°C ~ 70°C (-13°F ~ 158°F) |
| Humidity | Max. 90% (non-condensing) |
| Cercaons | CE, FCC |
| Requirement | |
| Management Interface | Internet Explorer 7.0 or higherFirefox 3.5 or higherSafari 4.0 or higher |
| To Run sware | Windows 7 (32/64-bit), Vista (32/64-bit), XP (32/64-bit)Windows Server 2000, 2008 |
| To Run Sware | Windows 7 (32/64-bit), Vista (32/64-bit), XP (32/64-bit) |
| SecurView Sware | Channel: supports up to 32 camerasRecord/Playback/Moon Detecon/Audio |
| Network Protocols | IPv4, ARP, TCP, UDP, ICMPDHCP Client, NTP Client, DNS Client, DDNS Client, SMTP Client, FTP Client HTTP PPPoE UPnP |
| Wireless | |
| Standard | IEEE 802.11b, IEEE 802.11g, and IEEE 802.11n |
| Frequency | 2.4 ~ 2.497 GHz ISM band |
| Antenna | 1 x detachable 2dBi dipole antennas (Reverse-SMA connector) |
| Date Rate | 802.11b: up to 11Mbps802.11g: up to 54Mbps802.11n: up to 150Mbps |
| Security | 64/128-bit WEP, WPA/WPA2-PSK |
TRENDnet User's Guide
TV-IP651W / TV-IP651WI
| Output Power | 802.11b: 18dBm (typical)802.11g: 15dBm (typical)802.11n: 15dBm (typical) |
| Receiving Sensitivity | 802.11b: -85dBm at 11Mbps802.11g: -76dBm at 54Mbps802.11n: -65dBm at 150Mbps |
| Channels | 1~11 (FCC), 1~13(ETSI) |
| Management | |
| Accounts | Up to 64 user accounts |
| Remote Login | Remote management supported |
| Backup / Restore | Save/retrieve conguraon les |
| Sengs | |
| Image | Brightness, contrast, saturaon, , ip, mirror (horizontal/vercal) |
| Video Seng | Encoding: MJPEG- Resoluon: 640 x 480 (20 fps), 320 x 240 (30 fps), 160 x 120- Max frame rate: VGA@20fps, QVGA@30fps, QQVGA@30fps- JPEG quality: Very Low, Low, Medium, High, Very High |
| Recording | event based (moon detecon) and scheduled |
| Snapshot | Trigger event: moon detecon or digital input signalAcon: send alert email and/or upload to FTPReal me snapshot |
| Port Sengs | HTTP port: 80 (default) |
| Time | Synchronize with NTP server or set me / date manually |
TV-IP651WI
| Camera | |
| General | Sensor: 1/5" CMOS SensorBoard LensFocal Length: 4mmF/No: 1.5 |
| Minimum illuminaon: 0 lux (IR on)Focus Depth: 20 cm ~ InnityView:Horizontal: 38.0 degreesVercal: 28.7 degreesDiagonal: 46.5 degreesDigital Zoom: 4x | |
| Audio | Built-in omni-direconal microphoneSensitivity: -38dB +/- 3dB (5 meters max.)Frequency: 100~20000HzS/N: >60dBFormat: PCM |
| Pan & Tilt | Pan: -170° ~ +170°Tilt: up 90° and down 25°Auto-Patrol preset posions: 24 |
| Day/Night | Built-in ICRNight vision (IR) supports up to 7.5 meters |
| Hardware | |
| Network | IEEE 802.3u 10/100Mbps Auto-MDIX Fast Ethernet |
| LED | Power, Link/Act |
| WPS Buon | Push to enable WPS |
| Reset Buon | Reset to factory default |
| Privacy Buon | Privacy mode on/o |
| Power Consumpon | Max. 7.2 Was |
| Power | Input: 100~240V, 50/60Hz 0.5AOutput: 12V, 1.25A external power adapter |
| Dimension | 112 x 110 x 130 mm (4.4 x 4.3 x 5.1 in.) |
| Weight | 485 g (1.1 lbs.) |
| Temperature | Operang: 0°C ~ 40°C (32°F ~ 104°F)Storage: -25°C ~ 70°C (-13°F ~ 158°F) |
TRENDnet User's Guide
TV-IP651W / TV-IP651WI
| Humidity | Max. 90% (non-condensing) |
| Cercaons | CE, FCC |
| Requirement | |
| Management Interface | Internet Explorer 7.0 or higherFirefox 3.5 or higherSafari 4.0 or higher |
| To Run soware | Windows 7 (32/64-bit), Vista (32/64-bit), XP (32/64-bit)Windows Server 2000, 2008 |
| To Run Soware | Windows 7 (32/64-bit), Vista (32/64-bit), XP (32/64-bit) |
| SecurView Soware | Channel: supports up to 32 camerasRecord/Playback/Moon Detecon/Audio |
| Network Protocols | IPv4, ARP, TCP, UDP, ICMPDHCP Client, NTP Client, DNS Client, DDNS Client, SMTP Client, FTP ClientHTTPPPPoEUPnP |
| Wireless | |
| Standard | IEEE 802.11b, IEEE 802.11g, and IEEE 802.11n |
| Frequency | 2.4 ~ 2.497 GHz ISM band |
| Antenna | 1 x detachable 2dBi dlpole antenna (Reverse-SMA connector) |
| Date Rate | 802.11b: up to 11Mbps802.11g: up to 54Mbps802.11n: up to 150Mbps |
| Security | 64/128-bit WEP, WPA/WPA2-PSK |
| Output Power | 802.11b: 18dBm (typical)802.11g: 15dBm (typical)802.11n: 15dBm (typical) |
| Receiving Sensitivity | 802.11b: -85dBm at 11Mbps802.11g: -76dBm at 54Mbps802.11n: -65dBm at 150Mbps |
| Channels | 1~11 (FCC), 1~13(ETSI) |
| Management | |
| Accounts | Up to 64 user accounts |
| Remote Login | Remote management supported |
| Backup / Restore | Save/retrieve conguraon les |
| Sengs | |
| Image | Brightness, contrast, saturaon, , lp, mirror (horizontal/vercal) |
| Video Seng | Encoding: MJPEG- Resoluon: 640 x 480 (20 fps), 320 x 240 (30 fps), 160 x 120- Max frame rate: VGA@20fps, QVGA@30fps, QQVGA@30fps- JPEG quality: Very Low, Low, Medium, High, Very High |
| Recording | event based (moon detecon) and scheduled |
| Snapshot | Trigger event: moon deteconAcon: send alert email and/or upload to FTPReal me snapshot |
| Port Sengs | HTTP port: 80 (default) |
| Time | Synchronize with NTP server or set me / date manually |
Troubleshoong
1. The Power LED and Ethernet Acvity LED do not light up.
The power supply or camera might be faulty. Check that the conneccon to both the power source and the terminal on the back of the camera are secure and that you are using the provided power supply. If the camera is otherwise functioning correctly, the LEDs might have been disabled in the conguraon. See the secon of this guide on Conguraon of System sengs.
2. The camera can't be accessed or access is slow
There might be a problem with the network cable. To conrm that the cables are working, ping the address of a known device on the network. If the cabling is OK and your network is reachable, you should receive a reply similar to the following (...bytes = 32 me = 2 ms).
Another possible problem may be that the network device such as a hub or switch utilized by the Network Camera is not funconing properly. Please conrm the power for the devices are well connected and funconing properly.
3. The camera can be accessed locally but not remotely
This might be caused by a rewall. Check the Internet rewall with your system administrator. The rewall may need to have some sengs changed in order for the Network Camera to be accessible outside your local LAN. For more informaon, please refer to the secon about installing your camera behind a router.
Make sure that the Network Camera isn't conicng with any Web server you may have running on your network.
The default router seng might be a possible reason. Check that the conguraon of the router sengs allow the Network Camera to be accessed outside your local LAN.
4. White vercal lines appear on the image from the camera
It could be that the CMOS sensor (a square panel situated behind the lens that measures the light signals and changes it into a digital format so your computer can present it into an image that you are familiar with) has become overloaded when it has been exposed to bright lights such as direct exposure
to sunlight or halogen lights. Reposition the Network Camera into a more shaded area immediately as prolonged exposure to bright lights will damage the CMOS sensor.
5. The camera images are 'noisy'
Oen if the camera is in a low-light environment, the images can contain a lot of noise. Try enabling Night mode and see if that improves the image quality. Otherwise, try to use the camera in a locaon where there is a bit more light.
6. The camera images are of poor quality.
Make sure that your computer's display properes are set to at least 16-bit color. Using 16 or 256 colors on your computer will produce dithering artifacts in the image, making the image look as if it is of poor quality.
Try also adjusng the brightness, contrast, saturaon, light frequency and anicker controls on the Video Sengs under the Conguraon menu. You may also consider adjusng the resolution of the camera and the compression rate to improve the image.
7. Video can't be viewed through the web browser interface.
AcveX might be disabled. If you are viewing the images from Internet Explorer make sure AcveX has been enabled in the Internet Opons menu. You may also need to change the security sengs on your browser to allow the AcveX plug-in to be installed.
If you are using Internet Explorer with a version number lower than 6, then you will need to upgrade your Web browser soware in order to view the streaming video transmied by the Network Camera. Try also viewing the video using Java. Ensure that you have the latest version of Java installed before you do. Go to www.java.com for more informaon.
TRENDnet User's Guide
TV-IP651W / TV-IP651WI
Federal Communicaon Commission Interference Statement
This equipment has been tested and found to comply with the limits for a Class B digital device, pursuant to Part 15 of the FCC Rules. These limits are designed to provide reasonable protecon against harmful interference in a residential installaon. This equipment generates, uses and can radiate radio frequency energy and, if not installed and used in accordance with the instrucons, may cause harmful interference to radio communicaons. However, there is no guarantee that interference will not occur in a parcular installaon. If this equipment does cause harmful interference to radio or television recepon, which can be determined by turning the equipment o and on, the user is encouraged to try to correct the interference by one of the following measures:
Reorient or relocate the receiving antenna.
Increase the separaon between the equipment and receiver.
Connect the equipment into an outlet on a circuit dierent from that to which the receiver is connected.
Consult the dealer or an experienced radio/TV technician for help.
This device complies with Part 15 of the FCC Rules. Operaon is subject to the following two conditions: (1) This device may not cause harmful interference, and (2) this device must accept any interference received, including interference that may cause undesired operaon.
FCC Cauon: Any changes or modicaons not expressly approved by the party responsible for compliance could void the user's authority to operate this equipment. IEEE 802.11b or 802.11g operaon of this product in the U.S.A. is rmware-limited to channels 1 through 11.
IMPORTANT NOTE:
FCC Radiaon Exposure Statement:
This equipment complies with FCC radiaon exposure limits set forth for an uncontrolled environment. This equipment should be installed and operated with minimum distance 20cm between the radiator & your body.
This transmier must not be co-located or operang in conjuncon with any other antenna or transmier.
Europe – EU Declaraon of Conformity
This device complies with the essenal requirements of the R&TTE Direcve 1999/5/EC. The following test methods have been applied in order to prove presumption of conformity with the essenal requirements of the R&TTE Direcve 1999/5/EC:
EN 60950-1: 2006 +A11:2009
Safety of Informaon Technology Equipment
EN 62311: 2008
Assessment of electronic and electrical equipment related to human exposure restricons for electromagnec elds (0 Hz-300 GHz)
(IEC 62311:2007 (Modified))
EN 300 328 V1.7.1: (2006-10)
Electromagnec compatibility and Radio spectrum Maers (ERM); Wideband Transmission systems; Data transmission equipment operang in the 2,4 GHz ISM band and using spread spectrum modulaon techniques; Harmonized EN covering essenal requirements under arcle 3.2 of the R&TTE Direcve
EN 301 489-1 V1.8.1: (2008-04)
Electromagnec compatibility and Radio Spectrum Maers (ERM); ElectroMagnec Compatibility (EMC) standard for radio equipment and services; Part 1: Common technical requirements
EN 301 489-17 V2.1.1 (2009-05)
Electromagnec compatibility and Radio spectrum Maers (ERM); ElectroMagnec Compatibility (EMC) standard for radio equipment and services; Part 17: Specific conditions for 2,4 GHz wideband transmission systems
This device is a 2.4 GHz wideband transmission system (transceiver), intended for use in all EU member states and EFTA countries, except in France and Italy where restrictive use applies.
In Italy the end-user should apply for a license at the naonal spectrum authorities in order to obtain authorizaon to use the device for seng up outdoor radio links and/or for supplying public access to telecommunications and/or network services.
This device may not be used for seng up outdoor radio links in France and in some areas the RF output power may be limited to 10 mW EIRP in the frequency range of 2454 – 2483.5 MHz. For detailed informaon the end-user should contact the naonal spectrum authority in France.

TRENDnet User's Guide
TV-IP651W / TV-IP651WI
| csČesky [Czech] | TRENDnet mto prohlašuje, že tento TV-IP651W / TV-IP651WI je ve shodě se základními požadavky a dalšími příslušnými ustanoveními směrnice 1999/5/ES. |
| daDansk [Danish] | Undertegnede TRENDnet erklærer herved, at følgende udstyr TV-TV-IP651W / TV-IP651WI overholder de væsentlige krav og øvrige relevante krav i direkv 1999/5/EF. |
| deDeutsch [German] | Hiermit erklärt TRENDnet, dass sich das Gerät TV-IP651W / TV-IP651WI in Übereinsmmung mit den grundlegenden Anforderungen und den übrigen einschlägigen Besmmungen der Richtlinie 1999/5/EG bendet. |
| etEes [Estonian] | Käesolevaga kinnitab TRENDnet seadme TV-IP651W / TV-IP651WI vastavust direkivi 1999/5/EÜ põhinõuetele ja nimetatud direkivist tulenevatele teistele asjakohastele sätetele. |
| enEnglish | Hereby, TRENDnet, declares that this TV-IP651W / TV-IP651WI is in compliance with the essenal requirements and other relevant provisions of Direcve 1999/5/EC. |
| esEspañol [Spanish] | Por medio de la presente TRENDnet declara que el TV-IP651W / TV-IP651WI cumple con los requisitos esenciales y cualesquiera otras disposiciones aplicables o exigibles de la Direcva 1999/5/CE. |
| elEλληνική [Greek] | ME THN ΠΑΡΟΥΣΑ TRENDnet ΔΗΛΩΝΕΙ OTI TV-IP651W / TV-IP651WI ΣΥΜΜΟΡΦΩΝΕΤΑΙ ΠΡΟΣ ΤΙΣ ΟΥΣΙΩΔΕΙΣ ΑΠΑΙΤΗΣΕΙΣ ΚΑΙ ΤΙΣ ΛΟΙΠΕΣ ΣΧΕΤΙΚΕΣ ΔΙΑΤΑΞΕΙΣ ΤΗΣ ΟΔΗΓΙΑΣ 1999/5/EK. |
| frFrançais [French] | Par la présente TRENDnet déclare que l'appareil TV-IP651W / TV-IP651WI est conforme aux exigences essenelles et aux autres disposions permentes de la direcve 1999/5/CE. |
| itItaliano [Italian] | Con la presente TRENDnet dichiara che questo TV-IP651W / TV-IP651WI è conforme ai requisi essenziali ed alle altre disposizioni pernen stabilite dalla direva 1999/5/CE. |
| lvLatviski [Latvian] | Ar što TRENDnet deklarē, ka TV-IP651W / TV-IP651WI atbilst Direkvas 1999/5/EK būskajām prasībām un ciem ar to |
| saistajiem noteikumiem. | |
| itLietuvių[Lithuanian] | Šiuo TRENDnet deklaruoja, kad šis TV-IP651W / TV-IP651WI anka esminius reikalavimus ir kitas 1999/5/EB Direktyvos nuostatas. |
| nlNederlands[Dutch] | Hierbij verklaart TRENDnet dat het toestel TV-IP651W / TV-IP651WI in overeenstemming is met de essenële eisen en de andere relevante bepalingen van richtlijn 1999/5/EG. |
| ntMal[Maltese] | Hawnhekk, TRENDnet, jiddikjara li dan TV-IP651W / TV-IP651WI jikkonforma mal-ħgijiet essenzjali u ma provvedimen oħrajn relevan li hemm d-Dirreva 1999/5/EC. |
| huMagyar[Hungarian] | Alulíro, TRENDnet nyilatkozom, hogy a TV-IP651W / TV-IP651WI megfelel a vonatkozó alapvetõ követelményeknek és az 1999/5/EC irányelv egyéb előírásainak. |
| plPolski[Polish] | Niniejszym TRENDnet oświadcza, že TV-IP651W / TV-IP651WI jest zgodny z zasadniczymi wymogami oraz pozostałymi stosownymi postanowieniami Dyrektywy 1999/5/EC. |
| ptPortuguês[Portuguese] | TRENDnet declara que este TV-IP651W / TV-IP651WI está conforme com os requisitos essenciais e outras disposições da Direcva 1999/5/CE. |
| slSlovensko[Slovenian] | TRENDnet izjavlja, da je ta TV-IP651W / TV-IP651WI v skladu z bistvenimi zahtevami in ostalimi relevantnimi določili direkve 1999/5/ES. |
| skSlovensky[Slovak] | TRENDnet týmto vyhlasuje, že TV-IP651W / TV-IP651WI spĺňa základné požiadavky a všetky príslušné ustanovenia Smernice 1999/5/ES. |
| fiSuomi[Finnish] | TRENDnet vakuuaa täten eä TV-IP651W / TV-IP651WI tyyppinen laite on direkivin 1999/5/EY oleellisten vaamusten ja sitä koskevien direkivin muiden ehtojen mukainen. |
| svSvenska[Swedish] | Härmed intygar TRENDnet a denna TV-IP651W / TV-IP651WI står l överensstämmelse med de väsentliga egenskapskrav och övriga relevanta bestämmelser som framgår av direkv 1999/5/EG. |
Limited Warranty
TRENDnet warrants its products against defects in material and workmanship, under normal use and service, for the following lengths of me from the date of purchase.
TV-IP651W / TV-IP651WI - 3 Years Warranty
AC/DC Power Adapter, Cooling Fan, and Power Supply carry 1 year warranty.
If a product does not operate as warranted during the applicable warranty period, TRENDnet shall reserve the right, at its expense, to repair or replace the defective product or part and deliver an equivalent product or part to the customer. The repair/replacement unit's warranty connues from the original date of purchase. All products that are replaced become the property of TRENDnet. Replacement products may be new or reconditioned. TRENDnet does not issue refunds or credit. Please contact the point-of-purchase for their return policies.
TRENDnet shall not be responsible for any soware, rmware, informaon, or memory data of customer contained in, stored on, or integrated with any products returned to TRENDnet pursuant to any warranty.
There are no user serviceable parts inside the product. Do not remove or aempt to service the product by any unauthorized service center. This warranty is voided if (i) the product has been modified or repaired by any unauthorized service center, (ii) the product was subject to accident, abuse, or improper use (iii) the product was subject to conditions more severe than those specified in the manual.
Warranty service may be obtained by contacng TRENDnet within the applicable warranty period and providing a copy of the dated proof of the purchase. Upon proper submission of required documentaon a Return Material Authorizaon (RMA) number will be issued. An RMA number is required in order to initiate warranty service support for all TRENDnet products. Products that are sent to TRENDnet for RMA service must have the RMA number marked on the outside of return packages and sent to TRENDnet prepaid, insured and packaged appropriately for safe shipment. Customers shipping from outside of the USA and Canada are responsible for return shipping fees. Customers shipping from outside of the USA are responsible for custom charges, including but not limited to, duty, tax, and other fees.
WARRANTIES EXCLUSIVE: IF THE TRENDNET PRODUCT DOES NOT OPERATE AS WARRANTED ABOVE, THE CUSTOMER'S SOLE REMEDY SHALL BE, AT TRENDNET'S OPTION, REPAIR OR REPLACE. THE FOREGOING WARRANTIES AND REMEDIES ARE EXCLUSIVE AND ARE IN LIEU OF ALL OTHER WARRANTIES, EXPRESSED OR IMPLIED, EITHER IN FACT OR BY OPERATION OF LAW, STATUTORY OR OTHERWISE, INCLUDING
WARRANTIES OF MERCHANTABILITY AND FITNESS FOR A PARTICULAR PURPOSE. TRENDNET NEITHER ASSUMES NOR AUTHORIZES ANY OTHER PERSON TO ASSUME FOR IT ANY OTHER LIABILITY IN CONNECTION WITH THE SALE, INSTALLATION MAINTENANCE OR USE OF TRENDNET'S PRODUCTS.
TRENDNET SHALL NOT BE LIABLE UNDER THIS WARRANTY IF ITS TESTING AND EXAMINATION DISCLOSE THAT THE ALLEGED DEFECT IN THE PRODUCT DOES NOT EXIST OR WAS CAUSED BY CUSTOMER'S OR ANY THIRD PERSON'S MISUSE, NEGLECT, IMPROPER INSTALLATION OR TESTING, UNAUTHORIZED ATTEMPTS TO REPAIR OR MODIFY, OR ANY OTHER CAUSE BEYOND THE RANGE OF THE INTENDED USE, OR BY ACCIDENT, FIRE, LIGHTNING, OR OTHER HAZARD.
LIMITATION OF LIABILITY: TO THE FULL EXTENT ALLOWED BY LAW TRENDNET ALSO EXCLUDES FOR ITSELF AND ITS SUPPLIERS ANY LIABILITY, WHETHER BASED IN CONTRACT OR TORT (INCLUDING NEGLIGENCE), FOR INCIDENTAL, CONSEQUENTIAL, INDIRECT, SPECIAL, OR PUNITIVE DAMAGES OF ANY KIND, OR FOR LOSS OF REVENUE OR PROFITS, LOSS OF BUSINESS, LOSS OF INFORMATION OR DATE, OR OTHER FINANCIAL LOSS ARISING OUT OF OR IN CONNECTION WITH THE SALE, INSTALLATION, MAINTENANCE, USE, PERFORMANCE, FAILURE, OR INTERRUPTION OF THE POSSIBILITY OF SUCH DAMAGES, AND LIMITS ITS LIABILITY TO REPAIR, REPLACEMENT, OR REFUND OF THE PURCHASE PRICE PAID, AT TRENDNET'S OPTION. THIS DISCLAIMER OF LIABILITY FOR DAMAGES WILL NOT BE AFFECTED IF ANY REMEDY PROVIDED HEREIN SHALL FAIL OF ITS ESSENTIAL PURPOSE.
Governing Law: This Limited Warranty shall be governed by the laws of the state of California.
Some TRENDnet products include soware code written by third party developers. These codes are subject to the GNU General Public License ("GPL") or GNU Lesser General Public License ("LGPL").
Go to http://www.trendnet.com/gpl or http://www.trendnet.com Download secon and look for the desired TRENDnet product to access to the GPL Code or LGPL Code. These codes are distributed WITHOUT WARRANTY and are subject to the copyrights of the developers. TRENDnet does not provide technical support for these codes. Please go to http://www.gnu.org/licenses/gpl.txt or http://www.gnu.org/licenses/lgpl.txt for specific terms of each license.
PWP05202009v2

TRENDNET®
Product Warranty Registration
Please take a moment to register your product online. Go to TRENDnet's website at http://www.trendnet.com/register
TRENDnet
20675 Manhattan Place
Torrance, CA 90501. USA
Copyright ©2012. All Rights Reserved. TRENDnet.
- TRENDnet User's Guide
- Table of Contents
- Contents
- Product Overview ....1
- Installaon....3
- Starng the Setup Wizard ....5
- Conguraon....10
- How to setup/access the camera remotely....23
- Technical Specicaons 26
- Troubleshoong 29
- Package Contents
- Features
- TV-IP651W
- TV-IP651WI
- Product Hardware Features
- Installaon
- Wired Connecon
- Connect the Ethernet Cable
- Aach the Power Supply
- WPS Connecon
- Aach the Power Supply
- Wall mount installaon
- Starng the Setup Wizard
- TV-IP651W / TV-IP651WI
- Wireless Connecon
- Connecng over wireless
- Conguraon
- Viewing Video
- VIEW VIDEO | ACTIVEX
- VIEW VIDEO | JAVA
- Viewing Camera Sengs
- System
- Video
- Audio
- Wireless
- Network
- Acve Users
- Conguring Camera Sengs
- User
- Date/Time
- Moon Detecon
- Upload
- Day/Night Mode (for TV-IP651WI)
- Tools
- FTP Server Test
- E-mail Test
- Restart
- Factory Reset
- Firmware Upgrade
- Backup and Restore
- How to setup/access the camera remotely
- Congure DDNS on your Camera
- Congure DDNS on your router
- Troubleshoong
- The Power LED and Ethernet Acvity LED do not light up.
- The camera can't be accessed or access is slow
- The camera can be accessed locally but not remotely
- White vercal lines appear on the image from the camera
- The camera images are 'noisy'
- The camera images are of poor quality.
- Video can't be viewed through the web browser interface.
- Federal Communicaon Commission Interference Statement
- IMPORTANT NOTE:
- FCC Radiaon Exposure Statement:
- Limited Warranty
- TV-IP651W / TV-IP651WI - 3 Years Warranty
- TRENDNET®
- Product Warranty Registration
Brand : TRENDNET
Model : TV-IP651WI
Category : Security Camera