KAB1SS - Coffee machine Cylinda - Free user manual and instructions
Find the device manual for free KAB1SS Cylinda in PDF.


| Product Type | Coffee Machine |
| Brand | Cylinda |
| Model | KAB1SS |
| Dimensions (H x W x D) | 32 x 25 x 42 cm |
| Weight | 6.2 kg |
| Power Supply | 220-240 V, 50/60 Hz, 1200 W |
| Water Tank Capacity | 1.8 L |
| Bean Hopper Capacity | 200 g |
| Pump Pressure | 15 bar |
| Functions | Espresso, lungo, cappuccino, hot water, steam |
| Milk Frother | Integrated steam wand |
| Adjustable Coffee Strength | Yes, 5 levels |
| Grinder Type | Ceramic burr grinder |
| Grinder Settings | 13 levels |
| Display | LED backlit, touch buttons |
| Cup Warmer | Top surface |
| Auto Shut-Off | After 30 min of inactivity |
| Descaling Program | Automatic with indicator |
| Cleaning Program | Automatic rinse cycle |
| Removable Brew Unit | Yes, washable |
| Water Filter | Intenza Aroma Pro (optional) |
| Spare Parts Available | Brew group, water tank, drip tray, steam wand |
| Repairability Index | 7.5 / 10 |
| Safety Features | Overheat protection, child lock |
Frequently Asked Questions - KAB1SS Cylinda
User questions about KAB1SS Cylinda
0 question about this device. Answer the ones you know or ask your own.
Ask a new question about this device
Download the instructions for your Coffee machine in PDF format for free! Find your manual KAB1SS - Cylinda and take your electronic device back in hand. On this page are published all the documents necessary for the use of your device. KAB1SS by Cylinda.
USER MANUAL KAB1SS Cylinda
natural_image
Simple line drawing of a kitchen appliance with oven, refrigerator, and washing machine (no text or symbols)Cylinda KAB1BL
Cylinda KAB1SS
Cylinda
en enklare vardag
Dear Valued Customer,
Now that you chose our Filtered Coffee Machine, you also bought a quality CYLÍNDA product.
The life of your appliance will prolong if you perform necessary care and maintenance procedures.
We hope you enjoy using your appliance.
Important Safety Information
Please read the instructions in this manual carefully to familiarise yourself with the appliance quickly and use all the functions of your appliance to their fullest extent and keep this manual for future reference.

WARNING: Refers to the serious injury risks.

WARNING: Before you start to use your appliance, always take safety measures mentioned in this manual in order to prevent any dangerous situations and risks of fire, electric shock and personal injuries.
Contents
Safety Warnings....1
Safety Information to be Considered when Using the Appliance 2
Safety Information to be Considered when Performing Cleaning and Maintenance Procedures .... 11
Points to be Considered during Carrying and Transportation...12
Liability Limitation 13
Specifications 14
General Appearance 15
Digital Control Panel and LED Display.... 18
Before Initial Operation 20
Usage 21
Cleaning and Maintenance....23
Descaling....24
Troubleshooting 39
Safety Warnings
- WARNING: Before you start to use your appliance, always take safety measures mentioned in this manual in order to prevent any dangerous situations and risks of fire, electric shock and personal injuries.
- This user manual contains important information about the initial use, safety, intended uses, cleaning and maintenance of your appliance.
- Read user manual carefully and follow the instructions.
- Keep this user manual in a safe place, and provide this user manual with the appliance in case you lend your appliance.
- This appliance is intended for making coffee for non-commercial use at home or in similar indoor environments such as:
- staff kitchen areas in shops, offices and other working environments;
- farm houses;
-
by customers in hotels, motels and other residential-type environments;
-
in bed and breakfast type environments.
- WARNING: Using your appliance for purposes other than its intended purpose may cause damage and dangerous conditions and renders the warranty void. Damages that may occur under these conditions are borne by the user.
Safety Information to be Considered when Using the Appliance
- Connect and operate the appliance only in accordance with the information on type label. Make sure that the mains supply in your home is compatible with the power and voltage ratings indicated on the rating plate of your appliance.
- Connect the appliance only to an AC current and a grounded outlet.
- The electrical safety of your appliance can only be ensured if the appliance is connected to a fully grounded, protected wall outlet. The manufacturer is not liable for any personal injury or property damage resulting from the use of an ungrounded outlet.
- Keep the appliance and its cord out of the reach of children under 8 years of age. Do not allow the appliance cable to dangle from the counter.
- This appliance is not meant to be used by people—including kids—who have diminished physical, sensory, or mental capabilities or who lack experience and knowledge, unless those people have received supervision or instruction from a person who is accountable for their safety.
- This appliance can be used by children aged 8 years and older if they are under supervision or have received instructions on how to use the appliance safely and understand the dangers involved. Cleaning and user maintenance should not be performed by children unless
they are older than 8 years of age and under supervision.
• Children must not tamper with the appliance.
• Children should be supervised to ensure that they do not play with the appliance.
- Keep young children away from the appliance and do not let your appliance cable dangle from the counter.
Young children can pull down the appliance holding its cord and this can lead to injuries.
- Cleaning and user maintenance should not be performed by children unless they are older than 8 years of age and under supervision.
- Do not add water after the appliance has started.
• The warm-keeping plate becomes hot while the appliance is running. Never touch it. There is serious danger of burning!
- Use only fresh cold water to fill the water tank, never fill it with warm or hot water.
- WARNING: Keep the packaging materials away from the infants and children to prevent any risk of suffocation. Do not
permit this packaging material to be used as a toy.
- Unplug the appliance after each use or in case of malfunction or before cleaning.
- Do not immerse the appliance, its base unit or power plug into water or any other liquids. Do not immerse the appliance in water.
- You can use your product only with its own base unit.
- Keep the base unit dry and clean.
• Water may gush out of the spout of the coffee machine during boiling, do not touch boiling water.
- During operation, hot steam may be released from your appliance and parts of your appliance may become very hot.
• Always ensure the lid is closed and do not lift it while the water is boiling.
• WARNING: To prevent the danger of burning:
- Keep all parts of your body away from the steam outlet.
- Do not open the filter compartment during operation.
- Before cleaning your appliance, make sure that it has cooled down completely.
- Do not add water into the appliance while your appliance is still hot. This may cause burn injuries.
- Be careful while opening the lid, boiling water may outburst.
- The water level should be between Max (12) and Min (2) levels. If you overfill your coffee machine, boiling water may outburst.
- Allow to cool before disassembling and assembling parts and before cleaning the appliance.
- Do not touch hot surface. Use only the handles or buttons.
- Do not operate your appliance when there is no water in it, or your appliance will get damaged. Do not fill your appliance with any liquid other than water or do not put food items in the water tank of your appliance.
• This product should be kept under constant supervision and control during operation.
- Do not operate the appliance on inclined surfaces.
- Place your appliance on a dry, level and stable surface, free of water and away from exposure to heat.
- The top surface of a furniture worktop may contain materials that can damage the rubber foot of your appliance. If necessary, place a protective mat under the foot of your appliance.
- Do not place your appliance in environments that are too hot, wet, or too humid and do not place it near flammable materials.
- Choose a location where small children cannot access the hot surfaces of the appliance.
- Your appliance is not designed for placement inside a wall or cabinet.
• The mains plug for your appliance must be in an easily accessible place so that
the appliance's electrical circuit can be quickly disconnected in case of emergency.
- Do not place the carafe on a gas or electric hob or in a microwave oven. Carafe is intended for use with this appliance.
- Never place the carafe on a wet or cold surface.
- Do not use a carafe with a cracked or loose or weakened handle.
- Never leave the empty carafe on the warm-keeping plate, otherwise the container may crack.
- If any cracks appear in the carafe, do not use the appliance. Use the carafe with caution, as it is extremely fragile.
- Before using, check whether all functions are operating correctly.
- Use the coffee grinder only to grind the roasted coffee beans. Do not use for other granular foods.
- Avoid touching moving parts, as the blade is sharp.
- If the power cord is damaged, it must be replaced by the manufacturer, its service
representative, or another suitably certified individual to prevent hazard. Please contact with the authorised service or customer communication center.
- The appliance should only be used if there are no visible damages in its power cord and on its body.
- Never use your appliance under following circumstances:
- If the appliance or the power cord is damaged,
- If the appliance is dropped, there are visible signs of damage or the appliance does not function correctly,
- If the appliance is damaged to the extent that its electrical parts are seen,
- If he appliance, power cord or power plug has fallen into water or other liquids.
- If any of the conditions described above are observed, disconnect the power cord immediately and contact with an authorised service.
• A damaged appliance or damaged parts can cause serious injuries and fire.
- In case of any failure with your appliance, do not attempt to repair it. The appliance does not contain any components which might be repaired by the user.
- Unauthorized usage of accessories may lead to fire, electrical shock and/or personal injury.
- Care should be taken not to open the inside of your appliance. There is risk of electric shock in case of touching the electrical connections within the appliance and/or modifying the electrical and mechanical structure of the appliance.
- Extend the power cord so that it does not cause any danger. Do not pull the power cord over sharp edges and do not pinch it. Keep away from hot and wet areas. Power cord should not touch the hot parts of the appliance.
- Do not use the appliance outdoors.
- Do not place the appliance near a hot gas or electric hob or a heated oven.
- While disconnecting from the outlet, grasp the plug and do not pull it out by the cord.
- Do not hold the plug with wet hands.
- Dry the appliance and all parts before connecting it to
the mains and before installing parts.
- Position the appliance so that the power plug is always within reach.
- This appliance must not be operated with an external clock timer or separate remote control system.
- Do not use an extension cord for this appliance.
- Avoid contact with hot parts of the product.
- Allow the appliance to cool down before storing.
- Before lifting the carafe from its base unit, ensure that the coffee machine is disconnected.
water. To avoid electric shock, do not clean your appliance with water, use a soft cloth to clean your appliance.
- Do not use abrasive cleaning agents when cleaning.
- Do not clean the carafe with cleaning agents, steel wires, or other abrasive materials.
Safety Information to be Considered when
Performing Cleaning and Maintenance Procedures
- Clean the appliance regularly as stated in the "Cleaning and Maintenance" section. Before starting the cleaning and maintenance procedure, always unplug the appliance from the outlet.
- Do not immerse the appliance in
- You can wipe the body of the appliance with a damp cloth, and then you can polish it with a dry cloth.
- WARNING: Make sure that you completely dry the cloth by which you wipe the surface of the appliance. Permeation of water inside the electrical components of your appliance will cause serious damage to your appliance.
- Do not use any sharp, pointed, or similar tools during cleaning.
Points to be Considered
during Carrying and
Transportation
- During carrying and transportation, your appliance must be kept in original box in order to protect its components from damage.
- Keep the appliance in
normal position during carrying.
- Do not drop the appliance during transportation and protect it from impacts.
- Failures and damages occurred during transportation after delivery of product to customer are not covered by warranty.
Liability Limitation
All technical information, user instructions, information about operation and maintenance of the appliance contained in this manual are the most up-to-date information available. Manufacturer does not assume any responsibility for damages and injuries that may occur as a result of non-compliance with the instructions given in this manual, using the product for purposes other than its intended use, unauthorised repairs, unauthorised modifications on the product and using spare parts and accessories that are not approved by the manufacturer.
Specifications
| Model | Cylinda KAB1BLCylinda KAB1SS |
| Operating Voltage (V), Frequency (Hz) | 220-240 V AC50-60 Hz |
| Length of power cord 80 | cm |
| Weight 2.8 kg | |
| Dimensions (WxDxH) | 240x272x316 mm |
| Maximum amount of coffee powder/water | Powder Coffee: 70 g water: 0,25 1,25 Lt |
This product is in compliance with the European CE Directives 2 014 /30 /EU (Electromagnetic Compatibility Directive) and 2 014 /35 /EU (Low Voltage Directive). This appliance conforms to Regulation on the Supervision of the Waste Electrical and Electronic Equipment.

- Technical specifications and this manual are subject to change without prior notification.
- This appliance conforms to the WEEE regulation.
General Appearance
This illustration is intended for providing information on the components of the appliance only. Components may differ as per appliance model. Illustrations are representative.

- Water Tank Cover
- Coffee Brewing Head
- Water Tank
- Water Level Indicator
- LED Display
- Warm-Keeping Plate
- Powder Coffee Container Holder
- Powder Coffee Container Cover
- Filter Basket
- Funnel
- Funnel Holder
- Drip Adjustment Button
- Carafe
- Coffee Level Indicator
- Number of Cups Selection Button/ Programmable Timing Button
- Hour Adjustment Button
- Descaling Indicator
- Programmable Timing Indicator
- Warm-Keeping Off Indicator
- Coffee Brewing Indicator
- Minute Adjustment Button
- Start Cancel Button/ Warm-Keeping Off Button
- Measuring Spoon
Digital Control Panel and LED Display

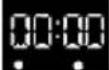
 | Current Setting Indicator of Internal Clock and Timer |
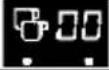
 | Number of Cups Indicator |
 | Descalina Indicator |
 | Programmable Timing Indicator |
 | Warm-Keeping Off Indicator |
 | Coffee Brewing Indicator |
Buttons
- 📋/∅Number of Cups Selection Button/ Programmable Timing Button:
Short press to choose desired number of cups to brew. Long press to turn on timing function. When timing is activated, this button will illuminate white While brewing or during 40 minute warm-keeping, press and hold to extend warm-keeping time 2 hours.
- Hour Adjustment Button: Press to set clock time.
-
⏻ Minute Adjustment Button: Press to set the minutes.
-
⏻/※ Start Cancel Button/ Warm-Keeping Off Button:
Start or stop operation. This button will be illuminated white during operations. While standby, press and hold to turn off heating plate.
- Drip Adjustment Button:
You can adjust it to your preference by turning the knob to adjust the flow rate, quantity and strength of the brewed coffee according to the number of cups.

Before Initial Operation
- When using your appliance for the first time, you may smell an odor caused by the material used in your appliance. This odor will vanish in a short time.
- Check that all accessories are complete and the appliance is not damaged.
- Remove the funnel and other removable parts, clean them with warm water. You can also use detergent if necessary. After installing all the parts in their places, put cold water in the water tank paying attention not to exceed the maximum level.
- Do not put coffee and filter paper.
- Plug the appliance in. Press the Start/Cancel button and boil until there is no water left. Repeat this process 2 - 3 times to clean the coffee machine.
Operation
- Open the water tank cover of the appliance, fill enough amount of water into the water tank with the carafe. The water level must not exceed the level marked “MAX” (the number 10). Each line corresponds to 2 cups of coffee 125 ml each and a maximum of 10 cups of coffee 1250 ml each can be prepared in total.
- NOTE: Since the coffee will absorb some of the water, the amount of coffee you will obtain will be less than the water you put in the machine.
- Coffee Brewing Head, Fu nnel, Funnel Holder and Carafe must be assembled correctly in position before brewing.
- Do not remove the Coffee Brewing Head, Funnel, Funnel Holder and Carafe during brewing.
- Open the water tank lid and fill the water tank with fresh cold water and then close the water tank lid. Ensure that the water will not run out of the rear opening of the water tank. Do not fill the water tank above the “MAX” filling level.
- Place the 1/4 (size 4) paper filter into the funnel.
NOTE: You can take out the funnel holder for filling the coffee powder before brewing. To do this, use the handle to pull the powder coffee container cover out from under the coffee brewing head. Then turn the funnel holder counterclockwise until it detaches noticeably. Pull the funnel out from under the coffee brewing head. - NOTE: To insert the funnel holder back into the powder coffee container holder, turn it clockwise until it locks into the holder and
install it.
- Place the carafe horizontally on the warm-keeping plate. Remember to open the drip adjustment button clockwise to avoid water spill before brewing. You can adjust the coffee strength using the drip adjustment button based on your personal taste.
- Connect the device's power cable to the power supply. The LED display illuminates showing the default time setting "0:00" to remind you, that the internal clock should be set. After approx. 30 seconds, the appliance switches to standby mode automatically and internal clock will be shown continuously.
- NOTE: It is not crucial to set the internal clock of the appliance if you wish to start the brewing cycle manually. However, if you wish to use the timer, you should set the internal clock correctly, because the internal clock is used for estimating and specifying the demanded starting time.
- Choose the desired number of cups (2/3/4/5/6/7/8/9/10) you want to brew, the machine will dispense water according to the selected cup size, and will not use up the water in the water tank by default.
- Short press to select the cup size, press once to increase the cup size; 10 cups is maximum capacity.
- NOTE: Each cup uses 125ml of water. For example, 8 cups will use 1L of water and 10 cups uses 1.25L of water.
- Press the button once, the white indicator illuminates and then the appliance will begin working. While brewing, 📋icon will light up on LED display. The brewing process can be interrupted by pressing the ⏻/❄ button again.
- Remove the carafe to serve when brewing is complete. You can tell when icon disappears on the LED screen. Before removing the carafe, close the drip adjustment button anticlockwise to “drip stop” position.
- You can just take out carafe, pour and serve at any time after turning
the drip adjustment button anticlockwise to “drip stop” position. If coffee is still brewing, you should check and make sure the funnel and funnel holder doesn’t overflow with water.
- We recommend to enjoy the freshly brewed coffee after the brewing process is finished. The coffee maker will enter “warm-keeping” mode for 40 minutes automatically if it is connected to power. While in “warm-keeping” mode, 🏠/❄ button will illuminate with white. If you wish to turn off warm-keeping, press 🏠/❄ button once, the white indicator will turn off.
NOTE: If you wish to extend warm-keeping time to 2 hours. While brewing or during 40 minute warm-keeping, press and hold to extend warm-keeping time 2 hours. A dot appears on the display.
NOTE: If you wish to drink iced coffee, you can fill the carafe with ice. ⏻/※ Press and hold for 3 seconds, ✝ icon will light up on screen, when ✝ icon is on, warm-keeping function will not operate. Your coffee will directly pour onto the ice, enjoy your ice coffee.
To turn off this function, while stanby mode press and hold for seconds again, *con will disappear.
FEATURES OF COFFEE MAKER
Cups Selection
You can choose the desired number of cups (2/3/4/5/6/7/8/9/10) the coffee maker brew each time, the machine will dispense water according to the selected cup size, and will not use up the water in the water tank by default. Short press 📋/💡 to select the cup size, press 📋/💡 once to increase the cup size; 10 cups is maximum capacity.
NOTE: 125 ml of water is used for each cup. For example, 8 cups will use 1L of water and 10 cups uses 1.25L of water.
Drip Adjustment
The drip speed control is a special highlight of the coffee maker designed for controlling the taste of your coffee. The maximum intake volume of the filter basket is 500 ml (0.5 litres, including water and coffee powder). When filling only up to 400-450 ml of fresh water into the water tank for operation (approx. 4 cups) getting a filling level somewhat below the 0.5 marking, you can freely select the dripping speed or even completely close the drip adjustment button without any concern. This way, you may get an even stronger coffee with
increasing bitterness. With the drip speed control set to high dripping speed, the hot water will run through the coffee powder even faster leading to a mild, more digestible low-acid coffee.
The special combination of drip speed control, manually operated drip adjustment button, and freely selectable type of coffee container enables you to get several cups of coffee with differing taste by only one single brewing cycle.
Warm-keeping function
Immediately after starting the brewing cycle the warm keeping plate will be heated to pre-heat the carafe. When using the provided carafe and leaving it on the warm keeping plate after brewing, the coffee will be kept at approx. 80 - 85°C
NOTE: When using other containers than the provided carafe, the coffee temperature within your container depends on type, shape and material of the container used.
NOTE: You cannot switch on the warm keeping plate separately without starting a brewing cycle and therefore without filling water into the water tank.
Automatic Turn Off
To save energy and for your safety and convenience, if you might possibly have forgotten to switch off the appliance, the appliance will switch off automatically 40 minutes after starting the brewing cycle.
In this case, the ⏻/❄ button will go out and the warm-keeping plate will cool down. If you activated extend warm-keeping for 2 hours function, the appliance will switch automatically 2 hours after starting the brewing cycle.
LED Display
The LED Display will assist you in preparing the device for programmable timing use. Usually, the current setting of the internal clock will be displayed. The appliance starts at “0:00”, every time you connect it to the power supply. Using the time setting buttons “HOUR” ⏻ and “MINUTE”
-, you can enter the actual time. However, this will only be necessary when using programmable timing.
Additionally, the descaling icon flashing on the LED display could remind you that the appliance needs descaling. At least at this point, you should perform the descaling cycle as soon as possible, because deposits of lime (scale) within the water system of the appliance will disadvantageously influence the performance and lifetime of the appliance as well as the taste of your coffee.
Programmable Timing Function
This coffee machine features programmable timing function. According to the internal 24-hours clock, with a starting time selected, the appliance can switch on automatically up to 24 hours after set-up.
Setting up the timer is performed in 3 steps: Adjusting the internal clock of the appliance, selecting the desired starting time, and activating the programmable timing feature.
Using Various Coffee Containers
When using the provided carafe, you will benefit from the specially designed carafe lid. Even with the carafe filled up to the maximum, pouring is done easy without dripping and splashing. If inserted correctly, the carafe lid will be engaged securely on the carafe and will not fall during pouring. Additionally, the flavors and aroma will be kept within the carafe as far as possible.
As the drip adjustment button is operated manually, the appliance can be used in combination with any heat-resistant, suited container. Select a container (e.g. China jug, coffee mug) of appropriate size to take the complete amount of water, you have filled into the water tank and set up the appliance as usual. However, the opening on top of the container must be sufficiently large to avoid splashing and overflow of the coffee while dripping. Additionally, the container must fit effortlessly onto the warm-
keeping plate below the filter basket.
By opening and closing the drip adjustment button via the drip speed control, you can even fill several coffee mugs in only one brewing sessions, this way getting a different taste of coffee within each mug. However, when using this feature, you should exercise special care to avoid overflow of the filter basket and coffee running unexpectedly out onto the warm-keeping plate.
USING THE PROGRAMMABLE TIMING FUNCTION
1. Setting the Internal Clock
For the programmable timing function of the coffee machine, you must first set the time. Otherwise, the starting point of operation cannot be determined correctly. Press the "HOUR" and "MINUTE" setting buttons to set the correct time. The internal clock of the appliance is using the 24-hours mode. Prepare the appliance for operation. When connected to the power supply, the appliance will always start at "0:00" and it will be flashing on the LED display for approx. 30 seconds to remind you, that the shown time will be incorrect. However, you can set the internal clock via the time setting buttons "HOUR" and "MINUTE" at any time you like. During time setting, "0:00" will flash on the LCD display again. By pressing the time setting buttons "HOUR" or "MINUTE" adjust the time shown on the display. With the correct time on the display, press the button shortly to confirm your setting. Anyway, after approx. 6 seconds with no button pressed, the appliance ⏻/※ will return to standby mode automatically with the currently set time.
2. Setting the Starting Time
For the programmable timing feature to run smoothly, you need to set the internal clock and then set the start time. Prepare the appliance for operation and set the internal clock as described above. Press and hold for 3 seconds. flashes on the LED Display. By pressing the time setting buttons “HOUR” and “MINUTE”, set the desired time for starting operation. When still in timer setting mode, shortly press the 📋/💡 button to confirm the current setting. With no buttons pressed for more than 5 seconds, the appliance will return to displaying the internal clock. NOTE: You can enter timer setting mode again and modify the set time again.
3. Enabling the Programmable Timing Function
WARNING: In any case, remember to prepare the appliance completely and correctly for use when enabling the programmable timing function! Otherwise,
large amounts of hot water could run out or splash, causing severe injuries and damage. Prepare the appliance for operation. Set the internal clock and the starting time for the timer as described above. Press and hold 📋/💡 for 3 seconds to activate the timer. The 🔊/💡 button will be illuminated white with the timer activated, and on the LED display “💡 will be shown with the currently set starting time. The appliance will start the brewing cycle at the set starting time automatically.
When the brew cycle is started, Programmable timing will be deactivated automatically. 📋/💡 button goes out and ⏻/❄ button lights up.
To deactivate the timer control prematurely; (button 📋/ lights up): Press button 📋/ once. button ⏻/ ✱ goes out and the timer-controlled operation is deactivated.
Checking the start time: Hold the 📋/💡 button pressed for at least 3 seconds. “
“” will be shown on the LED display with the currently set starting time. After approx. 5 seconds, the appliance will switch back to the internal clock and will be shown on the LED display again. Timer-controlled operation will be activated still with the button illuminated.
NOTE: For changing the starting time, you have to deactivate timer controlled operation first.
NOTE: Even with timer-controlled operation activated, you can start operation manually at any time you like. For this, simply press the ⏻/※button. The ⏻/※button will be illuminated to indicate that the appliance is operating, while the 📋/💡 button goes out and timer-controlled operation is deactivated.
TIPS FOR A PERFECT CUP OF COFFEE
☒ A clean coffee maker is crucial for getting the optimum taste of your coffee. Thus, rinse the filter basket and carafe with hot water after each brewing cycle to remove the oils of the coffee. Regularly, thorough cleaning of the appliance is necessary too. At the latest, when little droplets of oil accumulate on the surface of your coffee, the appliance needs a thorough cleaning. However, oiliness may occur more frequently, when a heavily roasted type of coffee is used.
☒ With white or sand-coloured particles or stains of lime in the water tank and/or on the coffee brewing head, the appliance needs descaling. Additionally, descale the appliance as soon as possible, when the descaling icon flashes on the LED Display during operation.
Always use fresh cold drinking water for brewing coffee. Since 98.5% of the finished coffee consists of water, the water quality means a lot to the coffee taste. Fresh water is rich in the oxygen needed to release the taste and aroma from the ground coffee. Water that has stood for a long time, or that has been heated before, is poor in oxygen and has a flat taste. The coffee will then have the same taste.
☒ You have a guarantee that the temperature of the water that comes into contact with the coffee is between 92^ - 96^ C from this coffee maker. The water attracts exactly the right amount of flavors and aromas from the ground coffee. If the temperature is lower, the coffee does not get the fullness and aroma the coffee has to offer. If it gets higher, the water will extract more caffeine and chlorogenic acid, which gives the coffee a bitter taste.
☒ Via the drip speed control you can influence the dripping speed and, therefore, the extraction time. We recommend you to adjust the drip speed control accordingly to amount of water selected for brewing.
☒ The grind size (coarse or fine) will affect the rate at which the water can flow through the ground coffee in the filter basket. The taste of your coffee may differ severely, when changing the grind size. If the grind is
too fine, the water can only flow very slowly, even when setting a high dripping speed. The result could be dark and bitter. If the grind size is too coarse the coffee may be lacking in taste, flavour and colour.
It is best to grind coffee beans directly before brewing to maximize flavour. Buy coffee beans (whole beans or pre-ground) in small batches to reduce the storage time. Coffee beans are best consumed between 5 - 20 days after the ‘Roasted On’ date.
Dose correctly. How strong you want the coffee is a matter of taste. We recommend 60g of coffee per liter of water (7.5 grams per 125ml) for 8/9/10 cups brewing. For 2/3/4/5/6/7 cups, we recommend higher coffee to water ratio. Always use coffee measure or weight.
Freshly brewed coffee always tastes best - so serve it as fast as you can. If this is not possible, be sure to store the coffee properly and serve it preferably within half an hour. After this, the taste is noticeably lost. The keep warm temperature of this coffee maker is between 80° - 85 °C which is optimal. If the temperature becomes too low, the coffee becomes dull in color and it tastes sour. If it gets too high, the coffee tastes bitter.
Cleaning and Maintenance
- Before starting the cleaning and maintenance procedure, always unplug the appliance from the outlet and let it cool.
- Avoid using abrasive cleaning agents. You can use soap to remove persistent stains.
- Do not immerse the appliance, power cord or plug in water. Do not wash in the dishwasher. To avoid electric shock, do not clean your appliance with water, use a soft and damp cloth to clean your appliance.
• After each use, clean all detachable parts with hot, soapy water. To remove stains, wipe the exterior of the product with a damp, soft cloth. - Clean the filter basket after each use. Otherwise, normal use of the
appliance may be disrupted.
- Drops of water can accumulate in the area above the funnel and drip onto the base of the product during brewing. To control dripping, after each use of the product, wipe this area with a clean, dry cloth.
- Use a damp cloth to gently wipe the hot plate.
Descaling
- You should descale the appliance regularly – at least when noticing white or sand-colored deposits in the water tank or at the riser pipe of the water tank, or on the coffee brewing head. At the latest, with the descaling icon flashing on the LED display during operation, the appliance needs descaling. Please, perform the descaling cycle according to the instructions.
- icon will light up every 40 brew cycle.
• We recommend to use descaling products made for coffee makers.
- Descaling should be done regularly to maintain perfect coffee experience.
- The complete descaling cycle will take approx. 2,5 hours.
• Empty and clean the coffee machine according to the instructions above.
- Prepare approx. 1.25 litres of the descaling solution according to the instructions given on the package. Fill the descaling solution into the water tank up to the maximum filling level (1.25). Leave the descaling solution within the appliance for approx. 1 hour.
- Without filter paper and coffee powder, prepare the appliance for operation. Connect the appliance to the mains power supply. Ensure that the drip speed control is completely open.
- Hold and press the and button for 3 seconds, until the descaling icon is flashing on the LCD display. Then wait for 5 seconds. The coffee machine will automatically start descaling process. During the process, the descaling icon will be shown continuously. Ensure good ventilation. Press button to cancel descaling cycle.
- Wait until the water tank is completely empty. Then switch OFF the appliance.
- Leave the descaling solution cool down in the carafe for approx. 15 minutes. Then pour the contents of the jug back into the water tank and wait another 15 minutes.
- Thereafter, start a normal brewing cycle but without filter paper and coffee powder (press the button shortly).
Wait until the water tank is completely empty again.
- Switch off the appliance and leave the appliance cool down for approx. 15 minutes.
- Remove all removable parts. Discard the descaling solution and rinse all removable parts under running tap water. Over a sink, turn the appliance upside down to remove any residues of descaling solution from the water system.
- Fill approx. 0.5 litres of clear, cold tap water into the water tank and thereafter turn the appliance upside down over the sink again to rinse the water system.
Troubleshooting
When you notice an abnormal situation in your appliance, you may attempt to troubleshoot according to the following descriptions.
| PROBLEM CAUSE SOLUTION | ||
| The appliance is not operating. | Not plugged in properly. Plug | it firmly. |
| No power at the outlet. Check | the fuse or power switch. | |
| Start/Cancel button is not pressed. | Press the Start/Cancel button. | |
| The appliance does not keep warm. | The ambient temperature is too low. | Use the appliance at an ambient temperature that is suitable for use. |
Disposal of the Appliance in an Environmental Friendly Manner

natural_image
Symbol of a trash bin crossed out by two diagonal lines (no text or numbers present)This marking either on the product or the information label indicates that this appliance should not be disposed with other household wastes at the end of its life. To prevent possible harm to the environment and human health due to uncontrolled waste disposal, please separate this product from the other types of waste and recycle it responsibly to promote the sustainable reuse of material resources. For information about where and how you can recycle this appliance in an environmentally friendly manner, please contact the dealer you purchased the product from and relevant local organizations. This product should not be mixed with other commercial wastes for recycling.
Recommendations on Energy Saving
Make sure the cover is completely closed when making coffee.
Pour in as much water as you need.
Customer's Elective Rights
The customer, in case the product is found defective as per the terms of Protection of the Consumers Act, No 650 2, even though the defect occurs at a later time, have the following rights for two years following the date of delivery to the customer:
1) Return the sold product and cancel the agreement,
2) Keep the sold product and request a discount on the sales price in proportion to the defect, (one of these elective rights can be used against the Seller),
3) Unless an excessive cost is required, request a free-of-charge repair of the product, with all costs belonging to the Seller, 4) If it is possible, to replace the product with an equivalent one free-of-defect, (one of these elective rights can be used against the Seller,
manufacturer or importer).
If the free-of-charge repair or replacement with an equivalent product free-of-defects will cause a disproportional drawback for the seller then the consumer can use his right to cancel the agreement and request a discount on sales price in proportion to the defect. The customer can file their complaints and rejections at Consumer Courts and Consumer Arbitration Committees.
Manufactured in:
Guang Dong Xinbao Electrical Appliances Holdings Co., Ltd.
Adres: South Zhenghe Road, Leliu Town, Shunde District, Foshan City, Guangdong, China
Manufacturer/Importer Company:
Cylinda AB
Sollentuna, Sweden
+46 771 25 25 00
kundservice@cylinda.se
Kära kund,
natural_image
Symbol of a trash bin crossed with a diagonal line, representing waste or discharge (no text or labels)Adress: South Zhenghe Road, Leliu Town, Shunde District, Foshan City, Guangdong, Kina
natural_image
Symbol of a trash bin crossed out by two diagonal lines (no text or numbers present)Osoite: South Zhenghe Road, Leliu Town, Shunde District, Foshan City, Guangdong, China
DA-111
natural_image
Symbol of a trash bin crossed with no text or labels
Adresse: South Zhenghe Road, Leliu Town, Shunde District, Foshan City, Guangdong, Kina
Producent/Importfirma:
Cylinda AB
Kjære kunde,
- Vanntank-lokk
- Kaffebryggehode
- Vanntank
- Vannivåindikator
- LED-skjerm
- Varmholdende tallerken
- Beholderholder for pulverkaffe
- Beholderdeksel for pulverkaffe
- Filterkurv
- Trakt
- Traktholder
- Knapp for dryppejustering
- Karaffel
- Kaffenivåindikator
- Knapp for timejustering
- Avkalkingsindikator
- Programmerbar tidsindikator
- Kaffebryggingsindikator
- Knapp for minuttjustering
-
Måleskje
-
Knapp for valg av antall kopper / programmerbar tidsknapp.
-
Indikator for avslått varmefunksjon
-
Start/stopp-knapp / Knapp for avslått varmebevaringsfunksjon
Digitalt kontrollpanel og LED-display

 | Gjeldende innstillingsindikator for intern klokke og timer | |
 | Antall kopper-indikator | |
 | Avkalkningsindikator | |
 | Programmerbar tidsindikator | |
 | Indikator for avslått varmefunksjon | |
 | Kaffebryggingsindikator |
Knapper

natural_image
Symbol of a trash bin crossed out by two diagonal lines (no text or numbers present)Guang Dong Xinbao Electrical Appliances Holdings Co., Ltd. Adresse: South Zhenghe Road, Leliu Town, Shunde District, Foshan City, Guangdong, Kina
Service: Nationwide service in Sweden Visit www.cylinda.se Call 0771-25 25 00
Declare: Model code, Serial number, Purchase date, Problem description, Name and address, Phone number
Contact us: www.cylinda.se
- Dear Valued Customer,
- Contents
- Safety Warnings....1
- Specifications 14
- General Appearance 15
- Digital Control Panel and LED Display.... 18
- Before Initial Operation 20
- Usage 21
- Cleaning and Maintenance....23
- Troubleshooting 39
- Safety Warnings
- Safety Information to be Considered when Using the Appliance
- Safety Information to be Considered when
- Performing Cleaning and Maintenance Procedures
- Points to be Considered
- during Carrying and
- Transportation
- Liability Limitation
- Specifications
- General Appearance
- Digital Control Panel and LED Display
- Buttons
- Before Initial Operation
- Operation
- FEATURES OF COFFEE MAKER
- Cups Selection
- Drip Adjustment
- Warm-keeping function
- Automatic Turn Off
- LED Display
- Programmable Timing Function
- Using Various Coffee Containers
- USING THE PROGRAMMABLE TIMING FUNCTION
- Setting the Internal Clock
- Setting the Starting Time
- Enabling the Programmable Timing Function
- TIPS FOR A PERFECT CUP OF COFFEE
- Cleaning and Maintenance
- Descaling
- Troubleshooting
- Disposal of the Appliance in an Environmental Friendly Manner
- Recommendations on Energy Saving
- Customer's Elective Rights
- Manufactured in:
- Manufacturer/Importer Company:
- Kära kund,
- Producent/Importfirma:
- Kjære kunde,
- Digitalt kontrollpanel og LED-display
- Knapper
Brand : Cylinda
Model : KAB1SS
Category : Coffee machine