
CKSTAF90D - Freezer OSTER - Free user manual and instructions
Find the device manual for free CKSTAF90D OSTER in PDF.


| Product Type | Air Fryer |
| Brand | Oster |
| Model | CKSTAF90D |
| Display Type | Digital LED Display |
| Control Method | Touch buttons (Temperature +/- , Time +/-, Menu, Start/Cancel, Power) |
| Preset Programs | 6 presets: Fries, Chicken, Fish, Meat, Pizza, Bake |
| Temperature Range | 80°C - 200°C |
| Timer Range | Up to 60 minutes (manual mode adjustable) |
| Cooking Capacity | Up to 3 kg whole chicken; suitable for various foods |
| Basket Material | Non-stick coated, with handle |
| Tray Material | Non-stick coated removable air fryer tray with silicone pads |
| Safety Features | Auto shut-off when basket is opened; unit only heats when basket fully inserted |
| Electrical Rating | 120V ~ 60Hz (typical US specification) |
| Power Rating | 1500W (estimated typical air fryer power) |
| Power Cord Storage | Yes, underneath unit |
| Cleaning Instructions | Hand wash basket and tray; deep clean monthly with vinegar/lemon mixture |
| Warranty | One-year limited warranty |
| Country of Origin | China |
Frequently Asked Questions - CKSTAF90D OSTER
User questions about CKSTAF90D OSTER
0 question about this device. Answer the ones you know or ask your own.
Ask a new question about this device
Download the instructions for your Freezer in PDF format for free! Find your manual CKSTAF90D - OSTER and take your electronic device back in hand. On this page are published all the documents necessary for the use of your device. CKSTAF90D by OSTER.
USER MANUAL CKSTAF90D OSTER
natural_image
Oster air fryer with digital display and control buttons (no visible text or symbols on device body)MODELO MODEL
CKSTAF90D
READ ALL INSTRUCTIONS BEFORE USING THIS APPLIANCE
PRECAUCIONES IMPORTANTES
When using electrical appliances, basic safety precautions should always be followed to reduce the risk of fire, electric shock, and/or injury to persons including the following:
- Read all instructions before using this product.
- This appliance generates heat during use. Do not touch hot surfaces. Use handles or knobs. Use tongs to lift food out of the basket, or allow basket to cool and use oven mitts before reaching into the cooking basket when necessary.
- To protect against electric shock, do not place or immerse cord, plugs, or appliance in water or other liquid.
- This appliance is not intended for use by children or by persons with reduced physical, sensory, or mental capabilities, or lack of experience and knowledge, unless they have been given supervision or instruction concerning use of the appliance by a person responsible for their safety. Children should be supervised to ensure that they do not play with the appliance. Keep the appliance and its cord out of reach of children.
- Unplug from outlet when not in use, before putting on or taking off parts and before cleaning. Allow to cool before putting on or taking off parts, and before cleaning. To disconnect, turn any control to OFF, then unplug power cord from outlet. Do not disconnect by pulling on cord.
- Do not operate any appliance with a damaged cord or plug or after the appliance malfunctions, or has been damaged in any manner. Do not attempt to replace or splice a damaged cord. Return appliance to the manufacturer (see warranty) for examination, repair or adjustment.
- The use of accessory attachments not recommended by the appliance manufacturer may cause injuries.
- Do not use outdoors or for commercial purposes.
- Do not let cord hang over edge of table or counter, or touch hot surfaces.
- Do not place on or near wet surfaces, or heat sources such as a hot gas or electric burner, or in a heated oven.
- Extreme caution must be used when moving an appliance containing hot oil or other hot liquids.
- The heating base is subject to residual heat from cooking cycle. Do not touch heating base immediately after using. Allow to cool before handling.
- Use caution when removing the basket during or after a cooking cycle. Escaping steam can cause burns.
- Do not use appliance for other than intended use. Misuse can cause injuries.
- Intended for household countertop use only. Keep 6 inches (152 mm) clear from the wall and on all sides. Always use appliance on a dry, stable, level surface.
- WARNING: Spilled food can cause serious burns. Keep appliance and cord away from children. Never drape cord over edge of counter, never use outlet below counter, and never use with an extension cord.
- Do not use with a programmer, timer, wireless plug adapter or outlet that allows control remotely, or connect to a circuit that is regularly switched on and off by the utility.
- Please see the Cleaning section for instructions on how to clean surfaces in contact with food.
SAVE THESE INSTRUCTIONS
This appliance is intended to be used in household and similar applications such as:
– staff kitchen areas in shops, offices and other working environments;
– farm houses;
– by clients in hotels, motels and other residential type environments;
– bed and breakfast type environments.
NOTICES
- Some countertop and table surfaces are not designed to withstand the prolonged heat generated by certain appliances. Do not set the heated unit on a finished wood table. We recommend placing a hot pad or trivet under your air fryer to prevent possible damage to the surface.
- During initial use of this appliance, some slight smoke and/or odor may be detected. This is normal with many heating appliances and will not recur after a few uses.
LINE ART AND DESCRIPTION OF THE PARTS OF THE AIR FRYER
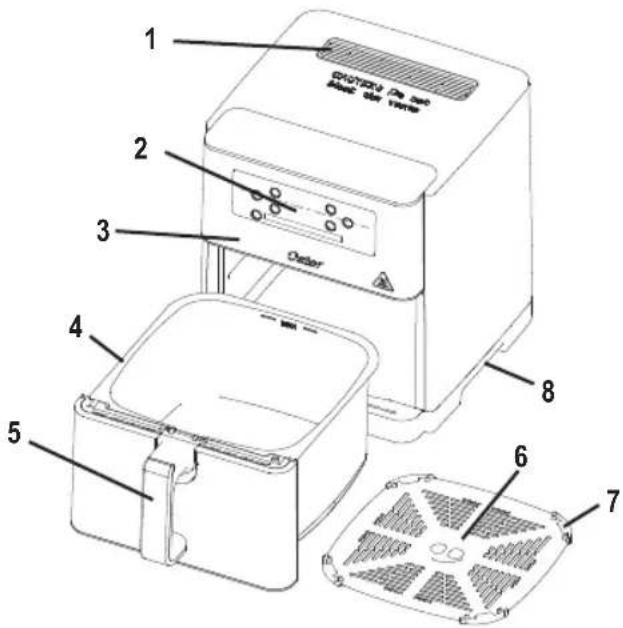
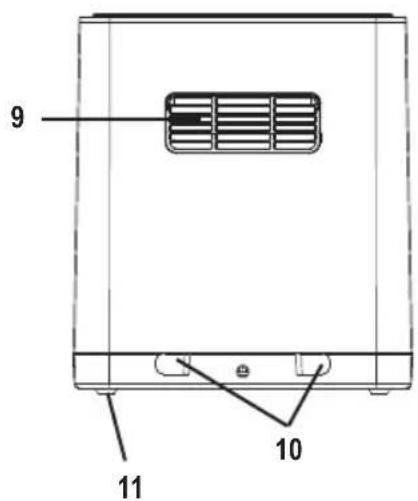
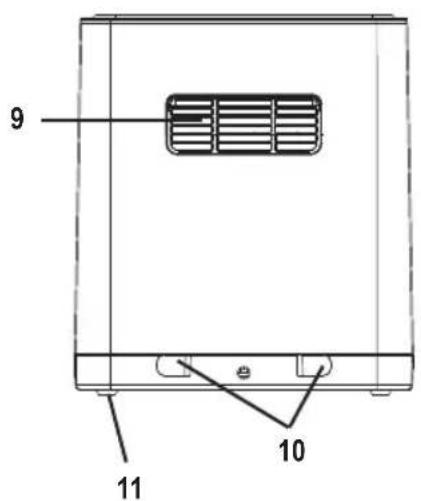
- Upper vent (air intake)
- Control panel
- Stainless Steel Bezel
- Cooking basket
- Handle
-
Non-stick coated Air fryer tray
-
Non-skid tray silicon pads
- Pick up location
- Back Vent (Outlet)
- Power cord storage
- Non-skid rubber feet
- Power Cord (Not shown)
DESCRIPTION OF CONTROL PANNEL
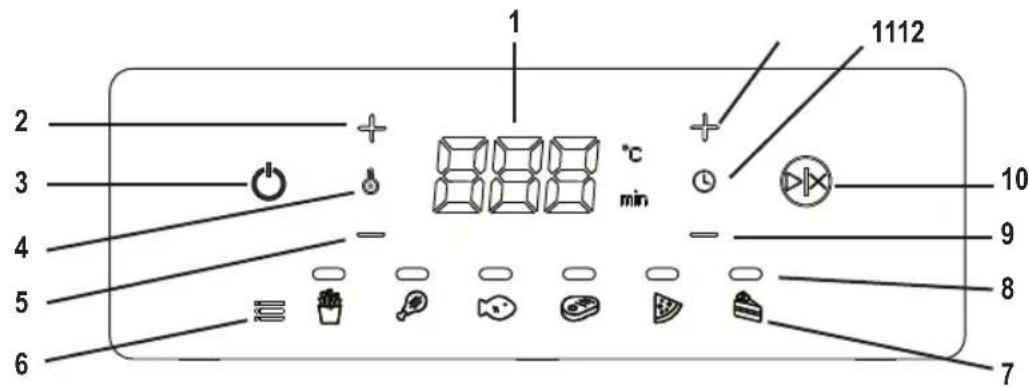
- LED Display
- Temperature Up button
- Power Button
- Temperature icon
- Temperature Down Button
-
Menu Toggle button
-
Function Icons
- Cook Function Indicators
- Decrease Time Button
- Start/Cancel Button
- Time Icon
- Increase Time Button
BEFORE FIRST USE
▲ Never immerse any part of the air fryer body, power cord or plug in water or any other liquid. Before assembling or disassembling your air fryer, ensure it is unplugged and all parts are cool.
Unpack the appliance and remove all packaging, promotional materials and stickers. Remove all printed documents. Wash the inner cooking basket and removable cooking tray with hot, soapy water. Rinse then dry all of the parts. Lightly cover the entire cooking surface, including the cooking grate, with cooking oil. Turn on the appliance and warm to maximum heat. Then turn off and cool completely. Clean excess oil off with hot water without rubbing. Finally, dry the surface with a dry cloth. Now the air fryer is ready to be used.
USAGE INSTRUCTIONS
Preparing Your Air Fryer
- Remove all packaging materials, stickers and labels in and on the unit.
- Wash all accessories and wipe the inside of the unit with a damp cloth.
- Place unit on a flat surface.
- Plug the air fryer into an electrical outlet. Unit will enter stand by mode
- Press the Power button to turn the unit on, unit will enter function selection mode. The default setting is Fries (200C and 18mins), you may start cooking using this default setting by pressing the Start/Cancel button OR you may manually adjust the Time and temperature (See Manual Mode), OR you may switch the setting using the Menu button See Preset Mode).
MANUAL MODE
Your air fryer allows you to adjust the temperature and time in any setting using the temp up/down ⏻ and time up/down Ⓑ buttons. Use these buttons when a recipe calls out for a specific cooking time or to adjust based on food quantities.
-
In any setting, press the Plus or Minus signs next to the temperature 🔊 and time 🔒 icons to adjust to desired temperature and time.
-
Use the handle to gently pull the cooking basket, ensure the cooking tray is properly in place and place the food in the basket. Replace the cooking basket back into the air fryer properly.
-
Then press the Ⓜ for the air fryer to begin working
Note: The air fryer will not start heating up unless the cooking basket is fully closed. To pause the cooking cycle slightly open the cooking basket, to cancel the cooking cycle and/or select a different setting, press the button and select the new setting, the time and temperature can be adjusted at any time, even while the unit is running.
-
Once timer is up, the unit will beep to inform cooking cycle is complete. Pull the basket out of the appliance and place it on a heat resistant surface. Check if the foods are ready. If not, simply put back into the Air Fryer and set the time for a few extra minutes.
-
When the food is ready, carefully pull the cooking basket from the air fryer and empty food into serving bowl or plate. Be careful that the cooking tray does not come loose. Air fryer basket will be hot. Use tongs to lift food out of the basket, or allow basket to cool and use oven mitts before reaching into the cooking basket when necessary.
- Do not use metallic utensils to take food out from the cooking basket.
PRESET MODE
- Use the Menu button (☐) to choose the desired Preset from the 6 available pre-programmed settings: – Fries (☐), chicken (☐), fish (☐), meat (☐), pizza (☐), bake (☐). Temperature and time will automatically appear and the LED above the selected preset will light up. Note: Time and temperature can be adjusted for any setting.
- Use the handle to gently pull the cooking basket, ensure the cooking tray is properly in place and place the food in the basket. Replace the cooking basket back into the air fryer properly and press the ⏻ button. Note: The air fryer will not start heating up unless the cooking basket is fully closed. To pause the cooking cycle slightly open the drawer, to cancel the cooking cycle and/or select a different setting, press the ⏻ button and select the new setting, the time and temperature can be adjusted at any time, even while the unit is running.
- To ensure crispiness, some foods require shaking halfway through the cooking process. To do this, pull the cooking basket out of the appliance by the handle and gently shake/stir the food. Then slide the basket back into the Air Fryer and continue to cook.
- Once timer is up, the unit will beep to inform cooking cycle is complete. Pull the basket out of the appliance and place it on a heat resistant surface. Check if the foods are ready. If not, simply put back into the Air Fryer and set the time for a few extra minutes.
- When the food is ready, carefully pull the cooking basket from the air fryer and empty food into serving bowl or plate. Be careful that the cooking tray does not come loose. For larger more fragile items, use tongs to lift the food out of the basket. Use oven mitts when reaching into the cooking basket is necessary.
- Do not use metallic utensils to take food out from the cooking basket.
PRESET MODE
| Preset | Fries | Chicken | Fish meat | Pizza | Bake | |
| Time 18 min 200C 180C 200C | 2 min 16 min 15 | min 16 min 12 | min | |||
| Notes Best for frozen French fries. If using fresh, hand cut potatoes, please see cooking chart.Arrange frozen fries in a layer (about 650 - 700 grams), open basket and shake well midway through the cooking process.For extra crispiness add 5 more minutes at the end of the cycle. | 180C 160C | Best for natural/raw chicken wings (approx. 0.9kg). Pat dry and season, let marinate and arrange in a layer over the air fryer tray, allow for enough space between wings for the air to circulate.Flip half way through the cooking process and allow to rest for 3 minutes. | Best for large fillets of fresh fish (0.5 - 0.6kg ). Pat dry and marinate, pre-heat for 3 min then place fish inside and cook for 13min. Tip: To facilitate inserting and removing the fish, use aluminum foil or waxed paper, trimmed longer than the base of the basket to grab easily to remove and place food inside. | Pat dry steak,marinate with salt and desired condiments in a sealed bag, allow 30 min for marinating then pat dry again. Pre-heat air fryer for 3 min and place steak inside, let cook for two minutes and flip. Flip one more time half way through the cooking process.This preset cooks steak to well done - light pink middle. Best for steaks 1/2-1 inch thick | Best for frozen thick crust pizza.Pre-heat for 3 min and insert pizza, allow for enough room between pizza and the sides of the cooking basketfor air to go through.Place pizza directly on the air fryer tray. | Best for:Baked potatoes.Muffins.Cakes and other baked goods might require additional baking time.Test mix with tooth pick or butter knife at the end of the cooking time. If knife or tooth pick does not come out clean, add additional time and verify again. |
TABLE OF WEIGHTS AND COOKING TIMES
| Food Weight (kg) Function Temp Time (min) Oil? Notes | ||||||
| Potatoes | ||||||
| Hand cut fries 0.5 Fries 200 30 yes | Cut the potatoes in strips of approximately 5cm long x 1.5cm width by 0.5cm thick, apply 1tbsp of olive oil and salt, cook for 30 min stirring regularly (at least every 10 min). Cooking time will vay depending on the thickness of the potato strips. | |||||
| Frozen fries (thick cut) | 0.5 Fries | 200 14 No | Shake half way through cooking process | |||
| Frozen fries (Thin cut) | 0.7 Fries | 200 18 No | Shake half way through cooking process, for extra crispiness, add 3 more minutes | |||
| Baked Potatoes | 0.7 | Bake | 160 | 16 | Yes | Cover potatoes in olive oil and seasoning, place directly on air fryer tray and start baking program. Shake half way through the process |
| Meat / Poultry / Fish | ||||||
| Whole chicken | 3 Manual | 170 60 No | Pat dry chicken, season and let marinate. Set timer for 60min. For best results, flip the chicken every 15 - 20 minutes, this will prevent the skin from darkening before it's fully cooked inside.*Monitor temperature as cooking times may vary. Inside temperature should be above 75C. | |||
| Chicken wings 09 | Chicken | 200 22 No | Fresh chicken wings, pat dry and season, let marinate and arrange in a layer over the air fryer tray, allow for enough space between wings for the air to circulate. Flip half way through the cooking process and allow to rest for 3 minutes. | |||
English - 7
| Food Weight (kg) Function | Temp Time (min) Oi ? Notes | |||||
| Chicken Leg quarters | 2.5 Chicken 200 44 No | Pat dry chicken, season and let marinate. Place leg quarters on the tray with the “drum stick” facing up and cook for 22 minutes, then flip to allow a different area to be exposed to the hot air and cook for 12 minutes, then flip again and allow the opposite area to be exposed to the hot air. Cook until center temperature is 75C or higher. | ||||
| Steak (Rib eye) | 0.6 Meat 200 15 No | Pat dry steak, marinate with salt and desired condiments, allow 30 min for marinating, pat dry again. Pre-heat air fryer for 3 min and place steak inside, let cook for two minutes and flip. Flip one more time half way through the cooking process. This preset cooks steak to well done - light pink middle 7min > Medium 9min > Medum Well 12min > Well Done | ||||
| Pork chops 0.6 | Meat 200 30 | No | Pat dry and season, preaheat the air fryer for 3 minutes and place the chops on the air frying tray. Cook for 3 min and flip. Continue cooking and flip again halfway through the cooking process. | |||
| Fresh Salmon | 0.6 | Fish | 180 | 16 | Yes | Pat dry salmon, brush with olive oil, marinate with a mix of lemon juice, lemon zest, minced garlic, parsley, salt and pepper. Pre-heat air fryer to 180C for 3 minutes, then place salmon inside and cook for 16 - 19 min (depending on fillet thickness) |
| Food Weight | t (kg) Function | Temp Time | (min) Oil | ? Notes | ||
| Snacks | ||||||
| Frozen Mozzarella Sticks | 0.42 Fries | 200 8 No | Do not thaw, flip periodically until golden on all sides, allow enough space between pieces for air to circulate, do not block all the holes on the air fryer tray. | |||
| Frozen Tequenos | 0.45 Fries | 200 8 No | Do not thaw, flip periodically until golden on all sides, allow enough space between pieces for air to circulate, do not block all the holes on the air fryer tray. | |||
| Dehydrated Strawberries | 80 grams | Manual 80 | 2 cycles of 60 min | No | Slice strawberries thinly and place them on air fryer tray, flip the strawberries after the first cycle. | |
| Dehydrated Pineapple | 4 large, thinly sliced rounds of pineapple | Manual 80 | 3 cycles of 60 min | No | Slice pineapples in rounds thinly, approximately 1mm thick. If slices are too thick more time will be required. | |
| Brownie Mix 283g Bake 180 16 | No | Pre-heat air fryer for 3 min at 180C, pour mix into a pan (max 20cmx 20 cm). Place inside of air fryer (always use oven mits when handling hot air fryer). Cook for 16 min or until a toothpick or knife inserted at the center comes out clean. | ||||
English - 8
Note: Cook times are estimates and may vary based on food type, preparation, and external temperatures. Cook until crisp and golden brown.
Note: Flip/shuffle the food halfway through the cooking cycle for even cooking.
Note: Do not air fry frozen raw meats (i.e. burgers, steaks, wings).
HELPFUL TIPS / TROUBLE SHOOTING
| Problem Potential Cause Solution | ||
| Undercooked Foods Too much food | d was placed in cooking basket | To ensure proper cooking, all food must be exposed to the air coming from the fan, it's always better to arrange food in a thin layer and allow enough space between food pieces so the air can go through. Also thoroughly shaking / flipping the food is required for proper cooking. |
| Incorrect time / temperature setting | Some pre-set times are intended for thawed foods (i.e. meat and fish) and they might not be enough to fully cook frozen pieces. Follow the cooking times guide to decide the time and temperature setting required. | |
| Overcooked Foods Incorrect time/ | temperature setting | Some pre-set times are intended for frozen items (i.e. Fries and Pizza), Refer to the cooking times guide to decide the proper time and temperature setting for your condition. |
| Unit does not start Cooking basket | slightly open As a safety measure, | this air fryer will not function unless the cooking basket is fully inserted into the unit. Make sure the basket is properly in place and fully inserted and press the Start/ Cancel button ➕ |
| Verify unit is plugged in, no error code is shown on the display, a program is selected and press the start button, verify timer is counting down. | If after verifying all these items the unit is still not working, contact customer service. | |
| Burnt smell First Use It is recommended to heat Air | Fryer to 200°C for approximately 15 minutes to eliminate any manufacturing residue that may remain after shipping. | |
| Food build up Clean your air fryer frequently, preferably after each use to avoid food and grease build up | ||
| Screen not responding -- Unplug unit, wait 10 secs and | plug back in | |
| Error code on display Component failure Unplug unit, wait 10 secs and | plug back in, if unit does not work contact Oster customer service and provide error code. | |
ERROR CODES
| E1 Contact | Oster Customer Service |
| E2 Unplug unit, wait for unit to cool down, plug back in and press start button. If unit does not function, call Oster Customer Service | |
| E3 Call Oster Customer Service | |
| E4 Call Oster Customer Service | |
CARE AND CLEANING
Always unplug your Air Fryer and allow it to cool completely before cleaning it. NEVER immerse the MAIN body, power cord or plug in water or any other liquid. Never use harsh abrasive cleaners or cleaning materials.
- Carefully wipe any oil spatter from the air frier roof with kitchen paper or a slightly damp cloth. Wipe over the outer body with a clean, slightly damp cloth and dry.
- Wash the removable cooking basket, cooking tray and handle with warm soapy water using a cloth, sponge or non-abrasive brush. Dry completely before use or storage.
- To avoid grease build up on the roof and fan of the unit, it is recommended to do a deep cleaning once a month (refer to deep cleaning instructions)
Deep cleaning
- In a heat resistant bowl, prepare a mix by mixing 1 cup of water, 2 tbsp of vinegar and the juice of half a lemon or lime
- Carefully place inside the air fryer and run at 200^ C for 30 minutes
- Allow enough time for air fryer to cool down before handling, use extra caution to verify the heating element and the roof of the air fryer are cool to handle.
- Flip the air fryer upside down. Using a damp towel proceed to clean the surroundings of the heating element, fan and the whole air fryer roof surface, if necessary you can also use a small soft nylon brush (like a tooth brush) to scrub the surface and remove any baked grease.
- Do NOT use water or a wet sponge to clean this area as this could cause permanent damage to the device, only use a dry towel or slightly damp cloth.
NOTE
Oster®
For product questions contact:
Oster Consumer Service
USA:1.800.334.0759
Mexico: 1.800.506.1700
Colombia: 1.800.018.0360
Peru: 380.0199
Chile: 56225945098
Argentina: 5530.3600
www.oster.com / www.osterlatinamerica.com
© 2022 Sunbeam Products, Inc. All rights reserved. Distributed by Sunbeam Latin America, LLC, 5200 Blue Lagoon Drive, Suite 860, Miami, FL 33126. One year limited warranty – please see insert for details.
www.oster.com
Impreso en China Printed in China
P.N.NWL0001357672 Rev B
CKSTAF90D-22SEM3_GCDS-SL
Brand : OSTER
Model : CKSTAF90D
Category : Freezer