
UMG-1000 - Network router Planet - Free user manual and instructions
Find the device manual for free UMG-1000 Planet in PDF.


| Product Type | Electronic measuring instrument |
| Brand | Planet |
| Model | UMG-1000 |
| Dimensions (W x H x D) | 200 mm x 150 mm x 50 mm |
| Weight | 0.5 kg |
| Power Supply | 9V battery or AC adapter (not included) |
| Display | LCD screen with backlight |
| Measurement Functions | Voltage, current, resistance, capacitance, frequency |
| Safety Rating | CAT II 600V |
| Operating Temperature | 0°C to 40°C |
| Storage Temperature | -20°C to 60°C |
| Humidity | 0% to 80% non-condensing |
| Accessories Included | Test leads, user manual, carrying case |
| Data Hold | Yes |
| Auto Range | Yes |
| Battery Indicator | Yes |
| Overload Protection | Yes |
| Maintenance | Clean with a soft, dry cloth. Do not use solvents. |
| Spare Parts / Repairability | Contact Planet support for replacement parts |
| Warranty | 2 years limited warranty |
Frequently Asked Questions - UMG-1000 Planet
User questions about UMG-1000 Planet
0 question about this device. Answer the ones you know or ask your own.
Ask a new question about this device
Download the instructions for your Network router in PDF format for free! Find your manual UMG-1000 - Planet and take your electronic device back in hand. On this page are published all the documents necessary for the use of your device. UMG-1000 by Planet.
USER MANUAL UMG-1000 Planet
Unified Office Gateway
UMG-1000
UMG-1000W

natural_image
Exterior view of a Planet Wireless network device (no signage or text overlays)
User's Manual
Version 1.0.0
Copyright
Copyright (C) 2011 PLANET Technology Corp. All rights reserved.
The products and programs described in this User's Manual are licensed products of PLANET Technology, This User's Manual contains proprietary information protected by copyright, and this User's Manual and all accompanying hardware, software, and documentation are copyrighted.
No part of this User's Manual may be copied, photocopied, reproduced, translated, or reduced to any electronic medium or machine-readable form by any means by electronic or mechanical. Including photocopying, recording, or information storage and retrieval systems, for any purpose other than the purchaser's personal use, and without the prior express written permission of PLANET Technology.
Disclaimer
PLANET Technology does not warrant that the hardware will work properly in all environments and applications, and makes no warranty and representation, either implied or expressed, with respect to the quality, performance, merchantability, or fitness for a particular purpose.
PLANET has made every effort to ensure that this User's Manual is accurate; PLANET disclaims liability for any inaccuracies or omissions that may have occurred.
Information in this User's Manual is subject to change without notice and does not represent a commitment on the part of PLANET. PLANET assumes no responsibility for any inaccuracies that may be contained in this User's Manual. PLANET makes no commitment to update or keep current the information in this User's Manual, and reserves the right to make improvements to this User's Manual and/or to the products described in this User's Manual, at any time without notice.
If you find information in this manual that is incorrect, misleading, or incomplete, we would appreciate your comments and suggestions.
FCC Warning
This equipment has been tested and found to comply with the limits for a Class A digital device, pursuant to Part 15 of the FCC Rules. These limits are designed to provide reasonable protection against harmful interference when the equipment is operated in a commercial environment. This equipment generates, uses, and can radiate radio frequency energy and, if not installed and used in accordance with the Instruction manual, may cause harmful interference to radio communications. Operation of this equipment in a residential area is likely to cause harmful interference in which case the user will be required to correct the interference at his own expense.
FCC Caution
To assure continued compliance (example-use only shielded interface cables when connecting to computer or peripheral devices). Any changes or modifications not expressly approved by the party responsible for compliance could void the user's authority to operate the equipment.
This device complies with Part 15 of the FCC Rules. Operation is subject to the Following two conditions: (1) This device may not cause harmful interference, and (2) this Device must accept any interference received, including interference that may cause undesired operation.
CE mark Warning
The is a class A device, In a domestic environment, this product may cause radio interference, in which case the user may be required to take adequate measures.
Energy Saving Note of the Device
This power required device does not support Stand by mode operation.
For energy saving, please remove the DC-plug or push the hardware Power Switch to OFF position to disconnect the device from the power circuit.
Without remove the DC-plug or switch off the device, the device will still consuming power from the power circuit. In the view of Saving the Energy and reduce the unnecessary power consuming, it is strongly suggested to switch off or remove the DC-plug for the device if this device is not intended to be active.
Trademarks
The PLANET logo is a trademark of PLANET Technology. This documentation may refer to numerous hardware and software products by their trade names. In most, if not all cases, these designations are claimed as trademarks or registered trademarks by their respective companies.
WEEE Warning

To avoid the potential effects on the environment and human health as a result of the presence of hazardous substances in electrical and electronic equipment, end users of electrical and electronic equipment should understand the meaning of the crossed-out wheeled bin symbol. Do not dispose of WEEE as unsorted municipal waste and have to collect such WEEE separately.
Safety
This equipment is designed with the utmost care for the safety of those who install and use it. However, special attention must be paid to the dangers of electric shock and static electricity when working with electrical equipment. All guidelines of this and of the computer manufacture must therefore be allowed at all times to ensure the safe use of the equipment.
Revision
User's Manual for PLANET Unified Office Gateway
Model: UMG-1000 / UMG-1000W
Rev: 1.0 (February. 2011)
Part No.: EM-UMG1000 Series_v1.0
Table of Contents
1. Introduction......7
1.1 Product Features....8
1.2 Package Contents ......9
1.3 Outlook ...... 10
1.3.1 Front Panel 10
1.3.2 Rear Panel....10
2. Hardware Installation ......11
2.1 Hardware Installation....11
2.1.1 Removing the Chassis Cover.... 11
2.1.2 The Hard Disk Installation....11
2.2 Physical Connection....15
2.2.1 WAN Connection....15
2.2.2 LAN Port Connection 15
2.2.3 PSTN FXO Port Connection 16
2.3 Quick Setup Wizard ....17
2.3.1 First Time Login 17
2.3.2 Welcom to Quick Start....18
3. Web Management - Home 25
3.1 Overview 25
3.2 Alert Log 26
4. Web Management - User 27
4.1 User Overview 27
4.2 Deleting a User Account....28
4.3 Updating the User Setting 28
4.4 Creating a User Account ......29
4.5 Departments and Groups ....30
4.6 Deleting a Group 30
5. Web Management - Network....31
5.1 Overview....31
5.2 Internet....33
5.3 Local Network....33
5.4 Service ....34
5.5 The VPN Log....34
6. Web Management - Wireless....35
6.1 Overview 35
6.2 Wireless Setting ......36
6.3 Wireless Clients ....37
6.4 Blocking the Connected Wireless Client ....37
6.5 Wireless MAC Block List....38
7. Web Management - Storage....39
7.1 Storage Overview....39
7.2 View a Volume by SMB 41
7.3 Updating a Volume....41
7.4 Deleting a Volume 41
7.5 Creating a Storage Volume......42
7.6 Storage Setting....43
7.7 Storage Bakcup and Restore 44
7.8 The Storage Log....45
8. Web Management - PBX......46
8.1 IP PBX Overview 46
8.2 IP PBX Call Setting....48
8.3 Voice....50
8.4 IP PBX Call Rules....51
8.5 IP PBX Channel Setting 52
8.6 SIP Trunk Setting ....52
8.7 IP PBX Call Reference ....53
8.8 IP PBX Call Log ....54
9. Web Management - Email....55
9.1 Email Overview....56
9.2 Email Basic Setting....57
9.3 Email Blacklist....58
9.4 Email Alias....59
9.5 Email Forward 60
9.6 Email Log....61
10. Web Management - FTP 62
10.1 FTP Overview 62
10.2 FTP Setting 62
10.3 FTP Account 62
10.4 FTP Log....63
11. Web Server 64
11.1 Web Server Overview....64
11.2 Web Server Settings ......64
12. Web Management - Security 65
12.1 Security Overview....65
12.2 Security Setting....66
12.3 Content Filter....68
12.4 Access Control....69
12.5 Port Forwarding ....70
12.6 Security Log 71
13. Web Management - System....72
13.1 System Overview 72
13.2 System Setting....73
13.3 System Event Log....73
14. Web Management - Branch-to-Branch....75
14.1 Branch-to-Branch Setup....75
14.2 Security Channel....75
14.3 Remote Calls 75
14.4 Remote Data Synchronization ....76
14.5 Shared Services....76
14.6 Global user Profile....77
14.7 Centralized Configuration management .....77
14.8 Branch-to-Branch Overview....77
14.9 Delete a Branch....79
14.10 Branch-to-Branch Setting 80
14.11 Branch Users....81
14.12 Branch-to-Branch Log 81
15. Web Management - Maintenance....82
15.1 System 82
15.2 Software Update....83
15.3 Remote Service 83
16. Personal Account Web Administration....84
16.1 User Login 84
16.2 User Home Page....85
16.3 Access to Administrator....86
16.4 Personal Setting....86
16.5 Contract List....87
16.6 Personal Call Records....87
16.7 Call Reference 88
16.8 Logout....88
Appendix A – Console Maintenance Method 89
Appendix B – Remote Access ......90
Appendix C – Scenario Example....91
Case 1 X-Lite how to register on the UMG-1000 Series....91
Case 2_ VIP-880 VoIP Gateway how to register on the UMG-1000 Series......97
Case 3 VIP-281GS GSM Gateway how to register on the UMG-1000....102
Case 4 VIP-254 and VIP-360PT how to register on the UMG-1000....111
Case 5_ How do you setup a VPN with UMG-1000 Series....118
Case 6_ How to use LCR function on UMG-1000 Series ......127
1. Introduction
1.1 Product Features
IP PBX / VoIP Service
▶ SIP 2.0 (RFC3261)
PSTN Support
➢ Call-Parking, Echo Cancellation
FXO Disconnection Tone Detection
QoS Support
Music on Hold
Telephone Conference, 3-Way Calling
▶ Voicemail to E-mail
Forwards to Voicemail on No-Answer
➢ Supports Call Hold, Call Waiting
▶ Blacklist of Number Patterns
➢ Call Privilege Control, Call Log
450 Minutes Recording Time
Unconditional, Unavailable, Busy Call Forward
Fax Server Support
▶ Multiple SIP Trunk Support
▶ Upload Sound Files for IVR
▶ Least Cost Routing (LCR)
➢ Busy Lamp Field (BLF)
▶ Bridged Line Appearance (BLA)
E-mail Service
Supports POP3, SMTP, IMAP
▶ Secured Socket Layer (SSL)
Junk Mail Filtering
E-mail Storage Quota
▶ E-mail Alias Group Assignment
Mail Attachment Size Restriction
➢ User E-mail Storage Quota
E-mail Log Record Management
Anti-Virus and Anti-Spam
▶ Auto Backup, Auto Reply
➢ E-mail White and Black list Based on Domain
Name, User Name, and E-mail Address
Supports Web Mail
Supports Mail Service via DDNS
Internet Security Service
➢ Static IP, PPPoE, DHCP, PPTP, L2TP
➢ Web Content Filter by Domain and Keyword
▶ Access Control List (ACL)
URL / IM / P2P Blocking
▶ Firewall / NAT
IPSec / PPTP / L2TP Pass-through
DoS Attack Protection (TCP SYN Flood, UDP Flood, ICMP Flood, Ping of Death)
UPnP and DMZ
Site-to-Site SSL VPN
➢ PPTP VPN Remote Access
▶ RIP / Static Route
IP-MAC Binding
Network Storage Service
▶ Up to 1.5TB Hard Disk
Supports User Network Storage Quota
Compatible Windows 2000 / XP / Vista, Mac, Linux
➢ Scheduled Auto Backup, Auto Snapshot
Supports User / Group Privilege ACL
System Management
▶ Single Point of Management
System Logging with E-mail Alert
▶ Fast Recovery with Remote Service
Environment Monitoring
Dynamic Domain Name Services (DDNS)
▶ Multiple Domain Name Support
▶ Multiple Hostname Support
WiFi Service (UMG-1000W only)
➢ 1 x 802.11b/g/n Wireless Access Point
2 x RP-SMA Detachable Antenna
Security: WEP / WPA / WPA2
SSID
▶ Wireless 802.1x Authentication
1.2 Package Contents
■ UMG-1000 / UMG-1000W Unit x 1
■ AC Power Cord x 1
CD x 1
■ Quick Installation Guide x 1
■ HDD accessories package x 1
■ RJ-45 to RS-232 Console cable x 1
■ Antenna x2 (UMG-1000W)
If any of above items are damaged or missing, please contact your dealer immediately.
1.3 Outlook
1.3.1 Front Panel

| LED ON/OFF | Description | |
| Power | On | Power On |
| Off | Power Off | |
| Status | Flash | System operating |
| WAN | On Connect to WAN port | |
| Off Disconnect to WAN port | ||
| LAN | On Connect to 1~3 LAN ports | |
| Off Disconnect to 1~3 LAN ports | ||
1.3.2 Rear Panel

| Port Description | |
| DC 12V DC 12V, 3.75A | |
| Power Power ON/OFF button | |
| Console | Use RJ-45 to RS-232 console cable for engineer maintenance (future feature) |
| USB 2 x USB2.0 (future feature) | |
| LAN 3 x RJ-45 10/100/1000Base-T, Auto-Negotiation, Auto MDI/MDI-X | |
| WAN | 1 x RJ-45 10/100/1000Base-T, Auto-Negotiation, Auto MDI/MDI-X |
| Voice | 4 x RJ-11 (4 x FXO) |
| Antenna(For UMG-1000W) | Used to connect the external antenna for 802.11b/g/n wireless network |
2. Hardware Installation
2.1 Hardware Installation
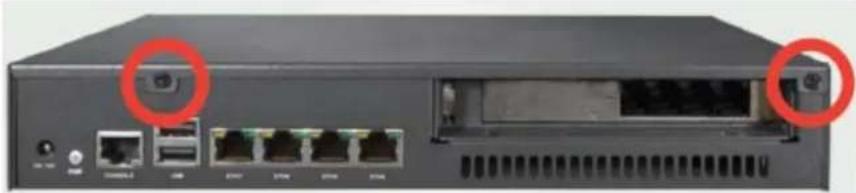
2.1.1 Removing the Chassis Cover
- The screws around the cover are used to secure the cover to the chassis. Remove these screws and put them in a safe place for later use.

■ Slide the cover backward then remove it from the chassis.

natural_image
Black rectangular electronic device with red upward arrows indicating orientation (no text or symbols)iCaution
Prior to removing the chassis cover, make sure the unit's power is off and disconnected from the power sources to prevent electric shock or system damage.
2.1.2 The Hard Disk Installation
The 2.5" SATA HDD is necessary for system operating. Please install at least 80G HDD before system configurations.
■ Remove the drive bay from the chassis.
- Insert the provided dampers on the sides of the drive bay.

■ Place the SATA drive on the drive bay.
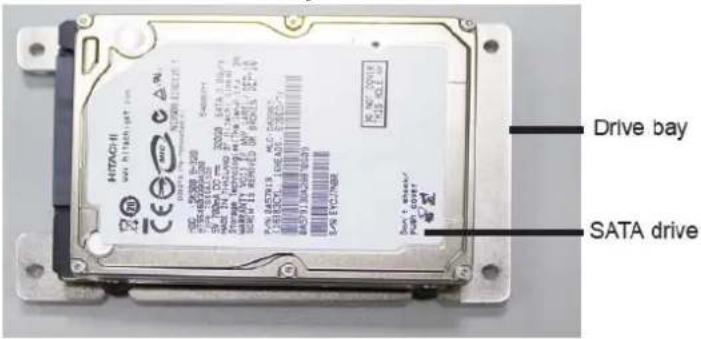
- Turn to the other side of the bay then use the provided mounting screws to secure the SATA drive to the drive bay.

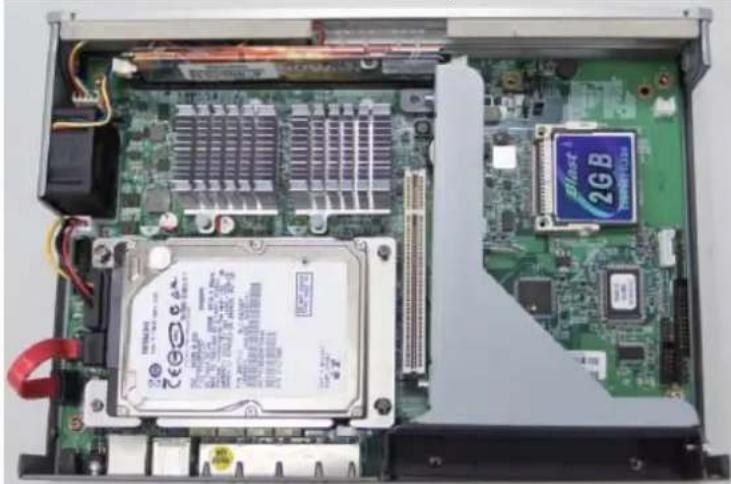
- The photo below shows the screws mounted in place.

- Locate for the SATA data connector and the SATA power connector on the motherboard.
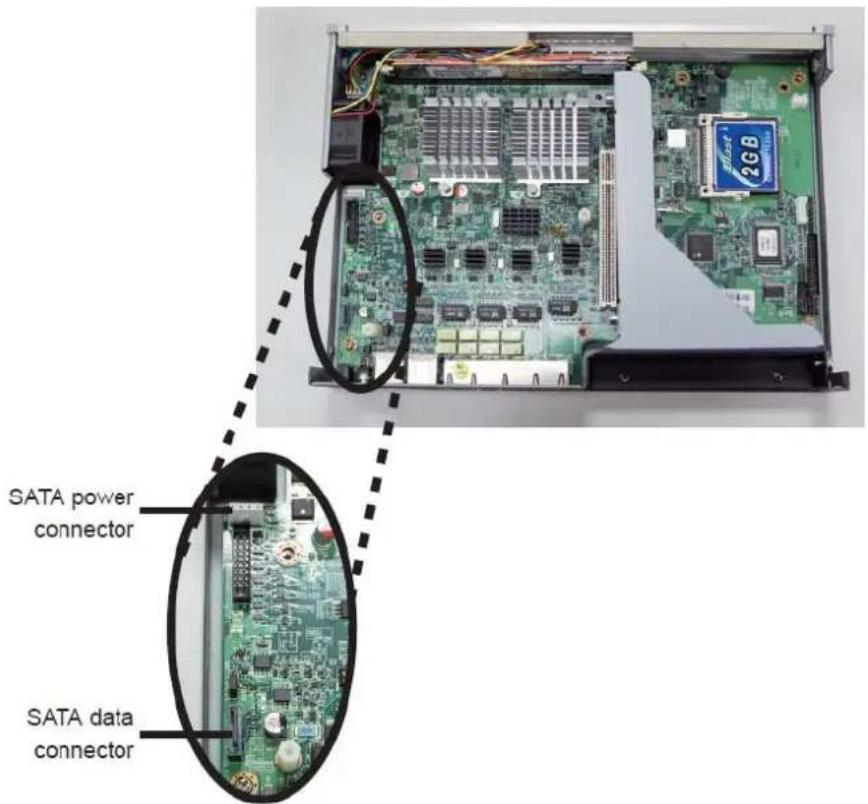
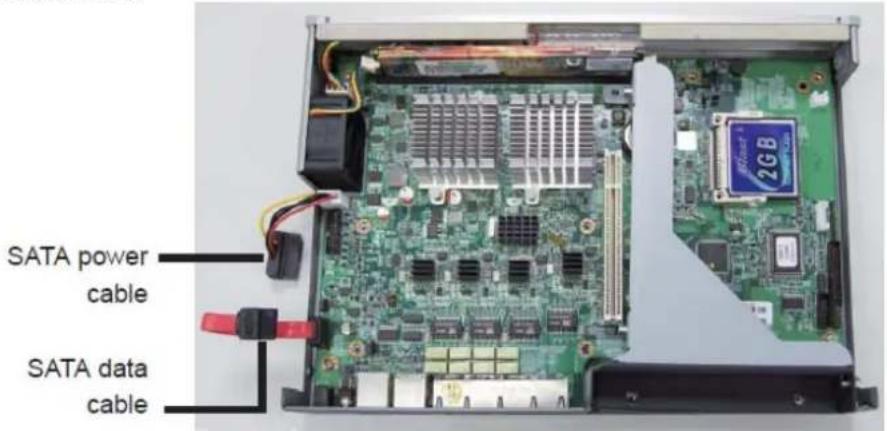
- Connect the provided SATA data cable and SATA power cable to the connectors on the motherboard.
- Locate for the mounting studs on the board.

- Align the mounting holes of the drive bay with the mounting studs on the board then use the provided mounting screws to secure the drive bay in place.
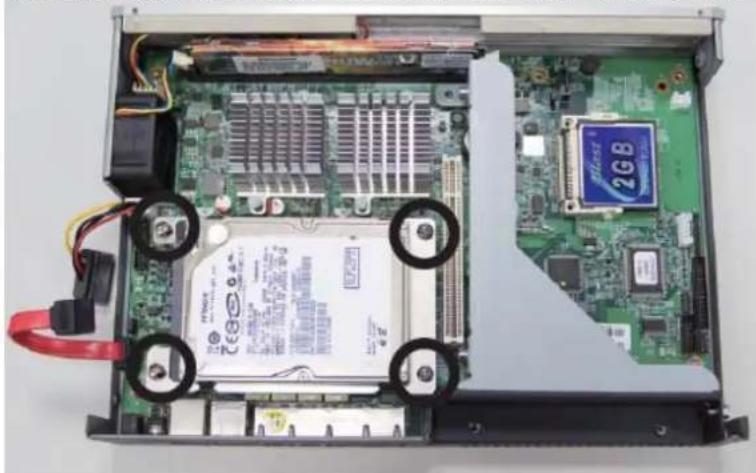
natural_image
Internal view of an open computer motherboard showing drive bays, CPU socket, and memory card (no text or symbols visible)Connect the SATA data cable and SATA power cable to the SATA drive.
natural_image
Interior view of an internal computer motherboard showing CPU socket, RAM slots, and a Elaser 2GB chip (no text or symbols visible)- Putting the cover back to the chassis and lock the screws.
natural_image
Front view of a network switch device showing ports and connectors (no visible text or labels)2.2 Physical Connection
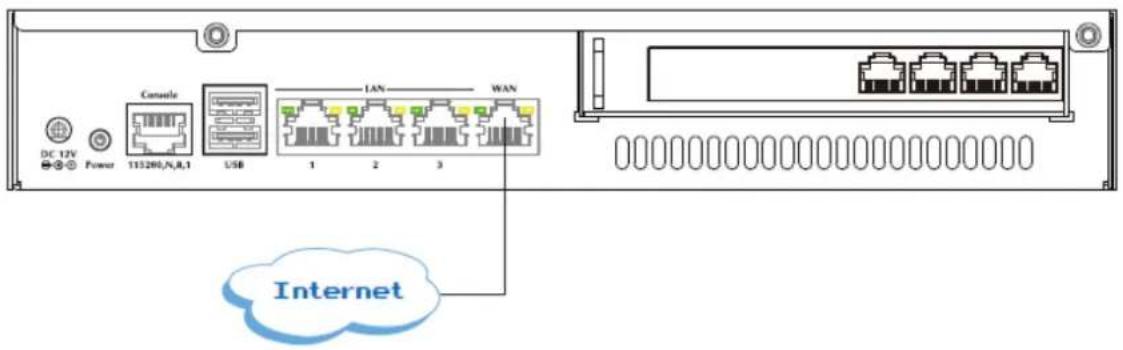
2.2.1 WAN Connection
- Locate the WAN port on the rear panel.
- Connect the WAN port with the Ethernet cable.
2.2.2 LAN Port Connection
- There are 3 Ethernet ports on the rear panel. It is recommended to connect the third party switches to the LAN port to expand the LAN ports.

flowchart
graph TD
    A["PC"] --> B["IP Phone"]
    C["Console"] --> D["11280,N,A,T"]
    E["USB"] --> F["1"]
    G["LAN"] --> H["3"]
    I["WAN"] --> J["1"]
    K["Switch"] --> L["PC"]
    M["Switch"] --> N["IP Phone"]
2.2.3 PSTN FXO Port Connection
- Locate the voice port of the PSTN adapter on the rear panel.
■ The Analog PSTN port may vary from 4 FXO ports.
■ Connect one or more telephone cables to one of the selected FXO port.

2.3.1 First Time Login
Now that the network connection between your PC and UMG-1000 Series has been established, you must login in order to access PLANET View.
Launch a web browser (for example: IE, Firefox etc.) and type the UMG-1000 Series IP address in the address bar. The default address is "http://192.168.1.1".
If you can not see the following login page, recheck your physical LAN connection and repeat Section 4.2 LAN Connection. To avoid web-based management abused by unauthorized users, the login sessions will logout automatically if the session is inactive for more than 5 minutes. Type in an authorized username and password and then click the button "Apply". The default username is "admin", and its password is "admin" all in lower case.

2.3.2 Welcom to Quick Start
After the first login, an easy and short quick start up should be completed to make the UMG-1000 Series service normally. There is an alternative selection in the page "Welcome". One selection is for "Quick Start" and the other is for "Faster Recovery UMG to UMG" which will be explained in the user's manual. The quick start includes five steps which will lead administrator to setup the UMG-1000 Series. Check the first radio box and then click the button "Start" to continue.
![Welcome Thank you for choosing PLANET UMG products. You will be walking through the basic system setup in 5 quick and easy steps, including: 1. Create Company Profile 2. Activate UMG Services 3. Setup Internet Connection 4. Setup Storage 5. Confirm Please click on [ Start ] when you are ready.](/content/2026/05/1015190/images/e2a626a46095eb3b4a0c98d1c2997f9b1f820290369662daa0d1798ccebe9fa1.jpg)
Step 1: Create the Company Profile
This page allows an administrator to build a company profile. Specify the profile and then click the button "Next" to go to step 2.

| Item Description | |
| Company Specify your company name. | |
| Location Specify your city name. | |
| Country Specify your country name. | |
| Time Zone Specify the time zone. | |
| PBX Extension | Specify the prefix of the extensions. All PBX extensions will be prefixed with this number. (X=0~9). |
Step 2: Activating UMG-1000 Series services
The UMG-1000 Series allows the administrator to activate the service on demand. By default, all services are inactive. The administrator can activate the service in this page by checking the radio box of the corresponding service. The activated services will start up by using the default configuration after the quick start. Click the button "Next" to go to step 3.

| Item Description | |
| PBX Enable or disable the IP PBX service. | |
| PPTP VPN Enable or disable the PPTP VPN service. | |
| Email Enable or disable the Email service. | |
| Network Storage | Enable or disable the network storage service. |
| Internet Domain Name | Specify a valid Internet domain for the email server if the email service is enabled. |
Step 3: Setting up the Internet Connection
This page allows the administrator to quickly setup the WAN connection. To setup the Internet connection, you should be awarded of what method you are using to connect to the Internet. All technical information should be provided by your Internet Service Provider (ISP). The ISP type should be one of the followings: static, DHCP, PPPoE or PPTP. Select your ISP type in the drop down menu. Specify the Internet connection configuration and then click the button “Next” to go to step 4 or click the button “Skip” to skip this step.
AUTO DETECT ISP TYPE
By clicking the button "Detect", you can make the UMG-1000 Series to recognize the ISP type automatically.

It may take a while to detect your ISP type. Please wait.
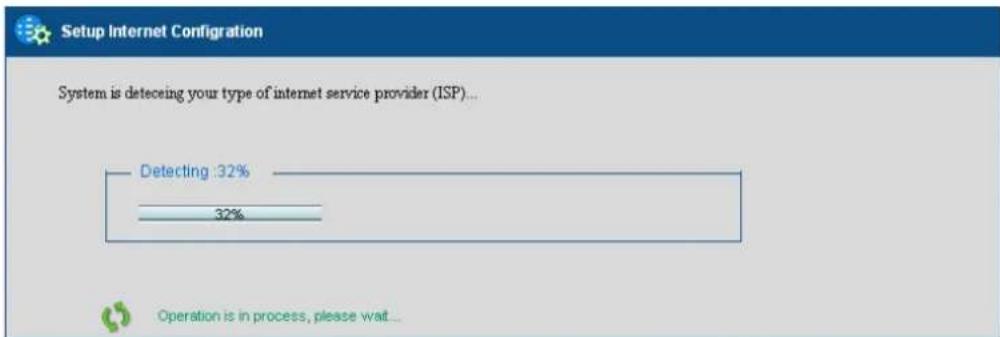
The ISP type will be detected and the result will be presented as follows. If "Network Cable Disconnected" is detected, please recheck the physical connection and repeat the action as shown in Section "WAN Connection". There could be more than one ISP type recognized, so choose the most suitable type from the list and then click the button "Next" to continue.

MANUAL SETUP INTERNET CONFIGURATION: STATIC
If your ISP type is "Static", choose it as your ISP type and setup the configuration.

| Item Description | |
| IP Address Specify the static IP address. | |
| Subnet Mask Address Specify the subnet mask address. | |
| Default Gateway Address | Specify the IP address of the default gateway. |
| DNS Server Address | Specify the IP address of the primary and secondary Domain Name System. |
| MAC Address Show MAC | address information. |
MANUAL SETUP INTERNET CONFIRURATION: DHCP
If your ISP type is "DHCP", choose it as your ISP type and setup the configuration.
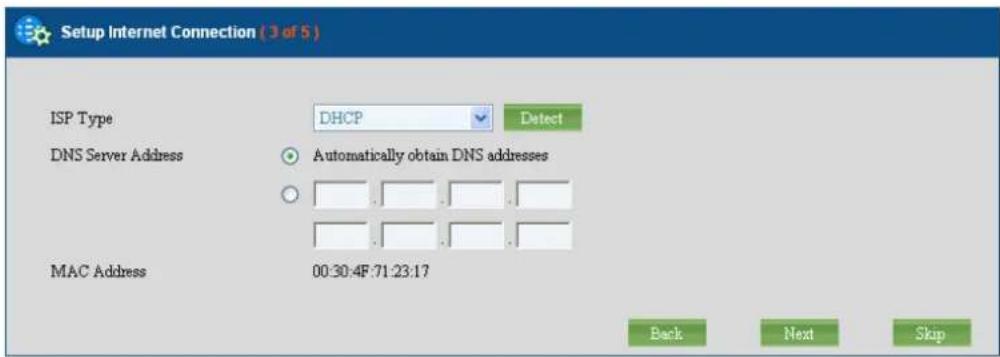
| Item Description | |
| DNS Server Address | Automatically obtain the DNS address or specify the IP address of the primary and secondary DNS server. |
| MAC Address Show MAC address information. | |
MANUAL SETUP INTERNET CONFIRURATION: PPPOE
If your ISP type is "PPPoE", choose it as your ISP type and setup the configuration.
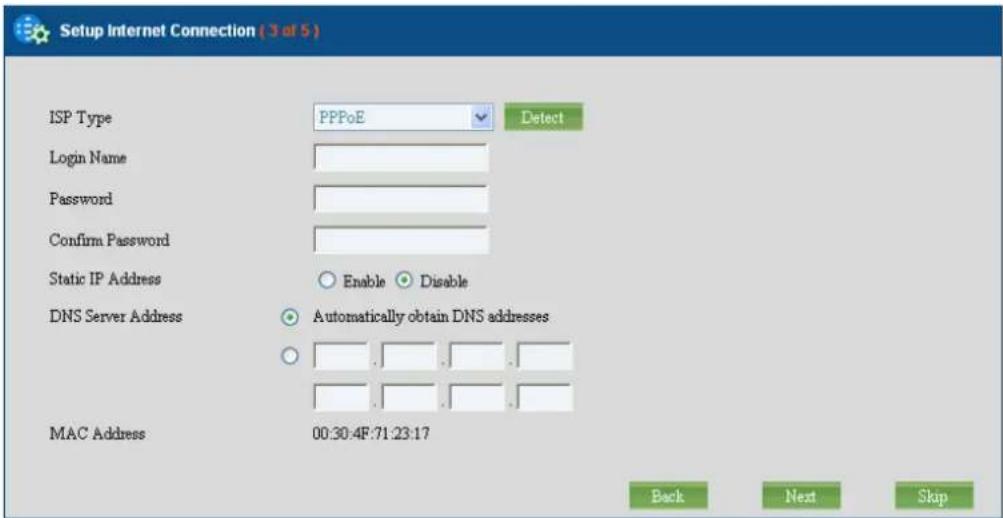
| Item Description | |
| Login Name Specify the login username to the PPPoE server. | |
| Password Specify the login password to the PPPoE server. | |
| Confirm Password Retype the password. | |
| Static IP Address Specify whether you have a static IP address. | |
| IP address | Specify your static WAN IP address if you have enabled the “Static IP Address”. |
| Subnet Mask Address | Specify the subnet mask address if you have enabled the “Static IP Address”. |
| DNS Server Address | Automatically obtain the DNS address or specify the IP address of the primary and secondary DNS server. |
| MAC Address Show MAC address information. | |
MANUAL SETUP INTERNET CONFIRURATION: PPTP
If your ISP type is "PPTP", choose it as your ISP type and setup the configuration.

| Item Description | |
| PPTP Server Specify the PPTP server IP address. | |
| Login Name Specify the username to login to the PPTP server. | |
| Password | Specify the corresponding password to login to the PPTP server. |
| Confirm Password Retype the password. | |
| Static IP Address Specify whether you have a static WAN IP address. | |
| IP address Specify whether you have a static IP address. | |
| Subnet Mask Address | Specify your static WAN IP address if you have enabled the “Static IP Address”. |
| DNS Server Address | Specify the subnet mask address if you have enabled the “Static IP Address”. |
| MAC Address Show MAC address information | |
Step 4: Creating the Network Storage
This page allows the administrator to quickly setup the storage. Because the UMG-1000 Series just could install one hard disk, so that just the "JBOD" option can be selected. Then click the button "Next" to go to step 5.
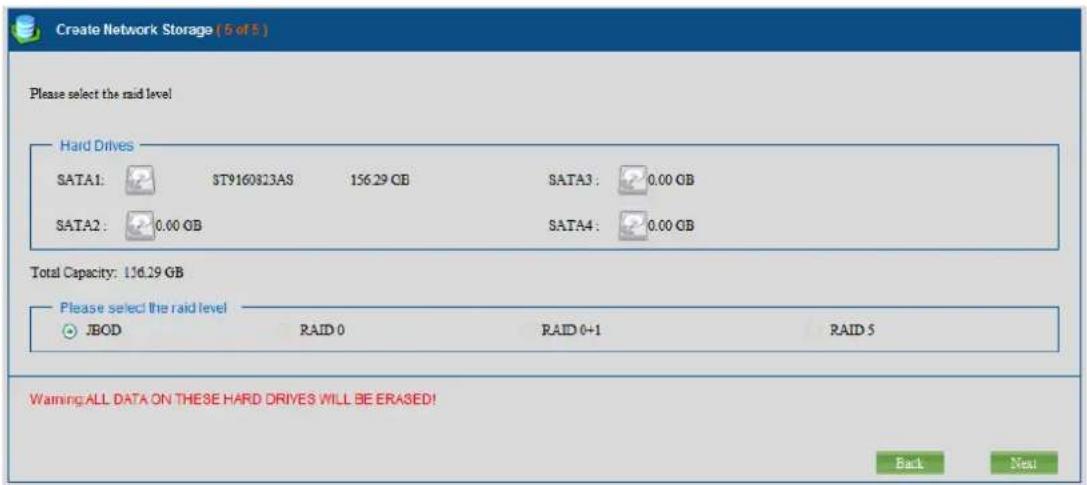
Step 5: Confirmation
Please recheck your input data to ensure the accurate. Click the button "Back" to make changes. Then confirm your data and wait for the accomplishment of the wizard. It will take a couple of minutes. Please "do not" close the browser. The browser will show the RAID building progress. After finishing the wizard successfully, the page of "Personal Account Web Administration" will automatically appear.

3. Web Management - Home
UMG-1000 Series provides a basic chassis as the hardware platform, back-end service control software and front-end web-based GUI management tool PLANET View. This chapter gives a general description of UMG-1000 Series.
3.1 Overview
The “Overview” screen presents the UMG-1000 Series system service status summary in one convenient location. You can quickly and efficiently view the important details of the system status, service state, and environment condition.

HEADER
Welcome: Displays the effective user ID.
Company: Displays the company name.
Location: Displays the location.
SYSTEM STATUS
This section lists the system status of UMG-1000 Series, including the current system information and the software, hardware versions.
Software Version: Displays the software running version number.
Hardware Version: Displays the hardware version.
Internet domain Name: Displays the Internet Domain Name configuration.
Storage Workgroup Name: Displays the Workgroup name of the Network Storage.
Deploy Mode: Displays the deployment mode: Standalone, Headquarter, or Branch mode.
System Uptime: Displays the total uptime since the last reboot.
Last Reboot Time: Displays the last system reboot time.
Current Date: Displays the current date.
Temperature: Display the current system internal temperature.
UMG SERVICE
This section lists the state and status of all the IT services.
PBX: Displays the state (enable or disable) and status (up or down) of VoIP service.
Wireless: Display the state (enabled or disabled) and status (up or down) of WiFi service.
Email: Displays the Email service state (enabled or disabled) and its status (up or down).
Firewall: Displays the Firewall service state (enabled or disabled) and its status (up or down).
Storage: Displays the storage service state (enabled or disabled) and its status (up or down).
PPTP VPN: Displays the VPN service state (enabled or disabled) and its status (up or down).
Alert: Displays the current system alert state, enabled or normal.
3.2 Alert Log
The screen displays the UMG-1000 Series alert log list. If the administrator has assigned the alert email address, the messages will be sent to the added email address.

Date: Displays the date of the alert log.
Time: Displays the time of the alert log.
ID: Displays the alert log ID.
Description: Displays the detail description of the alert Log.
4. Web Management - User
The UMG-1000 Series provides a user based service provisioning with secured access control based on the given privilege.
GROUP MANAGEMENT
Group management allows the administrator to organize groups and departments similar to the organization of your company and assign different privileges to different groups. It creates a more efficient way of managing and controlling large numbers of users.
USER MANAGEMENT
User management allows the administrator to manage the user profile. Based on the profile, the data and services of this user can be created, updated or deleted. An user provisioning services include email, voice, remote access VPN, and network storage.
4.1 User Overview
The administrator can get the overview of all the available users' profile including a brief introduction in the "Overview" page. To get more detailed information on a specific user, click the corresponding user name. (Refer to Section - Updating the User Setting.) The administrator can also delete or temporarily suspend the user's access by checking the radio box and clicking the "delete" button. (Refer to Section - Delete a User Account.)

USER LIST
This section lists all the available user information:
Username: Displays a user name.
Department: Displays the department which the specific user belongs to.
Email: Displays the email service status of the user.
PPTP VPN: Displays the PPTP VPN status of the user.
Extension: Displays the VoIP phone number of the specific user.
Call Privilege: Displays the call privilege of the specific user.
Quota: Displays the maximum quota of the specific user.
4.2 Deleting a User Account
Check the radio box and click the "delete" button. You can delete or disable the specific user account. Disabling the user account will freeze all user services without damaging the profile and data of the user. Deleting the user account will clear the entire data and profile of the user. If you want to freeze this account for a period of time, check the "Disable the user account" check box and confirm. If you want to delete the user, check the "Delete all the user's data" check box and confirm.

Note:
Delete all user account data, the user's email, voice, private data and profile will be deleted.
Please backup the data first.
4.3 Updating the User Setting
Click the username that you want to update in the "Overview" page, and the detailed user profile will appear. Change the user profile and then click the "Apply" button to update the user setting.

4.4 Creating a User Account
To create a new user account, click the "User" tab in the "User" screen. This screen allows the administrator to create a new user profile with specified service privileges.
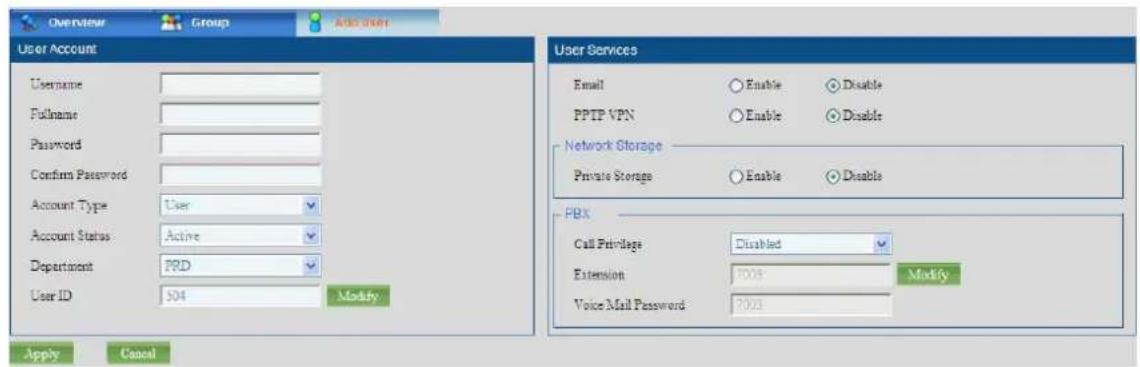
USER ACCOUNT:
This section lists all the available settings of the user profile:
User name: Specifies a user name. All user related IT services will be created based on this name. It cannot be changed once set.
Full Name: Specifies the user's full name.
Password: Specifies the user's access password. This password will be applied to all the user related services, too.
Confirm password: Confirms and verifies the entered user password.
Account Type: Specifies either a common user or admin user privilege. The user with the admin privilege can access the GUI management pages to manage the UMG-1000 Series except the storage service.
Account Status: Indicates whether the user account is in an active or suspended state. Active: all user subscribed IT services can be optionally enabled. Suspended: all user subscribed IT services are disabled.
Department: Indicates a proper group or department for the user. You can create a new group or department by clicking the "Group" tab from the "User" screen.
User ID: Specifies a unique user identifier for the user. The default value is recommended.
USER SERVICES:
This section lists all the available settings of the user services:
Email: Allows or denies user Email services.
PPTP VPN: Allows or denies a user's VPN remote access privileges.
Private Storage: Allows or denies a user's local storage access.
Storage Quota: Specifies the maximum user quota.
IP PBX phone privilege: Allows or denies a user's VoIP phone access.
Disable: Denies a user's VoIP phone access.
Local: Allows the user to dial a local external phone.
National: Allows the user to dial a national external phone.
International: Allows the user to dial an international external phone.
Extension: Specifies the VoIP phone number of the specific user which starts with the local dial prefix. It must be specified if the IP PBX phone privilege is not disabled and it cannot be changed once applied.
Voice Mail Password: Specifies the password that is used to access the voice mail. It must be specified if the IP PBX service is enabled.
4.5 Departments and Groups
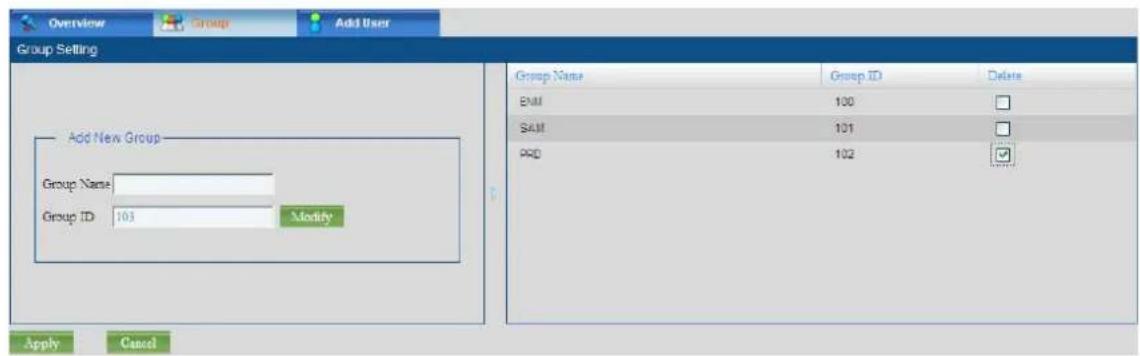
You may assemble your defined users into different groups based on different criteria. To add a new group, click the "Group" tab. The "Group Settings" screen will then appear.

GROUP SETTING
This section lists all the available settings of the group:
Group ID: Specifies the group unique identifier. The default group ID is recommended.
Group Name: Specifies a name for the group i.e. sales, marketing, or operation.
GROUP LIST
This section lists available group information:
Group ID: Displays the group ID.
Group Name: Displays the group name.
4.6 Deleting a Group
Check the check box "delete" and click the "Apply" button to delete a group.
Note:
You must delete all the members within the group before you delete the group.
5. Web Management - Network
The UMG-1000 Series network management suite provides the administrator the ability to co figurate Internet service, Local Area Network services, FTP control services, NTP service and network storage security services.
INERNET Configuration
The UMG-1000 Series provides 10/100Mbps WAN ports as the internet interface and supports static IP, DHCP, PPTP and PPPoE as the ISP type. Internet management provides the ability for the administrator to manage the configuration of the Internet interface. The UMG-1000 Series can also works as the gateway which connects the Internet and the LAN and determines where to direct the package of data that arrive at the UMG-1000 Series.
LAN Configuration
A Local Area Network (LAN) is a high-speed communications system designed to link computers and other data processing devices to share vital computing resources, such as printers, files etc. The UMG-1000 Series provides 24x4 10/100 Mbps and 2x10/100/1000 Mbps ports for LAN switching. The UMG-1000 Series also provides the Spanning Tree Protocol (STP) to prevent undesirable loops in the network.
NETWORK SERVICES Configuration
The UMG-1000 Series provides many network services, including FTP, DNS, SAMBA, NTP, DHCP etc. Network services management allows for the ability to manage the configuration of these services.
5.1 Overview
The administrator can get the overview of the network settings and the status of the network services.

INTERNET SETTING:
This section lists the current settings of the Internet:
ISP Type: Displays the ISP type.
IP Address: Displays the IP address of the WAN port of UMG-1000 Series.
Subnet Mask Address: Displays the subnet mask address.
Default Gateway Address: Displays the IP address of the default gateway.
Primary DNS Address: Displays the primary DNS address.
Secondary DNS Address: Displays the secondary DNS address.
Internet Link Speed: Displays the maximum speed of the Internet link.
This section lists all the current settings of LAN:
Connected Users: Displays the number of users that have been connected to the UMG-1000 Series.
Local Server Address: Displays the LAN IP address of the UMG-1000 Series.
Subnet Mask Address: Displays the LAN subnet mask address.
DHCP Server: Displays the state of the DHCP server, enabled or disabled.
DHCP Range Start Address: Displays the start address of the DHCP IP range.
DHCP Range End Address: Displays the end address of the DHCP IP range.
Local Network Link Speed: Displays the maximum speed of the LAN link.
INTERNET SERVICES
This section lists the service state of the WAN services:
Internet Domain Name: Displays the Internet domain name.
DNS Server: Displays the state of the DNS service, enabled or disabled.
Email Server: Displays the state of the email service, enabled, or disabled.
PPTP VPN Server: Displays the state of the PPTP VPN server, enabled or disabled.
Network Storage: Displays the state of the network storage service (SAMBA), enabled or disabled.
This section lists the service state of the LAN services:
Domain Controller: Displays whether the UMG-1000 Series is the domain controller.
Domain Work Group: Displays the Windows workgroup that UMG-1000 Series belongs to.
NTP Server: Displays the state of the NTP server, enabled or disabled.
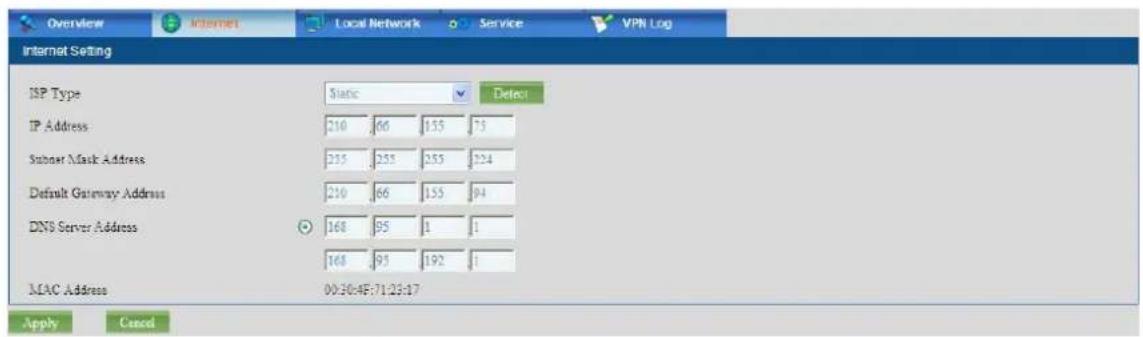
5.2 Internet
The "Internet" screen allows the administrator to change the Internet settings.
5.3 Local Network
The "Local Network" screen allows the administrator to change the Internet settings.

This section lists all the available settings of the LAN:
Local Server Address: Specifies the LAN IP address of the UMG-1000 Series Subnet Mask Address: Specifies the LAN subnet mask address.
DHCP Server: Specifies the state of the DHCP server, enabled or disabled.
DHCP Range Start Address: Specifies the start address of the DHCP IP range.
DHCP Range End Address: Specifies the end address of the DHCP IP range.
5.4 Service
The “Service” screen allows the administrator to change the setting of the network services.

INTERNET SERVICES
This section lists all the available settings of the WAN services:
Domain Work Group: Specifies the UMG-1000 Series Windows workgroup. Network Storage: Enables or disables the network storage server (SAMBA) service.
PPTP VPN Server: Enables or disables the PPTP VPN service.
NTP Server: Enables or disables the NTP service.
DYNAMIC DNS SERVICES
This section lists all the available settings of the LAN services:
Internet Domain Name: Specifies the Internet domain name.
5.5 The VPN Log
The "VPN Log" screen allows the administrator to trace the VPN logging history. The administrator can also search by using the login ID to find the user's VPN history.

VPN Log
This section lists the VPN logging history:
Date: Displays the date of the log.
Time: Displays the time of the log.
Source IP: Displays the client WAN IP
Assign IP: Displays the IP address that the server has assigned to the client.
Login: Displays the effective login ID of the client.
Event: Displays the detail description of the Log.
6. Web Management – Wireless (UMG-1000W only)
The UMG-1000W wireless suite integrates the following services: standard access point (AP), multiple layers of wireless security and client blocking.
STANDARD WIRELESS ACCESS POINT
The UMG-1000W supports three task groups in 802.11 standard working groups: 802.11b/g/n. 802.11b supports data rates up to 11 Mbps, 802.11g supports data rates of at least 20 Mbps and 802.11n supports up to 300Mbps / 2T2R.
ENCRYPTION and Security
A wireless client will connect and join the network if no encryption is enabled. However, the encryption greatly enhances the security of the connection and data transmission between the access point and the wireless client. This includes the IEEE 802.1x port-based authentication protocol, Wireless Protected Access (WPA), Wireless Protected Access –version 2 (WPA2,) Wireless Encryption Protocol (WEP). If WEP is chosen as the encrypt method, each packet is composed of the 24 bits Initialization vector and 40/104 bits encryption. Therefore, WEP encrypt length will be 64bits or 128 bits. WEP uses the RC4 stream encryption (a fresh key stream for each package). WEP, with minimal flaws, is enough to prevent most hacking. At the same time, WEP will cause often a 20-50% reduction of the wireless speed. WPA is an interim solution until the 802.11i comes out. It also uses the RC4 with the key changed to TKIP. TKIP works by generating a sequence of WEP keys based on a master key and re-keying periodically.
CLIENT BLOCKING
The wireless is the opening network system for the wireless clients and any authenticated clients can access the Wireless LAN (WLAN). However, the wireless AP can monitor the status of the connected clients and set access limitation to the clients. To temporarily block client access, the administrator can add the client MAC to the clock list. The client cannot connect to the AP unless the administrator releases the blocking.
6.1 Overview
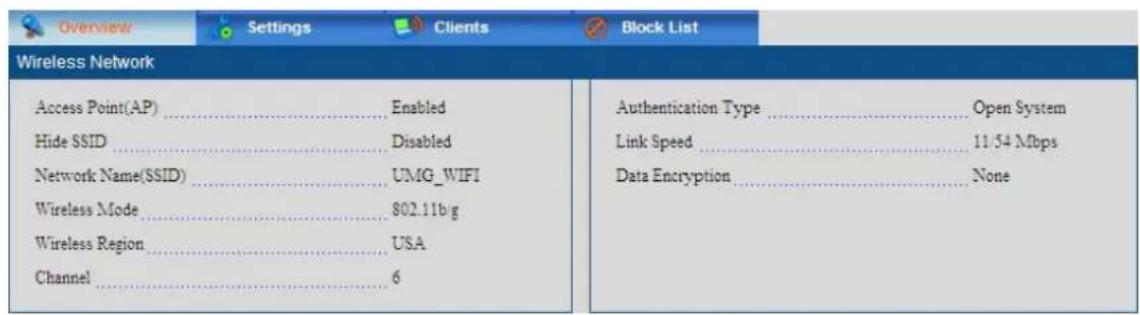
The wireless “Overview” screen presents the current wireless services status summary. The administrator can quickly view important details of your wireless Access Point services (AP) status.
WIRELESS NETWORK
This section lists all the current settings of the wireless Access Point (AP).
Access Point: Displays the wireless AP service state, enabled or disabled.
Hide SSID: Displays the visibility of the wireless AP SSID.
Network Name (SSID): Displays the SSID of this wireless network.
Wireless Mode: Displays the wireless AP supporting mode.
Wireless Region: Displays the region that the wireless AP belongs to.
Channel: Displays the current channel configuration mode: auto or channel number
Authentication type: Displays the current wireless AP security access type.
Link speed: Displays the wireless AP link speed.
Data Encryption Type: Displays the type of data encryption.
Encrypt Strength: Displays the encrypt strength if WEP is the data encryption type.
Security Key: Displays the key for the clients to access this AP if WEP is the data encryption type.
6.2 Wireless Setting
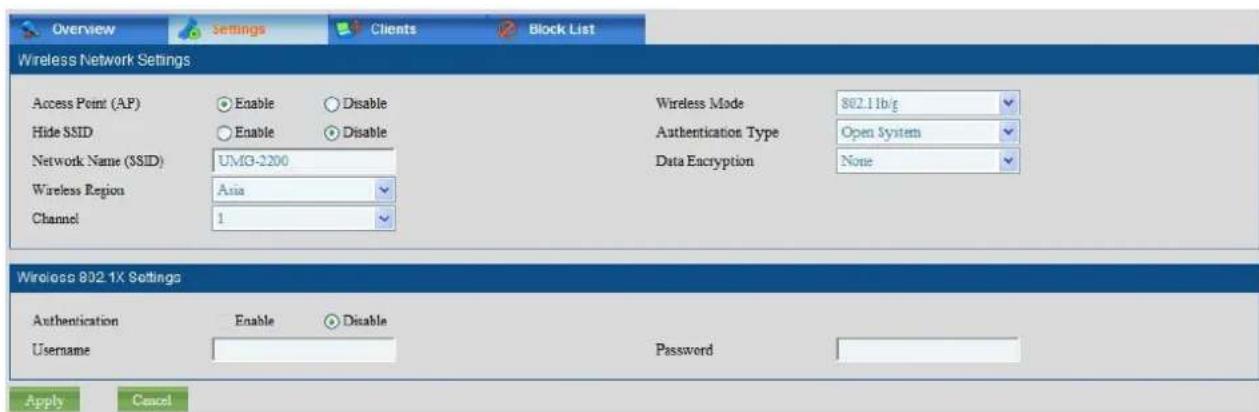
The wireless "Setting" screen enables the administrator to manage the wireless AP.
WIRELESS NETWORK
This section lists all the available settings to the wireless Access Point (AP). Service is only accessible when enabled. SSID is visible and can be scanned only when "Hide SSID" is disabled.
Access Point: Enables or disables the wireless AP service.
Hide SSID: Specifies whether the wireless AP SSID is visible or not.
Network Name (SSID): An SSID is the name of a wireless local area network (WLAN). Specifies the preferred SSID name string.
Wireless Region: Specifies the region that the wireless AP belongs to. The region will affect the channels and the working frequency of your AP.
Wireless Mode: Specifies the preferred wireless AP mode.
Channel: Specifies a preferred wireless channel number or an auto channel.
Authentication Type: Specifies the authentication type.
Data Encryption: Specifies the type of Data Encrypt.
Encrypt Strength: Specifies the encrypt strength if WEP is the data encryption type.
Security Key: Specifies the key for the clients to access this AP if WEP is the data encryption type.
Note:
You cannot detect the AP if "Hide SSID" is enabled.
6.3 Wireless Clients
The wireless “Clients” screen shows the wireless clients current connection to the UMG-1000 Series wireless Access Point (AP). Each connected wireless clients information is listed in a tabulated form. The following are the wireless client connection information.

WIRELESS CLIENT
This section lists the current information on the connected wireless clients.
MAC Client: Displays the MAC Address of the wireless client.
IP Address: Displays the IP Address of the wireless client.
Hostname: Displays the host name of the wireless client.
Channel: Displays the connected channel number.
Rate: Displays the data transfer rate.
6.4 Blocking the Connected Wireless Client
The administrator can block any connected wireless client by clicking the "block" button. The selected wireless client will be blocked and access will be denied.

6.5 Wireless MAC Block List
The wireless “Block List” screen displays the current block list. The administrator can unblock any or all of the computers currently prohibited to access the shared resources through the wireless AP.

CREATE NEW RULE
This section lists the settings to block a wireless client to access the wireless AP.
MAC Address to Block: Specifies the MAC address to block.
ACCESS BLOCK LIST
This section lists all the currently blocked wireless clients to the wireless AP.
MAC: Displays the MAC address in the block list.
The administrator can add a new MAC address to the block list by filling in the client MAC address and clicking the "Apply" button. The client with the newly added MAC address cannot access this AP any more.
REMOVE FROM THE BLOCK LIST
The administrator can remove a selected MAC address from the block list by checking the corresponding checkbox and clicking the "Apply" button. The unblocked client with the MAC address can then access the wireless AP again.
7. Web Management - Storage
The UMG-1000 Series storage suite includes the following services: Network Storage Server, backup/restore, and remote data synchronizing.
NETWORK STORAGE SERVER
The UMG-1000 Series supports Server Message Block (SMB), also known as Common Internet File System (CIFS) to share files on the private network which can be used for WINDOWS, Linux/Unix and other operating systems and Network File System (NFS) clients/servers.
BACKUP AND RESTORE
The UMG-1000 Series will automatically backup storage according to the scheduled time. The administrator can also backup the current storage manually. The UMG-1000 Series supports two solutions for backup. One is snapshot and the other is full data copy. Snapshot is an effectual and space-saving method. It is a picture in time of how the data was organized rather than a copy of the data. It provides a consistent view of the device, but it can build a snapshot of the device on and only on the local UMG-1000 Series. Another way is building a full data copy. It is a safer method to build all your data into a ZIP file; however, it takes much more storage space because of redundancy. Backup to the remote SAMBA or NFS server is supported and it is a good choice if you already have a storage server. It is strongly recommended to enable the feature of auto backup because the administrator can restore the data to a previous backup when data corruption occurs.
REMOTE DATA SYNCHRONIZATION
Please refer to Section - Remote Data Synchronization.
7.1 Storage Overview
The Storage “Overview” screen presents the current network storage services status summary. The system administrator can quickly view important details of the network storage condition and services.
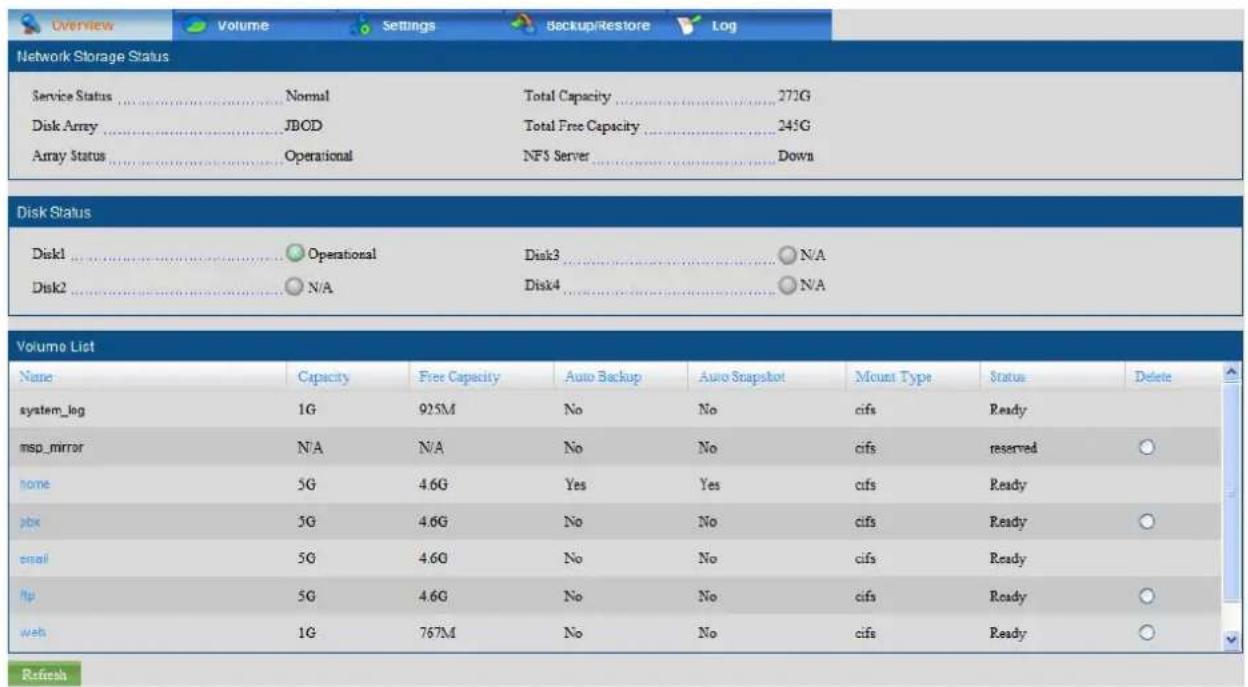
NETWORK STORAGE STAUS
This section lists the current status of the storage.
Service Status: Displays the current system operation status if normal
DISK Array: Displays the current storage RAID level: JBOD
Array Status: Displays the status of the disk, good or bad.
Total Capacity: Displays the total storage size in Gigabyte.
Total Free Capacity: Displays the available storage size in Gigabyte.
NFS Server: Displays the status of the NFS service, up or down.
DISK STAUS
This section lists the current status of the four disks, good or bad. If any disk is in bad state, please replace the faulty one as soon as possible to avoid the loss of data.
Disk1: Displays the status of the first disk,
Disk2: (No use)
Disk3: (No use)
Disk4: (No use)
VOLUME LIST
This section lists all the existing volumes with the brief information of their configuration and status.
Name: Displays the volume name.
Capacity: Displays the specific volume capacity in Gigabyte.
Free Capacity: Displays the available size of the specific volume in Gigabyte.
Auto Backup: Displays the auto backup status of the specific volume, Yes or No.
Auto Snapshot: Displays the auto snapshot status of the specific volume, Yes or No.
Mount Type: Displays the file system that can be used in NAS of the specific volume.
7.2 View a Volume by SMB
Check the radio box "view" of the specific volume or browse to file://ip/dir (where "ip" stands for the LAN IP address of UMG-1000 Series and "dir" stands for the volume you want to access) to view the volume by the SAMBA.
Note:
It is recommended to add a user with the same name and password of the PC Window account to access the Network Shared Storage.
7.3 Updating a Volume
Click the volume name that you want to update, and you can get the detailed information. Change the setting and click the "update" button to update the volume.
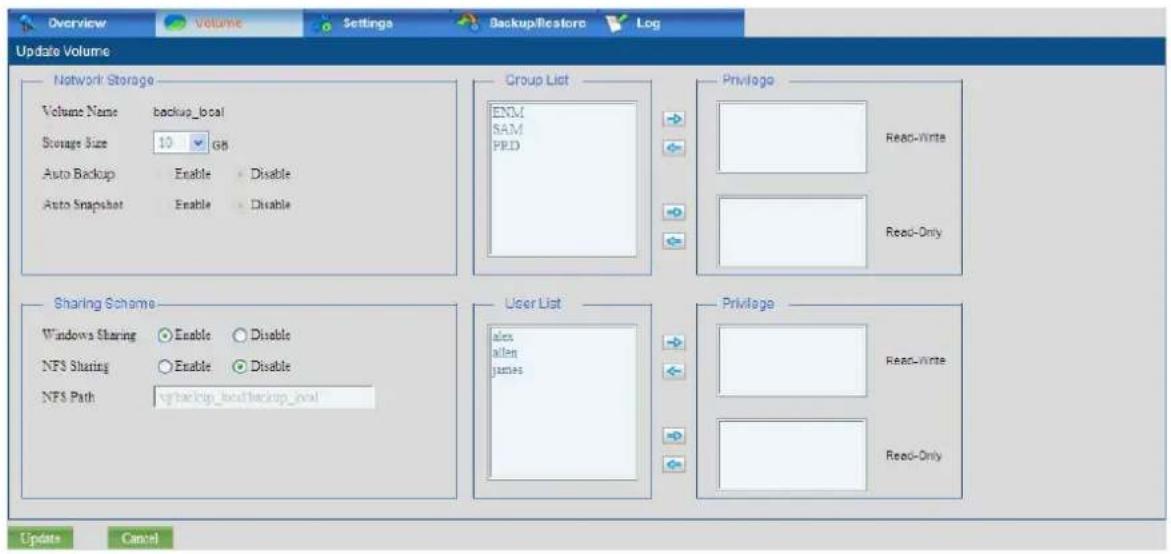
NETWORK STORAGE
Refer to Section - Creating a Storage Volume.
7.4 Deleting a Volume
Select the radio button "delete" then click the "Delete" button to delete a volume.
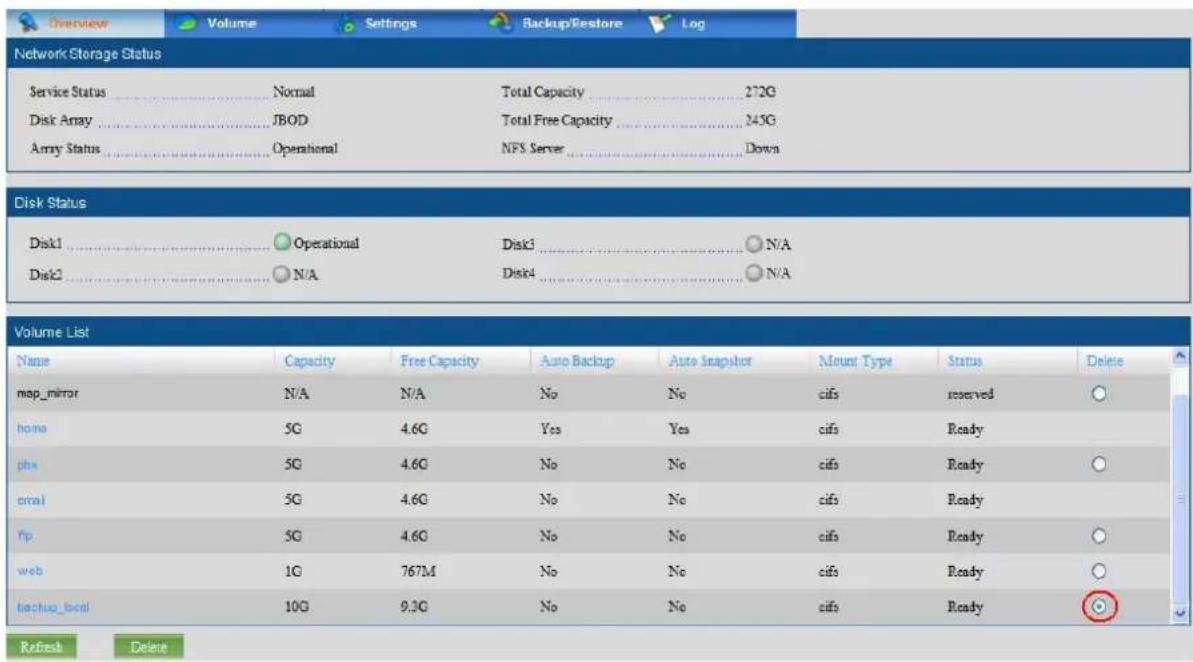
Note:
All data in this volume will be deleted if the volume is deleted.
7.5 Creating a Storage Volume
The Storage "Volume" screen allows the administrator to create a network shared storage volume.
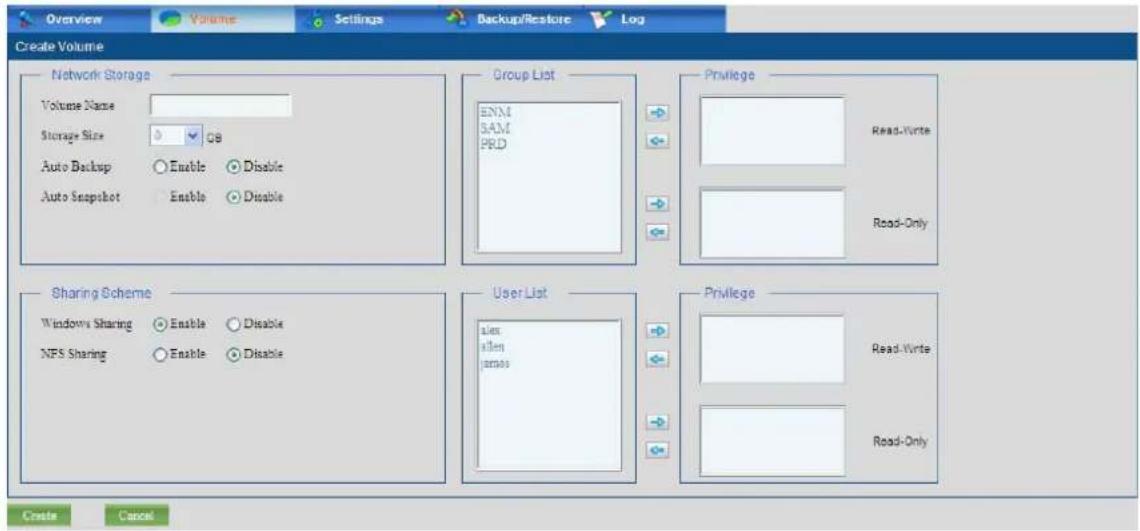
NETWORK STORAGE
This section lists all the available settings for network storage. The system will backup the volume automatically only if "Auto Backup" or "Auto Snapshot" is enabled.
Volume Name: Specifies the preferred Volume name.
Storage Size: Specifies the capacity of this volume.
Auto Backup: Allows or denies this volume to backup automatically.
Auto Snapshot: Allows or denies this volume to build the snapshot automatically.
SHARING SCHEME
This section lists all the available sharing schemes.
Windows Sharing: Specifies whether to share this volume to Windows clients by SAMBA (CIFS).
NFS Sharing: Allows or denies this volume to be shared as a Network File System. It is mainly used among UNIX/LINUX operation system..
USER GROUP
The user group displays all groups that can be set to access the volume. All the users in the group can also access the volume.
PRIVILEGE
Privilege: Read-Write/Read Only.
[Right] button: Selects a group in the User Group drop down menu and click the [right] button to set a privilege to the group. All users in the group will have the same privilege.
[Left] button: Selects a group name in the Privilege drop down menu and click the [left] button to withdraw a privilege from the group. All users' privileges will then be called back.
USER LIST
The user list displays all users that can be set to access the volume. Only the user specified or in the specified group can access this volume via network.
Privilege: Read-Write/Read Only.
[Right] button: Selects a group in the User Group drop down menu and click the [right] button to set a privilege to the group.
[Left] button: Selects a user name in the Privilege drop down menu and click the [left] button to withdraw a privilege from the user.
7.6 Storage Setting
The Storage “Setting” screen enables the administrator to manage the storage backup policy.

SNAPSHOT SCHEDULE
This section lists all the available settings of the daily snapshot policy.
Daily Snapshot: Specifies whether to allow the system to create a storage snapshot automatically or manually.
Time: Specifies the time to create the snapshot automatically.
BACKUP SCHEDULE
This section lists all the available settings of the backup policy.
Weekly full backup: Specifies whether to allow the system to create weekly full backup automatically or manually.
Weekday: Specifies the day to create the full backup files automatically.
Time: Specifies the specific time to create the full backup files.
Keep Copies: Specifies the maximum number of the full backup copies.
Daily Incremental backup: Specifies whether to allow the system to create daily incremental backup automatically or not.
Time: Specifies the specific time to create the incremental backup files.
VOLUME BACKUP PATH SETTING
This section lists all the available settings of the backup policy.
Local: Backs up volumes to local storage.
NFS: Backs up volumes to the specified NFS server.
Host: Specifies the NFS server host.
Path: Specifies the available path of the NFS server.
7.7 Storage Bakcup and Restore
The Storage "Backup" screen allows the administrator to backup a volume manually, view an existing backup, delete an existing backup, and restore a volume to an existing backup.
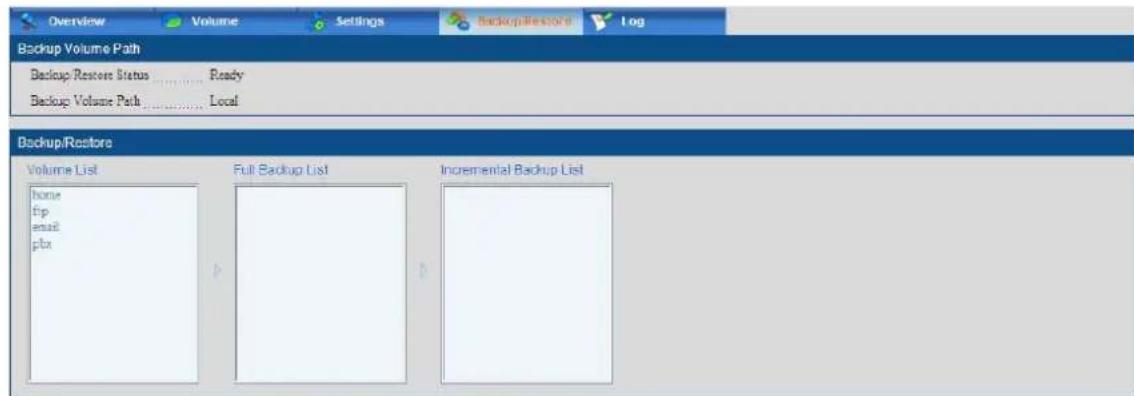
BACKUP/RESTORE
This section lists all the volumes and the available backup.
Volume List: Displays all the existing volumes in the UMG-1000 Series.
Backup List: Displays the date of the available backup point of a volume which is in the format of MM/DD/YYYY HH:MM:SS
Backup: Specifies a volume in the volume list and backs up the volume manually.
Restore: Specifies a backup file in the backup list and clicks the button to restore the selected volume to the specific backup file.
Delete: Deletes a backup file manually.
BACKUP VOLUME PATH
This section lists settings of the backup path.
Back/Restore Status: Displays the backup/restore operation status.
Backup Volume Path: Displays all the volumes' backup path.
BACKUP A VOLUME
Select a volume and then click the "backup" button to backup the volume.

Delete and restore Backup files
Select a backup file of a volume in the full backup list and then click the "Restore" button to restore the volume to the file. Click the "Delete" button to delete the backup files.
Note:
It is strongly recommended that the administrator to perform manually backs up to the current volume, and then restores the volume.
7.8 The Storage Log
The storage log shows the network storage history.

EVENTS
Date: Displays the date of the event.
Time: Displays the time of the event.
Description: Display the detailed description of the event.
8. Web Management - PBX
The UMG-1000 Series's Private Branch Exchange (PBX) solution provides a private telephone switching system that allows the telephone extensions to connect internally and domestically, as well as externally and internationally. In most cases, a PBX is an independent piece of equipment residing in an enterprise and is responsible for switching calls between enterprise users. It allows these end users to place calls using a network instead of the standard telephone infrastructure. The UMG-1000 Series supports the PBX, enabling users to share a specific number of external phone lines, saving the added cost of having an external phone line for each user. The UMG-1000 Series's PBX allows end users to place calls using a network instead of the standard telephone infrastructure. UMG-1000 Series's PBX manages both the Plain Old Telephone Service (POTS) and Voice over IP (VoIP) devices, utilizing VoIP accounts to connect them to telephone proxies. Devices within the UMG-1000 Series's PBX allow users to freely communicate with each other, thus creating a cost-effective telephone environment.
8.1 IP PBX Overview
The UMG-1000 Series IP PBX overview displays the current IP PBX services status.
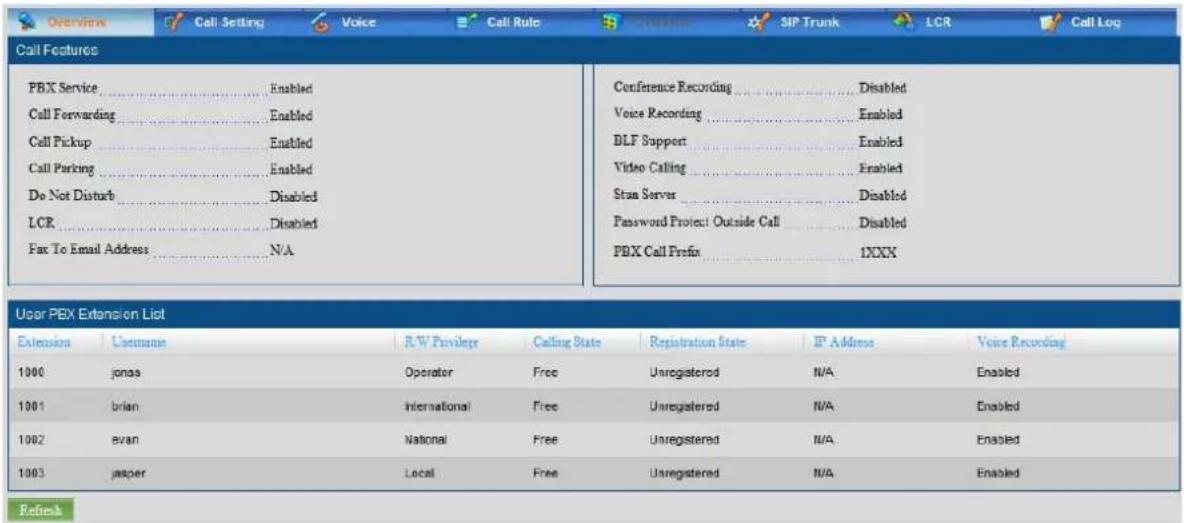
CALL FEATURE
This section indicates the status of the following PBX features.
VoIP Service: Displays the state of the IP PBX service, enabled or disabled.
Call Forwarding: Displays the state of the feature "Call Forwarding", enabled or disabled.
Call Pickup: Displays the state of the feature "Call Pickup", enabled or disabled.
Call Parking: Displays the state of the feature "Call Parking", enabled or disabled.
Do Not Disturb: Displays the state of the feature "Do Not Disturb", enabled or disabled.
LCR: Display the state of the feature "LCR", enabled or disabled.
Fax to Email Address: Displays the fax receiver's email address
Conference Call: Displays the state of the feature “Conference Call”, enabled or disabled.
Voice Recording: Displays the state of the feature “Record Voice”, enabled or disabled.
BLF Support: Display the state of the feature "BLF", enabled or disabled.
Video Calling: Display the state of the feature "Video Calling", enabled or disabled.
Stun Server: Display the state of the feature "Stun Server", enabled or disabled.
Password Protect Outside Call: Display the state of the feature, enabled or disabled.
PBX Call Prefix: Displays the call prefix.
EXTENSION LIST
This section lists all the extensions with the owner's information in the UMG-1000 Series.
Extension: Displays an extension number.
Username: Displays the full name of the specific extension.
R/W Privilege: Display the state of the specific extension.
Calling State: Displays the call state of the specific extension, free or busy.
Registration State: Displays the status of the phone with the specific extension, registered or unregistered.
IP Address: Displays the current IP Address of the phone with the specific extension.
Voice Recording: Displays if open the voice recording feature with the specific extension.
8.2 IP PBX Call Setting
Click the “Setting” tab in the “VoIP” screen. The VoIP “Setting” screen appears, allowing the administrator to manage the IP PBX services and features. The IP PBX service and call features can be globally or individually enabled or disabled.

CALL FEATURE SETTING
This section lists all the available setting of IP PBX. The IP PBX service is accessible only when the VoIP service is enabled.
PBX Service: Enables or disables the IP PBX service
Call Forwarding: Enables or disables the feature “Call Forwarding”. Enabling this feature will allow the user in the UMG-1000 Series to forward the incoming calls to another telephone. The call forwarding extension number can only be set by the individual user in the personal account web administration.(Refer to Section - Personal Account Web Administration)
Call Pickup: Enables or disables the feature "Call Pickup". Enabling this feature will allow answering an incoming call to the specific extension from another phone within the same call pick up group.
Call Parking: Enables or disables the feature "Call Parking". Enabling this feature will allow parking an incoming call and pick up it at another location.
Do Not Disturb: Enables or disables the feature "Do Not Disturb". Enabling this feature will prevent ringing of the incoming call.
LCR: When enable this option, the LCR function just could be used.
Stun Server: This function can help the IP PBX could working properly behind NAT. To change these settings please following your ISP information.
Conference Record: Enables or disable the feature “Conference Record”. Enabling this feature will allow record conference.
Voice Recording: Enables or disables the feature "Record Voice".
BLF Support: If the subscriber device (IP Phone) also support the BLF function, the subscriber could monitor the current usage status for other subscribers.
Video Calling: The subscriber could use Video Phone to achieve the video communication.
Password Protect Outside Call: When the subscriber want to make external PSTN call, the subscriber will be prompted to input the password if enable this option.
PBX Call Prefix: Specifies the call prefix. All the extensions in the group will be prefixed with the number.
Extension Digits: It could define the extension number length.
AUDIO QUALITY TUNING OPTIONS
This section lists all the tunings of audio quality.
Receive Gain: Specifies the receive gain.
Transmit Gain: Specifies the transmit gain.
Codec
This section set the audio and ideo codec types.
Audio Codec: Specifies the audio codec for voice communication.
Video Codec: Specifies the video codec for video communication.
FAX Server
This section set the email address of fax receiver.
Fax to Email Address: the email address of fax receiver.
Group Pickup
Each user could define the group at "Group Pickup List", so this user could carry out the pickup service for specific group.
User List: To list all of users.
Group Pickup List: Move the specific group from "Group List" to here, so that the user could carry out the call pickup service for the members of group.
Group List: To list all of groups.
8.3 Voice
Click the "Voice" tab in the "VoIP" screen. This page could setup the Conference, Upload Music on Hold Music and IVR Voice Prompts.
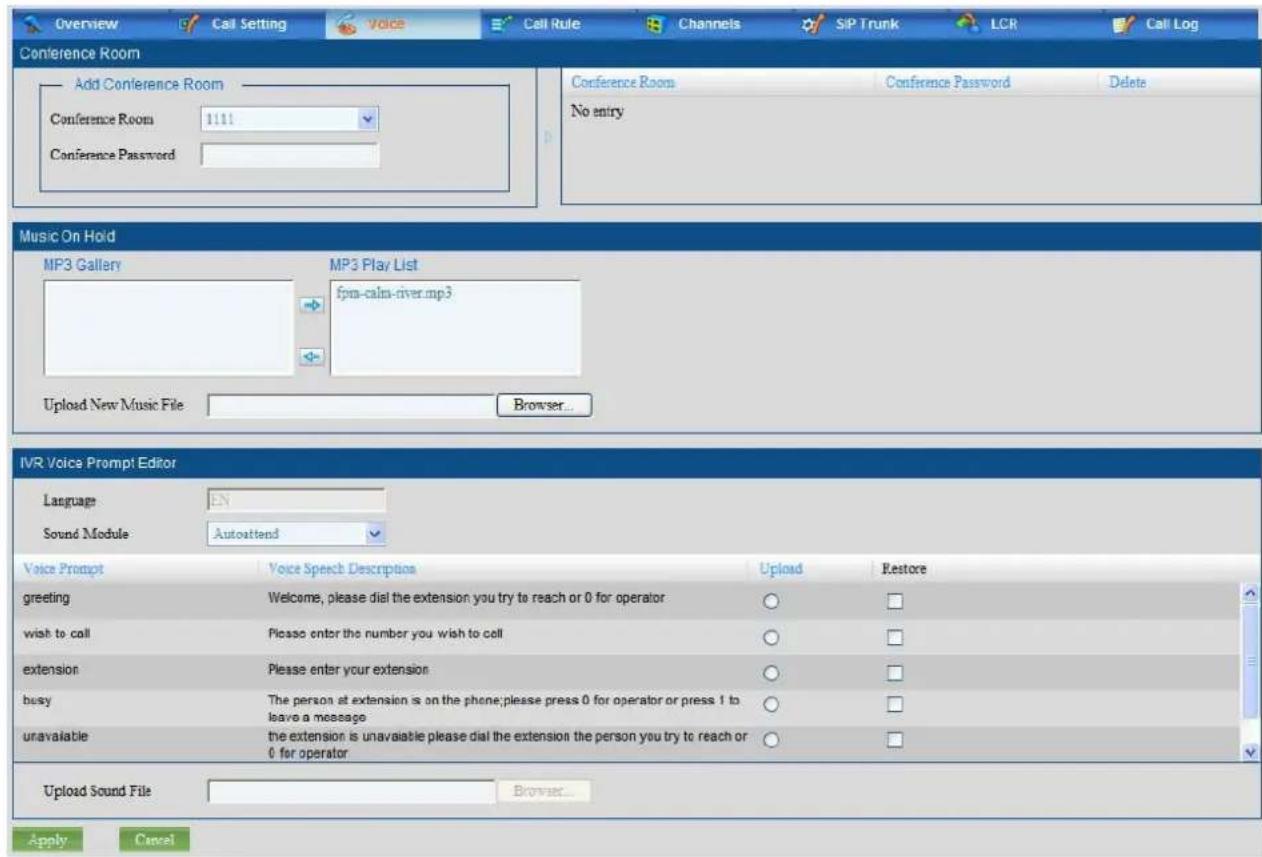
Conference Room
This section need to select the conference room number and set room password.
Music On Hold
This section could upload the MP3 file for on hold music.
MP3 Gallery: Here will list all of MP3 music.
MP3 Play List: To choose the current using on hold music from MP3 Gallery to here.
IVR Voice Prompt Editor
The user could record the personal IVR prompts and upload to UMG system via this section.
Upload: Select which voice sound want to upload.
Restore: The IVR will return to default voice.
8.4 IP PBX Call Rules
Additional call rules (call restrictions) can be specified according to each country's specific rules in the screen "Call Rule". The blocking call rule setting is to restrict unexpected user calls which may result in additional costs for the business. Another call rule is to add the prefix to the external calls automatically which may help reduce the call charges.

Call Rule List
This section lists all the existing call rules.
Rule: Displays the type of the call rule.
Privilege: Displays the call privilege that the call rule has been applied on.
Prefix: Displays the prefix of the call rule if it is a prefix rule.
Number Pattern: Displays the number pattern.
Delete: Deletes the call rule.
Call Rule Setting
This section lists all the call rule settings.
Block Rule: Specifies whether or not the rule is a block rule.
Privilege: Specifies the privileges of the call rule.
Number Pattern: Specifies the number pattern to be blocked.
Add Prefix Rule: Specifies whether or not the rule is a prefix rule.
Privilege: Specifies the call privilege that is applied to the call rule. Use “*” for serial unknown numbers and “?” for a signal number.
Prefix: Specifies the prefix that will be added to the number.
Number Patten: Specifies the number pattern applied to the rule. Use “*” for serial unknown numbers and “?” for a signal number.
8.5 IP PBX Channel Setting
The PBX "Channels" allows the administrator to see the list of the PSTN card.

Hardware Type
This section lists the channels of PSTN Card. The UMG-1000 Series will show from Channel 1 \~ Channel 4
Channels Forward
This section lists the settings of the caller ID.
Name: Specifies the call name that will be shown to the call receiver.
Number: Specifies the call number that will be shown to the call receiver.
The administrator can choose a channel as a voice or a data channel by clicking the corresponding "right" button or removing a channel from the existing list by clicking the corresponding "left" button.
Channels setting
This section set the channel, call ID and related extension. This means that the related channel will just response the related call number and extension.
8.6 SIP Trunk Setting
SIP Trunk Setting allows UMG system register to different SIP systems and ITSP Services (SIP Trunk).
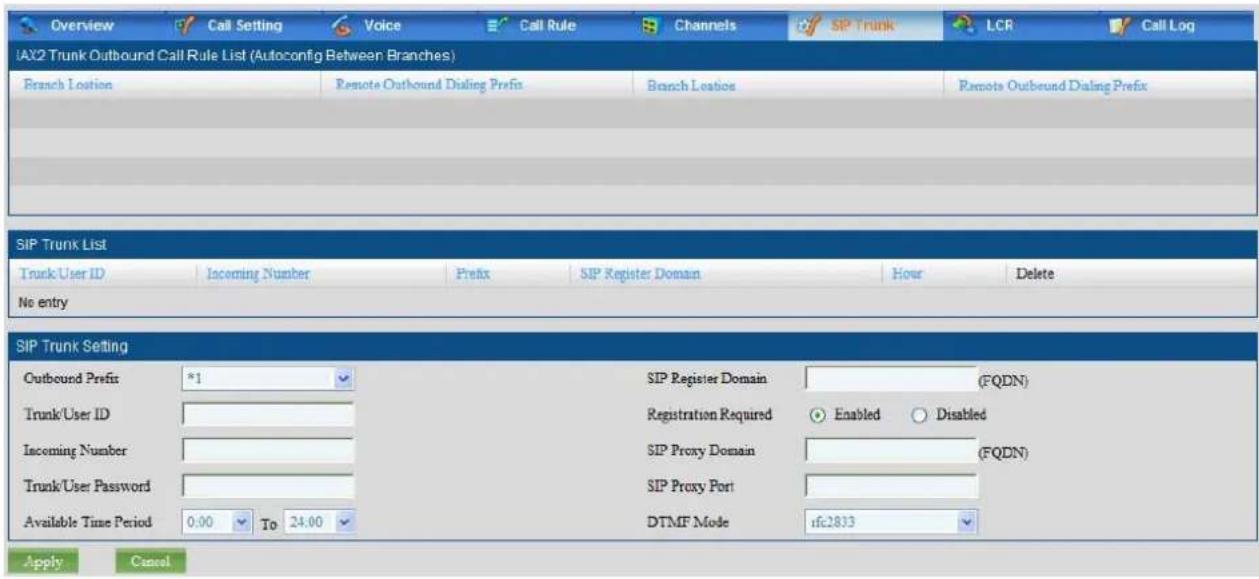
SIP Trunk List
This section lists the SIP Trunk records.
SIP Trunk Setting
This section to fill the relation registration information to create SIP Trunk.
Outbound Prefix: To assign the prefix number for this record. When the subscriber want to make external call via this SIP Trunk, the dialing number need start by the prefix number.
Trunk/User ID: Specifics the account ID for registering.
Incoming Number: Specifics the number for registering.
Trunk/User Password: Specifics the password for registering.
Available Time Period: Specifics what time can use this SIP Trunk for calling.
SIP Register Domain: Specifics the register server address.
Registration Required: Specifics if need send registration require with server.
SIP Proxy Domain: Specifics the proxy server address.
SIP Proxy Port: Specifics the SIP port.
DTMF Mode: Specifics the DTMF mode.
8.7 IP PBX Call Reference
The system could define the prefix number for FXO or SIP Trunk, or integrate the external gateway for prefix number at this page. Please remember to enable the "LCR" function at Call Setting page at first.

Gateway Trunk Setting
UMG-1000 Series can make the off-net call either via the external voice gateway. Before you can make the successful call, you have to fill in gateway's IP address and SIP port.
FXO Trunk Setting
You also could determine use which FXO port for outgoing call via LCR function.
LCR Trunk Group Setting
When want to make VoIP calls through the above Gateway Trunk, FXO channel or SIP Trunk, the user can use this function to accomplish the 2_Stage dialing method.
LCR Dialing Rules Setting
This is another way to make VoIP calls through the above Gateway Trunk, FXO channel or SIP Trunk, the user can use this function to accomplish the 1_Stage dialing method.
8.8 IP PBX Call Log
The "Call Log" screen enables the administrator to check all the call history.

CALL RECORDS
This section lists all the information of the history call records.
Time: Displays the time the call occurs.
From: Displays the calling number.
To: Displays the called number.
Duration: Displays the call duration.
9. Web Management - Email
The UMG-1000 Series Email suite includes the following service: commonly used Email server, Email filtering, Email message management and email blacklist. These services provide users a basic, secure and easy-managing email service.
EMAIL SERVER
The UMG-1000 Series supports common Email servers that support Post Office Protocol version 3 (POP3), Internet Message Access Protocol (IMAP) and Simple Mail Transfer Protocol (SMTP). POP3 is a standard mail protocol used to receive emails from a remote server to local clients. It also allows clients to download email messages to local computers and read them offline. IAMP is used for accessing the email on the remote web server from a local client. It allows the mail box to be managed by multiple users. SMTP is the standard protocol for sending emails.
EMAIL FILTER
Email Filtering is the Anti-Spam and Anti-Virus of email. Every email sent to or received from the UMG-1000 Series email server will be verified and filtered according to the standard rules and virus database. This will greatly reduce the potential harm to your private network. The email server uses the common filter standard and builds the virus database which can be updated from the virus server automatically.
EMAIL MESSAGE MANAGEMENT
The UMG-1000 Series supports the email message management including auto backup and auto replay. The email server can backup every sent and received email and reply to the mail sender with the user pre-selected email if the corresponding feature is enabled.
EMAIL BLACK LIST
An email server always gathers the reports about the spam and threaten coming from certain addresses. The administrator can add these addresses to the email blacklist so that the email server will filter, reject and drop mails from these addresses.
EMAIL forward
The UMG-1000 Series supports the email forward function. The email either received or sent will be forwarded from monitored user to monitor user
The email overview shows the current setting of the Email service.

SERVICE
The section lists the current settings of the email service.
Email Service: Displays the state of Email services, enabled or disabled Spam Guard: Displays the state of the feature “Spam Guard”, enabled or disabled.
Auto Backup: Displays the state of the feature "Auto Backup" feature, enabled or disabled.
Auto Reply: Displays the state of the feature "Auto Reply", enabled or disabled Email Alert: Displays the state of the feature "Email Alert", enabled or disabled Encrypted Connection: Displays the state of the feature "Encrypted Connection", enabled or disabled.
Encrypted Connection (SSL): Displays the state of the feature “Encrypted Connection”, enabled or disabled.
Internet Domain Name: Displays the domain name of the server.
Attachment Size Limitation: Displays the attachment size limitation.
Mail Box Limitation: Displays the mail box limitation of each user.
VIRUS SETTING
The section lists the current setting of the virus database.
Protection: Displays the antivirus state.
Auto Update: Displays the state of the feature “auto update Email virus database”, enable or disable.
Virus Database Version: Displays the current version of the virus data base.
Last Update: Displays the last upgraded date in format of "MM DD HH:MM:SS YY".
9.2 Email Basic Setting
The “Email Setting” page allows the administrator to manage the setting of the Email service.

SERVICE
This section lists all the available settings of the email service. The email service is accessible only when Email service is enabled.
Email Service: Enables or disables the Email services.
Spam Guard: Enables or disables the feature "Spam Guard". Enabling this feature will allow filtering all the junk mail and it will protect the mail box from invasion of spammers.
Auto Backup: Enables or disables "Auto Backup" feature. Enable this feature to make the UMG-1000 Series backup all your incoming and outgoing email.
Auto Reply: Enables or disables "Auto Reply" feature. Enabling this feature will allow the mail server to reply to the receiver automatically.
Encrypted Connection: Enables or disables “Encrypted Connection”. Enable this feature if you would like to build a secure channel between your Email clients and the UMG-1000 Series Email when you send or receive Email.
Email Alert: Enables or disables the "Email Alert" feature. Enabling this feature will allow the UMG-1000 Series to send an email to the pre-assigned address with a detailed event report when the system encounters critical error.
Internet Domain Name: Specifies the Internet domain name.
Attachment Size Limitation: Specifies the limitation size of the mail attachment.
Mail Box Limitation: Specifies the limitation size of the users' mail box.
VIRUS SETTING
This section lists all the settings of the email antivirus database.
Protection: Enables or disables antivirus protection. Enable this feature if you would like to scan mail for antivirus.
Auto Update: Enables or disables the feature "Auto Update Email Virus Database". Enable this feature if you want to make the UMG-1000 Series update the email virus database automatically.
ALERT EMAIL ADDRESS
This section lists all the email alert mail addresses that the UMG-1000 Series will send
email to when the system encounters critical error.
Alert Mail Receiver: Displays the alert email receiver.
Add new email alert address: Specifies the alert email receiver.
ADD MAIL ADDRESS TO ALERT EMAIL LIST
Specify a full Email address and click the "Apply" button to add the email address to the alert list.
DELETE MAIL ADDRESS FROM ALERT EMAIL LIST
Check the "delete" check box and click the "Apply" button to delete the selected email address from the alert list.
9.3 Email Blacklist
All the email from the email addresses, email accounts, domain names in the email blacklist will be reject by the email server. The administrator can manage the email black list in the "Blacklist" page.

EMAIL BLACK LIST SETTING
This section allows for the adding of new entities to the email black list
Username: Specifies the username that you want to add to the black list.
Email Address: Specifies the email address that you want to add to the black list.
Domain Name: Specifies the domain name that you want to add to the black list. All the emails sent to this domain will be blocked.
EMAIL BLACK LIST
This section shows all the entities in the email black list
Username: Displays the name of the black entity.
Email Address: Display the type of the black entity, username, email address, or domain name.
DELETE ENTITIES FROM THE BLACK LIST
Check the "Delete" check box and click the "Apply" button to delete an entity from the black list.
9.4 Email Alias
Administrators can manage the Email alias here. Email alias is not a real email account. Instead, it is an address that forwards all emails that it has received to its email accounts.
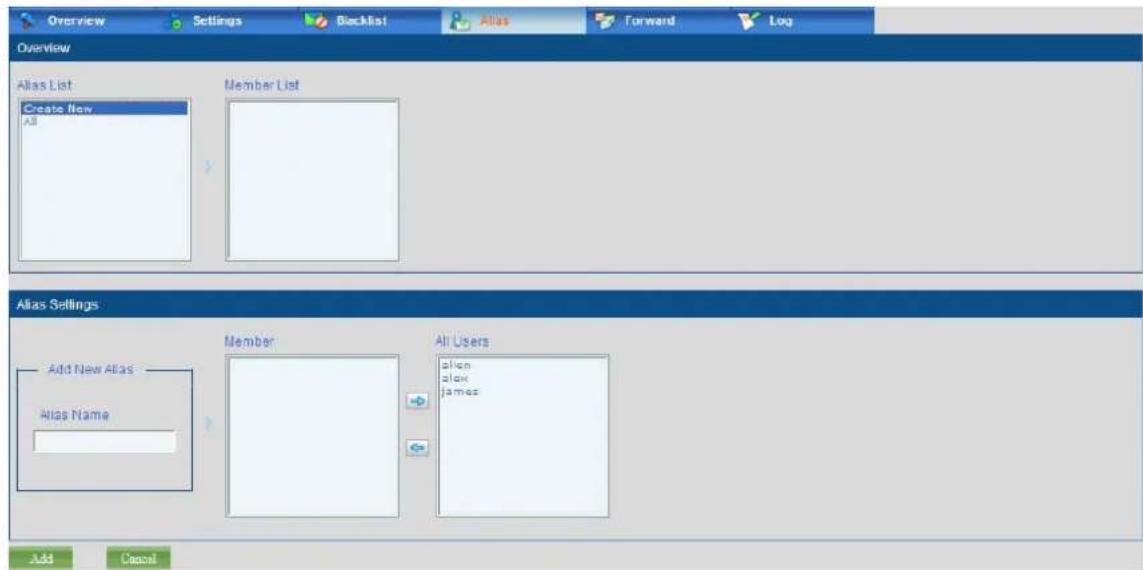
OVERVIEW
This section lists all the existing email alias accounts and their numbers. Select an alias name and its numbers will be shown in the number menu.
Alias List: Displays all alias names.
Number List: Displays the numbers of an alias.
SETTINGS
Alias Name: Specifies a preferred alias name.
Number: Specifies the number of the alias from the user list.
All number: Displays all available users.
CREATING AN EMAIL ALIAS
Type an alias name and use the "Left" and "Right" button to add or delete numbers. Then click the "Add" button to create an Email alias.

DELETING AN EMAIL ALIAS
Select an alias from the alias list, and then click the "Delete" button to delete the email alias.
UPGRADING AN EMAIL ALIAS
Select an alias from the alias list. Use the "Left" and "Right" buttons to add or remove its numbers, and then click the "Upgrade" button to upgrade an alias.
9.5 Email Forward
The page "Email Forward" allows the administrator to set forward user and monitored user. Select one forward user and multi monitored user. Both received email and sent email will forward one copy to monitored user.

9.6 Email Log
The page “Email Log” allows the administrator to scan and query the Email log. The log will show the mail history, spam and virus mail history, and user connection history.

EMAIL LOG
This section lists all the email logs.
Date: Displays the date of an incoming or outgoing mail.
Time: Displays the time of an incoming or outgoing mail.
From: Displays the full address of the email sender.
To: Displays the full address of the email receiver.
Encrypted: Display whether it is an encrypted connection between the email client and the UMG-1000 Series Email server.
Spam: Displays whether it is a junk mail.
Virus: Displays whether a virus is existing in the mail.
EMAIL LOG SORTING
Select "Search by name" or "Search by date" in the drop down menu and specify the key word in the text fill. Then click the "Search" button, and the results will appear.
10. Web Management - FTP
The “FTP Server” screen allows the administrator to manage the FTP server. When adding an account to the FTP authorized list, the UMG-1000 Series will send the email with the suitable account and password information to the specified requested email and the account will expire automatically after the expiration time.
10.1 FTP Overview
The page "FTP Overview" shows the current FTP settings.

10.2 FTP Setting
The "FTP Setting" page allows the administrator to manage the FTP service.

FTP SETTING
This section lists all the available settings of the FTP service:
FTP Server: Enables or disables the FTP server.
Encrypted Connection FTPS): Enables or disables the encrypted connection.
10.3 FTP Account
The "FTP Account" page allows the administrator to manage the FTP User.

FTP USER
This section lists all the available settings of FTP configuration management:
Requested Email: Specifies the email address of the one who requested the FTP service.
Login Name: Specifies the account that is used to login to the FTP service.
Password: Specifies the corresponding password.
Directory: Specifies the authorized directory of this account.
Privileges: Specifies the privileges of this account.
Duration: Displays the valid duration of the account. After the specified period, the account will expire automatically.
10.4 FTP Log
The "FTP Log" page show FTP Log.

FTP LOG LIST
This section lists the service state of the LAN services:
Requested Email: Displays the email address of the one who requested the FTP service.
Login Name: Displays the login account.
Client IP: Displays the current client IP address.
File Name: Displays the downloading or uploading file name.
Action: Displays the action of the account: download, upload, or idle.
Complete Status: Displays the status of the account.
Complete Time: Displays the completed time of the account.
11. Web Server
The UMG-1000 Series has support the Web Server feature, it let administrator could put the web pages into system for web services.
11.1 Web Server Overview
The page "Web Server Overview" shows the current Web Server settings.

11.2 Web Server Settings
The page "Web Server Overview" shows the current Web Server settings.

Web Server Setting
The "Web Server Setting" page allows the administrator to setup the Web Server parameters.
WEB Server: TO enable or disable the Web Server funciton.
Web Server Port: Specifics the web server service port.
Web Server Index Page: Specific the index page format type.
Web Server Directory: Specific the file located path.
12. Web Management - Security
The UMG-1000 Series security suite includes the comprehensive services: package inspection Firewall, Point-to-Point Tunneling Protocol (PPTP) based Virtual Private Network (VPN). These services will allow connection to the Internet and protection from any Internet threats.
Firewall Security
The UMG-1000 Series provides an easy-understanding and professional network security management. By default, firewall enables all prevention schemes and exclusively drops all packages to protect the user's private network except the ones matching the predefined rules by the safety applications in LAN. The administrator can also set the access control rules to achieve a better network environment by denying some services of the clients in LAN. The administrators can also assign authorized users in LAN to a trusted IP list. The users in the trusted IP list will not be shielded or blocked by all the firewall rules.
PPTP VPN Security
PPTP VPN is a secure tunnel for transporting IP traffic using PPP. It is supported by Microsoft dial-up Networking. The UMG-1000 Series provides the PPTP VPN server to build a secure link to the UMG-1000 Series from the outside of the office. It is a good choice especially for mobile and remote users who can connect to the Internet and want to securely access the office network.
12.1 Security Overview
The page "Security Overview" shows the current security settings.
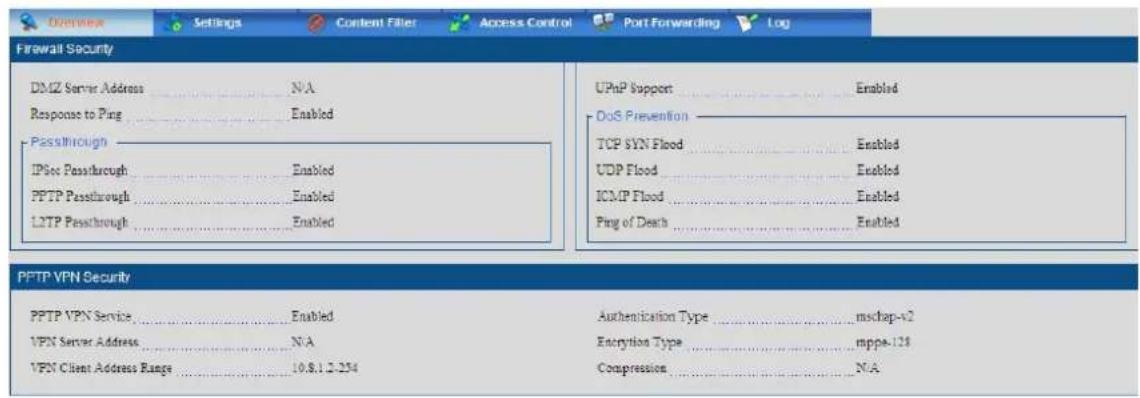
FIREWALL SECURITY
This section lists all the current firewall settings.
DMZ Server Address: Displays the DMZ host IP address.
Response to Ping: Displays the state of the feature "Response to Ping", enabled or disabled.
UPnP Support: Displays the state of the feature "UPnP Support", enabled or disabled.
PASSTHROUGH
This section lists all the current firewall pass-through rules.
IPSec Passthrough: Displays whether the "IPSec Passthrough" feature is enabled or disabled.
PPTP Passthrough: Displays whether the "PPTP Passthrough" feature is enabled or disabled.
L2TP Passthrough: Displays whether the "LTP Passthrough" feature is enabled or disabled.
DOS PREVENTION
This section lists all the current settings for the DOS prevention.
TCP SYN Flood: Displays the state of the “TCP SYN Flood” feature, enabled or disabled.
UDP Flood: Displays the state of the “UDP Flood” feature, enabled or disabled.
ICMP Flood: Displays the state of the "ICMP Flood" feature, enabled or disabled
Ping of Death: Displays the state of the "Ping of Death" feature, enabled or disabled.
PPTP VPN SECURITY
This section lists all the current PPTP VPN settings.
PPTP VPN Service: Displays the state of the PPTP VPN service, enabled or disabled.
VPN Server Address: Displays the IP address PPTP VPN server.
VPN Client Address Range: Displays the IP address range which will be granted to PPTP clients by the server.
Authentication Type: Displays the authentication method in which the PPTP server authenticates its clients.
Encryption Type: Display the encryption type in which the PPTP server encrypts the data.
Compression: Displays the state of the data compression, enabled or disabled.
12.2 Security Setting
The "Security Setting" page allows the administrator to manage the firewall.

FIREWALL SECURITY
This section lists all the available security settings.
UPnP Support: Enables or disables the "UPnP Support" feature. Enable this feature if you would like to support the Universal Plug and Play (UPnP) protocol.
Response to Ping: Enables or disables the "Response to Ping" feature. Enable
this feature to make the UMG-1000 Series respond to the ping request from the Internet.
DMZ Server Address: Specifies the DMZ host IP address. The clients on the outside network cannot connect to the servers in the private network which are protected by the firewall. To solve this problem, a DMZ (demilitarized zone) host is inserted between the company's private network and the public network. The DMZ host will be exposed to the Internet without protection. Specify it only if you need a special Internet service or expose one computer with no restriction.
PASSTHROUTH
This section lists all the settings of the firewall pass-through rules.
IPSec Passthrough: Enables or disables the "IPSEC Passthrough" feature. Enable this feature to allow Internet Protocol Security (IPSEC) pass-through.
PPTP Passthrough: Enables or disables the “PPTP Passthrough” feature. Enable this feature to allow PPTP VPN pass-through.
L2TP Passthrough: Enables or disables the "L2TP Passthrough" feature.
DOS PREVENTION
This section lists all the settings of the firewall DoS prevention rules.
TCP SYN Flood: Enables or disables the “TCP SYN Flood” feature. Enable this feature for protection from the TCP SYN flood attack.
UDP Flood: Enables or disables the “UDP Flood” feature. Enable this feature for protection from the UDP SYN flood attack.
ICMP Flood: Enables or disables the “ICMP Flood” feature. Enable this feature for protection from the ICMP SYN flood attack.
Ping of Death: Enables or disables the “Ping of Death” feature. Enable this feature for protection from a “Ping to Death” attack.
Note:
A DMZ host will be exposed on the web without protection by a firewall. Assigning a DMZ host may make other computers in the network vulnerable. When assigning a DMZ host, you must take security into account and protect it if possible.
12.3 Content Filter
The “Content Filter” page allows the administrator to set the HTTP content filter rules and assign the trusted IP.

URL SITE/KEYWORD TO BLOCK RULES
This section allows for the setting of the HTTP content filter rules.
Block Site: Specifies the URL site if you want to block all the content of this site.
Keyword: Specifies the keyword that you wish to block. All sites containing this keyword will be blocked.
DELETING THE URL SITE/KEYWORD TO BLOCK RULES
Check the check box of the corresponding site/keyword and click the "Apply" button. The site/keyword will be deleted from the block list, and the site/keyword will can be accepted again.
ADDING TRUSTED IP
This section allows setting the trusted IP.
Trusted IP: Specifies the trusted IP address.
DELETING FROM THE TRUSTED IP LIST
Check the check box of the corresponding IP address and click the "Apply" button. The trusted IP address will be deleted from the trusted list. The IP will be treated as the normal again.
12.4 Access Control
To control access to Internet of some services in LAN, the administrator can set the access control rules in the page "Access Control". The specific services of the PC in LAN cannot be accessed through the Internet any more.

SERVICE ACCESS CONTROL
This section allows for the setting of access rules on the LAN PC.
Service Name: Specifies the service to block.
Service Type: Specifies the service type. It can be the system defined or user defined.
Protocol: Specifies the network protocol that the rule will apply to if you select "user defined" as the service type.
Start Port: Specifies the start port that the rule will apply to if you select "user defined" as the service type.
End Port: Specifies the end port that the rule will apply to if you select "user defined" as the service type.
MAC Address: Specifies the MAC address of the PC client in LAN on which you want to apply the rule.
IP Address: If you want to apply the rule on a special IP address, check this option.
Single IP Address: Specifies one single IP address in LAN on which you want to apply the rule.
IP Address Range: Specifies the IP address range in LAN on which you want to apply the rule.
All: Specifies whether or not you want to apply the rules on all PC clients in LAN.
DELETING SERVICES FROM THE ACCESS CONTROL LIST
Check the "Delete" check box of the corresponding service and click the "Delete" button to delete the service from the access control list. The firewall will not block this service any more.
12.5 Port Forwarding
To control forward some special internet request from WAN to LAN, the administrator can set the port forwarding rules in the page "Port Forwarding". The specific internet request can forward from WAN to LAN.
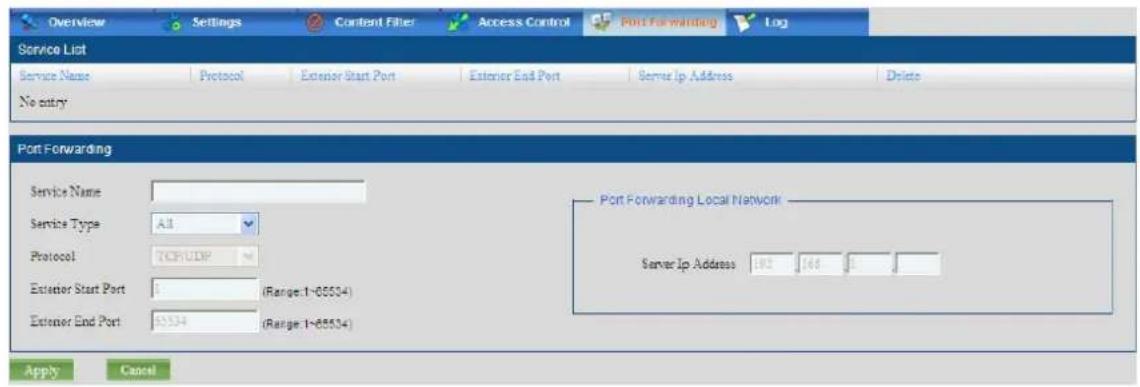
SERVICE PORT forward
This section allows for the setting of port forward rules.
Service Name: Specifies the service to forward.
Service Type: Specifies the service type. It can be the system defined or user defined.
Protocol: Specifies the network protocol that the rule will apply to if you select "user defined" as the service type.
Extension Start Port: Specifies the start port that the rule will apply to if you select "user defined" as the service type.
Extension End Port: Specifies the end port that the rule will apply to if you select "user defined" as the service type.
Server IP Address: If you want to apply the rule to a special IP address, check this option.
DELETING SERVICES FROM THE port forward LIST
Check the "Delete" check box of the corresponding service and click the "Delete" button to delete the service from the port forward list. The firewall will not forward this service any more.
12.6 Security Log
The "Security Log" page shows the firewall logs.

SECURITY LOG
This section lists all the firewall logs.
Date: Displays the date of the log.
Time: Displays the time of the log.
Source: Displays the source IP address of the package.
Destination: Displays the destination of the package.
Protocol: Displays the protocol of the package.
Event: Displays the action that the firewall has taken to deal with the package.
SECURITY LOG SORTING
Select "Search by addresses or "Search by date" in the drop down menu. Specify the key word in the text fill, and then click "Search" button. The results will then appear.
13. Web Management - System
The UMG-1000 Series provides system management mechanisms to understand and manage our system. It mainly provides: hardware overview, company profile setup, and system event management.
HARDWARE OVERVIEW
The UMG-1000 Series will display all hardware information, including: hardware version, the technical parameter of CPU, Memory, Flash, RTC, Disk etc.
COMPANY PROFILE SETUP
The UMG-1000 Series provides the ability to build and update the profile of the customer's company.
SYSTEM EVENT MANAGEMENT
The UMG-1000 Series provides the event reporting system that strives for the continued improvement product safety and reliability through the systematic collection and analysis. It gives the administrator the ability to determine what should be done when events occur.
13.1 System Overview
The system "Overview" screen presents a summary of the UMG-1000 Series system status.

VERSION
Software Version: Displays the current software version of the UMG-1000 Series.
Hardware Version: Displays the current hardware version of the UMG-1000 Series.
HARDWARE INFORMATION
CPU: Displays the CPU information.
Memory: Displays the memory information.
Flash: Displays the flash information.
Real Time Clock (RTC): Displays the RTC information.
Wireless: Displays the information of the wireless adapter.
Local Network Ethernet Port: Displays the information of the switch.
Internet Port: Displays the information of the WAN interface.
Extension Port: Displays the information of the extension ports. PBX Card: Displays the information of VoIP card.
DISK INFORMATION
Disk: Displays the disk name.
Model Number: Displays the model number of the disk.
Serial Number: Displays the serial number of the disk.
Firmware Revision: Displays the firmware version of the disk.
Capacity: Displays the raw capacity of the disk.
13.2 System Setting
The page "System Setting" allows the administrator to update the company profile.
![Overview Settings Events System Setting Company PLANET Location TAIPEI Country TAIWAN Time Zone (GMT-08:00) Taipei Date & Time Set Local Time Date 16/06/2009 [M/M/DD/YYYY] Time 01:35:13 [km/mm:ss] Synchronize system clock with a time server over the Internet Time Server tune-ww.nist.gov Next Synchronization Sat Jun 6 00:00:00 2009 Apply Cancel](/content/2026/05/1015190/images/14e494f4fec0439e458ce5a7479d28271b748f3ba2c649bca613e841f4f69474.jpg)
SYSTEM SETTING
This section lists all the settings of company profile.
Company: Specifies your company name.
Location: Specifies your company location.
Country: Specifies the country of your company.
Time Zone: Specifies the time zone of your city.
DATE & TIME
This section allows the administrator to set the local time.
Set Local Time: Manually set the local date and time
Date: Specifies the local date in format of MM/DD/YYYY.
Time: Specifies the local time in format of hh:mm:ss.
Synchronize clock with server over the internet: Automatically updates the local date and time from the specified time server.
Time Server: Specifies the time server you would like to synchronize time with.
13.3 System Event Log
The UMG-1000 Series system events are classified by its severity which includes Critical, Major, Minor, Notification, Warning, and Informational.
•The Critical event shows that the UMG-1000 Series is in critical, unrecoverable
condition and cannot service any more.
- The major event shows that the UMG-1000 Series encountered major error and some services cannot be used any more.
- The minor event shows that some error occurred because an action or an operation has failed, however, the UMG-1000 Series is still in good state.
- The notification event shows that actions should be taken to prevent loss of data and to avoid further losses.
•The warning event shows that a wrong operation has been taken. - The info event shows that an action has been taken but no damages have occurred.
| Date | Time | Local | ID | Description | |
| 0/5/2009 | 01:24:41 | info | 0x1112b000 | start b2b service successfully. | |
| 0/5/2009 | 01:24:41 | info | 0x1112b007 | start bs serverice successfully. | |
| 6/5/2009 | 01:24:41 | info | 0x1112b001 | start storage service successfully. | |
| 6/5/2009 | 01:24:41 | info | 0x11201012 | detect logic volume is not nfs exported, deny nfs service | |
| 6/5/2009 | 01:24:37 | info | 0x1112b003 | start email service successfully. | |
| 6/5/2009 | 01:24:37 | info | 0x1112b004 | start ptx service successfully. | |
| 6/5/2009 | 01:24:37 | info | 0x11118002 | add user james successfully. | |
| 6/5/2009 | 01:24:37 | info | 0x11118002 | add user alex successfully. | |
| 6/5/2009 | 01:24:36 | info | 0x11118002 | add user allen successfully. | |
| 6/5/2009 | 01:24:36 | info | 0x11118002 | add user admin successfully. | |
| 6/5/2009 | 01:24:36 | info | 0x11118002 | add user oxim successfully. | |
| 6/5/2009 | 01:24:35 | info | 0x11118002 | add user dovecot successfully. | |
| 6/5/2009 | 01:24:35 | info | 0x11118002 | add user clernav successfully. | |
| 6/5/2009 | 01:24:35 | info | 0x11118002 | add user squid successfully. | |
| 6/5/2009 | 01:24:35 | info | 0x11118002 | add user mall successfully. | |
| 6/5/2009 | 01:24:34 | info | 0x1110206e | set b2b configuration successfully | |
| 6/5/2009 | 01:24:34 | info | 0x11102088 | set storage configuration successfully | |
| 6/5/2009 | 01:24:34 | info | 0x1120101c | set local backup. | |
| 6/5/2009 | 01:24:33 | nsity | 3x5a01001 | detect WAN to address 210.68.155.75 | |
| 6/5/2009 | 01:24:31 | info | 0x111020e0 | set evm configuration successfully. | |
| 6/5/2009 | 01:24:30 | info | 0x1120102C | act scheduled incremental backup enable. | |
| 6/5/2009 | 01:24:30 | info | 0x11201CtA | act scheduled full backup enable. | |
| 6/5/2009 | 01:24:30 | info | OxI 1I 2O 6o 1 | act printer configuration successfully. | |
| 6/5/2009 | 01:24:3C 01:24:3C - 3C - 3C - 3C - 3C - 3C - 3C - 3C - 3C - 3C - 3C - 3C - 3C - 3C - 3C - 3C - 3C - 3C - 3C - 3C - 3C - - - - - - - - - - - - - - - - - - - - - - - - - - - - - - - - - - - - - - - - - - - - - - - - - - - - - - - - - - - - - - - - - - - - - - - - - - - - - - - - - - - - - - - - - - - - - - - - - - - - - Sort : All Critical Major Minor Warning Info Notification | ||||
EVENTS
This section lists all the system events information.
Date: Displays the date of the events.
Time: Displays the time of the events.
Level: Displays the event severities.
ID: Displays the event IDs.
Description: Displays the detailed descriptions of the events.
Alert Event Classification
This section lists the event sorting information by a user's selected criterion.
All: Displays all events.
Critical: Displays the critical events only.
Major: Displays the major events only.
Minor: Displays the minor events only.
Warning: Displays the warning events only.
Info: Displays the information events only.
14. Web Management - Branch-to-Branch
The Branch-to-Branch is a solution for building a company intranet which provides the ability to build a secure intranet, share data, setup voice link, and manage remote IT resources between all your branches by using the Internet. First, a reliable, secure, and auto recoverable connection is built between the different branches via the Internet or your private network. Second, an intranet which can only be accessed by authorized users, especially for the numbers or employees of the organization will be built based on this connection. Third, the VoIP switching and data synchronization systems are automatically setup for inter-branch communication. Finally, a centralized configuration management platform for the administrator to organize and manage all data and resources within the whole intranet is implemented. When the enabling the Branch-to-Branch feature, the UMG-1000 Series can be in only one of the following modes.
STANDALONE
Standalone is a standby mode when the Branch-to-Branch feature is disabled.
HEADQUARTER
Headquarter is a server or master mode. The UMG-1000 Series in this mode will be the master node in this group.
DIVISION
Division is a client or slave mode. The UMG-1000 Series in this mode will be a slave node in the group and can be managed by its headquarter.
14.1 Branch-to-Branch Setup
If you want to setup up Branch-to-Branch, you must connect the UMG-1000 Series to the Internet or your private network. Choose one system as the headquarter (server) of this group and others as divisions (clients). Refer to Section - Branch-to-Branch Setting to setup the configuration.
14.2 Security Channel
Once Branch-to-Branch is setup, the secure Intranet will be built automatically. To setup the connection, both the headquarter and divisions will negotiate and SSL will be used for the authentication to protect from any Internet threats. Then a VPN channel is built for the encryption data transmission and this secure channel will be maintained until the physical network link is down or disconnected manually.
14.3 Remote Calls
Once the connection is settled, the database of all the branches and the voice link will be setup automatically. This means that users can call the extensions in the UMG-1000 Series
group once the connection is settled. For example, a user of the headquarter named user_hq with the extension "1456" can call the user named user_div1 with the extension "5678" by dialing "5678" directly. If another UMG-1000 Series joins the UMG-1000 Series group as a new division and the user named user_div2 with extension 7890 is in it, the three users can call each other directly. Any call features in the call group e.g., call transfer, conference, and call forwarding is available between connected branches. All calls between extensions in different branches are visa VoIP without paying any long distance changes.
Note:
The call prefix of the divisions is determined by the headquarter.
14.4 Remote Data Synchronization
When a new division is added to the profile of the headquarter, two directories named "FromBran-
Headquarter Divisions
ToBran-<location>-<prefix> → FromHQ
FromBran-<location>-<prefix> ← ToHQ
The data will be synchronized every few minutes.
Note:
Data can only be synchronized automatically between the Headquarter and it associated divisions when the link status is “connected”.
14.5 Shared Services
Some specific services can be shared among different UMG-1000 Series systems. Email is now supported. This means that if divisions do not have valid domain names but headquarter does, all users in divisions can use the email service in the headquarter. For example, if the headquarter has a valid Internet domain name “PLANET.com.tw” and its division does not, the user named “demo” with its enabled email service will have an email box whose address is demo@PLANET.com.tw. However, its email address will be changed as the division gets a valid Internet domain name. If the division gets a domain name “sh.PLANET.com.tw”, the user’s email address will be changed to demo@PLANET.com.tw. All this information will be shown on a contract list.
14.6 Global user Profile
After connection, the profile of the headquarter and its divisions will be synchronized. So far, the contact list synchronization is supported. Anyone who can access the UMG-1000 Series can get the fully detailed contract list which includes all users in the UMG-1000 Series group in user private web administration.
14.7 Centralized Configuration management
Another facility is the centralized configuration platform. It provides the ability for the administrator of the headquarters to manage all the divisions IT resources in his own office. Click the “Web Management on the “Branch-to-Branch Overview” page to access the division administration GUI (Refer to Section - Branch-to-Branch Overview).
14.8 Branch-to-Branch Overview
The "Branch-to-Branch Overview" page presents the current Branch-to-Branch settings.
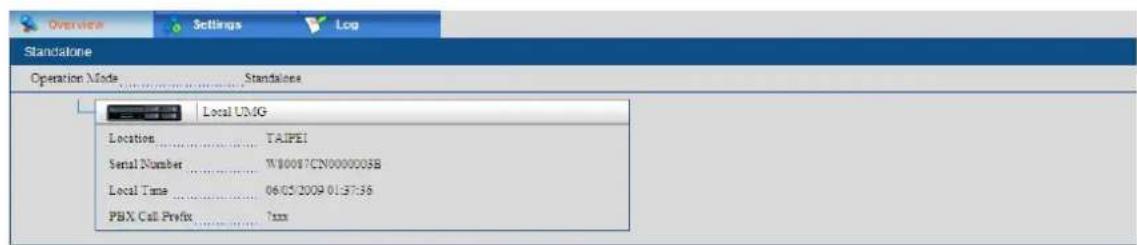
STANDALONE
Operation mode: Displays the current operation mode.
Serial Number: Displays the BTB serial number.
Local Time: Displays the local time.
Call Prefix: Displays the local call prefix.

HEADQUARTER
Operation mode: Displays the current operation mode
Headquarter Location: Displays the location of the UMG-1000 Series.
Headquarter Serial Number: Displays the BTB serial number.
Headquarter Local Time: Displays the local time of the UMG-1000 Series.
Headquarter Call Prefix: Displays the call prefix of the UMG-1000 Series.
Location: Displays the location of the specific Branch.
Serial Number: Displays the BTB serial number of the specific Branch.
Link Status: Displays the link status of the specific Branch.
Key: Displays the key used to authenticate the specific Branch.
Local Time: Displays the local time of the specific Branch.
Connection Time: Displays the total connection live time of the specific Branch.
Call Prefix: Displays the call prefix of the specific Branch.
Admin: Click this button to go to the branch web administration to manage the IT resource of the branch UMG-1000 Series when and only when connected.
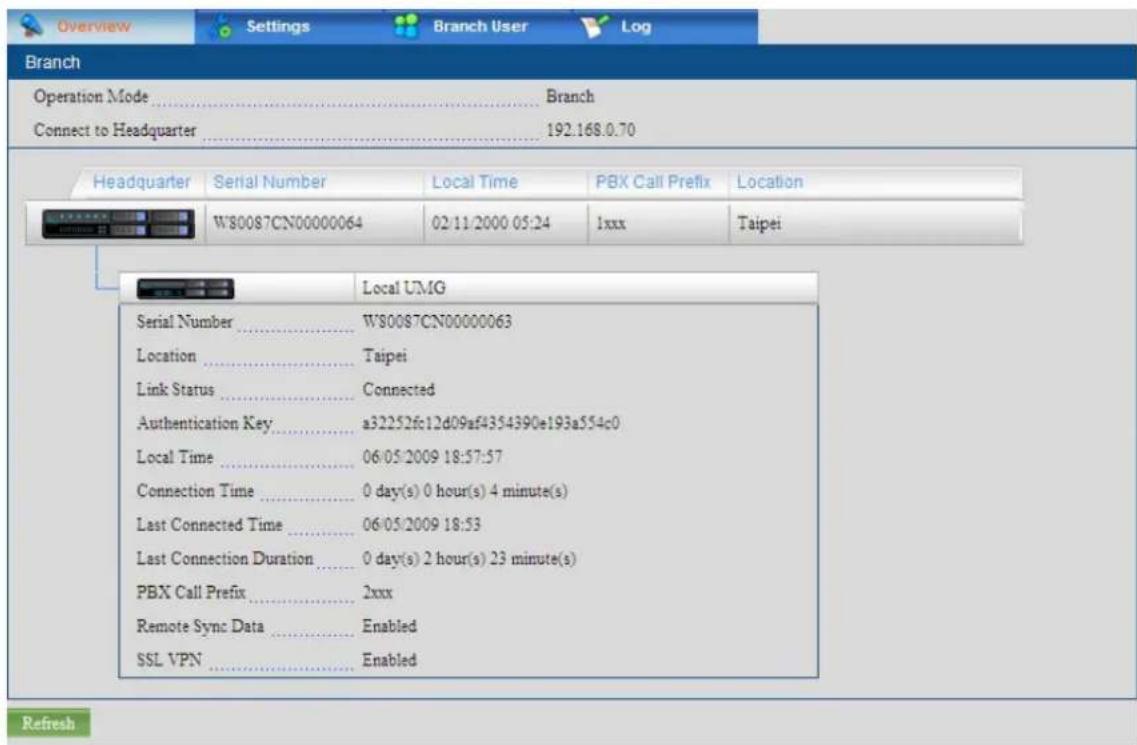
BRANCH
Operation mode: Displays the current operation mode
Connect to Headquarter: Displays the host/IP address of headquarter UMG-1000 Series.
Headquarter Location: Displays the location of the headquarter UMG-1000 Series.
Headquarter Serial Number: Displays the BTB serial number of the headquarter.
Headquarter Local Time: Displays the local time of the headquarter UMG-1000 Series.
Headquarter Call Prefix: Displays the call prefix of the headquarter UMG-1000 Series.
Location: the Displays the location of the UMG-1000 Series.
Serial Number: Displays the BTB serial number.
Link Status: Displays the link status of the UMG-1000 Series.
Key: Displays the key used to connect to the headquarter UMG-1000 Series.
Local Time: Displays the local time of the UMG-1000 Series.
Connection Time: Displays the total connection live time of the headquarter UMG-1000 Series.
Call Prefix: Displays the call prefix of the UMG-1000 Series.
14.9 Delete a Branch
If the mode of your UMG-1000 Series is Headquarter, check the "Delete" check box in the page "Overview" and then click the "Delete" button. The selected branch will then be deleted.
Note:
Delete a branch will delete the entire branch configuration profile.
14.10 Branch-to-Branch Setting
The “Branch-to-Branch Setting” page allows administrator to manage branch to branch. There are three modes of Branch-to-Branch, Headquarter, Division, and Standalone.
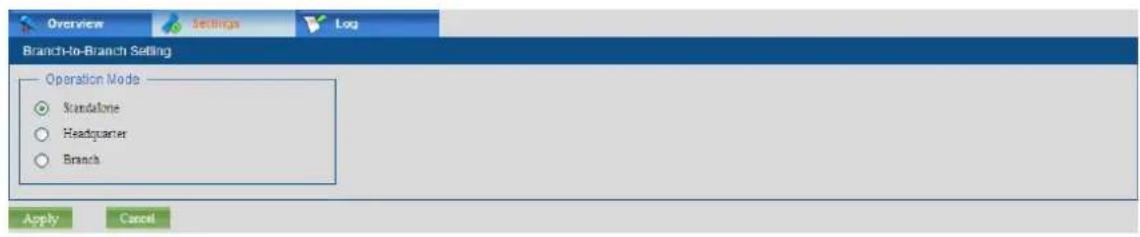
OPERATION MODE
Standalone: Disables the Branch-to-Branch feature.
Headquarter: Specifies the operation mode to Headquarter.
Division: Specifies the operation mode to Branch.

ADD NEW BRANCH
Serial Number: Specifies the BTB serial number of the allowable branch.
Key: Generates the key that will be used as the authentication password when building the connection between the UMG-1000 Series and the branch.
Call Prefix: Specifies the call prefix of the branch.
Remote Sync Data: Enables or disables the feature "Synchronize data" between the UMG-1000 Series and the branch.

CONNECT TO HEADQUARTER
Serial Number: Specifies the BTB serial number of the headquarter you want to connect.
Domain Name/IP: Specifies the host or IP address of the headquarter you want to access.
Key: Specifies the key that the headquarter has provided as the authentication password for the branch.
14.11 Branch Users
This section shows all the user contact information in different branches.
| Username | Fullname | Extension | Call Privilege | Department | Location | Email Address |
| alex | Alex Tien | 1101 | Local | ENM | Taipei | ailex@planet-1.com.tw |
| alien | Allen Huang | 1100 | National | ENM | Taipei | alien@planet-1.com.tw |
| alienh | Allen | 2001 | International | administrator | Taipei | alienh@planet-2.com.tw |
| amy | Amy Lee | 1701 | Local | RMA | Taipei | amy@planet-1.com.tw |
| chloe | Chloe Hsu | 1500 | National | MKT | Taipei | chloe@planet-1.com.tw |
| dennis | Dennis Hua ng | 1200 | National | RDM | Taipei | dennis@planet-1.com.tw |
| higgins | James Higgi ns | 1111 | Operator | President | Taipei | higgins@planet-1.com.tw |
| james | JaMEs Yan G | 1102 | Local | ENM | Taipei | james@planet-1.com.tw |
| jesmine | Jesmine Ch ang | 1400 | National | ADM | Taipei | jesmine@planet-1.com.tw |
| justin | Justin Liu | 1202 | Local | RDM | Taipei | justin@planet-1.com.tw |
| karen | Karen Tsai | 1601 | Local | PRD | Taipei | karen@planet-1.com.tw |
| kim | Kim Huang | 1401 | Local | ADM | Taipei | kim@planet-1.com.tw |
| lana | Lana Chen | 1700 | National | RMA | Taipei | lana@planet-1.com.tw |
| idia | Lidia Sung | 1300 | National | SAM | Taipei | idia@planet-1.com.tw |
| lory | Lory Lee | 1501 | Local | MKT | Taipei | lory@planet-1.com.tw |
14.12 Branch-to-Branch Log
The branch-to-branch log shows the branch-to-branch history.

EVENTS
Date: Displays the date of the event.
Time: Displays the time of the event.
Description: Displays the detailed description of the event.
15. Web Management - Maintenance
The UMG-1000 Series maintenance suit includes the following services: configure backup/restore, software update, diagnose, and remote support request.
BACKUP/RESTORE CONFIGURE
The UMG-1000 Series provides the ability to backup the configuration in case of losing the configuration when abnormal events occur. Users can backup the current configuration to their own PC, file server etc., and avoid monotonous reconfiguration. It is possible for the administrator to restore the configuration to an older one if some mishandling has occurred.
UPDATE
The UMG-1000 Series provides to update to the latest software. The administrator should download the latest software image from http://www.PLANET.com.tw and start the update process manually.
REMOTE SERVICE
If your UMG-1000 Series does not work normally, please contact your product provider. However, you can also choose the remote service. Request the remote service and provide a temporary login ID and password from an PLANET support engineer by sending an email with the description of the problem and the authorized access permission.
15.1 System
The "System" page allows the administrator to backup or restore the configuration.

CONFIGURATION
Backup Configuration: Backs up the current configuration to your PC.
Restore Configuration From Selected File: Restores the configuration to the user's specified file.
Restore To Default: Restores the configuration to default.
System Reboot: Reboots the UMG-1000 Series.
Shut Down: Shuts down the UMG-1000 Series.
Restore To Manufacture Default: Restores the UMG-1000 Series to manufacture default. This will restore all configurations to default and clear all data in the disks. You must backup the configuration and important data first.
15.2 Software Update
The “Software Update” page allows the administrator to update the software to the latest version.

SOFTWARE UPDATE
Select Software Image: Selects the update image file on your PC or file server. Uploaded Version Number: Displays the uploaded software version.
Download the latest image file to your PC. Select the software image that you want to update on your PC and then click "Apply" to update.
15.3 Remote Service
The page "Remote Service" allows the administrator to report problems and get online help.
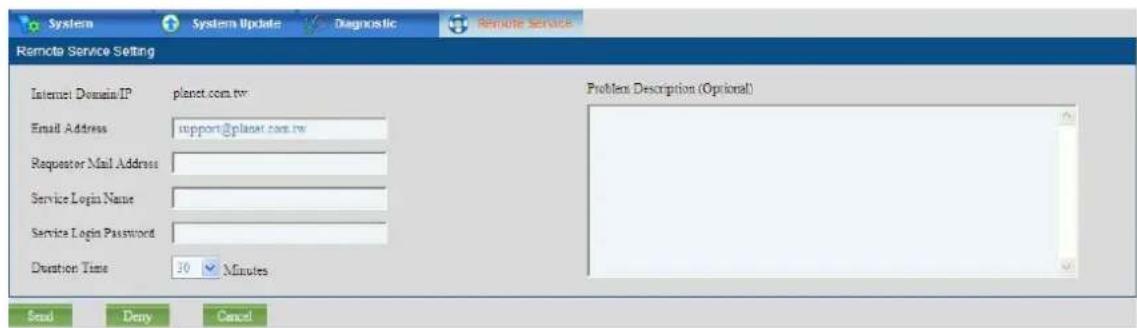
Internet Domain/IP: Displays the Host/IP of the UMG-1000 Series.
Email Address: Specifies the address that the email will be sent to. By default, the email will be sent to support@planet.com.tw. You can also send the email to your own product provider.
Requestor Mail Address: Specifies requester's email address.
Service Login Name: Specifies the username to login to your GUI and access your UMG-1000 Series via PPTP VPN. The username and password will be sent to the former email address.
Service Login Password: Specifies the password corresponding to the user account.
Duration Time: Specifies the MAX duration time of connection. PLANET support engineers cannot access the UMG-1000 Series if this time expires.
Problem Description (Optional): A brief description to the problem. It will help the email receiver locate and solve the problem more quickly.
16. Personal Account Web Administration
The personal account web administration is a very important concept of the user-based and centralized service for the UMG-1000 Series and allows every user to be his own administrator. Once an active user account is added to UMG-1000 Series, the user can login to the personal account web administration. After login, the user can update his or her profile, view the contact list and the UMG-1000 Series tutorial, etc
UPDATE THE USER PROFILE
The UMG-1000 Series provides every user a simple platform to manage his or her personal profile and private information. Some are invisible to the administrator. It is convenient for users to update the profile in their own way. However, for the sake of security, the service privilege can only be assigned by the administrator.
CONTRACT LIST
Based on all the user's profiles, a detailed contact list will be presented, including the user's email address and extension. All branch users will be presented here if the feature "Branch to Branch" is enabled. Refer to Section - Profile in One to get further information.
UMG-1000 Series TUTORIAL
The UMG-1000 Series provides some basic tutorials to help users learn how to use the features. The call reference is presented to give instructions to the call features. We will also put other tutorials on the web administration gradually.
16.1 User Login
Any user who wants to access the UMG-1000 Series web management must login here. Type an authorized username and password and then login.
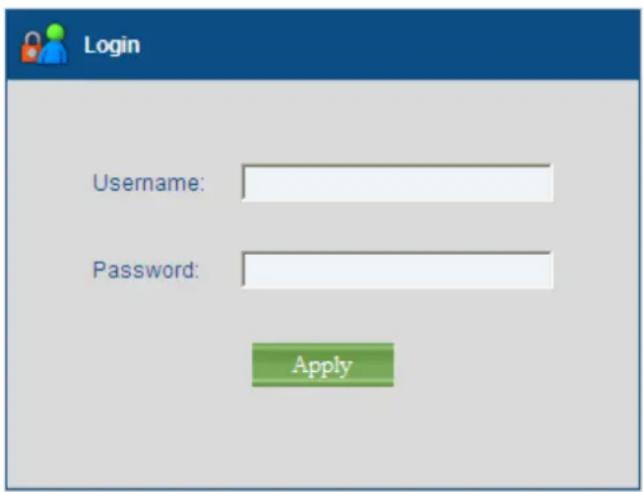
Note:
The user login session will be automatically terminated for security reason, If no action is taken in 5 minutes.
The page "My Account" shows the user profile.

ACCOUNT INFORMATION
This section lists the current user account settings.
Username: Displays the username.
Fullname: Displays the full name.
Department: Displays the department/group that the user belongs to.
Account Status: Displays the state of this account, active or suspend.
SERVICE PRIVILEGE
This section lists the current service privileges of this user.
Email: Displays the state of the email service, enabled or disabled.
PPTP VPN: Displays the state of the PPTP VPN service, enabled or disabled.
NETWORK STORAGE
This section lists the current network storage usage and status of the user.
Private Capacity: Displays the private capacity.
Storage Quota: Displays the storage quota.
Storage Used: Displays the storage size that has been used.
VOIP
This section lists the VoIP settings of this user.
Call Privilege: Displays the call privilege of the user.
Extension Number: Displays the VoIP phone number.
Voice Mail Password: Displays the password to access voice mail.
Do Not Disturb: Displays the state of the feature "Do Not Disturb", enable or disable.
Forward All Calls to: Displays the unconditional forward extension.
Forward Calls on Busy to: Displays the extension which your call will be forwarded to when your line is busy.
16.3 Access to Administrator
If your account is the administrator, there will be an "Admin" button on the left. Click that button to access the UMG-1000 Series web management.
Note:
Only one system administrator login session is allowed at any time.
16.4 Personal Setting
Users can update the profile in their own way on the "Personal Setting" page.

USER ACCOUNT
Username: Displays your account username.
Full Name: Specifies your full name.
New Password: Specifies your new password.
Confirm Password: Confirms and verifies the typed password.
CALL SETTING
Voice Mail Password: Specifies your voice mail password.
Forward All Call to: Specifies the unconditional forward extension. Fill the text fill only if you would like to forward all your calls to the extension.
Forward Calls on Busy to: Specifies the forward extension. Fill the text fill if you would like to forward your calls to the extension when your line is busy.
Do Not Disturb: Enable or disable the "Do Not Disturb" feature. Enable this feature only if you would like to prevent ringing of incoming calls.
EMAIL SETTING
Auto Reply: Enable or disable the feature “Email Auto Reply”. Enable it if you would like to make the email server automatically reply to the emails that you receive.
Auto Reply Message: Specifies the auto reply message.
16.5 Contract List
All users with their extensions and email addresses in the UMG-1000 Series will be listed in the page "Contact List".
| Contact List | ||||||
| Username | Fullname | Extension | Cell Privilege | Department | Location | Email Address |
| alex | Alex | 7001 | Local | ENM | TAIPEI | ailex@yang92.cn |
| allen | Alen | 7000 | Local | ENM | TAIPEI | alen@yang92.cn |
| jamee | Jamee | 7002 | Local | ENM | TAIPEI | jamee@yang92.cn |
CONTACT LIST
Username: Displays a username.
Full Name: Displays the full name of the user.
Extension: Displays the extension of the user.
Department: Displays the department/group the user belongs to.
Location: Displays the location of this user.
Email Address: Displays the Email address of the user.
16.6 Personal Call Records
The "Call Records" page shows the call records of the user.

Please refer to Section - IP PBX Call Records.
16.7 Call Reference
Users can get the call reference from the page "Call Reference".

Please refer to Section - IP PBX Call Reference.
16.8 Logout
Click the button "sign out" in the right top corner or close the browser to logout the current session. If no action has been taken in 5 minutes, the session will be logout automatically.
Appendix A – Console Maintenance Method
The UMG-1000 Series has a built-in command line interpreter and provides users a Command Line Interface (CLI). You can configure the network parameters by entering commands from the CLI.
Please use the RJ-45 to RS-232 console cable that boundled in package. To connect the RJ-45 port with Console port of UMG-1000, and connect another side (RS-232) with your PC.

You can access the CLI from a VT-100 terminal or terminal emulator connected to the DB9 serial port or through a Telnet session. The UMG-1000's serial port is EIA RS-232C compliant with the interface parameters:
| Baud rate | 115,200 |
| Number of data bits | 8 |
| Parity | None |
| Number of stop bits | 1 |
| Flow control | No |
To input the default account to login console mode: admin / admin
| Login:admin Password: No entry for terminal type "vt102"; using dumb terminal settings. |
| SmartIT -> ? |
| matched msp command list :: |
| enable [console|user|admin|diag|debug] |
| end |
| help |
| ifm get lan config |
| ifm get wan config |
| ifm set lan ip <string> |
| system reboot |
| system reset to default |
| SmartIT -> |
The bleow are the available command:
| Command Description | |
| Ifm get lan config | To show the current LAN port network parameters |
| Ifm get wan config | To show the current WAN port network parameters |
| Ifm set lan ip | To set the LAN IP addressFor example: ifm set la nip 192.168.1.1 |
| system reboot To reboot system | |
| System reset to default | To reset the system to factory default |
| ? To show all of available command | |
Appendix B – Remote Access
The UMG-1000 Series supports remote access. Administrator can access the web management remotely via secure HTTPS.
From remote PC, launch a web browser (for example: IE, Firefox etc.) and type "https://ipaddress" in the address bar of browser.
Type in an authorized username and password and then click the button "Apply". The default username is "admin", and its password is "admin" all in small case.

Appendix C – Scenario Example
The chapter shows you the concept and command to help you configure your UMG-1000 Series through sample configuration. And provide several ways to make calls to desired destination in UMG-1000 Series. In this section, we'll lead you step by step to establish your first voice communication via web browsers operations.
Case 1_X-Lite how to register on the UMG-1000 Series.

\*\*\* FW & Utility version List:
UMG-1000:v.1.1.1
ATA-150:v1.1
X-Lite:v3.0 build 56125
\*\*\* Create your UMG-1000 user account:
Step1. Please login to your UMG-1000 web-ui, and press the "Admin" button.
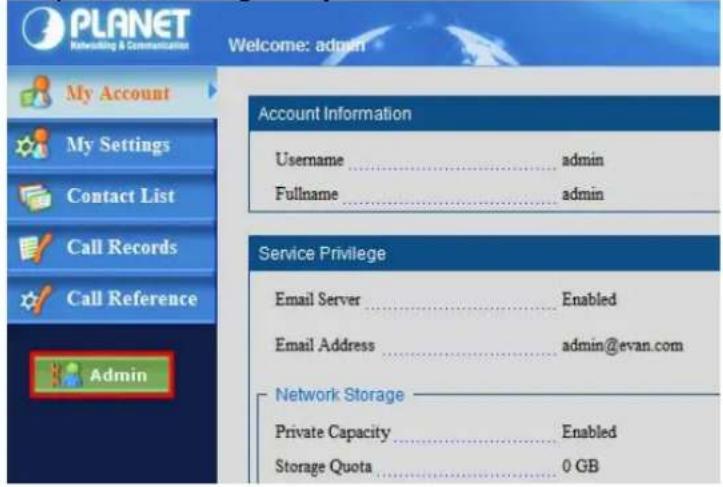
Step2. Go to "User" page, and press the "Add User" to create the user account.

Step3. Input the Username, password..., and modify the "Extension" number you want. After setting complete, please press the "Apply" to apply the configure.

\*\*\* Use ATA-150 to register to UMG-1000 :
Step1. Connecting Telephone:
Using a telephone cable, connect your telephone to the Phone port of the Phone Adapter.

Step2. Connecting Network and Power AC Power:
Connect the included Ethernet network cable to the LAN port of the Phone Adapter. Connect the included power adapter to the POWER port of the Phone Adapter. The PWR, LNK/ACT, and RING LEDs will be solidly lit when the Phone Adapter is ready for use.

natural_image
Diagram of a LAN device with an Ethernet cable inserted into the socket (no text or symbols)Step3. Basic Configuration & Administration Interface:
Using for soft utility to search SIP ATA from current network.
The utility not only easy-to-use and provides user more convenience for configuration access.
At the some time if you forget this IP address can also found that via the utility.
Please download the "SmartDiscoveryLite_v10.rar" at our FTP Server: ftp://surve_guest:7194@ftp.planet.com.tw/SmartDiscoveryLite_v10.rar
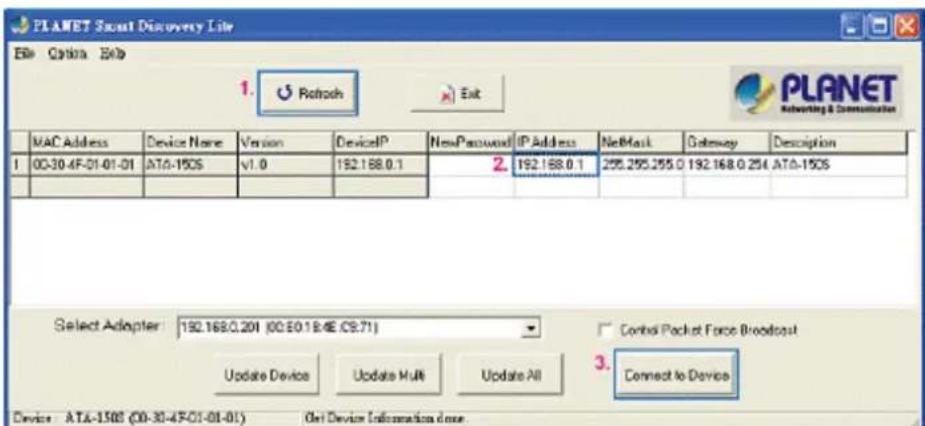
To press "Refresh" the button to show out the SIP ATA, then click IP Address item and press the "Connect to Device" button.
Step4. Login to your ATA-150 Web-UI :
You will connect to SIP ATA via your web browser automatically.
ATA will prompt for logon username/ password, please enter: admin / 123 to continue machine administration.

*The default IP address of ATA is 192.168.0.1.
You also could open your web browser, and insert http://192.168.0.1 in the address bar on your web browser to logon ATA web configuration page.
Step5. Configure the ATA-150 to register on UMG-1000 :
(1)Press the "SIP Setting".
(2)Press the "General" to open VoIP General Settings page.
(3)Press the "Service Domain" button.
(4)Display Name : Input the name you want.
.Line Number : Input the UMG-1000 Extension number, Ex. 5007
.Register Name : Same as the UMG-1000 Extension number, Ex. 5007
.Register Password : Same as the UMG-1000 Extension number, Ex. 5007
.Proxy : Tick the Enable
.Proxy Server : Input your UMG-1000 IP Address.
(5)Press the "Apply All" to apply the setting, then if success to register on UMG-1000.
The "Register Status" will show the "Registered".

Also, you can see the UMG-1000 Web-UI "PBX VoIP" page, there is show the 5007 Extension is work and Registered.

\*\*\* Use X-Lite to register to UMG-1000 :
Step1. Please download the X-Lite at X-Lite office web-page: http://www.counterpath.com/x-lite.html
Step2. After download and install complete, please open the X-Lite software.

Step3. Click the "Show Menu" button, and select the "SIP Account Settings" to setup your SIP Account.

Step4. Press the "Add" button to setup your SIP setting.

Step5. Input the setting and press the "OK" button to apply the setting.
*The Username and Password same as the UMG-1000 Extension number. Ex.5002

Step6. After setting complete, you will see the "Ready" on the X-Lite Screen.
And you can use it now.

Case 2_ VIP-880 VoIP Gateway how to register on the UMG-1000 Series.

flowchart
graph TD
    A["UMG-1000"] -->|SIP Register| B["VIP-880 VoIP Gateway"]
    A --> C["EX.5001"]
    A --> D["IP Phone"]
    B --> E["FXS"]
    B --> F["FXO"]
    E --> G["Phone"]
    F --> H["Wall Jack"]
    H --> I["Phone Company"]
    style A fill:#f9f,stroke:#333
    style B fill:#ccf,stroke:#333
    style C fill:#cfc,stroke:#333
    style D fill:#fcc,stroke:#333
    style E fill:#ffc,stroke:#333
    style F fill:#cfc,stroke:#333
    style G fill:#fcc,stroke:#333
    style H fill:#ffc,stroke:#333
    style I fill:#fcc,stroke:#333
\*\*\* FW & Utility version List:
UMG-1000:v.1.1.1
VIP-880:2.9.9
\*\*\* Create your UMG-1000 user account :
Step1. Please login to your UMG-1000 web-ui, and press the "Admin" button.
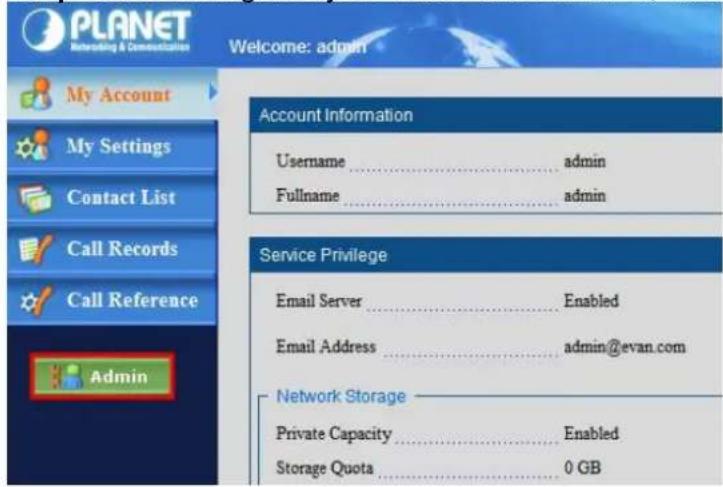
Step2. Go to "User" page, and press the "Add User" to create the user account.
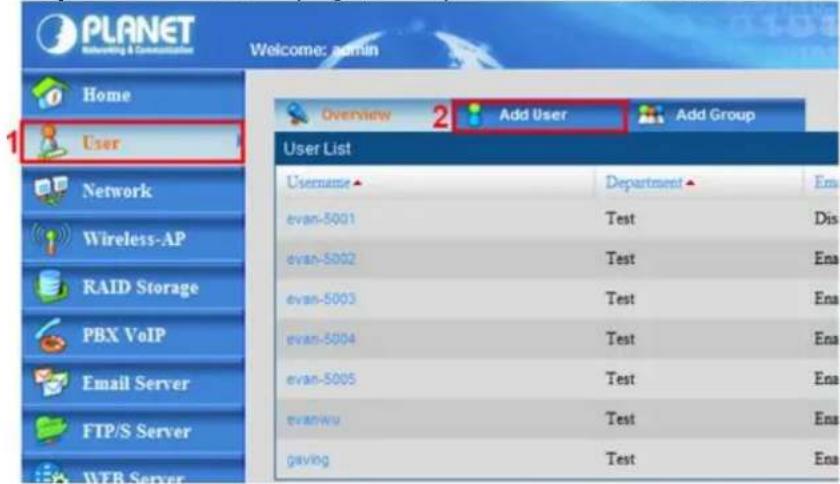
Step3. Input the Username, password..., and modify the "Extension" number you want. After setting complete, please press the "Apply" to apply the configure.

\*\*\* Use VIP-880 to register to UMG-1000 :
Step1. Configuration VoIP Setting register to UMG-1000 :
(1) Go to "VoIP Basic" page, and "VoIP Protocol Setting" select "SIP".
(2) Choose the FXS/FXO Port you want to register to UMG-1000.
Key-in the UMG-1000 extension number and password.
(the default extension password same as extension number)
Example. We used the FXS/Port 5 to register to UMG-1000 "5000" extension number.
We used the FXO/Port 6 to register to UMG-1000 "5003" extension number.

(3)Go to the below of page, please key-in your UMG-1000 IP-Address for connect to SIP Server.
Domain/Realm : UMG-1000 IP-Address or Domain name.
Sip Proxy Server : UMG-1000 IP-Address
SIP Authentication : Select "Enable"
Local SIP Port : 5060

When setting is complete, please press the "Apply" button on the below of page, then click the "Save Configuration" on the above of page to save setting.
If your setting is correct, you will see the "Register" information at UMG-1000.
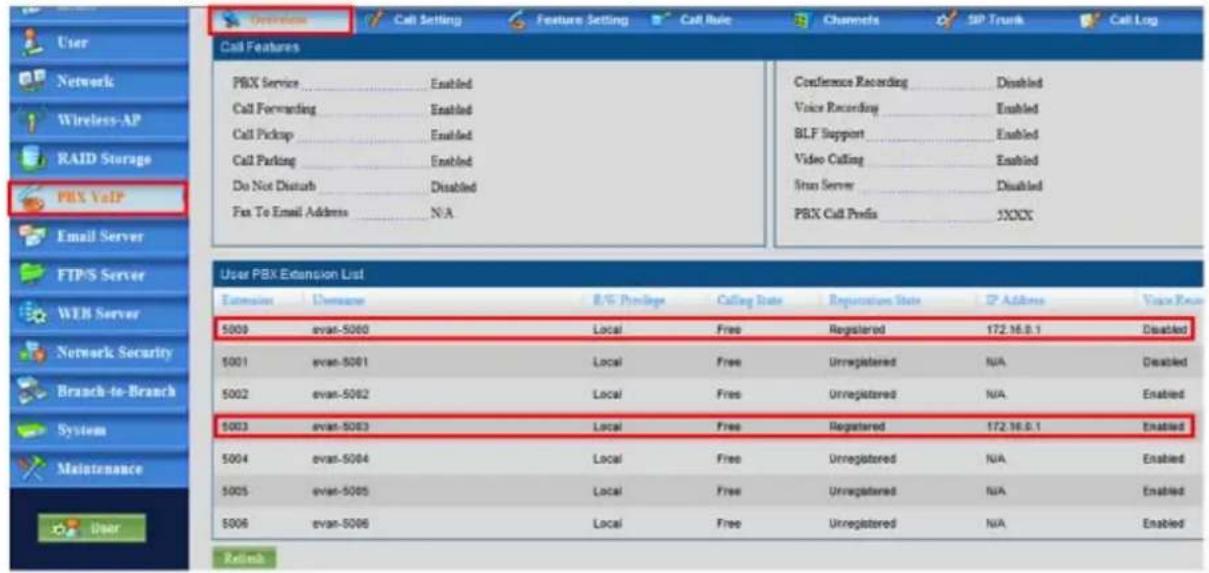
Step2. Configuration Hotline for when outside call in to forward extension number :
(1)Go to "Hot Line Setting" page.
(2) Set you want to forward to extension number which port you plug the PSTN Line.
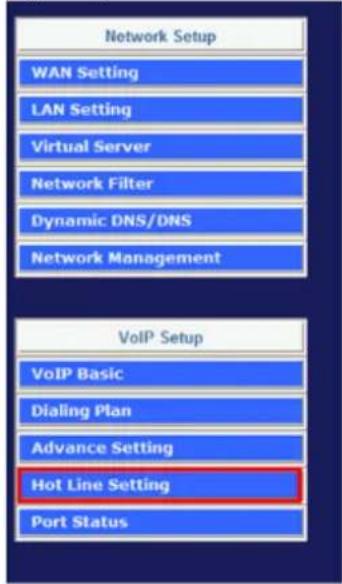
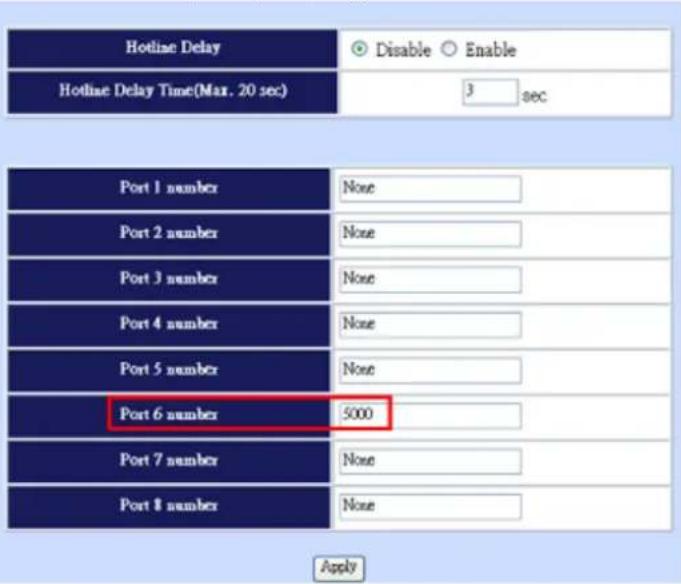
After setting complete :
(1)when call form outside, that will forward to your extension number 5000.
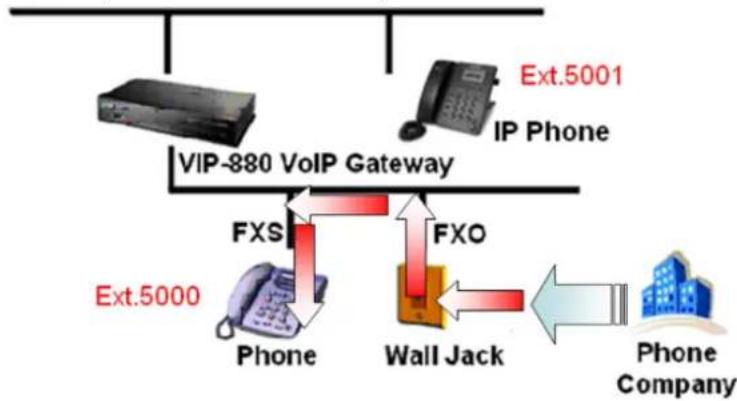
flowchart
graph TD
    A["Phone"] -->|Ext.5000| B["Wall Jack"]
    C["Phone Company"] -->|Ext.5001| D["IP Phone"]
    E["Extr.5001"] --> F["VIP-880 VoIP Gateway"]
    G["FXS"] --> H["FXO"]
    I["Ext.5000"] --> J["FXO"]
(2) When you want make a outside call, just dial the 5003 number to has outside call.

flowchart
graph TD
    A["VOIP Gateway"] --> B["IP Phone"]
    A --> C["FXS"]
    A --> D["FXO"]
    C --> E["Phone"]
    D --> F["Wall Jack"]
    style A fill:#f9f,stroke:#333
    style B fill:#ccf,stroke:#333
    style C fill:#cfc,stroke:#333
    style D fill:#fcc,stroke:#333
    style E fill:#ffc,stroke:#333
    style F fill:#fcc,stroke:#333
    note1["Ext.5000"] --> C
    note2["Ext.5001"] --> A
    note3["Out Side"] --> F
(3) If want call to another IP-Phone, just dial the extension number.

flowchart
graph TD
    A["UNIT-5000 System"] -->|SIP Register| B["VIP-880 VoIP Gateway"]
    B -->|FXS| C["Phone"]
    B -->|FXO| D["Wall Jack"]
    B -->|Ext.5000| E["Phone Company"]
    B -->|Ext.5001| F["IP Phone"]
    B -->|Ext.5003| G["Phone Company"]
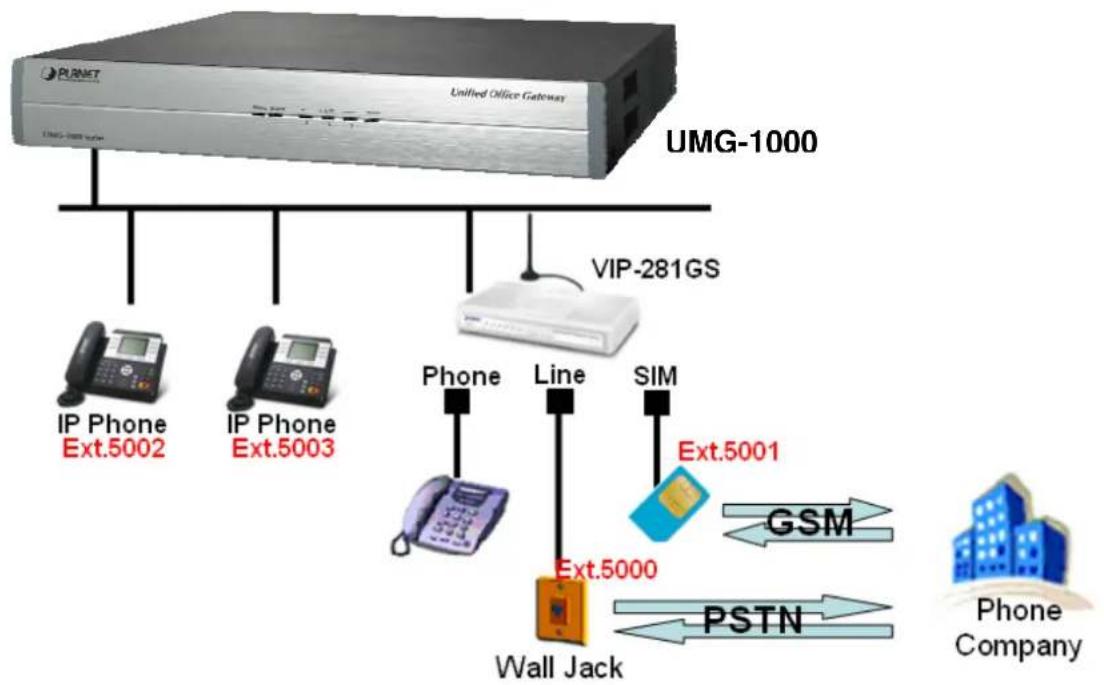
flowchart
graph TD
    A["UMG-1000"] --> B["IP Phone Ext.5002"]
    A --> C["IP Phone Ext.5003"]
    A --> D["VIP-281GS"]
    D --> E["Phone"]
    D --> F["Line"]
    D --> G["SIM"]
    G --> H["Ext.5001"]
    H --> I["GSM"]
    I --> J["Wall Jack"]
    J --> K["PSTN"]
    K --> L["Phone Company"]
\*\*\* FW & Utility version List:
UMG-1000:v.3.6.5
VIP-281GS : 3.2.4L
\*\*\* Create your UMG-1000 user account :
Step1. Please login to your UMG-1000 web-ui, and press the "Admin" button.
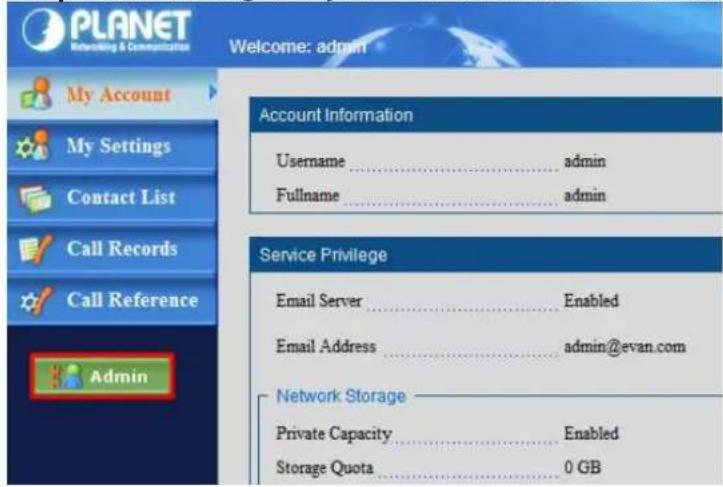
Step2. Go to "User" page, and press the "Add User" to create the user account.

Step3. Input the Username, password..., and modify the "Extension" number you want. After setting complete, please press the "Apply" to apply the configure.

*** Use VIP-281GS to register to UMG-1000 :
Step1.Configuration VoIP Setting register to UMG-1000 :
(3) Select the "Advance Setup".

(4) Go to "VoIP Basic" page, and "VoIP Protocol Setting" select "SIP".
(5) Register FXS and GSM on the UMG-1000.
Key-in the UMG-1000 extension number and password. (the default extension password same as extension number)
Example. We used the FXS to register to UMG-1000 "5000" extension number. We used the GSM to register to UMG-1000 "5001" extension number.

(3)Go to the below of page, please key-in your UMG-1000 IP-Address for connect to SIP Server.
Domain/Realm : UMG-1000 IP-Address or Domain name.
Sip Proxy Server : UMG-1000 IP-Address
SIP Authentication : Select "Enable"
Local SIP Port : 5060

When setting is complete, please press the "Apply" button on the below of page, then click the "Save Configuration" on the above of page to save setting.
If your setting is correct, you will see the "Register" information at UMG-1000.

Step2.Configuration the GSM Setting :
(1) Select the "GSM Setup".
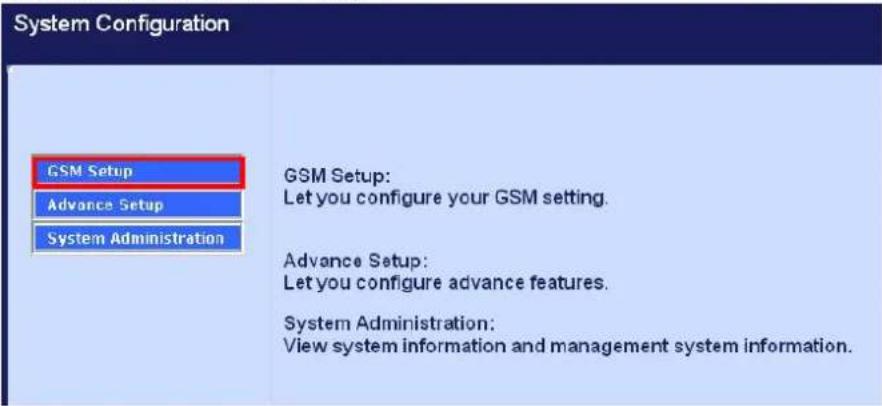
(2)Go to "GSM Parameter" page.
(3) If your PIN Card had set password, please "PIN Code Protection" select "Enable" and key-in your password.
(4) Choose your "GSM Frequency".
(5)After setting complete, press the "Apply" button and click the "Save Configuration".
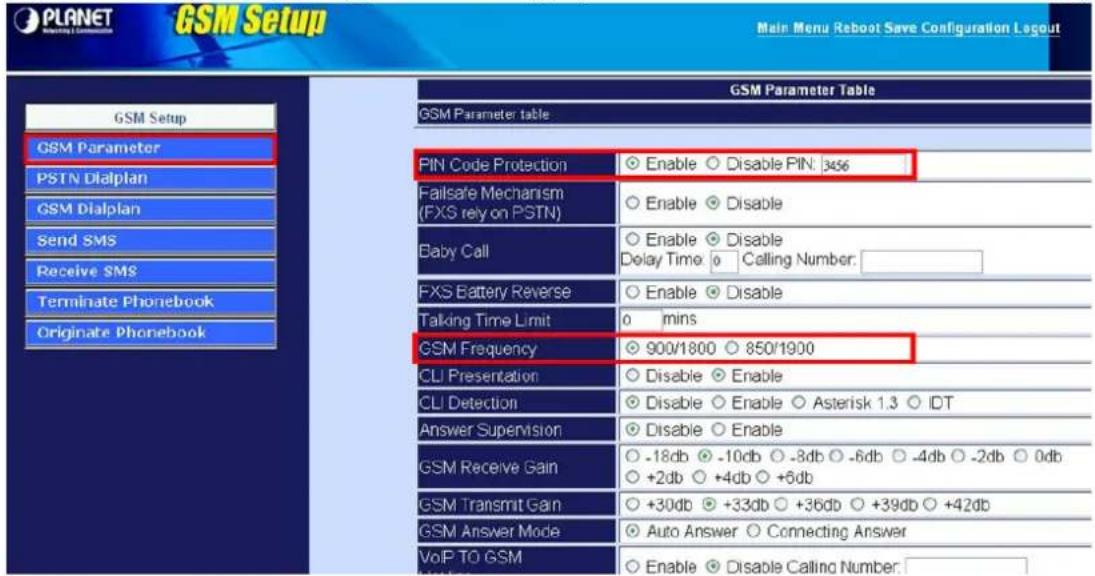
(6)Go to "System Administration" page.

(7)Go to "System Information" for check your GSM is success connect.

Step3. Configuration the prefix number for auto select PSTN Line or GSM Line when had outside call :
(1)Go to "PSTN Dialplan" page.
(2) Set the prefix number for choose PSTN Line outside call.
Example. We use prefix number "2" for choose PSTN Line outside call.
(3)After setting complete, press the "Apply" button and click the "Save Configuration".

(4)Go to "GSM Dialplan" page.
(5)Select "GSM Dial Termination Key".
(6) Set the prefix number for choose GSM Line outside call.
Example. We use prefix number "09" for choose GSM Line outside call.
(7) After setting complete, press the "Apply" button and click the "Save Configuration".

Step4.Configuration Hotline for when outside call in to forward extension number :
(1)Go to "Hot Line Setting" page.
(2) Set you want to forward to extension number for PSTN Line and GSM Line.

After setting complete :
(1)When use phone call "2xxxxxx", then will auto choose PSTN Line to outside.
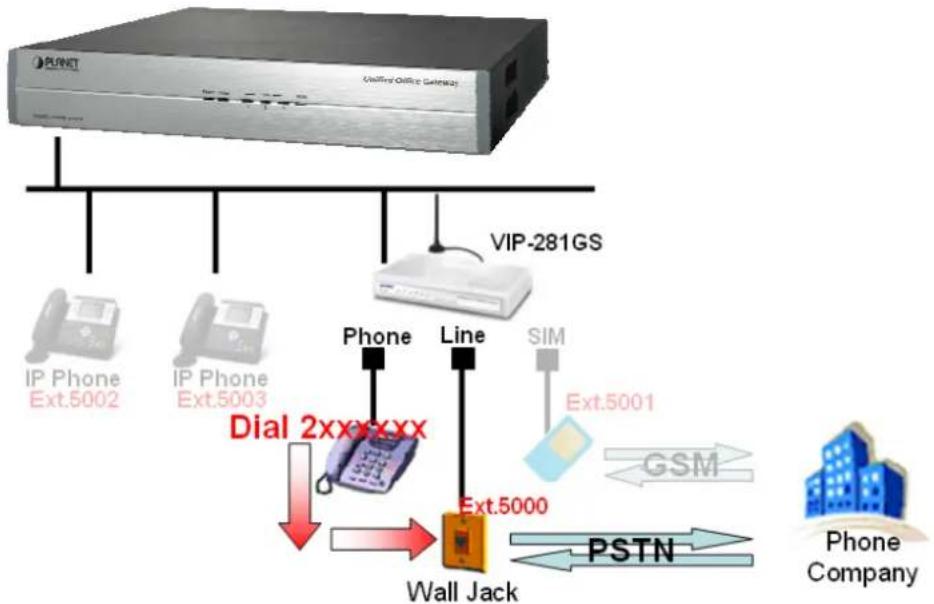
flowchart
graph TD
    A["PLANT"] -->|Ext.5002| B["IP Phone"]
    A -->|Ext.5003| C["IP Phone"]
    A -->|Ext.5001| D["Line"]
    A -->|Ext.5001| E["SIM"]
    A -->|Ext.5001| F["GSM"]
    A --> G["Wall Jack"]
    G --> H["PSTN"]
    H --> I["Phone Company"]
    style A fill:#f9f,stroke:#333
    style G fill:#ccf,stroke:#333
    style H fill:#cfc,stroke:#333
    style I fill:#fcc,stroke:#333
(2)When use phone call "09xxxxxx", then will auto choose GSM Line to outside.
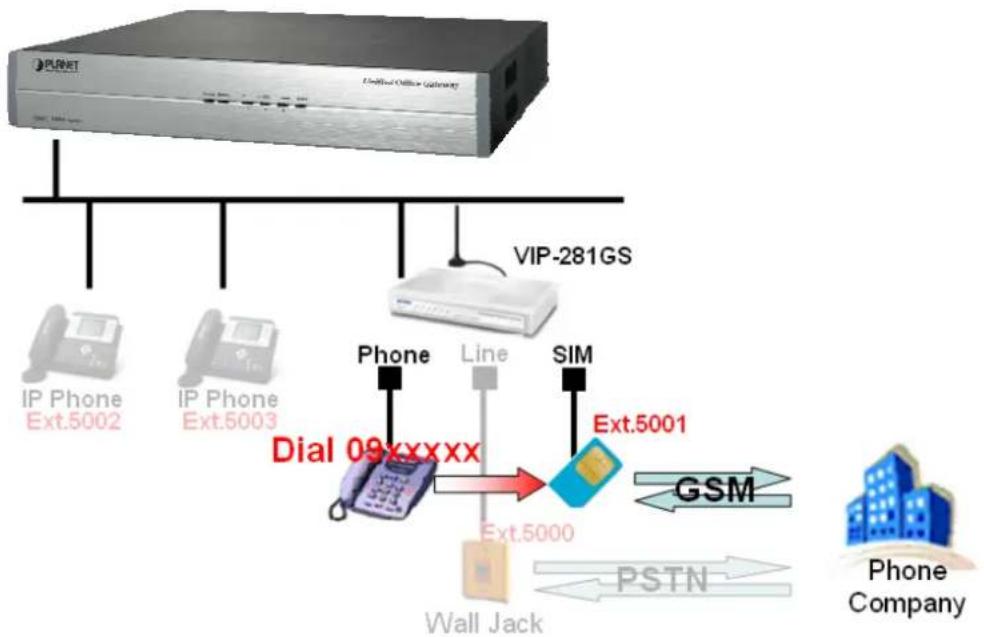
flowchart
graph TD
    A["PLANET Server"] --> B["IP Phone Ext.5002"]
    A --> C["IP Phone Ext.5003"]
    A --> D["VIP-281GS"]
    D --> E["Dial 09xxxxx"]
    E --> F["Phone"]
    E --> G["Line"]
    E --> H["SIM"]
    H --> I["Ext.5001"]
    I --> J["GSM"]
    J --> K["Phone Company"]
    E --> L["Wall Jack"]
    L --> M["PSTN"]
    M --> N["Ext.5000"]
(3) Use IP Phone to call outside by PSTN Line.
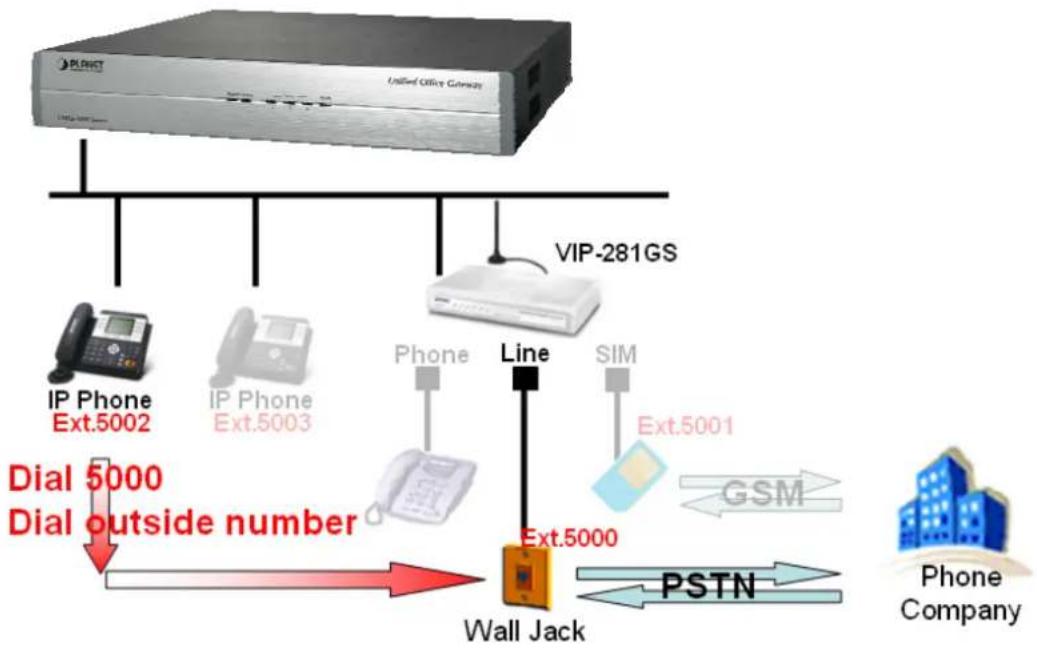
flowchart
graph TD
    A["United Office Devices"] --> B["IP Phone Ext.5002"]
    A --> C["IP Phone Ext.5003"]
    A --> D["VIP-281GS"]
    D --> E["Line"]
    E --> F["SIM"]
    F --> G["Ext.5001"]
    G --> H["GSM"]
    H --> I["Phone Company"]
    J["Dial 5000"] --> K["Dial outside number"]
    L["Wall Jack"] --> M["PSTN"]
    M --> N["Ext.5000"]
    N --> O["Phone Company"]
(4)When call form outside to PSTN Line, that will forward to your extension number 5002.

flowchart
graph TD
    A["User"] --> B["Device"]
    B --> C["IP Phone Ext.5002"]
    B --> D["IP Phone Ext.5003"]
    B --> E["Phone"]
    B --> F["Line"]
    B --> G["VIP-281GS"]
    B --> H["SIM"]
    H --> I["Ext.5001"]
    I --> J["GSM"]
    J --> K["Wall Jack"]
    K --> L["PSTN"]
    L --> M["Phone Company"]
(5)Use IP Phone to call outside by GSM Line.
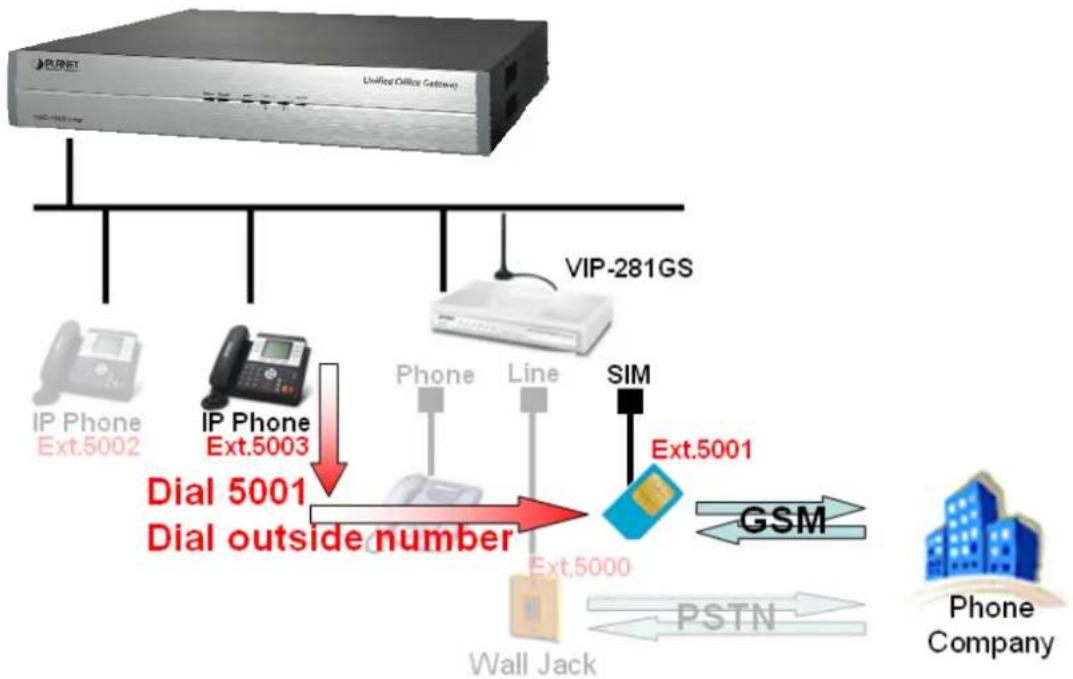
flowchart
graph TD
    A["UserOffice Getaway"] --> B["IP Phone Ext.5002"]
    A --> C["IP Phone Ext.5003"]
    A --> D["VIP-281GS"]
    C --> E["Dial 5001 Dial outside number"]
    D --> F["SIM"]
    F --> G["Ext.5001"]
    G --> H["GSM"]
    H --> I["Phone Company"]
    J["Wall Jack"] --> K["PSTN"]
    K --> L["Ext.5000"]
    L --> M["Line"]
    M --> N["Phone"]
    N --> O["Dial 5001"]
(6)When call form outside to GSM Line, that will forward to your extension number 5003.

flowchart
graph TD
    A["United Office Gateway"] -->|IP Phone Ext.5002| B["IP Phone Ext.5003"]
    A -->|IP Phone Ext.5002| C["IP Phone Ext.5003"]
    A -->|IP Phone Ext.5002| D["IP Phone"]
    A -->|IP Phone Ext.5002| E["IP Phone"]
    A -->|IP Phone Ext.5002| F["IP Phone"]
    A -->|IP Phone Ext.5002| G["IP Phone"]
    A -->|IP Phone Ext.5002| H["IP Phone"]
    A -->|IP Phone Ext.5002| I["IP Phone"]
    A -->|IP Phone Ext.5002| J["IP Phone"]
    A -->|IP Phone Ext.5002| K["IP Phone"]
    A -->|IP Phone Ext.5002| L["IP Phone"]
    A -->|IP Phone Ext.5002| M["IP Phone"]
    A -->|IP Phone Ext.5002| N["IP Phone"]
    A -->|IP Phone Ext.5002| O["IP Phone"]
    A -->|IP Phone Ext.5002| P["IP Phone"]
    A -->|IP Phone Ext.5002| Q["IP Phone"]
    A -->|IP Phone Ext.5002| R["IP Phone"]
    A -->|IP Phone Ext.5002| S["IP Phone"]
    A -->|IP Phone Ext.5002| T["IP Phone"]
    A -->|IP Phone Ext.5002| U["IP Phone"]
    A -->|IP Phone Ext.5002| V["IP Phone"]
    A -->|IP Phone Ext.5002| W["IP Phone"]
    A -->|IP Phone Ext.5002| X["IP Phone"]
    A -->|IP Phone Ext.5002| Y["IP Phone"]
    A -->|IP Phone Ext.5002| Z["IP Phone"]
    A -->|IP Phone Ext.5002| AA["IP Phone"]
    A -->|IP Phone Ext.5002| AB["IP Phone"]
    A -->|IP Phone Ext.5002| AC["IP Phone"]
    A -->|IP Phone Ext.5002| AD["IP Phone"]
    A -->|IP Phone Ext.5002| AE["IP Phone"]
    A -->|IP Phone Ext.5002| AF["IP Phone"]
    A -->|IP Phone Ext.5002| AG["IP Phone"]
    A -->|IP Phone Ext.5002| AH["IP Phone"]
    A -->|IP Phone Ext.5002| AI["IP Phone"]
    A -->|IP Phone Ext.5002| AJ["IP Phone"]
    A -->|IP Phone Ext.5002| AK["IP Phone"]
    A -->|IP Phone Ext.5002| AL["IP Phone"]
    A -->|IP Phone Ext.5002| AM["IP Phone"]
    A -->|IP Phone Ext.5002| AN["IP Phone"]
    A -->|IP Phone Ext.5002| AO["IP Phone"]
    A -->|IP Phone Ext.5002| AP["IP Phone"]
    A -->|IP Phone Ext.5002| AQ["IP Phone"]
    A -->|IP Phone Ext.5002| AR["IP Phone"]
    A -->|IP Phone Ext.5002| AS["IP Phone"]
    A -->|IP Phone Ext.5002| AT["IP Phone"]
    A -->|IP Phone Ext.5002| AU["IP Phone"]
    A -->|IP Phone Ext.5002| AV["IP Phone"]
    A -->|IP Phone Ext.5002| AW["IP Phone"]
    A -->|IP Phone Ext.5002| AX["IP Phone"]
    A -->|IP Phone Ext.5002| AY["IP Phone"]
    A -->|IP Phone Ext.5002| AZ["IP Phone"]
    A -->|IP Phone Ext.5002| BA["IP Phone"]
    A -->|IP Phone Ext.5002| BB["IP Phone"]
    A -->|IP Phone Ext.5002| BC["IP Phone"]
    A -->|IP Phone Ext.5002| BD["IP Phone"]
    A -->|IP Phone Ext.5002| BE["IP Phone"]
    A -->|IP Phone Ext.5002| BF["IP Phone"]
    A -->|IP Phone Ext.5002| BG["IP Phone"]
    A -->|IP Phone Ext.5002| BH["IP Phone"]
    A -->|IP Phone Ext.5002| BI["IP Phone"]
    A -->|IP Phone Ext.5002| BJ["IP Phone"]
    A -->|IP Phone Ext.5002| BK["IP Phone"]
    A -->|IP Phone Ext.5002| BL["IP Phone"]
    A -->|IP Phone Ext.5002| BM["IP Phone"]
    A -->|IP Phone Ext.5002| BN["IP Phone"]
    A -->|IP Phone Ext.5002| BO["IP Phone"]
    A -->|IP Phone Ext.5002| BP["IP Phone"]
    A -->|IP Phone Ext.5002| BQ["IP Phone"]
    A -->|IP Phone Ext.5002| BR["IP Phone"]
    A -->|IP Phone Ext.5002| BS["IP Phone"]
    A -->|IP Phone Ext.5002| BT["IP Phone"]
    A -->|IP Phone Ext.5002| BU["IP Phone"]
    A -->|IP Phone Ext.5002| BV["IP Phone"]
    A -->|IP Phone Ext.5002| BW["IP Phone"]
    A -->|IP Phone Ext.5002| BX["IP Phone"]
    A -->|IP Phone Ext.5002| BY["IP Phone"]
    A -->|IP Phone Ext.5002| BZ["INP-281GS"]
    BZ <--> AC["SIM"]
    AC <--> AD["GSM"]
    AD <--> AE["PSTN"]
    AE <--> AF["Phone Company"]

\*\*\* FW & Utility version List:
UMG-1000:v.1.1.1
VIP-254T/PT:V1.0.2
VIP-360PT: 2.0002
\*\*\* Create your UMG-1000 user account :
Step1. Please login to your UMG-1000 web-ui, and press the "Admin" button.
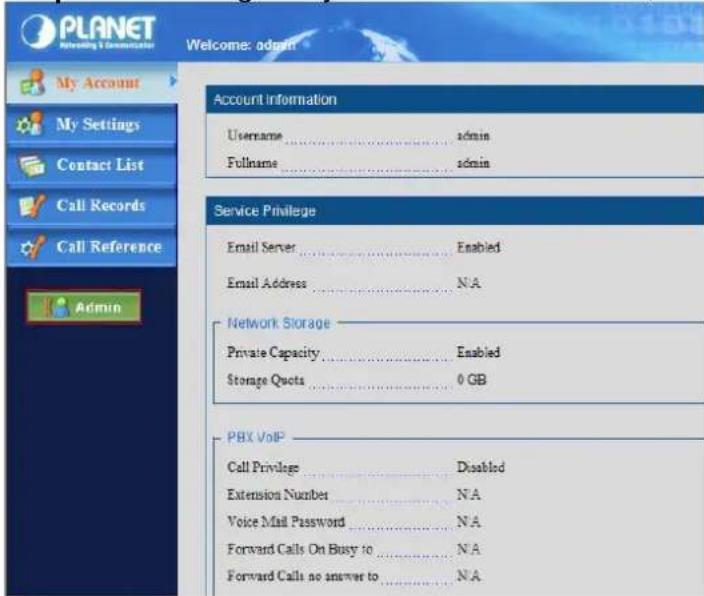
Step2. Go to "User" page, and press the "Add User" to create the user account.

Step3. Input the Username, password..., and modify the "Extension" number you want. After setting complete, please press the "Apply" to apply the configure.


\*\*\* Use VIP-254 to register to UMG-1000 :
Step1. VIP-254 will prompt for logon username/ password, please enter: root / No password to continue machine administration.
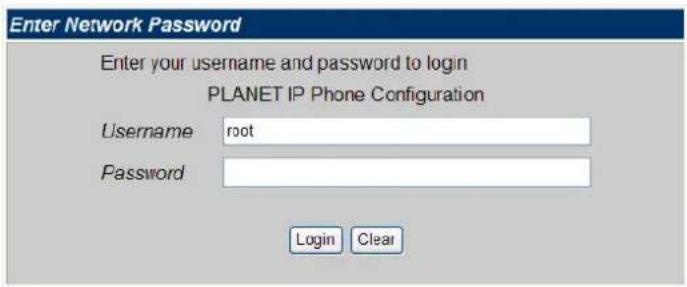
*The default IP address of ATA is 192.168.0.1.
You also could open your web browser, and insert http://192.168.0.1 in the address bar on your web browser to logon VIP-254 web configuration page.
Step2: Insert IP information
Go to Network -> LAN Setting, You will login LAN Setting page. Please insert IP information and press "Submit". After check "DHCP Client"

LAN Settings
You could configure the LAN settings in this page.
| LAN Mode: | Bridge | NAT |
LAN Setting
| IP Type: | ○Fixed IP ○ DHCP Client ○ PPPoE | |
| IP: | 172 16.0 249 | |
| Mask: | 255 255 255.0 | |
| Gateway: | 172 16.0.75 | |
| DNS Type: | ○Fixed ○ Auto | |
| DNS Server1: | 168 95 192 1 | |
| DNS Server2: | 168 95.1.1 | |
| MAC: | 033047beve23 | |
| Host Name: | PLANET IP PHONE | |
PPPoE Setting
| User Name: | |
| Password: | |
| Service Name: |

LAN Settings
You could configure the LAN settings in this page.
| LAN Mode | Bridge | NAT |
LAN Setting
| IP Type: | Fixed IP DHCP Client PPPoE |
| IP: | 172.16.0.249 |
| Mask: | 256.256.256.0 |
| Gateway: | 172.16.0.75 |
| DNS Type: | Fixed Auto |
| DNS Server1: | 168.95.192.1 |
| DNS Server2: | 168.95.1.1 |
| MAC | 0130477=23 |
| Host Name: | PLANET IP PHONE |
PPPoE Setting
| User Name: | |
| Password: | |
| Service Name: |

Step3. Set SIP
(1)Press the "SIP Settings".
(2)Check the "Realm#1" in Realm No.
(3)Display Name : Input the name you want. EX. 5002
.User Name : Input the name you want, Ex. 5002
.Register Name : Same as the UMG-1000 Extension number, Ex. 5002
.Register Password : Same as the UMG-1000 Extension number, Ex. 5002
.Proxy Server : Input your UMG-1000 IP Address.
(4)Press the "Apply All" to apply the setting, then if success to register on UMG-1000.

Service Domain Settings
You could set information of service domains in this page.
Realm No.:
Realm # 1

Also, you can see the UMG-1000 Web-UI "PBX VoIP" page, there is show the 5002 Extension is work and Registered.

\*\*\* Use VIP-360PT to register to UMG-1000 :
Step1.
VIP-360PT will prompt for logon username/ password, please enter: admin / 123 to continue machine administration.

*The default IP address of ATA is 192.168.0.1.
You also could open your web browser, and insert http://192.168.0.1 in the address bar on your web browser to logon VIP-360PT web configuration page.
Step2. Insert IP information
Go to Network -> LAN Setting, You will login LAN Setting page. Please insert IP information and press "Submit".

NETWORK
| WAN | LAN | QOS | SERVICE PORT | DHCP SERVER | SNTP |
| WAN Status | |||||
| Active IP | 172.16.0.247 | ||||
| Current Netmask | 255.255.0.0 | ||||
| Current Gateway | 172.16.0.1 | ||||
| MAC Address | 00:0e:30:00:5e:20 | ||||
| Get MAC Time | 20091119 | ||||
| WAN Setting | |||||
| Static | DHCP | PPPOE | |||
| Obtain DNS server automatically | |||||
| Static IP Address | 172.16.0.247 | ||||
| Netmask | 255.255.0.0 | ||||
| Gateway | 172.16.0.1 | ||||
| DNS Domain | |||||
| Primary DNS | 8.8.8.8 | ||||
| Alter DNS | 202.95.128.68 | ||||
| APPLY | |||||
Step3. Set SIP Settings
(1)Press the "VOIP".
(2)Server Name : Input the name you want. EX.5003
.Server Address : Input the UMG-1000 IP Address, EX.172.16.0.75
.Password : Same as the UMG-1000 Extension number, Ex. 5003
.Phone number : Input the UMG-1000 Extension number, Ex. 5003
(3)Press the "Apply" to apply the setting, then if success to register on UMG-1000. The "Register Status" will show the "Registered".

VOIP
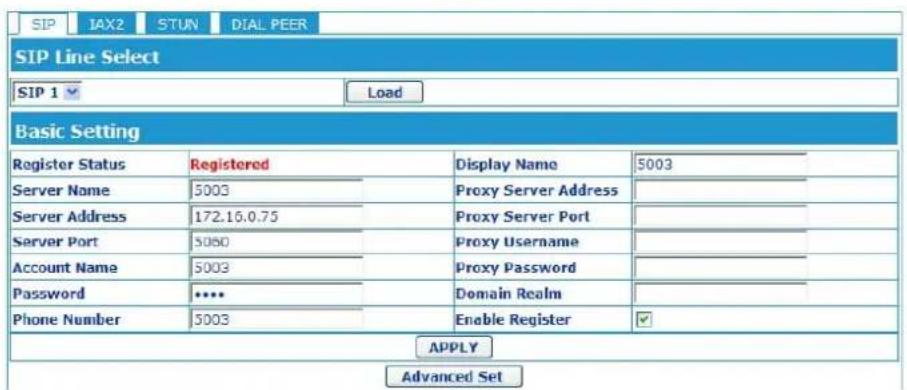
Also, you can see the UMG-1000 Web-UI "PBX VoIP" page, there is show the 5003 Extension is work and Registered.


Case 5_ How do you setup a VPN with UMG-1000 Series.

flowchart
graph LR
    A["PC"] --> B["UMG-1000"]
    C["Internet"] --> B
    D["Local Network"] --> E["VIP-360PT"]
    B --> F["Endled Office Gateway"]
    E --> G["PC"]
*** FW & Utility version List:
UMG-1000:v.1.1.1
*** Create your UMG-1000 internet :
Step1. Please login to your UMG-1000 web-UI, and press the "Admin" button.

Step2. Insert your "Internet"

Step3. Insert your "Local Network"
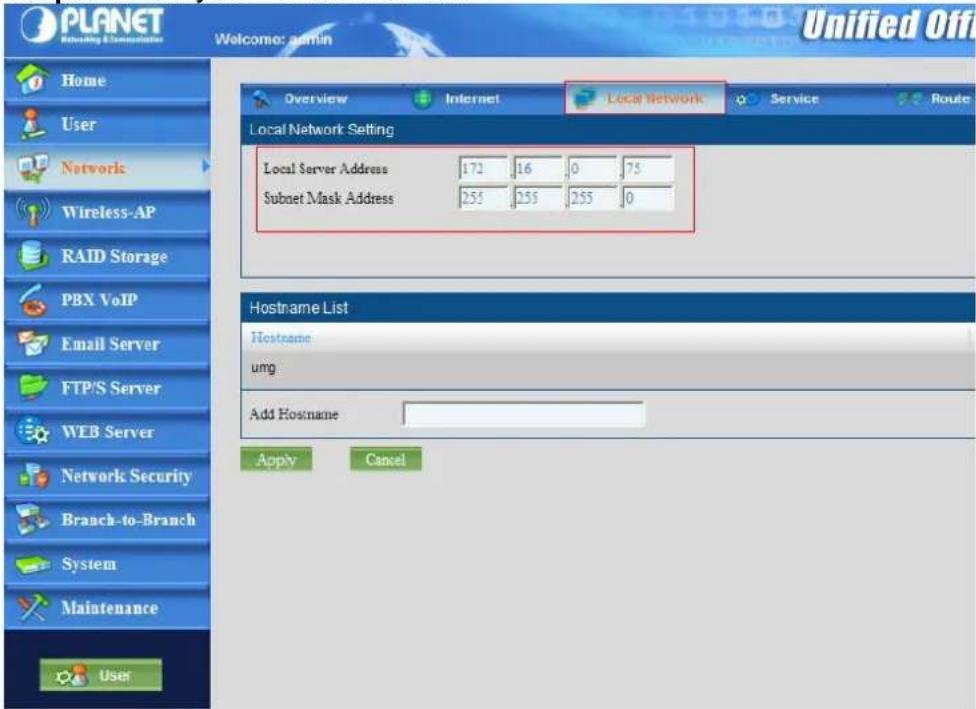
Step4. Check enable in the "PPTP VPN Server"
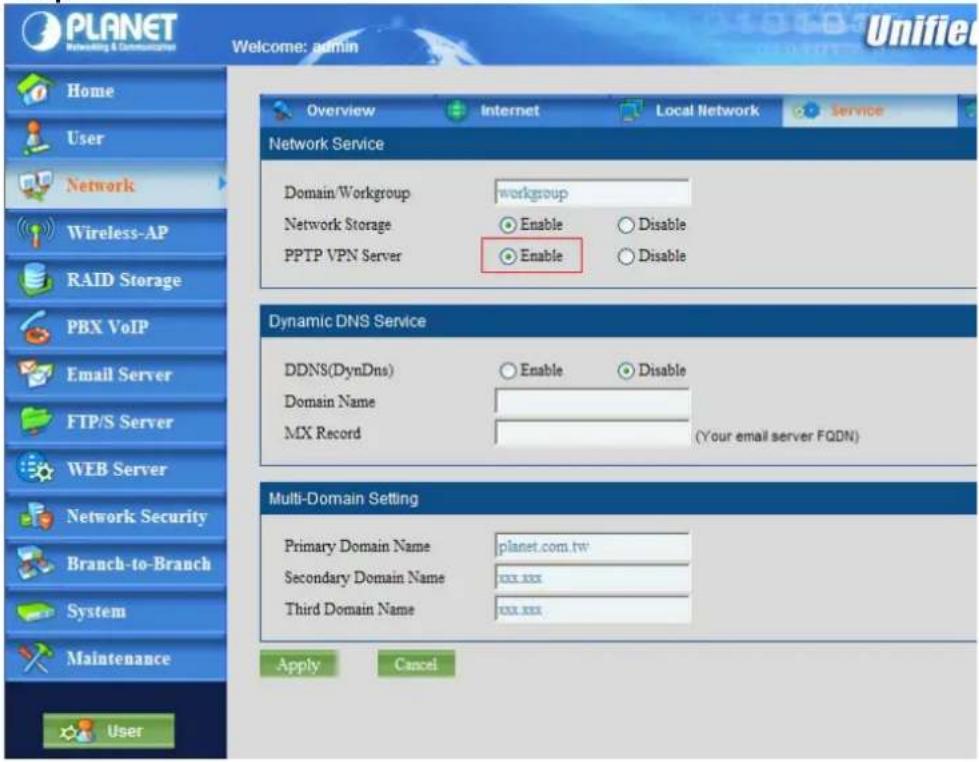
Step5. Double check your setting

\*\*\* Create your UMG-1000 user account :
Step1. Go to "User" page, and press the "Add User" to create the user account.

Step2. Double check your setting and make sure "Enable" PPTPVPN

\*\*\* Create your PCs a new connect :
Step1. Go to start→setting→Network Connections

Step2. press "Create a new connection"

Step3. Press "Next"

Step4. Check "Connect to the network at my workplace" and press "Next"
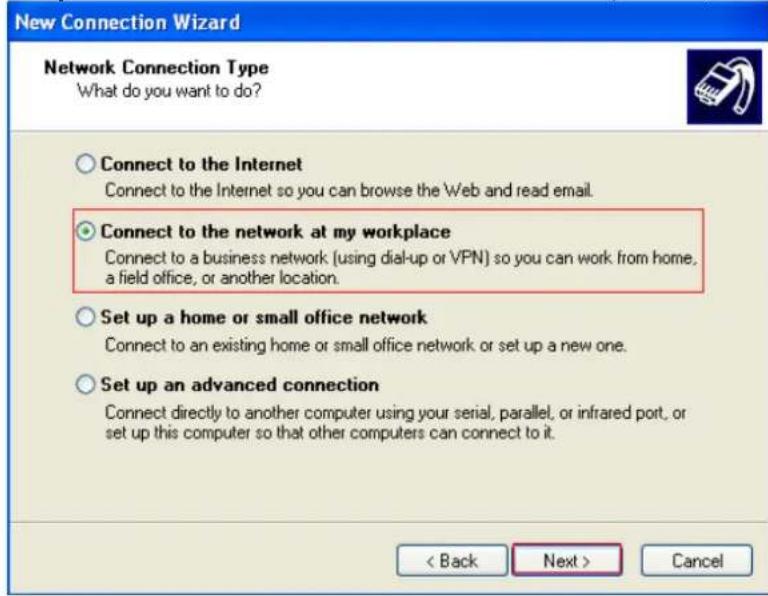
Step5. Check "Virtual Private Network connect" and press "Next"

Step6. Insert your company name
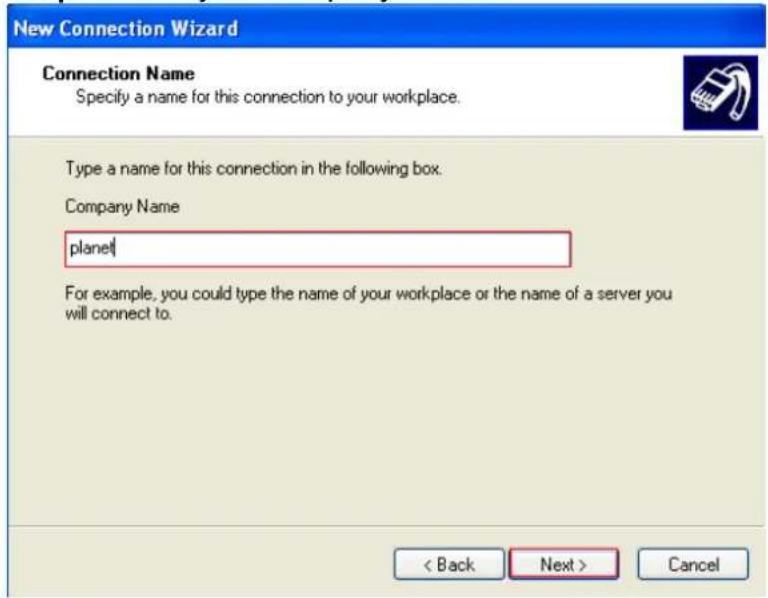
Step7. Insert your UMG-1000 internet IP address(Static-IP)

7
Step8. Check "Add a shortcut to this connect to my desktop" and press "Finish"
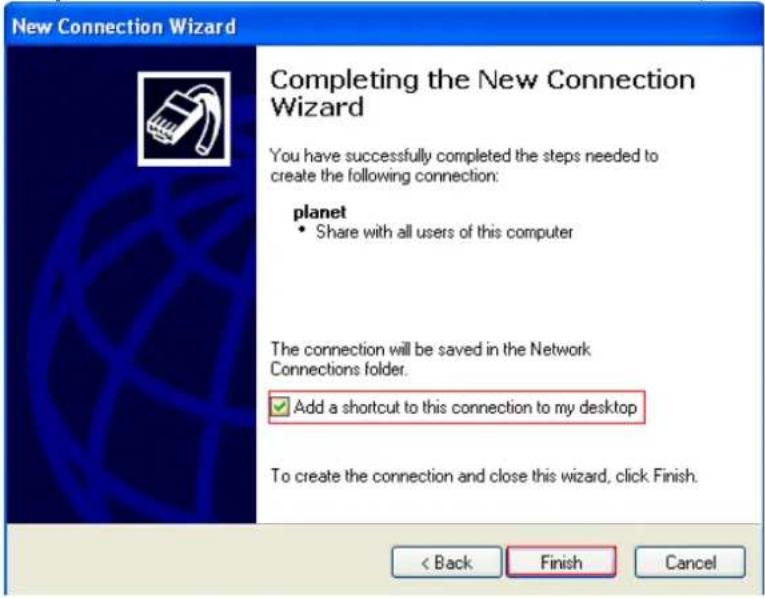
Step9. Insert your User name and Password (the same UMG-1000 user account)

Step10. Display connect to UMG-1000 and check it

Step11. Key Local IP address in the browser, you can go in management page.

Case 6_ How to use LCR function on UMG-1000 Series
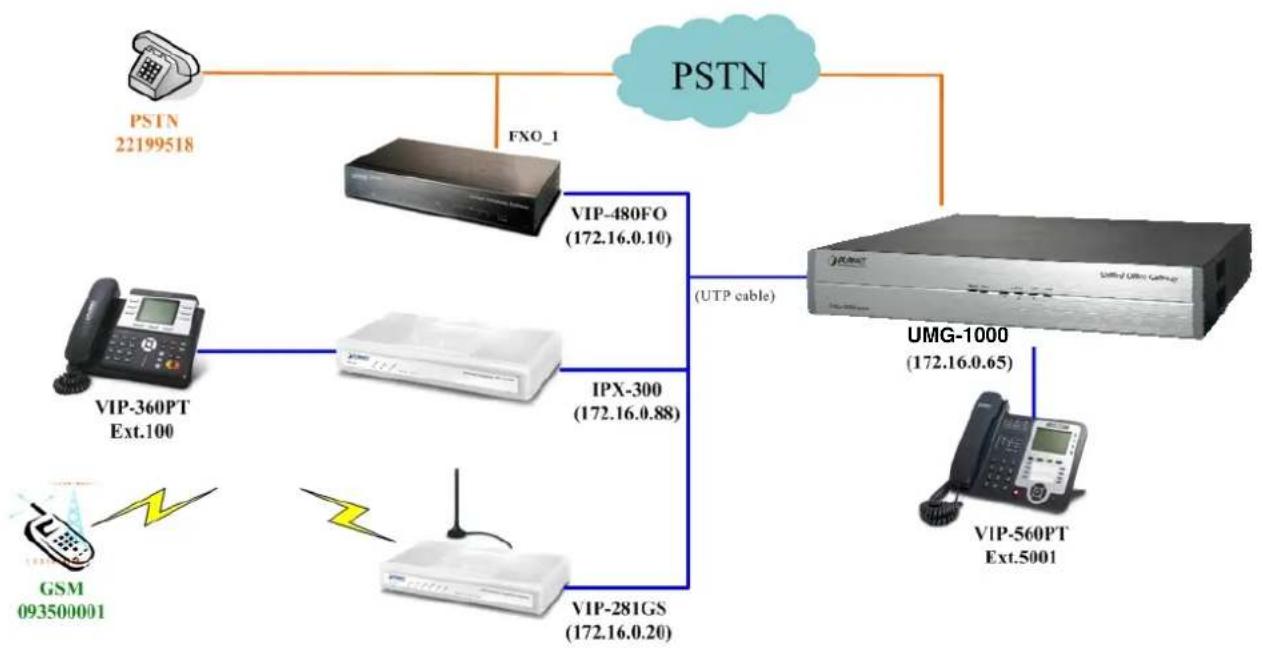
flowchart
graph TD
    PSTN["PSIN 22199518"] --> VIP-480FO["VIP-480FO (172.16.0.10)"]
    FXO_1["FXO_1"] --> VIP-480FO
    VIP-480FO --> IPX-300["IPX-300 (172.16.0.88)"]
    IPX-300 --> VIP-281GS["VIP-281GS (172.16.0.20)"]
    VIP-281GS --> UMG-1000["UMG-1000 (172.16.0.65)"]
    UMG-1000 --> VIP-560PT["VIP-560PT Ext.5001"]
    VIP-360PT["VIP-360PT Ext.100"] --> VIP-480FO
    VIP-360PT --> IPX-300
    VIP-360PT --> VIP-281GS
    GSM["GSM 093500001"] --> VIP-281GS
    VIP-480FO --> UMG-1000
    VIP-480FO --> UMG-1000
    VIP-281GS --> UMG-1000
    UPG["USTP cable"] --> UMG-1000
\*\*\* FW & Utility version List:
UMG-1000: v3.6.81
IPX-300: v2.1.9
VIP-480FO: v3.0.8
VIP-281GS: v3.2.4
VIP-360PT: v2.0002
VIP-560PT: v2.0.3.2-809
\*\*\* Create your UMG-1000 user account :
Step1. Please login to your UMG-1000 Web-UI, and press the "Admin" button.

Step2. Go to "User" page, and press the "Add User" to create the user account.

Step3. Input the Username, password..., and modify the "Extension" number you want. After setting complete, please press the "Apply" to apply the configuration.

*** Enable LCR, create SIP Trunk and setup LCR settings on UMG-1000 :
Step1. Go to "PBX VoIP" page, and press the "Call Setting" to enable LCR function.
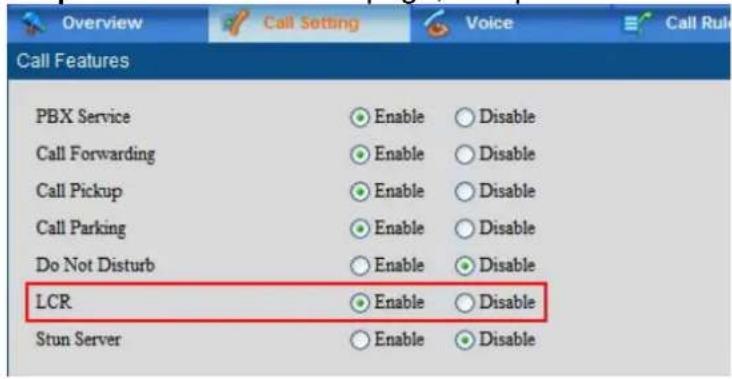
Step2. To press the "SIP Trunk" to create SIP Trunk for registering with IPX-300.

Step3. To press the "LCR" to setup LCR settings.
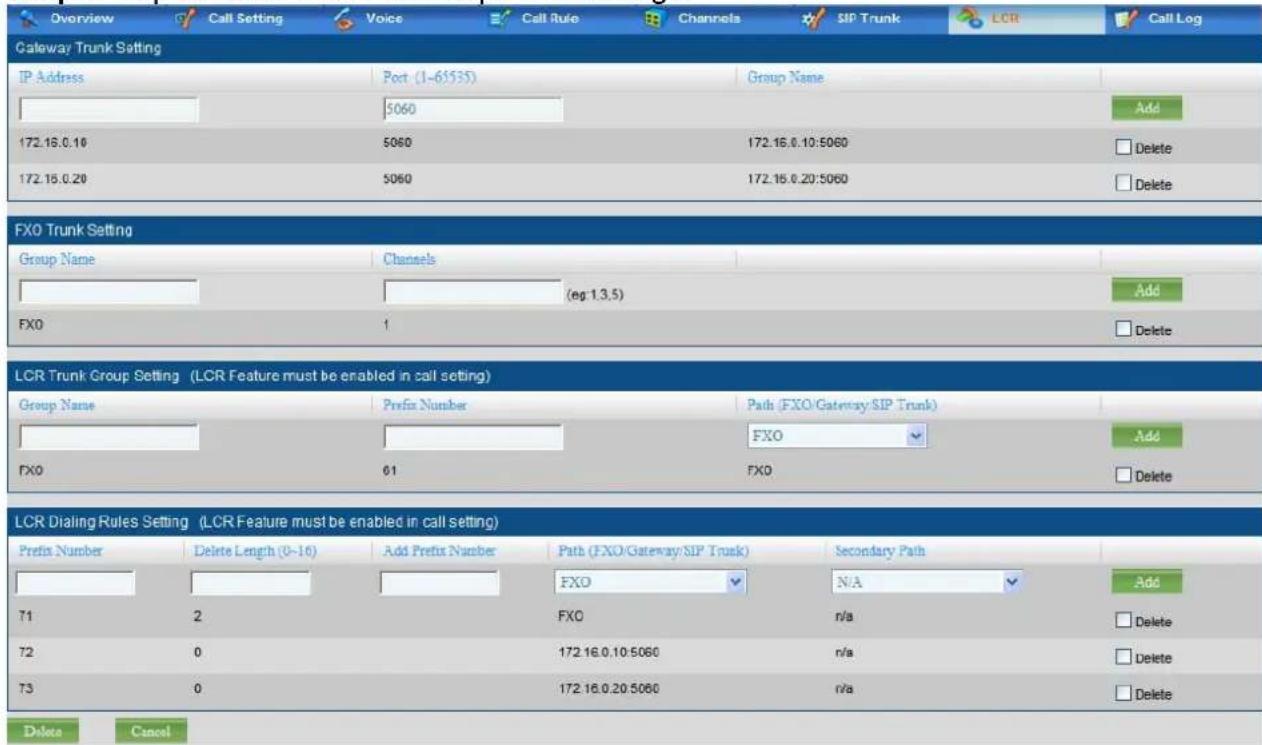
Gateway Trunk Setting:
UMG-1000 can make the off-net call either via the external voice gateway. Before you can make the successful call, you have to fill in gateway's IP address and SIP port.
In this case, we created 172.16.0.10 for FXO Gateway (VIP-480FO), and 172.16.0.20 for GSM Gateway (VIP-281GS).
FXO Trunk Setting:
You also could determine use which FXO port for outgoing call via LCR function.
In this case, we define channel 1 of FXO module.
LCR Trunk Group Setting:
When want to make VoIP calls through the above Gateway Trunk, FXO channel or SIP Trunk, the user can use this function to accomplish the 2_Stage dialing method.
In this case, we created the rule for outgoing call.
Prefix No.61: When dialing the number 61, it will hear the prompt for dialing desired external number. Then this call will go through FXO channel 1.
LCR Dialing Rules Setting:
This is another way to make VoIP calls through the above Gateway Trunk, FXO channel or SIP Trunk, the user can use this function to accomplish the 1_Stage dialing method.
In this case, we created the below rules for outgoing call.
Prefix No.71: When dialing the number start by 71, this call will go through FXO channel 1.
Prefix No.72: When dialing the number start by 72, this call will go through VIP-480FO.
Prefix No.73: When dialing the number start by 71, this call will go through VIP-281GS.
Prefix No.8: When dialing the number start by 8, this call will send to IPX-300 and ring up the desired extension.
\*\*\* Setup Dialing Plan on VIP-480FO and VIP-281GS :
Step1. Login to VIP-480FO Web-UI, and go to the "Dialing Plan" page. To add an Incoming Dial Plan.
Incoming Dial Plan: (maximun 50 entries, maximun length of prefix digits is 16 digit, maximun length of number is 20 digit):
| Item | Incoming no. | Length of Number | Delete Length | Prefix no. | Destination telephone port | Operation |
| 1 | 72x | 3 ~ 16 | 2 | None | 1 | |
| ADD |
Incoming no.:72x, when the subscribers of UMG-1000 dial the number start by 72, this call will send to VIP-480FO.
Length of Number: 3\~16, to define the total number length.
Delete Length: 2, to remove 72
Prefix no.: None, no add additional digits before the dialing number
Destination telephone port: 1, the finial dialing number will send to FXO port1 for outgoing.
Step2. Login to VIP-281GS Web-UI, and go to the "Dialing Plan" page. To add an Incoming Dial Plan.
Incoming Dial Plan: (maximum 50 entries, maximum length of prefix digits is 16 digit, maximum length of number is 20 digit):
| Item | Incoming no. | Length of Number | Delete Length | Prefix no. | Destination telephone port | Operation |
| 73x | 3 ~ 16 | 2 | FXS GSM | ADD |
Incoming no.:73x, when the subscribers of UMG-1000 dial the number start by 73, this call will send to VIP-281GS.
Length of Number: 3\~16, to define the total number length.
Delete Length: 2, to remove 73
Prefix no.: None, no add additional digits before the dialing number
Destination telephone port: 1, the finial dialing number will send to GSM port for outgoing.
\*\*\* Create extension on IPX-300 :
Step1. Login to IPX-300 Web-UI, and go to the "IP PBX Setup >> SIP Extension Setup" page. To add 2 extensions for VIP-360PT and UMG-1000 registrations.
IP PBX Setup
- User Extensions Setting
Add New User Extensions Add Batch
Extensions List Extension Max is 100
| User Extension | Password | Caller Id | Action | ||
| 100 | 123 | 100 | Advance | Delete | |
| 101 | 123 | 101 | Advance | Delete | |
Step2. To setup the VIP-360PT register to IPX-300 as ext.100, and VIP-560PT register to UMG-1000 as ext.5001.
\*\*\* Dialing Procedures :
-
Call to PSTN via FXO_1 of UMG-1000
Ext.5001 dials 61, hear the prompt for inputting 22199518. -
Call to PSTN via FXO_1 of UMG-1000
Ext.5001 dials 7122199518
- Call to PSTN via VIP-480FO
Ext.5001 dials 7222199518
- Call to GSM via VIP-281GS
Ext.5001 dials 73093500001
- Call to VIP-360PT via SIP Trunk
Ext.5001 dials 8100
- VIP-360PT Call to VIP-560PT
Ext.100 dials 101 and hears welcome prompts, then dials 5001.

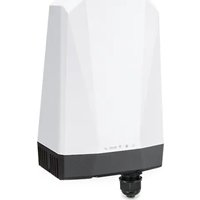
- Unified Office Gateway
- User's Manual
- Copyright
- Disclaimer
- FCC Warning
- FCC Caution
- CE mark Warning
- Energy Saving Note of the Device
- Trademarks
- WEEE Warning
- Safety
- Revision
- Table of Contents
- Introduction......7
- Hardware Installation ......11
- Web Management - Home 25
- Web Management - User 27
- Web Management - Network....31
- Web Management - Wireless....35
- Web Management - Storage....39
- Web Management - PBX......46
- Web Management - Email....55
- Web Management - FTP 62
- Web Server 64
- Web Management - Security 65
- Web Management - System....72
- Web Management - Branch-to-Branch....75
- Web Management - Maintenance....82
- Personal Account Web Administration....84
- Introduction
- Product Features
- IP PBX / VoIP Service
- E-mail Service
- Internet Security Service
- Network Storage Service
- System Management
- WiFi Service (UMG-1000W only)
- Package Contents
- Outlook
- Front Panel
- Rear Panel
- Hardware Installation
- Hardware Installation
- Removing the Chassis Cover
- iCaution
- The Hard Disk Installation
- Physical Connection
- WAN Connection
- LAN Port Connection
- PSTN FXO Port Connection
- First Time Login
- Welcom to Quick Start
- Step 1: Create the Company Profile
- Step 2: Activating UMG-1000 Series services
- Step 3: Setting up the Internet Connection
- AUTO DETECT ISP TYPE
- MANUAL SETUP INTERNET CONFIGURATION: STATIC
- MANUAL SETUP INTERNET CONFIRURATION: DHCP
- MANUAL SETUP INTERNET CONFIRURATION: PPPOE
- MANUAL SETUP INTERNET CONFIRURATION: PPTP
- Step 4: Creating the Network Storage
- Step 5: Confirmation
- Web Management - Home
- Overview
- HEADER
- SYSTEM STATUS
- UMG SERVICE
- Alert Log
- Web Management - User
- GROUP MANAGEMENT
- USER MANAGEMENT
- User Overview
- USER LIST
- Deleting a User Account
- Note:
- Updating the User Setting
- Creating a User Account
- USER ACCOUNT:
- USER SERVICES:
- Departments and Groups
- GROUP SETTING
- GROUP LIST
- Deleting a Group
- Web Management - Network
- INERNET Configuration
- LAN Configuration
- NETWORK SERVICES Configuration
- Overview
- INTERNET SETTING:
- INTERNET SERVICES
- Internet
- Local Network
- Service
- DYNAMIC DNS SERVICES
- The VPN Log
- VPN Log
- Web Management – Wireless (UMG-1000W only)
- STANDARD WIRELESS ACCESS POINT
- ENCRYPTION and Security
- CLIENT BLOCKING
- Overview
- WIRELESS NETWORK
- Wireless Setting
- Security Key: Specifies the key for the clients to access this AP if WEP is the data encryption type.
- Wireless Clients
- WIRELESS CLIENT
- Blocking the Connected Wireless Client
- Wireless MAC Block List
- CREATE NEW RULE
- ACCESS BLOCK LIST
- REMOVE FROM THE BLOCK LIST
- Web Management - Storage
- NETWORK STORAGE SERVER
- BACKUP AND RESTORE
- REMOTE DATA SYNCHRONIZATION
- Storage Overview
- NETWORK STORAGE STAUS
- DISK STAUS
- VOLUME LIST
- View a Volume by SMB
- Updating a Volume
- NETWORK STORAGE
- Deleting a Volume
- Creating a Storage Volume
- SHARING SCHEME
- USER GROUP
- PRIVILEGE
- Storage Setting
- SNAPSHOT SCHEDULE
- BACKUP SCHEDULE
- VOLUME BACKUP PATH SETTING
- Storage Bakcup and Restore
- BACKUP/RESTORE
- BACKUP VOLUME PATH
- BACKUP A VOLUME
- Delete and restore Backup files
- The Storage Log
- EVENTS
- Web Management - PBX
- IP PBX Overview
- CALL FEATURE
- EXTENSION LIST
- IP PBX Call Setting
- CALL FEATURE SETTING
- AUDIO QUALITY TUNING OPTIONS
- Codec
- FAX Server
- Group Pickup
- Voice
- Conference Room
- Music On Hold
- IVR Voice Prompt Editor
- IP PBX Call Rules
- Call Rule List
- Call Rule Setting
- IP PBX Channel Setting
- Hardware Type
- Channels Forward
- Channels setting
- SIP Trunk Setting
- SIP Trunk List
- SIP Trunk Setting
- IP PBX Call Reference
- Gateway Trunk Setting
- FXO Trunk Setting
- LCR Trunk Group Setting
- LCR Dialing Rules Setting
- IP PBX Call Log
- CALL RECORDS
- Web Management - Email
- EMAIL SERVER
- EMAIL FILTER
- EMAIL MESSAGE MANAGEMENT
- EMAIL BLACK LIST
- EMAIL forward
- SERVICE
- VIRUS SETTING
- Email Basic Setting
- ALERT EMAIL ADDRESS
- ADD MAIL ADDRESS TO ALERT EMAIL LIST
- DELETE MAIL ADDRESS FROM ALERT EMAIL LIST
- Email Blacklist
- EMAIL BLACK LIST SETTING
- DELETE ENTITIES FROM THE BLACK LIST
- Email Alias
- OVERVIEW
- SETTINGS
- CREATING AN EMAIL ALIAS
- DELETING AN EMAIL ALIAS
- UPGRADING AN EMAIL ALIAS
- Email Forward
- Email Log
- EMAIL LOG
- EMAIL LOG SORTING
- Web Management - FTP
- FTP Overview
- FTP Setting
- FTP SETTING
- FTP Account
- FTP USER
- FTP Log
- FTP LOG LIST
- Web Server
- Web Server Overview
- Web Server Settings
- Web Server Setting
- Web Management - Security
- Firewall Security
- PPTP VPN Security
- Security Overview
- PASSTHROUGH
- DOS PREVENTION
- Security Setting
- PASSTHROUTH
- Content Filter
- URL SITE/KEYWORD TO BLOCK RULES
- DELETING THE URL SITE/KEYWORD TO BLOCK RULES
- ADDING TRUSTED IP
- DELETING FROM THE TRUSTED IP LIST
- Access Control
- SERVICE ACCESS CONTROL
- DELETING SERVICES FROM THE ACCESS CONTROL LIST
- Port Forwarding
- SERVICE PORT forward
- DELETING SERVICES FROM THE port forward LIST
- Security Log
- SECURITY LOG
- SECURITY LOG SORTING
- Web Management - System
- HARDWARE OVERVIEW
- COMPANY PROFILE SETUP
- SYSTEM EVENT MANAGEMENT
- System Overview
- VERSION
- HARDWARE INFORMATION
- DISK INFORMATION
- System Setting
- SYSTEM SETTING
- DATE & TIME
- System Event Log
- Alert Event Classification
- Web Management - Branch-to-Branch
- STANDALONE
- HEADQUARTER
- DIVISION
- Branch-to-Branch Setup
- Security Channel
- Remote Calls
- Remote Data Synchronization
- Shared Services
- Global user Profile
- Centralized Configuration management
- Branch-to-Branch Overview
- BRANCH
- Delete a Branch
- Branch-to-Branch Setting
- OPERATION MODE
- ADD NEW BRANCH
- CONNECT TO HEADQUARTER
- Branch Users
- Branch-to-Branch Log
- Web Management - Maintenance
- BACKUP/RESTORE CONFIGURE
- UPDATE
- REMOTE SERVICE
- System
- CONFIGURATION
- Software Update
- SOFTWARE UPDATE
- Remote Service
- Personal Account Web Administration
- UPDATE THE USER PROFILE
- CONTRACT LIST
- UMG-1000 Series TUTORIAL
- User Login
- ACCOUNT INFORMATION
- SERVICE PRIVILEGE
- VOIP
- Access to Administrator
- Personal Setting
- USER ACCOUNT
- CALL SETTING
- EMAIL SETTING
- Contract List
- CONTACT LIST
- Personal Call Records
- Call Reference
- Logout
- Appendix A – Console Maintenance Method
- Appendix B – Remote Access
- Appendix C – Scenario Example
- \*\*\* FW & Utility version List:
- \*\*\* Create your UMG-1000 user account:
- \*\*\* Use ATA-150 to register to UMG-1000 :
- Step1. Connecting Telephone:
- Step2. Connecting Network and Power AC Power:
- Step3. Basic Configuration & Administration Interface:
- Step4. Login to your ATA-150 Web-UI :
- Step5. Configure the ATA-150 to register on UMG-1000 :
- \*\*\* Use X-Lite to register to UMG-1000 :
- \*\*\* Create your UMG-1000 user account :
- \*\*\* Use VIP-880 to register to UMG-1000 :
- Step1. Configuration VoIP Setting register to UMG-1000 :
- Step2. Configuration Hotline for when outside call in to forward extension number :
- Step2.Configuration the GSM Setting :
- Step4.Configuration Hotline for when outside call in to forward extension number :
- After setting complete :
- \*\*\* Use VIP-254 to register to UMG-1000 :
- Step2: Insert IP information
- LAN Settings
- Step3. Set SIP
- Service Domain Settings
- \*\*\* Use VIP-360PT to register to UMG-1000 :
- Step1.
- Step2. Insert IP information
- Step3. Set SIP Settings
- Step2. Insert your "Internet"
- Step3. Insert your "Local Network"
- Step1. Go to "User" page, and press the "Add User" to create the user account.
- Step2. Double check your setting and make sure "Enable" PPTPVPN
- \*\*\* Create your PCs a new connect :
- Step1. Go to start→setting→Network Connections
- Step2. press "Create a new connection"
- Step3. Press "Next"
- Step4. Check "Connect to the network at my workplace" and press "Next"
- Step5. Check "Virtual Private Network connect" and press "Next"
- Step6. Insert your company name
- Step7. Insert your UMG-1000 internet IP address(Static-IP)
- Step8. Check "Add a shortcut to this connect to my desktop" and press "Finish"
- Step9. Insert your User name and Password (the same UMG-1000 user account)
- Step10. Display connect to UMG-1000 and check it
- Step2. To press the "SIP Trunk" to create SIP Trunk for registering with IPX-300.
- Step3. To press the "LCR" to setup LCR settings.
- Gateway Trunk Setting:
- FXO Trunk Setting:
- LCR Trunk Group Setting:
- LCR Dialing Rules Setting:
- \*\*\* Setup Dialing Plan on VIP-480FO and VIP-281GS :
- \*\*\* Create extension on IPX-300 :
- IP PBX Setup
- \*\*\* Dialing Procedures :
Brand : Planet
Model : UMG-1000
Category : Network router