OT4030 - Oven Khind - Free user manual and instructions
Find the device manual for free OT4030 Khind in PDF.


| Product Type | Countertop Oven |
| Brand | Khind |
| Model | OT4030 |
| Dimensions (W x D x H) | 50 x 40 x 35 cm |
| Weight | 10 kg |
| Power Supply | 220-240V, 50Hz |
| Power Consumption | 1500 W |
| Capacity | 40 L |
| Temperature Range | 100°C - 250°C |
| Timer | Up to 60 minutes with auto shut-off |
| Functions | Bake, Grill, Toast, Roast, Reheat |
| Heating Elements | Quartz tubes, top and bottom |
| Interior Light | Yes |
| Control Type | Dial knobs for temperature, timer, and function |
| Accessories | Baking tray, wire rack, crumb tray |
| Cleaning and Maintenance | Wipe interior/exterior with damp cloth; avoid abrasive cleaners |
| Safety Features | Auto shut-off, cool-touch handle, overheating protection |
| Spare Parts Availability | Contact Khind service center; replacement trays and racks available |
| Warranty | 1 year limited warranty |
Frequently Asked Questions - OT4030 Khind
User questions about OT4030 Khind
0 question about this device. Answer the ones you know or ask your own.
Ask a new question about this device
Download the instructions for your Oven in PDF format for free! Find your manual OT4030 - Khind and take your electronic device back in hand. On this page are published all the documents necessary for the use of your device. OT4030 by Khind.
USER MANUAL OT4030 Khind
natural_image
Abstract grayscale graphic with white geometric shapes and grid lines, no text or symbols present••• Electric Oven / Oven Elektrik
Instruction Manual / Buku Panduan
Important / Mustahak
Please read this manual carefully before operating this product. Keep this manual handy for further reference.
Safety and Warning Information
- Carefully read all instructions before operating this appliance.
- Do not use this appliance if the cord or plug is damaged, or if this unit is malfunctioned or damaged in any way.
- This appliance is not intended for use by persons (including children) with reduced physical, sensory or mental capabilities, or lack of experience and knowledge, unless they have been given supervision or instruction concerning use of the appliance by a person responsible for their safety.
Children should be supervised to ensure that they do not play with the appliance.
-
If the supply cord is damaged, it must be replaced by the manufacturer, its service agent or similarly qualified persons in order to avoid a hazard.
-
CAUTION! The temperature of the door, outer surface or accessible surfaces may be high when the appliance is operating. Do not touch the appliance's surface during and after operating, it will be very hot! Always wear oven insulated gloves when inserting or removing food from the appliance.
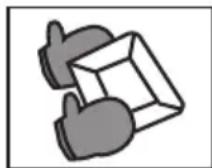
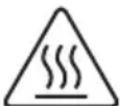
CAUTION! Hot Surface
-
This appliance is intended for household use only. Do not use the appliance other than its intended use.
-
The appliance is not intended to be operated by means of an external timer or separate remote-control system.
-
Do not place the appliance near a hot gas or electric burner.
-
Allow 4 inches of free space clearance on all sides when operating the appliance to provide adequate air circulation.
-
Do not cover Baking Tray or any part of the appliance with metal foil (to prevent overheating). The metal foil can be used for wrapping the food to be baked on the baking tray.
-
Be careful when removing hot tray or when disposing hot grease or other liquids.
-
Do not leave the appliance unattended while broiling or roasting food.
-
Oversized food or metal containers must not be inserted into the appliance as they may cause fire or electric shocks.
-
Do not place any items on top of the appliance while in operation. Inflammable liquids can cause fire.
-
Extreme caution must be exercised while using containers other than ceramic or metal in the appliance.
-
Do not place the following materials in the appliance when operating:
1) Cardboard 2) Plastic bag 3) Other combustible materials
- Do not store materials or utensils in the appliance other than the accessories provided.

Safety Precaution Information
Cleaning & Maintenance
- Always switch off the appliance, unplug from the mains and let the appliance cools down when the appliance is not in use or before cleaning or before putting on or taking off accessories.
- To clean the appliance, wipe with a soft cloth or sponge dipped in neutral cleaning solution. Do not use a hard brush, it may scratch surfaces.
- Wash baking rack & baking tray in hot water with a sponge after each use.
- Do not use abrasive cleaner like thinner or solvent to clean the appliance.
- Let all the parts and surfaces dry thoroughly prior to plugging oven in and using.
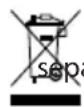
DISPOSAL: Do not dispose this product as unsorted municipal waste. Collection of such waste lately for special treatment is necessary.
Part Identification
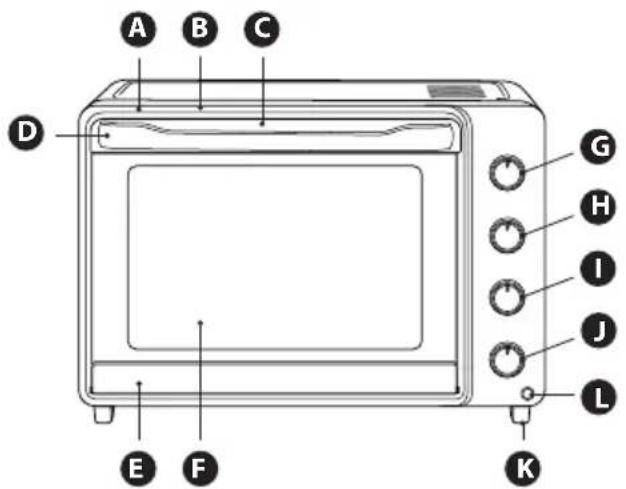
A Housing
B Front Panel
C Upper Door Frame
D Door Handle
E Lower Door Frame
F Door Glass
G Upper Temperature Control Knob
Function Control Knob
1 Down Temperature Control Knob
Timer Control Knob
K Oven Foot
Power Indicator Lamp
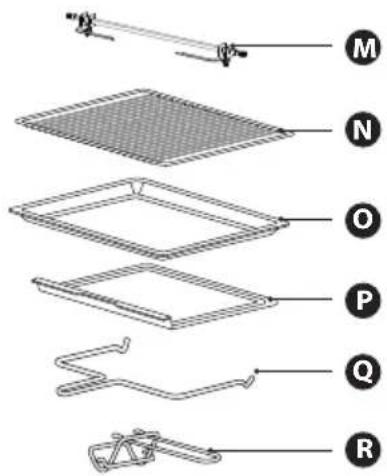
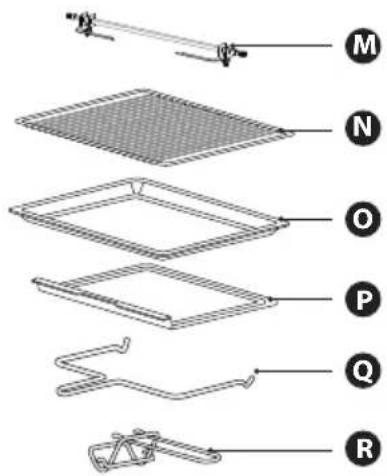
M Rotisserie Spit
N Baking Rack
Baking Tray (2pcs)
P Crumb Tray
Q Rotisserie Spit Handle
R Tray Handle
*Pictures are for illustration purpose only.
Specifications
Model : OT4030
Voltage : 220-240V\~50-60Hz
Power : 2000W
Specifications are subject to change without prior notice.
Before Using Your Electric Oven
Before using your electric oven with rotisserie & convection for the first time, be sure to:
- Read all of the instruction included in this manual.
- Make sure that the oven is unplugged and the Timer control is in the OFF position.
- Wash all the accessories in hot, soapy water or in the dishwasher.
- Thoroughly dry all accessories and reassemble in oven, plug oven into outlet and you are ready to use your new toaster oven.
- After reassembling your oven, we recommend that you run it at the highest temperature (250 °C) on the toast function for approximately 15 minutes to eliminate any packing residue that may remain after shipping. This will also remove all traces of odor initially present.
Please Note: Initial start-up operation may result in minimal smell and smoke (about 15 minutes). This is normal and harmless. It is due to burning of the protective substance applied to the heating elements in the factory.
Using Your Electric Oven
Please familiarize yourself with the following oven functions and accessories prior to first use:
• Upper/Down Temperature Control :
Choose the desired temperature from 90 °C to 250°C for baking broiling or toasting.
- Time Control :
When you turn activate the timer segment of the control, turn to the right (clockwise) to toast or use as a timer. This function also has a bell rings at the end of the programmed time.
- Function Control :
There're seven stages switch function selector:
Off OFF Upper and Lower Heat Rotisserie + Convection
Upper Heat Upper + Rotisserie
☐ Lower Heat Upper and Lower Heat + Convection
Note : To optimize 250°C temperature , please select function or , together turn both upper and down temperature control knob to 250 °C
Using Your Electric Oven
• Power ON Indicator: It's illuminated whenever the oven is turned on.
- Baking Tray: For use in broiling and roasting meat, poultry, fish and various other foods. It can also hold the drippings from the food or oil when using the rotisserie.
- Tray Handle: Allows you to pick up the wire rack, and bake tray when they are hot.
• Crumb Tray: Catch the scrap when baking and then take it out for easy cleaning.
How To Use
How To Use Rotisserie
a) Insert the first spit onto the skewer by pointing inward. Secure the first spit with thumbscrew provided.
b) Place the skewer across the center of the food that you are going to prepare. Make sure the food is at the center before inserting the second spit onto the skewer. Secure the second spit with the thumbscrew.
c) Insert the end-point of the skewer into the drive socket and rest the other end (square in shape) on the skewer support.
d) You may insert the bake tray to a lower rack to catch the dripped oil.
e) Turn the function control knob to

f) The desired maximum temperature is 200 °C degree if function is selected.
g) Switch on the power when turn the timer knob to your desired cooking time.
h) The cycle is completed when the timer knob reaches OFF position.
i) To remove the food, please lift up the skewer by using the rotisserie holder.
j) Make sure that both hooks are evenly place at the edge of the skewer. Please lift up the end which rest on the support first and slowly remove the skewer out of the drive socket.
k) Place the food on a cutting board or plate and remove the skewer by taking off the spit.
I) If you need convection function at the same time, please set the function knob to the which allow both convection and rotisserie functions.

How To Use
How To Use Convection
a) Insert the removable baking rack with food and baking tray.
b) Turn the function control knob to ☐.
c) Select the needed cooking temperature.
d) Switch on the power when turn the timer knob to your desired cooking time.
e) The cycle is completed when the timer knob reaches OFF position.
f) If you need rotisserie function at the same time, please set the function knob to the which allow both convection and rotisserie functions.

How To Use Bake
a) Place the removable rack into the desired position.
b) Insert the bake tray with food and close the oven door.
c) Turn the timer knob to the desired cooking time.
d) Turn the function select knob to
e) The desired maximum temperature is 200 °C degree if function is selected.
f) When finished baking, bell will ring to signal the end of the bake cycle.
g) You may also turn the timer to OFF position to switch off the oven.
How To Use Broil
a) Insert the removable baking rack with food and baking tray.
b) Close the glass door.
c) Turn the function select knob to ☐.
d) Select temperature and timer. Please note that the desired maximum temperature is 200 ^ degree when is selected.
e) You may also turn the timer to OFF position to switch off the oven.
f) When finished broiling, bell will ring to signal the end of the toast cycle.
Note : To optimize 250°C temperature, please select function ☐ or ☒,
together turn both upper and down temperature control knob to 250 °C.
How To Use
How To Toast

a) Insert the removable bake rack with food and bake tray.
b) Close the glass door.
c) Turn the function select knob to
d) Select the temperature and timer.
e) When finished toasting, bell will ring to signal the end of the toast cycle.
f) You may also turn the timer to
OFF position to switch off the oven.
Note: Baking Rack should be positioned in the middle of the oven with the indentations pointing down.
- Positioning of the Wire Racks
Cookies – Use bottom and middle Support Guides.
Layer Cakes – Use bottom Support Guide only (bake one at a time).
Pies – Use bottom and middle Support Guides.

CAUTION: Always use extreme care when removing baking tray, baking rack or any hot container from a hot oven. Always use the tray handle, or an oven mitt when removing hot items from the oven.
A Badan Luaran
B Panel Hadapan
C Rangka Pintu Atas
D Pemegang pintu
E Rangka Pintu Bawah
F Kaca Pintu
G Tombol Kawalan Suhu Atas
H Tombol Kawalan Fungsi
Tombol Kawalan Suhu Bawah
Kapasiti (Liter) : 40L
- Safety and Warning Information
- CAUTION! Hot Surface
- Safety Precaution Information
- Cleaning & Maintenance
- Part Identification
- Specifications
- Before Using Your Electric Oven
- Using Your Electric Oven
- • Upper/Down Temperature Control :
- - Time Control :
- - Function Control :
- How To Use
- How To Use Rotisserie
- How To Use Convection
- How To Use Bake
- How To Use Broil
- How To Toast
- - Positioning of the Wire Racks
Brand : Khind
Model : OT4030
Category : Oven