
TTS98H - Tractor Texas - Free user manual and instructions
Find the device manual for free TTS98H Texas in PDF.


| Product Type | Tractor (Ride-on Lawn Mower) |
| Brand | Texas |
| Model | TTS98H |
| Engine Power | 12.5 HP (Gasoline) |
| Engine Type | 4-Stroke, Single Cylinder |
| Cutting Width | 98 cm (38.6 inches) |
| Cutting Height | 25-85 mm (adjustable) |
| Transmission | Hydrostatic |
| Drive System | Rear-Wheel Drive |
| Fuel Capacity | 5.0 L |
| Oil Capacity | 1.1 L |
| Weight | Approx. 200 kg |
| Dimensions (L x W x H) | 1800 x 1200 x 1100 mm |
| Seat Type | High-back, adjustable |
| Speed Range | 0-8 km/h forward, 0-4 km/h reverse |
| Maintenance Interval | Oil change every 50 hours; air filter every 25 hours |
| Safety Features | Operator presence system, blade brake |
| Spare Parts Availability | Blades, belts, filters, spark plugs |
Frequently Asked Questions - TTS98H Texas
User questions about TTS98H Texas
0 question about this device. Answer the ones you know or ask your own.
Ask a new question about this device
Download the instructions for your Tractor in PDF format for free! Find your manual TTS98H - Texas and take your electronic device back in hand. On this page are published all the documents necessary for the use of your device. TTS98H by Texas.
USER MANUAL TTS98H Texas
natural_image
Line drawing of a tractor with large wheels and control panel (no text or symbols)Fig 1
TTS98 / TTS108
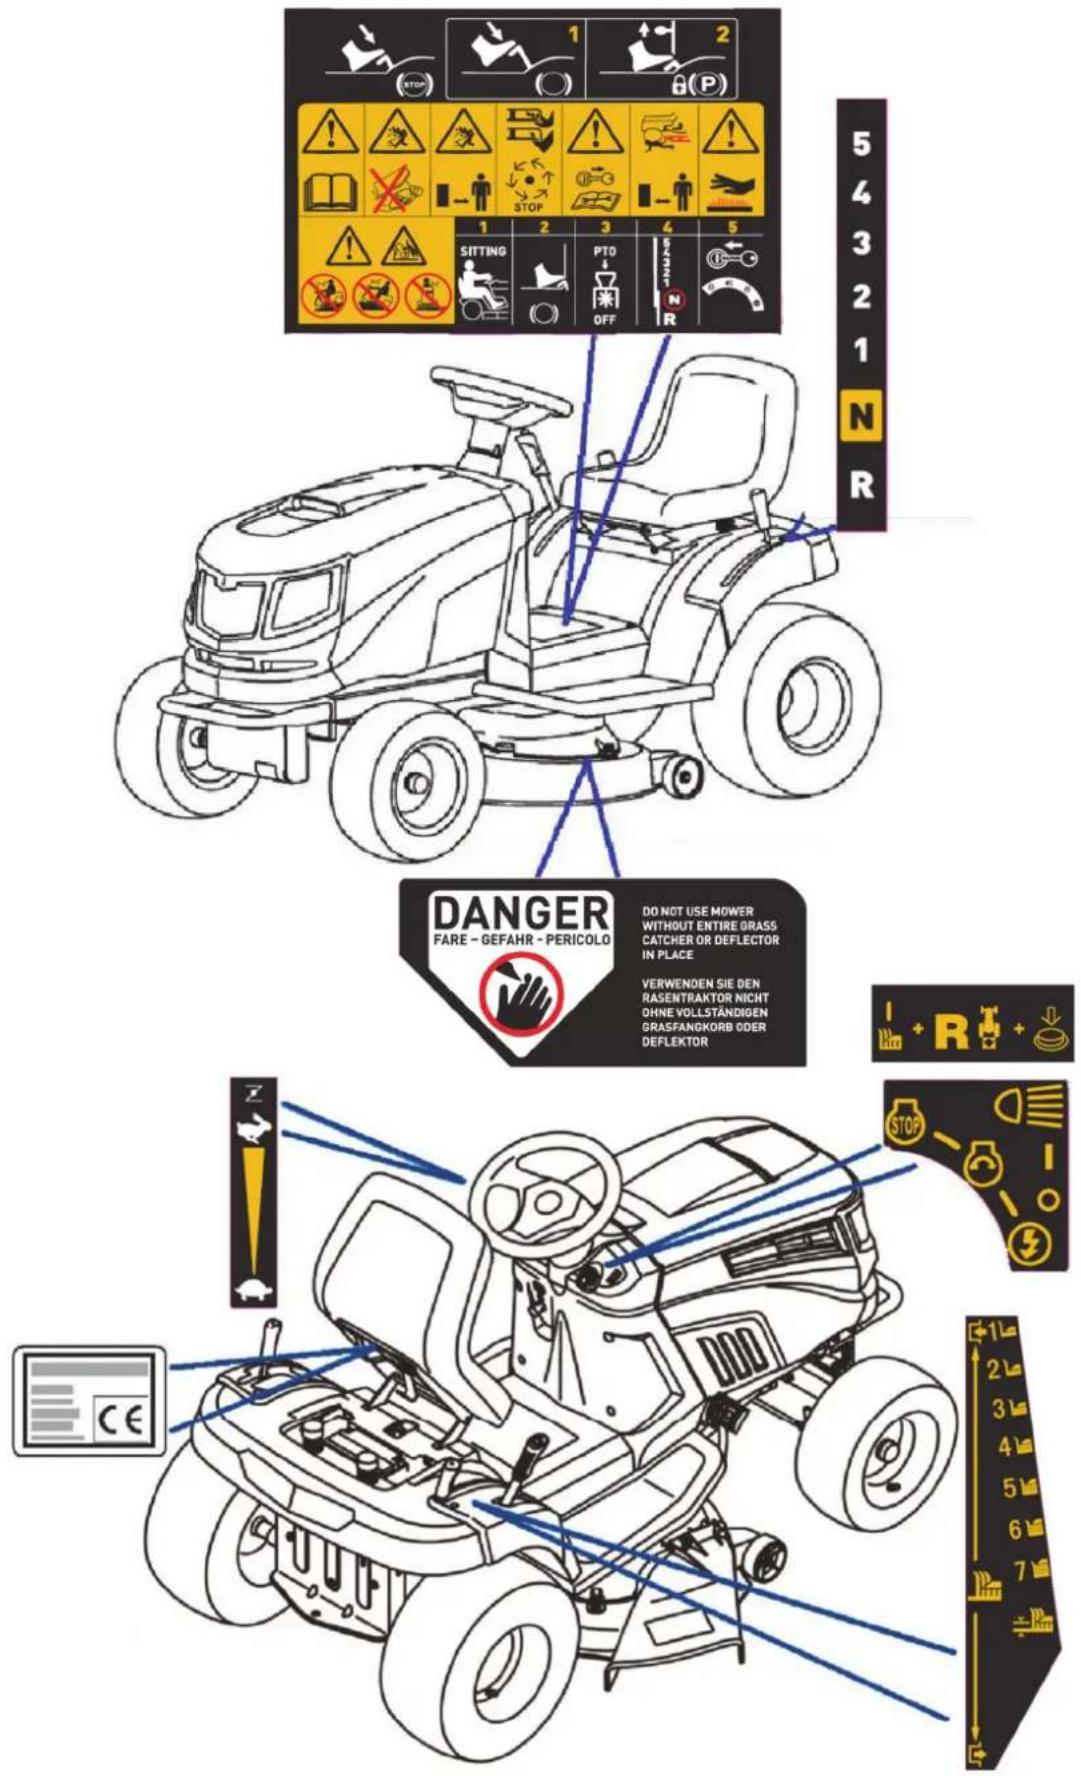
Fig 1
TTS98H / TTS108H
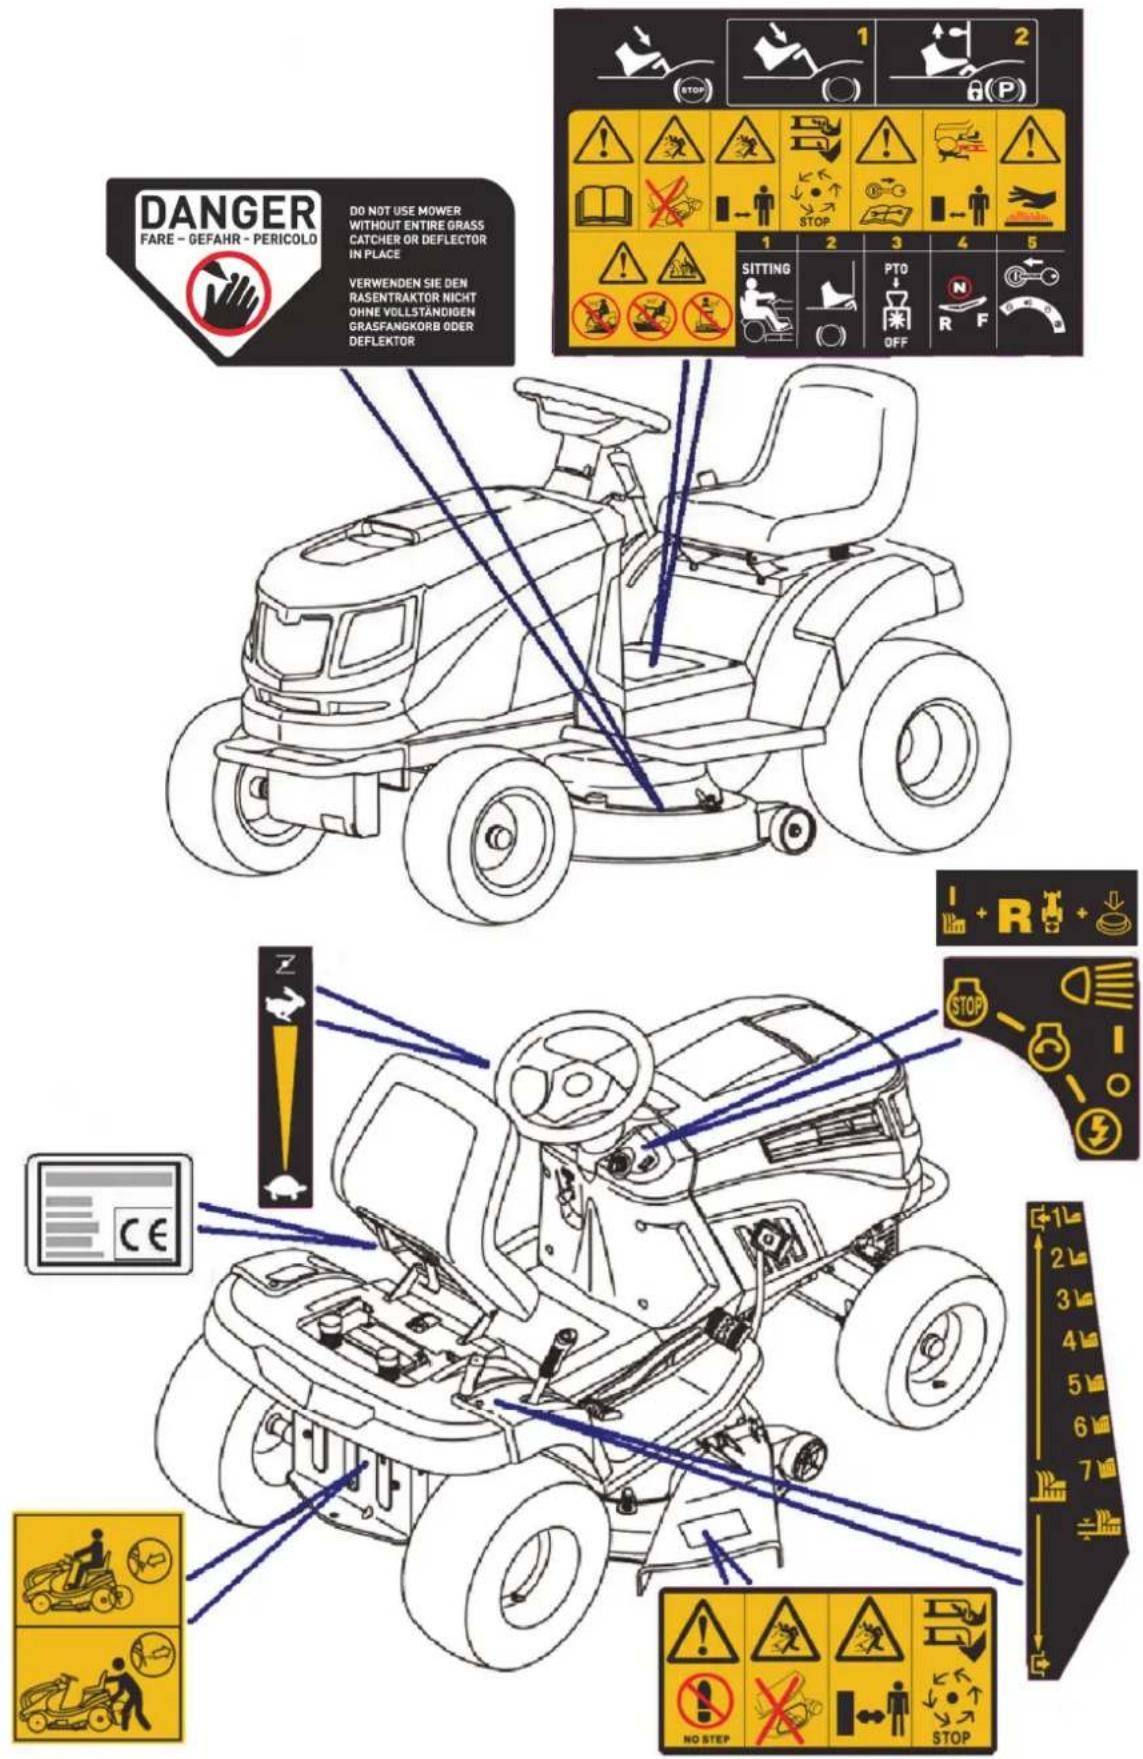
Fig 2
TTS98 / TTS108
TTS98H / TTS108H
| Fig3 | 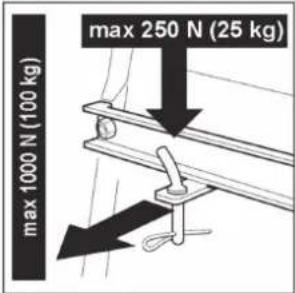 | |
| Fig4 | 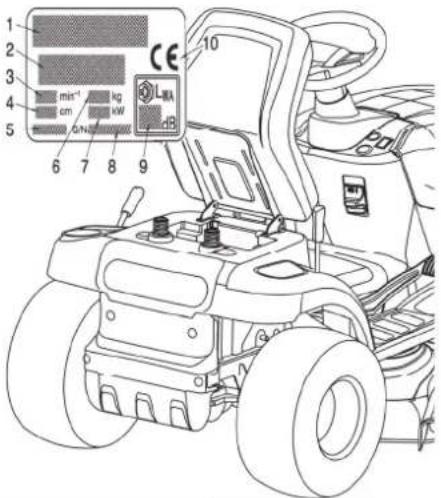 | |
| Fig5 | TTS98 / TTS108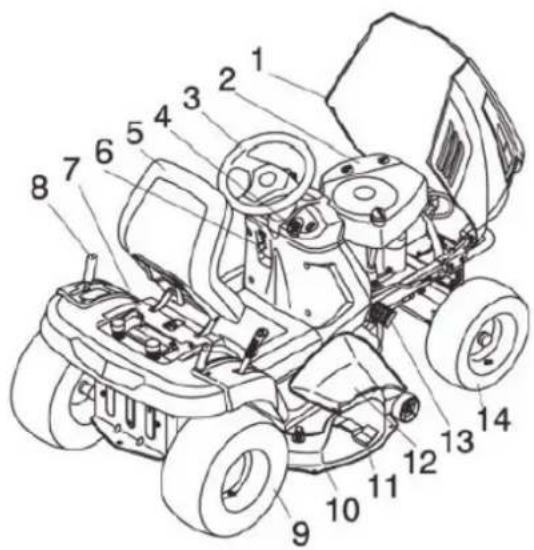 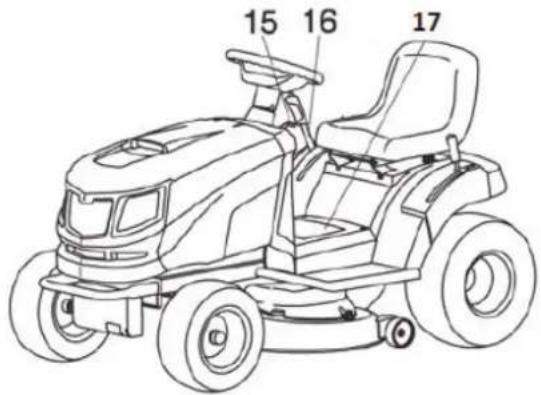 | TTS98H / TTS108H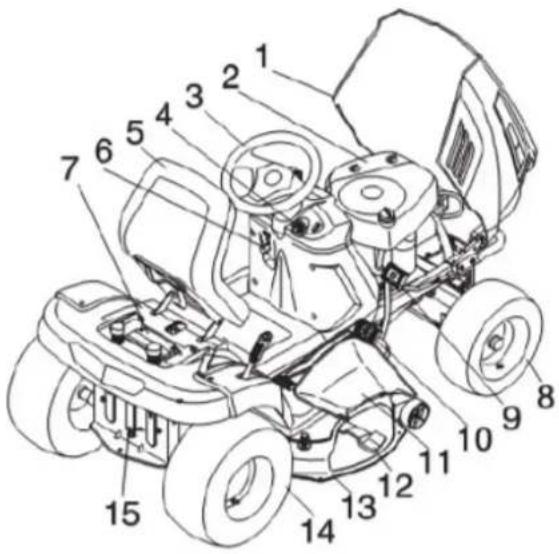 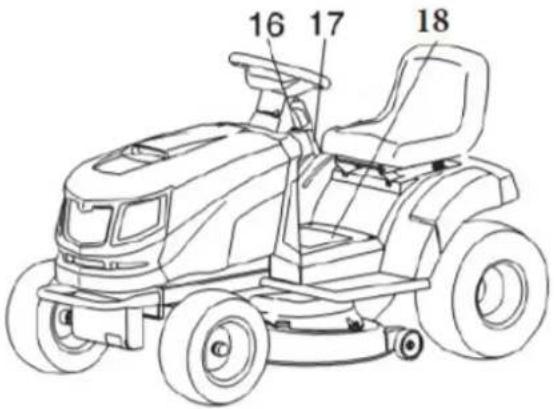 |
Fig 6
| BOLT-BATTERY | M8×40 | 11 |
| 20x 8.5x20.5 | ||
| M8 | ||
| M8×20 | ||
| Fig 7 | TTS98 - TTS108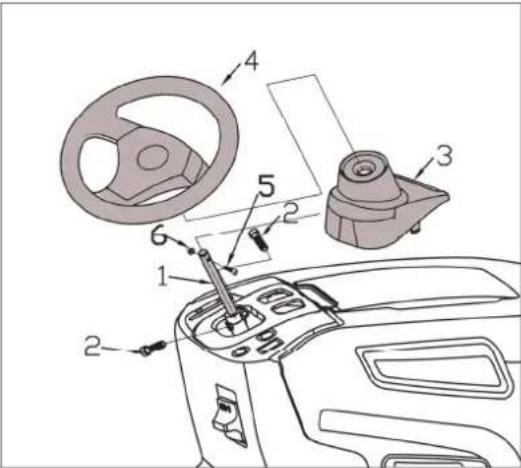 | |
TTS98H - TTS108H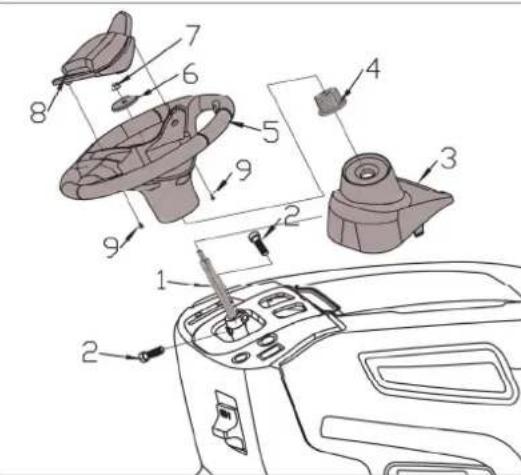 | 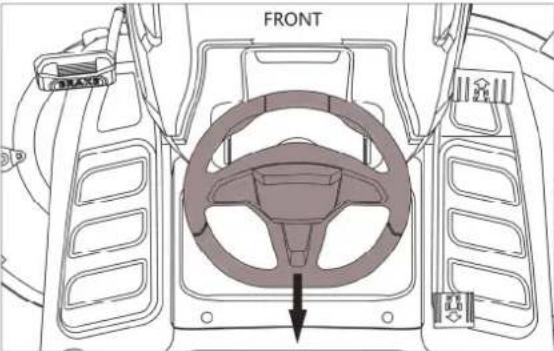 | |
| Fig 8 | 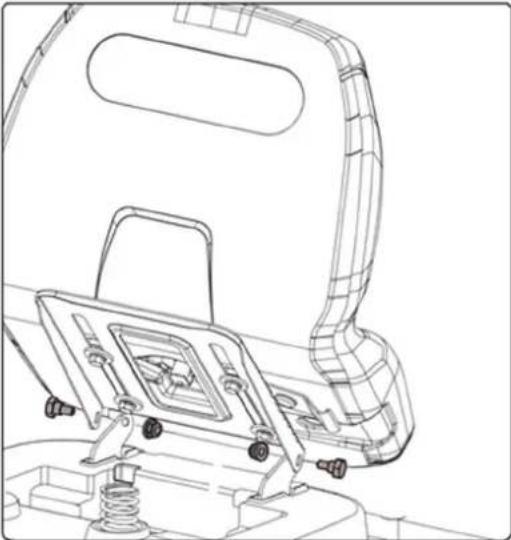 | 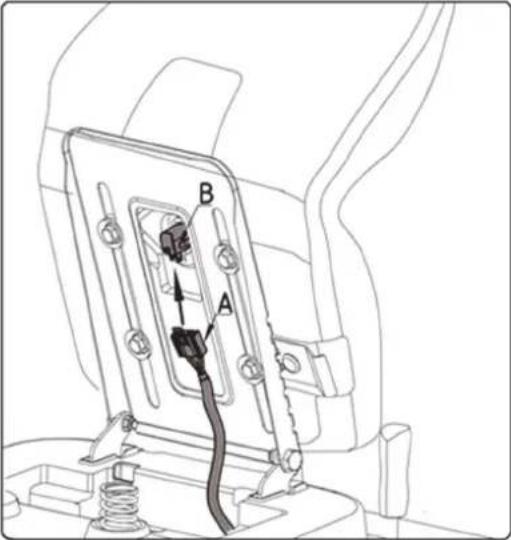 |
| Fig9 | 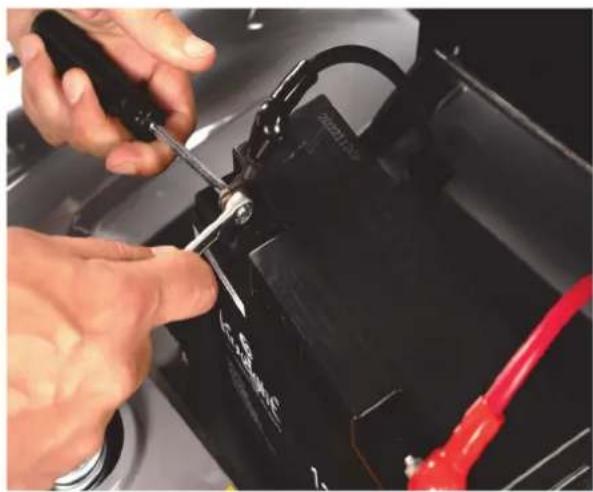 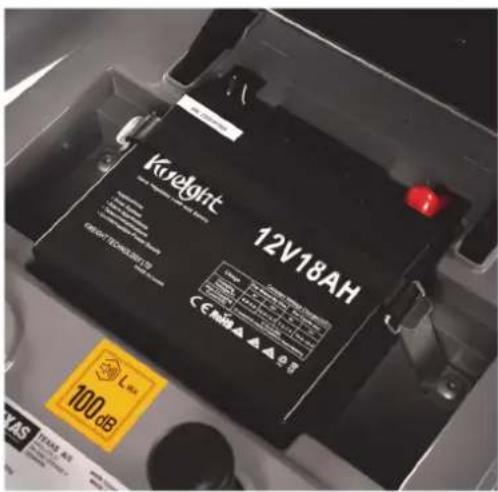 | |
| Fig10 | 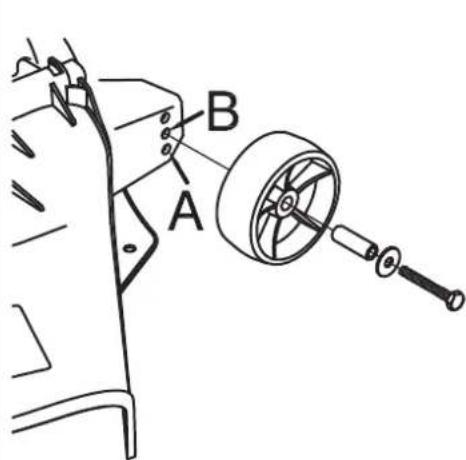 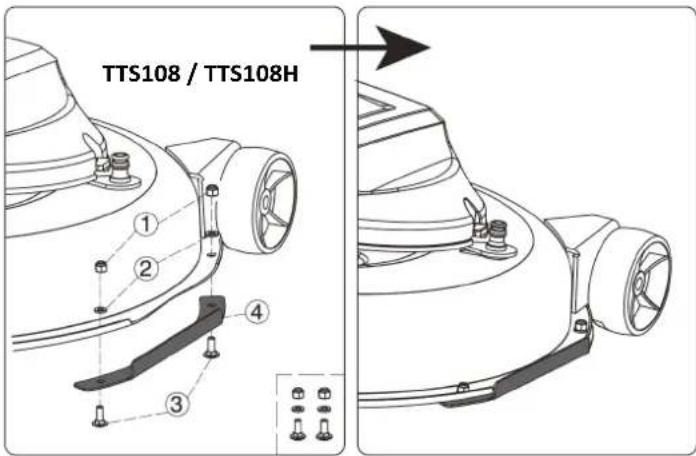 | |
| Fig11 | 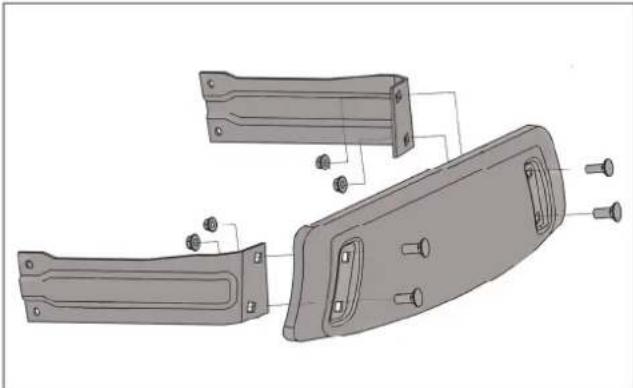 | |
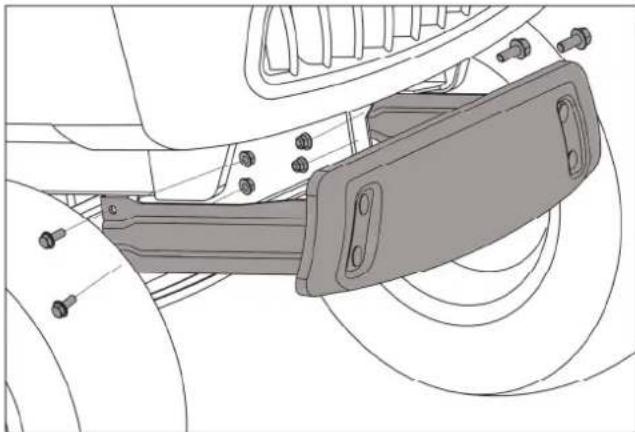 | ||
Fig 12
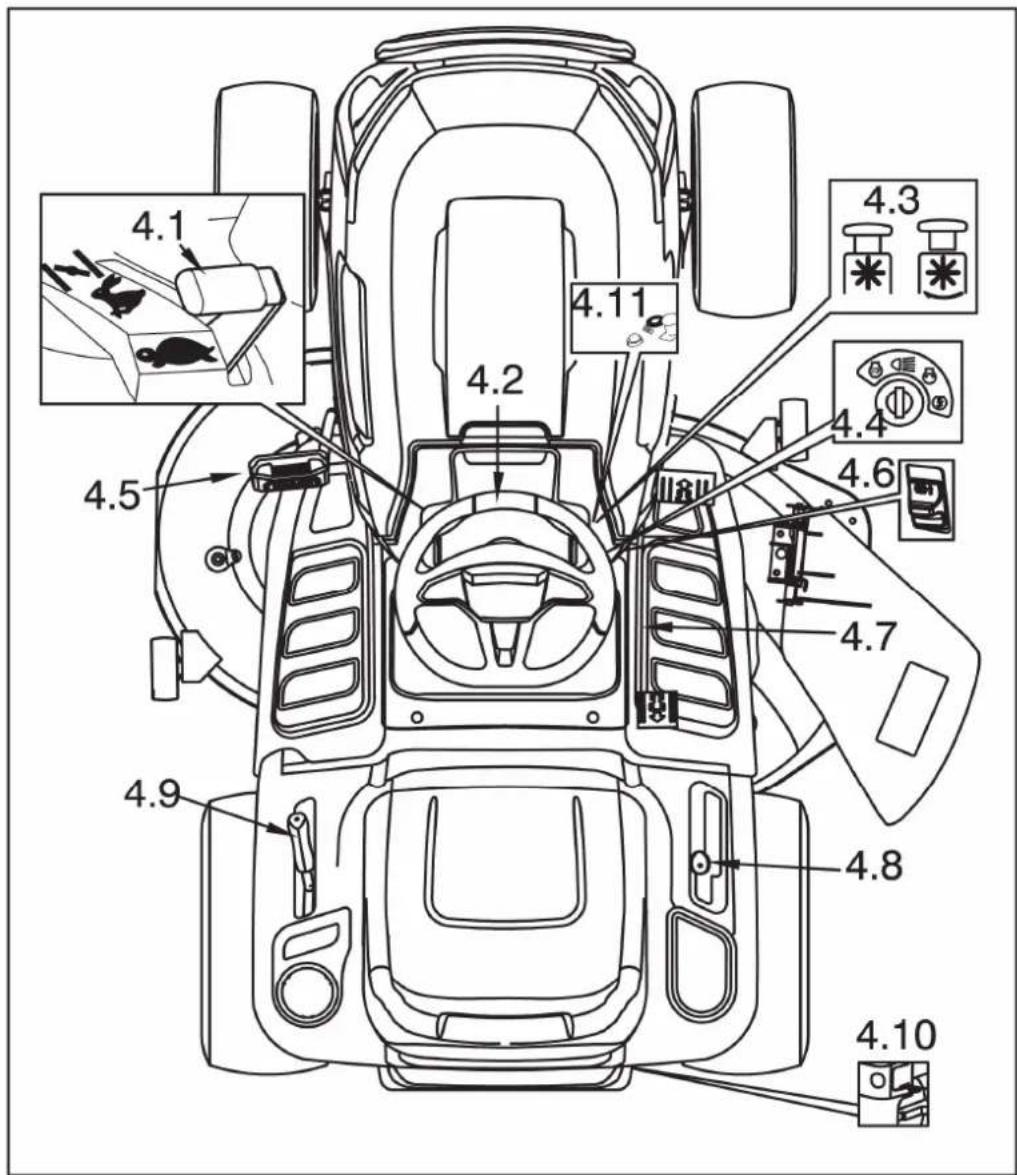
Fig 13
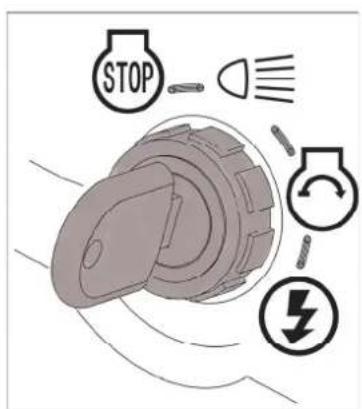
Fig 14
natural_image
Technical line drawing of a brake component with mounting bracket (no text or symbols)| Fig15 | 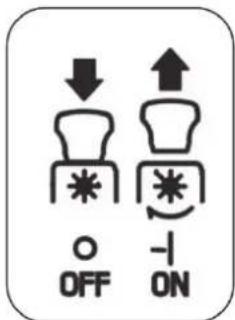 | |||
| Fig16 | TTS98 / TTS108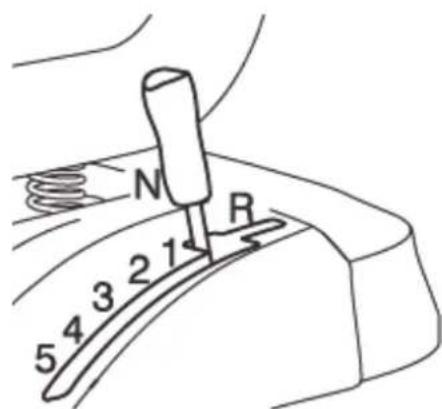 | TTS98H / TTS108H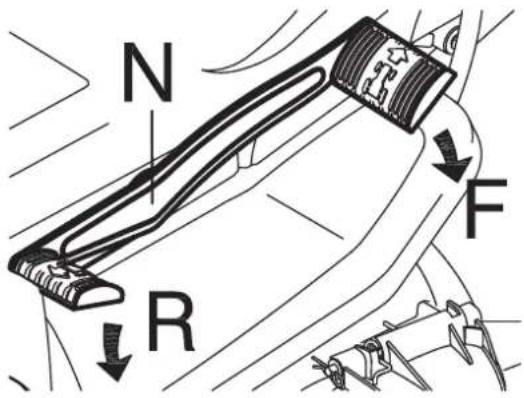 | ||
| Fig17 | 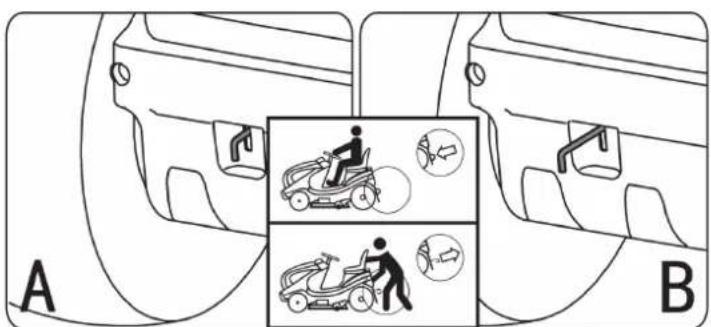 | Fig18 | 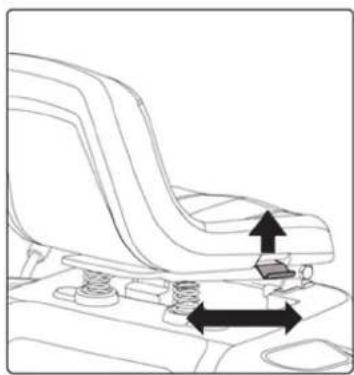 | |
| Fig19 | 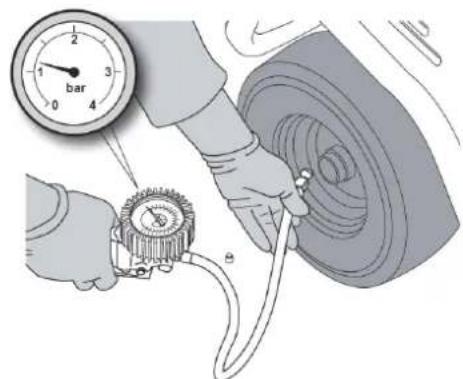 | Fig20 | 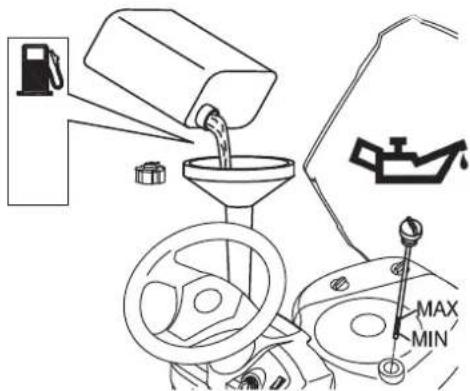 | |
| Fig21 | 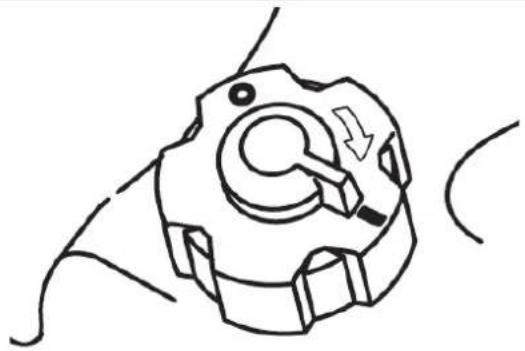 | Fig22 | 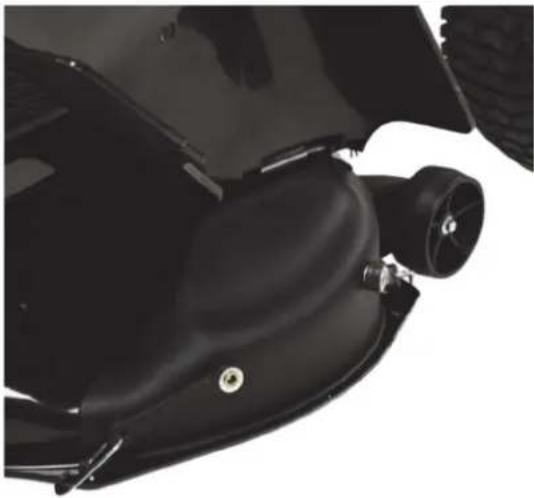 | |
| Fig22A | 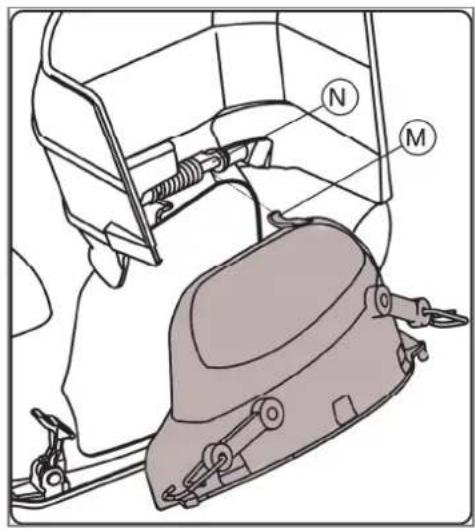 | 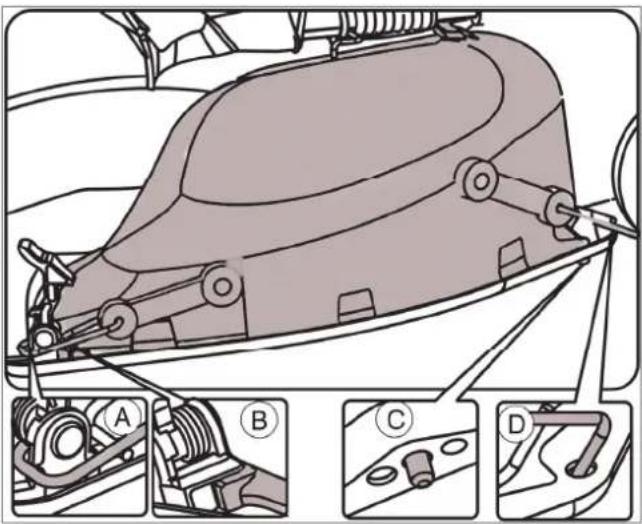 | ||
| Fig22B | 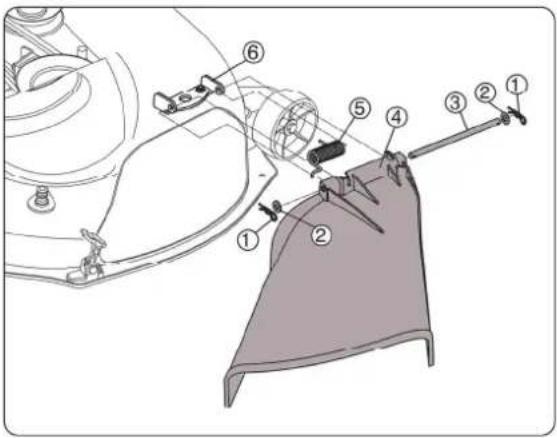 | 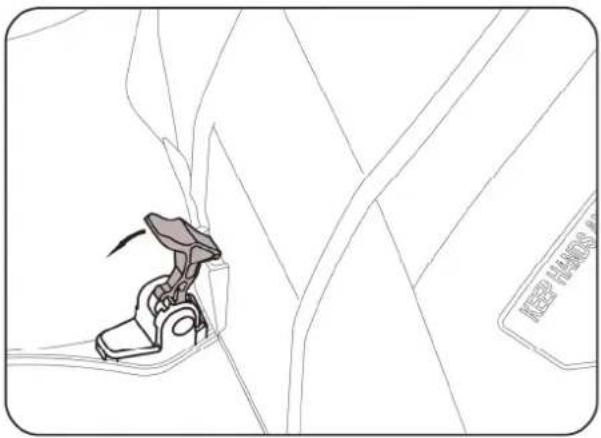 | ||
| Fig23 | 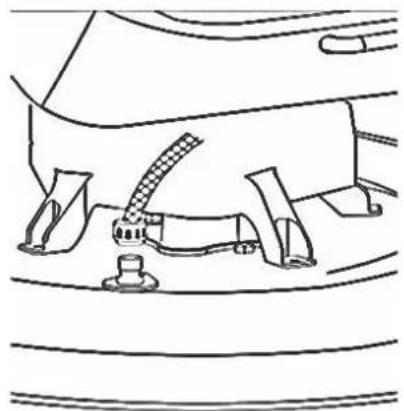 | |||
| Fig24 | 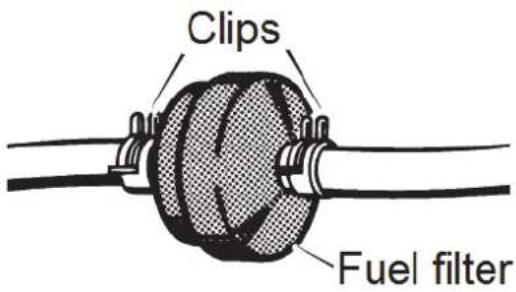 | Fig25 | 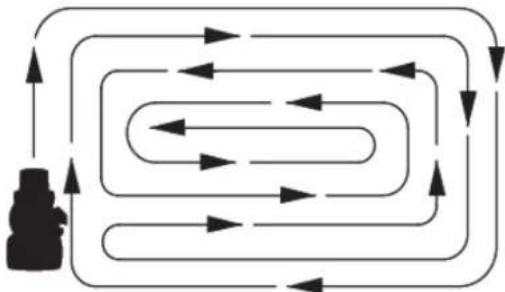 | |
| Fig26 | 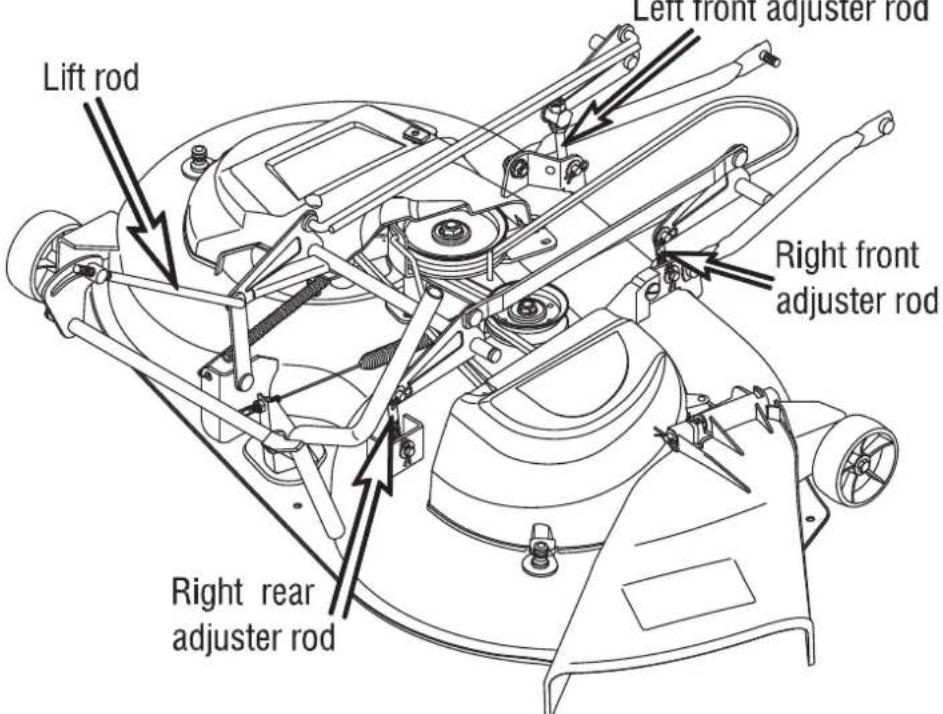 | |||
| Fig27 | 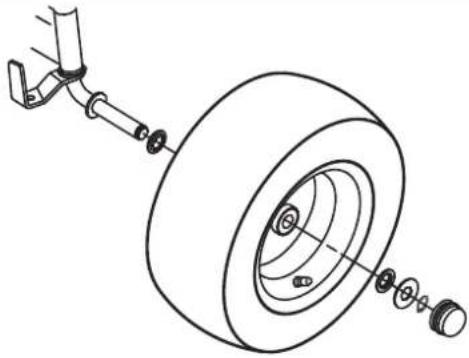 | Fig28 | 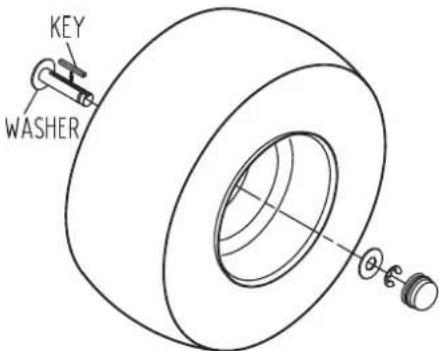 | |
| Fig29 | 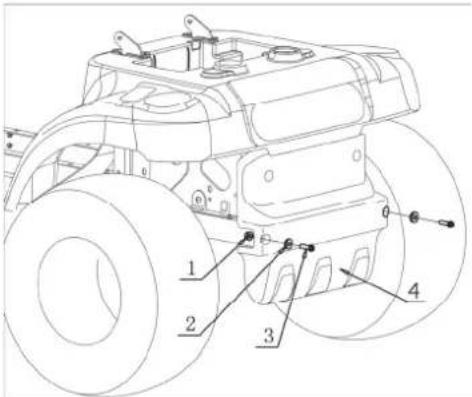 | Fig30 | 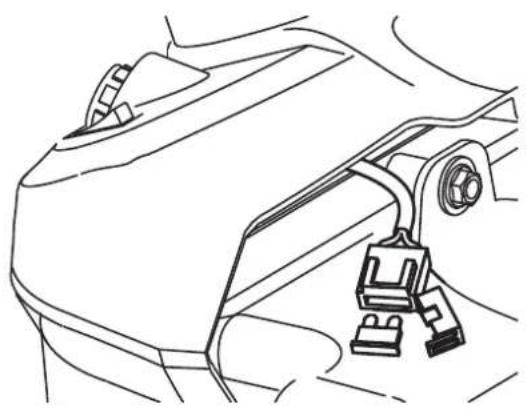 | |
 | ||||
| Fig31 | 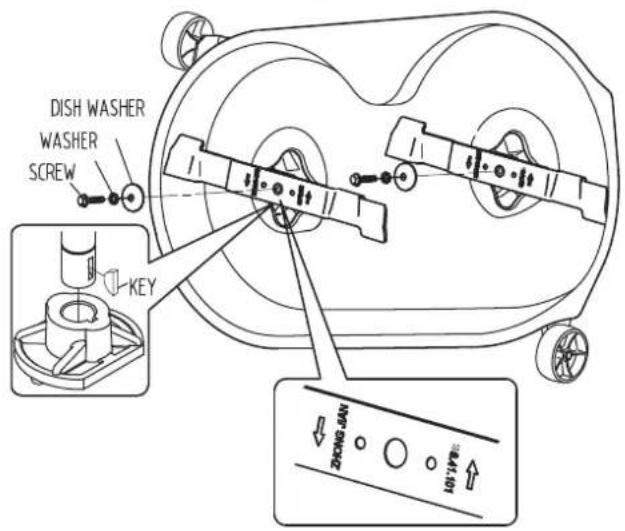 | |||
| Fig32 | 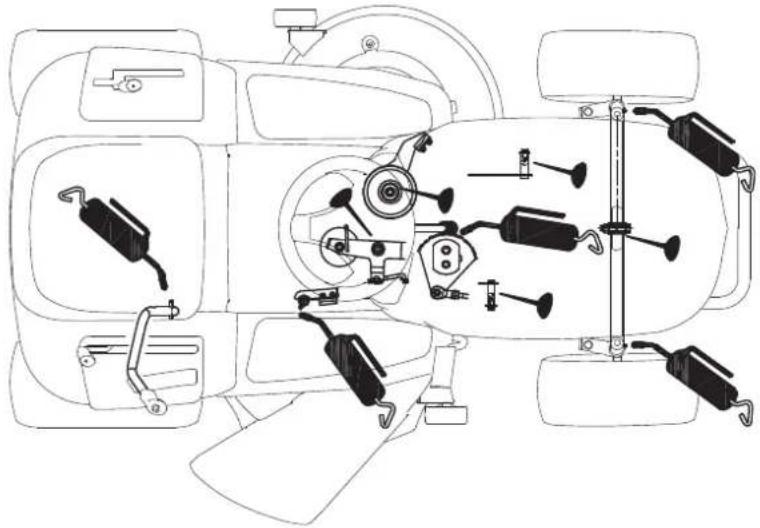 | |||
Fig 33
natural_image
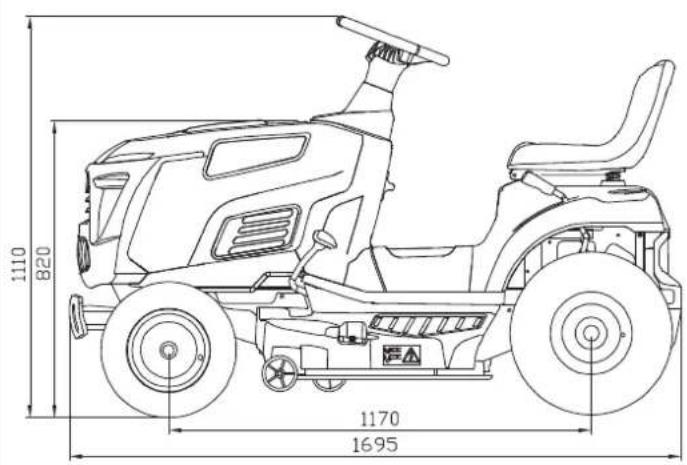
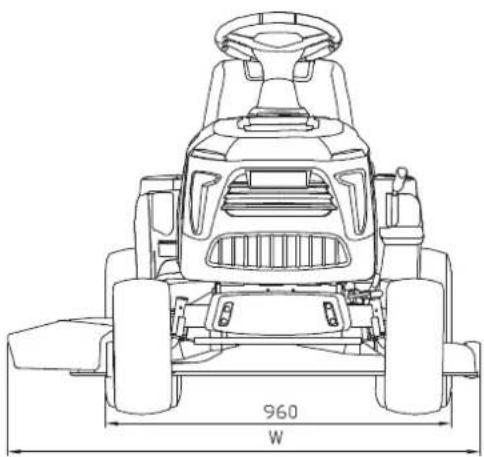
Technical line drawing of a tractor's front view with labeled dimensions (960 and W), no text or symbols present.| Model | TTS98 / TTS98H series | TTS108 / TTS108H series |
| W (mm) | 1280 | 1380 |
DK - Original brugsanvisning
A Disengage the blades for transport or whenever they are not in use.
Stands motoren og frakobl knivene:
1.4 Regulativer for bugsering
To start the engine:
GB - Original instructions
Illustrations....2
Introduction 27
- Safety 27
- Identification of the machine and components ..... 29
- Unpacking and assembly 30
- Controls and instruments .... 31
- How to use the machine.... 32
- Maintenance.... 35
- Specifications 37
- Warranty terms and conditions.... 38
EC Declaration of conformity.... 52
Spare parts
Spare part drawings for the specific product can be found on our website www.texas.dk If you find the part numbers yourself, this will facilitate more rapid service.
For purchase of spare parts, please contact your dealer.
Introduction
Dear Customer,
Thank you for having chosen one of our products. We hope that you will get complete satisfaction from using your new machine and that it will fully meet all your expectations. This manual has been written to help you become familiar with the machine and use it safely and efficiently. Do not forget that it is an integral part of the machine, so keep it close at hand for future reference and pass it on to the purchaser if you sell the machine.
This new lawn tractor has been designed and built in compliance with current standards and is safe and reliable if used for cutting and collecting grass following the instructions given in this manual (proper usage). If you use the machine in any other way or ignore the instructions for safe use, maintenance and repair, it is considered "incorrect usage". In this case, the warranty is automatically voided, and the Manufacturer is not held responsible for damage or injury to oneself or others.
Since we regular improve our products, you may find slight differences between your machine and the descriptions contained in this manual. Modifications can be made to the machine without notice and without the obligation to update the manual, although the essential safety and function characteristics will remain unaltered. If in doubt, do not hesitate to contact your dealer. And now enjoy your work!
After-sales service
This manual gives all the necessary instructions for using the machine and carrying out basic maintenance.
Any adjustments or maintenance operations not described in this manual must be carried out by your Dealer or a specialized Service Centre. Both have the necessary knowledge and equipment to ensure that the work is done correctly without affecting the safety of the machine.
If you wish, you can ask your dealer to prepare a maintenance program personalized to your needs.
This will help you keep your new purchase in peak performance and maintain its value over time.
For standard warranty terms (8)
1. Safety
1.1 How to read the manual
Please read this instruction manual carefully, especially the safety warnings marked with the symbol:

These give details or further information on what has already been said, in the aim to prevent damage to the machine. But non-observance might also result in the risk of serious injury or death to oneself or others.
Positions on the machine, such as "front" (F), "back" (B), "left" (L) or "right" (R) hand side, refer to the direction of forward travel.
For all operations regarding the use and maintenance of the engine or the battery not described in this manual, refer to the relevant manuals which form an integral part of all the documentation supplied with the machine.
1.2. General safety regulations
A) Training
Read the instructions carefully. Be familiar with the controls and how to use the equipment properly.
⚠️ Never let children or people unfamiliar with these instructions use the machine.
⚠️ Local regulations can restrict the age of the user
Never mow while people, especially children, or pets are nearby.
⚠️ Keep in mind that the operator or user is responsible for accidents or hazards
① occurring to other people or their property.
Do not carry passengers.
All drivers should seek and obtain professional and practical instruction. Such instruction should emphasize:
- the need for care and concentration when working with ride-on machines
- you cannot use the brake to regain control of a ride-on machine sliding down a slope. The main reasons for loss of control are:
■ insufficient wheel grip
■ over-speeding
- inadequate braking
■ the type of machine is unsuitable for its task
■ unawareness of the effect of ground conditions, especially slopes
- incorrect hitching and load distribution
B) Preparation
While mowing, always wear sturdy footwear and long trousers. Do not operate the equipment barefoot or wearing open sandals.
Thoroughly inspect the area where the equipment is to be used and remove all
△ objects which can be ejected from the machine
⚠️ DANGER! Petrol is highly flammable
- store fuel in containers specifically designed for this purpose
- refuel outdoors only and do not smoke while refueling
- add fuel before starting the engine. Never remove the cap of the fuel tank or add petrol while the engine is running or when the engine is hot
- if you spill petrol, do not start the engine and move the machine away from the area of spillage. Do not create any source of ignition until the petrol vapors have evaporated
- put back and tighten all fuel tank and container caps securely
⚠️ Replace faulty silencers
A Before use, always inspect the machine to check that the blades, blade bolts and cutter assembly are not worn or damaged. Replace worn or damaged blades and bolts in sets to preserve balance.
On multi-bladed machines, remember that the rotation of one blade can cause other blades to rotate
C) Operation
Do not start the engine in a confined space where dangerous carbon monoxide fumes can collect
⚠ Mow only in daylight or good artificial light.
Before starting the engine, disengage the blades and shift into neutral.
Do not use on slopes of more than 10° (18%)
Remember there is no such thing as a "safe" slope. Travelling on grass slopes requires particular care. To guard against overturning:
- do not stop or start suddenly when going up or downhill
- engage the drive slowly and always keep the machine in gear, especially when travelling downhill
■ machine speeds should be kept low on slopes and during tight turns
- stay alert for humps and hollows and other hidden hazards
- never mow across the face of the slope.
Use care when pulling loads or using heavy equipment:
- use only approved drawbar hitch points
- limit loads to those you can safely control; maximum load 100 kg
• do not turn sharply. Use care when reversing
- use counterweight(s) or wheel weights whenever advised in the instruction's manual
A Disengage the blades before crossing surfaces other than grass.
A. Never use the machine with damaged guards, or without the safety protective devices in place.
Do not change the engine governor settings or
overspeed the engine.
Operating the engine at excessive speed can increase the risk of personal injury.
▲ Before leaving the driving seat:
• disengage the blades and lower the attachments
- go into neutral and apply the parking brake
- stop the engine and remove the ignition key
⚠ Disengage the blades, stop the engine and remove the ignition key:
- before cleaning, checking or servicing the machine
- after striking a foreign object. Inspect the machine for damage and make repairs before restarting and operating the machine
- If the machine starts to vibrate abnormally (check for the causes immediately).
A Disengage the blades for transport or whenever they are not in use.
Stop the engine and disengage the blades:
• before refueling
• before removing side-discharge guard
Reduce the throttle during engine run-out. If the engine is provided with a shut-off valve, cut off the fuel when you have finished mowing
Never direct discharge of material toward bystanders nor allow anyone near the machine while in operation.
D) Maintenance an storage
Keep all nuts, bolts and screws tight to be sure the equipment is in safe working condition.
A Never store the equipment with petrol in the tank inside a building where fumes may reach an open flame or spark.
Allow the engine to cool before storing in any enclosure.
To reduce fire hazards, keep the engine, silencer, battery compartment and petrol storage area free of grass, leaves or excessive grease.
Check the sided discharge guard frequently for wear or deterioration.
Replace worn or damaged parts for safety purposes.
If the fuel tank must be drained, this should be done outdoors.
On multi-bladed machines, remember that the rotation of one blade can cause other blades to rotate.
When the machine is to be stored or left unattended, lower the cutting deck

Waste electrical products (battery) must not be disposed of with the household waste. This tool should be taken to your local recycling centre for safe treatment.
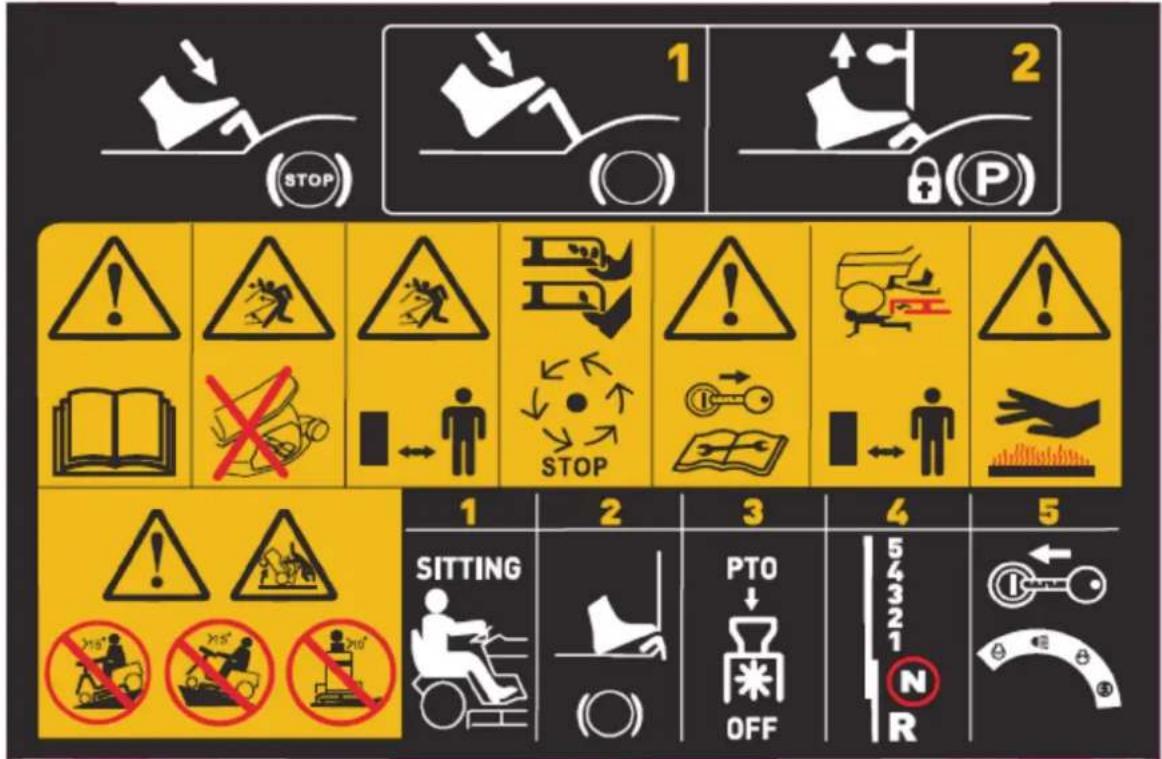
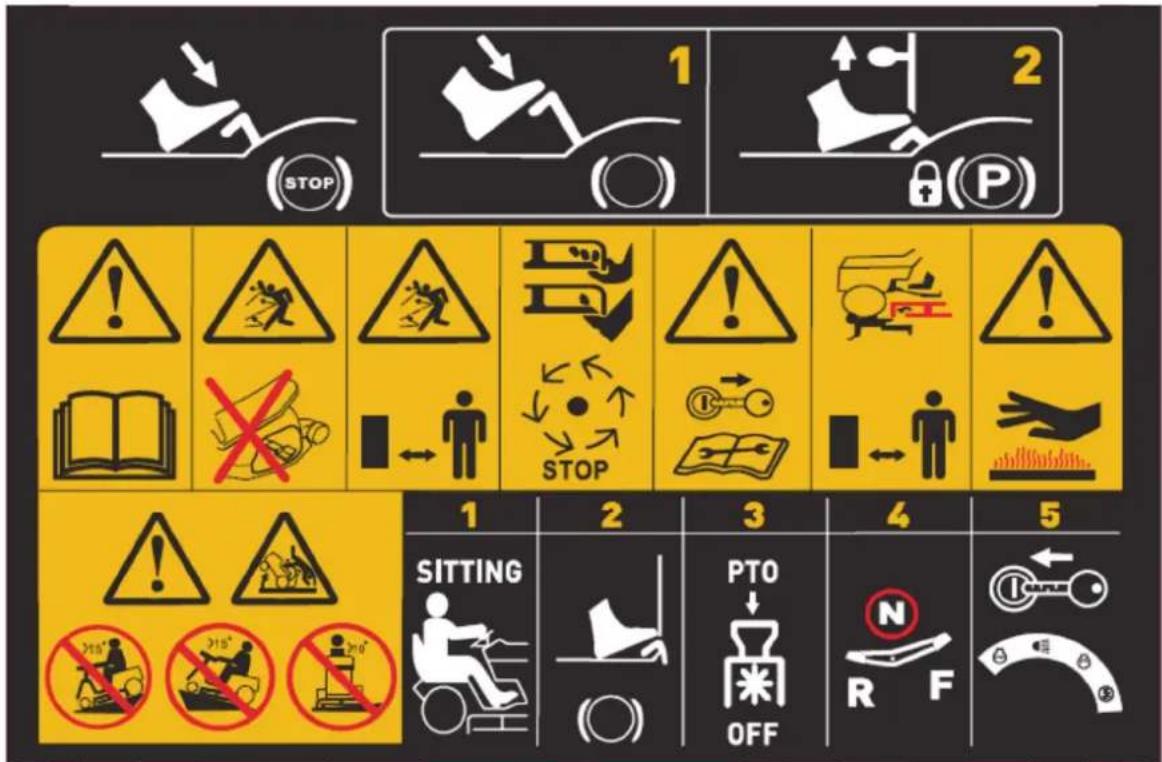
1.3 Safety labels
See Fig 1+2
Your machine must be used with care. This is why labels with illustrations have been placed on the machine, to remind you of the main precautions to take during use.
These labels are to be considered an integral part of the machine.
Should a label come off or become illegible, contact your dealer to replace it.
Their meaning is explained below.

Warning:
Read the instructions before operating this machine.
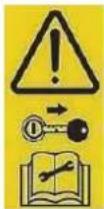
Warning:
Disconnect the ignition key and read the instructions before carrying out any repair or maintenance work.
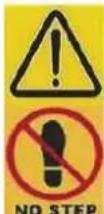
Warning:
No step on the deck or discharge guard.
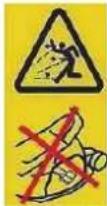
Danger!
Ejected objects:
Do not operate without the discharge guard or grass-catcher in place
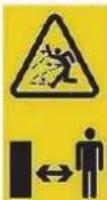
Danger!
Ejected objects:
Keep bystanders away
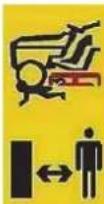
Danger!
Dismemberment:
Make sure that children stay clear of the machine at all time when engine is running
Danger!
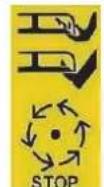
Risk of injury:
Blades in movement. Do not put hands or feet near. The blade will continue turning for some time after switching off the engine or disabling the blade control
Danger!
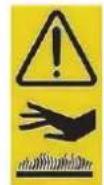
Risk of burns:
Wait for the engine to completely cool down before making any adjustments or servicing the engine itself
Danger!
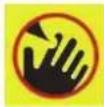
Risk of serious injury:
Keep hands and feet away before the blade and all the moving parts to come to a halt.
Danger!
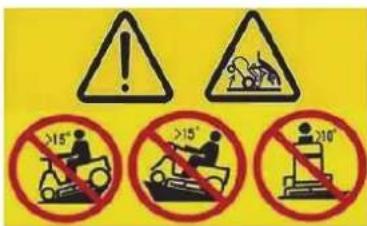
Risk of overturning on steep gradients
Do not use the machine on lawns with gradients of more than 15^ (27%).
Do not use the machine on lawns with side gradients above 10^ (18%).

Danger!
Keep hands and feet away.
Do not use lawn tractor without deflectors in place.
1.4 Regulations for towing
Accessories can be fitted to the rear hook of the tractor. When using the towing kit, do not exceed the recommended loads (100 kg) and follow the safety instructions. See Fig. 3
2. Identification of the machine and components
2.1 Identification of the machine
See Fig. 4
The label located in the seat bracket has the essential data of each machine:
-
Name and address of manufacturer
-
Type of machine
-
Engine speed in rpm
-
Cutting width
-
Year of manufacture
-
Weight in kg
-
Engine power
-
Serial number
-
Acoustic power level according to directive 2000/14/CE
-
Conformity mark according to directive 2006/42/EC
-
Art. no. for identification (e.g. if need spare parts)
2.2 Identification of main components
See Fig. 5
The main components of TTS98 - TTS108:
-
Engine cover
-
Engine
-
Steering wheel
-
Ignition key
-
Driving seat
-
Parking brake lever
-
Battery
-
Drive and speed change engagement lever
-
Rear driving wheels
-
Blade deck
-
Rotating blade
-
Discharge guard
-
Brake/clutch pedal
-
Front wheels
-
Engine throttle lever
-
Blade deck and cutting height adjustment up/down lever
-
Blade rotation engagement lever
-
Notice and safety labels
The main components of TTS98H / TTS108H:
-
Engine cover.
-
Engine
-
Steering wheel
-
Ignition key
-
Driving seat
-
Parking brake lever
-
Battery
-
Front wheels
-
Brake pedal
-
Drive engagement pedal
-
Discharge guard
-
Rotating blade
-
Blade deck
-
Rear driving wheels
-
Lever to release the hydrostatic transmission
-
Engine throttle lever
-
Blade deck and cutting height adjustment up/down lever
-
Blade rotation engagement lever
-
Notice and safety labels
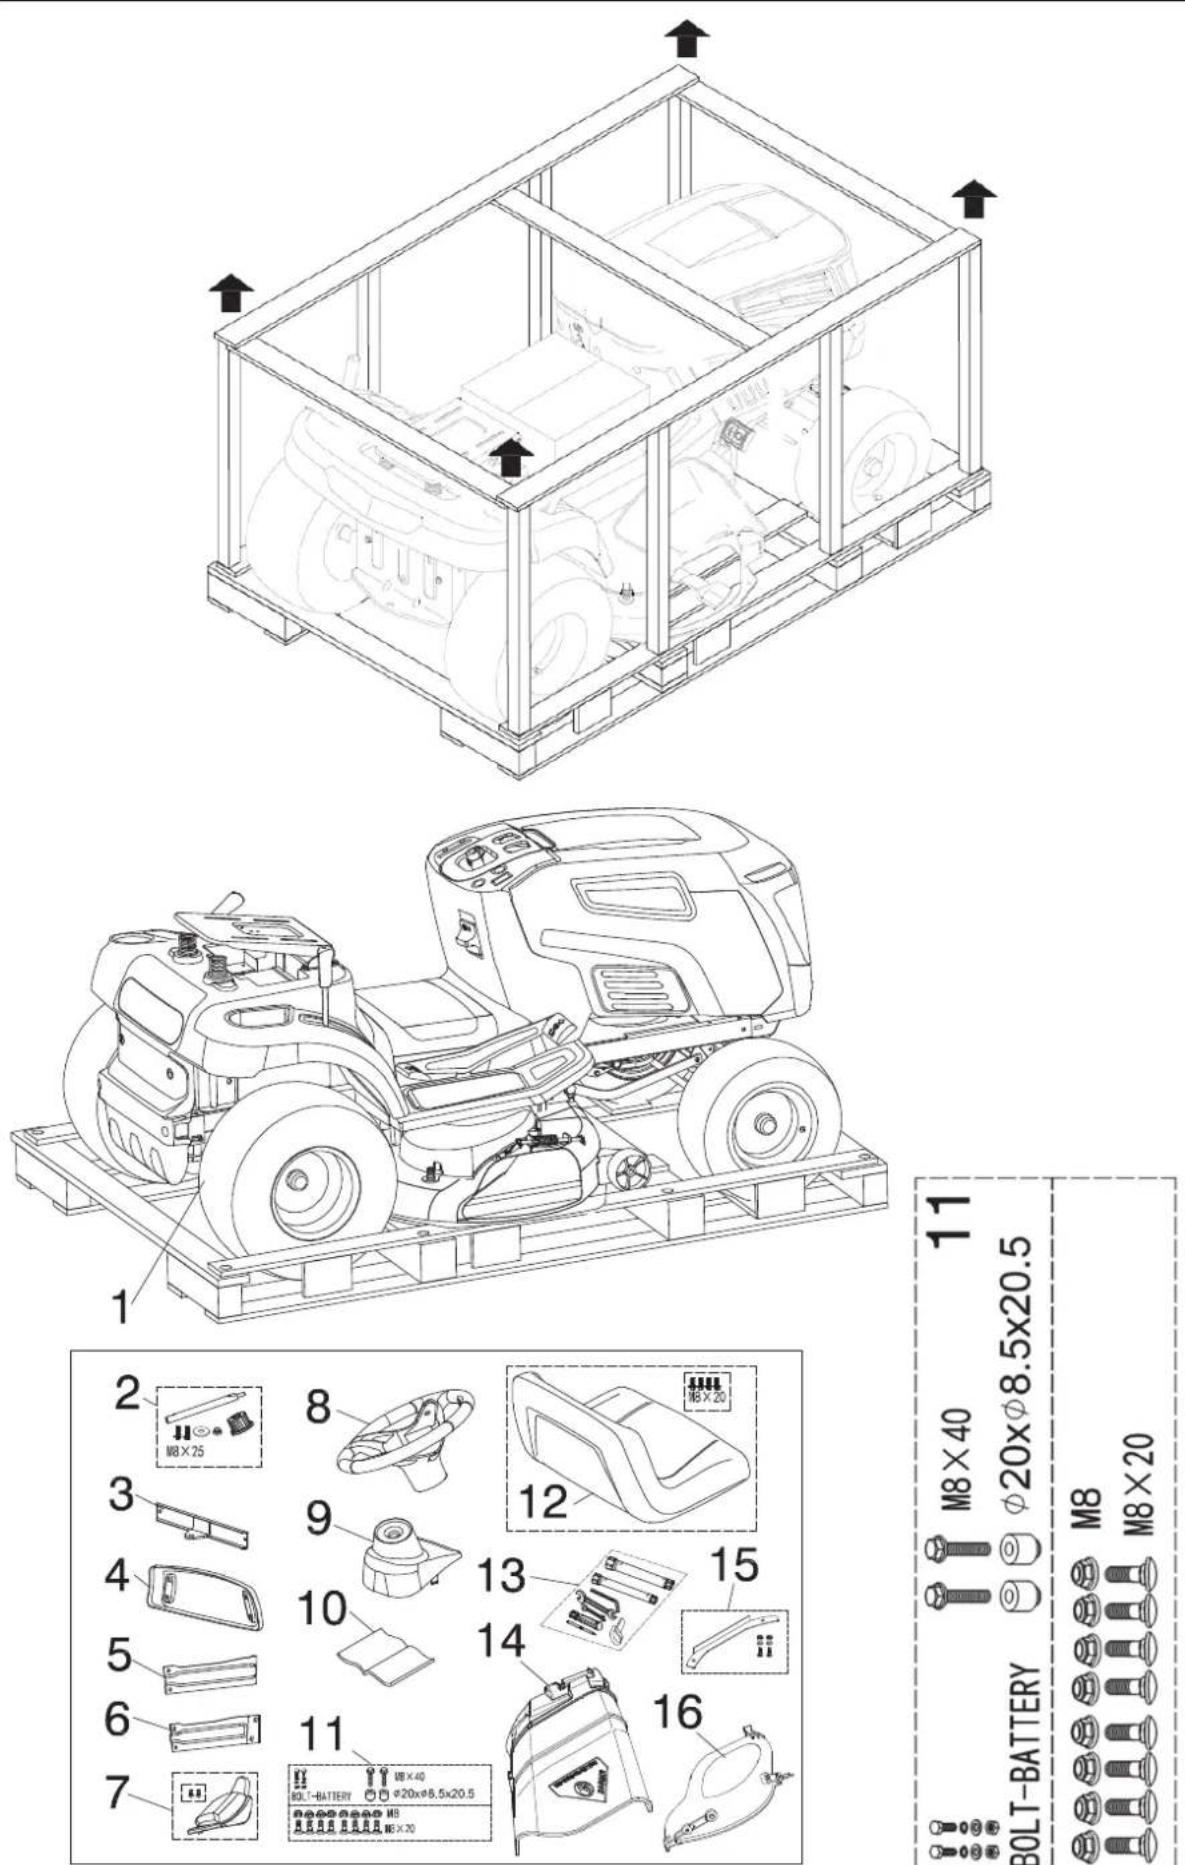
3. Unpacking and assembly
For storage and transport purposes, some components of the machine are not installed in the factory and have to be assembled after unpacking. Follow the instructions below.
The machine is supplied without engine oil or fuel. Before starting the engine, fill with oil and fuel following the instructions given in the engine manual.
3.1 Unpacking
When unpacking the machine, take care to gather all individual parts and fittings, and do not damage the cutting deck when taking the machine off the pallet.
Please remove the 6 bolts at the bottom of the packaging shelf at first, then you can lift up the upper frame so as to free the machine (operation to be performed by two people). And cut the fixed wire at the front and the rear of the tractor frame, then you move out the machine from the pallet.
The packaging contains (see Fig. 6):
-
The machine
-
Steering connect shaft and Splined hub
-
Towing kit
-
Bumper
-
Bumper bracket L
-
Bumber bracket R
-
Steering wheel cover
-
Steering wheel
-
Steering shaft cover
-
Instruction manual
-
Nuts, bolts, washer, bushing
-
Seat
-
Tools and starter key
-
Side deflector
-
Reinforce (Only TTS108/108H)
-
Mulching kit
To prevent damage to the cutting deck, raise it to its maximum height and take utmost care when taking the machine off the pallet.
3.2 Fitting the steering wheel
See Fig. 7
Put the machine on a flat surface and straighten up the front wheels. Fit the steering wheel onto the protruding shaft with the spokes directed towards the seat.
3.3 Fitting the seat
See Fig. 8
Mount the seat on the plate using 2 bolts and nuts.
Connect the wire harness A and switch B under the seat.
3.4 Connecting the battery
See Fig. 9
-
Fit the battery in its housing. Important: Position the battery with the polarities (+) and (−). Make sure the battery is fitted so (+) is facing left near the red cable. Pay attention to the small (+) and (−) symbols on the battery top.
-
Connect the battery connectors to the machine connection leads and tighten the 2 screws. then cover the protective cap for the 2 wire is in place.
It might be necessary to charge the battery before use.
Connect a standard 12V charger for 12-24 hours.
Charger is not included.
This machine used the following battery:
KW12-18 / 12V, 18AH (art. no. 440968)
3.5 Mounting the deck wheel
See Fig. 10
Mounting the two deck wheels on the deck using the bolts, bushing, washer and nuts.
On the flat lawn, if need, you can change the position of support wheel to obtain a lower cut.
In soft, uneven lawns, you must always set the wheels in the hole «A».
3.51. Mounting reinforcement bar (only 108 cm).
Mount the reinforcement bar as shown in Fig. 10
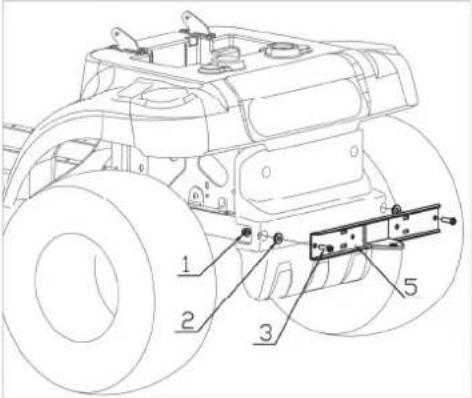
3.6 Mounting the front bumper
See Fig. 11
Mounting the front bumper on the bottom of the frame using the screws.
3.7 Mounting side deflector
Insert the elastic pin (1) and washer (2) into the right end of the pin (3); Insert the pin shaft into the side deflector (4), bracket (6) and torsion spring (5) in sequence and insert the washer (2) and elastic latch (1) at the other end. Note: When you need to open the side deflector, please press the self-locking button first, and do not force it to open
4. Controls and instruments
For overview, see Fig. 12
4.1 Throttle
This regulates the engine's rpm. The positions are indicated on a plate showing the following symbols:


«CHOKE»
cold
starting
«SLOW»
for minimum engine speed
«FAST»
for maximum engine speed
The «CHOKE» position enriches the mixture so must only be used for the time necessary when starting from cold. When moving from one area to another, put the lever in a position between «SLOW» and «FAST» When cutting, shift into «FAST»
4.2 Steering wheel
See Fig. 12
Turns the front wheels.
4.3 Headlight switch
See Fig. 13
For turning on the headlights when
the key is in the position.

4.4 Key ignition switch
See Fig. 13
This key operated control has three positions:


«OFF»
everything is switched off
«ON»
activates all parts
«START»
connects the starter motor
If you release the key on «START», it will automatically return to «ON».
4.5 Brake pedal
See Fig. 14
This pedal works the brake on the rear wheels. For model TTS98-TTS108 the pedal also acts as a clutch, engaging and disengaging drive to the wheels, and in second part it acts as a brake on the rear wheels.
Do not keep the pedal halfway between clutch engagement or disengagement, as this can cause overheating and damage the transmission belt. When the machine is moving, keep your foot off the pedal (TTS98-TTS108 only).
4.6 Parking brake
See Fig. 14
With machine stopped:
-
keep the pedal pressed
-
Lift the parking brake lever and keep lifted
-
Release the pedal.
This way, the rear wheels remain braked.
To release the parking brake, fully press the pedal. (the parking brake lever is automatically released and returns to down position)
The engine can only be started at the parking position, when operator is sitting on seat and when driving and cutting is disengaged.
4.8 Cutting height adjustment lever
Lifts or lowers the blade deck and thereby adjusts the grass cutting height. There are seven positions for this lever (shown as «1» to «7» on the label), which correspond to various cutting heights between 30 and 90 mm.
To go from one height to another, press the button on the handle and accompany the lever to the required position. When the button is released, the lever remains in the selected position.
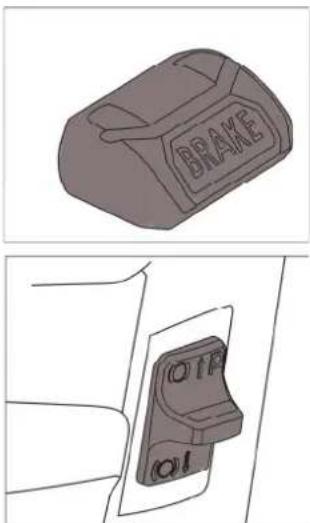
4.3 Blade rotation engagement lever
See Fig. 15
Starts or stops blade rotation:

Blades engaged

Blades disengaged
Before the machine is being used, the cable adjustment should always be checked.
The cables can be checked by activating the handles fully and check if the cable is tight. If not, it must be tightened. If the handle cannot easily be fully activated, the cable should be loosened.
After first season, it must be expected that the cables need to be adjusted for optimal activation, as cables can stretch when used.
4.9 Drive speed change
See Fig. 16
Model TTS98 and TTS108 has a speed change lever.
This lever has seven positions for the 5 forward speeds, the neutral position «N» and reverse «R». When shift the speed change lever, press the clutch pedal to disengage the drive belt and shift the lever as shown on the label.
Never directly shift the lever from forward to reverse or from reverse to forward before the machine come to stop.
Model TTS98H and TTS108H is equipped with a drive engagement pedal.
This pedal engages drive in the wheels as well as modulating the machine's forward and reverse speeds.
To engage forward drive, press it towards «F» with your toecap. As you increase the pressure on the pedal, the speed of the machine increases.
Reverse is engaged by pressing the pedal with the heel towards «R».
The pedal automatically goes into neutral «N» when released.
Reverse must only be engaged when the machine is stopped! If the drive pedal is used (whether forwards or for reverse) when the parking brake is engaged, the engine stops.
4.10 Lever to release the hydrostatic transmission See Fig. 17
Only for model TTS98H and TTS108H!
This lever has two positions as shown on the label: «A» Transmission engaged - for all uses, when moving and during cutting «B» Transmission disengaged - this makes it much easier move the machine by hand, with the engine turned off.
5. How to use the machine
5.1 Safety recommendations
The machine must only be used for the purpose for which it was designed (cutting grass). Do not tamper with or remove the safety devices fitted on the machine.
REMEMBER THAT THE USER IS ALWAYS RESPONSIBLE FOR DAMAGE AND INJURY TO OTHERS!
Before using the machine:
Δ read the general safety regulations, paying attention to driving and cutting on slopes
A carefully read the instructions for use, make sure you are familiar with the controls and know how to stop the blades and the engine quickly
A never put your hands or feet next to or beneath the rotating parts and always keep away from the exit.
Do not use the machine when in a precarious state of health or under the effect of medicine or any other substances that can reduce your reflex actions and your ability to concentrate.
It is the user's responsibility to assess the potential risk of the area where work is to be carried out, and to take all the necessary precautions to ensure his own safety and that of others, particularly on slopes or rough, slippery and unstable ground.
Do not leave the machine on high grass with the engine running to avoid the risk of starting a fire.
This machine must not be used on slopes steeper than 10^ (18%). If the machine is likely to be used mostly on sloping ground (never steeper than 10^ ), fit counterweights beneath the cross-member of the front wheels. These improve stability at the front and reduce the chances of tipping over.
All the references relating to the positions of controls are described in chapter 4.
5.2 Why the safety devices cut in
The safety devices work in two ways:
They prevent the engine from starting if all the safety requirements have not been met
They stop the engine if even just one of the safety requirements is lacking.
To start the engine, make sure that:
- The transmission is in "neutral"
• The blades must not be engaged - The operator must be seated, and the parking brake engaged.
The engine stops when:
- The operator leaves his seat and the parking brake is disengaged
- The operator leaves his seat and the blades are engaged
- The blades are engaged, and the machine is in reverse.
5.3 Diretions before starting work
Before starting to mow, it is necessary to carry out several checks and operations to ensure you can work efficiently and with maximum safety.
5.3.1 Seat adjustment
See Fig. 18
To change the seat position, lift the seat adjustment lever up, Slide the seat forward or rearward to the desired position; then release the adjustment lever. Make sure seat is locked into position before operating the tractor.
5.3.2 Tire pressure
See Fig. 19
Having the right tire pressure is the main condition for ensuring that the cutting deck is horizontal and mows evenly. Unscrew the valve caps and connect a compressed air line with a gauge to the valves.
The pressures are:
Front tire: 1.2 bar (15 x 6.0-6) Rear tire: 1.0 bar (18 x 8.5-8)
5.3.3 Checking the fuel and oil (■ 3.7)
See Fig. 20
The engine manual indicates what type of oil and fuel you can use. With the engine off, check the oil level according to the instructions in the engine manual, this must be between the MIN and MAX marks on the oil dipstick. Refuel using a funnel, but do not completely fill the tank. The fuel tank's capacity is about 7.5 liters
Refueling should be carried out in an open or well-ventilated area with the engine off. Always remember that petrol fumes are inflammable.
DO NOT USE A NAKED FLAME TO LOOK INSIDE THE TANK AND DO NOT SMOKE WHEN REFUELLING.
A Do not drip petrol onto the plastic parts to avoid damaging them. In the event of accidental spills or leaks, rinse immediately with water. The warranty does not cover for damage to
plastic parts of the bodywork or the engine caused by petrol.
5.3.4 Checking machine safety and efficiency
- Check that the safety devices function as described (■ 5.2).
- Check that the brake is in perfect working order.
- Do not start mowing if the blades vibrate or if you are unsure whether they are sharp enough. Always remember that:
- A badly sharpened blade pulls at the grass and causes the lawn to turn yellow.
- A loose blade causes unwanted vibrations and can be dangerous.
Do not use the machine if you are unsure whether it is working safely or efficiently. If in doubt, contact your Dealer immediately to make the necessary checks and repairs.
5.4 Using the machine
5.4.1 Starting
A The engine must be started in an open or well-ventilated area! ALWAYS REMEMBER THAT EXHAUST GASES ARE TOXIC!
To start the engine:
-
Open the air valve on fuel lid (to "I") - See Fig. 21
-
Disengage the blades (■ 4.3)
-
Operate the parking brake (■ 4.6)
-
Keep the drive pedal at the NEUTRAL position
-
Sit on the tractor seat
-
When starting from cold, move the throttle to the «CHOKE» position shown on the label.
-
If the engine is already warm, position the throttle lever between «SLOW» and «FAST»
-
Put in the ignition key and turn to «ON» to make electrical contact, then turn to «START» to start the engine. Release the key once the engine has started.
-
When the engine has started, move the throttle to «SLOW».
The choke must be closed as soon as the engine is running smoothly. Using it when the engine is already warm can foul the spark plugs and cause the engine to run erratically.
If there are engine starting problems, do not insist as you can risk running the battery flat and flooding the engine. Turn the key to «OFF», wait for a few seconds and then repeat the operation. If the malfunction persists, refer to the engine manual
Always bear in mind that the safety devices prevent the engine from starting if safety requirements have not been met ( 5.2). In these cases, once the situation has been corrected, the key must first be turned back to «OFF» before the engine can be restarted.
5.4.2 Starting and moving without mowing
This machine has not been approved for use on public roads. It must be used (as indicated by
the highway code) in private areas – away from traffic.
When moving the machine, the blades must be disengaged, and the cutting deck raised as high as possible:
- Position the throttle between «SLOW» and FAST
- Disengage the parking brake and release the brake pedal (4.6)
- Press the drive pedal (Fig. 16) in direction «F» and reach the required speed by gradually increasing pressure on the pedal and working the throttle
A Drive must be engaged as described (Fig. 16) to prevent sudden engagement from causing tipping up and loss of control of the vehicle, particularly on slopes.
5.4.3 Braking
The machine already slows down considerably by just releasing the drive pedal.
If need faster breaking, use the brake pedal (4.5)
5.4.4 Reverse
Reverse must be engaged only when the machine has stopped moving.
When the machine has stopped moving, start reversing by pressing the drive pedal in direction «R» (Fig. 16).
Reverse Mode Operation Button (RMO)
The reverse mode operation knob is located on the RH console to the left of the blade start/stop knob. Press the RMO switch and do not press it always, then the machine can cut the grass when driving reverse. After close the blade start/start knop or engine stop, the RMO will get invalid. You need to press the RMO button again if need to keep the blades rotating when driving reverse. NOTE: Mowing in reverse is NOT recommended.
5.4.5 Grass cutting
To start cutting:
- Move the throttle to «FAST»
- Raise the cutting deck as high as possible
• Engage the blades (■ 4.3) - Start moving forwards on the grass very slowly and with utmost caution, as already described
- Regulate the cutting height and speed considering the conditions of the lawn (the height, density and dampness of the grass).
When cutting on sloping ground, reduce your speed to ensure safe conditions.
Whatever the conditions, always reduce the speed if you notice a drop in engine speed.
If you travel too fast compared to the amount of grass being cut, you will not be able to mow/cut the grass well.
Disengage the blades and raise the cutting deck as high as possible whenever you need to get past an obstacle.
5.4.6 Use of mulching function
See Fig. 22 (A)
Mulching is ideal for ornamental lawns. With the mulching cover fitted in the cutting deck, the grass is cut
into very tiny pieces, which disappear between the blades of grass and rot down to provide natural fertilizer for the grass.
To use the mulching function, lift up the side discharge guard and attach the included mulching cover to the hole of the deck. Make sure the upper part is placed on the axle under the guard and secure it to the hole of the deck with the 2 hooks.
Important: The grass must be dry and not too long to get the best results. Mulching therefore requires regular and more frequent mowing – once or twice a week to work optimally. If the grass becomes too long, it can make the engine stop due to overload. If this happens, either raise the cutting height or use the side discharge function.
5.4.7 End of mowing
When you have finished mowing, disengage the blades, lower the engine speed and ride the machine with the cutting deck raised as high as possible.
5.4.8 End of work
Stop the machine, move the throttle to «SLOW» and turn off the engine by turning the key to «OFF». When the engine has stopped, close the air valve on fuel lid. (■ 5.4.1)
A. To avoid backfire, position the throttle on «SLOW» for 20 seconds before stopping the engine. Always take out the ignition key before leaving the machine unattended!
A. To keep the battery charged, do not leave the key in the «ON» position when the engine is not running.
5.4.9 Cleaning the machine
After use, clean the outside of the machine. Clean the plastic parts of the body with a damp sponge using water and detergent, taking care not to wet the engine, the electrical parts or the electronic circuit board located under the dashboard.
A Never use hose nozzles or harsh detergents to clean the bodywork or the engine!
When washing the inside of the cutting deck and the collector channel, the machine must be on firm ground with:
• The grass-catcher or stone-guard fitted
• The operator seated
• The engine running
• The transmission in neutral
- The blades engaged
Connect a water hose to each of the pipe fittings at a time and run water through each one for a few minutes, with the blades moving. See Fig. 23
When washing, the cutting deck should be lowered right down.
5.4.10 Storage and inactivity for long periods
See Fig. 24
If you intend not to use the machine for a long period (more than 1 month), disconnect the battery cables and follow the instructions in the engine instruction manual.
Empty the fuel tank by disconnecting the tube situated at the inlet of the fuel filter and follow the instructions in the engine manual.
A Carefully remove any dry grass cuttings which may have collected around the engine or silencer to prevent their catching fire the next time the machine is used!
Put the machine away in a dry, sheltered place and preferably covered with a cloth
The battery must be kept in a cool and dry place. Before a long storage period (more than 1 month), always fully charge the battery, and then it must be charged every 3 months to maintain its capacity.
The next time the machine is used, check that there are no fuel leaks from the tubes, fuel stopcock or carburetor.
5.4.11 Summary of main steps to follow when using the machine
| To... You will need to... | |
| Start the engine (5.4.1) | Open the fuel stopcock, ensure that all the conditions allowing starting are met, and then turn the key. |
| Go forward (5.4.2) | Press the drive pedal forward. |
| Brake or stop (5.4.3) | Reduce the engine speed and press the brake pedal |
| Reverse (5.4.4) | Stop the machine; press the drive pedal back. |
| Cut the grass (5.4.5) | Fit the grass-catcher and apply the throttle; engage the blades and adjust the cutting height. Press the drive pedal forward. |
| Use the mulching function (5.4.6) | Attach the mulching cover under the side discharge guard. |
| Finish mowing (5.4.7) | Disengage the blades and reduce the engine speed. |
| Stop the engine (5.4.8) | Reduce the engine speed, wait a few seconds, turn the key and close the fuel stopcock. |
| Store the machine (5.4.9) | Engage the parking brake, remove the key and, if necessary, wash the machine, and the inside of the cutting deck. |
5.5 Using the machine on slopping ground
Only mow on slopes with gradients up to the maximum shown here.
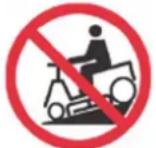
15°
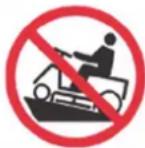
15°

10°
Lawns on a slope have to be mowed moving up and down and never across them.
When changing direction, take great care that the wheels facing up the slope do not hit any obstacles (such as stones, branches, roots, etc.) that may cause the machine to slide sideways, tip over or make you lose control.
A REDUCE SPEED BEFORE ANY CHANGE OF DIRECTION ON SLOPES, and always apply the parking brake before leaving the machine at a standstill and unattended.
A Start moving forwards very carefully on sloping ground to prevent the risk of tipping over. Reduce the forward speed before going on a slope, particularly downhill.
A Never use reverse to reduce speed going downhill: this could cause you to lose control of the vehicle, especially on slippery ground.
Only for TTS98H and TTS108H:
Go down slopes without touching the pedal (Fig. 16) to take advantage of the braking effect of the hydrostatic drive when the transmission is not engaged.
5.6 Transporting
If the machine is transported on a truck or trailer, use suitable equipment for lifting and enough people for the weight involved and the type of lifting system used. The machine must never be lifted by rope and tackle. During transport, close the fuel stopcock, lower the cutting deck, apply the parking brake and fasten the machine securely with ropes or chains to the hauling device.
5.7 Lawn maintenance
- To keep a lawn green, soft and attractive, it should be cut regularly without damaging the grass. A lawn can be composed of different types of grass. If the lawn is cut frequently, grass and roots grow more vigorously, forming a solid grassy bed. If the lawn is cut is less frequently, higher grass and weeds start growing (plus daisies and clovers, etc.).
- It is always better to cut the grass when dry.
- The blades must be in good condition and well sharpened so that the grass is cut straight without a ragged edge that leads to yellowing at the ends.
- The engine must run at full speed, both to ensure a sharp cut of the grass and to get the necessary thrust to push the cuttings through the collector channel.
- The frequency of mowing should be in relation to the rate of growth of the grass. The grass should not be left to grow too much between one cut and the next.
- During hot and dry periods, the grass should be cut
a little higher to prevent the ground from drying out.
- The best height of the grass on a well-kept lawn is approx. 4-5 cm. With one cut, you do not need to remove more than a third of the total height. If the grass is very tall, it should be cut twice in 24 hours period – the first time with the blades at maximum height, possibly reducing the cutting width, and the second cut at the desired height.
- When you mow large areas, start by turning to the right so that the cut grass will discharge away from shrubs, fences, drive-ways, etc. After one or two rounds, mow in the opposite direction making left turns until finished. See Fig. 25
- The appearance of the lawn will improve if you alternate cutting in both directions.
- If the collector system tends to get blocked with grass, you should reduce the forward speed as it may be too high for the condition of the grass. If the problem persists, the probable causes are either badly sharpened blades or deformed wings.
- Be very careful when mowing near bushes or kerbs as these could distort the horizontal position of the cutting deck and damage its edge as well as the blades.
6. Maintenance
6.1 Safety recommendations
Before cleaning or doing maintenance work, take out the ignition key and read the relevant instructions. Wear adequate clothing and work gloves whenever your hands are at risk.
A Never use the machine with worn or damaged parts. Faulty or worn-out parts must always be replaced and not repaired. Only use original spare parts! Parts that are not of the same quality can damage the equipment and affect your safety and that of others.
A Never dispose of used oil, fuel, batteries or other pollutants in unauthorized places!
6.2 Scheduled maintenance
| Operation | Every hours |
| MACHINE | |
| Check of fastening and sharpness of blades 25 | |
| Blade replacement 100 | |
| Transmission belt check 25 | |
| Transmission belt replacement ^1) | - |
| Blade belt check 25 | |
| Blade belt replacement ^1) | - |
| Drive adjustment and check 10 | |
| Blade brake and engagement check 10 | |
| Bolt and screw check 25 | |
| General lubrication ^2) | 25 |
| ENGINE^3) | |
| Check engine oil level 5 | |
| Engine oil change 50 | |
| Air filter cleaning and check 5 | |
| Air filter replacement 50 | |
| Fuel filter check 50 | |
| Fuel filter replacement 100 | |
| Spark plug contacts check and cleaning 50 | |
| Spark plug replacement 100 | |
1) Replace the belt(s) as soon as they show obvious sign of wear.
2) Lubrication depends usage and area (do before winter storage).
3) See the engine manual for the full list and frequency. At the first signs of wear, contact your dealer to replace the part. General lubrication of all joints should also be carried out whenever the machine is to be left unused for a long period.
All checks, adjustments and replacements not described in chapters 6.3 and 6.4 of this manual must be carried out by your Dealer or a specialized Service Center. Both have the necessary knowledge and tools to ensure that the work is carried out correctly without affecting the safety of the machine.
6.2.1 Engine
Follow all the instructions in the engine manual. To empty the engine oil, unscrew the oil plug when refitting the plug, make sure the seal is positioned correctly.
6.2.2 Battery
The battery must be carefully maintained to ensure long life. The machine battery must always be charged:
- Before using the machine for the first time after purchase
- Before leaving the machine disused for a long period
- Before starting up the machine after a long period of disuse
Carefully read and observe the battery recharging instructions in the booklet provided with the battery. Failure in following the instructions or in charging the battery could permanently damage the battery cells. A flat battery must be recharged as soon as possible.
Charger is not included with machine!
Battery will re-charge when tractor is used.
A. Recharging must be done using a battery charger at constant voltage. Other recharging systems can irreversibly damage the battery.
6.3 Checks and adjustments
6.3.1 Cutting deck alignment
See Fig. 26
The cutting deck should be properly set to obtain a good cutting result.
For achieving good results from cutting the front part should always be 5-6 mm lower than the rear part.
- Place the machine on flat ground and check the tire pressure
- Put 30 mm blocks under the front edge of the deck and 35 mm blocks under the rear edge and then put the lifting lever into position «2»
- Adjust the left front adjuster rod, right adjuster rod and right rear adjuster rod keep the deck in touch with the blocks
- Adjust the lift rod, keep the deck in touch with the blocks
6.3.2 Cutting blades disengage
When you move the blade rotation engagement lever to the DISENGAGE position, all movement will stop within five seconds if the adjustment is correct. In case of any doubts, do not hesitate to contact your retailer.
Before you make an inspection, adjustment, or repair to the unit, disconnect the wire to the spark plug. Remove the wire from the spark plug to prevent the engine from starting by accident.
6.4 Dismantling and replacement
6.4.1 Replacing wheels
See Fig. 27+28
Stop the machine on flat ground and put a block under a load-bearing part of the frame on the side that the wheel is to be changed.
The wheels are held by a snap ring which can be eased off with a screwdriver.
If you have to replace one or both rear wheels, make sure they have the same diameter, and check that cutting deck is horizontal to prevent an uneven cut. You must make sure the key and washer are securely lodged in place.
Before remounting the wheel, apply grease to the axle. Put the snap ring and supporting washer back in place.
6.4.2 Replacing and repairing the tires
The tires are “tubeless” and so all punctures must be repaired by a tire repairer following the procedures required for this kind of tire.
6.4.3 Replacing a fuse
See Fig. 30
The machine is fitted with 10A fuses.
When it blows, the machine stops, the dashboard light switches off and the battery gradually runs out. The machine will have problems starting.
Remove the fuse and replace with a same type fuse.
A blown fuse must always be replaced by one of the same types and ampere rating, and never with one of another rating.
6.4.4 Dismantling, replacing and remounting the blades
See Fig. 31
Always wear work gloves when handling the blades. Before you inspect or remove the blade, stop the engine and disconnect the wire to the spark plug.
A Damaged or bent blades must always be replaced, never try to repair them! ALWAYS USE ORIGINAL BLADES!
A Make sure the blades are correctly balanced. Make sure you put them back in the right place by referring to the code stamped on the outside of each blade.
1) Dismantling blades
Loosen anti-clockwise the screw
2) Original spare parts
Only the following pairs of blades can be used on this machine:
98 cm version: Art. no. 465083 - 2 pcs.
108 cm version: Art. no. 465084 - 2 pcs.
Always change both blades!
3) Remounting blades
Make sure the printed code on the blade to face the operator who remounted the blade.
Check that the concave part of the cushion disc presses against the blade.
Remount the shaft hubs making sure that the keys are securely lodged in place.
4) Tightening the screws
Tightening clockwise with a torque wrench calibrated to 40-45 Nm.
6.4.5 Replacing the belt
The belt replacement must be carried out at an Authorized Service Center.
Replace the belts as soon as they show obvious sign of wear!
ALWAYS USE GENUINE REPLACEMENT BELTS!
6.5 Lubrication
See Fig. 32
-
Apply grease with an injector to the areas shown. apply two or three shots of grease and wipe off excess grease.
-
Lubricate the areas shown with engine oil below.
-
Wipe the area clean, apply a few drops of oil, then wipe up drips or spills.
Do not dirty the belt or brake shoe or tires with the grease or oil. Oil or grease will damage them.
- Specifications
| Model:Engine:Rated power: | TTS98 / TTS98HLoncin LC1P90F-1, 432 cc7.5 kW at 2600 min ^-1 |
| Model:Engine:Rated power: | TTS108 / TTS108HLoncin LC1P92F-1, 452 cc7.8 kW at 2600 min ^-1 |
| Engine oil capacity: 1.2 L | |
| Fuel (gasoline)capacity: | 7.5 L |
| Blade: | 98 cm:Art. no. 465083 (2 pcs.)108 cm:Art. no. 465084 (2 pcs.) |
| Blade screwtightening torque: | 40-45 Nm |
| Battery: 12V / 18Ah | |
| Cutting height: 30-90 mm | |
| Cutting width: | 98 cm: TTS98108 cm: TTS108 |
| Front tires size: 15 x 6.00-6 | |
| Rear tires size: 18 x 8.50-8 | |
| Front tire pressure: 1.0 bar | |
| Rear tire pressure: 1.2 bar | |
| Forward speed: | 1.6-3.4-5.1-6.4-8.3 km/h:(TTS98, TTS108)0 - 8.8 km/h (TTS98H,TTS108H) |
| Reverse speed: | 2.5 km/h (TTS98, TTS108)0 - 4.5 km/h (TTS98H,TTS108H) |
| Net weight: | 169.5 kg (TTS98)168.5 kg (TTS98H)170.0 kg (TTS108)170.0 kg (TTS108H) |
8. Warranty terms and conditions
The warranty period is 2 years for private end users in EU countries.
Products sold for commercial use, only have a warranty period of 1 year.
The warranty covers material and/or fabrication faults.
Restrictions and requirements
Normal wear and replacement of wearing parts are NOT covered by the warranty.
Wearing parts, which are NOT covered for more than 12 months:
- Blades
- Cables
- Belts
- Tires
- Fuses
- Switches
• Membranes/gaskets/fuel hoses - Spark plugs
• Engine liquids (oil, gasoline) - Filters
- Light bulbs
- Battery: If the battery is not stored correct (frost-free and recharged every 3 months), the durability is only guaranteed for 6 months.
If you start the engine without adding oil, it will be damaged and cannot be repaired and therefore not covered by the warranty.
The warranty does NOT cover damages/faults caused by:
- Lack of service and maintenance
• Structural changes - Exposure to unusual external conditions
- Damages to the bodywork, deck, handles, panels etc.
- If the machine has been improperly used or overloaded
- Wrong use of oil, gasoline or other liquid types, which are not recommended in this user manual
- Bad or dirty gasoline, which results in contamination of the fuel system
- Use of unoriginal spare parts.
- Other conditions where Texas cannot be held responsible.
Whether a case is a warranty claim or not is determined in each case by an authorized service center.
Your receipt is your warranty note, why it should always be kept safe.
REMEMBER: The purchase of spare parts as well as any request for warranty repair, art. number (e.g. 900631XX), year and serial number should always be informed.
* We reserve the right to change the conditions and accept no liability for any misprints.
4.3 Messerrotationshebel
Siehe Abb. 15
2006/42/EC - 2014/30/EU - 2000/14/EC amended by 2005/88/EC
Johnny Lolk Managing Director

Responsible for documentation Johnny Lolk
TEXAS
EQUIPMENT
- DK - Original brugsanvisning
- Regulativer for bugsering
- To start the engine:
- GB - Original instructions
- Spare parts
- Introduction
- After-sales service
- Safety
- How to read the manual
- General safety regulations
- A) Training
- B) Preparation
- C) Operation
- overspeed the engine.
- D) Maintenance an storage
- Safety labels
- Warning:
- Danger!
- Ejected objects:
- Dismemberment:
- Risk of injury:
- Risk of burns:
- Risk of serious injury:
- Risk of overturning on steep gradients
- Keep hands and feet away.
- Regulations for towing
- Identification of the machine and components
- Identification of the machine
- See Fig. 4
- Identification of main components
- The main components of TTS98 - TTS108:
- The main components of TTS98H / TTS108H:
- Unpacking and assembly
- Unpacking
- The packaging contains (see Fig. 6):
- Fitting the steering wheel
- Fitting the seat
- Connecting the battery
- Mounting the deck wheel
- Mounting reinforcement bar (only 108 cm).
- Mounting the front bumper
- Mounting side deflector
- Controls and instruments
- Throttle
- Steering wheel
- Headlight switch
- Key ignition switch
- Brake pedal
- Parking brake
- Cutting height adjustment lever
- Blade rotation engagement lever
- Drive speed change
- Only for model TTS98H and TTS108H!
- How to use the machine
- Safety recommendations
- REMEMBER THAT THE USER IS ALWAYS RESPONSIBLE FOR DAMAGE AND INJURY TO OTHERS!
- Why the safety devices cut in
- The safety devices work in two ways:
- To start the engine, make sure that:
- The engine stops when:
- Diretions before starting work
- Seat adjustment
- Tire pressure
- The pressures are:
- Checking the fuel and oil (■ 3.7)
- DO NOT USE A NAKED FLAME TO LOOK INSIDE THE TANK AND DO NOT SMOKE WHEN REFUELLING.
- plastic parts of the bodywork or the engine caused by petrol.
- Checking machine safety and efficiency
- Using the machine
- Starting
- Starting and moving without mowing
- the highway code) in private areas – away from traffic.
- Braking
- Reverse
- Reverse Mode Operation Button (RMO)
- Grass cutting
- Use of mulching function
- End of mowing
- End of work
- Cleaning the machine
- Storage and inactivity for long periods
- Summary of main steps to follow when using the machine
- Using the machine on slopping ground
- Transporting
- Lawn maintenance
- Maintenance
- Safety recommendations
- Engine
- Battery
- Charger is not included with machine!
- Checks and adjustments
- Cutting deck alignment
- Cutting blades disengage
- Dismantling and replacement
- Replacing wheels
- Replacing and repairing the tires
- Replacing a fuse
- Dismantling, replacing and remounting the blades
- ALWAYS USE GENUINE REPLACEMENT BELTS!
- Lubrication
- Warranty terms and conditions
- Restrictions and requirements
- The warranty does NOT cover damages/faults caused by:
- Messerrotationshebel
- 2006/42/EC - 2014/30/EU - 2000/14/EC amended by 2005/88/EC
- TEXAS
Brand : Texas
Model : TTS98H
Category : Tractor