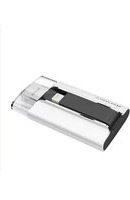
iXpand 2.0 - USB Drive SANDISK - Free user manual and instructions
Find the device manual for free iXpand 2.0 SANDISK in PDF.


| Product Type | USB Flash Drive with Lightning Connector |
| Brand | SanDisk |
| Model | iXpand 2.0 |
| Interface | Lightning (for iOS devices) and USB-A (for PC/Mac) |
| Capacity Options | 32GB, 64GB, 128GB, 256GB |
| Dimensions | Approximately 2.5 x 0.7 x 0.4 inches (64 x 18 x 10 mm) |
| Weight | Approximately 10 grams |
| Power Source | Bus-powered via Lightning or USB-A connector |
| Operating Systems Supported | iOS 10.3 or later; Windows 7/8/10/11; macOS 10.9 or later |
| Main Functions | Automatic backup of photos/videos; manual file transfer; play media directly; free up iPhone storage |
| Software | SanDisk iXpand Drive app (available on App Store) |
| Data Transfer Speed | Up to 90 MB/s read (USB 3.0) |
| Encryption | Password protection with AES 128-bit encryption via SanDisk SecureAccess software |
| Materials | Plastic casing with metal connector |
| Maintenance | Clean with a soft, dry cloth. Avoid exposure to liquids and extreme temperatures. |
| Safety | Do not disassemble. Keep away from children. Use only in compatible devices. |
| Spare Parts | Not available individually; product is not user-serviceable. |
| Repairability | Non-repairable; warranty replacement recommended for defects. |
| Warranty | Limited 2-year warranty (check local terms) |
Frequently Asked Questions - iXpand 2.0 SANDISK
User questions about iXpand 2.0 SANDISK
0 question about this device. Answer the ones you know or ask your own.
Ask a new question about this device
Download the instructions for your USB Drive in PDF format for free! Find your manual iXpand 2.0 - SANDISK and take your electronic device back in hand. On this page are published all the documents necessary for the use of your device. iXpand 2.0 by SANDISK.
USER MANUAL iXpand 2.0 SANDISK
natural_image
Exterior view of a SanDisk hard drive with visible internal components (no text or symbols on the device body)SanDisk®
a Western Digital brand
Western Digital Technologies, Inc.
951 SanDisk Drive, Milpitas, CA 95035
Western Digital Technologies, Inc. is the seller of record and licensee in the Americas of SanDisk® products.
©2016 Western Digital Corporaon. All rights reserved.
Introducon
Geng Started
• Connecng to iPhone/iPad
- Charging
• Understanding the LED indicator
Applicaons
- App Overview
- Camera Roll Sync
- File Management
- Photo
- Video
- Music
- Password Protecon
- Sharing
- Contact Management
Device Sengs
- Drive Name
- Formang
- Firmware update
Troubleshoong & Support
Instruconal Icons


Informaon

Quick Tip
Introducon
iXpand Flash Drive Overview
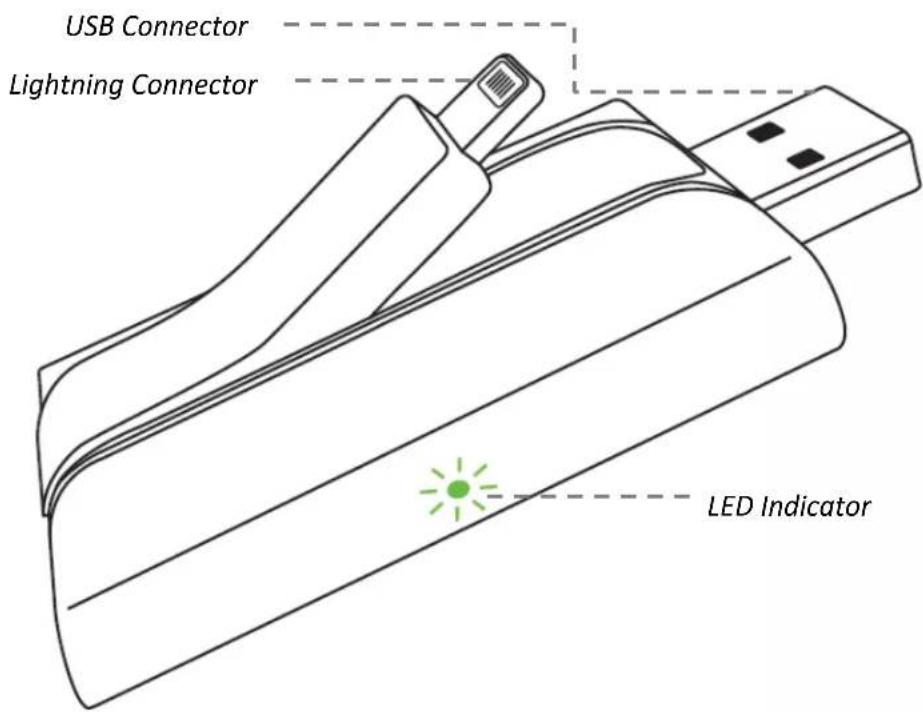
Figure: iXpand Flash Drive layout
- Automacally syncs photos and videos from camera roll when connected.
- Transfer photos and videos from the camera roll to the drive to free up iPhone/iPad memory.
- Watch popular-format movies directly from the drive ^1 .
- Encrypts les across iPhone, iPad, and computers for secure transfer ^2 .
Works with
iPhone 5, iPhone 5C, iPhone 5S, iPhone 6, iPhone 6 Plus, iPad Air ^™ , iPad mini ^™ , iPad with Rena display and newer (iOS 7.1+).
Windows vista ^® , Windows 7, Windows 8, Mac OS X v10.6+.
Specicaons
- Interface: Lightning and USB 2.0 connectors
• Available in: 16GB, 32GB and 64GB ^3 - Operational Temperature: 0\~60°C.
• Dimensions: 64.17mm x 36.78mm x 11.80mm
• Baery: pre-charged, ready to use
^1 Support for .WMV, .AVI, .MKV, .MP4, .MOV video formats. Compatible device required.
^2 Password protecon uses 128-bit AES encrypon and is supported by iOS 7+, Mac OS X v10.6+ (Soware download required for Mac, (see www.sandisk.com/support/ixpandashdrive) Windows Vista, Windows 7 and Windows 8.
^3 1GB=1,000,000,000 bytes. Actual user storage less.
Geng Started
Connecng to iPhone/iPad
Physical conneccon

Gently li the Lightning connector slightly to connect to iPhone/ iPad

1

2

3
Installing the app
When you've connected the drive to your iPhone or iPad, you'll be prompted to install the companion iXpand Sync app.
1 If this does not occur, please be sure the drive is fully charged. On the screen, select "App Store".
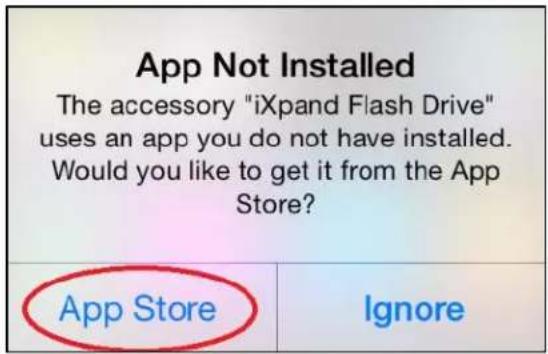
2 Install the "iXpand Sync" app from the App Store.

Charging iXpand Flash Drive

Plug your drive into a computer USB port or a USB AC adaptor* to charge it.
* USB AC adaptor: not included with the drive
LED Indicator
The LED on the side of iXpand Flash drive indicates its baery, charging and transfer status as explained below

natural_image
Simple line drawing of a rectangular object with a green star and upward arrow, no text or symbols present.- Green – sucient baery
- Red – low baery level. Charge by plugging the device to a USB port of PC/Mac computer or a USB AC adaptor
- Amber- charging in progress. Will become green when done
- Blinking-le transfer in progress. Do not disconnect the drive
Applicaons
App overview
iXpand sync app is the companion to your iXpand Flash Drive. Its major funcons:
-
Add photos/videos from the camera roll to the drive with the '+' buon.
-
Access other funcons - camera sync, "My Downloads", sengs and transfer contacts through the menu icon in the top le corner.

Camera Roll Sync
You can back up your camera roll to the iXpand Flash Drive by seng up auto-sync or manually syncing as needed.
Automac Sync
Set-up once and transfer your camera roll to the drive automacally each me the drive is connected.
To set-up:
1 Connect the iXpand Flash Drive to the iPhone/iPad.
2 On the app, go to Menu → Camera Sync.
3 Turn on the "Automac Sync" opon on the camera sync screen.

Syncing may take longer than normal the 1^st me. Once set up, only newly added les will be copied to the drive.
Manual Sync
Sync your camera roll with the drive as needed using manual sync.
To sync:
1 Connect the iXpand Flash Drive to your iPhone/iPad.
2 Go to Menu → Camera Sync.
3 To change the desnaon of the synced les on the drive, select the "Sync Desnaon" as a folder on the drive.
4 Select "Sync Now".
5 All the les in your Camera Roll will be copied to the drive in the folder specified as the Sync Desnaon.

Syncing may take longer than normal the 1^st me. Once set up, only newly added les will be copied to the drive.
File Management
Use your iXpand Flash Drive and iXpand sync app to transfer and manage les between your iPhone, iPad, PC and Mac computer.
Transfer les from your iPhone or iPad to the drive
1 Connect the iXpand Flash Drive to your iPhone/iPad.
2 Select the add le buon “+”.
3 When prompted to "select les", choose the les you want to transfer from iPhone/iPad to the drive.
4 "Select Desnaon" to specify where to store the les on your drive.

You can choose "New Folder" opon to create a new folder as the desnaon of the le transfer on the drive.
Transfer les from drive to iPhone/iPad
1 Connect the iXpand Flash Drive to your iPhone/iPad.
2. Press "Select" buon to choose the les from the drive.
3. Press at the boom of the screen.
4 Choose "Save to My Downloads" or, if you're copying iOS-supported photos and videos only, choose "Save Images/Videos" to save them to the Camera Roll
5 The selected les will be saved to your phone.

Files downloaded to My Downloads are accessible using the iXpand sync app even when drive is not connected.
Transfer les between PC and drive
To transfer les between your iXpand Flash Drive and computer simply plug the iXpand Flash Drive into your computer's USB port.
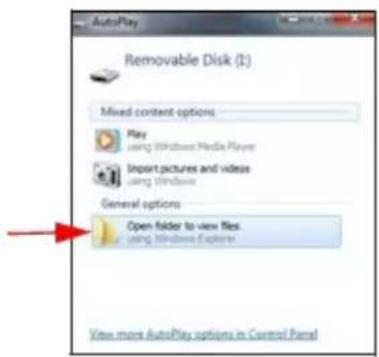
1 In the AutoPlay window, click Open folder to view les:
2 Drag and drop music, videos, photos, and documents between your computer and the iXpand Flash Drive window.

Transfer les between Mac computer and drive
To transfer content between your iXpand Flash Drive and Mac computer:
1 Plug your iXpand Flash Drive into your Mac computer's USB port.

2 Drag and drop music, videos, photos, and documents between your Mac computer and the iXpand Flash Drive window.
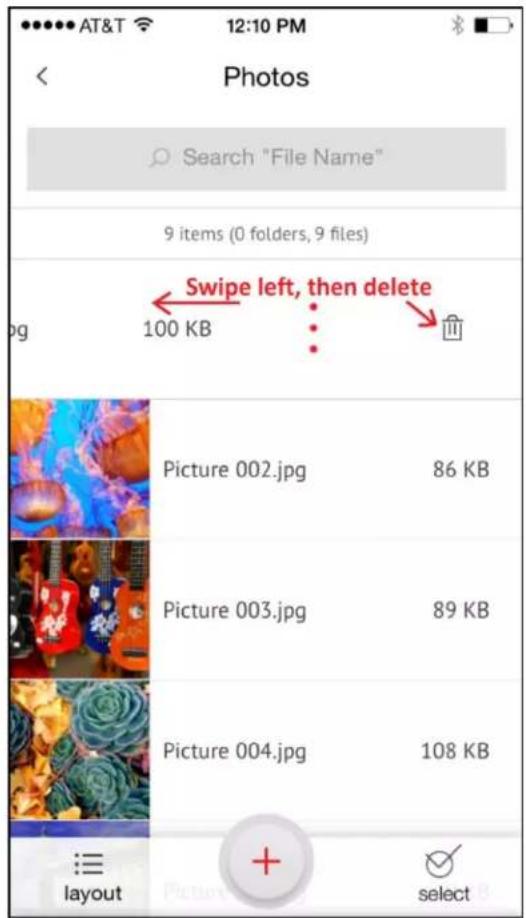
Delete les
1 Connect the iXpand Flash Drive to your iPhone/iPad.
2 Press "Select" and choose the les you'd like to delete from the drive.
3 Press at the boom of the screen.

You can swipe le on a le icon in list view and choose "delete" to easily remove individual les.
Search
1 In the le view, pull down the screen.
2 You will see a search box appear at the top. Enter the le name you would like to nd.
3 You'll see search results appear for any matching les.
Photos
Supported le formats
BMP, TIF, TIFF, JPG, PNG, GIF, XBM, ICO, TGA
Playback
1 Plug the iXpand Flash Drive to your iPhone/iPad.
2 The contents of the drive will appear. Browse to the folder containing your photos.
3 Tap the photo you'd like to view.
4 You can view other photos in the same folder by swiping le or right.
Slideshow
1 Browse to the folder containing your photos.
2 Choose the photo you want to start with.
3 Select the slideshow buon at the boom of the screen and the slideshow will begin.
4 Slideshow sengs can be changed through the sengs opon on the same screen.
Videos
Supported le formats
WMV, AVI, MKV, MP4, MOV, FLV, MPG, RMVB, M4V, TS
Playback
1 Connect the iXpand Flash Drive to your iPhone/iPad.
2 The contents of the drive will appear. Browse to the folder containing your videos.
3 Tap the video you want to play.
4 You can play other videos in the same folder by swiping le or right.

Some DRM-protected content cannot be streamed. Check with the content provider for playback restricons.
Music
Supported le formats
MP3, AIF, WAV, AIFF, M4A, WMA, AAC, OGG, FLAC
Playback
1 Connect the iXpand Flash Drive to your iPhone/iPad.
2 The contents of the drive will appear. Browse to the folder containing your music.
3 Tap the song you want to play.
4 You can play the other songs in the same folder by swiping le or right.

Playback supports music purchased from iTunes. Some DRM-protected content is not supported. Check with the content provider for playback restricons.
Securing Files/ SanDisk SecureAccess
SanDisk SecureAccess™ Soware
The SanDisk SecureAccess soware is designed to protect sensitive data on your drive. When security is enabled in the app, a special “SanDiskSecureAccess Vault” folder is created in your drive. Any locked les are moved into the SanDiskSecureAccess Vault and can be accessed only with a password.
Enable Security on iPhone/iPad
1 Connect the iXpand Flash Drive to your iPhone/iPad.
2 Go to Menu → Sengs → Security.
3 Enable the security by swiping the dot to the right.
4 Enter a password when prompted to set password. Then select OK.
5 Enter a hint for your password. Then select OK. IMPORTANT: If this password is forgoen, locked les will not be recoverable.
6 Once the security is enabled, a folder called "SanDiskSecureAccess Vault" (along with a SanDisk SecureAccess Vault Sengs folder) is created in the drive.

Do not delete SanDiskSecureAccess Vault Sengs folder, if you want to use security feature.
Secure Files on iPhone/iPad
1 To secure les, enable security rst as explained above.
2 Select the les you'd like to secure.
3 Press thelock icon at the boom of the screen.

All secured les are moved to SanDiskSecureAccess Vault folder.
Access secured les (secured through iXpand Sync) on a Mac Computer
1 On your mac, download Secure Access ^TM soware from
downloads.sandisk.com/downloads/SanDiskSecureAccessV3_mac.zip
2 Copy the le SanDiskSecureAccessV3_mac to the iXpand Flash Drive.
3 Launch the app SanDiskSecureAccessV3_mac. Click "Next" in the screen below.
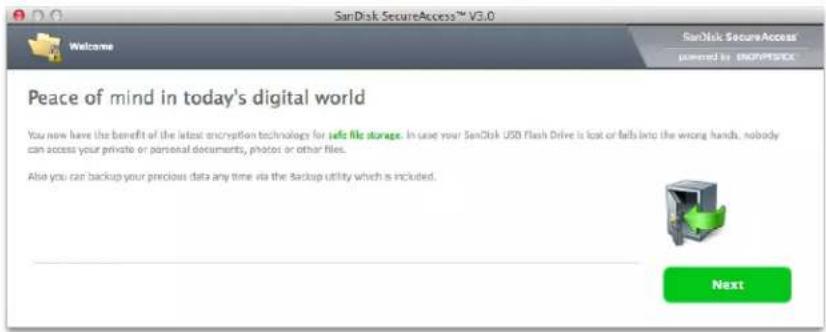
4 Read and accept the license terms and click "Next".

5 Enter the password you used to protect les on iXpand Flash Drive using iXpand Sync app.

6 Read the guidelines and click "Next".

7 Access locked les or lock additional les using the below interface.


To access the secured les on Windows®- based computers, download Secure Access™ soware from
downloads.sandisk.com/downloads/SanDiskSecureAccessV3_win.exe and follow the instrucons at hp://downloads.sandisk.com/downloads/qsg/secureaccessv2-qsg.pdf
Sharing
You can share les from your iXpand Flash Drive in many ways including Facebook, Twier and others from within the app.
How to share
1 Connect the iXpand Flash Drive to your iPhone/iPad.
2 Select the le you want to share from the drive.
3 Select at the boom of the screen.
4 Choose the desired upload/share opon.
Contact Management
Create a backup contact le and restore it when needed. This is particularly valuable when moving to a new iPhone.
Backup
1 Go to Menu → Transfer Contacts → Backup
2 Select the contacts to back up.
3 Select "Backup".
Restore
1 Go to Menu → Transfer Contacts → Restore
2 Choose the backup le you'd like to restore.
3 Select "Restore".

The contact restore operaon may create duplicate contacts.
Device Sengs
Drive Name
You can choose a name for your drive to make it easier to identify the drive in your le browser when it's plugged into a PC or Mac computer.
1 Go to Menu → Sengs → Drive Name
2 In the text box, name the drive and hit OK.
Formang the drive
1 Connect the drive to a PC/Mac computer through the USB connector.
2 Format the drive as a regular USB ash drive.

iXpand Flash Drive must be formed as FAT-32 only.
About the device
1 Go to Menu → Sengs → About
2 Under the About secon, you can see
a. Current app version
b. Drive rmware version
c. Device ID of the drive
d. SanDisk Privacy Statement
e. Legal terms and conditions
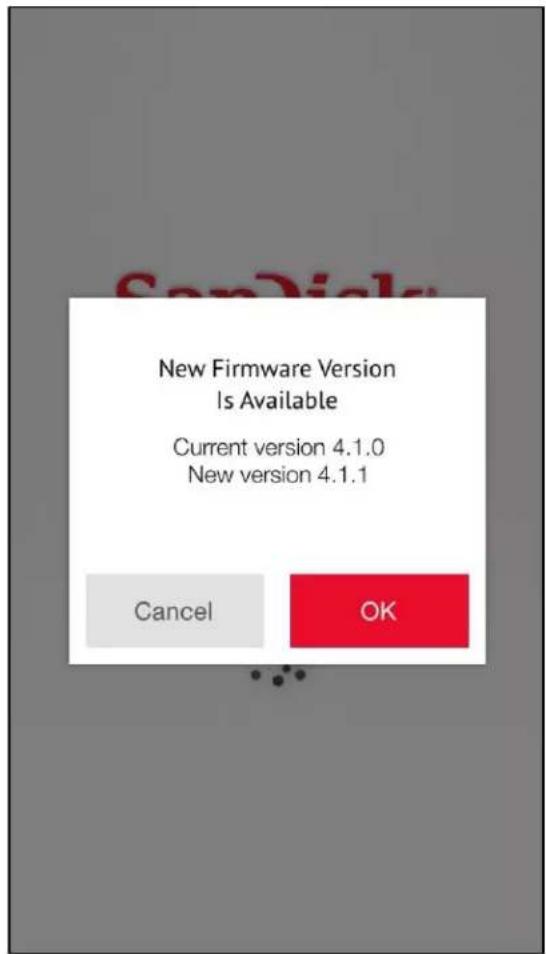
Device FW Update
SanDisk rolls out regular app updates to constantly improve the user experience.
When a rmware update is available and the drive is connected to an iPhone or iPad, you will see a prompt in the app (as below). Hit OK to update the app.

DO NOT disconnect the drive while app update is in progress.
Troubleshoong & Support
In-app Support
Go to Menu → Help. To access the app walkthrough, geng started guide and online support.
Online Support
The support page for iXpand Flash Drive is available at:
www.sandisk.com/support/ixpandashdrive
SanDisk is a trademark of Western Digital Corporaon, registered in the United States and other countries. iXpand and SanDisk SecureAccess are trademarks of Western Digital Corporaon. iPhone, iPad, and Mac are trademarks of Apple Inc. All other trademarks are the property of their respective owners.
©2014 Western Digital Corporaon. All rights reserved.



- Introducon
- Geng Started
- Applicaons
- Device Sengs
- Troubleshoong & Support
- Instruconal Icons
- iXpand Flash Drive Overview
- Works with
- Specicaons
- Connecng to iPhone/iPad
- Physical conneccon
- Installing the app
- Charging iXpand Flash Drive
- LED Indicator
- App overview
- Camera Roll Sync
- Automac Sync
- Manual Sync
- File Management
- Transfer les from your iPhone or iPad to the drive
- Transfer les from drive to iPhone/iPad
- Transfer les between PC and drive
- Transfer les between Mac computer and drive
- Delete les
- Search
- Photos
- Playback
- Slideshow
- Videos
- Supported le formats
- Music
- Securing Files/ SanDisk SecureAccess
- SanDisk SecureAccess™ Soware
- Enable Security on iPhone/iPad
- Secure Files on iPhone/iPad
- Access secured les (secured through iXpand Sync) on a Mac Computer
- Sharing
- Contact Management
- Backup
- Restore
- Drive Name
- Formang the drive
- About the device
- Device FW Update
- In-app Support
- Online Support
Brand : SANDISK
Model : iXpand 2.0
Category : USB Drive