WAL025948 - Lighting Luxo - Free user manual and instructions
Find the device manual for free WAL025948 Luxo in PDF.

| Product Type | LED desk lamp with adjustable arm |
| Brand | Luxo |
| Model | WAL025948 |
| Dimensions (L x W x H) | 40 cm x 30 cm x 60 cm |
| Weight | 1.5 kg |
| Power Supply | AC 100-240V, 50/60 Hz via included adapter |
| Power Consumption | 10 W (LED) |
| Light Source | Integrated LED, non-replaceable |
| Color Temperature | 3000K - 5000K adjustable |
| Brightness | Dimmable (stepless) up to 800 lumens |
| Adjustable Arm | Yes, articulated arm with spring balance |
| Materials | Aluminum and high-impact plastic |
| Mounting | Desk clamp or base stand included |
| Main Functions | Adjustable brightness and color temperature, memory function |
| Maintenance and Cleaning | Wipe with soft dry cloth; do not use liquid cleaners |
| Safety | CE certified, overheat protection, no UV emissions |
| Spare Parts | Replacement AC adapters and LED driver units available |
| Repairability | Modular design; user-replaceable parts: adapter, driver |
| General Information | Suitable for office and home use; 36-page manual included |
Frequently Asked Questions - WAL025948 Luxo
User questions about WAL025948 Luxo
0 question about this device. Answer the ones you know or ask your own.
Ask a new question about this device
Download the instructions for your Lighting in PDF format for free! Find your manual WAL025948 - Luxo and take your electronic device back in hand. On this page are published all the documents necessary for the use of your device. WAL025948 by Luxo.
USER MANUAL WAL025948 Luxo
Installation and maintenance manual for arm based products
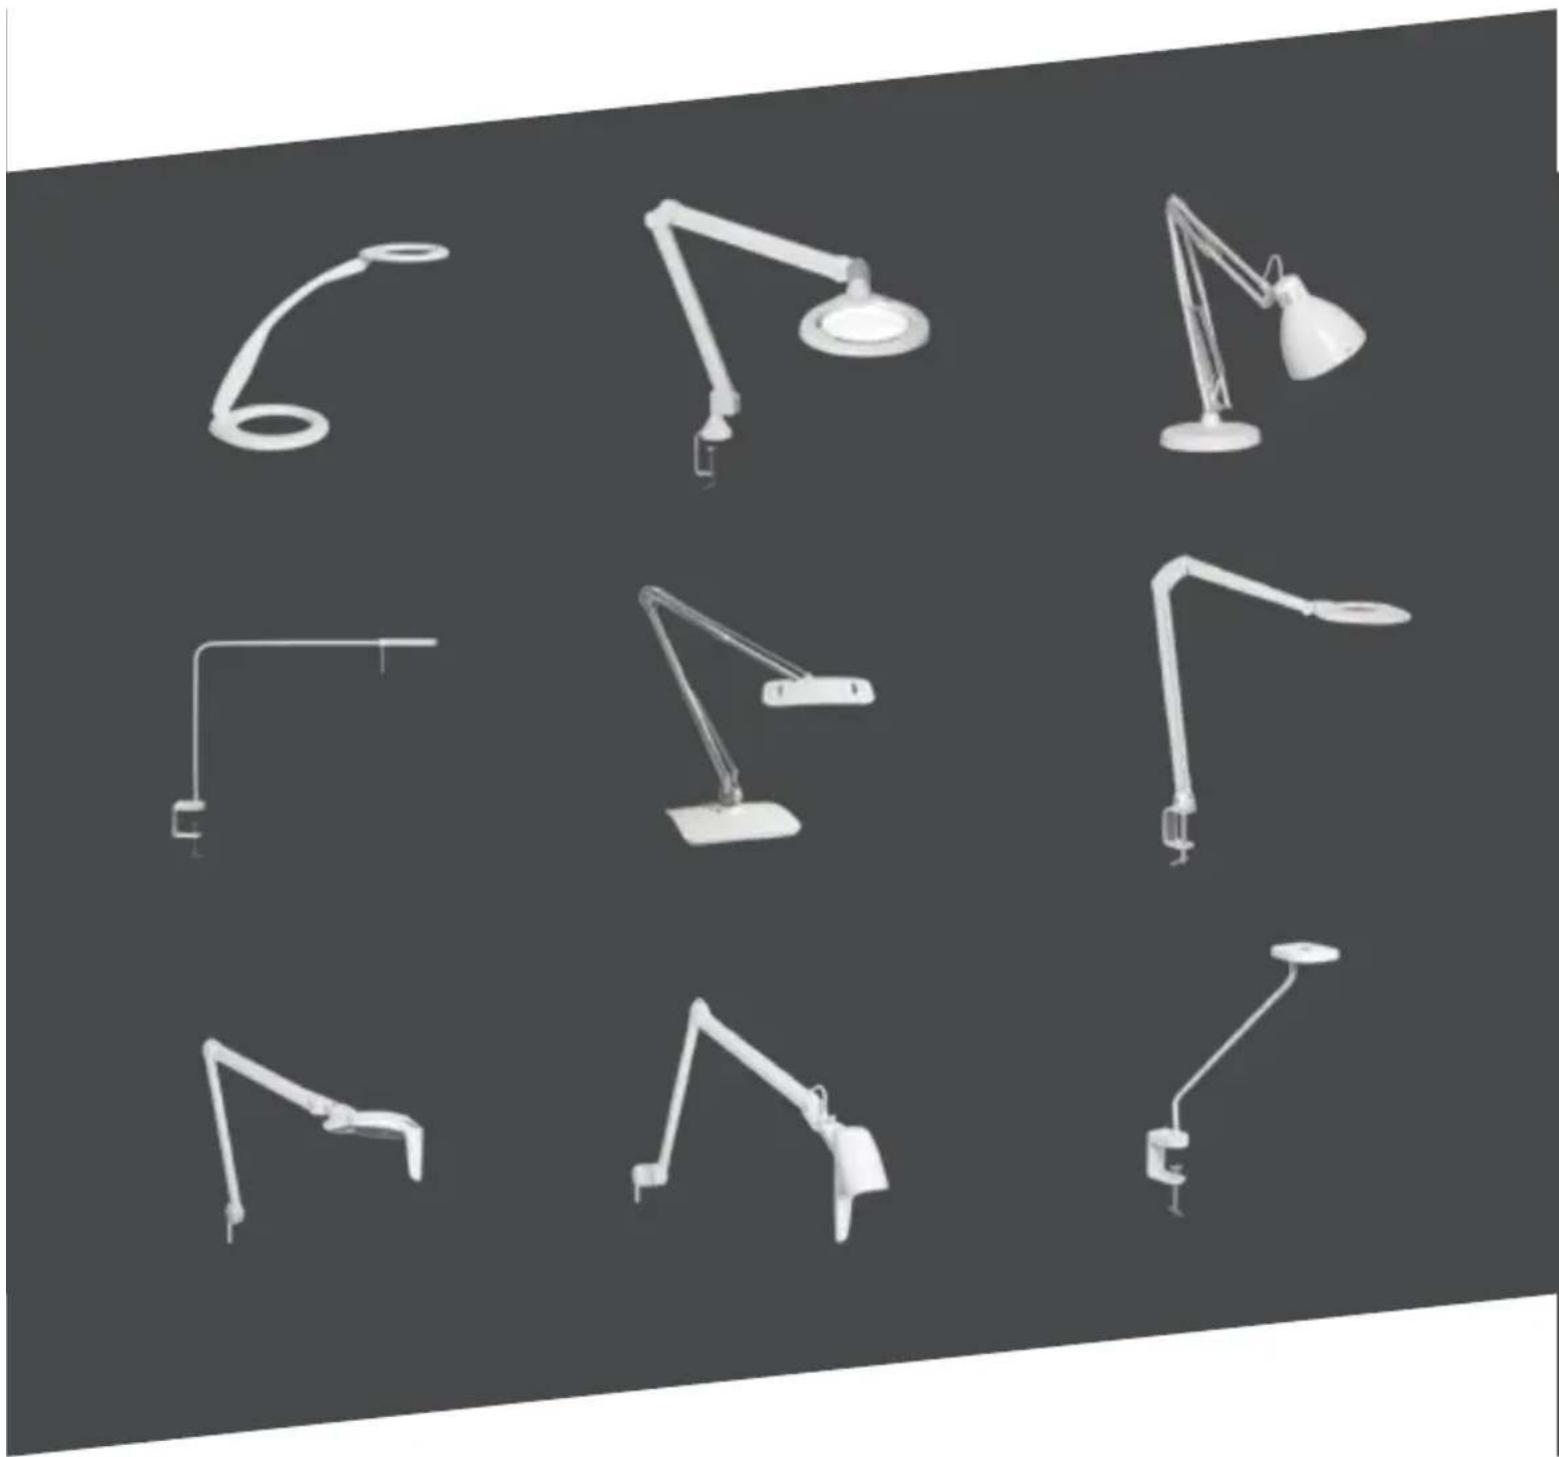
natural_image
Collection of white desk lamps and adjustable armshelves against a dark background (no text or symbols)
English
Do not connect to a temporary electricity supply. This may damage the electronics.
Norsk
natural_image
Symbol of a trash bin crossed with diagonal lines, no text or numbers presentEnglish
Our products are subject to the Directive 2012/19/EU (Waste Electrical and Electronic Equipment - WEEE) and should, at the end of their lifespan, always be collected separately and brought to the appropriate collection point in your community or region.
Norsk
LED are sensitive to electrostatic discharge. Do not touch the surface of the LED module.
Norsk
The light source contained in this luminaire shall only be replaced by the manufacturer or his service agent or a similar qualified person. Live parts inside – RISK OF ELECTRIC SHOCK
Norsk
Luxo is only responsible for the luminaire when installation, maintenance, repairs or alterations are performed by luxo or by personnel who are qualified for such work.
If the luminaires external flexible cable or cord is damaged, it must be exclusively replaced by the manufacturer or a qualified technician to reduce the risk of injury. Any repairs of the arm must be carried out by Luxo or personnel authorized by Luxo.
Products consist of spring-loaded arms, which can do harm to people and property during service, if misused.
Spring loaded arm
This product has a spring-loaded arm. Ensure therefore that the mounting is done according to the recommendations in the chapter assembly.
Applying a load beyond what the spring-balancing arm is designed for, the arm function can be damaged and product functionality cease. Therefore avoid such strain. Product with damages resulting in decreased functionality shall be removed from service until the damage is repaired.
Sun protection for illuminated magnifiers
The glass in illuminated magnifiers can if exposed to strong direct sunlight provide a source of unwanted concentrated heat. The product should therefore not be placed in direct sunlight without sun protection being used.
Mounting
General
To prevent damage to materials or personal injury during installing a product with a spring-loaded arm, attach to the table, wall, ceiling bracket or floor stand. Place the product in the bracket, remove the protective plastic or rubber-band, and fold the product carefully. Use only original accessories supplied by Luxo. An overview of accessories are available on our website. The lifetime and functionality cannot be guaranteed by the use of third-party accessories.
Upon assembly of products for wall or ceiling brackets, make sure that the material the product is attached to have the sufficient capacity. Calculated force in normal use is specified in the user manual for each bracket. Luxo does not take responsibility for fixing the brackets.
IMPORTANT:
A Luxo arm should be mounted so that it is easy to operate, without inflicting joints or other structural components and abnormal force. Limited force is required to move a spring-balanced arm from Luxo.
Most of our task lights have an asymmetric light distribution. This means that the light is distributed evenly and at an angle across the work surface. This reduces the risk of glare and avoids distracting users or others present in the room. To take advantage of the effect of asymmetrical light it is important that the fixture be placed next to the user. For more information, see our website or contact your Luxo representative.
Sensors
Luminaires with an integrated sensor always come with a separate user manual enclosed. Please use this manual to change the factory default values. User manuals may be downloaded from the 'Download' section on our website.
When luminaires have an integrated sensor, it is important to ensure that the sensor detection view is not obstructed. The sensor must be positioned correctly in relation to the area it is to cover.
Other parts of the building, modifications, redecoration or reflective surfaces may affect the function of the integrated sensor.
Timer
Luminaire with integrated timer always has attached separate user manual. Please use this for changing the factory pre-set values. Manuals can be downloaded from our web page.
Instructions for use of the product with spring-balanced arm
The product should be installed so that normal use is within the product's intended application and that there is no intentional limitation of arm movement. Avoid using the arm so that the arm tubes merge and / or arm movement is repeatedly caught against its end stop. Such movement may cause fracture that may cause injury to the user or people and equipment close to the product.
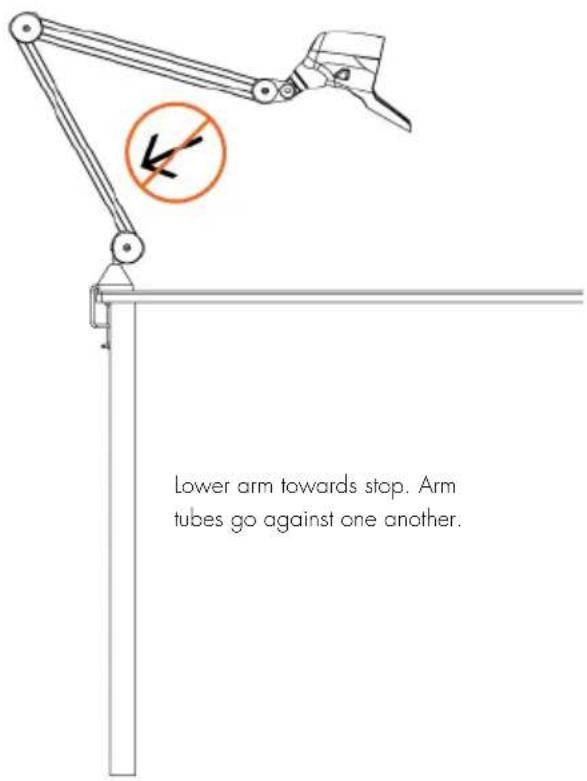
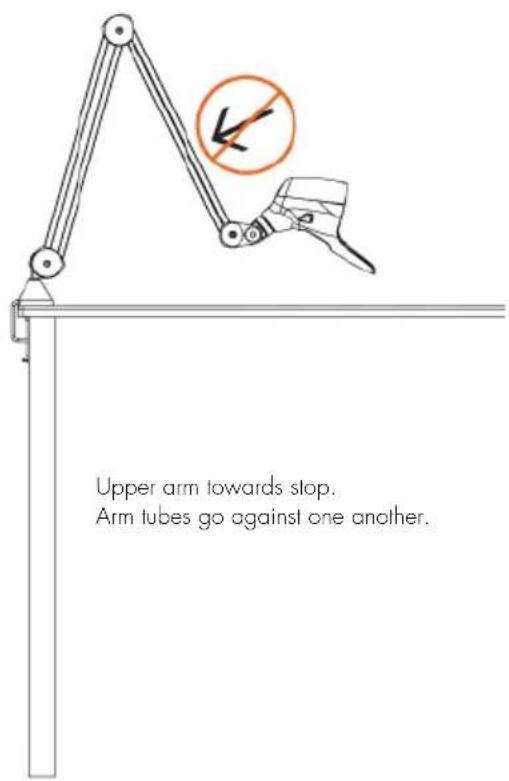
Upper arm towards stop. Arm tubes go against one another.
English
Table arm
A table arm is designed to be installed so that normal working use is above the mounting bracket horizontal level.
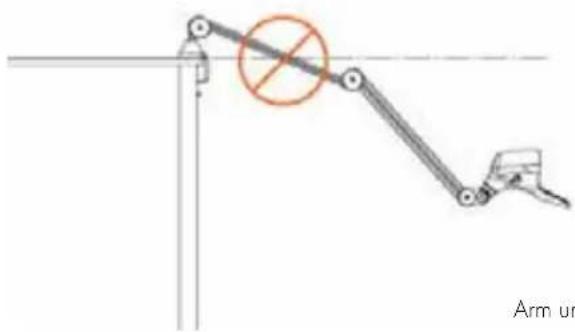
natural_image
Mechanical linkage diagram showing a lever system with a circular component and a hand, no text or symbols present.Arm under lower work area. Overload of arm.
Wall arm
A wall arm is intended to be mounted so that normal working use is under the wall bracket horizontal level. Be sure that the bracket isn't mounted too high so the product will be subjected to unnecessary force in the lower range of normal use.
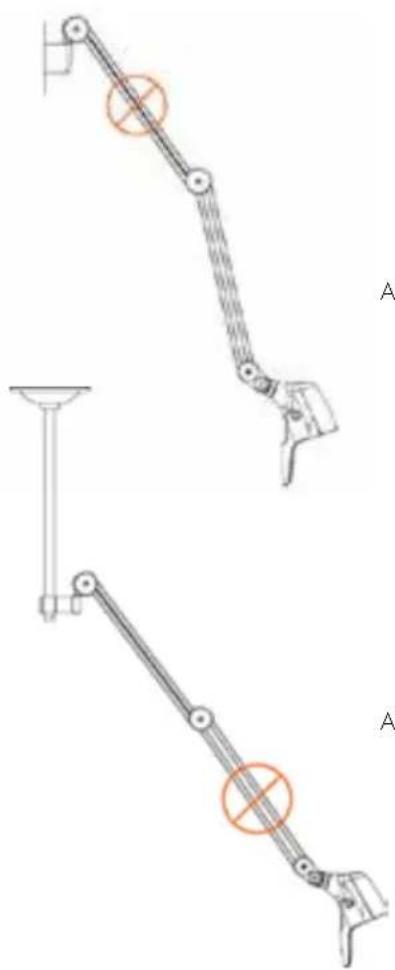
natural_image
Mechanical linkage diagram showing two articulated arms with circular cross marks, labeled A (no text or symbols on the structures themselves)Arm under lower work area. Overload of arm.
Ceiling arm
An arm designed for ceiling mount should be mounted at a corresponding installation height for a wall arm. Be sure that the bracket isn't mounted too high so the product would be subjected to unnecessary force in the lower range of normal use.
Arm under lower work area. Overload of arm.
Trolley
An arm designed for installation in trolleys should have its main work area corresponding to a table arm, over the mounting bracket horizontal level.
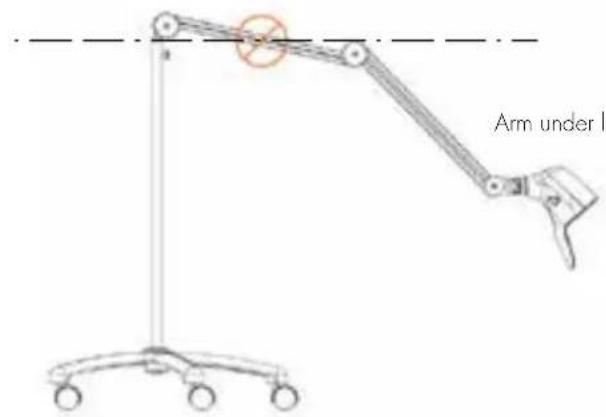
Arm under lower work area. Overload of arm.
Maintenance
General
The lifetime of the driver/ballast is influenced by temperature and the quality of the supply voltage. Rated failure of the components is 0,2% per 1000 hours at the luminaires maximum allowed ambient temperature. Mains supply transients and spikes, as well as connection to disturbed mains supply, will drastically reduce lifetime.
Cleaning
Regular cleaning of luminaires is essential for optimal lighting. Luminaires are cleaned in a de-energized state. Electrical components and connections should not be exposed to water or moisture. Be aware that LED luminaires are sensitive to electrostatic discharge (ESD).
Cleaning intervals are normally consistent with those planned during the project planning.
Luminaires can be cleaned with a neutral detergent (pH 7) mixed in lukewarm water. The mixture is to be applied with a soft cloth, sponge or similar. After cleaning, soap residues should be removed using a soft clean cloth dampened with water. Do not spray detergent direct onto the luminaires as residual detergent may penetrate and harm electrical components, reflector or optic. Organic solvent based, strongly alkaline detergents as well as ammonia-based detergents should be avoided, as they can damage components in short and long term. This especially applies for components produced in synthetic materials such as plastic.
LED-luminaires
LED-luminaires have a tolerance in their light output of +10%. As for conventional light sources LED light sources will have a reduction in light output during their lifetime. When exchanging an LED luminaire with a new one you may be able to see a difference in light output compared with the old luminaires. This is a consequence of technical changes and improved light output, new LED-luminaires may have slightly different lighting qualities compared to the old ones.
LUXO LED luminaires have an estimated life time L(xx) of minimum 50.000h at max luminaire ambient temperature. (xx = % rest light after estimated life time). If a failure occurs to an LED light source before the luminaire lifetime has ended it is advisable to change the whole luminaire.
As with conventional light sources you may perceive variations in colour temperature between luminaires mounted close together (cluster). Colour tolerances for LED light sources are normally better or the same as for conventional light sources.
All relevant information is to be found on our WEB-pages.
Replacement of interchangeable light sources
Always use gloves when replacing light sources so that you do not leave fingerprints on the reflecting surface. Light sources should be replaced when the luminaires are in a de-energized state. The light sources being replaced must be replaced with similar ones in order to maintain the characteristics of the luminaires.
Light sources at the end of their service life can produce heat above the expected level. This can damage luminaires' components. It is always financially wise to plan the replacement of light sources in groups. Check the lifetime of the light source you use on our website or consult your light sources supplier. Then plan the intervals at which you want to replace your light sources. Some light sources are likely to fail before their indicated lifetime and may have to be replaced before the planned group replacement.
Replacing driver / ballast
The lifetime of the driver/ballast is influenced by temperature and the quality of the supply voltage. Rated failure of the components is 0,2% per 1000 hours at the luminaires maximum allowed ambient temperature. However, a loss of around 10% may be expected during this period. Mains supply transients and spikes, as well as connection to disturbed mains supply, will drastically reduce lifetime.
Electronic drivers / ballasts should be replaced by qualified personnel and always when the luminaires have been de-energized. For LED luminaires it is important to establish an EPA (Electrostatic Protected Area) before any replacement of driver is conducted. This is due to that LED light sources are sensitive to electrostatic discharge (ESD). For fluorescent luminaires it is recommended that light sources are replaced and the luminaires are tested before an attempt is made to replace electronic ballast.
Sikkerhet
Generelt
natural_image
Mechanical linkage diagram showing a lever with a circular symbol indicating no movement or force (no text or labels)natural_image
Mechanical linkage diagram with a circular component and connecting rods (no text or symbols)natural_image
Mechanical linkage diagram with a red circle indicating a specific joint or restriction (no text or symbols present)natural_image
Diagram of a robotic arm with a circular motion indicator and a dashed horizontal line, no text or symbols presentVedlikehold
Generelt
natural_image
Diagram of a mechanical linkage system with a circular component and a hand, no text or symbols presentnatural_image
Mechanical linkage diagram showing two articulated arms with circular cross symbols indicating rotational motion (no text or labels)natural_image
Diagram of a robotic arm with a red circle indicating a joint, mounted on a stand (no text or symbols present)natural_image
Mechanical linkage diagram showing a lever with a circular motion indicator and a labeled arm (no text or symbols on the diagram itself)natural_image
Mechanical linkage diagram with a circular component and connecting rods (no text or symbols)natural_image
Mechanical linkage diagram with a red crosshair and pipe connection (no text or symbols)natural_image
Mechanical linkage diagram with a red circle indicating no force or weight, connected by rods (no text or symbols)natural_image
Mechanical linkage diagram with a circular component and a funnel (no text or symbols)natural_image
Mechanical linkage diagram with a red circle indicating a specific joint or mark (no text or symbols present)natural_image
Diagram of a robotic arm with a circular motion indicator and a dashed reference line, no text or symbols present.natural_image
Diagram of a mechanical linkage system with a pulley and lever mechanism (no text or symbols)natural_image
Mechanical linkage diagram with a circular component and connecting rods (no text or symbols)natural_image
Mechanical linkage diagram with a red crosshair indicating a specific point (no text or symbols present)natural_image
Diagram of a robotic arm with a red circular symbol and a dashed horizontal line, mounted on a stand (no text or labels)natural_image
Mechanical linkage diagram showing a chain with a circular component and a hand holding a tool (no text or symbols)natural_image
Mechanical linkage diagram with a red circular symbol indicating rotational motion (no text or labels)natural_image
Mechanical linkage diagram with a red circle indicating a crossed-out component (no text or labels)natural_image
Diagram of a robotic arm with a red circle and cross symbol, positioned above a curved base (no text or labels)natural_image
Mechanical linkage diagram with a red circle indicating no force or weight, connected to a vertical pole (no text or symbols)natural_image
Mechanical linkage diagram with a red circular symbol indicating a joint or force (no text or labels)Arm under lavere arbeidsområde. Overbelastning af arm.
Plafond arm
natural_image
Mechanical linkage diagram with a red crosshair indicating a specific joint (no text or symbols present)Arm under lavere arbeidsområde. Overbelastning af arm.