
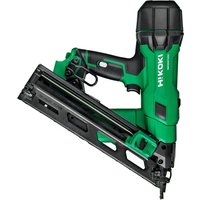
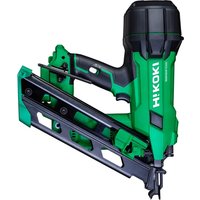
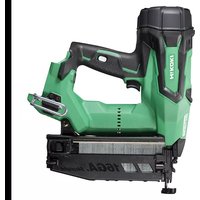
NR90AE - Stapler HiKOKI - Free user manual and instructions
Find the device manual for free NR90AE HiKOKI in PDF.


| Product Type | Pneumatic Coil Stapler |
| Brand | HiKOKI |
| Model | NR90AE |
| Fastener Type | Broad crown staples (1-1/4 in. to 1-1/2 in.) |
| Magazine Capacity | Up to 300 staples |
| Operating Pressure | 70 – 120 psi (4.8 – 8.3 bar) |
| Air Consumption | Approx. 0.04 ft³ per cycle |
| Weight | 2.5 kg (5.5 lbs) |
| Dimensions (L x W x H) | 12.8 x 10.2 x 28.5 cm (5 x 4 x 11.2 in) |
| Depth of Drive Adjustment | Tool-free, adjustable |
| Anti-Dry Fire Mechanism | Prevents firing when empty |
| Nose Design | Low profile for tight spaces |
| Handle Grip | Rubberized for comfort |
| Exhaust Port | 360° adjustable exhaust |
| Loading Type | Side-loading coil |
| Safety Trigger | Contact trip (sequential and bump fire) |
| Maintenance | Lubricate with pneumatic tool oil before use; clean dust and debris |
| Included Accessories | Hex wrenches, safety goggles, oil bottle |
| Warranty | 1 year limited warranty |
Frequently Asked Questions - NR90AE HiKOKI
User questions about NR90AE HiKOKI
0 question about this device. Answer the ones you know or ask your own.
Ask a new question about this device
Download the instructions for your Stapler in PDF format for free! Find your manual NR90AE - HiKOKI and take your electronic device back in hand. On this page are published all the documents necessary for the use of your device. NR90AE by HiKOKI.
USER MANUAL NR90AE HiKOKI
natural_image
Technical line drawing of a nail pad with attached fastener (no text or symbols)Read through carefully and understand these instructions before use.
Keep this Manual available for others before they use the Nailer.
Bruksanvisning
Brugsanvisning
Bruksanvisning
Käyttöohjeet
Handling Instructions
1

2

natural_image
Technical illustration of a mechanical assembly with hands holding a tool, showing a bracket and a numbered label (13) with an arrow indicating motion or direction.3
natural_image
Technical line drawing of a nail screw being inserted into a fastener using a tool, with no visible text or symbols.4
5

6

7

8

| Svenska Dansk Norsk | |||
| 1 | Huvudskydd Hovedafskærmning Beskyttelse deksel | ||
| 2 | Utblåsningsskydd Udstødsdække Utblåsningsdeksel | ||
| 3 | Hölje Værktøjshus Hus | ||
| 4 | Hylsa Dæksel Kappe | ||
| 5 | Kolvens o-ring Stempel O-ring Stempelets o-ring | ||
| 6 | Kolv Stempel Stempel | ||
| 7 | Drivblad Drivblad Slagblad | ||
| 8 | Nos Næse Ansats | ||
| 9 | Avtryckare Udløser Avtrekker | ||
| 10 | Tryckarm | Udløserarm | Støstang |
| 11 | Noshylsa | Næsekappe | Frontkappe |
| 12 | Avfyrningshuvudet (Mynning) | Affyringshoved (udgang) | Avfyringshode (utgang) |
| 13 | Magasin | Magasin | Magasin |
| 14 | Bandfjäder | Bändfjeder | Flat spiralfjær |
| 15 | Spikmatare (A) | Sømfremfører (A) | Spikermater (A) |
| 16 | Spikmatare (B) | Sømfremfører (B) | Spikermater (B) |
| 17 | Spikspärr | Sømstopper | Spikerstopper |
| 18 | Luftplugg | Luftstik | Luftplugg |
| 19 | Avtryckarbult | Aftrækker | Avtrekkerpinne |
| 20 | Koppla loss luftslang | Fjern luftslangen | Koble fra luftslange |
| 21 | Mindre djup | Korte side | Grunn side |
| 22 | Större djup | Lange side | Dyp side |
| 23 | Justerare | Regulator | Regulator |
| 24 | Smörjare | Smørenippel | Oljesmører |
| 25 | Filter | Filter | Filter |
| 26 | Reducerventil | Reduktionsventil | Reduksjonsventil |
| 27 | Kompressorsida | Kompressor-side | Kompressorsiden |
| 28 | Spiksida | Søm-side | Spikerpistolsiden |
INSPEKSJON OG VEDLIKEHOLD
FORSIKTIG
Read all safety warnings, instructions, illustrations and specifications provided with this power tool.
Failure to follow all instructions listed below may result in serious injury.
Save all warnings and instructions for future reference.
- Operate the power tool safely for correct uses.
Do not use the power tool for uses other than those specified in this instructions.
- For safe operation handle the power tool correctly.
Please follow the instructions given in this instruction manual and correctly handle this tool so as to ensure safe operation. Never let the tool be used by children or people who do not know enough to be able to handle it correctly, or let it be used by people who cannot operate it correctly.
- Confi rm the safety of the workshop.
Keep unauthorized people away from the workshop. Especially children should be kept away.
- The right parts in the right places.
Do not remove any of the covers or screws. Keep them in place as they have their functions.
Moreover, because it would be dangerous, never make modifi cations to the tool or use it after making modifi cations.
- Check the tool before using it.
Before using the tool, always check that no parts of it are broken, that all screws are completely tight, and that no parts are missing or rusty.
- Excessive work could cause accidents.
Do not make tools and accessories work beyond their abilities. Excessive work not only damages the power tool but also is dangerous in itself.
- Stop operation immediately if abnormalities are noticed.
Stop operation if you notice abnormalities, or if the power tool does not work properly; have the power tool inspected and serviced.
- Look after the power tool carefully.
If you drop or knock the power tool against things, the outer frame may be deformed and cracks or other kinds of damage may occur, so please handle it with sufficient care. Also, do not scratch or engrave signs on the power tool. Owing to high pressure air inside the tool, cracks in the surface are dangerous. Never use the power tool if a crack develops or if air is escaping from a crack.
- Take good care for a long life.
Always take good care of the power tool and keep it clean.
- Inspection at regular intervals is essential for safety.
Inspect the power tool at regular intervals so that the power tool can be operated safety and efficiently at all times.
- Consult an authorized service agent if repair or parts replacement is necessary.
Ensure that the power tool is serviced by authorized service agent only, and that only genuine, replacement parts are used.
- Keep the power tool in a proper place.
When not in use, the power tool should be kept in a dry place out of the reach of children. Put into the body 5-10 drops oil through the hose joint to protect the tool from rust.
-
The exploded assembly drawing on this handling instructions should be used only for aut service center.
-
Hold the tool with a fi rm grasp and be prepared to manage recoil.
-
Store idle power tools out of the reach of children and do not allow persons unfamiliar with the power tool or these instructions to operate the power tool.
Power tools are dangerous in the hands of untrained users.
-
Do not modify the fastener driving tool. Modifications may reduce the effectiveness of safety measures and increase the risks to the operator and/or bystander
-
Maintain power tools and accessories. Check for misalignment or binding of moving parts, breakage of parts and any other condition that may affect the power tool's operation. If damaged, have the power tool repaired before use.
Many accidents are caused by poorly maintained power tools.
- Do not overreach. Keep proper footing and balance at all times.
This enables better control of the power tool in unexpected situations.
- Keep children and bystanders away while operating a power tool.
Distractions can cause you to lose control.
PRECAUTIONS ON USING NAILER
- Safe operation through correct usage
This tool was designed for driving nails into wood and similar materials. Use it for its intended purpose only.
- Make sure air pressure is within the rated range of air pressure.
Fastener driving tools operated by compressed air shall only be connected to compressed air lines where the maximum allowable pressure cannot be exceeded by a factor of more than 10% which can for example be achieved by a pressure reduction valve which includes a downstream safety valve.
(For model NR90AÉ (T1), 110% of rated maximum allowable pressure is 9.1 bar = 130 psi)
Fastener driving tools operated by compressed air should only be operated at the lowest pressure required for the work process at hand, in order to prevent unnecessarily high noise levels, increased wear and resulting failures.
- Never operate the equipment with high-pressure gases other than compressed air.
Never use carbon dioxide, oxygen or another gas from pressurized containers under any circumstances.
- Be careful of ignition and explosions.
Since sparks may fly during nailing, it is dangerous to use this tool near lacquer, paint, benzine, thinner, gasoline, gas, adhesives and similar inflammable substances as they may ignite or explode. Under no circumstances should this tool therefore be used in the vicinity of such inflammable material.
5. Always wear eye protection (protective goggles).

When operating the power tool, always wear eye protection, and ensure that surrounding people wear eye protection too. The possibility of fragments of the nails that were not properly hit entering the eye is a threat to sight. Eye protection can be bought at any hardware store. Always wear eye protection while operating this tool. Use either eye protection or a wide vision mask over prescription glasses.
Employers should always enforce the use of eye protection equipment.
6. Protect your ears and head.

When engaged in nailing work please wear ear mufflers and head protection. Also, 13 depending on condition, ensure that surrounding people also wear ear mufflers and head protection. Unprotected exposure 14 to high noise levels can cause permanent, disabling, hearing loss and other problems such as tinnitus (ringing, buzzing, whistling or humming in the ears).
Risk assessment and implementation of appropriate controls for these hazards are essential.
Appropriate controls to reduce the risk may include actions such as damping materials to prevent workpieces from "ringing".
Operate and maintain the tool as recommended in these instructions, to prevent an unnecessary increase in noise levels.
7. Pay attention to those working close to you.
It would be very dangerous if nails that were not properly driven in should hit other people. Therefore, always pay attention to the safety of the people around you when using this tool. Always make sure that nobody's body, hands or feet are close to the nail outlet.
8. Never point the nail outlet towards people.
Always assume the tool contains fasteners.
If the nail outlet is pointed towards people, serious accidents may be caused if you mistakenly discharge the tool. When connecting and disconnecting the hose, during nail loading or similar operations, be sure the nail outlet is not pointed towards anyone (including yourself). Even when no nails are loaded at all, it is dangerous to discharge the tool while pointing it at someone, so never attempt to do so. No horseplay. Respect the tool as a working implement.
9. Before using the power tool, check the push lever.
You may rest the tool on a level surface as shown in Fig.3.
Be sure not to apply the force downward onto the tool to the extent that the push lever is engaged.
Before using the power tool make sure to check that the push lever and valve operate properly. Without nails loaded into the power tool, connect the hose and check the following. If the sound of operation occurs this indicates a fault, so in such a case do not use the power tool until it has been inspected and repaired.
○ If merely pulling the trigger causes operating sound of driver blade movement occur, the power tool is faulty.
○ If merely pushing the push lever against the material to be nailed causes the sound of driver blade movement to occur, the power tool is faulty. Furthermore, with regard to the push lever, note that it must never be modified or removed.
10. Use specified nails only.
Never use nails other than those specified and described in these instructions.
11. Do not modify the fastener driving tool.
Modifications may reduce the effectiveness of safety measures and increase the risks to the operator and/or bystander.
12. Be careful when connecting the hose.
When connecting the hose and loading nails in order not to fire the tool by mistake, make sure of the following.
○ Do not touch the trigger.
- Do not allow the firing head to contact with any surface.
- Keep the firing head down.
Strictly observe the above instructions, and always make sure that no part of the body, hands or legs is ever in front of the nail outlet.
- Be careful when handling fasteners, especially when loading and unloading, as the fasteners have sharp points which could cause injury.
- Do not carelessly place your finger on the trigger. Do not place your finger on the trigger except when actually nailing. If you carry this tool or hand it to someone while having your finger on the trigger, you may inadvertently discharge a nail and thus cause an accident.
- Press the nail outlet firmly against the material to be nailed.
When driving in nails, press the nail outlet firmly against the material to be nailed. If the outlet is not applied properly, the nails may rebound.
- Keep hands and feet away from the firing head when using.
It is very dangerous for a nail to hit the hands or feet by mistake. - During operation, debris from workpiece and fastening/collation system may be discharged.
- Beware of the tool's kickback.
Do not approach the top of the tool with your head etc. during operation. This is dangerous because the tool may recoil violently if the nail currently being driven in comes into contact with a previous nail or a knot in the wood.
- Take care when nailing thin boards or the corners of wood.
When nailing thin boards, the nails may pass right through, as may also be the case when nailing the corners of wood due to deviation of the nails. In such cases, always make sure that there is no one (and nobody's hands or feet; etc.) behind the thin board or next to the wood you are going to nail.
- Simultaneous nailing on both sides of the same wall is dangerous
Under no circumstances should nailing be performed on both sides of a wall at the same time. This would be very dangerous since the nails might pass through the wall and thus cause injuries.
-
Do not use the power tool on scaffoldings, ladders. The power tool shall not be used for specific application for example:
-
when changing one driving location to another involves the use of scaffoldings, stairs, ladders or ladder alike constructions, e.g. roof laths,
– closing boxes or crates, - fitting transportation safety systems e.g. on vehicles and wagons.
ple22Do not disconnect the hose with your finger on the trigger.
If you disconnect the hose with your finger on the trigger, the next time the hose is connected, there is a danger that the power tool will fire a nail spontaneously, or operate incorrectly.
- Disconnect the hose and take out any nails left in the magazine after use.
Disconnect tool from air before doing tool maintenance, cleaning a jammed fastener, leaving work area, moving tool to another location, or after use. It is very dangerous for a nail to be fi red by mistake.
- When removing a nail which has become stuck, make sure to first of all disconnect the hose and release compressed air.
When removing a nail which has become stuck in the nail outlet, first of all make sure to disconnect the hose and release compressed air inside the power tool. Accidental firing of the nail could be very dangerous.
- A female plug (air socket) should not be used in the body.
If a female plug is installed in the body, the compressed air sometimes can not be drawn when the hose is disconnected so avoid this.
The tool and air supply hose must have a hose coupling such that all pressure is removed from the tool when the coupling joint is disconnected.
- While using a tool, the operator shall adopt a suitable but ergonomic posture.
Maintain secure footing and avoid awkward or off - balanced postures.
- If the operator experiences symptoms such as persistent or recurring discomfort, pain, throbbing, aching, tingling, numbness, burning sensation, or stiff ness, do not ignore these warning signs.
The operator shall consult a qualified health professional regarding overall activities.
- Long time continuous and repetitive work may lead to muscular-skeletal disorders.
Do not keep working with a same posture or by applying excessive force for a long time.
And take some rest regularly and especially when you feel tired.
- Slips, trips and falls are major causes of workplace injury.
Be aware of slippery surfaces caused by use of the tool and also of trip hazards caused by the airline hose.
- Proceed with additional care in unfamiliar surroundings.
Hidden hazards may exist, such as electricity or other utility lines.
-
Make sure there are no electrical cables, gas pipes etc. that could cause a hazard if damaged by use of the tool.
-
Risk assessment should include dust created by the use of the tool and the potential for disturbing existing dust.
-
Direct the exhaust so as to minimize disturbance of dust in a dust filled environment.
-
Where dust or exhaust hazards are created, the priority shall be to control them at the point of emission.
-
Information to conduct a risk assessment of these hazards and implementation of appropriate controls is essential.
-
Exposure to vibration can cause disabling damage to the nerves and blood supply of the hands and arms.
-
Wear warm clothing when working in cold conditions, keep your hands warm and dry.
-
If you experience numbness, tingling, pain or whitening of the skin in your fingers or hands, seek medical advice from a qualified occupational health professional regarding overall activities.
-
Operate and maintain the tool as recommended in these instructions, to prevent an unnecessary increase in vibration levels.
-
Hold the tool with a light, but safe, grip because the risk from vibration is generally greater when the grip force is higher.
SPECIFICATIONS
| Type of power | Piston reciprocating |
| Air pressure | 4.9 – 8.3 bar |
| Applicable nails | ref. Fig. |
| Numbers of loadable nails | 64 – 70 nails (2 strips) |
| Size | 527 mm (L) × 322 mm (H) × 125 mm (W) |
| Weight | 3.4 kg |
| Nail-feeding method | Spiral spring type |
| Hose (inside diam.) | 8 mm |
NAIL SELECTION
Only nails shown in the Table below can be driven with this Nailer.
Plastic-collated strip nails Full-head nails | Min. Max. | |
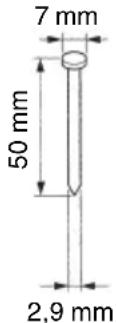 | 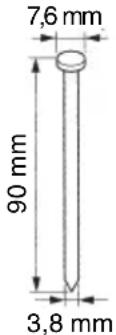 |
Dimensions of nails
STANDARD ACCESSORIES
(1) Eye protection 1
(2) Nose cap (mounted on tool) 1
APPLICATIONS
○ Floor and wall framing.
○ Truss build-up, Window build-up.
○ Subfl ooring and roof decking.
○ Wall sheathing.
○ Mobile home and modular housing construction.
Be sure to use the hose provided with minimum 8 mm inside diameter.
NOTE
The air supply hoses must have a minimum working pressure rating of 12.8 bar or 150 percent of the maximum pressure produced in the air supply system, whichever is higher.
2. Check on safety CAUTION
- Unauthorized persons (including children) must be kept away from the equipment.
○ Wear eye protection.
○ Check the retaining screws which fix the exhaust cover, etc. for tightness.
Check the nailer for air leaks and defective or rusty parts.
☐ Check whether or not the push lever works correctly. Also check whether or not any dirt has adhered to the moving parts of the push lever.
○ Recheck on operational safety.
BEFORE USE
1. Check the air pressure CAUTION
The air pressure must be constantly maintained at 4.9 – 8.3 bar.
Adjust the air pressure between 4.9 to 8.3 bar according to the diameters and length of nails and hardness of the wood being nailed. Pay special attention to the output pressure, capacity, and piping on the air compressor, so that air pressure does not exceed the specified limit. Note that excessive pressure may affect overall performance, service life, and safety.
2. Lubrication
(1) Prior to operating this nailer, be sure to provide an air set between the air compressor and this device. Lubrication through the air set offers smooth operation, extended service life, and anticorrosion.
Adjust the oiler so that a single drop of oil is supplied at intervals of 5 to 10 nailing cycles.
(2) It is recommended using the recommended oil (SHELL TONNA). Other applicable oils are listed. Never mix two or more types of different oils.
3. Load nails
CAUTION
○ When loading nails into Nailer,
(1) do not depress trigger;
(2) do not depress push lever; and
(3) keep your face, hands feet and other body parts, as well as those of other persons away from the nose muzzle to avoid possible injury during usage and carrying.
(1) Insert nail strip into rear of magazine (See Fig. 2).
(2) Slide the nail strip forward in the magazine. The nail strip should pass the nail stopper.
(3) Pull the nail feeder (B) back to engage the nail feeder (A) to the nail strip.
NOTE
Use nail strip of more than 5 nails.
The Nailer is now ready to operate.
Removing the nails:
① Pull the nail feeder (B) backward.
② Return the nail feeder (B) forward quietly while pushing the nail feeder (A).
③ Push the nail stopper toward the magazine side, and pull out nails from the back of the magazine.
CAUTION
To prevent unintentional operation, never touch the trigger or place the top end of the push lever on a work bench or floor. Also, never face the nail outlet toward any part of a person.
Do not use the body or any portion of the tool as a hammer as nails may be discharged unexpectedly or the tool may become damaged and serious injury could occur.
○ Take precautions to ensure the safety of persons in the vicinity during operation.
- Ensure tool is always safely engaged on the workpiece and cannot slip.
○ Never carry a pneumatic tool by its hose.
○ Never drag a pneumatic tool by its hose.
1. Nailing procedures
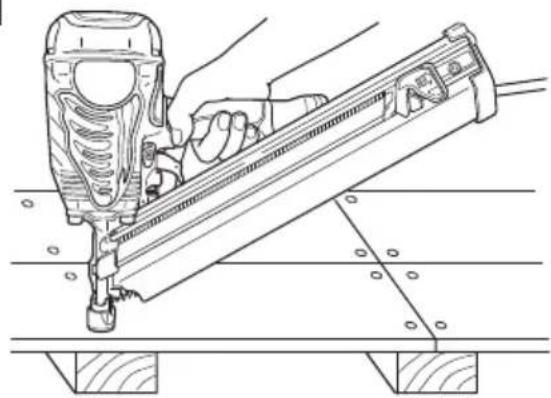
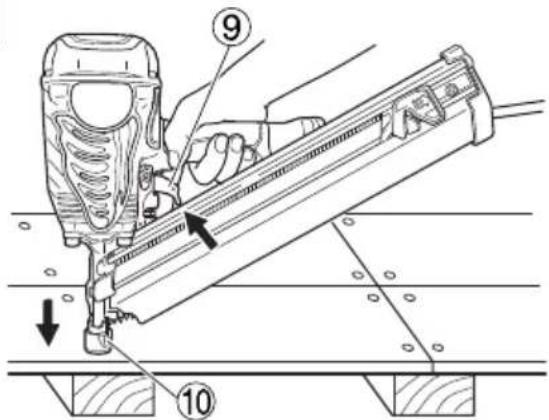
This product is a nailer using SINGLE SEQUENTIAL ACTUATION MECHANISM. If you pull the trigger first, nothing will happen even if you press the push lever up against an object.
Depress the nail outlet onto the desired point; then pull the trigger to drive a nail in a single shot (See Fig.4).
After nailing once, nailing will not be possible again until the trigger is released and pressed again.
Don't turn a trigger pin, it's locked (See Fig.5).
You cannot drive a nail by first pulling on the trigger and then pressing the push lever against an object (continuous nailing).
WARNING
A nail will fire each time the trigger is depressed as long as the push lever remains depressed.
CAUTION
Exercise care when nailing corners of lumber. When continuous nailing corners of lumber, a nail may go astray or break through the corner.
○ Do not drive a nail on another nail.
○ Do not drive a nail on metal parts.
NOTE
○ Precautions on no-load operation Sometimes nailing will continue after driving in all nails previously contained in the magazine.
This is termed “no-load operation”. Such operation may deteriorate the bumper, magazine, and nail feeder. To avoid no-load operation, occasionally confirm the amount of remaining nails. On the other hand, all nails should be removed after using this nailer.
○ Always handle nails and package carefully. If nails are dropped, collating bond may be broken.
○ After nailing:
(1) disconnect air hose from the nailer;
(2) remove all nails from the nailer;
(3) supply 5 - 10 drops of HiKOKI pneumatic tool lubricant into the air plug on the nailer; and
(4) open the petcock on the air compressor tank to drain any moisture.
○ Under low temperature conditions, the machine sometimes does not operate correctly. Always operate the machine at the appropriate ambient temperature.
2. Adjusting the nailing depth (See Fig. 6)
To assure that each nail penetrates to the same depth, be sure that:
(1) the air pressure to the Nailer remains constant (regulator is installed and working properly), and
(2) the Nailer is always held firmly against the workpiece.
If nails are driven too deep or shallow into the workpiece, adjust the nailing depth in the following order.
① Disconnect air hose from nailer.
② If nails are driven too deep, turn the adjuster to the shallow side.
If nails are driven too shallow, turn the adjuster to the deep side.
③ Stop turning the adjuster when a suitable position is reached for a nailing test.
④ Connect the air hose.
Always wear eye protection.
Perform a nailing test.
⑤ Disconnect air hose from nailer.
⑥ Choose a suitable position for the adjuster.
3. Using the nose cap (See Fig. 7) CAUTION
When detaching or attaching the nose cap, be sure to remove your finger from the trigger and disconnect the air hose from the nailer.
The nose cap is attached to the push lever tip to protect the workpiece from scratches or damage. Remove in the order shown below when not using.
(1) DISCONNECT AIR HOSE FROM NAILER.
(2) Pull out the nose cap in the direction of the arrow as shown in the diagram.
○ Attach to the tip of the push lever in the reverse order of detaching.
INSPECTION AND MAINTENANCE
CAUTION
Be sure to disconnect the hose during cleaning jam inspection, maintenance and cleaning.
1. Inspecting the magazine
Clean the magazine. Remove paper chips or wooden chips which may have accumulated in the magazine. Lubricate it with HiKOKI pneumatic tool lubricant.
2. Check on mounting screws for each part
At regular intervals check every part for loose mounting screws and whether or not there are any air leaks. Retighten any loose screws. Operating the equipment with loose screws untightened will incur a hazard.
3. Inspecting the push lever
Check if the push lever (Fig. 1) can slide smoothly.
Clean up the sliding area of the push lever and use the provided oil for lubrication from time to time. Lubrication enables smooth sliding and simultaneously serves to prevent the formation of rust.
4. Storing
○ When not in use for an extended period, apply a thin coat of the lubricant to the steel parts to avoid rust.
- Do not store the Nailer in a cold weather environment. Keep the Nailer in a warm area.
○ When not in use, the Nailer should be stored in a warm and dry place.
Keep out of reach of children.
CAUTION
In the operation and maintenance of power tools, the safety regulations and standards prescribed in each country must be observed.
COMPRESSOR
CAUTION
When the maximum, operating pressure of the air compressor exceeds 8.3 bar, be sure to provide a reducing valve between the air compressor and nailer. Then, adjust the air pressure within the operating range of 4.9 - 8.3 bar. If the air set is installed, lubrication is also possible, thus providing additional convenience.
OILER-FILTER-REDUCING VALVE (Air Set)
So that the equipment can be operated under an optimum condition to ensure extended service life, it is recommended to use an oiler filter reducing valve. Please limit the length of the hose between the unit and the air set to within 10m when using. (Fig. 8)
APPLICABLE LUBRICANTS
| Type of lubricant Name of lubricant | |
| Recommended oil SHELL TONNA | |
| Motor oil SAE10W, | SAE20W |
| Turbine oil | ISO VG32 – 68(#90 – #180) |
Noise Information
Noise characteristic values in accordance with EN ISO 11148-13:2018
The typical A-weighted single-event sound power level L_WA,1s,d=105 dB
The typical A-weighted single-event emission sound pressure level at work station L pA, 1s, d = 98 dB Uncertainty K: 2.5 dB (A)
These values are tool-related characteristic values and do not represent the noise development at the point of use. Noise development at the point of use will for example depend on the working environment, the workpiece, the workpiece support and the number of driving operations, etc.
Depending on the conditions at the workplace and the form of the workpiece, individual noise attenuation measures may need to be carried out, such as placing workpieces on sound-damping supports, preventing workpiece vibration by means of clamping or covering, adjusting to the minimum air pressure required for the operation involved, etc.
In special cases it is necessary to wear hearing protection equipment.
Vibration Information
The typical vibration characteristic value in accordance with EN ISO 11148-13:2018,2000: 5.5 m/s ^2 . Uncertainty K = 1.5 m/s ^2
This values is a tool-related characteristic value and does not represent the influence to the hand-arm-system when using the tool. An influence to the hand-arm-system when using the tool will for example depend on the gripping force, the contact pressure force, the working direction, the adjustment of energy supply, the workpiece, the workpiece support.
natural_image
Line drawing of a quill pen with inkwell (no text or symbols)
natural_image
Line drawing of a quill pen with inkwell (no text or symbols)| Svenska Suomi | ||
| EG-DEKLARATION BETRÄFFANDE LIKFORMIGHETVi förklarar på eget ansvar att produkten stavspikverktyg, identifierad enligt typ och särskild identifikationskod *1), överensstämmer med alla relevanta krav i direktiven *2) och standarderna *3). Teknisk fil enligt *4) – Se nedan.Den europeiska standardansvariga på representationskontoret i Europa är auktoriserad att sammanställa den tekniska fi len.Bilaga V (2000/14/EG): För information rörande buller, se kapitelbeskrivningen.Denna försäkran gäller för produkten med tillhörande CE-märkning. | EY-ILMOITUS YHDENMUKAISUUDESTAVakuutamme yksinomaisella vastuullamme, että runkonaulain, joka identifioidaan tyypin ja erityisen tunnistuskoodin *1) perusteella, on kaikkien direktiivien *2) ja standardien *3) asiaankuuluvien vaatimusten mukainen. Tekninen tiedosto kohdassa *4) – katso alta.Eurooppalaisten standardien hallintaelin Euroopan edustustossa on valtuutettu kokoamaan teknisen tiedoston.Liite V (2000/14/EY): Katso melupäästöihin liittyviä tietoja kappaleesta ominaisuudet.Ilmoitus on sovellettavissa tuotteeseen kiinnitettyyn CE-merkintään. | |
| Dansk English | ||
| EF-OVERENSSTEMMELSESERKLÆRINGVi erklærer os fuldstændigt ansvarlige for, at Stavsøm, identificeret ved type og specifik identifikationskode *1), er i overensstemmelse med alle relevante krav i direktiverne *2) og standarderne *3). Teknisk fi i *4) – Se nedenfor.Lederen af europæiske standarder på repræsentationskontoret i Europa er bemyndiget til at kompilere den tekniske fi I.Appendiks V (2000/14/EF): For information vedrørende støjafgivelse henvises til afsnittet Specifi kationer.Erklæringen gælder produktet, der er mærket med CE. | EC DECLARATION OF CONFORMITYWe declare under our sole responsibility that Strip Nailer, identified by type and specific identification code *1), is in conformity with all relevant requirements of the directives *2) and standards *3). Technical fi le at *4) – See below.The European Standard Manager at the representative office in Europe is authorized to compile the technical fi le.Annex V (2000/14/EC): For information relating to noise emissions, see the chapter specifi cations.The declaration is applicable to the product affi xed CE marking. | |
| Norsk | ||
| EF'S ERKLÆRING OM OVERENSSTEMMELSEVi erklærer på eget ansvar at Stavspikerpistol, identifisert etter type og spesifikk identifikasjonskode *1), er i samsvar med alle relevante krav i direktiver *2) og standarder *3). Teknisk fil under *4) - Se nedenfor.Styreren for europeiske standarder ved representantkontoret i Europa er autorisert til å kompilere den tekniske fi len.Anneks V (2000/14/EF): For informasjon relatert til lydemisjon, se kapittel spesifi kasjonene.Erklæringen gjelder for CE-merket på produktet. | ||
| *1) NR90AE(T1) C351608B*2) 2006/42/EC, 2011/65/EU*3) EN ISO 11148-13:2018 | ||
| *4) Representative offi ce in EuropeHikoki Power Tools Deutschland GmbHSiemensring 34, 47877 Willich, GermanyHead offi ce in JapanKoki Holdings Co., Ltd.Shinagawa Intercity Tower A, 15-1, Konan 2-chome, Minato-ku, Tokyo, Japan | 29. 11. 2019Naoto YamashiroEuropean Standard Manager29. 11. 2019A. NakagawaCorporate Offi cer | |
Koki Holdings Co., Ltd.
- INSPEKSJON OG VEDLIKEHOLD
- FORSIKTIG
- PRECAUTIONS ON USING NAILER
- Always wear eye protection (protective goggles).
- Protect your ears and head.
- Pay attention to those working close to you.
- Never point the nail outlet towards people.
- Before using the power tool, check the push lever.
- Use specified nails only.
- Do not modify the fastener driving tool.
- Be careful when connecting the hose.
- NAIL SELECTION
- STANDARD ACCESSORIES
- APPLICATIONS
- NOTE
- Check on safety CAUTION
- BEFORE USE
- Check the air pressure CAUTION
- Lubrication
- Load nails
- CAUTION
- Removing the nails:
- Nailing procedures
- WARNING
- Adjusting the nailing depth (See Fig. 6)
- Using the nose cap (See Fig. 7) CAUTION
- INSPECTION AND MAINTENANCE
- Inspecting the magazine
- Check on mounting screws for each part
- Inspecting the push lever
- Storing
- COMPRESSOR
- OILER-FILTER-REDUCING VALVE (Air Set)
- Noise Information
- Vibration Information
- Koki Holdings Co., Ltd.
Brand : HiKOKI
Model : NR90AE
Category : Stapler