
Apollo APO-VX20-UC - Video Conferencing System WyreStorm - Free user manual and instructions
Find the device manual for free Apollo APO-VX20-UC WyreStorm in PDF.


| Product Type | Video Conferencing System |
| Brand | WyreStorm |
| Model | Apollo APO-VX20-UC |
| Dimensions (W x H x D) | Approx. 120 x 70 x 70 mm |
| Weight | Approx. 0.5 kg |
| Power Supply | USB bus-powered (5V, 500mA) or optional AC adapter |
| Camera Resolution | 4K UHD (3840x2160) @ 30fps |
| Field of View | 120° (diagonal) |
| Microphone Array | Built-in, 3-microphone array with 5m pickup range |
| Speaker | Integrated full-range speaker, 3W |
| Connectivity | USB-C (USB 3.0 compatible), Bluetooth 5.0, Wi-Fi (optional) |
| Compatibility | Windows, macOS, Chrome OS, Linux; major conferencing apps |
| Main Functions | Auto-framing, noise cancellation, echo suppression, 4K video |
| Mounting Options | Desktop, tripod (1/4") or monitor mount (with clip) |
| Control | IR remote (included) and physical buttons on unit |
| Privacy Shutter | Yes, built-in physical shutter for camera |
| LED Indicators | Power, mute, and camera tracking status |
| Cleaning and Maintenance | Wipe with soft, dry cloth; avoid liquids; clean lens with lens tissue |
| Safety Features | Overcurrent protection, automatic power-off when not in use |
| Spare Parts and Repairability | Limited spare parts available; contact authorized service centers |
| Warranty | 2 years limited warranty |
Frequently Asked Questions - Apollo APO-VX20-UC WyreStorm
User questions about Apollo APO-VX20-UC WyreStorm
0 question about this device. Answer the ones you know or ask your own.
Ask a new question about this device
Download the instructions for your Video Conferencing System in PDF format for free! Find your manual Apollo APO-VX20-UC - WyreStorm and take your electronic device back in hand. On this page are published all the documents necessary for the use of your device. Apollo APO-VX20-UC by WyreStorm.
USER MANUAL Apollo APO-VX20-UC WyreStorm
natural_image
Exterior view of a black wireless audio device with a circular head and stand (no visible text or symbols)User Manual
v1.0
Contents
Contents 2
Overview 3
Device Connectivity 3
Wireless Casting 4
Dual-View 5
USB Behavior & Peripherals 6
Control 6
Camera 7
Wiring Diagram....7
BYOD Conference Room 7
Zoom Room....8
Add-On Mic (APO-COM-MIC) 9
Web Interface....10
Camera Settings....10
Video Settings 10
Wi-Fi Settings....11
Casting Settings....11
Overview
This user manual provides a detailed overview of the Apollo VX20 video bar. WyreStorm recommends reading through this document in its entirety before designing or installing a system.
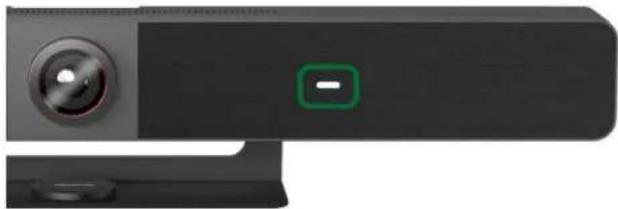
LED Behavior
natural_image
Close-up of a black video camera with a circular button and a green border (no text or symbols visible)| Blinking Orange | Booting |
| Solid White | Normal Operation |
| Blinking White | Standby |
| Rapid Blinking White | Firmware Updating |
| Solid Red | Mics Muted |
| Blinking Blue | Bluetooth Pairing |
Device Connectivity
When a user is ready to present, there are a number of connection methods that are available. Apollo supports both wired and wireless video passthrough. If using wireless screensharing, a user's personal device will not have access to Apollo's built-in speakerphone or any USB peripherals. Connecting to Apollo via Airplay (Apple devices) or Miracast (Windows & Android) is for screensharing content only.
Wired connections add the ability for data communication on top of video transmissions. A hardwired USB-C connection to a personal device allows both A/V and USB data to transmit over a single cable. This will allow compatible USB-C devices to share content to a conference display while at the same time having access to Apollo's built-in speakerphone and any USB peripherals devices such as a webcam.
A native HDMI connection is also available and can be used for simple video passthrough to a display. If USB data communication is also needed to a device which is using HDMI, a separate USB Type B connection can be used in tandem to connect the Apollo's speakerphone and peripheral USB devices.

| A | USB 3.0 Device | Connect USB peripheral devices such as a touchscreen display |
| B | USB 3.0 Host | Used to connect a PC for access to the VX20's speakerphone and camera (by default, syncs to the HDMI input when active) |
| C | USB-C Input | Supports Alt-Mode for video passthrough and access to the VX20's speakerphone and camera. Also supports 60w PD. |
| D | Mic | Used for connecting the APO-COM-MIC add-on USB microphone |
| E | Power | DC power connection |
| F | HDMI Output | Connects to an HDMI display |
| G | HDMI Input | Connects PC to VX20 for video passthrough |
| H | Ethernet | Used to connect to Apollo's web UI, wireless casting, or API control |
Wireless Casting
The VX20 supports wireless video streaming by two methods.
- Native streaming via AirPlay or Mircast
- Streaming via the APO-DG1 USB-C dongle
Native Streaming
This VX20 has a built-in wireless access point that can be used to cast content via AirPlay or Miracast. There are three modes for the AP.
Router Mode: This is the default mode. When connecting to the AP in this mode, the VX20 acts as a bridge to an existing network via its LAN connection. This is useful if there is no existing Wi-Fi network available and you wish to use the VX20 as the primary wireless AP.
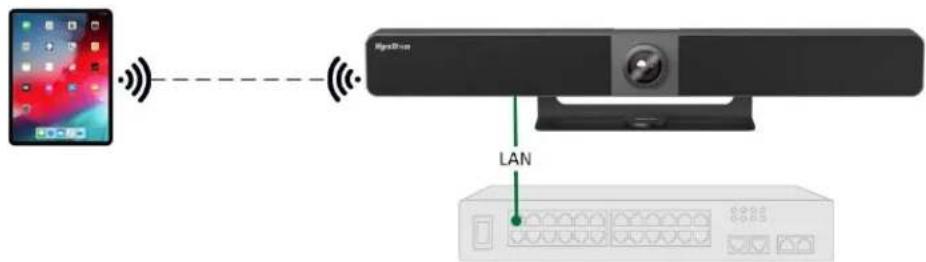
Router Disabled: This mode doesn't allow the VX20 to bridge the wireless connection to its LAN port. This mode is useful if you wish to isolate the wireless casting from an enterprise/existing network. When clients connect to the switcher's AP in this mode, they will only be able to wirelessly cast content. They will not have internet access.
AP Disabled: This mode completely disables the built-in AP. This mode should be used when you plan to use an existing network's access point(s). This requires a LAN connection to the VX20 in order for it to be found and discoverable on the existing network.

flowchart
graph TD
    A["Smartphone"] -->|Wireless Signal| B["Router"]
    B -->|LAN| C["Server"]
    C -->|Wireless Signal| B
    style A fill:#f9f,stroke:#333
    style B fill:#ccf,stroke:#333
    style C fill:#cfc,stroke:#333
Casting Dongle (APO-DG1)
A second option to stream wireless video is via the APO-DG1 USB-C casting dongle. The APO-DG1 is a simple plug and play method to wirelessly share content. The dongle plugs into an available USB-C port on a PC and operates by a button press.
For more details on how to operate and pair the APO-DG1 view the QuickStart Guide at wyrestorm.com

flowchart
graph LR
    A["Laptop"] --> B["Data Link"]
    B --> C["Apple TV"]
Important! Miracast will not work if the client PC has Wi-Fi disabled. Miracast does not operate over a wired LAN connection.
In the absence of video, Apollo generates a "Guide Screen" and is shown on the connected display with instruction on how to cast content using the various casting protocols.
Dual-View
Up to two separate video sources can be transmitted through Apollo in a split screen view. This can be a combination of wireless & wired devices, for example two Airplay devices, or one Miracast & one USB-C, etc... Dual-View uses LIFO (Last In First Out), Apollo will automatically switch to Dual-View when a second device sync is detected and will return to a single full screen image when a second sync is disconnected.

USB Behavior & Peripherals
By default, Apollo is set to auto switch the active USB host between the USB-C or USB Type B connection. USB auto switching uses LIFO (Last In First Out) meaning, if a new device is connected, Apollo recognizes the new device and can automatically send connection of the speakerphone and USB peripherals to this newly connected source. This capability is great for applications that will have many devices that are 'hot-plugged' during a meeting.
You can also manually adjust this to force a certain USB connection as a fixed host so that newly connected devices do not trigger auto switch, which is great for Zoom or Teams room applications. This is covered in more detail in the Zoom/Teams section of this document.
The VX20 also features a native USB 3.0 device port. Any peripheral connected to this port becomes available to the personal device connected via the USB-C or USB-B connection. This port can be used for connecting a smart display or touchscreen for annotations. For long distance runs of USB peripheral devices, consider using the CAB-UAOC-15, which is WyreStorm's 15m USB 3.2 active extension cable.
Control
The VX20 includes a Bluetooth remote which allows control over various functions of the video bar.
| Button | Description |
| Button to make the device pair with Apollo VX20. See Bluetooth Remote Pairing for more information. | |
| Press to answer calls* | |
| Press to disconnect calls.* | |
| Press to revert back to the default camera view.** | |
| Press to perform ePTZ functions.** | |
| 1 2 | Press and hold for 3s to save current camera view to preset 1 or 2. Single press to switch the camera view to either preset.** |
| Button | Description |
| Press to toggle between mute and unmute. | |
| Press to adjust the volume.Press and hold to adjust the volume continuously. | |
| Press to toggle between Auto Framing, Presenter/Speaker Tracking or turn off advanced functions. | |
| Press to adjust the zoom.Press and hold to adjust the zoom continuously. |
Apollo features CEC auto power on/off for connected displays. When a source device is connected for the first time, this can trigger Apollo to send a CEC command to automatically turn on the display, vice versa, after 'x' amount of no sync detection Apollo can power of the display.
Apollo also features an API which can be connected to via 3^rd -party control systems. Details on this API can be found at wyrestorm.com.
Camera
The VX20's integrated camera features advanced functionality including ePTZ and A.I. tracking. ePTZ is the ability for the camera to "electronically" simulate a mechanical pan, tilt, zoom camera. ePTZ uses the camera's 4K resolution to maintain a clear and high-resolution image when zooming, panning, or tilting digitally via supported software. The camera uses the UVC 1.1 protocol and is compatible with many software applications to manipulate the ePTZ functionality.
Presenter tracking: detects motion and then tracks the moving object (person). Presenter tracking is best for scenarios where only one person will be in frame such as the front of a classroom where a "presenter" is speaking. Due to the nature of using motion detection, presenter tracking is not recommended where multiple persons will be in the same frame as it may cause the motion detection to become sporadic if it detects multiple moving objects simultaneously.
Speaker tracking: uses audio detection via the beamforming microphones to intelligently PTZ to a person speaking. This mode is best used when multiple users are positioned around a conference room table and are all in the camera's FOV.
Auto framing: uses motion detection and body recognition to zoom in or out to best frame one or multiple people to the camera. This mode does not track a presenter or use audio detection.
Wiring Diagram
BYOD Conference Room
A BYOD (Bring Your Own Device) conference room allows users to walk into a conference room with their own computer to host a meeting. All meeting software is hosted on the user's personal device and is not specific to a certain vendor (i.e., Zoom or Teams).
In this application Apollo acts as a unification 'hub' which allows connection of personal devices to have access to Apollo's speakerphone, transmit video to a display and by extension have access to any USB cameras that may be connected to Apollo's USB peripheral device port.

flowchart
graph TD
    A["Desktop with Laptop"] -->|USB-C| B["Video Player"]
    C["Desktop with Laptop"] -->|HDMI USB| B
    D["Desktop with Smartphone"] -->|AirPlay/Miracast| B
    B -->|HDMI| E["Computer monitor"]
    F["APOLV-X20-UC"] -->|USB| G["APOLV-X20-UC"]
    G --> H["APOLV-X20-UC"]
    H --> I["APOLV-X20-UC"]
    I --> J["APOLV-X20-UC"]
    style A fill:#f9f,stroke:#333
    style C fill:#f9f,stroke:#333
    style D fill:#f9f,stroke:#333
    style F fill:#f9f,stroke:#333
    style E fill:#ccf,stroke:#333
    style G fill:#ccf,stroke:#333
    style H fill:#ccf,stroke:#333
    style I fill:#ccf,stroke:#333
Zoom Room
A Zoom Room differs from a BYOD room in that it will contain a 'room PC' that is designed to host the conference software. In this application, personal devices will not have access to Apollo's speakerphone or peripheral USB cameras as they will be fixed to the 'room PC'.
BYOD devices are still supported in a Zoom Room however they are for content sharing only and will require a specific topology in order to work properly. Refer to the diagrams below for suggested topologies for a Zoom Room.
For additional details on Zoom Rooms visit this Getting Started with Zoom Rooms page.

flowchart
graph TD
    A["Laptop"] -->|USB-C| B["Internet Explorer"]
    A -->|HDMI| C["ZOOM CAPTURE CARD"]
    C -->|USB| D["ZOOM ROOM PC"]
    D -->|HDMI| E["Computer"]
Add-On Mic (APO-COM-MIC)
The VX20 supports expanding the microphone pickup range by using an add-on USB microphone. This add-on mic connects to the VX20 via the rear USB port labeled "Mic".
The APO-COM-MIC supports the same features as the VX20 integrated microphones includes AES, ANS & AGC. The mic also includes a 2-way mic mute toggle which is indicated by red LEDs on both the add-on mic and the VX20's status LED.
The APO-COM-MIC can also be cascaded up to three times by connecting an additional mic to the USB port labeled "EXT MIC"

The connection distance can be increased by using the APO-MIC-EXT which is a point-to-point USB to ethernet extender. This extender connects in between the VX20 and the APO-COM-MIC to allow up to a 60m extension for installing cables through the floor, walls, or ceilings.

flowchart
graph LR
    A["Device"] --> B["Ethernet"]
    B --> C["Video Camera"]
    style A fill:#f9f,stroke:#333
    style C fill:#bbf,stroke:#333
Web Interface
Camera Settings

Click the icon to start preview
Other apps can't access the device while you preview it on this web.

Video Settings
Video Settings
Output
Timing:
Auto
HDCP:
Passthrough
Screen:
Single Screen
CEC
CEC:

One Touch Play:
80 04
Standby:
80 36
CEC command just supports Hex format with a maximum of 15 byte (example: 40 04).
Apply
Load Default
CEC Test
One Touch Play
Standby
Wi-Fi Settings
The following settings adjust the built-in AP for the VX20. It is recommended to leave the Wi-Fi band and channel untouched unless you specifically experience wireless interference or connection issues.
In the Soft AP section, you can enable or disable the routing functionality as illustrated in the Wireless Casting section above.
Wi-Fi Settings
Built-in WIFI
Band:

5G
Channel:

Auto

Manual
36
Apply
Soft AP
Soft AP:

Soft AP Router:

Password:
12345678
The password must be 8 to 20 characters long (letters, numbers, or ' only)
Apply
Casting Settings
These settings enable or disable Miracast and Airplay support. This is independent of the built-in AP.
BYOD Settings
BYOD
BYOD:

Access Code:

Auto

Manual

0000-9999 or blank
Apply
Guide Screen
Guide Screen:
Select the jpeg files
Image in jp(e)g format with 1920x 1080 resolution
Upland
- User Manual
- Contents
- Overview
- LED Behavior
- Device Connectivity
- Wireless Casting
- Native Streaming
- Casting Dongle (APO-DG1)
- Dual-View
- USB Behavior & Peripherals
- Control
- Camera
- Wiring Diagram
- BYOD Conference Room
- Zoom Room
- Add-On Mic (APO-COM-MIC)
- Web Interface
- Camera Settings
- Video Settings
- Wi-Fi Settings
- Casting Settings
Brand : WyreStorm
Model : Apollo APO-VX20-UC
Category : Video Conferencing System