
CH-500P - Heating Cotech - Free user manual and instructions
Find the device manual for free CH-500P Cotech in PDF.


| Product Type | Space Heater |
| Brand | Cotech |
| Model | CH-500P |
| Category | Heating |
| Dimensions (H x W x D) | 30 x 20 x 15 cm |
| Weight | 1.5 kg |
| Power Supply | 220-240 V ~ 50/60 Hz |
| Power Consumption | 2000 W |
| Heating Type | Fan Forced |
| Thermostat | Adjustable |
| Overheat Protection | Yes |
| Tip-Over Switch | Yes |
| Fan Only Mode | Yes |
| Noise Level | Approx. 45 dB |
| Material | Plastic housing |
| Cleaning | Wipe with dry cloth |
| Safety Certification | CE, GS |
| Spare Parts Availability | Contact Cotech support |
| Warranty | 2 years |
| Country of Origin | China |
Frequently Asked Questions - CH-500P Cotech
User questions about CH-500P Cotech
0 question about this device. Answer the ones you know or ask your own.
Ask a new question about this device
Download the instructions for your Heating in PDF format for free! Find your manual CH-500P - Cotech and take your electronic device back in hand. On this page are published all the documents necessary for the use of your device. CH-500P by Cotech.
USER MANUAL CH-500P Cotech
Read the entire instruction manual carefully and make sure that you fully understand it before you use the equipment. Keep the manual for future reference.
Viktig information:
natural_image
Line drawing of a portable electric heater with ventilation grilles and control panel (no text or symbols)ART.NO
18-2913
36-5732
MODEL
CH-500P-UK
CH-500P
Ver. 20140912
Original instructions
Bruksanvisning i original
400 W convector heater
ART.NO 18-2913 MODEL CH-500P
36-5732 CH-500P
Please read the entire instruction manual before using the product and then save it for future reference. We reserve the right for any errors in text or images and any necessary changes made to technical data. In the event of technical problems or other queries, please contact our Customer Services (see address details on the back).
Safety
- The heater may be used by children aged 8 or over provided they have been instructed in the safe use of the product and that they understand the hazards and risks involved. Cleaning and maintenance may be carried out by children aged 8 or over, but only under adult supervision.
- Keep the heater and its mains lead out of the reach of children under the age of 8.
- The product may be used by persons with reduced physical, sensory or mental capability, lack of experience or knowledge which could jeopardise their safety, provided they have been given supervision or instruction concerning the safe use of the product and understand the hazards involved. Never let children play with the heater.
- The heater should only be connected to a wall outlet with a 230 V, 50 Hz power supply.
- Make sure that the mains lead does not come into direct contact with the heater housing or is in close contact with the hot air exhaust port.
- Never use the heater in bathrooms or any other type of wetrooms.
- Never place or mount the heater in such a way that it risks falling into water or other liquids.
-
The heater must only be mounted and used indoors.
-
Never cover the heater.
- Never mount the heater immediately in front of or below a mains outlet.
- Make sure that no foreign objects risk penetrating the heater's air intakes or exhaust ports.
- Never use the heater in rooms where flammable liquids or gases are stored or used.
- The mains lead should be checked regularly. Never use the product if the mains lead or plug is damaged.
- The mains lead must be changed if damaged. This is to prevent the risk of electric shock or fire and should only be carried out by the manufacturer, qualified service facility or qualified technician.
- The heater should never be operated via a timer switch or other device which turns the heater on automatically.

Note: Never cover the heater. If covered, there is a risk of erheating or even fire.
Buttons and functions
- Wall bracket
- Lock screws (one on each side)
- Hot air exhaust port
- Indicator light
- Thermostat control
- Air inlet
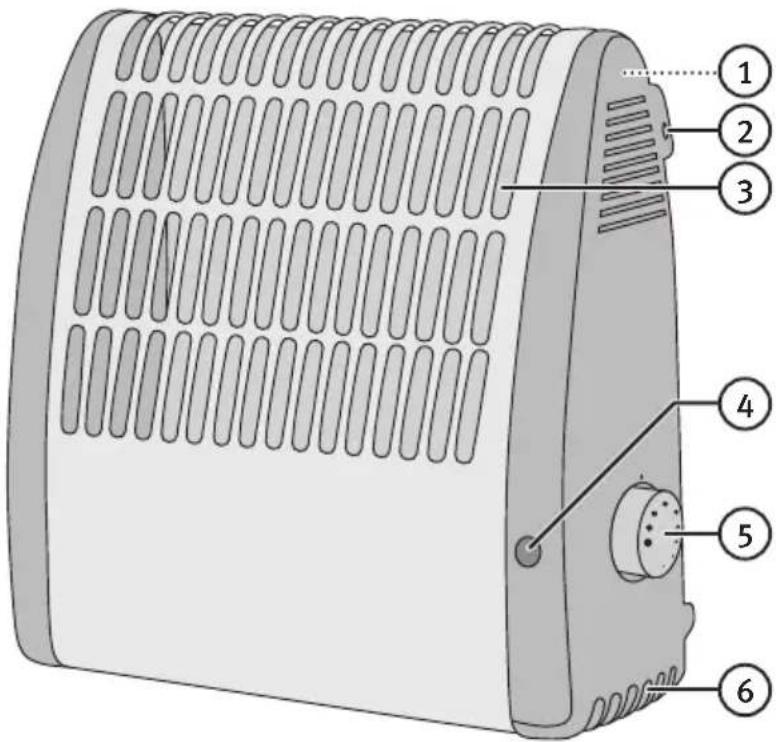
Assembly
Note: Remember to allow for a generous amount of free clearance around the heater during mounting:
70 cm above
40 cm to either side
50 cm below
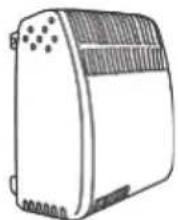
natural_image
Line drawing of a rectangular electronic device with ventilation grilles and mounting feet (no text or symbols)40 cm40 cm
50 cm
-
The product is intended for wall-mounted use only. Make sure that the chosen wall mounting area is free from obstructing electrical conduit or plumbing.
-
Use the wall bracket as a drill template to mark out the drilling holes onto the wall.
-
Screw the wall bracket to the wall. Use suitable screws/fasteners.
-
Attach the heater to the bracket using the included lock screws.
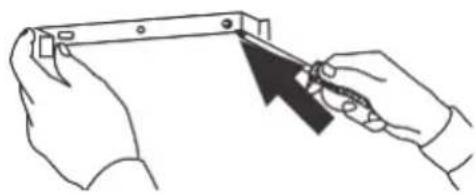
natural_image
Illustration of hands holding a metal bracket with a black arrow pointing to the edge (no text or symbols)
natural_image
Illustration of a hand using a tool to press down a device (no text or symbols present)Operating instructions
Note: The ability of the heater to warm up an area is greatly dependant on the size of the room. If the room is too large the ability of the heater to warm it up to the desired temperature may be insufficient.
- Plug the heater into a wall socket.
- Turn the thermostatic control dial up to max. The heater and indicator lamp should both come on.
- Once the room temperature has reached the desired level, slowly turn back the thermostat control until it clicks and the indicator lamp turns off.
- The heater's thermostat is now set to the desired temperature and the heater will maintain the room temperature by automatically being switched on and off.
Overheating protection
- The overheating protection automatically trips and turns off the heater whenever it overheats.
- To reset the overheating protection, unplug the heater and let it cool for 15 min.
- Then plug the heater back into a wall socket. The overheating protection should now be reset and the heater should now work normally.
Care and maintenance
- Clean the product using a lightly moistened cloth. Use only mild cleaning agents, never solvents or corrosive chemicals.
- Unplug the heater from the wall socket if it is not to be used for an extended period.
- Store the heater in a dry and dust-free environment when it is not in use.
Troubleshooting guide
| The heater does not start. • | Check that the mains lead is properly plugged into an electrical socket.• Check that the wall socket is live.• The overheating protection has tripped (see the Overheating protection section above). |
Disposal
This product should be disposed of in accordance with local regulations. If you are unsure how to proceed, contact your local council.
Specifications
Rated voltage 230 V, 50 Hz
Power 400 W
Size 27 × 25 × 10 cm
Frysvakt 400 W
ART.NR 18-2913 MODELL CH-500P-UK
36-5732 CH-500P
Montering
natural_image
Illustration of hands holding a metal frame with a black arrow pointing to the edge (no text or symbols)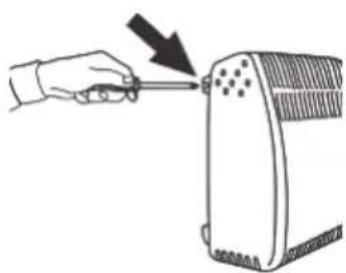
natural_image
Illustration of a hand using a tool to press down a device (no text or symbols present)Användning
Montering
natural_image
Line drawing of a rectangular electronic device with ventilation grilles and mounting holes (no text or symbols)40 cm40 cm
50 cm
natural_image
Illustration of hands holding a metal frame with a black arrow pointing to the edge (no text or symbols)
natural_image
Illustration of a hand using a tool to press down a device (no text or symbols present)Bruk
Asennus
natural_image
Line drawing of a rectangular electronic device with ventilation grille and mounting feet (no text or symbols)40 cm40 cm
50 cm

natural_image
Illustration of two hands holding a metal frame with a black arrow pointing to the edge (no text or symbols)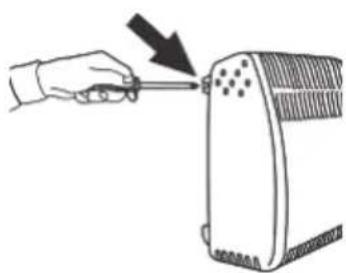
natural_image
Illustration of a hand using a screwdriver to press a small electronic device (no text or symbols present)Käyttö
Montage
natural_image
Line drawing of a portable air conditioner unit (no text or symbols)40 cm40 cm
50 cm
natural_image
Line drawing of hands holding a rectangular device with a black arrow pointing to the edge (no text or symbols)
natural_image
Illustration of a hand using a tool to press down a device (no text or symbols present)Anwendung
POSTAL 10 – 13 Market Place
Kingston Upon Thames
Surrey
KT1 1JZ
DEUTSCHLAND


Brand : Cotech
Model : CH-500P
Category : Heating