
MultiSync MT1000 - Projector NEC - Free user manual and instructions
Find the device manual for free MultiSync MT1000 NEC in PDF.


| Product type | Video projector |
| Brand | NEC |
| Model | MultiSync MT1000 |
| Display technology | 0.7-inch LCD |
| Native resolution | XGA (1024x768) |
| Brightness | 1100 ANSI lumens |
| Contrast ratio | 400:1 |
| Lamp life | 1500 hours (normal mode) |
| Power supply | 100-240 V, 50/60 Hz |
| Power consumption | 240 W (max) |
| Dimensions (W x D x H) | 307 x 249 x 98 mm |
| Weight | 3.5 kg |
| Connectivity | VGA, S-Video, Composite, Audio |
| Maintenance and cleaning | Clean the air filter every 100 hours; replace the lamp after 1500 hours |
| Security | Kensington lock, auto-off |
| Spare parts and repairability | Replacement lamp available; air filter |
| General information | User manual downloadable in PDF format |
Frequently Asked Questions - MultiSync MT1000 NEC
User questions about MultiSync MT1000 NEC
0 question about this device. Answer the ones you know or ask your own.
Ask a new question about this device
Download the instructions for your Projector in PDF format for free! Find your manual MultiSync MT1000 - NEC and take your electronic device back in hand. On this page are published all the documents necessary for the use of your device. MultiSync MT1000 by NEC.
USER MANUAL MultiSync MT1000 NEC
Part No. 78408201 Printed in Japan
NEC Technologies, Inc. 1250 N. Alvington Heights Road, Suite 500 Hosco, Illinois 60143-1248
D3N
NEC Multimedia Theatre
NEC Multimedia Theatre
MultiSync ^ MT 1000 ^TM
LCD Projector User's Manual
NEC
IMPORTANT INFORMATION
Precautions
Please read this manual carefully before using your NEC MultiSync MT1000 LCD Projector and keep the manual handy for future reference.
Your serial number is located next to the main power switch on the back of your MultiSync MT1000. Record it here:
CAUTION
LASER RADIATION- DO NOT STARE INTO BEAM

WAVE LENGTH: 670 nm MAX. OUTPUT: 1 mW CLASS II LASER PRODUCT
CAUTION
TO PREVENT SHOCK, DO NOT OPEN THE CABI-NET. NO USER-SERVICEABLE PARTS INSIDE. REFER SERVICING TO QUALIFIED NEC SERVICE PERSONNEL.

This symbol warns the user that uninsulated voltage within the unit may be sufficient to cause electrical shock. Therefore, it is dangerous to make any kind of contact with any part inside of the unit.

This symbol alerts the user that important information concerning the operation and maintenance of this unit has been provided. The information should be read carefully to avoid problems.
WARNING
TO PREVENT FIRE OR SHOCK, DO NOT EXPOSE THIS UNIT TO RAIN OR MOISTURE. DO NOT USE THIS UNIT'S GROUNDED PLUG WITH AN EXTENSION CORD OR IN AN OUTLET UNLESS ALL THREE PRONGS CAN BE FULLY INSERTED. DO NOT OPEN THE CABINET. THERE ARE HIGH-VOLTAGE COMPONENTS INSIDE. ALL SERVICING MUST BE DONE BY QUALIFIED NEC SERVICE PERSONNEL.
DOC Compliance Notice
This Class A digital apparatus meets all requirements of the Canadian Interference-Causing Equipment Regulations.
RF Interference
WARNING
The Federal Communications Commission does not allow any modifications or changes to the unit EXCEPT those specified by NEC Technologies in this manual. Failure to comply with this government regulation could void your right to operate this equipment.
This equipment has been tested and found to comply with the limits for a Class A digital device, pursuant to Part 15 of the FCC Rules. These limits are designed to provide reasonable protection against harmful interference in a commercial installation. This equipment generates, uses and can radiate radio frequency energy and, if not installed and used in accordance with the instructions, may cause harmful interference to radio communications. Operation of this equipment in a residential area is likely to cause harmful interference in which case the user will be required to correct the interference at their own expense.
Important Safeguards
These safety instructions are to ensure the long life of your LCD projector and to prevent fire and shock. Please read them carefully and heed all warnings.
Installation
- For best results, use your LCD projector in a darkened room.
- Place the projector on a flat, level surface in a dry area away from dust and moisture.
- Do not place your LCD projector in direct sunlight, near heaters or heat radiating appliances.
- Exposure to direct sunlight, smoke or steam can harm internal components.
- Handle your LCD projector carefully. Dropping or jarring can damage internal components.
-
Do not place heavy objects on top of the LCD projector.
-
If installing the LCD projector on the ceiling:
a. The ceiling must be strong enough to support the LCD projector and the installation must be in accordance with any local building codes.
b. The LCD projector must be installed by qualified NEC service personnel.
Power Supply
- The LCD projector is designed to operate on a power supply of 100-120 or 220-240 V 50/60 Hz AC. Ensure that your power supply fits this requirement before attempting to use your LCD projector.
- Handle the power cable carefully and avoid excessive bending. A damaged cord can cause electric shock or fire.
- If the LCD projector is not to be used for an extended period of time, disconnect the plug from the power outlet.
Cleaning
- Unplug the LCD projector before cleaning.
- Clean the cabinet periodically with a damp cloth. If heavily soiled, use a mild detergent. Never use strong detergents or solvents such as alcohol or thinner.
- Use a blower or lens paper to clean the lens, and be careful not to scratch or mar the lens.
- Clean the air filter with a vacuum cleaner after every 100 hours of operation.
a. Clean the outside of the filter with a vacuum cleaner.
b. Do not use water or any other liquid to clean the air filter.
c. Do not operate your LCD projector without the air filter.
Lamp Replacement
- Be sure to replace the lamp when the Status light comes on. If you continue to use the lamp after 2000 hours of use, the lamp bulb may shatter, and pieces of glass may be scattered in the lamp case. Do not touch them as the pieces of glass may cause injury. If this happens, contact your NEC dealer for lamp replacement.
- Allow a minimum of ONE minute to elapse between turning the lamp off and on. High voltage is applied to the lamp immediately when the power is turned on. Therefore turning the power off and quickly back on may shorten the life of your lamp and result in damage to your LCD projector.
Fire and Shock Precautions
- Ensure that there is sufficient ventilation and that vents are unobstructed to prevent the build-up of heat inside your LCD projector. Allow at least 3 inches (10cm) of space between your LCD projector and a wall.
- Prevent foreign objects such as paper clips and bits of paper from falling into your LCD projector. Do not attempt to retrieve any objects that might fall into your projector. Do not insert any metal objects such as a wire or screwdriver into your LCD project. If something should fall into your projector, disconnect it immediately and have the object removed by a qualified NEC service person.
-
Do not place any liquids on top of your LCD projector.
-
Do not look into the lens while the projector is on. Serious damage to your eyes could result.
- Do not look into the laser pointer while it is on and do not point the laser beam at another person. Serious injury could result.

ATTENTION
RISQUE D'ELECTROCUTION NE PAS OUVRIR
ATTENTION
RAYONNEMENT LASER NE PAS REGARDER DANS LE FAISCEAU

LONGUEUR D'ONDE: 670 nm MAX. SORTIE: 1 mW APPREIL A LASER DE CLASSE 2

NEC MultiSync® LCD Projector Products
NEC Technologies, Inc. (hereafter NECTECH) warrants this product to be free from defects in material and workmanship under the following terms.
HOW LONG IS THE WARRANTY?
Parts and labor are warranted for (2) two years from the date of the first customer purchase. The lamp is warranted for 2000 hours of operating time or six months, whichever comes first.
WHO IS PROTECTED?
This warranty may be enforced only by the first purchaser.
WHAT IS COVERED AND WHAT IS NOT COVERED
Except as specified below, this warranty covers all defects in material or workmanship in this product. The following are not covered by the warranty:
-
Any product which is not distributed in the U.S.A., Canada and Mexico by NECTECH or which is not purchased in the U.S.A., Canada or Mexico from an authorized NECTECH dealer. If you are uncertain as to whether a dealer is authorized, please contact NECTECH at 800-836-0655.
-
Any product on which the serial number has been defaced, modified or removed.
- Damage, deterioration or malfunction resulting from:
a. Accident, misuse, abuse, neglect, fire, water, lightning or other acts of nature, unauthorized product modification, or failure to follow instructions supplied with the product.
b. Repair or attempted repair by anyone not authorized by NECTECH.
c. Any shipment of the product (claims must be presented to the carrier).
d. Removal or installation of the product.
e. Any other cause which does not relate to a product defect.
- Cartons, carrying cases, batteries, external cabinets, magnetic tapes, or any accessories used in connection with the product.
WHAT WE WILL PAY FOR AND WHAT WE WILL NOT PAY FOR
We will pay labor and material expenses for covered items. But we will not pay for the following:
-
Removal or installation charges.
-
Costs of initial technical adjustments (set-up), including adjustment of user controls. These costs are the responsibility of the NECTECH dealer from whom the product was purchased.
- Payment of shipping charges.
HOW YOU CAN GET WARRANTY SERVICE
- To obtain service on your product, consult the dealer from whom you purchased the product.
- Whenever warranty service is required, the original dated invoice (or a copy) must be presented as proof of warranty coverage. Please be prepared to describe or demonstrate the problem to your dealer.
- For the name of the nearest NECTECH authorized service center, call NECTECH at 800-836-0655.
LIMITATION OF IMPLIED WARRANTIES
ALL IMPLIED WARRANTIES, INCLUDING WARRANTIES OF MERCHANTABILITY AND FITNESS FOR A PARTICULAR PURPOSE, ARE LIMITED IN DURATION TO THE LENGTH OF THIS WARRANTY.
EXCLUSION OF DAMAGES
NECTECH'S LIABILITY FOR ANY DEFECTIVE PRODUCT IS LIMITED TO THE REPAIR OR REPLACEMENT OF THE PRODUCT AT OUR OPTION. NECTECH SHALL NOT BE LIABLE FOR:
- DAMAGE TO OTHER PROPERTY CAUSED BY ANY DEFECTS IN THIS PRODUCT, DAMAGES BASED UPON INCONVENIENCE, LOSS OF USE OF THE PRODUCT, LOSS OF TIME, COMMERCIAL LOSS; OR
- ANY OTHER DAMAGES, WHETHER INCIDENTAL, CONSEQUENTIAL OR OTHERWISE. SOME STATES DO NOT ALLOW LIMITATIONS ON HOW LONG AN IMPLIED WARRANTY LASTS AND/OR DO NOT ALLOW THE EXCLUSION OR LIMITATION OF INCIDENTAL OR CONSEQUENTIAL DAMAGES, SO THE ABOVE LIMITATIONS AND EXCLUSIONS MAY NOT APPLY TO YOU.
HOW STATE LAW RELATES TO THE WARRANTY
This warranty gives you specific legal rights, and you may also have other rights which vary from state to state.
FOR MORE INFORMATION, TELEPHONE 800-366-5213
NEC TECHNOLOGIES, INC.
1250 N. Arlington Heights Road, Suite 500
Itasca, Illinois 60143-1248
NOTE: All products returned to NECTECH for service MUST have prior approval. To get approval, call NEC Technologies at 800-836-0655.
TABLE OF CONTENTS
1. Introduction
Introduction To The MultiSync MT1000 LCD Projector 13
How Do You Get Started? 13
What's In The Box? 15
Getting To Know Your MultiSync MT1000 LCD Projector 17
Front Features 17
Rear Features 18
Top Features 19
Terminal Panel Features 21
Remote Control Features 25
2. Installation
Setting Up Your MultiSync MT1000 LCD Projector 29
Selecting A Location 30
Using A Tabletop Or Cart 31
Ceiling Installation 33
Reflecting The Image 34
Rear Screen Projection 34
Wiring Diagram 35-36
Connecting Your PC Or Macintosh Computer 37
Connecting Your Document Camera 41
Connecting Your VCR Or Laser Disc Player 41
Connecting An External Monitor 42
Connecting Your Remote Mouse Receiver 44
3. Operation
General Controls 47
Using The Menus 49
Menu Descriptions & Functions 51
Source Menu (Source Icons) 51
Image Adjust Menu(Sound And Picture Control Icons) 53
Power Menu(Projector Control Icons) 57
Settings Menu(Maintenance Icons) 59
4. Maintenance
Replacing The Lamp 61
Cleaning Or Replacing The Filter 63
Remote Control Battery Installation 64
5. Troubleshooting
Status Light Messages 69
Common Problems & Solutions 71
6. Specifications
Optical 73
Electrical 74
Mechanical 74
D-Sub Pin Assignments 77
Timing Chart 79
PC Control Command Reference 81
Cable Connection 85
INTRODUCTION1
This section introduces you to your new MultiSync MT1000 LCD Projector, provides a list of materials that comes with your projector and describes the features and controls.
Congratulations On Your Purchase Of The MultiSync MT1000 LCD Projector
The MultiSync MT1000 is one of the very best LCD projectors available today. The multiple LCD panels enable you to project precise images up to 300 inches across (measured diagonally) from your PC or Macintosh computer (desktop or notebook), VCR, document camera, or even a laser disc player.
You can use the projector on a tabletop or cart, you can permanently mount it on a ceiling*, or you can use MultiSync MT1000 LCD Projector to project images from behind the screen. The remote control can be used wirelessly or with a cable, and you can even use the remote control with the remote mouse receiver to operate the mouse on your PC or Mac. But best of all, the MultiSync MT1000 is an NEC LCD projector. That means you can depend on years of reliable performance and crystal-clear presentations!
The features you'll enjoy include:
- Simple set up and operation.
- A high-performance 250 watt metal halide lamp that delivers 450 ANSI lumens and is guaranteed for 2000 hours of service or six months, whichever comes first.
- A wireless remote control that operates the projector from any angle.
- A laser pointer that's built into the remote control.
- The power zoom control enables you to adjust the image to be between 20 and 300 inches (measured diagonally).
- You can choose between video modes depending on your source: "normal" for a typical picture, "natural" for true color reproduction, and "camera" for use with a document camera or low APL picture.
- The "image capture" enables you to use the entire picture as a background image or to create an image loop.
- An image can be projected from in front or behind a screen, and the projector can even be installed on the ceiling.
- Supports most IBM VGA, S-VGA, XGA, SXGA(pseudo), Macintosh, or any other RGB signals within a horizontal frequency range of 15.754 to 85 kHz and a vertical frequency range of 50 to 85 Hz. This includes NTSC, PAL, SECAM and NTSC4.43 standard video signals.
Note: Composite video standards are as follows:
NTSC: U.S. TV standard for video in U.S. and Canada.
PAL: TV standard used in western Europe
SECAM: TV standard used in France and Eastern Europe
NTSC4.43: TV standard used in Middle East countries
- The remote control can be used with or without a cable, and you can even use the remote to operate your PC or Macintosh mouse wirelessly from across the room with the remote mouse receiver.
- You can control your MultiSync MT1000 LCD Projector with a PC.
- The contemporary cabinet design is compact, easy to carry, and complements any office, board room or auditorium.
* Installing the MultiSync MT1000 LCD Projector on the ceiling must be done by authorized NEC technicians. Consult your NEC dealer for more information.
How Do You Get Started?
The fastest way to get started is to take your time and do everything right the first time. Take a few minutes now to watch the introductory video and review the manual. This may save you hours later on. At the beginning of each section of the manual you'll find an overview. If the section doesn't apply, you can skip it.
What's In The Box?
Make sure your box contains everything listed. If any pieces are missing, contact your dealer. Please save the original box and packing materials if you ever need to ship your MultiSync MT1000 LCD Projector.
• NEC MultiSync MT1000 LCD Projector
- Remote Control With Built-In Laser Pointer And Cables
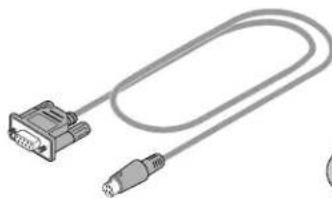
- Remote Mouse Receiver
• PC/Macintosh MultiCable (15-Pin Mini D-Sub To 15-Pin D-Sub Connector)
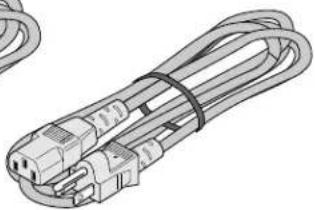
- Power Cable
- Two AA Batteries
- Introductory Video
- User's Manual
- Accessory Catalog
- Registration Card


natural_image
3D rendering of a USB cable connector with terminal connectors (no text or symbols visible)Mouse adapter (For Macintosh)

natural_image
3D rendering of a connected SDA connector with ports, no text or symbols visibleUser's manual

Registration cardMouse adapter (For IBM F
Serial cable
natural_image
Illustration of a U892-1082 voltage regulator with a cable and connector (no text or symbols)PC/Macintosh MultiCable
(15-Pin Mini D-Sub To 15-Pin D-Sub connector)

natural_image
Illustration of a USB cable connector with multiple ports (no text or symbols visible)Power cable
natural_image
Coiled electrical power plug with terminal connectors (no text or symbols visible)Introductory video

natural_image
3D rendering of a rectangular electronic device with two internal discs and a flat top (no text or symbols)Accessory catalog

Getting To Know Your MultiSync MT1000 LCD Projector
Front Features
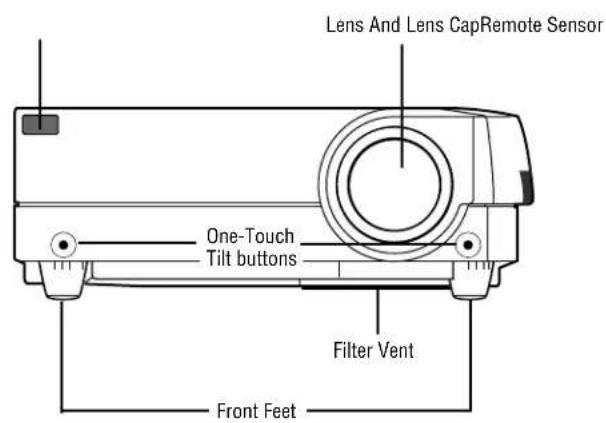
Rear Features

Right Side Features
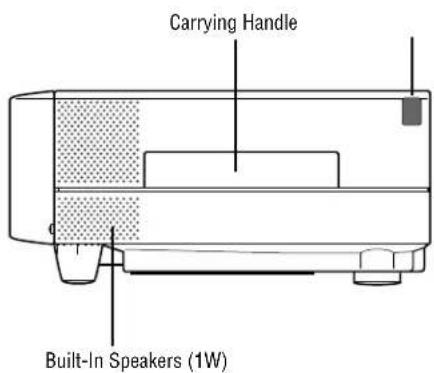
Left Side Features
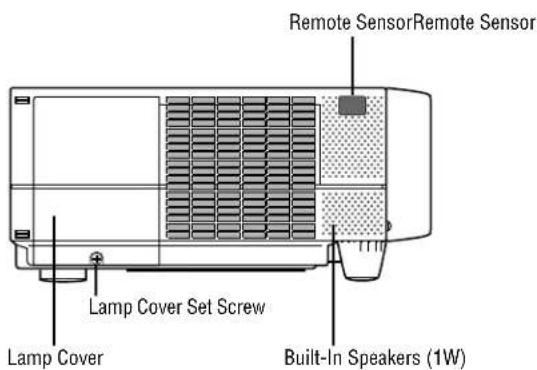
Top Features
① Power Button
Use this button to turn the power on and off when the Main Power Switch is on and the LCD projector is in standby. (When this button is pressed and held for at least two seconds, the “Display Mute” mode will be canceled.)
② Menu Button
Displays the on-screen menu.
③ Select Button
After you press the “Menu” button, use this button to select the menu icon of the item you wish to adjust.
④ Enter Button
Executes your menu selection.
⑤ (+) (-) Adjust Button
Use these buttons while you're in the Image Adjust mode to change the level of a selected menu item. These buttons are also used to set an item in the Power or Settings menus.
Press the (+) button to make the image larger; press (−) to make the image smaller.

Press the (+) or (−) buttons to focus an image.
⑧ Power Indicator
When this indicator is green, the LCD projector is on; when the indicator is amber, it is standing by.
⑨ Status Indicator
When this is lit red continually, it's warning you that the projection lamp has exceed 2000 hours of service. After this light appears, it is advisable to replace the projection lamp as soon as possible.(See pages 61 and 62)
When the operating time of the lamp exceeds 2000 hours, the STATUS indicator is lit red continually. In addition the message "LAMP USAGE XX HOURS" appears continually when the on-screen menu is not displayed.
If this light blinks red rapidly, it indicates that either the lamp cover or filter cover is not attached properly; if the light blinks slowly it means the projector's internal temperature is too hot to operate safely. See the Status Light Messages on pages 69 and 70 for more details.
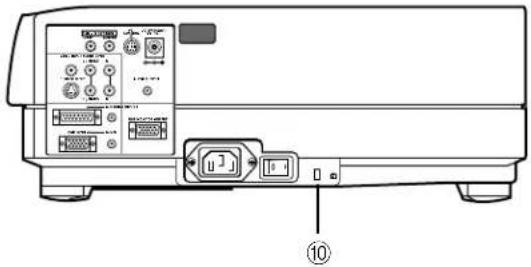
Terminal Panel Features
This panel is located in the rear and is where you connect your cables.
① Remote Control Jacks
a. Remote Control Input Jack
Connect your remote control cable here for wired operation.
b. Remote Control Output Jack
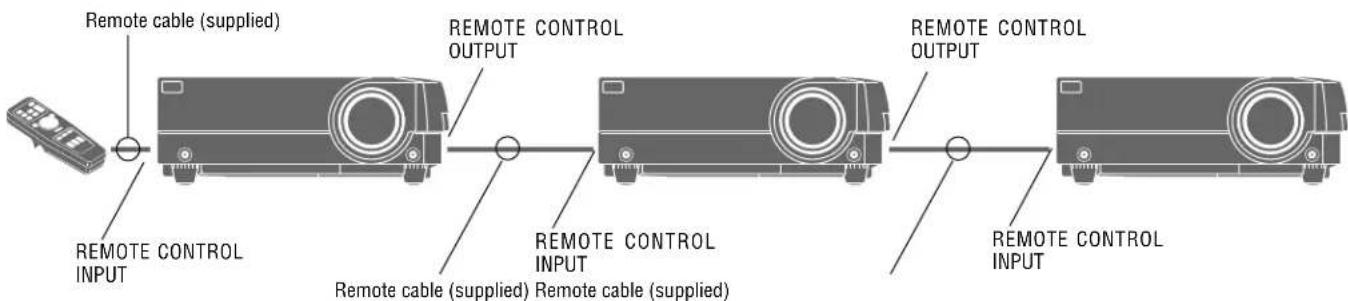
This terminal enables you to operate up to five LCD projectors with the same remote control.
When your remote mouse receiver is connected here, the remote sensors on the LCD projector cabinet will receive your mouse commands.
② PC Control Port
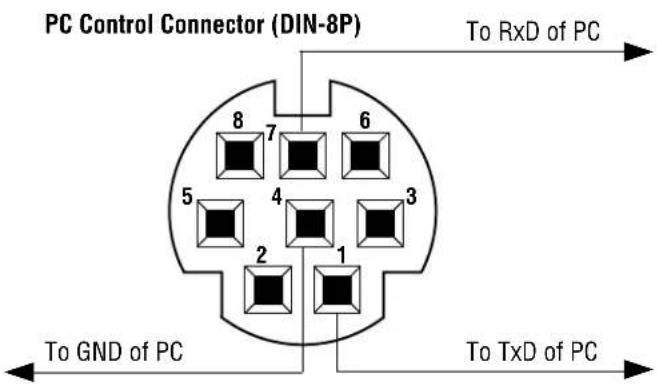
Use this port to connect your PC to control the MultiSync MT1000 Projector. This enables you to use your PC and serial communication protocol to control the projector. If you are writing your own program, command references are on pages 79 to 82.
③ 12V DC/400 mA Output Terminal
Use this terminal to plug in a document camera or any other 12V accessory.
④ Video Input
Connect a VCR, laser disc player, or document camera here to project video.
Left Channel/Mono Audio Input Jack
This is your left channel audio input for stereo sound coming from video equipment or audio system. This also serves as your monaural audio input.
Right Channel Audio Input Jack
This is your right channel audio input for stereo sound.
⑤ S-Video Input
Here is where you connect S-Video input from an external source like a VCR.
Left Channel/Mono Audio Input Jack
This is your left channel audio input for stereo sound coming from S-Video equipment or audio system. This also serves as your monaural audio input.
Right Channel Audio Input Jack
This is your right channel audio input for stereo sound.
NOTE: S-Video provides more vivid color and higher resolution than the traditional composite video format.
① a ① b ② ③
REMOTE CONTROL PC CONTROL DC12V/400mA INPUT OUTPUT OUTPUT
VIDEO INPUT AUDIO INPUT L/MONO R
Connect your PC or other RGB equipment such as IBM or compatible computers. Use the NEC MultiCable that's supplied to connect to a PC.
RGB 1 Audio Input Mini Jack
This is where you connect RGB audio output from a computer or another RGB source.
⑦ RGB Input 2 Connector (Mini D-Sub 15 pin)
Connect a Macintosh or compatible computer here using the NEC MultiCable that's supplied.
RGB 2 Audio Input Mini Jack
This is where you connect a second RGB audio output from a computer or another RGB source.
⑧ Audio Output Mini Jack
Connect additional external speakers here to listen to audio coming from your computer, Video or S-Video input.

⑨ RGB Monitor Output Connector (Mini D-Sub 15 pin)
You can use this connector to loop your computer image to an external monitor from either the RGB 1 or RGB 2 input source.
⑩ Built-in Security Slot 🔒)
This security slot supports the MicroSaver® Security System.
MicroSaver ^® is a registered trademark of Kensington Microwave Inc. The logo is trademarked and owned by Kensington Microwave Inc.
Remote Control Features
You can use your remote control with the cable or wireless to operate your MultiSync MT1000 LCD Projector. With the remote mouse receiver connected to your computer, you can also use the projector's remote control to operate your computer's mouse wireless, too. (See pages 43 and 44 to connect the remote mouse receiver to your computer.)
If you want to use your remote control with the cable, connect one end of the cable to the jack on the remote control and the other end to the Terminal Panel.
NOTE: If you are using a Macintosh computer, you can click either the right or left button to activate the mouse.
① Left Click Button
Use this button to enter your menu selection. It works the same as the "Enter" button on the cabinet.
② Laser Pointer
Beams a laser light when "Laser" button is pressed.
③ Infrared Transmitter
Direct the remote control toward the remote sensor on the projector cabinet or the remote mouse receiver.
④ LED
Flashes when any button is pressed.
⑤ Power On And Off
If your main power switch is turned on, you can use this button to turn your MultiSync MT1000 LCD Projector on and off.
⑥ Video Button
Press to select an NTSC, PAL, SECAM or NTSC4.43 compatible video source from a VCR, laser disc player or document camera.
⑦ Volume Buttons
Press (+) to increase the volume and (-) to decrease it.
⑧ S-Video Button
Press to select an S-Video source from a VCR.
⑨ RGB 1 Button
Press to select a video source from a computer connected to your RGB 1 port.
⑩ RGB 2 Button
Press to select a video source from a computer connected to your RGB 2 port.
⑪ Laser Button
Press and hold this button to activate the laser pointer. When lit, you can use the laser to draw your audience's attention to a red dot that you can place on any object within 30 feet (10 m).

⑫ Menu Button
Use this button to call up the On-Screen Menu so you can adjust and set the image. After you press this button, it will light up. During this time you can use the mouse pointer and right/left click buttons to make menu selections. If no buttons are pressed within 10 seconds while it illuminates, the light goes out. To return to the main menu from a sub menu, press this button again.
⑬ Mouse Pointer Button
Works as a mouse for your projected computer image. This button is also used to adjust position.
This button selects the submenu you want to adjust. (See page 49.)
After you make your on-screen menu selection, use this button to adjust the level up or down. (See page 49.)
⑭ Right Click Button
Press this button to exit "Menus" or "Position."
⑮ Freeze Button
This button will freeze a picture. Press again to resume motion.
⑯ Position Button
When the picture is magnified, press this button to activate the mouse buttons that you can use to reposition the image in eight directions. When you're finished, the "Position" button will remain lit for 10 seconds.
NOTE: When you are adjusting Position, the Mouse Pointer button is used to move the picture.
⑰ Picture Mute Button
This button turns off the image for a short period of time. Press again to restore the image.
⑱ Magnify/Reduce Button
Use the (+) or (−) button to adjust the image size up to 400%.
⑲ Focus Button
Press the (+) or (−) button to adjust the focus.
20 Zoom Button
Press the (+) button to zoom in and the (−) button to zoom out.
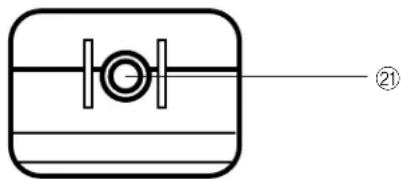
②1 Remote Jack
Connect your remote control cable here for for wired operation.
NOTE: You cannot use Menu and Position at the same time.
Remote Control Precautions
- Do not look into the laser pointer while it is on.
- Do not point the laser beam at a person.
- When the cable is connected to the remote control, it will not work in the wireless mode.
- Handle the remote control carefully.
- If the remote control gets wet, wipe it dry immediately.
- Avoid excessive heat and humidity.
• If you will not be using the remote control for a long time, remove the batteries. - Do not mix new and old or different types of batteries.

natural_image
Pure electrical circuit lines without any symbolsINSTALLATION2
This section describes how to set up your MultiSync MT1000 LCD projector and how to connect video and audio sources.
Setting Up Your MultiSync MT1000 LCD Projector
Your MultiSync MT1000 LCD Projector is simple to set up and use. But before you get started, you must first:
- Determine the image size
- Set up a screen or select a non-glossy white wall onto which you can project your image.
Carrying The LCD Projector Always carry your LCD projector by the handle. Ensure that the power cord and any other cables connecting to video sources are disconnected before moving the projector. When moving the projector or when it is not in use, cover the lens with the lens cap.

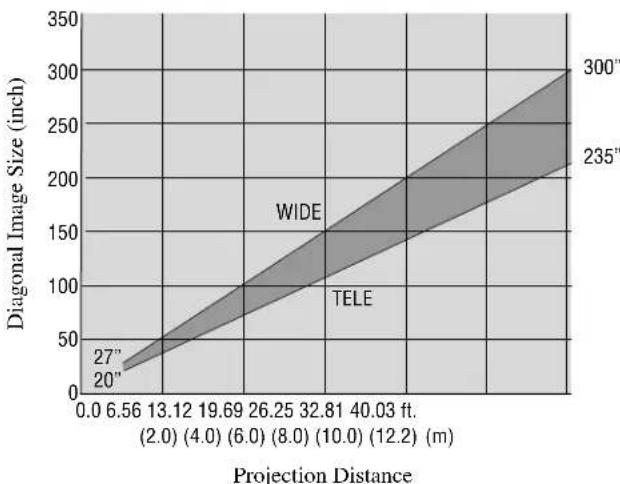
Selecting A Location The further your LCD projector is from the screen or wall, the larger the image. The minimum size the image can be is approximately 20" (0.5 m) measured diagonally when the projector is roughly 3 feet (1.0 m) from the wall or screen. The largest the image can be is 300" (7.6 m) when the projector is about 40.03 feet (12.2 m) from the wall or screen.

Projection Distance and Image Size
line
| Projection Distance (m) | Diagonal Image Size (inch) | | ----------------------- | -------------------------- | | 6.56 | 20" | | 13.12 | 27" | | 19.69 | 20" | | 26.25 | 27" | | 32.81 | 20" | | 40.03 | 27" | | 40.03 | 300" |Using A Tabletop Or Cart
- Place your LCD projector on a flat level surface at the optimal distance from the screen or wall so you realize the size image you want. (Avoid having bright room lighting or sun light directly on the screen or wall where you'll be projecting the image.)
- Connect the power cable, remove the lens cap and turn the projector on. (If no input signal is available, the projector will display a background image.)
- Ensure that the projector is square to the screen.
- Move the projector left or right to center the image horizontally on the screen. (A)
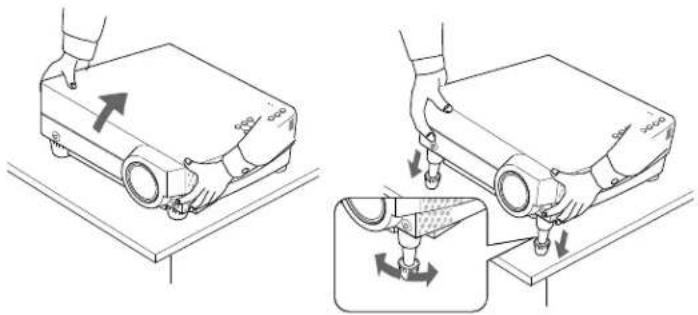
- To center the image vertically (B), lift the front edge of the projector and press the buttons on the front of the projector, just above the feet, to release the one-touch tilt feet. (There is approximately 10.5° of up and down adjustment for the front of the projector.)

- Toffinetune the image's position vertically on the screen, rotate each front foot.
- Inocase or reduce the size of the projected image by pressing the "Zoom" (+) or (−) buttons on the remote control or top of the cabinet.
natural_image
Illustration of two mechanical devices with arrows indicating motion, showing assembly or repair process (no text or symbols)WARNING
- Only use your LCD projector on a solid, level surface. If the projector falls to the ground, you can be injured and the projector severely damaged.
- Do not use the LCD projector where temperatures vary greatly. The projector must be used at temperatures between 32^ (0^) and 104^ (40^) .
- Do not expose the LCD projector to moisture, dust, or smoke. This will harm the screen image.
- Ensure that you have adequate ventilation around your LCD projector so heat can dissipate. Do not cover the vents on the bottom or the side of the projector.
Ceiling Installation
Installing your MultiSync MT1000 LCD Projector on the ceiling must be done by a qualified technician. Contact your NEC dealer for more information.
Do not attempt to install the projector yourself.
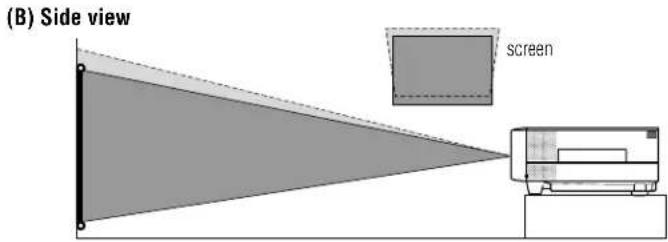
NOTE : Distances may vary ±5%.

line
| Distance from optical axis center | Screen center line (Telephoto) | Screen center line (Wide) | | --------------------------------- | ------------------------------ | -------------------------- | | 0 | 1.43 ft | 13.39 ft | | 1.64 ft | 235"-300" | 165"-222" | | 13.12 ft | 143.2 mm | 13.39 ft | | 16.40 ft | 8.5° | 6.5° | | 19.69 ft | 77"-100" | 3.28 ft | | 22.97 ft | 47"-60" | 7.87 ft | | 26.25 ft | 20"-27" | 13.12 ft | | 29.53 ft | — | 19.69 ft | | 32.81 ft | — | 26.25 ft | | 36.09 ft | — | 40.03 ft | | 39.37 ft | — | 40.03 ft | | 40.03 ft | — | 40.03 ft | | 43.52 ft | — | 40.03 ft | | 46.81 ft | — | 40.03 ft | | 49.19 ft | — | 40.03 ft | | 52.47 ft | — | 40.03 ft | | 55.85 ft | — | 40.03 ft | | 59.23 ft | — | 40.03 ft | | 62.61 ft | — | 40.03 ft | | 65.99 ft | — | 40.03 ft | | 69.37 ft | — | 40.03 ft | | 72.75 ft | — | 40.03 ft | | 76.13 ft | — | 40.03 ft | | 79.51 ft | — | 40.03 ft | | 82.89 ft | — | 40.03 ft | | 86.27 ft | — | 40.03 ft | | 89.65 ft | — | 40.03 ft | | 92.93 ft | — | 40.03 ft | | 96.21 ft | — | 40.03 ft | | 99.59 ft | — | 40.03 ft | | 102.97 fr | — | 40.03 ft | | 106.35 fr | — | 40.03 ft | | 109.73 fr | — | 40.03 ft | | 112.11 fr | — | 40.03 ft | | 115.49 fr | — | 40.03 ft | | 118.87 fr | — | 40.03 ft | | 122.25 fr | — | 40.03 ft | | 125.63 fr | — | 40.03 ft | | 129.01 fr | — | 40.03 ft | | 132.39 fr | — | 40.03 ft | | 135.77 fr | — | 40.03 ft | | 139.15 fr | — | 40.03 ft | | 142.53 fr | — | 40.03 ft | | 145.91 fr | — | 40.03 ft | | 149.29 fr | — | 40.03 ft | | 152.67 fr | — | 40.03 ft | | 156.05 fr | — | 40.03 ft | | 159.43 fr | — | 40.03 ft | | 162.81 fr | — | 40.03 ft | | 166.19 fr | — | 40.03 ft | | 169.57 fr | — | 40.03 ft | | 172.95 fr | — | 40.03 ft | | 176.33 fr | — | 40.03 ft | | 179.71 fr | — | 40.03 ft | | 183.09 fr | — | 40.03 ft | | 186.47 fr | — | 40.03 ft | | 189.85 fr | — | 40.03 ft | | 193.23 fr | — | 40.03 ft | | 196.61 fr | — | 40.03 ft | | 199.99 fr | — | 40.03 ft | | 202.37 fr | — | 40.03 ft | | 205.75 fr | — | 40.03 ft | | The image displays a horizontal bar chart with three bars representing different screen sizes (inches) and their corresponding wavelengths (in meters). The chart is divided into four sections based on the x-axis position relative to the y-axis position relative to the z-axis position relative to the z-axis position relative to the z-axis position relative to the z-axis position relative to the z-axis position relative to the z-axis position relative to the z-axis position relative to the z-axis position relative to the z-axis position relative to the z-axis position relative to the z-axis position relative to the z-axis position relative to the z-axis position relative to the z-axis position relative to the z-axis position relative to the z-axis position relative to the z-axis position relative time.If your projector is mounted on the ceiling and your image is upside down, use the "Menu" and "Select" buttons on your projector cabinet or (▲) (▼) buttons on your remote control to correct the orientation. (See page 60.)
Reflecting The Image
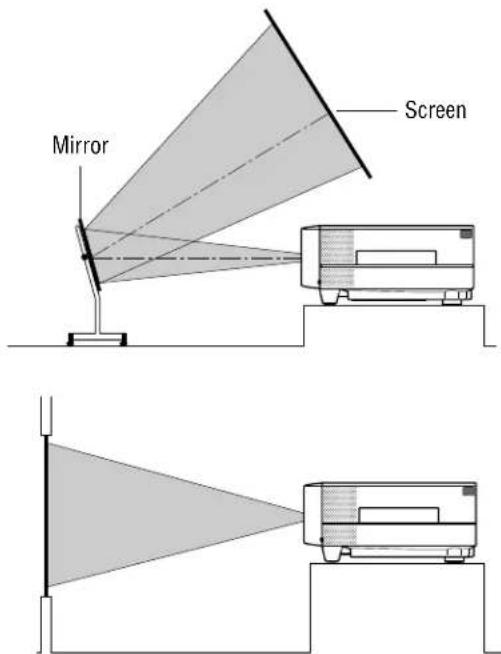
Using a mirror to reflect your LCD projector's image enables you to enjoy a much larger image. Contact your NEC dealer if you need a mirror.
If you're using a mirror and your image is inverted, use the "Menu" and "Select" buttons on your projector cabinet or (▲) (▼) buttons on your remote control to correct the orientation. (See page 60.)
Rear Screen Projection
You can use your MultiSync MT1000 LCD projector to project an image from the rear onto a transparent screen. The distance the projector must be from the screen is the same as if you were projecting the image from the front. Contact your NEC dealer if you need a transparent screen.
If you're projecting the image from the rear and your image is inverted, use the "Menu" and "Select" buttons on your projector cabinet or (▲) (▼) buttons on your remote control to correct the image. (See page 60.)
Wiring Diagram

flowchart
graph TD
    A["Document Camera"] --> B["To video, S-video, and audio inputs on the LCD projector."]
    C["VCR or LaserDisk Player"] --> B
    D["IBM/MAC MultiCable"] --> E["To mini D-Sub 15-pin or D-Sub 15-pin connector on the LCD Projector."]
    F["IBM VGA or Compatibles"] --> G["Macintosh or Com"]
    H["PS/2 mouse adapter (supplied)"] --> G
    I["Mac ADB adapter (supplied)"] --> G
    J["INR I/O ECO CONTROL OUTPUT"] --> K["VIDEO HOT AUDIO INPUT L: LONG R"]
    K --> L["S-HI/O E OUTPUT L: LONG R"]
    L --> M["AUDIO OUTPUT"]
    M --> N["RGB INPUT 2"]
    N --> O["Audio"]
    P["INR CONTROL OUTPUT"] --> Q["INR NOONION OUTPUT"]
    Q --> R["Output"]
Remote Mouse Receiver Remote Mouse Receiver
Remote Control Guideline
- Plug the serial cable with the remote mouse receiver into your computer's mouse port and restart your computer to gain remote mouse control.
- When using the remote control's built-in infrared mouse on a laptop computer, the laptop's mouse, trackball or trackpad will be disabled. Disconnect the infrared receiver and restart your computer to regain trackball or trackpad mouse control.
- If the screen goes blank while using your remote control, it may be the result of the computer's screen-saver or power management software. If you accidentally hit the OFF button on the remote control, wait one full minute and then press the ON button to resume.
Connecting Your PC Or Macintosh Computer
Connecting your PC or Macintosh computer to your MultiSync MT1000 LCD Projector will enable you to project your computer's screen image for an impressive presentation. All of these following display standards are supported:
| VGA 640×480 for graphics | VGA 640×400 for graphics |
| VGA 640×350 for graphics VGA | 720×400 for text |
| VGA 720×350 for text SVGA 800 | ×600 |
| XGA 1024×768 Macintosh at 1024 | ×768 |
| Macintosh at 640×480 Macintosh at 832×624 | |
To connect to a PC, Macintosh or computer equipped with an XGA/SVGA/VGA adapter or compatible graphics adapter, simply:
-
Turn off the power to your LCD projector and computer.
-
If your PC does not support XGA/SVGA/VGA you will need to install an XGA/SVGA/VGA graphics board. Consult your computer's owner's manual for your XGA/SVGA/VGA configuration. If you need to install a new board, see the manual that comes with your new graphics board for installation instructions.
-
Use the MultiCable that's supplied to connect your PC or Macintosh computer to the LCD projector. For a PC, use the smaller 15-pin connector on the cable to connect to your computer's video port; use the larger 15-pin connector on the cable to connect to the projector's RGB 1 input. For Macintosh, use the larger 15-pin connector on the cable to connect to your computer's video port; use the smaller 15-pin connector on the cable to connect to the projector's RGB 2 input. (You can also use your own video cable if you wish. For a PC cable, use the smaller 15-pin connector RGB 2 on the projector. For a Macintosh cable, use the larger 15-pin connector RGB 1 on the projector.)
-
Turn on the LCD projector and the computer.
-
If the projector goes blank after a period of inactivity, it may be caused by a screen saver installed on the computer you've connected to the projector.
NOTE: Refer to your computer's owner's manual for more information about your computer's video output requirements and any special identification or configuring your projector's image and monitor may require.
Changing Video Resolutions
Depending on your computer's graphic capability, you may be able to select one of several resolutions. Generally a computer- either a PC or Macintosh- with 1 meg. of memory will run:
640×480 at 16.7 million colors (24 bit Truecolor)
800 × 600 at 65 thousand colors.
1024×768 at 256 colors.
As the resolution increases, the number of colors you can run decreases. With 2 meg. of memory a computer will run:
640×480 at 16.7 million colors (24 bit Truecolor).
800 × 600 at 16.7 million colors (24 bit Truecolor).
1024×768 at 65 thousand colors.
1280 × 1024 at 256 colors.
Windows 95
There are two methods you can use to change your resolution.
Method 1
- Move your cursor to the background image and click.
- In the "Properties" menu, select "Settings."
-
Change your resolution and click "OK."
-
You may be asked to reboot for the changes to take affect, or you'll get a message that "Windows is about to resize your display." You'll be asked if you want to keep your settings. Select "Yes."
Method 2
- Click on your "My Computer" icon.
- Open "Control Panel" and select "Display."
- Change your resolution and click "OK." after the new resolution is selected.
- You may be asked to reboot for the changes to take affect, or you'll get a message that "Windows is about to resize your display." You'll be asked if you want to keep your settings. Select "Yes."
Windows 3.1
- Click on the "Main" icon and open "Control Panel."
- Select "Change System Settings" and click on "Option."
- Choose "Change Display Settings."
- Select the resolution you want.
- Choose the current drive or another.
- Restart Windows for the changes to take affect.
Macintosh
- Under the Apple menu, select "Control Panels" and open "Monitors."
- Click and open "Options."
- Select your new resolution and click "OK."
If you have an NEC monitor connected to your Macintosh, you may have a "DPI-On-The-Fly" extension that enables you to change your resolution directly. The "DPI-On-The-Fly" icon is under your Apple menu.
Notebook Computers And Resolution Standards
NEC projectors are designed to project industry standardized video such as VESA (Video Electronics Standards Association) or VGA (Video Graphics Array). Notebook computers do not use industry standards. They use whatever timing is necessary to match their local LCD display. The end result is typically not standards. By turning off your notebook's display, the timing parameters are a bit more like the real VESA or VGA signal.
For an optimal projected image with a notebook computer, it is recommended that you use the CUSTOM 6 memory data. This feature is useful when an XGA image (1024×768) is displaying with a notebook computer supported by SXGA (1280×1024). See Source Menu on page 52 for more information.
Connecting Your Document Camera
You can connect your MultiSync MT1000 LCD Projector to a document camera. To do so, simply:
- Turn off the power to your LCD projector and document camera.
- Use a standard video cable to connect your document camera to the Video input on your projector.
- Turn on the LCD projector and the document camera.
NOTE: Refer to your document camera's owner's manual for more information about your camera's video output requirements.
Connecting Your VCR Or Laser Disc Player
Use common RCA cables (not provided) to connect your VCR or laser disc player to your MultiSync MT1000 LCD Projector. To make these connections, simply:
- Turn off the power to your LCD projector and VCR or laser disc player.
- Connect one end of your RCA cable to the video output connector on the back of your VCR or laser disc player, connect the other end to the Video input on your projector. Use standard RCA audio patch cords to connect the audio from your VCR or laser disc player to your projector (if your VCR or laser disc player has this capability). Be careful to keep your right and left channel connections correct for stereo sound.
- Turn on the LCD projector and the VCR or laser disc player.
NOTE: Refer to your VCR or laser disc player owner's manual for more information about your equipment's video output requirements.
Connecting An External Monitor
You can connect a separate, external monitor to your LCD projector to simultaneously view on a monitor the image you're projecting. To do so:
- Turn off the power to your LCD projector and computer, document camera or video source.
- Use a 15-pin cable to connect your monitor to the RGB MONITOR OUT connector on your LCD projector.
- Turn on the LCD projector and the computer, document camera or video source.
Connecting Your Remote Mouse Receiver
The remote mouse receiver enables you to operate your computer's mouse functions from the NEC MultiSync MT1000 remote control. It is a great convenience for clicking through your computer-generated presentations.
To connect the remote mouse receiver:
-
Turn off your computer.
-
For PCs: Remove your current mouse and connect the serial cable from the remote mouse receiver to your PC's mouse port. (Use the 6-pin adapter for connecting to a PS/2 computer.) For Macintosh: Remove your current mouse from your computer, attach the Macintosh adapter to the remote mouse receiver's serial cable, and connect the receiver to your mouse port.
-
When the remote mouse receiver is installed, it will disable your regular mouse, disconnect the remote mouse receiver and restart your computer.

■ The Remote Mouse Receiver as a mouse for your computer

■ The Remote sensors on the projector cabinet work as the remote sensor on the Remote Mouse Receiver

■ You can daisy-chain as many as five LCD projectors and operate them with the same remote control. To do so:
- Turn off your projectors.
- Use the remote control cables supplied to connect the Remote Control Output of one projector to the Remote Control Input of the next until all the projectors are connected.
flowchart
graph LR
    A["Remote control INPUT"] --> B["Remote cable (supplied)"]
    B --> C["Remote control OUTPUT"]
    C --> D["Remote cable (supplied)"]
    D --> E["Remote control INPUT"]
    E --> F["Remote cable (supplied)"]
    F --> G["Remote control OUTPUT"]
    G --> H["Remote control INPUT"]
OPERATION3
This section describes how to select a computer or video source and how to adjust the picture and sound.
General Controls Before you turn on your MultiSync MT1000 LCD Projector, ensure that the computer or video source is turned on and that your lens cap is removed.
- Turn On The LCD Projector The main power switch is on the back panel of the MultiSync MT1000 LCD Projector. By turning this switch on, the projector will go into its standby mode and the power light will glow amber. Only after you press the "On" button on the remote control or projector cabinet will the power light turn to green and the projector become ready to use.
NOTE: To turn the LCD projector on and off with just the back panel switch, use the menu and enable the "auto start" feature. (See page 57.)
-
Select The Computer Or Video Source Press the "Video" (VCR, document camera, or laser disc player), "S-video", "RGB 1" or "RGB 2" (computer) button on the remote control to display the image. Or press the "Menu" button on the cabinet and use the icons to select your video source: "Video", "S-Video", "RGB 1" or "RGB 2."
-
Adjust The Image Size Press the "Zoom" button (+) or (-) on the remote control or projector cabinet to make the image larger or smaller.
- Focus Press the "Focus" button (+) or (-) on the remote control or projector cabinet to focus the image.
- Turning Off The Projector First press the "off" button on the remote control or the projector cabinet. The power light will glow amber. Then turn off the main power switch on the back panel. The power light will go out.
IMPORTANT:
- The LCD projector should be unplugged if it will not to be used for an extended period.
- To turn off the image briefly (five minutes or less), use the "Picture Mute" button instead of turning the projector off and on.
- The LCD projector will display a black, blue, or loop image if no input signal is present.
- Do not turn the LCD projector off and then immediately back on. The projector needs to cool for a minute before it can be restarted.
Using The Menus
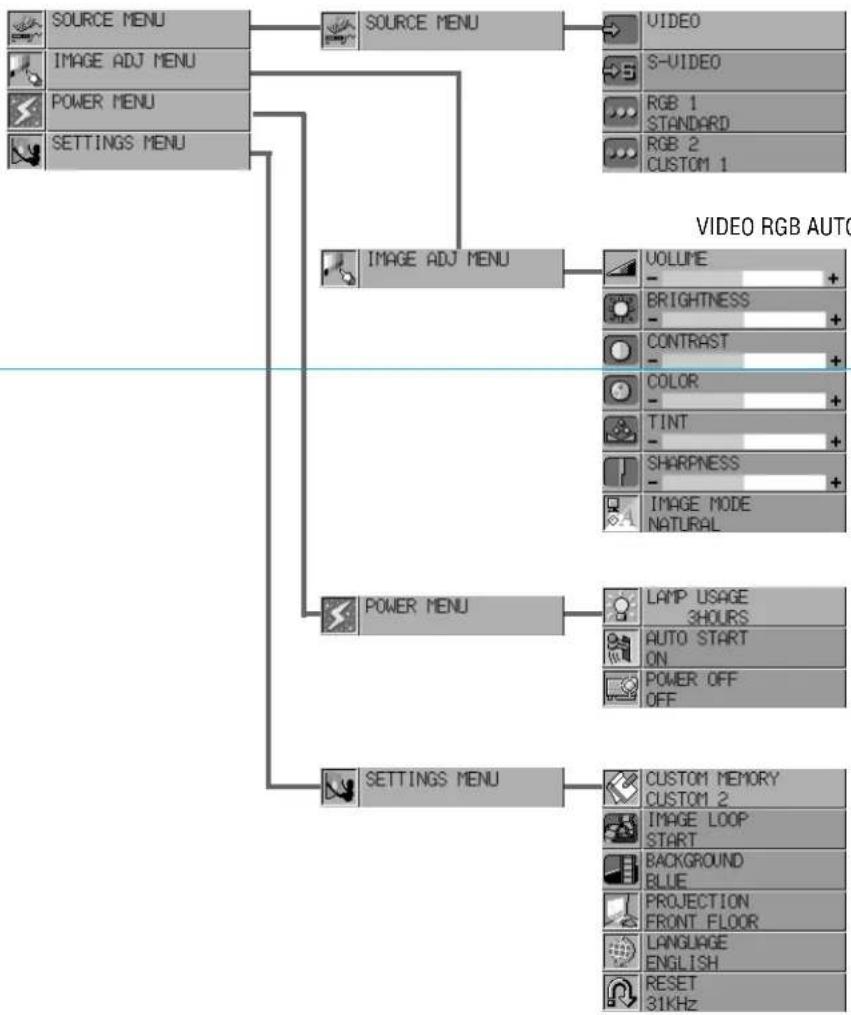
- Press the "Menu" button on the remote control or projector cabinet to display the Main Menu.
- Press the "Select" button on the projector cabinet or (▲) (▼) buttons on your remote control to highlight the menu for the item you want to adjust.
- Press the "Enter" button on the projector cabinet or the "Left Click" button on the remote control to select a submenu or item.
- Adjust the level or turn the selected item on or off by using the "Adjust" (+) or (−) buttons on the remote control or cabinet. The on-screen gauge will show you the amount of increase or decrease. [The (+) button is "on" and (−) is "off"].
- The change is stored until you adjust it again.
- Repeat steps 2-5 to adjust an additional item, or press "Right-Click" on your remote control to quit the menu display.
flowchart
graph TD
    A["SOURCE MENU"] --> B["SOURCE MENU"]
    B --> C["VIDEO"]
    B --> D["S-VIDEO"]
    B --> E["RGB 1 STANDARD"]
    B --> F["RGB 2 CUSTOM 1"]
    A --> G["IMAGE ADJ MENU"]
    A --> H["POWER MENU"]
    A --> I["SETTINGS MENU"]
    G --> J["IMAGE ADJ MENU"]
    J --> K["VOLUME - +"]
    J --> L["BRIGHTNESS - +"]
    J --> M["CONTRAST - +"]
    J --> N["COLOR - +"]
    J --> O["TINT - +"]
    J --> P["SHARPNESS - +"]
    J --> Q["IMAGE MODE NATURAL"]
    G --> R["POWER MENU"]
    R --> S["LAMP USAGE 3HOURS"]
    R --> T["AUTO START ON"]
    R --> U["POWER OFF OFF"]
    G --> V["SETTINGS MENU"]
    V --> W["CUSTOM MEMORY CUSTOM 2"]
    V --> X["IMAGE LOOP START"]
    V --> Y["BACKGROUND BLUE"]
    V --> Z["PROJECTION FRONT FLOOR"]
    V --> AA["LANGUAGE ENGLISH"]
    V --> AB["RESET 31KHz"]
VIDEO RGB AUTO PICTURE ON RGB AUTO PICTURE OFF

Menu Descriptions & Functions
Source Menu


Enables you to select a video source such as a VCR, laser disc player, computer or document camera depending on what is connected to your inputs. Press the "Select" button on the projector cabinet or (▲) (▼) buttons on your remote control to highlight the menu for the item you want to adjust
Video
Selects what is connected to your Video input-VCR, laser disc player, DVD player, or document camera.
S-Video
Selects what is connected to your S-Video input-VCR, DVD player, or laser disc player.
RGB 1
Selects the computer connected to your RGB 1 input. Use the "Adjust" (+) or (−) buttons to select a standard* or one of six** custom settings you can create. Press the "Enter" button on the cabinet or the "Left Click" button on the remote control to save your selection.
RGB 2
Selects the computer connected to your RGB 2 input. Use the "Adjust" (+) or (−) buttons to select a standard* or one of six** custom settings you can create. Press the "Enter" button on the cabinet or the "Left Click" button on the remote control to save your selection.
NOTE:
* Standard is normally used and it can be user changed and automatically recalled.
** "Custom 6" is read only. This feature is useful when an XGA image (1024 ×768) is displayed with a notebook computer supported by SXGA (1280 ×1024).
Image Adjustment Menu

Provides access to controls for your image and sound. Use the "Select" button on the projector cabinet or (▲) (▼) buttons on your remote control to highlight the menu for the item you want to adjust.
The volume, brightness, contrast, color, tint, sharpness and Image mode controls are available for Video or S-Video sources.
The volume, brightness, contrast, horizontal position, vertical position and auto picture controls are available for RGB 1 or RGB 2 sources.

Volume
Use the "Adjust" (+) or (−) buttons to adjust the volume.
Brightness
Use the "Adjust" (+) or (−) buttons to adjust the brightness.
Contrast
Use the "Adjust" (+) or (−) buttons to adjust the contrast.
Color\*
Use the "Adjust" (+) or (−) buttons to adjust the color.
Tint\*
Use the "Adjust" (+) or (−) buttons to adjust the tint.
Sharpness\*
Use the "Adjust" (+) or (−) buttons to adjust the sharpness.
Image Mode\*
Use the “Adjust” (+) or (−) buttons to choose “Normal” for a regular picture “Natural” for true color reproduction, or “Document Camera” for a document camera or other low APL picture.


Horizontal Position\*\*
Use the "Adjust" (+) button to move the image right; (−) to move it left.
Vertical Position\*\*
Use the "Adjust" (+) button to move the image up; (−) to move it down.
Auto Picture\*\*
Use the “Adjust” (+) button to turn this feature on so “Picture” and “Fine Picture” adjustments are made automatically. Use the “Adjust” (−) button to turn this feature off so you can make “Picture and Fine Picture” adjustments manually.
Picture Adjustment \*\*(when AUTO PICTURE is off)
Use this icon with the “Fine Picture Adjustment” to fine tune the computer image or to remove any vertical banding that might appear. This function adjusts the clock frequencies that eliminate the horizontal banding in the image. Press the “Adjust” (+) and (−) buttons until the banding disappears. This adjustment may be necessary when you connect your computer for the first time. This adjustment is made automatically when the Auto Picture is turned on.
Fine Picture \*\*(when AUTO PICTURE is off)
Use this icon to adjust the clock phase or to reduce video noise, dot interference or cross talk. (This is evident when part of your image appears to be shimmering.) Use the “Adjust” (+) and (−) buttons to adjust the image. Use the Fine Adjustment only after the Picture Adjustment is complete. This adjustment is made automatically when the Auto Picture is turned on.
NOTE:
★ Color, Tint, Sharpness and Image Mode controls will not work with an RGB source. The Tint control will not work with a PAL or SECAM source.
★★ Horizontal and Vertical position controls, and Picture, Fine Picture and Auto Picture adjustments will not work with a Video or S-Video source.
Power Menu

Provides access to Lamp Usage information and the Auto Start and Power Management features. Use the “Select” button on the projector cabinet or (▲) (▼) buttons on your remote control to access a submenu. Then press “Adjust” (+) or (−) to choose a specific option.
Lamp Usage
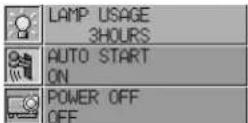
This tells you how long the lamp has been in operation. It is recommended that you replace a lamp after 2000 hours of service. After you install a new lamp, select this icon and press and hold the "Power On" button on the remote control for ten seconds to reset the lamp clock back to zero.
NOTE: The projector will turn off and go into stand by mode after 2100 hours of service. If this happens, press the "Power Off" button on the remote control for ten seconds to reset the lamp clock back to zero. Do this only after replacing the lamp.
Auto Start
Turns the LCD projector on automatically when the main power switch is turned on. This eliminates the need to always use the “Power” button on the remote control or projector cabinet. Press (+) to turn this feature on and (−) to turn it off.
Power Management
When “Power Off” is on and there is no RGB video input for five minutes or more, the projector will automatically turn itself off. Press the (+) to turn this feature on and (−) to turn it off. This feature does not work with Video or S-Video sources.
Settings Menu


Enables you to set preferences and other operating options. Use the "Select" button on the projector cabinet or (▲) (▼) buttons on your remote control to access the submenu you want.
Custom Memory
This enables you to save your current settings for an RGB source in one of five memories, Custom 1-5.
To change the STANDARD settings, proceed as follows:
- Connect your computer to the MultSync MT1000.
- Select the "STANDARD" in RGB 1 or RGB 2 source.
-
Adjust the horizontal/vertical position, Picture, and Fine Picture adjustments.
-
Select the Custom Memory icon.
-
Press the "Adjust" (+) or (−) buttons to choose a memory location, then press "Enter" on the cabinet or the "Left Click" on your remote control to save the new settings. If you do not want to change the STANDARD settings, first select the Custom Memory icon, then do the same as step 5.
Image Loop
This feature enables you to “capture” an image from a source that is currently being displayed. Up to 8 images can be stored.
Press the "Adjust" (+) or (−) buttons to select "Start" for the image you want to loop and "Capture" for the image you want to capture or to select "Delete" and delete all captured images from memory.
Press “Enter” on the cabinet or the “Left Click” on your remote control to save your image loop changes. To stop an image loop, press one of the “Video”, “S-Video”, “RGB1” or “RGB2” button, or using the Source menu.
Background
Use this feature to display a black or blue screen or to start an image loop when no input signal is available.
Press the "Adjust" (+) or (−) buttons to choose the back screen you want — blue, black or an image loop. Press "Enter" on the cabinet or the "Left Click" on your remote control to save your change.
Projection
This reorients your image for your type of projection. Press the “Adjust” (+) or (−) button until it is correct. Press “ENTER” on the cabinet or the “Left Click” on your remote control to save your change. The options are: front floor projection, rear ceiling projection, rear floor projection, and front ceiling projection.
Language
Use the “Adjust” (+) or (−) to choose one of six languages for on-screen instructions. Press “ENTER” on the cabinet or the “Left Click” on your remote control to save your change The options are: English, German, French, Italian, Spanish and Swedish.
Reset
Changes all adjustments to the factory preset levels for each source individually. To activate, you must hold down the “Adjust” (+) button on the cabinet or remote control for at least two seconds. The adjustments that will be reset are horizontal and vertical control, picture and fine picture adjustment (for the current source only), brightness, contrast, color, tint, and sharpness.
MAINTENANCE4
This section describes the simple maintenance procedures you should follow to replace the lamp, clean or replace the filter, and replace the batteries in the remote control.
Replacing The Lamp
After your lamp has been operating for 2000 hours or longer, the "status" light in the cabinet will go on. Even though the lamp may still be working, replace it at 2000 hours to maintain optimal projector performance.

CAUTION
- DO NOT TOUCH THE LAMP immediately after it has been used. It will be extremely hot. Allow at least one hour for the lamp to cool before handling.
- DO NOT REMOVE ANY SCREWS except the lamp cover set screw and two lamp case screws. You could receive an electric shock.
- Turn off the main power to the projector and disconnect the power cord. Allow at least one hour for the lamp to cool.
- The projector will turn off and go into stand by mode after 2100 hours of service. If this happens, be sure to replace the lamp. If you continue to use the lamp after 2000 hours of use, the lamp bulb may shatter, and pieces of glass may be scattered in the lamp case. Do not touch them as the pieces of glass may cause injury. If this happens, contact your NEC dealer for lamp replacement.

61
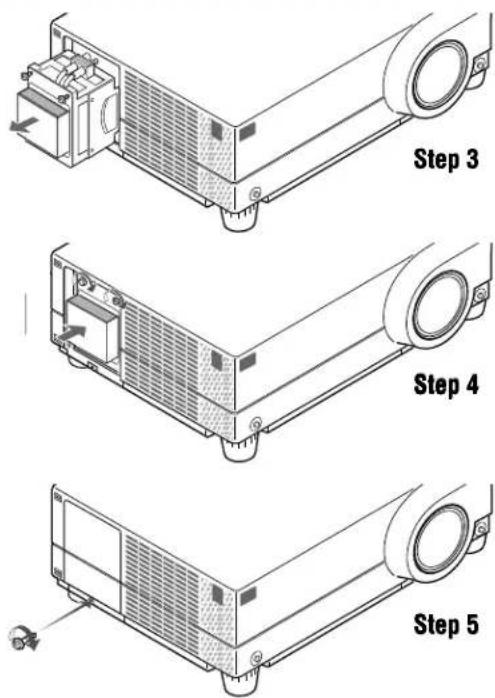
To replace the lamp:
- Remove the single screw that secures the lamp housing cover and remove the cover.
- Remove the two screws securing the lamp case. (There is an interlock on this case to prevent the risk of electrical shock. Do not attempt to circumvent this interlock.)
- Remove the lamp by pulling out the complete assembly.
- Install a new lamp case assembly and secure it in place with the two screws.
△CAUTION: Do not use a lamp other than the NEC replacement lamp. Order this from your NEC dealer using your projector's model number.
- Reattach the lamp cover and reinstall the single screw.
- After you install a new lamp, select the lamp Usage icon and press and hold the "Power On" button on the remote control for ten seconds to reset the lamp time clock to zero.
NOTE: If resetting the lamp clock back to zero after 2100 hours of service, press the "Power Off" (not "Power On") button on the remote control for ten seconds.
NOTE: When you replace the lamp, it is also wise to replace the filter. The filter comes in the same package with your replacement lamp.
⚠ CAUTION: Do not put the LCD projector on end except to replace the air filter.
Cleaning Or Replacing The Filter
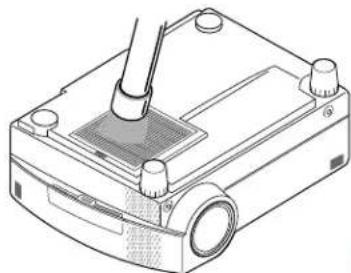
The air-filter sponge keeps the inside of the MultiSync MT1000 LCD Projector free from dust or dirt and should be cleaned after every 100 hours of operation (more often in dusty conditions). If the filter is dirty or clogged, your projector may overheat.
NOTE: Clean your filter after every 100 hours of operation.

CAUTION
- Turn off the LCD projector and wait for the fan to stop. Turn off the main power and unplug the projector before replacing the filter.
- Only clean the outside of the filter cover with a vacuum cleaner.
- Do not attempt to operate the projector without a filter.
- Your LCD projector will not operate unless the filter is installed correctly.
- Do not put the LCD projector on end except to replace the filter.
To clean the air-filter:
- Turn over the projector. Put the LCD projector on end so that the bottom is visible.
- Vacuum the filter through the filter cover.
- Place the projector back in a horizontal position.
natural_image
Technical line drawing of a mechanical device with a handle and control panel (no text or symbols)63
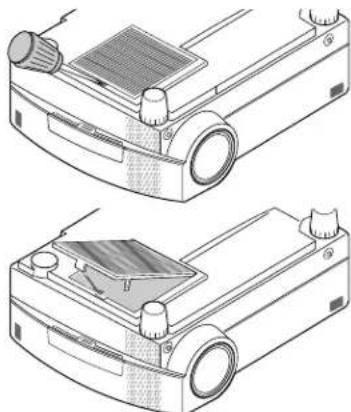
To replace the air-filter:
- Remove the filter panel by pushing up on the catch of the cover with a flat-head screwdriver until you feel it detach.
- Remove the filter and replace it.
- Reinstall the filter panel.
NOTE: Do not detach the sponge from the filter cover. Do not wash the filter with soap and water. Soap and water will damage the filter membrane. Before replacing the air-filter, remove dust and dirt from the projector cabinet. Keep out dust and dirt during filter replacement.
natural_image
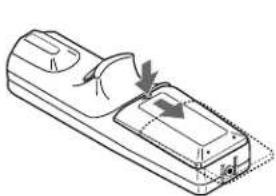
Technical line drawing of two views of a mechanical device with adjustment knobs and a central component (no text or symbols)Remote Control Battery Installation
- Press firmly and slide the battery cover off.
- Remove both old batteries and install new ones (AA). Ensure that you have the batteries' polarity (+/-) aligned correctly.
- Slip the cover back over the batteries until it snaps into place.
natural_image
Line drawing of a remote control device with a scroll wheel and indicator lights (no text or symbols)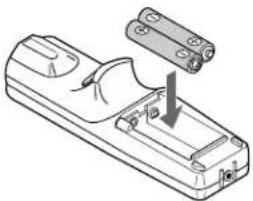
natural_image
Line drawing of a remote control device with a switch and battery, no text or symbols present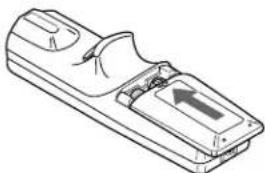
natural_image
Line drawing of a remote control device with an arrow indicating direction (no text or symbols)natural_image
Technical line drawing of a projector unit with labeled 'Etape 3' (no other text or symbols)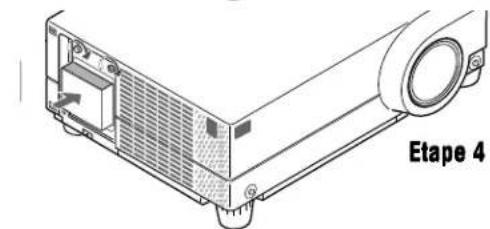
natural_image
Technical line drawing of a projector unit with labeled 'Etape 4' (no other text or symbols)
natural_image
Technical line drawing of a projector unit with label 'Etape 5' (no other text or symbols)natural_image
Technical line drawing of a mechanical device with a central component and multiple ports (no text or symbols)67
natural_image
Technical line drawing of a mechanical device with no visible text or symbols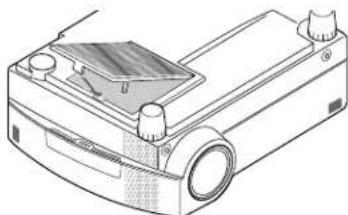
natural_image
Technical line drawing of a portable projector with control knobs and a solar panel (no text or symbols)natural_image
Line drawing of a remote control device with a scroll wheel and directional arrows indicating motion (no text or symbols)
natural_image
Line drawing of a remote control device with a hand inserting a cable (no text or symbols)
natural_image
Line drawing of a remote control device with an arrow indicating left vent (no text or symbols)TROUBLESHOOTING5
This section helps you resolve problems you may encounter while setting up or using your MultiSync MT1000 LCD Projector.
Status Light Messages
| Condition | Status |
| OFF | ■ Normal |
| On Continually | ■ The projector lamp has exceeded 2000 hours of operation and should be replaced. |
| Blinking very rapidly(On and off in a cycle of 1 sec.) | ■ Either the lamp cover or filter panel is not fastened properly. Check each and reattach them if necessary. |
| Blinking rapidly(On and off in a cycle of 4 sec.) | ■ The projector is overheated.• If there is insufficient ventilation around the projector or if the room where you're presenting is particularly warm, move the projector to a cooler location.• Check the filter and clean it if necessary.• If the problem persists, contact your NEC dealer for service. |
| Blinking Slowly(On and off in a cycle of 8 sec.) | ■ The cooling fan has stopped. Contact your NEC dealer for service. |
| Blinking very slowly(On and off in a cycle of 12 sec.) | ■ The lamp is not turned on.• The projector was turned off and back on too quickly. Turn off the projector, wait one minute, then turn the projector back on. Or the lamp is burnt. |
Common Problems & Solutions
| Problem | Check These Items |
| Does not turn on | Check that the cord is plugged in and that the power switch on the back panel is on.Ensure that the air filter and filter panel are installed correctly. (See page 64.)Check the status light to see if the projector has overheated or the lamp usage exceeds 2100 hours. |
| No picture | Use the menu icons to select your source (Video, S-Video, RGB1 or 2). (See pages 51 and 52.)Ensure your cables are connected properly.Use icons to adjust the brightness and contrast.Remove the lens cap. |
| Image isn't square to the screen | Reposition the projector to improve its angle to the screen. |
| Picture is blurred | Adjust the focus. (See page 20 or 28.)Reposition the projector to improve its angle to the screen.Ensure that the distance between the projector and screen is within the adjustment range of the lens. |
| Image is scrolling vertically, horizontally or both | Use icons to select the source you want to input. |
| Remote control does not work | Install new batteries. (See page 64.)Make sure there are no obstacles between you and the projector.Stand within 23 feet (7m) of the projector. |
| Status indicator is lit or blinking | See the Status Light message chart on pages 69 and 70. |
| Cross color in RGB mode | If “Auto Picture” is off, turn it on. If “Auto Picture” is on, turn it off and balance the image with the Picture Adjustment icon and Fine Picture Adjustment icon. |
To Contact Your NEC Service Representative, Call 1-800-836-0655
This section explains conditions that you will encounter when operating your MT1000 while displaying an SXGA (1280 × 1024) image.
When a menu or message is displayed while an SXGA image is projected, several lines of information will be lost.
When the "LAMP USAGE 2000 HOURS" message appears, several lines of information will be lost.
The "LAMP USAGE 2000 HOURS" message will not appear when the freeze button is activated.
SXGA images inherently display a 5 to 4 ratio, resulting in an image that appears to be smaller and more square than the 4 to 3 format commonly displayed.
SPECIFICATIONS6
This section provides technical information about the MultiSync MT1000 LCD Projector's performance.
Optical
LCD Panel
1.3", p-Si TFT active-matrix, 1024 × 768 dots
Lens Power zoom, power focus
F 2.5 f=52 - 68 mm
Lamp Metal halide lamp 250 W
(Guaranteed life span: 2,000 hours or 6 months from date of purchase, whichever comes first.)
Image Size 20-300 inches diagonal
Projection Distance 3.28 - 40.03 ft (1.0 - 12.2 m)
Light Output 450 ANSI lumens
Contrast Ratio Greater than 200:1
Color Temperature 8,500 ± 1500 Kelvin
Electrical
Inputs Video (NTSC / PAL / SECAM / NTSC4.43)
Color Reproduction Full color, 16.7 million colors simultaneously.
Horizontal Resolution 550 TV lines: NTSC, 350TV lines: PAL / SECAM / NTSC 4.43
RGB 1024 dots horizontal, 768 dots vertical
Power Requirement 100 - 120 / 220 - 240 VAC, 50 / 60 Hz
Input Current 5.8 A
Mechanical
Dimensions
15.4" (W)×5.8" (H)×12.7" (D)
39.0cm (W) × 14.5cm (H) × 32.1cm (D)
Net Weight
15.9 lbs //7.2 kg
Operational Temperatures
LCD projector: 32^ - 104^(0^ to 40^) 20 - 80% humidity
Remote control: 32^-140^ ( 0^ to 60^ )
Remote mouse receiver: 32^-140^ ( 0^ to 60^ )
Regulations
UL Approved (UL 1950, CSA 950)
Meets DOC Canada requirements
Meets FCC Class A requirements
Cabinet Dimensions

Unit : inch (mm)
D-Sub Pin Assignments
Pin No. Signal to be connected Pin No Signal to be connected
1 Red 1 Red GND
2 Green 2 Red
3 Blue 3 Horizontal Sync
4 GND 4 GND
5 GND 5 Green
6 Red GND 6 Green GND
7 Green GND 7 No Connection
8 Blue GND 8 No Connection
9 No Connection 9 Blue
10 Digital GND 10 No Connection
11 GND 11 GND
12 No Connection 12 Vertical Sync
13 Horizontal Sync 13 Blue GND
14 Vertical Sync 14 No Connection
15 No Connection 15 No Connection
# MAC 1152×870 75.6 68.7 100
# SUN 1152×900 69.95 61.769 92.94
# SGI 1152×900 76.05 71.736 105.6
# SGI 1280×1024 60 63.9 107.35
# VESA 1280×1024 60.04 64.286 108
# MAC 1280×1024 69.89 74.882 118.5
# HP 1280×1024 72.01 78.125 135
# VESA 1280×1024 75.03 79.976 135
# SUN 1280×1024 76.11 81.13 135
# 1152x870, # 1152x900 and # 1280x1024 images are compressed.
PC Control Command Reference
Command Codes
No. Function Code Data Description
01 Video 03H No Same as remote
02 RGB1 04H No Same as remote
03 RGB2 05H No Same as remote
04 S-VIDEO C6H No Same as remote
05 Power On 08H No Same as remote (See NOTE on page 86.)
06 Power Off 14H No Same as remote
07 Picture Mute 47H No Same as remote
08 Audio Mute 45H No
09 Onscreen Mute 11H No
10 Power Zoom W 09H
No Same as remote
11 Power Zoom T
0AH No
Same as remote
12 Power Focus +0BH No Same as remote
13 Power Focus - 0CH No Same as remote
14 Reset 43H No (Resets immediately after returning ACK)
15 D Up DEH No Same as remote
16 D Down DFH No Same as remote
17 D Right DCH No Same as remote
18 D Left DDH No Same as remote
19 D Right Up 21H No Same as remote
20 D Left Up 22H No Same as remote
21 D Right Down 23H No Same as remote
22 D Left Down 24H No Same as remote
23 Freeze 4CH No Same as remote
24 Slide + 4BH No Same as remote
25 Slide - 20H No Same as remote
26 Front Floor 33H No
27 Front Ceiling 34H No
28 Rear Floor 35H No
29 Rear Ceiling 36H No
30 Auto Start On 19H No
31 Auto Start Off 1AH No
32 Auto Picture On 1BH No
33 Auto Picture Off 1CH No
Command Codes (continued)
No. Function Code Data Description
34 Image mode Doc Cam 1DH No
35 Image mode Normal 1EH No
36 Image mode Natural 1FH No
37 Power Management On 15H No
38 Power Management Off 16H No
39 Digital Zoom W 89H No Same as remote
40 Digital Zoom T 8AH No Same as remote
41 Brightness 60H Yes 0 to 63
42 Contrast 62H Yes 0 to 63
43 Color 64H Yes 0 to 63
44 Tint 66H Yes -32 to +31(E0 to 1F)
45 Sharpness 68H Yes 0 to 3
46 Audio Volume 6AH Yes 0 to 63
47 Picture Adj 70H Yes* FFE0H to 001FH (-32 to +31)
48 Fine Picture 6EH Yes 0 to 127
49 H Position 72H Yes -128 to +127 (80 to 7F)
50 V Position 74H Yes -64 to +63 (C0 to 3F)
51 Lamp Reset 27H No
52 Language Select 3DH Yes 00:English, 01:German, 02:French, 03:Italian, 04:Spanish, 05:Swedish
These commands are subject to change without notice.
*(Low-order data) (High-order data) CSUM
CSUM = Checksum is a low-order digit of the sum from the Code to the immediately preceding data.
Cable Connection
Communication Protocol
Baud rate: 9600 bps
Data length: 8 bits
Parity: No parity
Stop bit: One bit
X on/off: None
Communications Full duplex procedure:
If the CPU of the LCD projector has received the data correctly, it returns an ACK(C5H). If the received data is not correct, the CPU returns a NAK(CAH), then the following status:
Receiving success: C5
Receiving failure: CA Err
Err 01: Command Error (command not supported)
Err 02: Checksum Error
Err 03: Busy (command not acceptable)
Err 04: Parameter Error (parameter data abnormal)
NOTE: If failing in powering-on, the CPU returns the following NAKs:
CA Err 1
Err 1 8X (Apply the corresponding bit.)
Bit 0: Either filter panel or lamp cover is not attached correctly
Bit 1: Fan stoppage
Bit 2: Overheated
Bit 3: Lamp lighting failure


- MultiSync ^ MT 1000 TM
- IMPORTANT INFORMATION
- Precautions
- CAUTION
- LASER RADIATION- DO NOT STARE INTO BEAM
- WARNING
- DOC Compliance Notice
- RF Interference
- Important Safeguards
- Installation
- Power Supply
- Cleaning
- Lamp Replacement
- Fire and Shock Precautions
- ATTENTION
- NEC MultiSync® LCD Projector Products
- HOW LONG IS THE WARRANTY?
- WHO IS PROTECTED?
- WHAT IS COVERED AND WHAT IS NOT COVERED
- WHAT WE WILL PAY FOR AND WHAT WE WILL NOT PAY FOR
- HOW YOU CAN GET WARRANTY SERVICE
- LIMITATION OF IMPLIED WARRANTIES
- EXCLUSION OF DAMAGES
- HOW STATE LAW RELATES TO THE WARRANTY
- TABLE OF CONTENTS
- Introduction
- Installation
- Operation
- Maintenance
- Troubleshooting
- Specifications
- INTRODUCTION1
- Congratulations On Your Purchase Of The MultiSync MT1000 LCD Projector
- The features you'll enjoy include:
- How Do You Get Started?
- What's In The Box?
- Getting To Know Your MultiSync MT1000 LCD Projector
- Top Features
- ① Power Button
- ② Menu Button
- ③ Select Button
- ④ Enter Button
- ⑤ (+) (-) Adjust Button
- ⑧ Power Indicator
- ⑨ Status Indicator
- Terminal Panel Features
- ① Remote Control Jacks
- ② PC Control Port
- ③ 12V DC/400 mA Output Terminal
- ④ Video Input
- Left Channel/Mono Audio Input Jack
- Right Channel Audio Input Jack
- ⑤ S-Video Input
- RGB 1 Audio Input Mini Jack
- RGB 2 Audio Input Mini Jack
- Remote Control Features
- ⑫ Menu Button
- ⑬ Mouse Pointer Button
- ⑭ Right Click Button
- ⑮ Freeze Button
- ⑯ Position Button
- ⑰ Picture Mute Button
- ⑱ Magnify/Reduce Button
- ⑲ Focus Button
- Zoom Button
- ②1 Remote Jack
- Remote Control Precautions
- INSTALLATION2
- Setting Up Your MultiSync MT1000 LCD Projector
- Using A Tabletop Or Cart
- Ceiling Installation
- Reflecting The Image
- Rear Screen Projection
- Remote Control Guideline
- Connecting Your PC Or Macintosh Computer
- Changing Video Resolutions
- Windows 95
- Windows 3.1
- Macintosh
- Notebook Computers And Resolution Standards
- Connecting Your Document Camera
- Connecting Your VCR Or Laser Disc Player
- Connecting An External Monitor
- Connecting Your Remote Mouse Receiver
- OPERATION3
- IMPORTANT:
- Using The Menus
- Menu Descriptions & Functions
- Source Menu
- Video
- S-Video
- RGB 1
- RGB 2
- NOTE:
- Image Adjustment Menu
- Volume
- Brightness
- Contrast
- Color\*
- Tint\*
- Sharpness\*
- Image Mode\*
- Horizontal Position\*\*
- Vertical Position\*\*
- Auto Picture\*\*
- Picture Adjustment \*\*(when AUTO PICTURE is off)
- Fine Picture \*\*(when AUTO PICTURE is off)
- Power Menu
- Lamp Usage
- Auto Start
- Power Management
- Settings Menu
- Custom Memory
- Image Loop
- Background
- Projection
- Language
- Reset
- MAINTENANCE4
- Replacing The Lamp
- To replace the lamp:
- Cleaning Or Replacing The Filter
- Remote Control Battery Installation
- TROUBLESHOOTING5
- SPECIFICATIONS6
- Optical
- Electrical
- Mechanical
- D-Sub Pin Assignments
- PC Control Command Reference
- Command Codes
- Command Codes (continued)
- No. Function Code Data Description
- Cable Connection
- Communication Protocol
- CA Err 1
Brand : NEC
Model : MultiSync MT1000
Category : Projector