
AirMemo N1 - Server Totolink - Free user manual and instructions
Find the device manual for free AirMemo N1 Totolink in PDF.


| Brand | Totolink |
| Model | AirMemo N1 |
| Product Type | Network Server |
| Dimensions | 20 x 15 x 5 cm |
| Weight | 1.0 kg |
| Power Supply | DC 12V, 2A |
| Processor | ARM Cortex-A7 1.2 GHz |
| Memory | 512 MB DDR3 |
| Storage | 1x SATA HDD/SSD (up to 4TB) |
| Network Interface | Gigabit Ethernet |
| USB Ports | 2x USB 2.0, 1x USB 3.0 |
| Main Functions | File sharing, media streaming, backup, print server |
| Supported Protocols | SMB, FTP, DLNA, AFP |
| Operating System | Embedded Linux |
| Management | Web-based interface |
| Cooling | Passive heatsink (fanless) |
| Operating Temperature | 0°C to 40°C |
| Storage Temperature | -20°C to 60°C |
| Humidity | 10% to 85% non-condensing |
| Cleaning | Wipe with a dry, soft cloth |
| Safety | Keep away from water and heat sources |
| Repairability | Contact authorized service center |
| Spare Parts | Power adapter, network cable |
| General Information | Designed for home and small office use |
Frequently Asked Questions - AirMemo N1 Totolink
User questions about AirMemo N1 Totolink
0 question about this device. Answer the ones you know or ask your own.
Ask a new question about this device
Download the instructions for your Server in PDF format for free! Find your manual AirMemo N1 - Totolink and take your electronic device back in hand. On this page are published all the documents necessary for the use of your device. AirMemo N1 by Totolink.
USER MANUAL AirMemo N1 Totolink
natural_image
Exterior view of a gray rectangular electronic device labeled 'AirHomo M1' (no additional text or symbols visible)TOTOLINK AirMemo N1 Product usage
manual
Company: Zioncom (Shenzhen) Co., Ltd.
contents
contents
Chapter 1 Product Introduction....2
1.1 Product introduction....3
1.2 product features.... 3
1.3 Product specifications....5
1.4 Exterior....5
1.4.1 Indicator light description 7
1.4.2 Interface and button description....7
chapter 2 Configure AirMemo N1....7
2.1 Operating procedures....8
2.2 Demo ……错误!未定义书签。
Chapter 3 Upgrade Steps......错误!未定义书签。
3.1 Firmware upgrade......错误!未定义书签。
statement
Copyright © 2022 ZIONCOM Ltd. All rights reserved
Without the express written permission of ZIONCOM Co., Ltd., no unit or
individual shall copy, copy, transcribe or translate part or all of the contents of
this manual, and shall not transmit it in any way (electronically, photocopying,
recording, etc.) for the purpose of profit.
Chapter 1 Product Introduction
1.1 Product introduction
AirMemo N1, N1 as your exclusive private cloud disk, you can store important documents, precious photos, Documents such as audio and video collections are stored in the N1, and can be easily stored and shared. Plus, with the remote access service provided by the N1, you can access your N1 anytime, anywhere without having to carry a storage device with you.
1.2 product features
Excellent performance, ultra-high-speed transmission
AirMemo N1 is equipped with 1.6GHz dual-core CPU and 2Gbytes memory, which can process data faster and improve wireless transmission performance. Also, it supports 2.0/2.5/3.5 inch hard drives. Use the Gigabit LAN port for fast and reliable data transfer via a network cable connection, making full use of the network bandwidth. Sequential
throughput exceeds 114 Mbps/s for reads and 117 Mbps/s for writes. Bring you an efficient and smooth experience.
Automatically backup files --- Free up your phone memory
AirMemo N1 can automatically search for unbacked data (including pictures, videos, audio, contacts) in the phone, and easily realize one-click backup. In addition, AirMemo N1 supports automatic identification and classification of file types. For example, pictures can be sorted by time. AirMemo N1 can properly preserve every precious memory for you.
Remote access, anytime and anywhere
Log in to the "T-Smart Home" app on your mobile phone, and you can access AirMemo N1 data anytime, anywhere. And you can download and upload data in different places through different devices (mobile phones, tablets, computers). Data on the AirMemo N1 can be accessed at any time, even on both ends of the Pacific Ocean. It makes remote work more efficient and convenient when traveling or traveling.
▶ Support offline download
AirMemo N1 supports offline download, remote control T-Smart Home to download high-definition movies in advance, manage download tasks, and view download progress. You can enjoy smooth HD movies at home without waiting for download time and saving phone memory.
▶ Independent storage space
In AirMemo N1, each user can set up his own private account and create his own personal data center. AirMemo N1 adapts to various operating systems, such as Android, iOS, Windows. Although the devices use different operating systems, the data distributed in each terminal can also be managed uniformly. Centralized management of personal data is easy.
Multi-User File Sharing
AirMemo N1 can be used as a home media center, and each personal account can put movies, photos and music into the public space to share with your family and friends. It can also be used as a shared network disk to record the baby's growth process and share the happiness and joy of life together. AirMemo N1 can also be used as a work sharing network disk, you can create a personal privacy partition, save and load anytime, anywhere. Documents and materials can be easily shared to public spaces to improve work efficiency.
USB 3.0 for backup and easy access
Via the USB 3.0 port on the AirMemo N1, you can connect your USB storage and enjoy high-speed access via Wi-Fi. In terms of entertainment, you can connect TVs, game consoles Play, view, listen and share your videos, photos and music on your media player or media player. Plus, you can schedule automatic backups to protect your PC's files and treasures from connected USB storage Your photos and documents.
1.3Productspecifications
| Product Name | Smart Home Data Server |
| Model | AirMemo N1 |
| CPU | Marvell 88F6820 Dual-core1.6GHz |
| Memory | 2Gbytes DDR3 |
| Drive bay | One bay |
| Drive type | SATA 3.0, 2.5/3.5 inch disk |
| Drive capacity | 1TB/2TB/3TB/4TB/6TB/8TB |
| USB port | USB3.0 *1 |
| LAN port | 10/100/1000Mbps LAN*1 |
| Button | DC/IN*1, SATA*1, Power*1, RST*1 |
| LED | Power*1, Ready*1, LAN*1, HDD*1, USB3.0*1 |
| Supported clients | Windows 7, 8, 10, 11, Android, iPhone |
| Power supply | DC 12V/3.5A |
| Dimension | 140*205*61MM |
1.4 Exterior
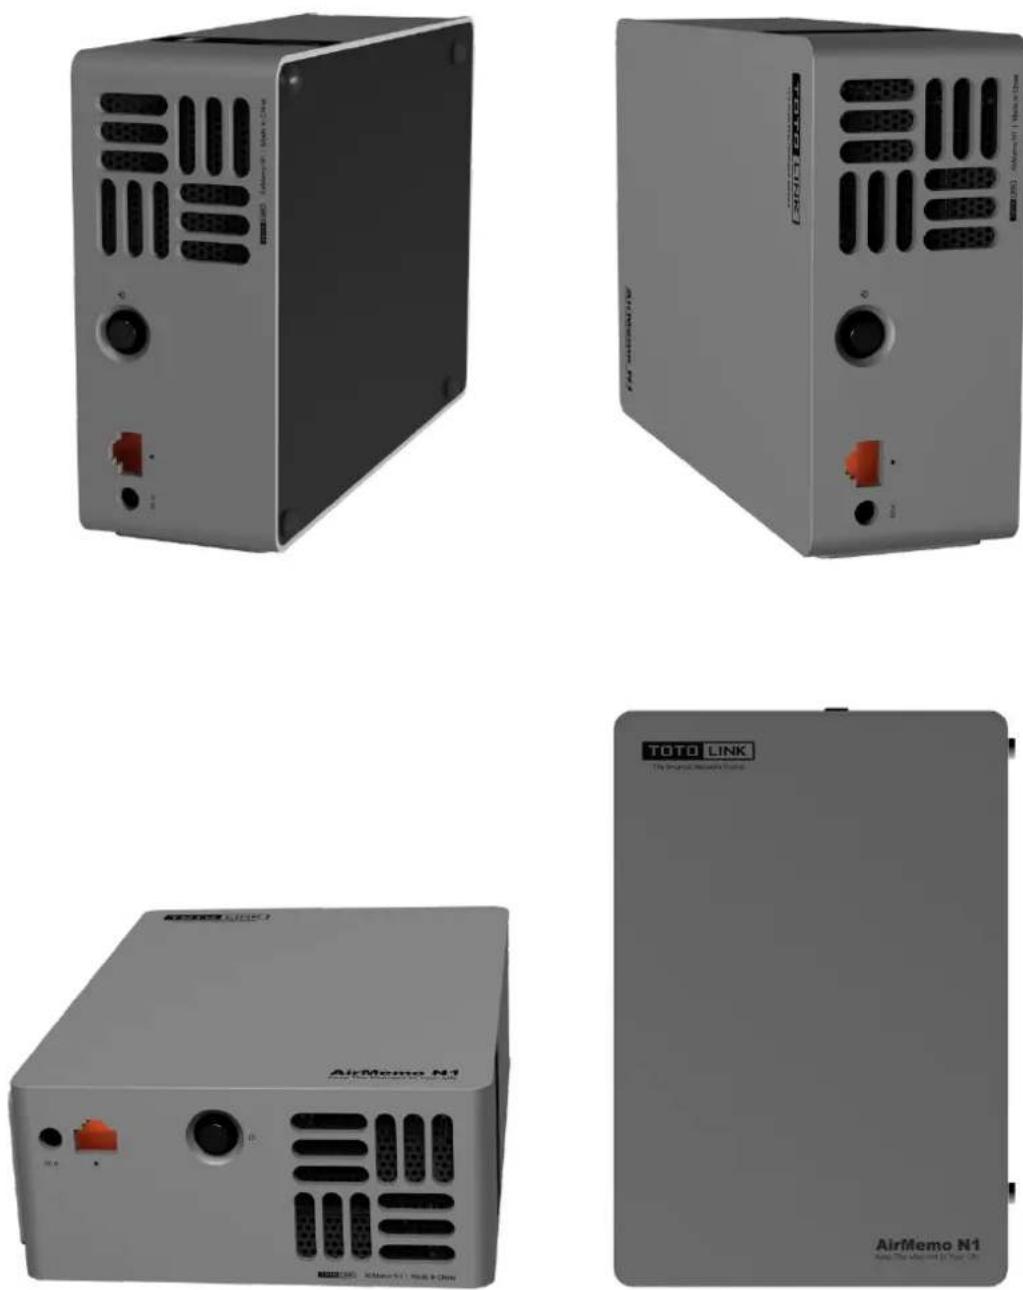
1.4.1 Indicator light description
| ⏻ | Static | Power on |
| Off | Power off | |
| Ready | Static | System normal |
| Off | System error | |
| ▪ | Flashing | Network connected |
| Off | No network | |
| ≡ | Static | Drive ready |
| Off | No internal drive/Drive error | |
| ss ↔ | Static | External drive detected |
| Off | External drive is not detected |
1.4.2 Interface and button description
| Power port | Power supply |
| Hard drive port | Insert the hard drive, power the drive, read and write data |
| LAN port | Connect with router through RJ45 cable, provide network transmission |
| USB port | Connect to a mobile hard drive to import and export data via APP |
| Power button | Powering on/off the device |
| RST button | Press and hold the button for 5 seconds until all indicators flash to restore factory settings and the data in the hard disk will be retained. |
Chapter 2 Configure AirMemo N1
2.1 Operating procedures
Put the hard disk into the hard disk bracket and fix it with three screws at the
bottom; insert the AirMemo N1, and connect the AirMemo N1 to the LAN port of the upper-level router with a network cable.

2.2 Mobile terminal configuration
- How to get the APP
IOS: Search for "T-Smart Home" in the AppStore and install it
Android: Search and download in Google Pay
Harmony:360 mobile assistant
You can also enter the official website to download (see the last page for the download address)
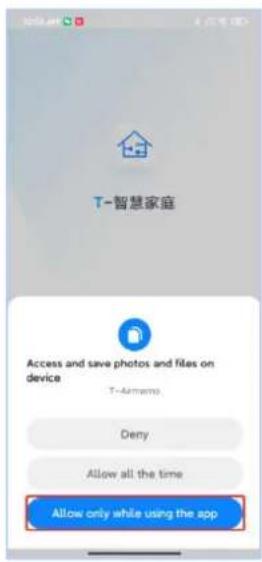
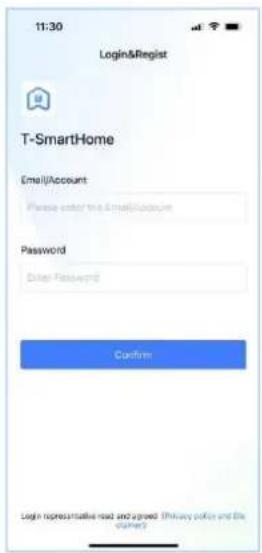
- Download "T-Smart Home" APP, please authorize the permissions required by APP during installation, otherwise it will not work properly. The first time you open the app, you need to register your account, enter your email and password.
Mailbox input restriction: you need to meet the mailbox format, please input the correct email address, in case you can't log in later, resulting in file loss
Password input restriction: The account must be composed of 8-16 letters or numbers, no special characters can be used.
Permissions required for IOS:

Permissions required for Android phones:


Register account interface:
- After the N1 is connected to the power supply, connect the N1 to the LAN port of the router with a network cable (before the device is not bound to the account is in the initialization state, the power indicator is always on, the system status indicator [Ready] is blinking, the rest of the indicators are not lit), connect the
phone to the WIFI of the router, the first connection needs to ensure that the phone and AirMemo N1 in the same LAN.
- Open the app, the first time to add a device requires the phone and AirMemo N1 in the same LAN; click Add Device, the app will automatically discover the AirMemo N1 device under the local network and display its MAC address, while other users who need to add this device can choose two ways to add the device: local add and scan the QR code to add the device remotely.


5. Add Device
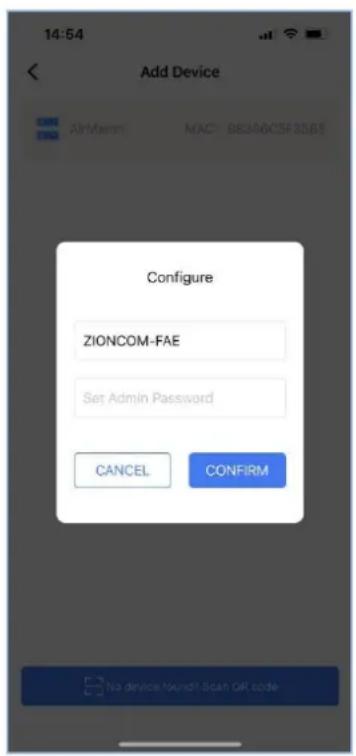
- The first user added: the device needs to set the device name and password (also known as the device management password), all accounts under the device can manage the N1 after entering the management password; the hard disk needs to be formatted after the addition is completed to be recognized by the device; the first time the device is configured, the hard disk needs to be formatted to AirMemo N1 recognizable format, if it is not a new hard disk, please backup the hard disk data first.

②. Other users to add
The first way (automatically find and add):
the app will automatically find the AirMemo N1 device under the local network and display its MAC address, click on the device to add it successfully, you need to enter the device management for authorization before entering the device; enter the management password in the first user account to see the authorization application for the new user, and the second user can use the device normally only after authorization.

The second way (scan the code to add):
the first user to open the device management function, enter the management password and click the "+" sign in the upper right corner to invite users, send a screenshot of the QR code to the invited user, scan the QR code to add, after adding into the device still need to authorize permission, this method is applicable to both local and remote add devices.


2.3 PC login
Note: When first logging in, you need to allow access to the network through
Windows Defender.
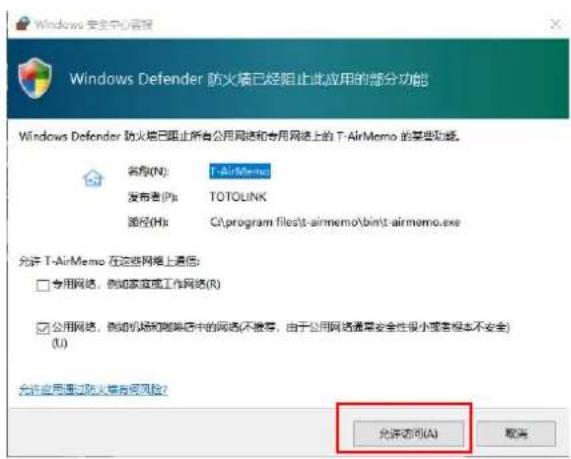
①. log in with the account and password registered on the mobile phone
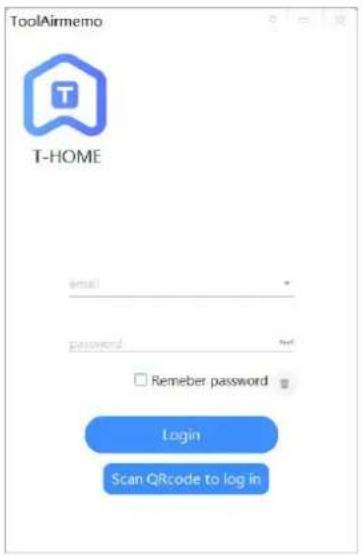
②. Or scan QR code to log in, it will pop up the QR code, use the mobile phone to scan the code to verify


- If the account password is inconsistent with the account password of the mobile app, a prompt box will pop up and you cannot log in.

- After the addition is successful, the device list and device name will be displayed.

- enter the page, you can upload/download files in the PC, and support most common file types on the computer

At this point, all N1 configurations are complete!
Chapter 3 Introduction to Common Functions
3.1 Forgotten password
- If you inadvertently forget the user password, enter the wrong password to log in and click the device to enter, prompting that the login password is inconsistent with the last time and cannot be connected; you can change the password successfully by clicking forget password after a verification code will be sent to the registered mailbox, enter the verification code and enter the new password.


- If you inadvertently forget the management password, you can reset the management password by restoring the factory settings; and N1 restoring the
factory settings will not clear the user's data, because the user's data are stored in the hard disk.
Reset steps:
①, long press the N1 reset button for 5-7 seconds and then release it until all the lights start flashing, wait for it to complete the reset and reboot (this process takes about 3 minutes)
②, after the reset is complete, open the cell phone APP (account does not need to change), first long press the previous device to remove it, and then re-add the device, and configure the device with a new name and management password


3.2 Uploading and viewing files
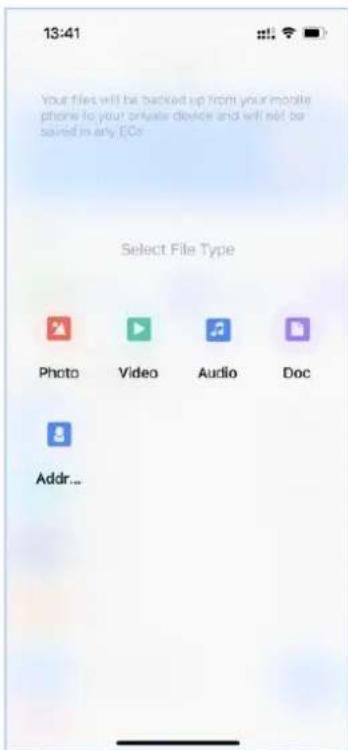
1、Upload files: Click the "+" icon at the bottom right corner to upload files, please make sure you have authorized the app before using this function (see
2.1.2 for details). When uploading files, you can choose the file type and corresponding folder, and you can also upload the corresponding type of files in the view file page.
2、New Folder: When uploading files, you can create new folders and select existing folders; there is also a new folder function in the view file page. This function is mainly to facilitate users to classify and filter files according to time, location and other conditions; thus, it is more convenient to find and manage files. Users can also move the data in the default folder to the folder they created.
3、View files: View personal files in the "My Personal Space" ribbon, categorized and displayed by file format, easy to find.


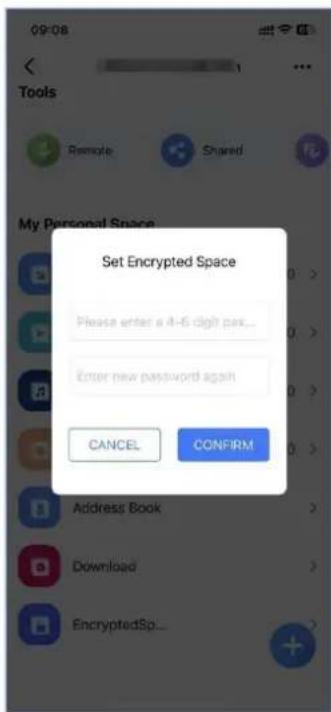
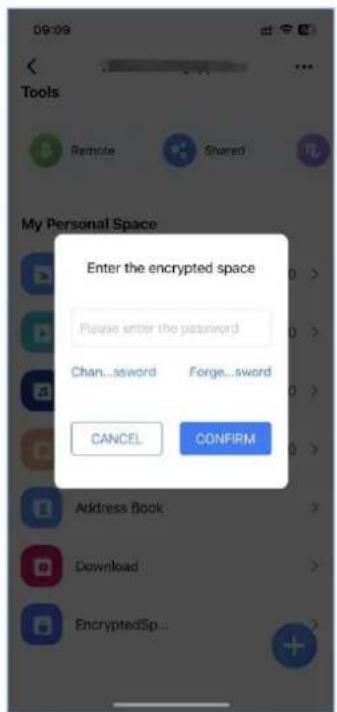
3.3 Encrypted space
You can see the encrypted space option by sliding to the bottom of the home page
①. The first time you use the encrypted space, you need to set a password
(password is 4-6 plain digits)
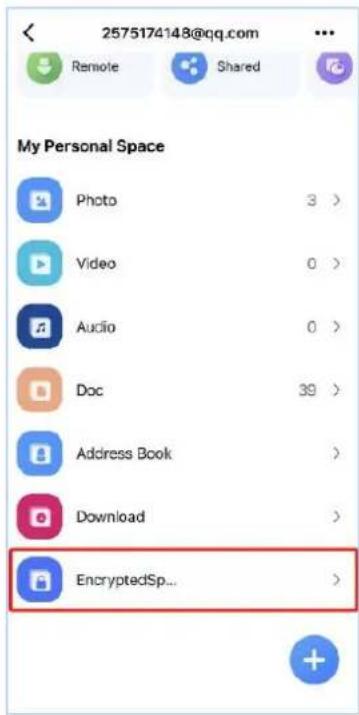
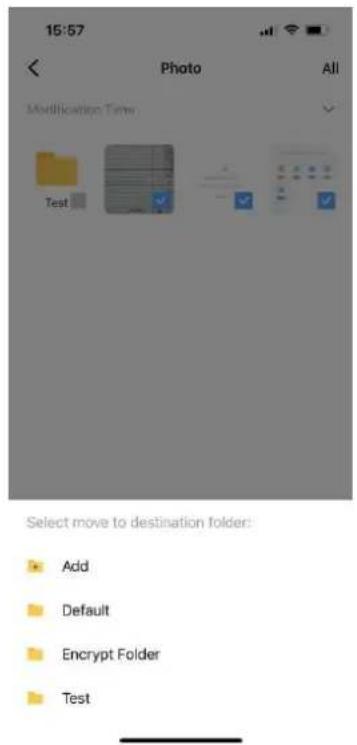
- Upload or move files to encrypted space: you can directly upload pictures,
videos, audio and documents to encrypted space or move files from My Space to encrypted space.

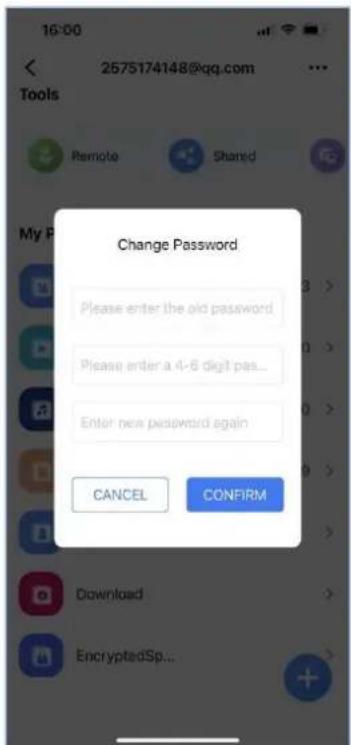
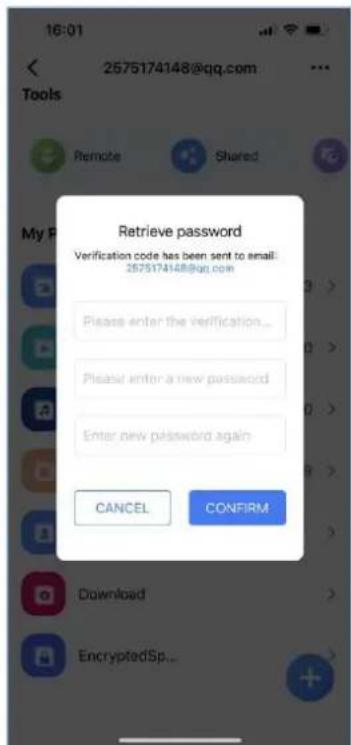
- Change the password of encrypted space: change the password of encrypted
space if the old password is known. If users forget the password, they can send the verification code to the registered email to retrieve the password.

3.4 Function Profile
- Tools - Introduction
①. External storage:

External Storage
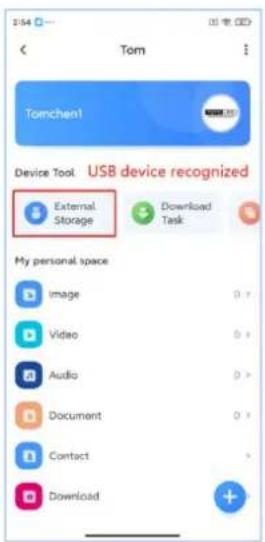
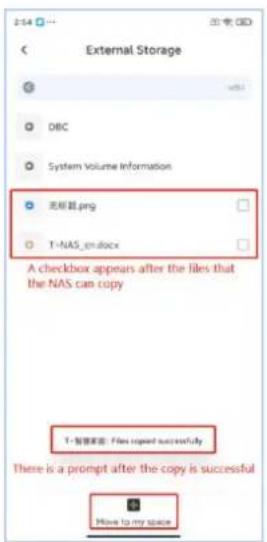
Insert U disk/mobile hard disk through USB interface, support NTFS, FAT32 format; the main interface will show the external storage function, you can copy the files recognized by AirMemo N1 from U disk to the device, and also copy the files from the device to U disk to achieve file transfer. (The interface will not be displayed if the U disk is not inserted)

②. To download a task:

Download Task
By clicking "New" in the upper right corner, create a new download task, paste thedownload link into the text box, you can download torrents to AirMemo N1, and
you can also upload local torrents; downloaded files can be viewed and deleted in
"Downloads".


③. Sharing Center:

Sharing
Center
Users can add files to the sharing center, share them with other users on the same device, and view data shared by other users.


④. Storage details:

Storage
Details
You can view the current total capacity, available capacity, and total capacity of the hard disk, and clear the APP cache

⑤. Recycle Bin:

Recycle Bin
Deleted files will be placed in the recycle bin, and the files can be recovered or deleted completely
- My personal space--Introduction
①. Photo.

Photo
The image format files uploaded by users will be saved in this directory, and you can enter this directory to view and upload images, create a directory to classify photos and other functions.
②. Videos.

Video
This directory stores some videos uploaded by users, you can enter this directory to view and upload the corresponding video files.
③. Audio.

Audio
This directory stores some audio files uploaded by users, such as music, recordings, etc. You can enter this directory to view and upload the corresponding video files.
④. Documents.

Doc
This directory stores some documents uploaded by users, you can enter this directory to view and upload the corresponding video files.
⑤. Address Book.

Address Book
This directory can upload the address book information in the user's cell phone, and supports uploading multiple cell phone numbers for one contact; to avoid losing important contact information due to changing cell phones or other factors.
⑥. Download contents.

Download
This directory saves the files and information downloaded by users via remote, as well as the corresponding download logs that can be viewed; it is convenient to re-download files when they are lost.
- Advanced Settings - Introduction
- PC login:

Login Computer
Use PC login to scan the QR code of the PC APP to log in. When scanning the code to log in, please ensure that the mobile phone and the computer are in the same local area network.
- Equipment management:

Device Managing
New users can be authorized to join/rejected to join; users who have already been removed from the device can also be removed.

3. Password management:

Password Managing
To modify the login account password, you need to enter the original password first

4. Other services:

Other services
Smaba and FTP Server file storage function, providing high-speed access to AirMemo N1 under PC local network, this function needs to be used in LAN. samba and ftp login user name is email account, password can be customized, default password: admin123
Samba login:
Use the runtime interface WIN+R to enter "\+AirMemo N1's IP address" (check N1's IP address in "Other Services" in the APP), the authentication screen will pop up, and you can access AirMemo by entering your username and password N1.
FTP login:
As N1 adopts a more secure transmission method and encrypts the data
transmitted by ftp, you need to use a client to access N1's FTP Server.

Chapter 4 Upgrades and Downloads
4.1 Firmware Upgrade
AirMemo N1 supports OTA upgrade, users can also upgrade locally via web page
- OTA upgrade
Open the app and enter the device management, click the upgrade icon to check whether the device firmware version is the latest version.
If it is not the latest version, it will jump to the upgrade page to upgrade online.
(Note: Do not power off during the upgrade process)

- Web upgrade
Put the firmware that needs to be upgraded on the desktop, select the file and click upload. After uploading, it will be automatically upgraded (note: the power cannot be cut off during the upgrade process)

- Check the IP address of AirMemo N1

- Connect the PC to the same router as AirMemo N1, open the browser, and use the IP address of AirMemo N1 to enter its management page
Username: admin
Password: management password (the password configured during device configuration, not the APP user password)

During the upgrade process, AirMemo N1 will restart. After restarting, it can be used normally until the 4 lights are on. (Now the upgrade takes about 2 minutes and 30 seconds longer, and the new version has been optimized)

4.2 Software Download
- APP Download
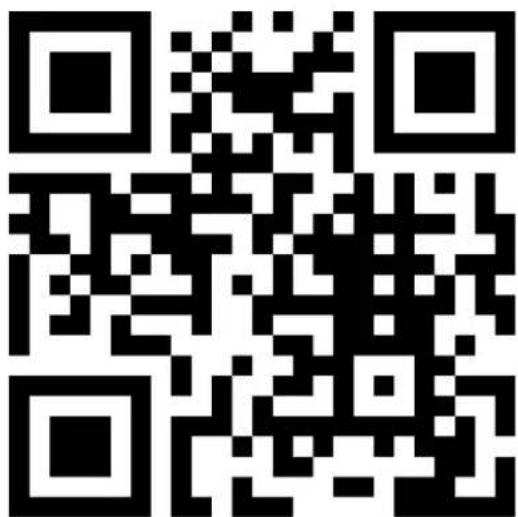
Scan this QR Code to download T-SmartHome app
Download Link: https://www.totolink.net/home/news/app/id/243/idd/42.html
• PC Client Download
Download Link: https://www.totolink.net/home/news/app/id/245/idd/158.html
PC Client

T-SmartHome Windows Client
2022-07-27 15:48
- TOTOLINK AirMemo N1 Product usage
- manual
- contents
- Chapter 1 Product Introduction....2
- chapter 2 Configure AirMemo N1....7
- Chapter 3 Upgrade Steps......错误!未定义书签。
- statement
- Chapter 1 Product Introduction
- Product introduction
- product features
- Excellent performance, ultra-high-speed transmission
- Automatically backup files --- Free up your phone memory
- Remote access, anytime and anywhere
- ▶ Support offline download
- ▶ Independent storage space
- Multi-User File Sharing
- USB 3.0 for backup and easy access
- Exterior
- Indicator light description
- Interface and button description
- Chapter 2 Configure AirMemo N1
- Operating procedures
- Mobile terminal configuration
- Register account interface:
- Add Device
- ②. Other users to add
- The first way (automatically find and add):
- The second way (scan the code to add):
- PC login
- Chapter 3 Introduction to Common Functions
- Forgotten password
- Reset steps:
- Uploading and viewing files
- Encrypted space
- Function Profile
- - Tools - Introduction
- - My personal space--Introduction
- Video
- Audio
- Doc
- Address Book
- Download
- - Advanced Settings - Introduction
- Password management:
- Password Managing
- Other services:
- Other services
- Samba login:
- FTP login:
- Chapter 4 Upgrades and Downloads
- Firmware Upgrade
- - OTA upgrade
- - Web upgrade
- Software Download
- - APP Download
- • PC Client Download
- PC Client
Brand : Totolink
Model : AirMemo N1
Category : Server