
UT-BACKOFEN 60 - Oven Ursus Trotter - Free user manual and instructions
Find the device manual for free UT-BACKOFEN 60 Ursus Trotter in PDF.


| Product Type | Built-in Electric Oven |
| Brand | Ursus Trotter |
| Model | UT-BACKOFEN 60 |
| Dimensions (H x W x D) | 595 x 595 x 550 mm |
| Oven Capacity | 67 Liters |
| Weight | 35 kg |
| Power Supply | 230 V ~ 50 Hz, 3.3 kW |
| Cooking Functions | Conventional, Grill, Fan-assisted, Defrost, Pizza, etc. |
| Temperature Range | 50 – 250 °C |
| Control Type | Electronic touch + rotary knobs |
| Display | LED digital display with clock |
| Cleaning | Easy-clean enamel interior, optional steam clean |
| Safety Features | Child lock, automatic shut-off, overheat protection |
| Door Type | Cool-touch glass door with soft-close hinge |
| Interior Light | Yes, halogen light |
| Energy Efficiency Class | A+ |
| Spare Parts Availability | Heating elements, thermostat, door gasket |
| Warranty | 2 years (standard) |
Frequently Asked Questions - UT-BACKOFEN 60 Ursus Trotter
User questions about UT-BACKOFEN 60 Ursus Trotter
0 question about this device. Answer the ones you know or ask your own.
Ask a new question about this device
Download the instructions for your Oven in PDF format for free! Find your manual UT-BACKOFEN 60 - Ursus Trotter and take your electronic device back in hand. On this page are published all the documents necessary for the use of your device. UT-BACKOFEN 60 by Ursus Trotter.
USER MANUAL UT-BACKOFEN 60 Ursus Trotter
German Engineering & Design
ELEKTRO-BACKOFEN
natural_image
Exterior view of a stainless steel Ursus Trotter oven with red-lit grating and control knobs (no visible text or symbols on main body)
natural_image
Black baking tray with four plated food items, including rolled bread, pickled cheese, and red onion garnish (no text or symbols visible)MANUAL DE USUARIO Y LETRA DE GARANTÍA
ELEKTRO-BACKOFEN UT-WESSEL44
Please read the manual carefully before use HOUSEHOLD AND INDOOR USE ONLY
Important safeguards
When using electric appliances, basic safety precautions should always be followed, including the following:
- Read all instructions.
- Do not touch hot surfaces. Use handle or knobs.
- Close supervision is necessary when any appliance is used by or near children.
- To protect against electric shock, do not immerse cord, plug, or any parts of the oven in water or other liquids.
- Do not let cord hang over edge of table or counter, or touch hot surfaces.
- Do not operate appliance with damaged cord or plug or after the appliance malfunctions, or has been damaged in any manner, return appliance to the nearest Authorized Service Center for examination, repair, or adjustment.
- The use of accessory attachments not recommended by the appliance manufacturer may cause hazard or injury.
- Do not place on or near a hot gas or electric burner, or in a heated oven, or in a microwave oven.
- When operating the oven, keep at least 12 cm of space on all sides of the oven to allow for adequate air circulation.
- Unplug from outlet when not in use, or before cleaning. Let it to cool before putting on or taking off parts, or before cleaning.
- Extreme caution must be used when moving an appliance containing hot oil or other hot liquids.
- Do not cover CRUMB TRAY or any part of the oven with metal foil. This may cause overheating of the oven.
- Use extreme caution when removing tray or disposing of hot grease or other hot liquids.
- Do not clean with metal scouring pads. Pieces can break off the pad and touch electrical parts, creating a risk of electric shock.
- A fire may occur if the oven is covered or touching flammable material, including curtains, draperies, walls, and the like, when in operation. Do not store any item on the oven during operation.
- Extreme caution should be exercised when using
containers constructed if anything other than metal or glass.
-
Do not place any of the following materials in the oven: cardboard, plastic, paper, or anything similar.
-
Do not store any materials, other than manufacturer's recommended accessories, in this oven when not in use.
-
Always attach plug to appliance first, then plug cord into the wall outlet. To disconnect, turn any control to "off", then remove plug from wall outlet. Always hold the plug, but never pull the cord.
-
Always wear protective, insulated oven mitts when inserting or removing items from the hot oven.
-
This appliance has a tempered, safety glass door. The glass is stronger than ordinary glass and more resistant to breakage. Avoid scratching door surface or nicking edges. If the door gas a scratch or nick, contact our consumer relations line before using the oven.
-
Do not use outdoors.
-
Do not use appliance for other than intended use.
-
This appliance is for HOUSEHOLD USE ONLY.
-
The accessible surfaces are liable to get hot when the appliance is operating.
-
Glass Door cannot support goods in the fully open position.
-
The appliance is not intended to be controlled by an external timer or separate remote-control system.
-
This appliance is not intended for use by persons (including children) with reduced physical, sensory or mental capabilities or lack of experience and knowledge, unless they have been given supervision or instruction concerning use of the appliance by a person responsible for their safety.
-
Children should be supervised to ensure that they do not play with the appliance.
-
For appliance with type Y attachment, if the supply cord is damaged, it must be replaced by the manufacturer, its services agent or similarly qualified persons in order to avoid a hazard.
-
Rear surface of appliances should be placed against a wall.
-
WARNING: This appliance includes a heating function. Surfaces, other than the functional surfaces may develop high temperatures. Since temperatures are perceived differently by different people, this device should be used with CAUTION. Hold the appliance exclusively to grip surfaces intended to hold and use such heat protection measures as heat protection Gloves or pot holders. Areas which are not intended to grips must be given sufficient time to cool.
Save these instructions
Before Using Your Electric Oven
Before using your electric oven for the first time, be sure to:
- Read all instructions included in this manual.
- Make sure oven is unplugged and Timer Knob is in the Off position.
- Remove all racks and pans. Wash the racks and pans in hot sudsy water or in dishwasher.
- Thoroughly dry all accessories and re-assemble in oven. Plug oven into outlet and you are ready to use your new Electric Oven.
- After re-assembling your oven, we recommend that you run it at MAX temperature on ☐ for approximately 15 minutes to eliminate any packing oil that may remain after shipping.
Piezas del Horno

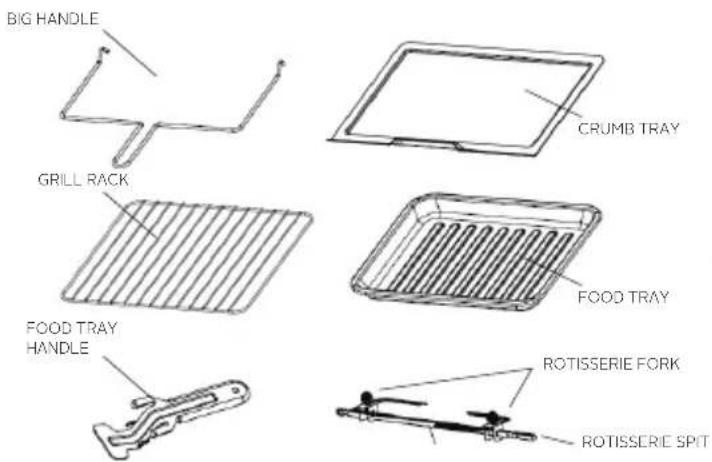
Using Your Electric Oven
Please familiarize yourself with the following oven functions and accessories prior to first use:
▶ Function Knob: There are six baking modes
□
☑ upper and lower heating elements + fan
upper heating elements + fan
Upper + lower heating elements
☐pper heating elements + rotisserie
upper and lower heating elements+ rotisserie + fan
▶ Thermostat Knob: Choose desired temperature from LOW--90°--230°.
▶ Timer Knob: Turn control to the left (counterclockwise) and the oven will STAY ON until manually shut off. To activate timer, turn to right (clockwise) for other use. A bell will sound at end of programmed time.
▶ Indicator Cover: It is illuminated whenever oven is turned on.
▶ Grill Rack: For toasting, baking, and general cooking in casserole dishes and standard pans.
▶ Food Tray: For use in broiling and roasting meat, poultry, fish, and various other foods.
▶ Rotisserie Spit: Use to roast a variety of meats and poultry.
Función &
This function is ideal for Baking pork slice, chicken legs, chicken wings, potato flakes, poultry meat, chops, fish and so on with more evenly heating up.
Operation
▶ Preheat oven as directed in recipe.
▶ Set Thermostat Knob to 230°.
▶ Turn Function Knob to 📄 or 📋.
▶ Check baked goods for doneness 5-10 minutes before expected completion.
▶ Turn Timer Knob to OFF when complete.
Function
This function is ideal for cooking bread, pizza, and fowl in general.
Operation
▶ Place a Grill Rack to in middle Support Guide.
▶ Turn Function Knob to 📄.
▶ Place food to be cooked on Food Tray and then place the Food Tray onto Grill Rack.
▶ Turn Timer Knob to ON. Time accordingly and check progress with meat thermometer to ensure desired doneness.
▶ To check or remove food, use TRAY/RACK HANDLE provided to help side food in and out.
▶ Turn Timer Knob to OFF when cooking is complete.
NOTE: ALL toasting times are based on meats at refrigerator temperature. Frozen meats may take considerably longer. Therefore, use of a meat thermometer is highly recommended.
Function &
This function is ideal for cooking whole chickens, fowl in general.
Rotisserie Spit Use: Insert pointed end of spit through fork, making sure points of fork face same direction as pointed end of spit. Slide towards square of SPIT and secure with thumbscrew. Place food to be cooked on spit by running spit directly through center of food. Place second fort into other end of roast or poultry. Check that food is centered on spit. Insert pointed end of spit into drive socket, located on right-hand side of oven wall. Make sure the square end of spit rests on spit support, located on left-hand side of oven wall.
Operation
▶ Place Food Tray in lowest, use touch oil.
▶ Preheat oven as directed in recipe.
▶ Set Thermostat Knob to 230°.
▶ Turn Function Knob to 📋 or 🌐 .
▶ Check baked goods for doneness 5-10 minutes before expected completion.
▶ Turn Timer Knob to OFF when complete.
NOTE: The weight of the food which is put on the Food Tray/Grill Rack can not be over 3.0kg. (just for reference)(The food can not concentrate on one side of the Food Tray/Grill Rack, you would better try you best to make the food put on the Food Tray/Grill Rack evenly).
Use maintenance instructions
This appliance requires little maintenance. It contains no user serviceable parts. Do not try to repair it yourself. Contact a qualified appliance repair technician if the product requires servicing.
Cleaning instructions
Always unplug oven and allow to cool before cleaning
To protect against the risk of electrical shock, do not immerse the unit, cord or plug in water or other liquid.
Your oven features a Quick-Clean coating. If desired, wipe walls with damp cloth and moistened with mild detergent. DO NOT USE STEEL WOOL SCOURING PADS OR ABRASIVE CLEANERS OR SCRAPE WALLS WITH METAL UTENSILS, AS THIS MAY DAMAGE THE Quick-clean INTERIOR.
Wash all accessories in hot sudsy water or in a dishwasher. Wipe the door clean with a damp cloth and wipe dry with a paper or cloth towel. Clean exterior with damp cloth.
DRY ALL PARTS AND SURFACES THOROUGHLY PRIOR TO PLUGGING OVEN IN AND USING.
To store
Unplug unit, allow to cool, and clean before storing. Store Electric Oven in its box in a clean, dry place. Never store appliance while it is hot or still plugged in. Never wrap cord tightly around the appliance. Do not put any stress on the cord where it enters the unit, as it could cause the cord to fray and break.
Specification
Power Consumption: 220V/50Hz
Output: 1500W
Capacity: 44L
Environment friendly disposal

POLIZA DE GARANTIA

natural_image
Symmetrical emblem featuring a central shield with two wings, enclosed in a laurel wreath (no text or symbols)Ursus Trotter
- ELEKTRO-BACKOFEN
- ELEKTRO-BACKOFEN UT-WESSEL44
- Important safeguards
- Save these instructions
- Before Using Your Electric Oven
- Before using your electric oven for the first time, be sure to:
- Using Your Electric Oven
- Función &
- Operation
- Function
- Function &
- Use maintenance instructions
- Cleaning instructions
- To store
- Specification
- POLIZA DE GARANTIA
- Ursus Trotter
Brand : Ursus Trotter
Model : UT-BACKOFEN 60
Category : Oven