
ProMini - Alarm system OLYMPIA - Free user manual and instructions
Find the device manual for free ProMini OLYMPIA in PDF.


| Product Type | Wireless Alarm System |
| Brand | Olympia |
| Model | ProMini |
| Dimensions (Control Panel) | 120 x 80 x 25 mm |
| Weight (Control Panel) | 150 g |
| Power Supply | AC 100-240V, 50/60Hz, DC 5V backup battery |
| Battery Backup | Rechargeable Li-ion 3.7V, 1000mAh |
| Main Functions | Motion detection, door/window sensors, siren, remote control, smartphone app control |
| Detection Range | Motion sensor up to 8m, 90° angle |
| Number of Zones | Up to 8 wireless zones |
| Communication | 433MHz RF, Wi-Fi 2.4GHz for app |
| Siren Volume | Up to 110 dB |
| Operating Temperature | -10°C to 50°C |
| Maintenance | Clean with dry cloth, avoid moisture; replace battery every 2 years |
| Safety Features | Tamper alert, low battery notification, auto-arm/disarm scheduling |
| Spare Parts Available | Sensors, remote controls, power adapters |
| Repairability | User-replaceable batteries and sensors; service center for panel |
| General Information | Designed for home/office security, expandable system, easy DIY installation |
Frequently Asked Questions - ProMini OLYMPIA
User questions about ProMini OLYMPIA
0 question about this device. Answer the ones you know or ask your own.
Ask a new question about this device
Download the instructions for your Alarm system in PDF format for free! Find your manual ProMini - OLYMPIA and take your electronic device back in hand. On this page are published all the documents necessary for the use of your device. ProMini by OLYMPIA.
USER MANUAL ProMini OLYMPIA
natural_image
Symmetrical decorative pattern with concentric circles and a triangular base (no text or symbols)ProMini

Bedienungsanleitung
Inhalt
1.2 Pay attention to the safety instructions 45
- Your ProMini 46
2.1 Checking the package contents 46
2.2 Accessories....46
2.3 Tuya Smart Home 46
2.4 System Requirements....46
2.5 Features 46
2.6 Operating modes and alarm zones 47
-
Your ProMini in detail....47
-
Symbols 47
-
Function of the keys 48
5.1 Function key 48
5.2 Setting key 48
-
Illuminated ring 49
-
Installing the alarm system....49
-
Installing Tuya Smart app....50
-
Connect the alarm system .... 51
9.1 Connect in Fast Mode 51
9.2 Connecting in Hotspot Mode 55
- Registering accessories (e.g. sensors) 60
10.1 Registering via the Tuya Smart app 60
10.2 Registration via alarm system 62
- Operation via Tuya Smart app....63
11.1 Activate / deactivate alarm....63
11.2 Trigger alarm....64
11.3 History recording....65
11.4 Set up accessories....66
11.5 Settings for your alarm system....69
-
Doorbell function....72
-
Create scenes....73
13.1 Example: Alarm on the alarm system controls a camera 73
13.2 Example: A Tuya Smart Home door/window sensor should trigger an alarm 78
- What else you need to know 83
14.1 Frequently asked questions (FAQ)....83
14.2 Cleaning 83
14.3 Disposal 84
14.4 Warranty....84
14.5 Simplified EU Declaration of Conformity 85
14.6 Technical data 85
14.7 Manufacturer 85
1. For your safety

The operating manual represents a component part of the device. It contains important information regarding safety, use and disposal. Familiarize yourself with all the operating and safety information before starting to use the device. Only use the device as described and for the purpose for which it is intended. Hand over all the documents with the device if it is transferred to third parties.
The alarm system is a passive security product and is designed for deterrence. Additional precautions must be taken to avoid and prevent burglaries and thefts.
Pay attention to this symbol. Texts marked with this symbol provide useful information on how to use your alarm system.
1.1 Intended use
Your ProMini - hereinafter referred to as: alarm system - is suitable for monitoring rooms and houses, provided that a secure radio link to the registered sensors (e.g., door/window contacts, smoke detectors) is ensured. The alarm system is only suitable for private use in closed rooms.
Any other use is considered improper. Unauthorized modifications or conversions are not permitted and will void the warranty.
These operating instructions contain important information on commissioning and handling. Be sure to enclose these operating instructions when passing the alarm system on to third parties.
To set up an alarm system, you need sensors that are not included in the scope of delivery. You can register sensors from the Protect/ProHome series with the alarm system.
1.2 Pay attention to the safety instructions
Read and observe the warnings to protect yourself and the environment.
WARNING! Danger to life due to electric shock! NEVER use the device if you suspect damage to the power plug or if damage is visible on the power plug.
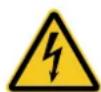
WARNING! NEVER carry out repairs on the device yourself. Do not open the device, it does not contain any parts to be serviced by the user. In the event of a fault, first contact our service department.
WARNING! Choking hazard! Children may swallow small parts, packaging or protective foils. Keep children away from the device and its packaging.
CAUTION! This appliance can be used by children aged from 8 years and above and persons with reduced physical, sensory or mental capabilities or lack of experience and knowledge if they have been given supervision or instruction concerning use of the appliance in a safe way and understand the hazards involved. Children must not play with the appliance. Cleaning and maintenance must not be carried out by children without supervision.
CAUTION! Hearing damage due to loud warning signal! Use hearing protection when testing the device. Do not stay in the vicinity of the warning signal for a longer period of time in the event of an alarm.
IMPORTANT! Damage to property due to environmental influences! Avoid environmental influences such as smoke, dust, vibrations, chemicals, moisture, heat or direct sunlight.
2. Your ProMini
2.1 Checking the package contents
Check the contents of the packaging of your alarm system before you put your alarm system into operation. If anything is missing or damaged, do not operate your alarm system under any circumstances. Contact our service department (see information in section „14.4 Warranty“ on page 84).
■ ProMini alarm system
■ Quick reference guide
2.2 Accessories
You can use accessories from the Protect/ProHome series with the alarm system. The only exceptions are the ProHome Heating controller and the ProHome switching/measuring socket.
For this purpose, contact our service/service partner.
When installing accessories, follow the operating instructions of the accessories.
2.3 Tuya Smart Home
You can use your alarm system to control other Tuya Smart Home devices (Wi-Fi) or to have your alarm system controlled by other Tuya Smart Home devices (Wi-Fi). To do this, you can create scenes in the Tuya Smart app (see section „13. Create scenes“ on page 73).
2.4 System Requirements
You need an Internet-enabled smartphone/tablet with the Android (from 4.4) or iOS (from 10) operating systems and the latest version of the Tuya Smart app.
For the initial start-up, connect your alarm system with the Tuya Smart app and the WLAN of your router.
When selecting a mounting location, make sure that your alarm system is within range of your wireless home network (WLAN).
2.5 Features
Volume selectable
You can set the volume for the alarm in 4 levels.
■ Expandable by up to 70 devices
You can register up to 70 devices (sensors, sirens or remote controls) to the alarm system.
■ 3 operating modes selectable
The alarm system has 3 operating modes: disabled, on-the-go enabled and home enabled.
- Alarm on smartphone
When the alarm is triggered, you will receive a notification via the Tuya Smart app.
Built-in Battery
The built-in rechargeable battery keeps the alarm system operating even in the event of a power failure.
■ Doorbell function
You can use sensors as a trigger for a doorbell sound.
2.6 Operating modes and alarm zones
Your alarm system has the following operating modes: Disarmed, Away Armed and Home Armed.
The alarm triggering in the respective operating mode depends on the assignment of the sensors to the alarm zones.
The sensors can be assigned to the following alarm zones: Ordinary zone, Home zone oder 24H zone.
| Disarmed Away Armed Home Armed | |||
| Ordinary zone | No alarm when a sensor is triggered | Alarm when a sensor is triggered | No alarm when a sensor is triggered |
| Home zone | No alarm when a sensor is triggered | Alarm when a sensor is triggered | Alarm when a sensor is triggered |
| 24H zone | Alarm when a sensor is triggered | Alarm when a sensor is triggered | Alarm when a sensor is triggered |
3. Your ProMini in detail
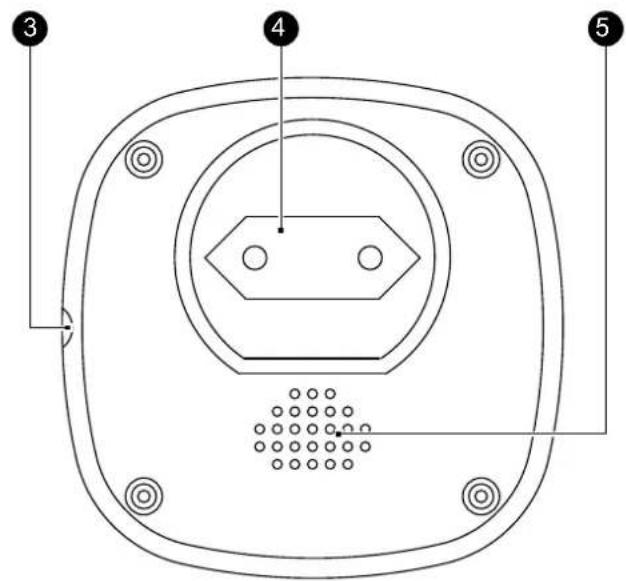
The following overview shows your alarm system in detail.
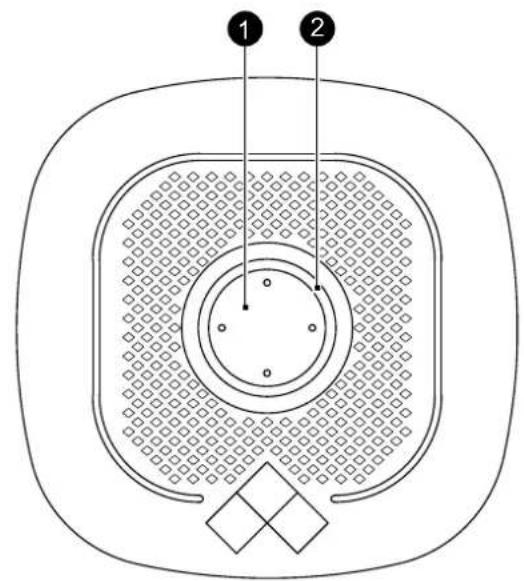
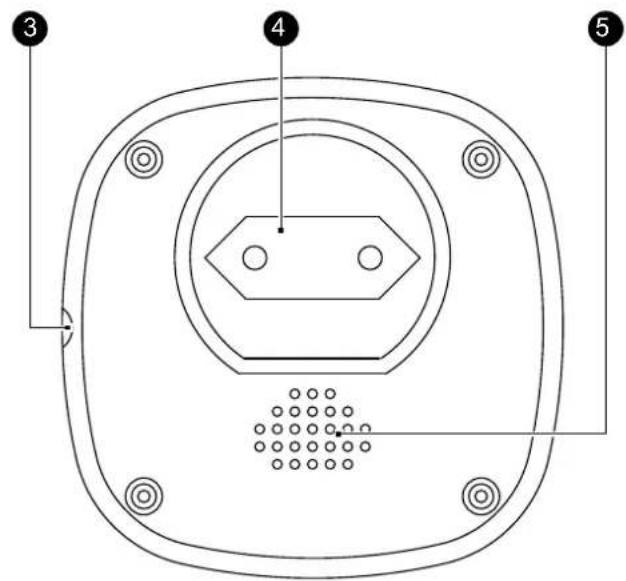
No. Meaning No. Meaning
1 Function key
4 Power plug
② Illuminated ring
⑤ Speaker
③ Setting key
4. Symbols
The following symbols can be found on the packaging or on the device itself. This section tells you what these symbols mean in detail.
Symbol Meaning
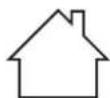
Use the product indoors only.
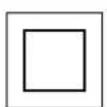
The symbol indicates that the design of the product corresponds to protection class II (double insulation). A safety connection to electrical ground (earth) is not required.
Further symbols can be found in section „14.3 Disposal“ on page 84.
5. Function of the keys
The following tables show you the functions of the individual keys and operating elements of your alarm system.
5.1 Function key
| Function Operation | |
| Switch on Press the function key briefly to switch on the alarm system. | |
| Note: The alarm system switches on automatically when plugged into a power outlet. | |
| Switch off | Press the function key for 5 seconds in battery mode until the alarm system beeps 1 time. The illuminated ring turns off. Note: Switch off the alarm system to save the battery if you remove the alarm system from the socket and do not use it. |
| Activate the alarm system | Press the function key briefly. The alarm system beeps 1 time, and the alarm system is activated in Away Armed mode. |
| Deactivate the alarm system | Press the function key briefly. The alarm system beeps 2 times, and the alarm system is deactivated. |
| Deactivate alarm | Press the function key briefly in the event of an alarm. The alarm is switched off. |
Important! Data loss possible when switching on! If you have set up the alarm system and switch it off, open the Tuya Smart app before switching it on. If you have not opened the Tuya Smart app when you switch it on, settings may be lost.
5.2 Setting key
| Function Operation | |
| Registering accessories | Press the setting key until the alarm system beeps 1 time. The illuminated ring flashes green. The alarm system is in registration mode.Press the setting key briefly in registration mode to exit registration mode. The alarm system beeps 1 time. |
| Fast Mode | Press the setting key for 3 to 5 seconds until the alarm system beeps 2 times. The alarm is in Fast Mode and the illuminated ring flashes quickly in blue.Note: If no connection can be established in Fast Mode, the alarm system automatically switches to Hotspot Mode. The illuminated ring flashes slowly in blue. |
| Hotspot Mode | Press the setting key and the function key simultaneously for 3 seconds. The alarm system is in hotspot mode and the illuminated ring flashes slowly in blue. |
| Resetting to factory settings | Press the setting key for at least 10 seconds until the alarm system beeps 3 times. The alarm system is reset to the factory settings. |
Note that when restoring the factory settings, all user settings are deleted.
6. Illuminated ring
The following table shows you the flashing and illuminated behavior of the illuminated ring on the front of your alarm system.
| Farbe Bedeutung | ||
| Red | 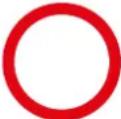 | Flashing rapidly:An alarm has been triggered. |
| Yellow | 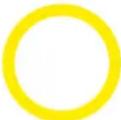 | Flashing slowly:There is no network connection. |
| Green |  | Flashing fast:The alarm system is in accessory login mode. |
| Blue |  | Flashing rapidly:The alarm system is in Fast Mode.Flashing slowly:The alarm system is in Hotspot Mode.Steady light:The network connection is good. |
7. Installing the alarm system
Positioning the alarm system:
Do not place the alarm system on or in the immediate vicinity of large metal objects or sources of electrical interference that will impair radio transmission.
- Place the alarm system as centrally as possible to ensure optimum radio transmission of all components.
- Select a properly installed power outlet near your router. The distance should be less than 5 m.
- Plug the alarm system into the socket.
8. Installing Tuya Smart app
To set up the alarm system, you need to install the Tuya Smart app.
The following describes the installation for devices with Android operating system. The installation for devices with the iOS operating system is identical in procedure. In case of significant differences, the illustrations of both operating systems are shown.
- Download the Tuya Smart app from the App Store or Google Play or scan this QR code.

Make sure that your alarm system and your smartphone/tablet are within the range of the same home network (WLAN).
- Open the Tuya Smart app.
- Create a new account or log in with an existing account. If you create a new account, follow the instructions in the app.
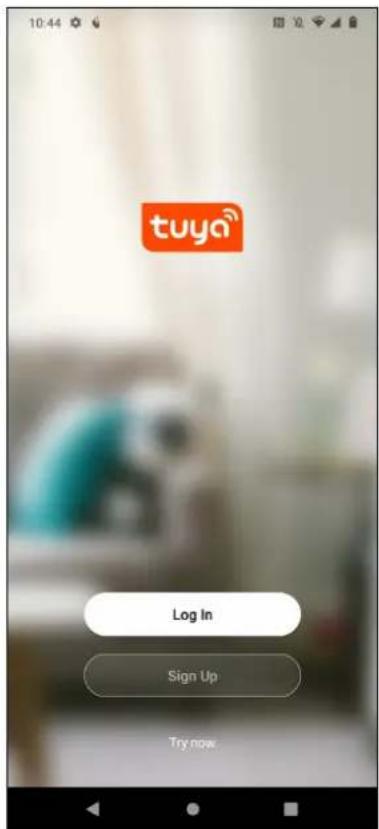
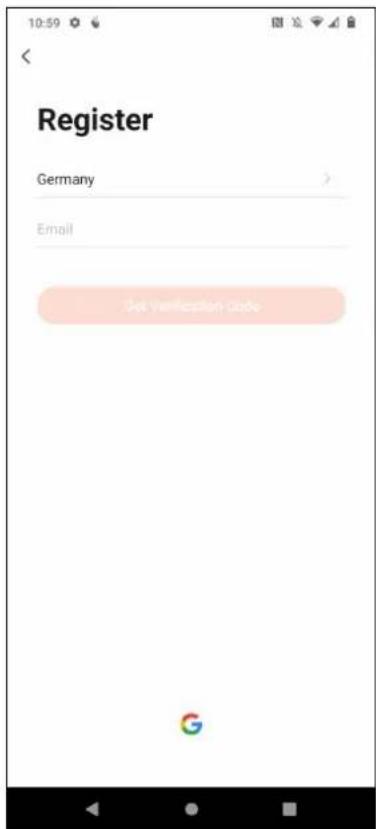
▶ You can use the Tuya Smart app to set up the alarm system.
9. Connect the alarm system
To set up the alarm system, you need to connect the alarm system to your home network (WLAN).
Make sure your smartphone/tablet is connected to your home network (WLAN) and your router's WLAN is set to 2.4 GHz.
9.1 Connect in Fast Mode
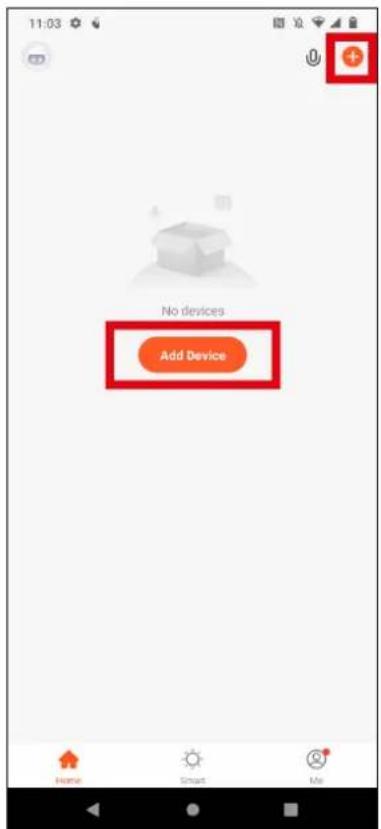
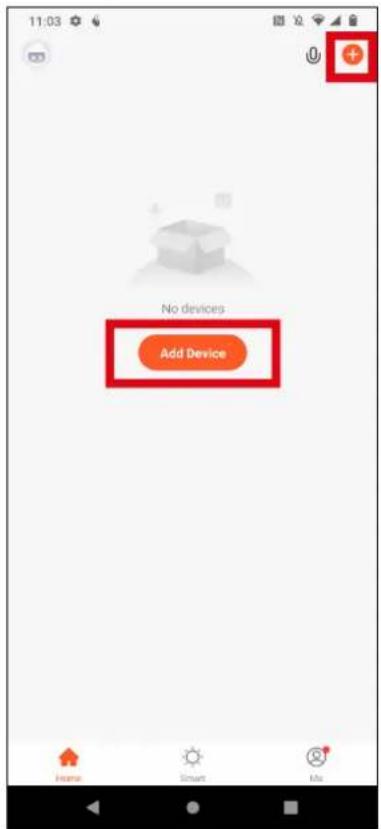
- In the Tuya Smart app, tap the plus in the upper right corner or Add Device.
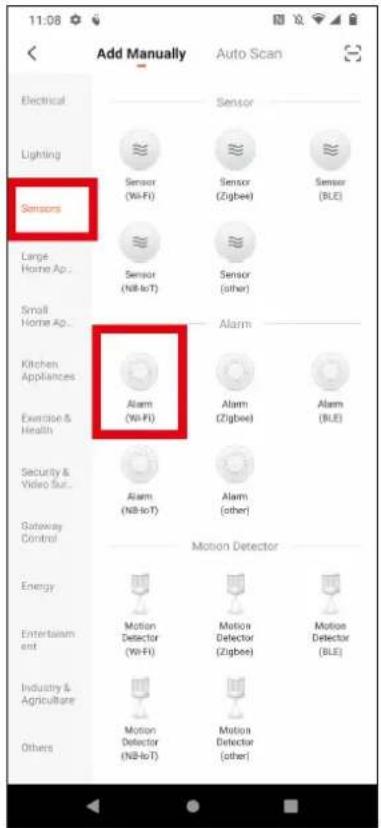
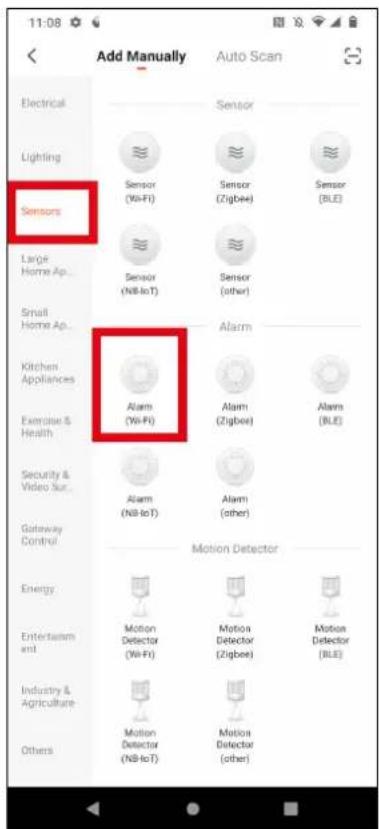
- Select the Sensors section and tap Alarm (Wi-Fi).
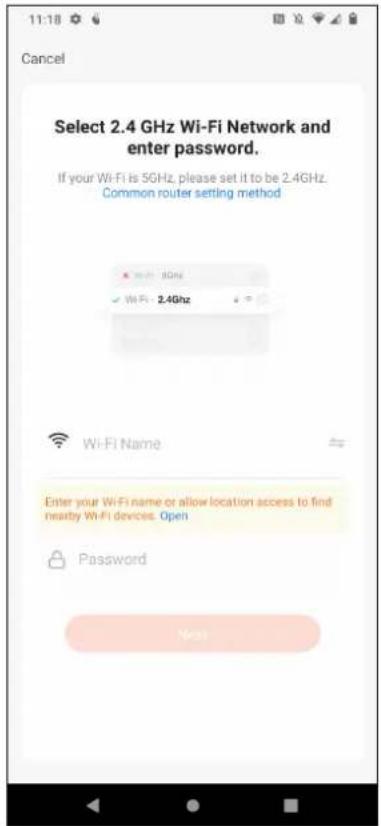
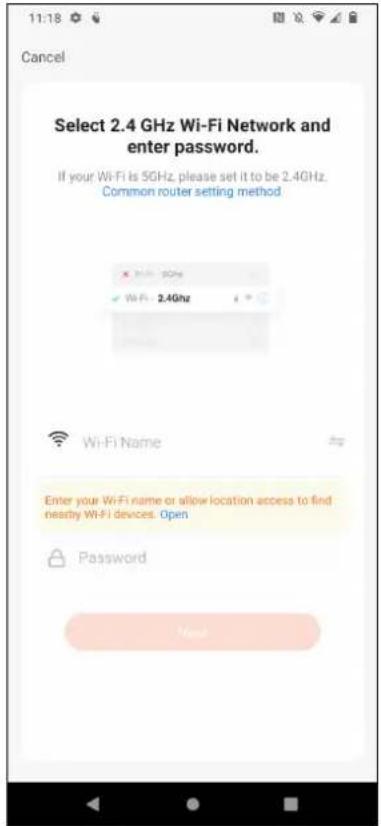
- Select your home network and enter the password for your home network.
- Press the setting button for 3 to 5 seconds until the alarm beeps 2 times.
▶ The illuminated ring flashes quickly in blue.
▶ The alarm system is now in Fast mode.
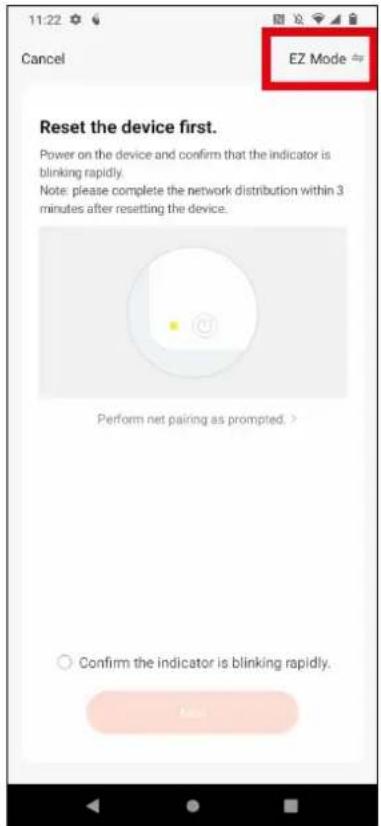
- Confirm in the Tuya Smart app that the indicator is blinking rapidly and tap Next.
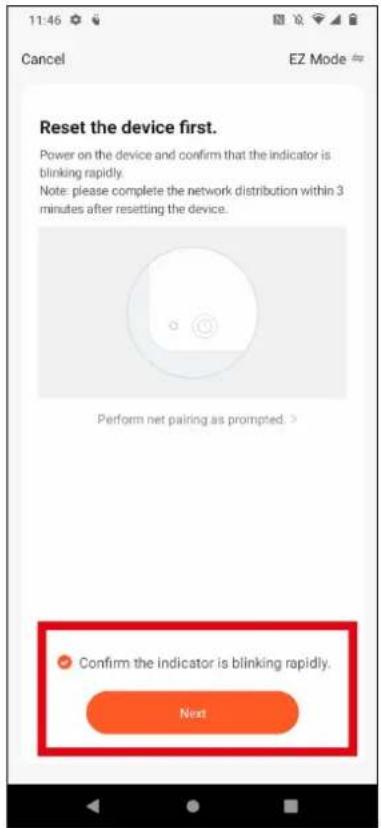
▶ A counter runs backwards until the connection is established.
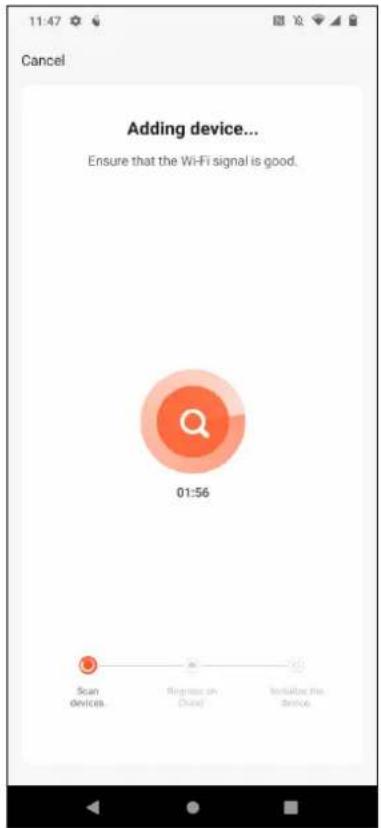
- When the alarm is successfully added, tap Done in the upper right corner of the Tuya Smart app.
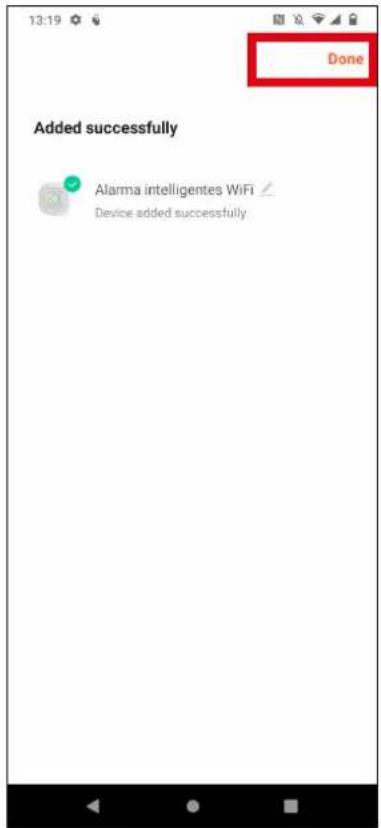
▶ The illuminated ring lights up continuously in blue.
▶ The alarm system can be set up via the Tuya Smart app.
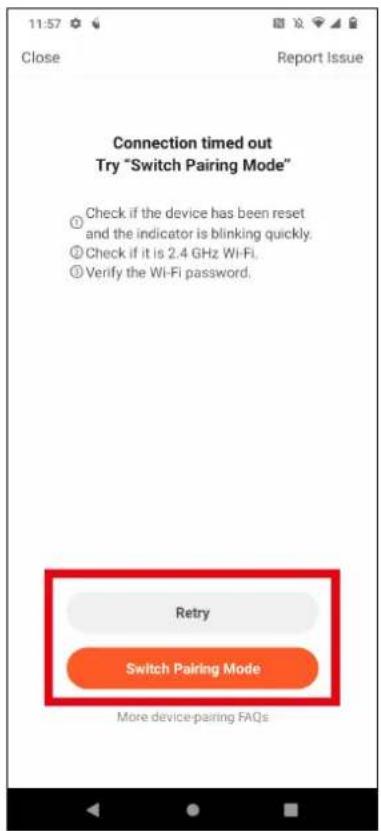
If the connection timeout occurs, you can repeat the process or switch to Hotspot Mode.
- Tap Retry to repeat the process or tap Switch Pairing Mode to switch to Hotspot Mode.
9.2 Connecting in Hotspot Mode
If a connection could not be established in Fast Mode, switch to Hotspot Mode.
- In the Tuya Smart app, tap the plus in the upper right corner or Add Device.
- Select the Sensors section and tap Alarm (Wi-Fi).
- Select your home network and enter the password for your home network.
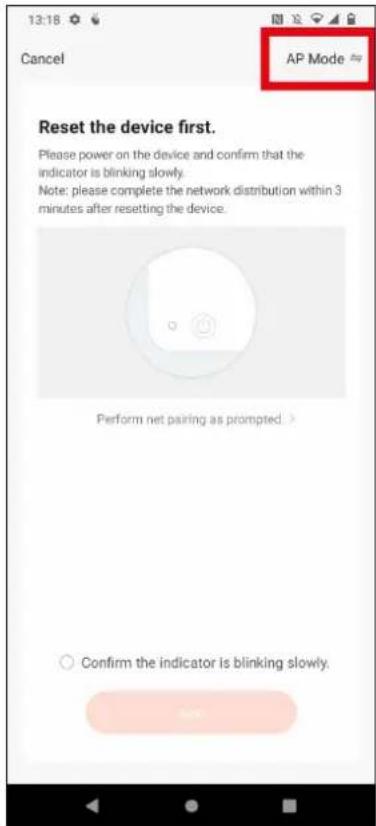
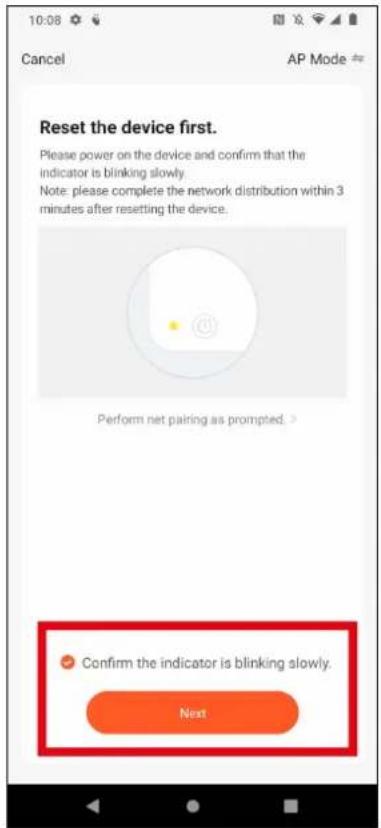
- In the Tuya Smart app, tap EZ Mode (Fast Mode) in the upper right corner and select AP Mode (Hotspot Mode).
- Press the setting key and the function key simultaneously for 3 seconds.
▶ The illuminated ring flashes slowly in blue.
▶ The alarm system is in hotspot mode.
- In the Tuya Smart app, confirm that the indicator is blinking slowly and tap Next.
7. Tap Go to Connect in the Tuya Smart app.
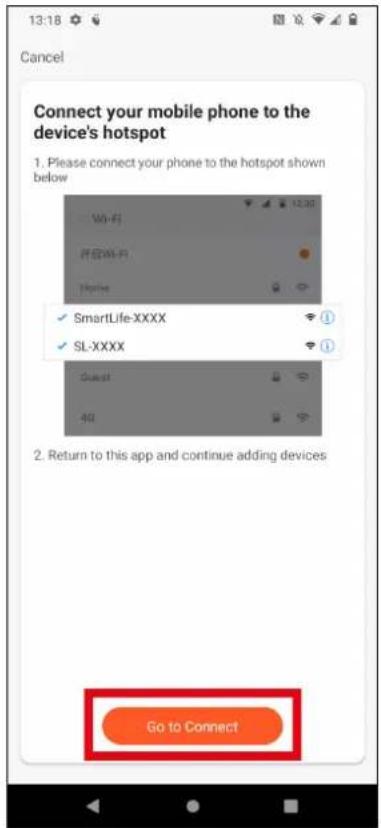
▶ Your smartphone/tablet switches to the WLAN setting and displays all available hotspots.
Android iOS
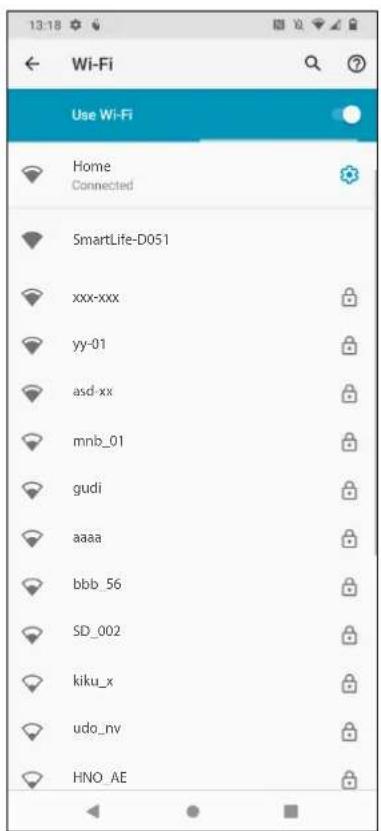
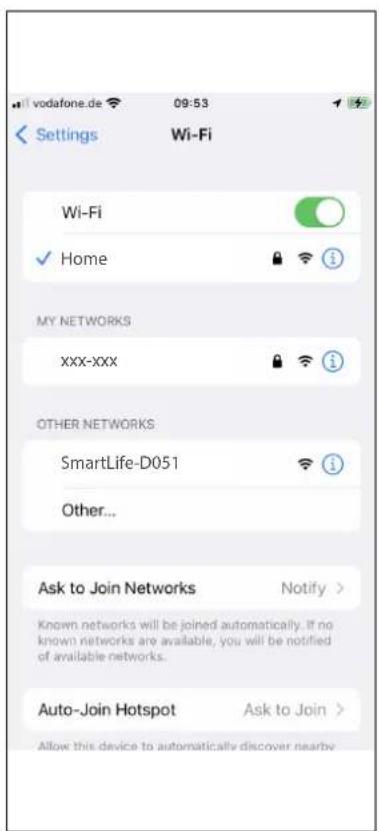
- Select the SmartLife-XXXX or SL-XXXX hotspot and tap Connect.
9. Switch to the Tuya Smart app.
▶ A counter will run backwards until the connection is established.
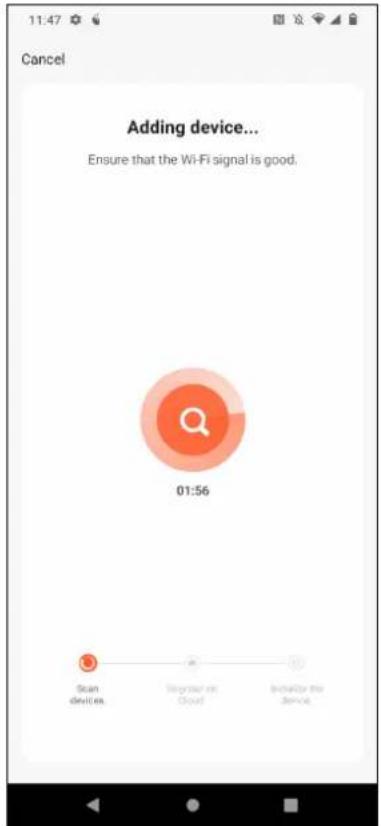
- When the alarm is successfully added, tap Done in the upper right corner of the Tuya Smart app.
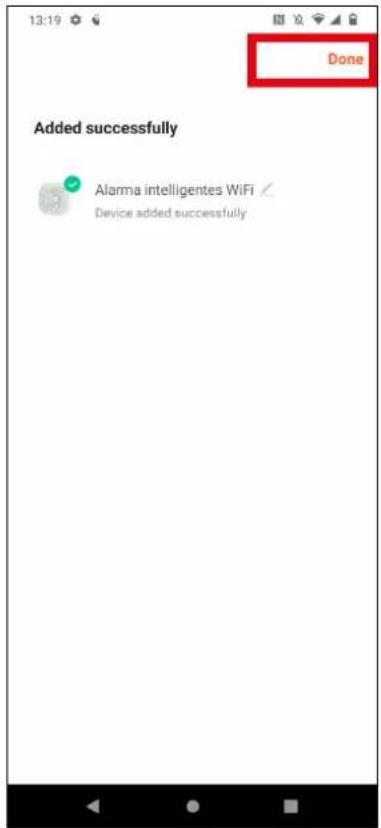
▶ The illuminated ring lights up continuously in blue.
▶ The alarm system can be set up via the Tuya Smart app.
10. Registering accessories (e.g. sensors)
You can register up to 70 devices (sensors, sirens or remote controls) to the alarm system. You can use accessories from the Protect/ProHome series.
Register several sensors one after the other. Sensors cannot be registered at the same time.
10.1 Registering via the Tuya Smart app
- Open the Tuya Smart app and tap on your alarm system.
In the settings, select your language under Master Language to display enrolled devices in your language.
2. Tap Accessories.
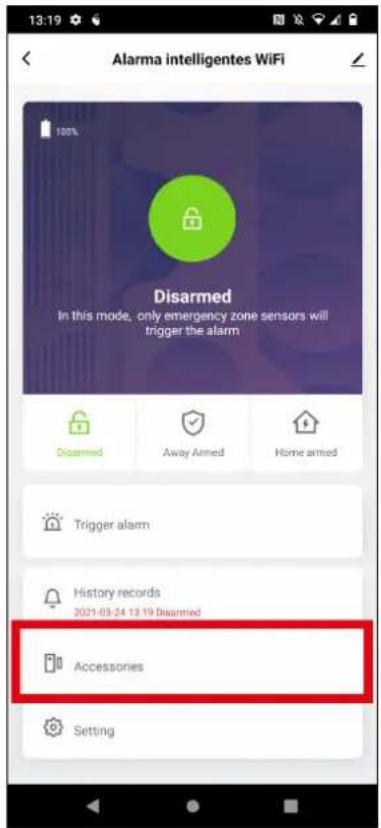
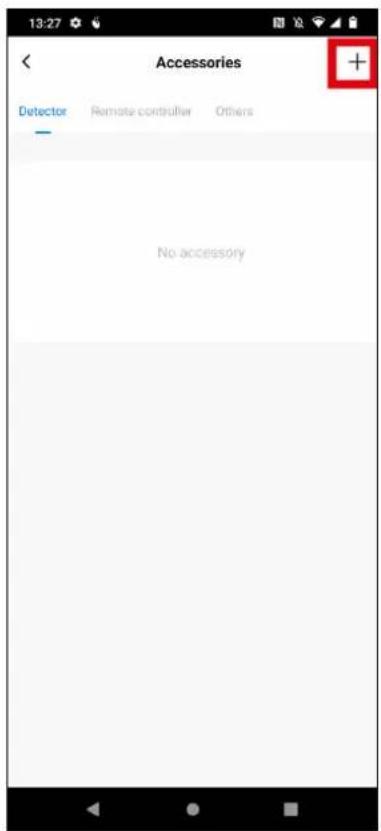
3. Tap the plus in the upper right corner to add accessories.
▶ In the Tuya Smart app, the login mode is displayed.
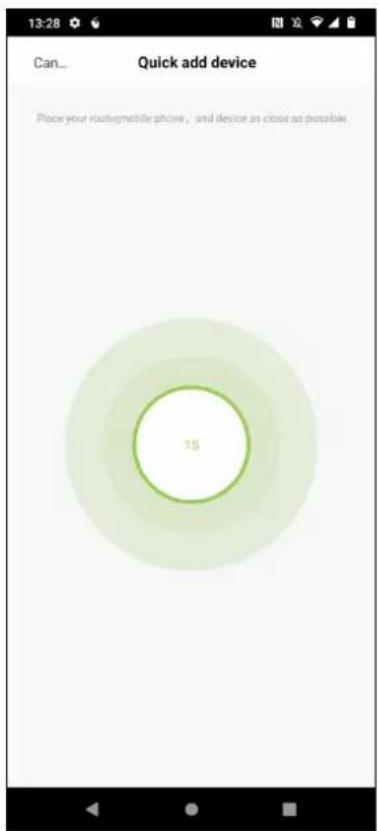
The alarm system is in registration mode. The illuminated ring flashes green.
- Trigger the registration process on the device to be registered.
Refer to the instructions for the device to be registered for information on how to initiate the registration process on the device to be registered.
Some devices log on by inserting the battery. If login by inserting the battery fails, try to login the device by triggering the device.
Note on remote controls: To log in a remote control, do not press the SOS/Emergency button, but press one of the other buttons on the remote control. The remote control is displayed in the list under Remote controller. If you use the SOS/emergency call key to log on a remote control, the remote control is displayed in the list under Detector.
▶ The registered device is displayed under Accessories.
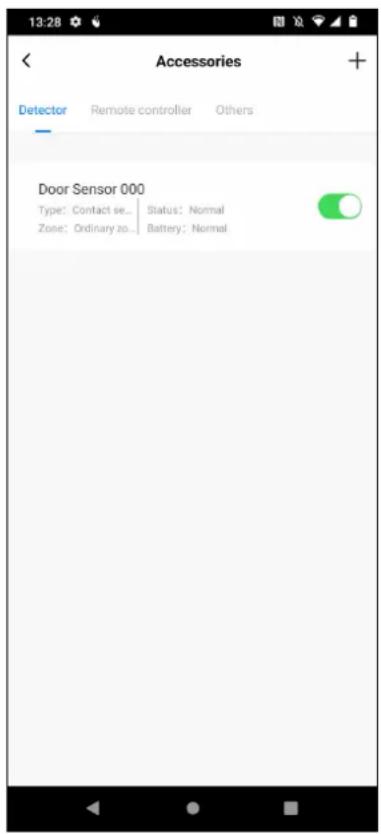
▶ The illuminated ring of the alarm system lights up blue.
10.2 Registration via alarm system
- Press the setting key until the alarm system beeps 1 time.
▶ The alarm system is in registration mode. The illuminated ring flashes green. - Trigger the registration process on the device to be registered.
Refer to the instructions for the device to be registered for information on how to initiate the registration process on the device to be registered.
Some devices register by inserting the battery. If registration by inserting the battery fails, try to register the device by triggering the device.
Note on remote controls: To log in a remote control, do not press the SOS/Emergency button, but press one of the other buttons on the remote control. The remote control is displayed in the list under Remote controller. If you use the SOS/emergency call key to log on a remote control, the remote control is displayed in the list under Detector.
▶ The alarm system beeps 1 time when the device to be registered has been registered.
▶ The alarm system beeps 2 times if the device to be registered has already been registered.
- In registration mode, briefly press the setting key to exit registration mode.
▶ The alarm system beeps 1 time. The illuminated ring lights up blue.
11. Operation via Tuya Smart app
11.1 Activate / deactivate alarm
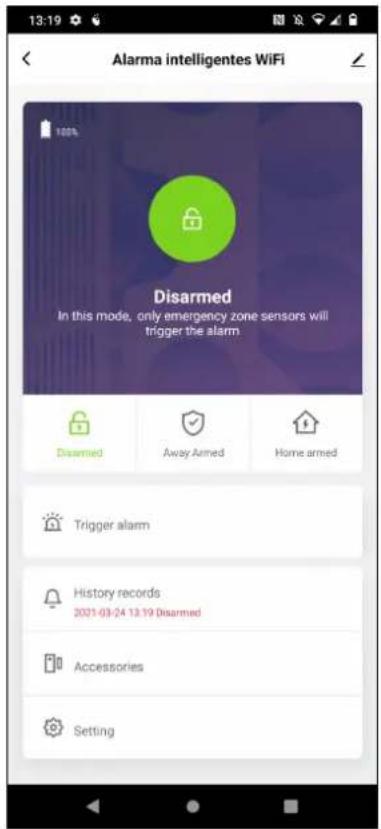
The alarm system has 3 operating modes.
- Tap the corresponding field in the Tuya Smart app to activate the operating mode.
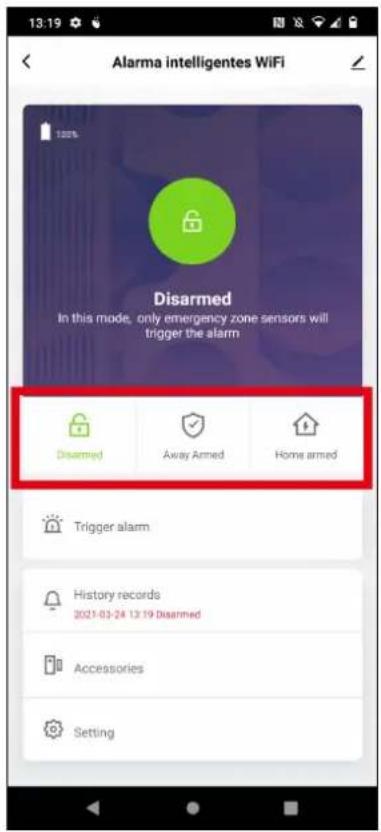
The active operating mode is highlighted in color and shown in the display above.
| Disarmed | In Disarmed mode, only sensors assigned to the 24H zone will trigger an alarm. |
| Away Armed | In Away Armed mode, all sensors (Ordinary zone, Home zone, or 24H zone) trigger an alarm. |
| Home Armed | In Home armed mode, only sensors assigned to the Home zone or 24H zone will trigger an alarm. |
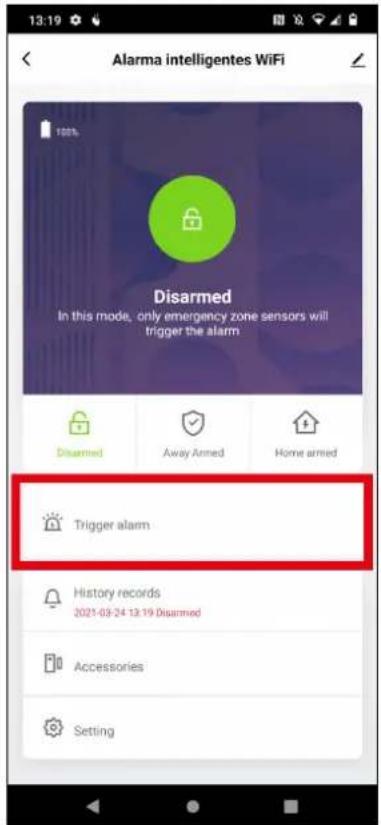
11.2 Trigger alarm
You can trigger an alarm manually via the Trigger alarm button.
1. Tap the Trigger alarm button.
▶ The alarm is triggered.
11.3 History recording
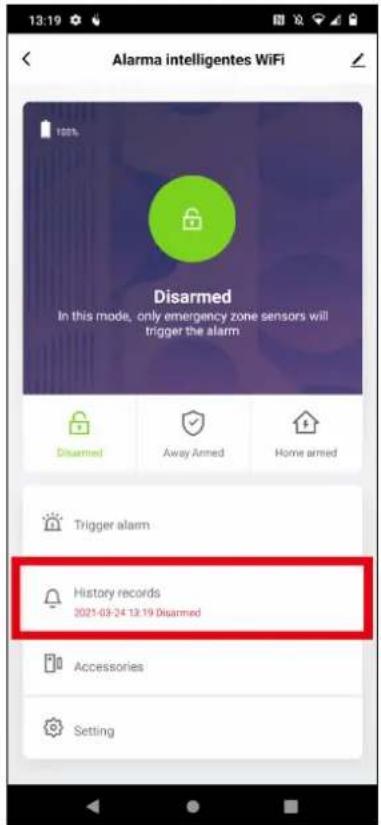
Under History records, the activation / deactivation of the alarm system and the alarms are recorded.
1. Tap the History records button.
▶ The history is displayed.
11.4 Set up accessories
Under Accessories, lists (Detector, Remote controller and Others) of all registered devices are displayed. You can activate / deactivate, delete, rename and make settings for accessories.
Deleting or renaming accessories
- Swipe the accessory row to the left.
▶ Buttons for deleting and renaming are displayed on the right.
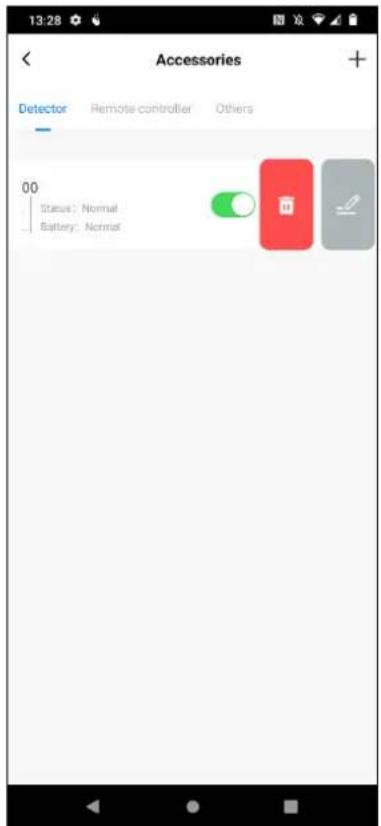
- Tap to rename the accessory or tap to delete the accessory.
Configuring settings for accessories
- Tap the line in the list with the accessory for which you want to make settings.
▶ The settings for the accessory will open.
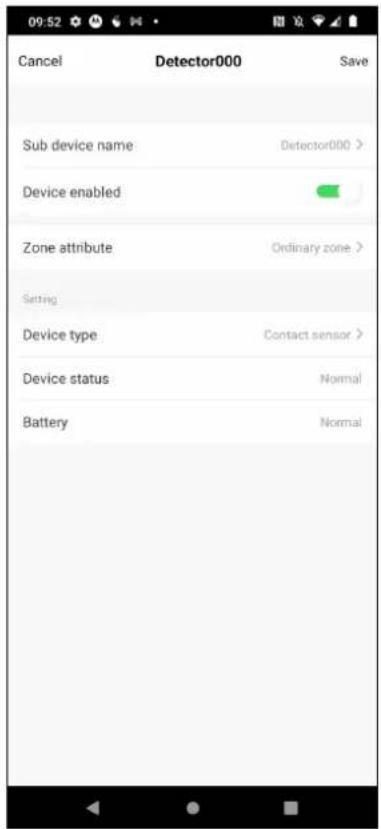
- Make the settings.
Configuration for accessories:
Sub device name Shows the device name.
Tap the device name to change the device name.
Device enabled Tap the switch to turn the accessory on / off.
Zone attribute Attach the accessories to a zone.
Ordinary zone
Sensors in the Ordinary zone trigger an alarm when the Away Armed mode is activated.
Home zone
Sensors in the Home zone trigger an alarm when the Away Armed or Home Armed mode is activated.
24H zone
Sensors in the 24H zone trigger an alarm in any mode, including Disarmed mode.
Device type Assign a device type to the accessory.
Device status Display of the device status.
Battery Display the battery status of the accessory.
- Tap Save in the upper right corner to save the settings.
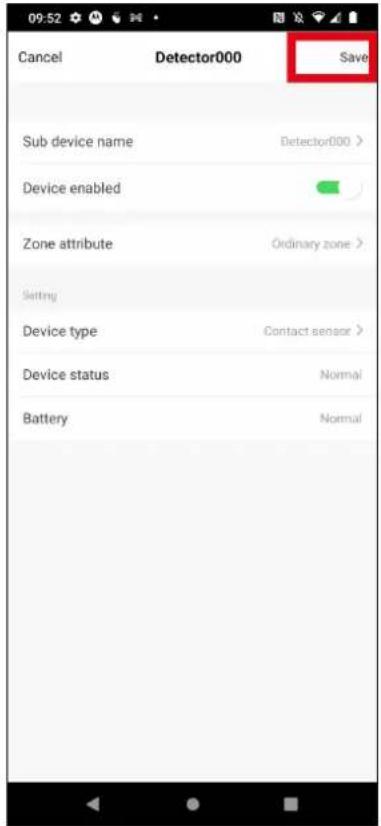
▶ The settings have been applied.
Tap Save in the upper right corner to save the settings. If you do not tap Save, the changes to the settings are not applied.
11.5 Settings for your alarm system
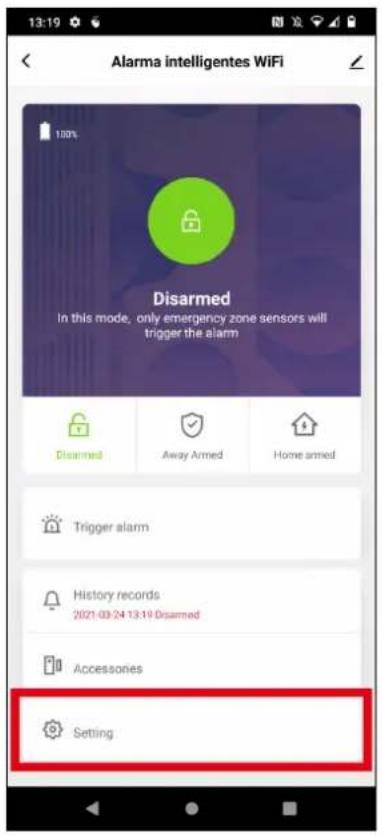
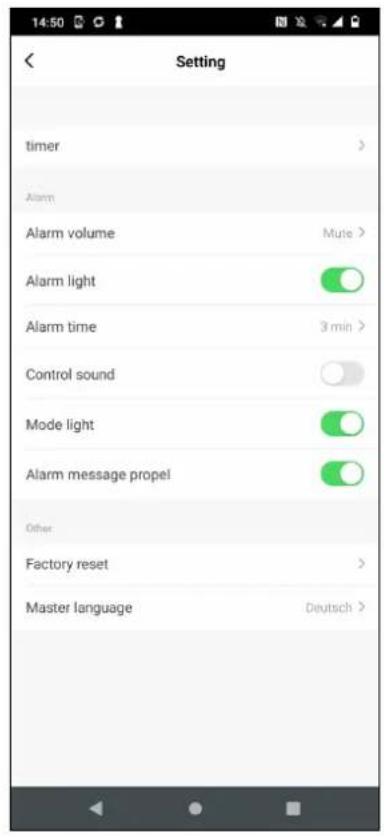
timer Timer for activating / deactivating the alarm system
Alarme volume Select the alarm volume in 4 levels: Low, Middle, High or Mute.
Alarme light On: The light ring flashes red when the alarm is triggered.
Off: The light ring will turn blue when the alarm is triggered.
Alarme time Select the alarm duration in 6 levels: 1 min, 2 min, 3 min, 4 min, 5 min or 6 min.
Note: Check if there are any legal restrictions on the alarm duration.
Control sound On: The confirmation tone when activating / deactivating or making settings is switched on.
Off: The confirmation tone during activation / deactivation or settings is switched off.
Mode light On: The illuminated ring is switched on.
Off: The light ring is switched off.
Alarme message propel On: A message is displayed on your smartphone/tablet when the alarm is triggered. Off: No message is displayed on your smartphone/tablet when the alarm is triggered.
Factory reset Reset to factory settings
Important: When resetting to factory settings, all data will be deleted. The alarm system will be removed from the Tuya Smart app.
Master language Selecting the language in the alarm system.
11.5.1 Time control for activating / deactivating the alarm system
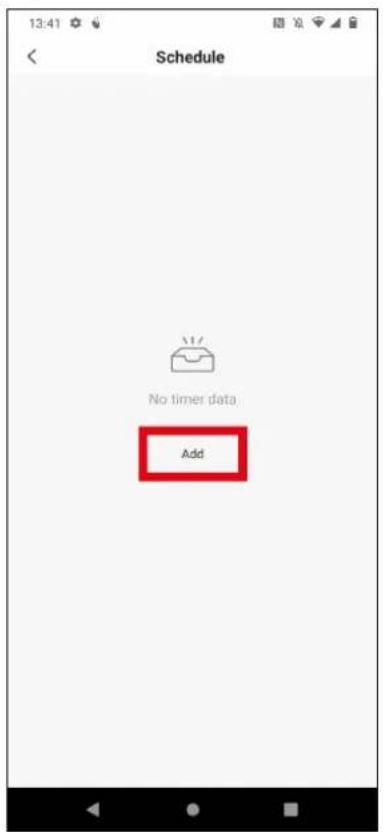
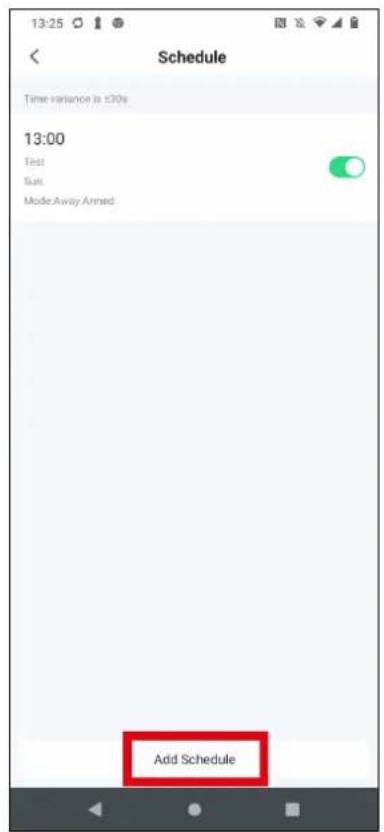
Under Settings → timer you can define times at which actions (Disarmed, Away Armed and Home Armed) are executed.
- Tap Add or Add Schedule to create an action.
- Set the time when an action should be executed.
- Under Repeat, you can select days of the week when the action should be repeated. If nothing is selected, the action will be executed only once.
- Under Note, enter information about the action. (Optional)
- Set the switch behind Notification if you want an execution message to be sent to your smartphone/tablet.
-
Select the action to be executed under Mode: Disarmed, Away Armed or Home Armed.
-
Tap Save in the upper right corner to save the settings.
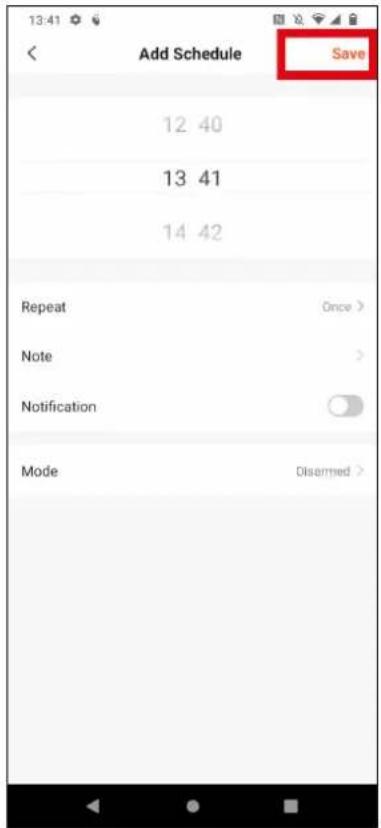
▶ The action has been created.
If you do not tap Save, the action is not created.
12. Doorbell function
You can use different sensors, e.g. contact sensors or motion detectors, as triggers for a doorbell sound.
- Open the settings for the sensor.
-
Tap Device Type and select Doorbell from the list.
-
Add the sensor you want to use as a doorbell under Accessories.
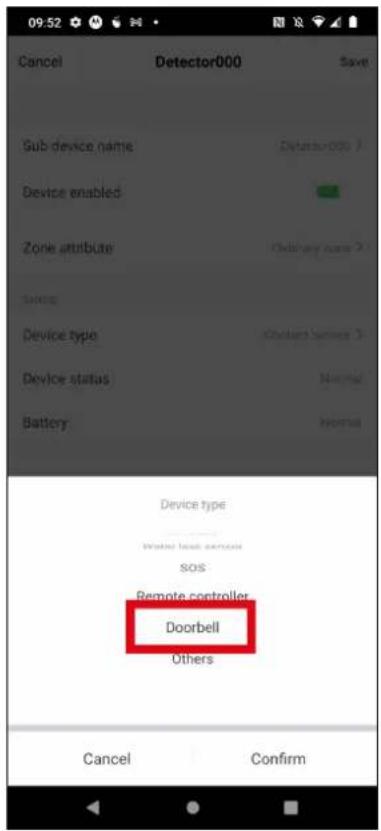
- Tap Zone attribute and select 24H zone from the list.
- Change the Sub device name.
- Tap Save in the upper right corner to apply the settings. ▶ When the sensor is triggered, the doorbell sounds on the alarm system.
13. Create scenes
You can create scenes in the Tuya Smart app. With a scene, you can, for example, switch on another device controlled via the Tuya Smart app when an alarm is triggered on the alarm system. You can also trigger the alarm system by another device controlled via the Tuya Smart app.
The sensors registered to the alarm system cannot be used to trigger a scene. Triggering a scene when an alarm is triggered is independent of the triggering sensor on the alarm system.
For information on which function of another device controlled via the Tuya Smart app is controlled via a scene or is available for triggering a scene, refer to the operating instructions of the device in question. For other devices controlled via the Tuya Smart app, the menu navigation may differ.
13.1 Example: Alarm on the alarm system controls a camera
In the following example, the alarm on the alarm system is to activate a camera.
- In the Tuya Smart app, tap Smart at the bottom to go to the scene creation area.
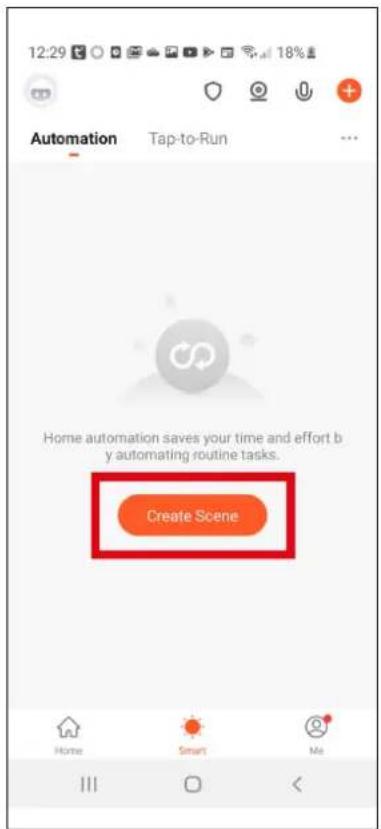
- Tap on Create scene.
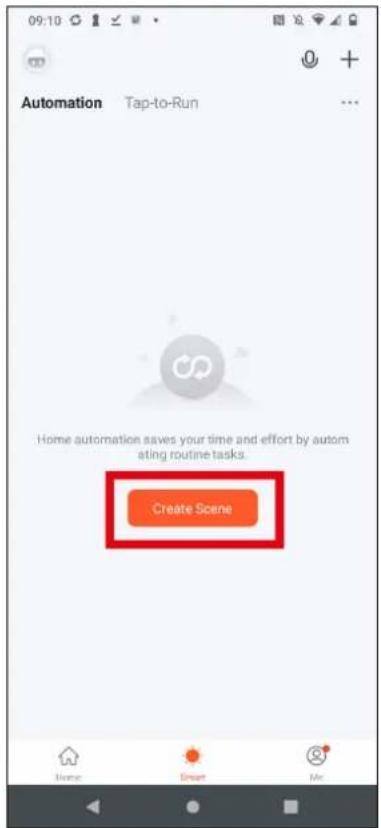
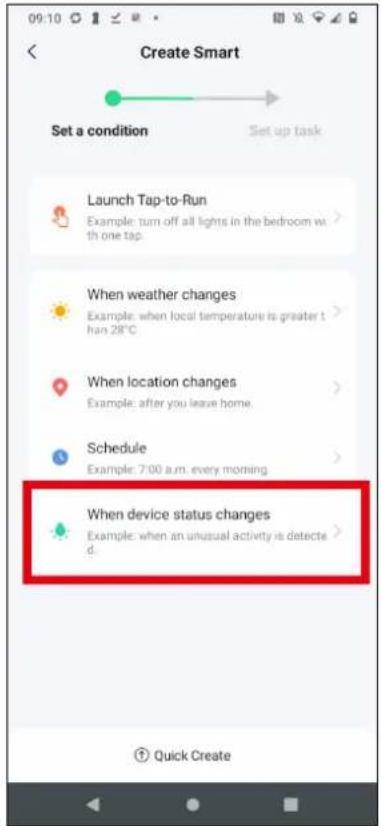
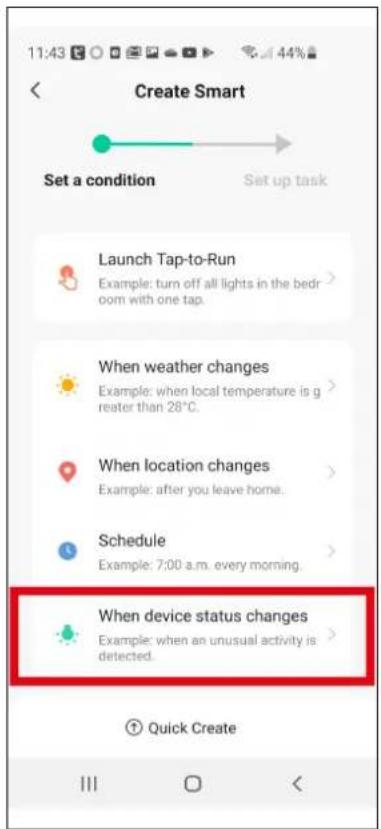
- Select the state that you want to trigger a scene. Select the When device status changes field if triggering an alarm on the alarm system should trigger a scene.
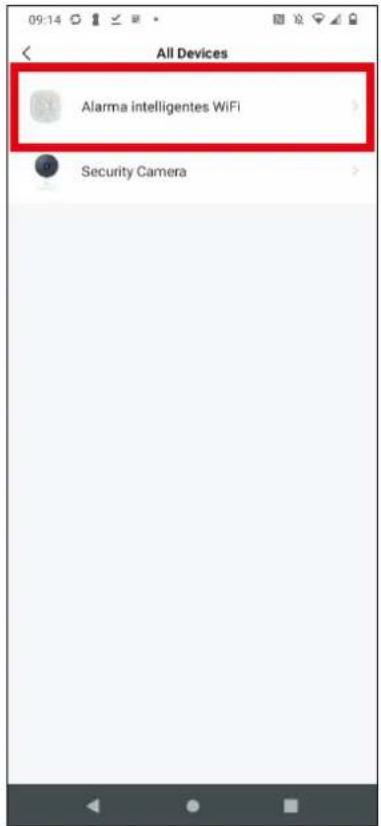
- Select the alarm system from the devices.
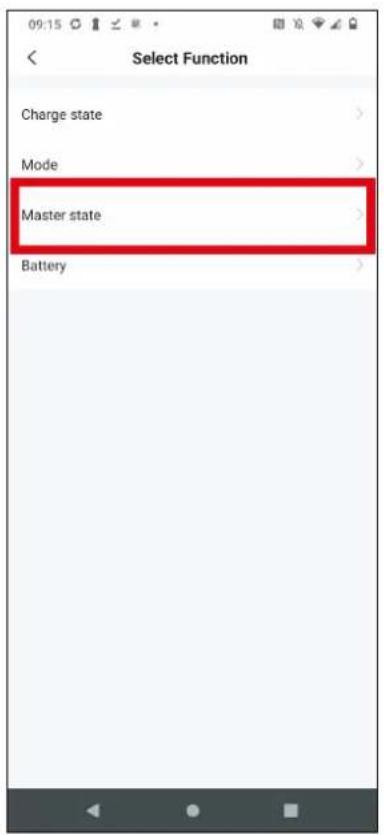
- Select the Alarm state under Master status if the triggering of an alarm at the alarm system is to trigger a scene.
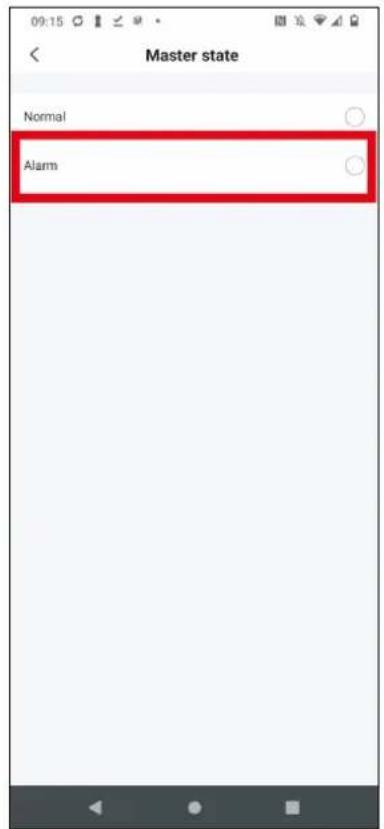
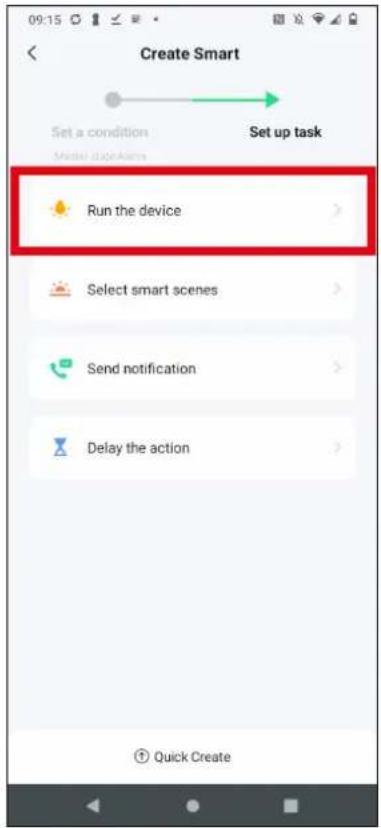
- Select the Run the device field to control another device controlled via the Tuya Smart app.
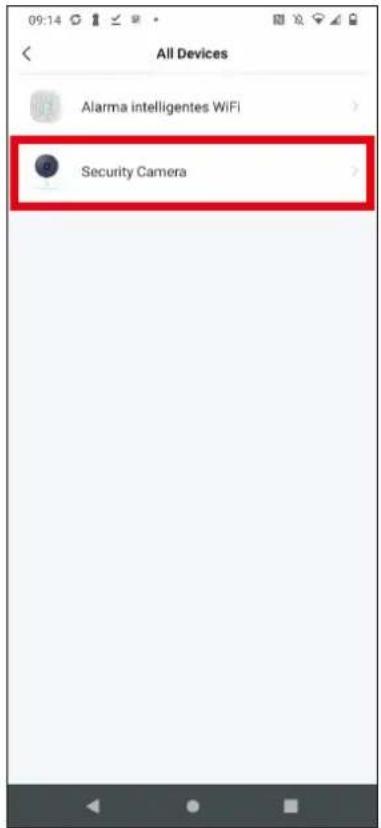
- Select the device to be controlled in the scene.
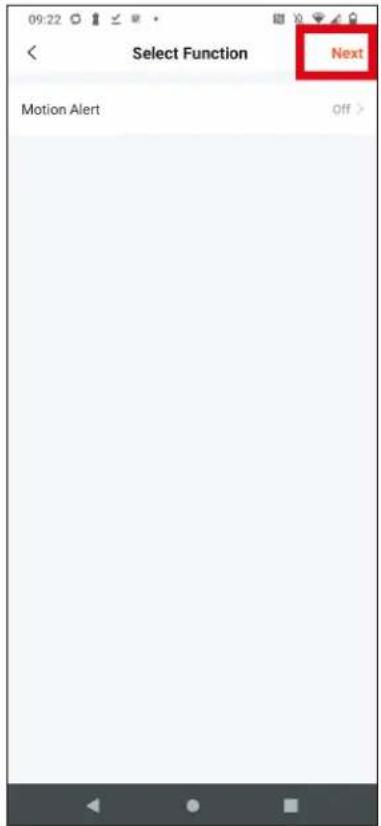
- Select the function you want to perform in the scene, such as Turn On Motion Alert, and tap Next.
- You can add more tasks to the scene, change the name of the scene, and make time settings for the scene. Tap Save to save the scene.
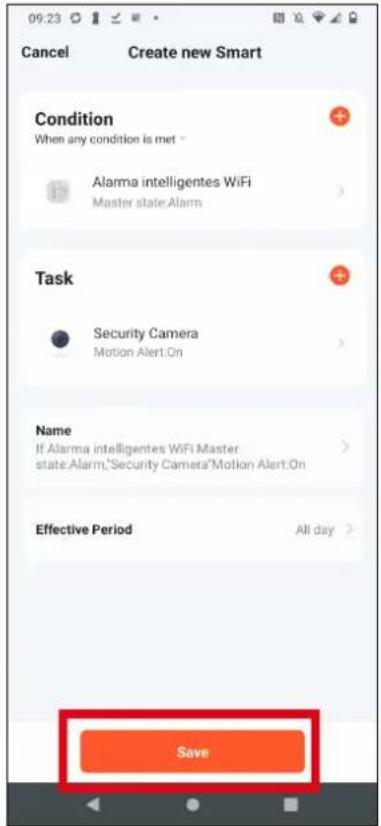
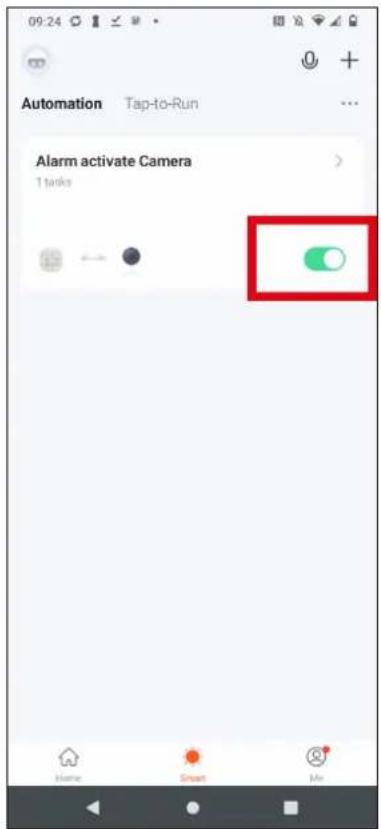
▶ The scene has been created.
- You can activate or deactivate the scene with the switch on the right.
13.2 Example: A Tuya Smart Home door/window sensor should trigger an alarm
In the following example, a door/window sensor controlled via the Tuya Smart app is to trigger an alarm at the alarm system.
1. Tap Create scene.
- Select the state that you want to trigger a scene. Select the field When device status changes if the triggering of the door sensor should trigger a scene.
- Select the Door/window sensor from the devices.
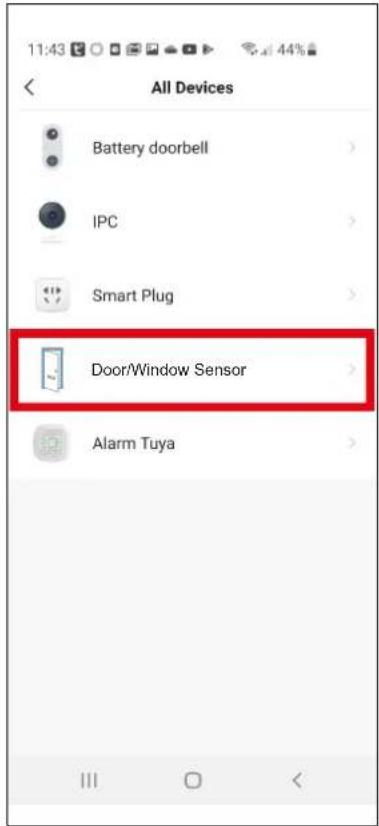
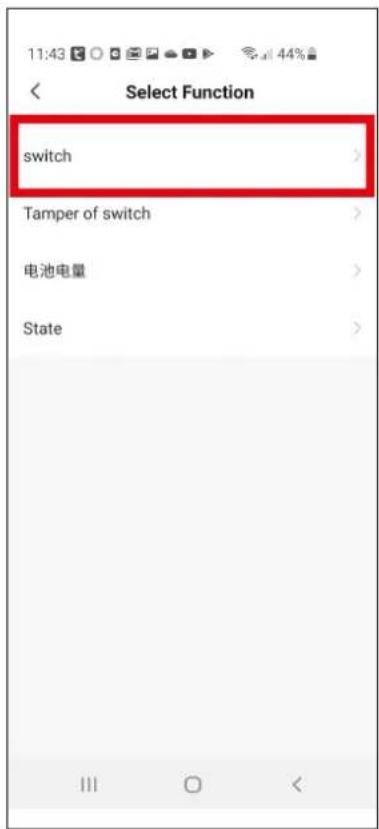
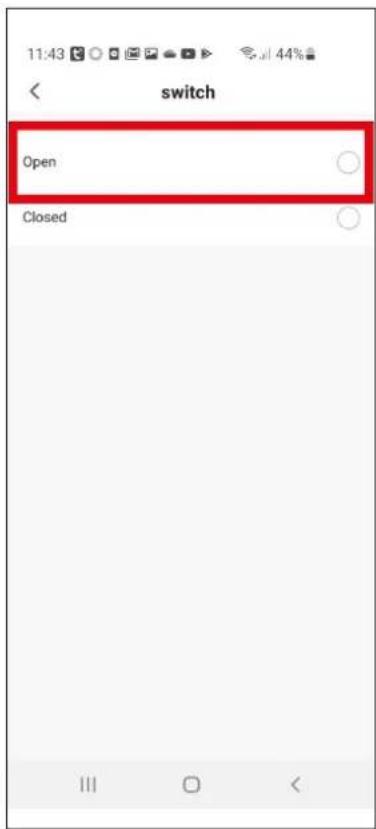
- Select the Open state under Switch, if opening the sensor is to trigger an alarm at the alarm system.
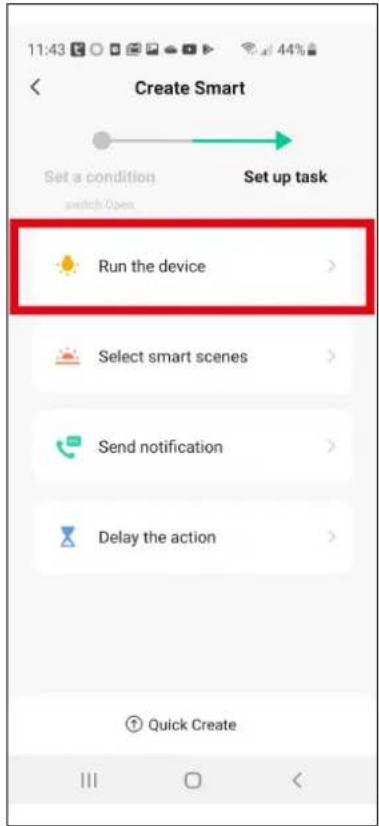
- Select the Run the device field to control the alarm system.
- Select the alarm system.
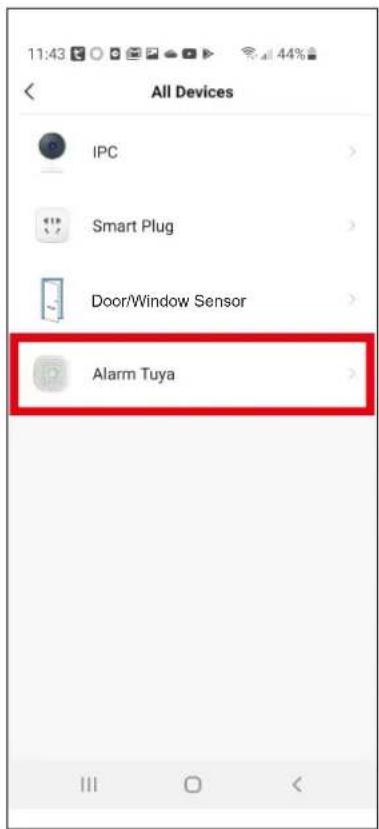
7. Under Trigger alarm, select the Trigger alarm state.
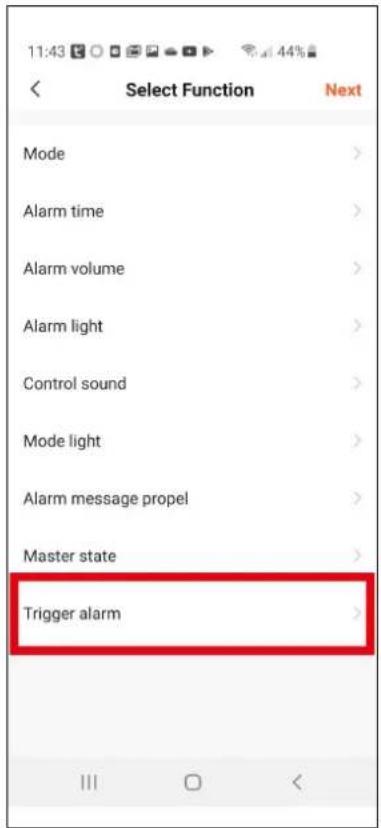
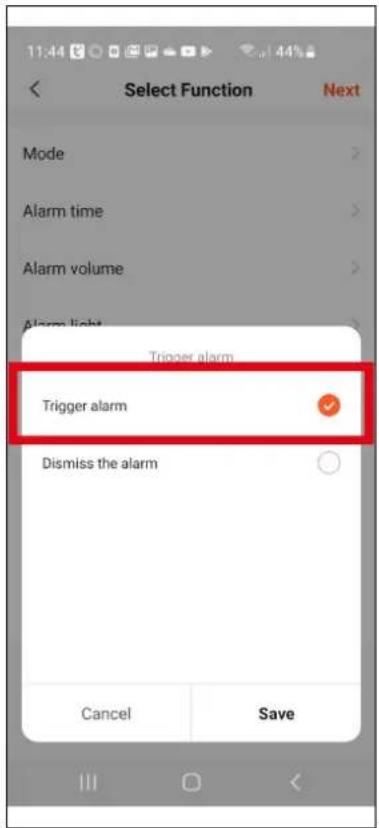
8. Save the selection and tap Next in the upper right corner.
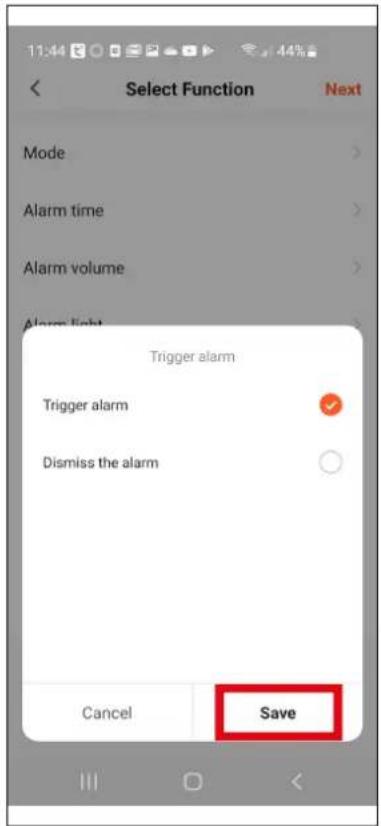
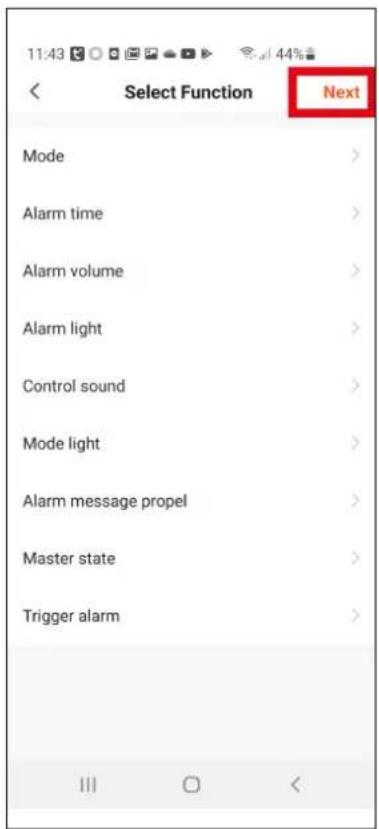
- You can add more tasks to the scene, change the name of the scene, and make time settings for the scene. Tap Save to save the scene.
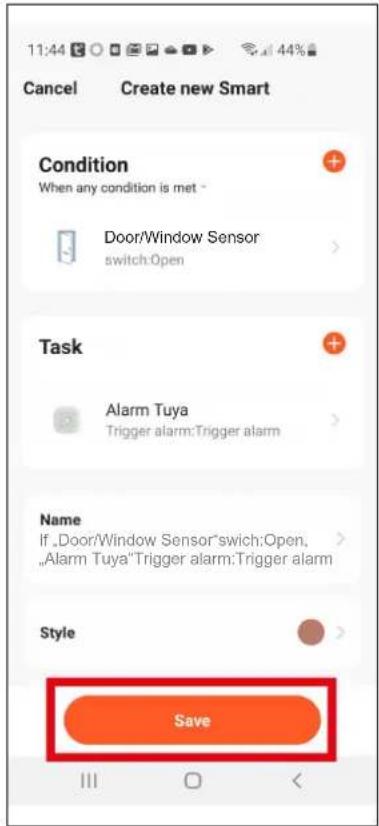
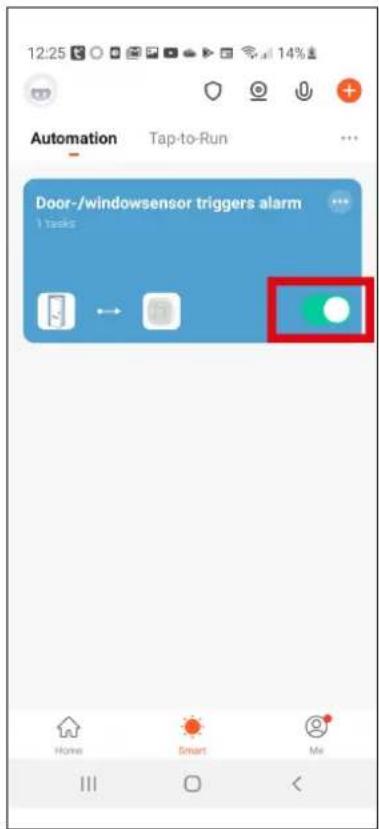
▶ The scene has been created.
- You can activate or deactivate the scene with the switch on the right.
14. What else you need to know
This chapter informs you about everything else you need to know: Answers to frequently asked questions, technical data, care and disposal instructions, information on conformity, and warranty.
14.1 Frequently asked questions (FAQ)
First try to identify your problem on the following pages and follow the suggested solutions.
The alarm system cannot be connected to the home network
- Check the settings on your router. The alarm system operates at a frequency of 2.4 GHz.
■ Reduce the distance to the router.
Accessories cannot be registered with the alarm system
- Check whether the distance between the alarm system and accessories is too great.
- Check if there are concrete walls or electrical devices between the alarm system and the accessory.
- Check the batteries in the accessory or the power supply to the accessory.
No alarm message is displayed on your smartphone/tablet
- Check in your smartphone/tablet if notifications are turned on.
Settings in the Tuya Smart app are not applied.
- Tap Save in the top right of the settings after you have made settings.
Scenes do not work
- Check if the scene is enabled.
- Check in the operating instructions of the other device controlled via the Tuya Smart app which settings have to be made or which conditions have to be fulfilled.
Unfortunately, the above-mentioned suggested solutions do not result in your alarm system working again as you expect it to? Try the FAQs on the Internet at www.go-europe.com or contact our service department.
14.2 Cleaning
Unplug the alarm system from the power outlet before cleaning.
Clean the housing surfaces with a soft, dry, lint-free cloth. Do not use any cleaning agents or solvents.
14.3 Disposal
Symbol Bedeutung

Find out about the possibilities of taking back used appliances free of charge from your dealer.

Packaging materials must be disposed of according to local regulations.
The packaging is made of environmentally friendly materials that you can dispose of at local recycling points. Advice on the options with which to dispose of your old device can be obtained from your municipal or local administration offices.
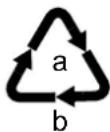
Observe the identification on the packaging materials during the waste sorting process; they are identified by abbreviations (b) and numbers (a) which have the following significance: 1–7: plastic/20–22: paper and cardboard/80–98: composite materials.
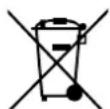
Defective or empty batteries must be recycled in accordance with Directive 2006/66/EC and its amendments. Return batteries and the device via the collection points provided.
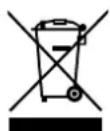
Defective or empty batteries must be recycled in accordance with Directive 2006/66/EC and its amendments. Return batteries and the device via the collection points provided.
Removing data from the device
Delete all user settings from your device before disposing of the device (for resetting to factory settings, see „5.2 Setting key“ on page 48).
14.4 Warranty
Dear customer,
We are delighted that you have chosen this equipment.
In the case of a defect, please return the device together with the receipt and original packing material to the point of sale.
14.5 Simplified EU Declaration of Conformity
Symbol Meaning

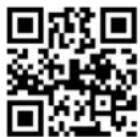
We, GO Europe GmbH, Zum Kraftwerk 1, 45527 Hattingen, DEUTSCHLAND, declare in sole responsibility, that the product complies with the EU Directives: 2014/53/EU, 2011/65/EU and 2009/125/EC. The full EU Declaration of Conformity is available online at the following website or by scanning the QR code: http://productip.com/?f=14d841
14.6 Technical data
| Feature Wert | |
| Supply voltage 100 V - 240 V AC | |
| Power input Max. 0.2 W | |
| Transmit power 20 dBm | |
| WLAN standard IEEE 802.11 b/g/n | |
| Radio frequency for accessories | 868.5 MHz |
| Range Max. 70 m | |
| Loudness at 1 meter distance | Low 80 dBMedium 85 dBHigh 90 dB |
| Dimensions (W × H × D) | 81.6 × 81.6 × 74.2 mm |
| Weight 100 g | |
Ambient conditions -10 °C bis 50 °C, max. 90% relative humidity
We reserve the right to make technical changes.
14.7 Manufacturer
GO Europe GmbH
Zum Kraftwerk 1
D-45527 Hattingen
Germany
www.go-europe.com
GO Europe GmbH
Zum Kraftwerk 1
45527 Hattingen
Germany
V1.15
07/2022
ID: 6032
- Bedienungsanleitung
- Inhalt
- For your safety
- Intended use
- Pay attention to the safety instructions
- Your ProMini
- Checking the package contents
- Accessories
- Tuya Smart Home
- System Requirements
- Features
- Operating modes and alarm zones
- Your ProMini in detail
- No. Meaning No. Meaning
- Symbols
- Symbol Meaning
- Function of the keys
- Function key
- Setting key
- Illuminated ring
- Installing the alarm system
- Installing Tuya Smart app
- Connect the alarm system
- Connect in Fast Mode
- Connecting in Hotspot Mode
- Tap Go to Connect in the Tuya Smart app.
- Android iOS
- Switch to the Tuya Smart app.
- Registering accessories (e.g. sensors)
- Registering via the Tuya Smart app
- Tap Accessories.
- Tap the plus in the upper right corner to add accessories.
- Registration via alarm system
- Operation via Tuya Smart app
- Activate / deactivate alarm
- Trigger alarm
- Tap the Trigger alarm button.
- History recording
- Tap the History records button.
- Set up accessories
- Deleting or renaming accessories
- Configuring settings for accessories
- Configuration for accessories:
- Ordinary zone
- Home zone
- 24H zone
- Settings for your alarm system
- Time control for activating / deactivating the alarm system
- Doorbell function
- Create scenes
- Example: Alarm on the alarm system controls a camera
- Example: A Tuya Smart Home door/window sensor should trigger an alarm
- Tap Create scene.
- Under Trigger alarm, select the Trigger alarm state.
- Save the selection and tap Next in the upper right corner.
- What else you need to know
- Frequently asked questions (FAQ)
- The alarm system cannot be connected to the home network
- Accessories cannot be registered with the alarm system
- No alarm message is displayed on your smartphone/tablet
- Settings in the Tuya Smart app are not applied.
- Scenes do not work
- Cleaning
- Disposal
- Symbol Bedeutung
- Removing data from the device
- Warranty
- Simplified EU Declaration of Conformity
- Technical data
- Manufacturer
Brand : OLYMPIA
Model : ProMini
Category : Alarm system