
EMV 960 - Range hood Scandomestic - Free user manual and instructions
Find the device manual for free EMV 960 Scandomestic in PDF.


| Brand | Scandomestic |
| Model | EMV 960 |
| Product Type | Range Hood |
| Width | 900 mm |
| Depth | 500 mm |
| Height | 100 mm (built-in) |
| Weight | 15 kg |
| Power Supply | 220-240 V, 50 Hz |
| Motor Power | 200 W |
| Extraction Rate | 600 m³/h |
| Noise Level | 65 dB(A) |
| Filter Type | Aluminum grease filter, reusable |
| Lighting | LED, 2 x 3 W |
| Control Type | Touch controls |
| Installation Type | Built-in / Wall-mounted |
| Venting Type | Ducted (external) or recirculation (with carbon filter) |
| Energy Class | A |
| Safety Features | Overheating protection, auto shut-off |
| Cleaning | Grease filter washable in dishwasher; surface with mild detergent |
| Spare Parts | Filters, LED bulbs available |
| Warranty | 2 years |
Frequently Asked Questions - EMV 960 Scandomestic
User questions about EMV 960 Scandomestic
0 question about this device. Answer the ones you know or ask your own.
Ask a new question about this device
Download the instructions for your Range hood in PDF format for free! Find your manual EMV 960 - Scandomestic and take your electronic device back in hand. On this page are published all the documents necessary for the use of your device. EMV 960 by Scandomestic.
USER MANUAL EMV 960 Scandomestic
natural_image
Diagram of airflow around a mechanical component with directional arrows indicating movement (no text or symbols)natural_image
Technical line drawing of a cylindrical component mounted on a base, with no visible text or symbols.- Kabelbinder

natural_image
Diagram of a brick wall with a chimney and a flat base, labeled 'Pic 6' (no text or symbols on the diagram itself)natural_image
Two abstract geometric shapes with vertical centerlines and dot patterns, no text or symbols presentRigtig Forkert
ADVARSEL


natural_image
Abstract line drawing of a stylized animal figure with a circular element, no text or symbols presentAdvarsel
Installation Af Fedtfilter
- Åben
- Luk
NOTE:

Miljøbeskyttelse:
This manual explains the proper installation and use of your cooker hood, please read it carefully before using even if you are familiar
with the product. The manual should be kept in a safe place for future reference.
Warning
- Do not try to use the cooker hood without the grease filters or if the filters are excessively greasy!
- Do not install above a cooker with a high level grill.
- Do not leave frying pans unattended during use because overheated fats or oils might catch fire.
- Never leave naked flames under the cooker hood.

• If the cooker hood is damaged, do not attempt to use.
• Do not flambé under the cooker hood.
- CAUTION: Accessible parts may become hot when used with cooking appliances.
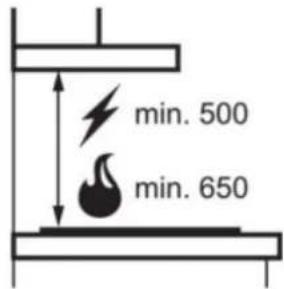
- The minimum distance between the supporting surface for the cooking vessels on the hob and the lowest part of the cooker hood. (When the cooker hood is located above a gas appliance, this distance shall be at least 65 cm)
- The air must not be discharged into a flue that is used for exhausting fumes from appliances burning gas or other fuels. Range hoods and other cooking fume extractors may adversely affect the safe operation of appliances burning gas or other fuels (including those in other rooms) due to back flow of combustion gases. These gases can potentially result in carbon monoxide poisoning. After installation of a range hood or other cooking fume extractor, the operation of open flued gas appliances should be tested by a competent person to ensure that back flow of combustion gases does not occur.
Function and Feature
- Important! Always switch off the electricity supply at the mains during installation and maintenance such as light bulb replacement.
- The cooker hood must be installed in accordance with the installation instructions and all measurements followed.
- All installation work must be carried out by a competent person or qualified electrician.
- Please dispose of the packing material carefully. Children are vulnerable to it.
- Pay attention to the sharp edges inside the cooker hood especially during installation and cleaning.
- Make sure the ducting has no bends sharper than 90 degrees as this will reduce the efficiency of the cooker hood.
- Warning: Failure to install the screws or fixing device in accordance with these instructions may result in electrical hazards.
- Warning: Before obtaining access to terminals, all supply circuits must be disconnected.
• Always put lids on pots and pans when cooking on a gas cooker. - When in extraction mode, air in the room is being removed by the cooker hood. Please make sure that proper ventilation measures
are being observed. The cooker hood removes odours from room but not steam.
- There shall be adequate ventilation of the room when the cooker hood is used at the same time as appliances burning gas or other fuels.
• Cooker hood is for domestic use only.


- If the supply cord is damaged, it must be replaced by the manufacturer, its service agent or similarly qualified persons in order to avoid a hazard.
- This appliance can be used by children aged from 8 years and above and persons with reduced physical, sensory or mental capabilities or lack of experience and knowledge if they have been given supervision or instruction concerning use of the appliance in a safe way and understand the hazards involved. Children shall not play with the appliance. Cleaning and user maintenance shall not be made by children without supervision.

- Caution: The appliance and its accessible parts can become hot during operation. Be careful to avoid touching the heating elements. Children younger than 8 years old should stay away unless they are under permanent supervision.
- There is a fire risk if cleaning is not carried out in accordance with the instructions.
• Regulations concerning the discharge of air have to be fulfilled. - Clean your appliance periodically by following the method given in the chapter MAINTENANCE.
- For safety reason, please use only the same size of fixing or mounting screw which are recommended in this instruction manual.
- Regarding the details about the method and frequency of cleaning, please refer to maintenance and cleaning section in the instruction manual.
- Cleaning and user maintenance shall not be made by children without supervision.
- When the cooker hood and appliances supplied with energy other than electricity are simultaneously in operation, the negative pressure in the room must not exceed 4 Pa(4 x 10 ^-5 bar).
- WARNING: Danger of fire: do not store items on the cooking surfaces.
• A steam cleaner is not to be used. - NEVER try to extinguish a fire with water, but switch off the appliance and then cover flame e.g. with a lid or a fire blanket.
Installation
Mounting of The V-Flap
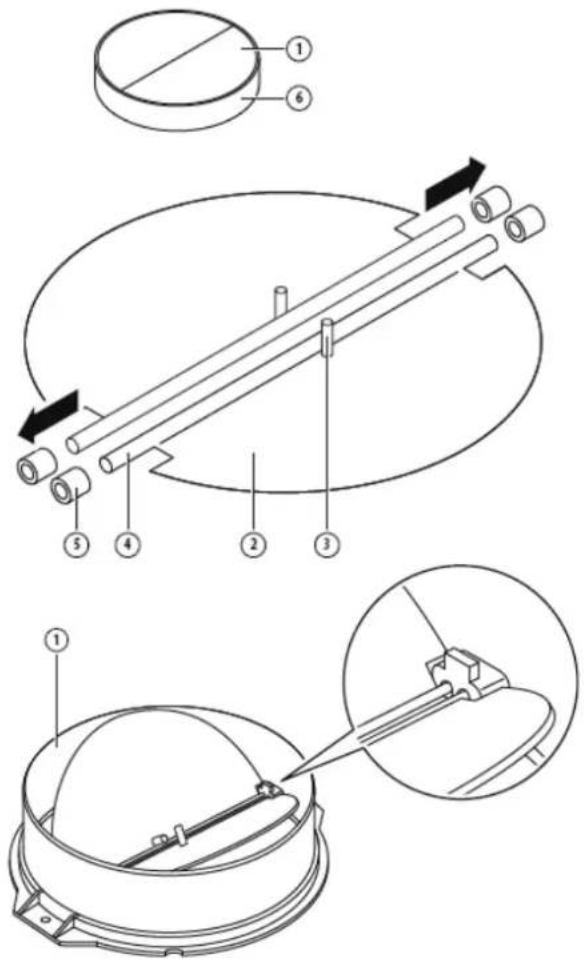
If the cooker hood does not have an assembled V-flap 1, you should mount the half-parts to its body. The images only show an example of how to mount the V-flap, because the outlet may vary according to different models and configurations.
To mount the V-flap 1 you should:
- Mount two half-parts 2 into the body 6;
• The pin 3 should be top oriented; - The axis 4 should be inserted into the holes 5 on the body;
- Repeat all the operations for the 2nd half-part.
If you have an outlet to the outside, your cooker hood can be connected as below picture by means of an extraction duct (enamel, aluminum, flexible pipe or non-flammable material with an interior diameter of 150mm)

natural_image
Diagram of airflow around a mechanical component with directional arrows indicating movement (no text or symbols)- Before installation, turn the unit off and unplug it from the outlet.

2. The cooker hood should be placed at a distance of 50\~65cm above the cooking surface for best effect. See pic 1.
natural_image
Diagram of a brick wall with dashed lines indicating construction or alignment, labeled 'Pic 2' at bottom (no text or symbols on the diagram itself)- After decide the cooker hood height, measure the position of the holes for hanging hood and inside chimney bracket. Drill 4 8 holes, 2 for inside chimney bracket and 2 for hanging the hood, and keep the hood level. The fixed position of the inside chimney bracket is the highest place of inside chimney. See pic 2.
- Screw 2 pcs ST4 x 30mm screws on the wall with wall plugs to fix the hood, then use 2 pcs ST4 x 40mm screws to fix the inside chimney bracket. See pic 2.
- Install the v-flap and expansion pipe onto the cooker hood. Fix the expansion pipe on the outlet with a cable tie. See pic
- Note: The expansion pipe is not included in this product.

-
Expansion pipe
-
V-flap

natural_image
Technical diagram of a cylindrical component mounted on a base, with no visible text or symbols- Cable tie

- Inside chimney
- Inside chimney bracket
-
Outside chimney
-
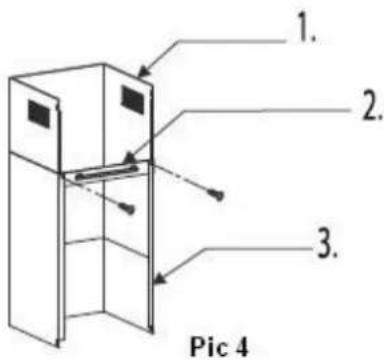
Install the outside chimney bracket onto the outside chimney with 2 pcs ST4*8mm screws, make the inside chimney can be flexed freely inside. See pic 4.
- Make the hood hang on the wall mounted screws in the fixed position, adjusting the cooker hood position, fix the cooker hood with 2 pcs ST4*30mm safety screws. See pic 5. Note: The two safety vents are positioned on the back housing, with a diameter of 6mm.
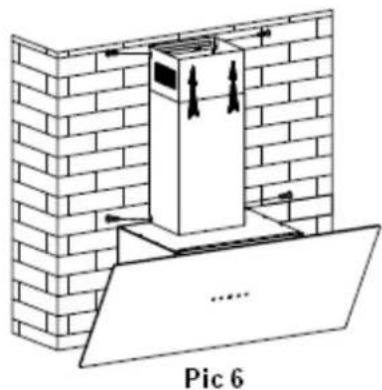
- Adjust the height of the inside chimney to the position of the inside chimney bracket and fix the inside chimney and outside chimney with 4 pcs ST4*8mm screws. See pic 6.

natural_image
Diagram of a brick wall with a chimney and a flat base, labeled 'Pic 6' (no text or symbols on the diagram itself)Hints For Exhaust Duct Installation
The following rules must be strictly followed to obtain optimal air extraction:
- Keep exhaust duct short and straight
- Do not reduce the size or restrict the exhaust duct
- When using the flexible duct always install the duct pulled taut to minimize pressure loss
- Failure to observe these basic instructions will reduce the performance and increase noise levels of the range hood.
- Any installation work must be carried out by a qualified electrician or competent person.
- Do not connect the ducting system of the hood to any existing ventilation system which is being used for any other appliance, such as warmer tube, gas tube, hot wind tube.
- The angle of the bend of the ventilation pipe should not be less than 120^ ; you must direct the pipe horizontally, or, alternatively, the pipe should go up from the initial point and should be led to an outer wall.
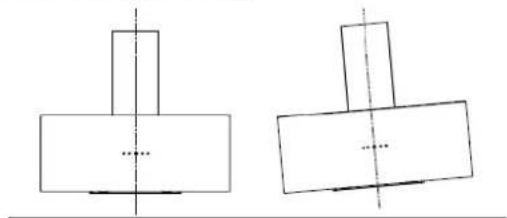
- After the installation, make sure that the cooker hood is level to avoid grease collection at on end.
Ensure the exhaust ducting selected for installation complies with relevant standards and is fire retardant.
natural_image
Two abstract geometric shapes with vertical and horizontal lines, no text or symbols presentRight Wrong
WARNING:


For safety reason, please use only the same size of fixing or mounting screws which are recommended in this instruction manual.

Failure to install the screws or fixing device in accordance with these instructions may result in electrical hazards.
Start Using Your Cooker Hood
Touch control with LED display


LED touch control has five buttons, see picture.

(Decrease),

(Lamp),

(Timer), (Power)
-
Power-on: After connecting the cooker hood to the main supply, the backlight of button will turn on, output will be closed and the cooker hood will enter into stand-by mode.
-
"POWER" button:
2.1 Press "POWER" button, the backlight of button will be on and the hood will work at the low speed, and the light will be on. The backlight of the buttons "DECREASE", "INCREASE", "LAMP", and "POWER" will be on. Press "POWER" button again, the backlight of button will be off and the cooker hood will be turn off and return into stand-by mode and operate by the circle.
2.2 . The button of "LAMP" button could be operated without pressing the "POWER" button. Press "POWER" button, the cooker hood will be turn off without any functions.
2.3 "LAMP" button:
Press "LAMP" button, the backlight of button and the lights will be on. Press again, the lights will be off. The lights run circularly.
- "INCREASE" button:
3.1 Press "INCREASE" button, the backlight of button will be on, the cooker hood starts to work at the low speed. the LED display will display "1",
3.2 Press "INCREASE" button again when it is working on the low speed, the cooker hood works at the mid speed and the LED display will display "2",
3.3 Press "INCREASE" button again when it is working on the mid speed, the cooker hood works at the high speed and the LED display will display "3".
- Press "DECREASE" button
4.1 Press "DECREASE" button, the cooker hood will decrease one speed, and the display will show the current working speed. When press "DECREASE" button again when it is working on the low
speed, the cooker hood will turn off and the backlight of the "DECREASE" button will be off.
- Press "TIMER" button:
5.1 The "TIMER" button works when the motor and light is on only. The timer setting is 5mins and could be repeat setting. When the time is up, the cooker hood will be turn off and the light will be off.
5.2 When the timer is set, if adjusting the speeds, the timer will re-calculate the working time.
Troubleshooting
| Fault | Possible Cause | Solution |
| Light on, but motor does not work | Fan switch turned off | Select a fan switch position. |
| Fan switch failed | Contact service center. | |
| Motor failed | Contact service center. | |
| Light does not work, motor does not work | House fuses blown | Reset/Replace fuses. |
| Mains power cable is loose or disconnected | Refit mains power cable to power outlet.Switch power outlet on. | |
| Oil leakage | One way valve and the outlet are not tightly sealed | Take down the one way valve and seal with sealant. |
| Leakage from the connection of chimney and cover | Take chimney down and seal. | |
| Lights not working | Broken or faulty bulbs | Replace bulbs as per this instruction. |
| Insufficient suction | The distance between the cooker hood and the gas top is too far | Refit the cooker hood to the correct distance. |
| The Cooker hood incline | The fixing screw is not tight enough | Tighten the hanging screw and make it horizontal |

NOTE:
Any electrical repairs to this appliance must conform to your local, state and federal laws. Please contact the service centre if in any doubt before undertaking any of the above.
Always disconnect the unit from the power source when opening the unit.
Maintenance And Cleaning
natural_image
Abstract line drawing of a stylized figure with geometric shapes and a circular element, no text or symbols present.Caution
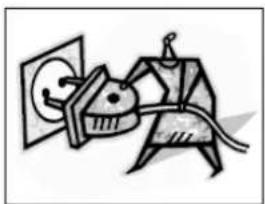
- Before maintenance or cleaning is carried out, the cooker hood should be disconnected from the mains power supply. Ensure that the cooker hood is switched off at the wall socket and the plug removed.
- External surfaces are susceptible to scratches and abrasions, so please follow the cleaning instructions to ensure the best possible result is achieved without damage.
General
Cleaning and maintenance should be carried out with the appliance cold especially when cleaning. Avoid leaving alkaline or acid substances (lemon juice, vinegar etc.) on the surfaces.
Stainless steel
The stainless steel must be cleaned regularly (e.g. weekly) to ensure a long life expectancy. Dry with a clean soft cloth. A specialized stainless steel cleaning fluid may be used.
NOTE:
Ensure that wiping is done along with the grain of the stainless steel to prevent any unsightly crisscross scratching patterns from appearing.
Control Panel Surface
The inlay control panel can be cleaned using warm soapy water. Ensure the cloth is clean and well wrung before cleaning. Use a dry soft cloth to remove any excess moisture left after cleaning.
Important
Using neutral detergents and avoid using harsh cleaning chemicals, strong household detergents or products containing abrasives, as this will affect the appearance of the appliance and potentially remove any printing of artwork on the control panel and will void manufactures warrantee.
Grease Mesh Filters
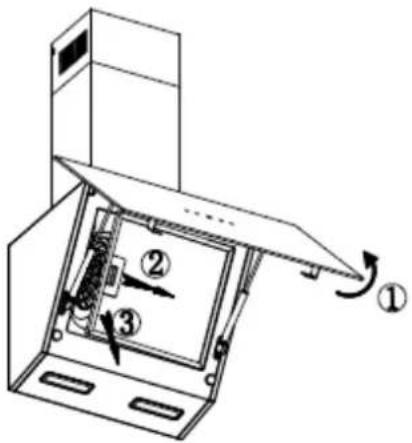
The mesh filters can be cleaned by hand. Soak them for about 3 minutes in water with a mild detergent and then brush it gently with a soft brush. Do not apply too much pressure so as to avoid any damage to it. (Leave to dry naturally out of direct sun light)
Filters should be washed separately to crockery and kitchen utensils. It is advisable not to use rinse aid. Following the picture beside to dismantle the grease filter.
Installing Grease Mesh Filters
• To install filters for the following four steps:
• Angle the filter into the slots at the back of the hood.
- Push the button on the handle of the filter.
- Release the handle once the filter fits into a resting position.
- Repeat to install all filters.
Carbon Filter- (Not supplied)
Activated carbon filter can be used to trap odors. Normally the activated carbon filter should be changed every 3 to 6 months according to your cooking habits. The installation procedure of activated carbon filter is as below:
- Before installing or replacing the carbon filters, disconnect the mains power to the unit.
- Press the filter lock and remove the mesh filter.
- Turn the carbon filter on both sides of the motor anticlockwise. Replace the carbon filters with the new carbon filters.
- Place the mesh filter.
- Connect the power supply to the wall socket.

- Open
- Close
NOTE:
- Make sure the filter is securely locked. Otherwise, it would loosen and cause danger.
- When activated carbon filter attached, the suction power will be lowered.
Bulb Replacement
Important!
- The bulb must be replaced by the manufacturer, its service agent or similarly qualified persons.
- Always switch off the electricity supply before carrying out any operations on the appliance. When handling bulb, make sure it has completely cooled down before any direct contact with hands.
- When handling bulbs hold with a cloth or gloves to ensure perspiration does not come in contact with the bulb as this can reduce the life of the bulb.
Note:
- Before changing the lights, make sure that the appliance is turned off and unplugged.
- Protect against danger when changing lights, such as wearing gloves.
Changing the lights:
- Remove the grease filter.
- Use a tool or the hand to press the spring splinter of both sides of LED light to the inside, until the light is pressed out. Then slightly pull the light connecting wire out, and dismantle the terminal of the light connecting wire.
- Apply the reverse procedure to reinstall the light.
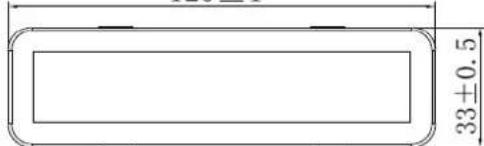
• ILCOS D code for this lamp is: DSS-1.5/65-S-120/33 - LED modules -round lamp
- Max wattage: 2×1.5W
- Voltage range: DC 12V
- Dimensions:


Environmental Protection:

This product is marked with the symbol on the selective sorting of waste electronic equipment. This means that this product must not be disposed of with household waste but must be supported by a system of selective collection in accordance with Directive 2012/19/EU. It will then be recycled or dismantled to minimize impacts on the environment, electrical and electronic products are potentially dangerous for the environment and human health due to the presence of hazardous substances. For more information, please contact your local or regional authorities.
NOTE:
The following shows how to reduce total environmental impact (e.g. energy use) of the cooking process).
• Install the cooker hood in a proper place where there is efficient ventilation.
- Clean the cooker hood regularly so as not to block the airway.
- Remember to switch off the cooker hood light after cooking.
- Remember to switch off the cooker hood after cooking.
Information for Dismantling
Do not dismantle the appliance in a way which is not shown in the user manual. The appliance could not be dismantled by user. At the end of life, the appliance should not be disposed of with household waste. Check with your Local Authority or retainer for recycling advice.
natural_image
Diagram of airflow around a mechanical component with directional arrows indicating movement (no text or symbols)natural_image
Technical diagram of a cylindrical component mounted on a base, with no visible text or symbols- Buntband
natural_image
Diagram of a brick wall with a chimney and a flat panel, labeled 'Pic 6' (no text or symbols on the diagram itself)natural_image
Pure geometric diagram of a T-shaped object with a vertical axis and center mark (no text or symbols)Höger

natural_image
Simple geometric diagram of two rectangles with a vertical centerline and a horizontal line, no text or symbols present.Fel
WARNING:


natural_image
Abstract line drawing of a stylized animal figure with a circular face, possibly a dog or creature, against a plain background (no text or symbols)Varning
Installera Grease Mesh-filter
- Max wattal: 2×1.5W

Miljöskydd

natural_image
Symbol of a trash bin with crossed lines indicating no waste or discharge, and a solid black rectangle below (no text or labels)natural_image
Diagram of airflow around a mechanical component with directional arrows indicating movement (no text or symbols)natural_image
Diagram of a brick wall with diagonal bracing and labeled section 'Pic 2' (no text or symbols on the diagram itself)natural_image
Technical diagram of a cylindrical component mounted on a base, with no visible text or symbols- Kabelbinder

- Schornstein innen
natural_image
Diagram of a brick wall with a chimney and a flat base, labeled 'Pic 6' (no text or symbols on the diagram itself)natural_image
Two identical line drawings of a T-shaped object with internal vertical lines and a base, no text or symbols present.Richtig Falsch
ACHTUNG:


natural_image
Abstract line drawing of a stylized figure with a cat and a bird, connected by a string (no text or symbols)Vorsicht
120±1
Umweltschutz:

natural_image
Symbol of a trash bin crossed with no text or labels, accompanied by a black rectangle below (no readable text or symbols)


- ADVARSEL
- Installation Af Fedtfilter
- NOTE:
- Miljøbeskyttelse:
- Warning
- Function and Feature
- Installation
- Mounting of The V-Flap
- To mount the V-flap 1 you should:
- Hints For Exhaust Duct Installation
- Start Using Your Cooker Hood
- Maintenance And Cleaning
- Caution
- General
- Stainless steel
- Control Panel Surface
- Important
- Grease Mesh Filters
- Installing Grease Mesh Filters
- Carbon Filter- (Not supplied)
- Bulb Replacement
- Important!
- Changing the lights:
- Environmental Protection:
- Information for Dismantling
- WARNING:
- Varning
- Installera Grease Mesh-filter
- Miljöskydd
- Richtig Falsch
- Vorsicht
- Umweltschutz:
Brand : Scandomestic
Model : EMV 960
Category : Range hood