
BIF 293A+ - Freezer Scandomestic - Free user manual and instructions
Find the device manual for free BIF 293A+ Scandomestic in PDF.


| Product Type | Freezer |
| Brand | Scandomestic |
| Model | BIF 293A+ |
| Installation Type | Built-in |
| Total Capacity | 293 liters |
| Energy Class | A+ |
| Annual Energy Consumption | ~250 kWh |
| Noise Level | ~40 dB |
| Climate Class | SN-T |
| Dimensions (H x W x D) | 1850 x 600 x 650 mm |
| Weight | ~60 kg |
| Voltage / Frequency | 220-240 V / 50 Hz |
| Defrost System | No Frost |
| Fast Freeze Function | Yes |
| Temperature Control | Electronic (adjustable) |
| Temperature Alarm | Visual and audible |
| Door Open Alarm | Yes |
| Interior Light | LED |
| Shelves | 4 adjustable glass shelves |
| Drawers | 3 transparent drawers |
| Reversible Door | Yes |
| Refrigerant | R600a |
| Spare Parts Available | Yes (from authorized service) |
| Manual Languages | English, Danish, German, Swedish, and others |
Frequently Asked Questions - BIF 293A+ Scandomestic
User questions about BIF 293A+ Scandomestic
0 question about this device. Answer the ones you know or ask your own.
Ask a new question about this device
Download the instructions for your Freezer in PDF format for free! Find your manual BIF 293A+ - Scandomestic and take your electronic device back in hand. On this page are published all the documents necessary for the use of your device. BIF 293A+ by Scandomestic.
USER MANUAL BIF 293A+ Scandomestic
Children aged from 3 to 8 years are allowed to load and unload refrigerating appliances.
This appliance can be used by children aged from 8 years and above and by persons with reduced physical, sensory or mental capabilities or lack of experience and knowledge if they have been given supervision or instruction concerning use of the appliance in a safe way and understand the hazards involved.
Children shall not play with the appliance.
Cleaning and user maintenance shall not be made by children without supervision.
To avoid contamination and depravity of food, please respect the following instructions:
- Opening the door for long periods can cause a significant increase of the temperature in the of the appliance.
- Cleaning regularly surfaces that can come in contact with food and is accessible for drainage systems.
- Clean water tanks if they have not been used for 48 h. or more; Flush the water system connected to a water supply if water has not been drawn for 5 days or more.
- Store raw meat and fish in suitable containers in the refrigerator, so it is not in contact with, or can drip onto other food.
- Two-star frozen-food compartments are suitable for storing pre-frozen food, storing or making ice-cream and making ice cubes.
- One-, two- and three-star compartments are not suitable for the freezing of fresh food.
- If the refrigerating appliance is left empty for long periods, switch off, defrost, clean, dry, and leave the door open to preventmould developing within the appliance.
1 Termostat
2 Skuffe

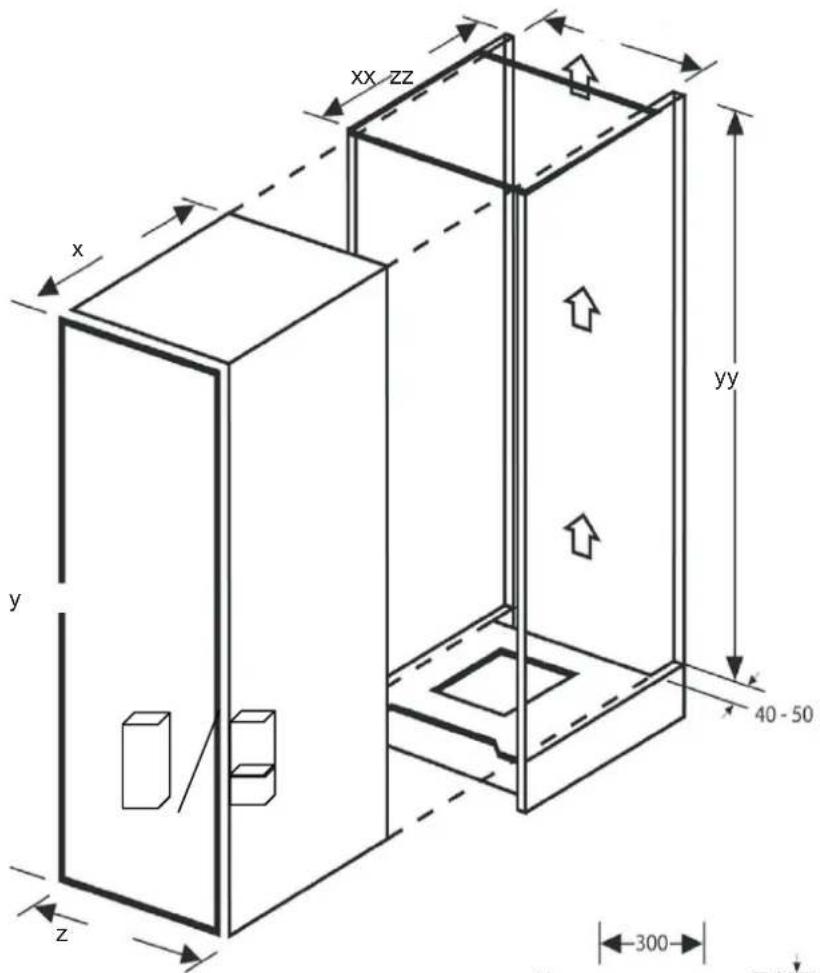
| X(mm) | Y(mm) | Z(mm) | XX(mm) | YY(mm) | ZZ(mm) | 1 | 1 | 2 |
| 540 | 1770 | 540 | 550-560 | 1778-1785 | 560 | 1 | ||

natural_image
Two-panel illustration showing hand cleaning a wall with a tool, no text or symbols presentSKIFT D∅RÅBNINGSRETNINGEN FOR DIT PRODUKT 2/2
natural_image
Two-panel line drawing showing a person's hand holding a wall and another holding a device with a lock (no text or symbols)natural_image
Illustration of a hand holding a tool over a piece of wood or metal, with no visible text or symbols.natural_image
Two-step diagram showing a hand using a tool to cut a component, with no visible text or symbols.natural_image
Line drawing of a 3D rectangular structure with a 200 cm² dimension label (no other text or symbols)VENTILATION 2/2

natural_image
Simple line drawing of a rectangular object with two vertical posts at both ends, labeled 'Figur 1' (no other text or symbols)
European Safety Certificate Compliance Declaration
The manufacturer assumes full responsibility for the compliance of products manufactured with relevant safety, health and environmental protection requirements set out in European Directives. Test reports are available for verification upon request. The manufacturer will present the quality certificate or manufacture license to a refrigerator dealer if so required.
Furthermore, the manufacturer declares that all parts intended to be in contact with fresh food as described in this User's Manual are free of toxic substances.
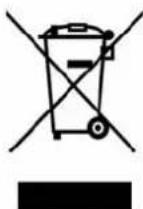
The symbol on the product or on its packaging indicates that this product may not be treated as household was te. Instead it shall be handed over to the applicable collection point for the recycling of electrical and electronic equipment. By ensuring this product is disposed of correctly, you will help prevent potential negative consequences for the environment and
human health, which could otherwise be caused by inappropriate waste handling of this product. For more detailed information about recycling of this product, please contact your local city office, your household waste disposal ser vice or the shop where you purchased the product.
- Environmental Protection and Proper Disposal......4
- Location.....4
- Installation ....4
- Rating Plate....5
- Electric Connection ....5
- Operation Instructions... 6
- Freezer Compartment ....7
- Ice & Ice Cream Making ....8
- Preparing for Vacation ....8
- Cleaning & Maintenance ....8
11.Defrosting 8
12.Problem Diagnosis 9
13.Troubleshooting 9 - During a Power Interruption....10
15.Making A Service Call 10
16.Installation In Kitchen 10
17.Warranty....10 - Illustration of Parts....10
19.Installation....11
It must be noticed that re refrigeration system contains refrigerants, which require specialized waste disposal. Contact your local waste disposal center for proper disposal of a n old appliance and contact your local authority or your dealer if you have any question. Please ensure that the pipe work of your refrigerator does not get damaged prior to being picked up by the relevant waste disposal center, and contribute to environmental awareness by insisting on an appropriate, anti-po llution method of disposal. Please see the rating plate for the type of refrigerant and insulation used.
The plug should be accessible after the appliance is positioned.
If the power cord is damaged, it must be replaced with a new power cord from the manufacturer or an authorized service agent.
Please read these instructions carefully before use.
Underline the important in structions. Keep the User's
Manual in a safe place for later reference. Remem ber to
hand it over to the owner, if you ever sell the appliance.
What you have bought is a safe and reliable refrigerator. With appropriate use and maintenance, it will be in service for years. The last page of this is User's Manual sets out specifications of this appliance and the performance data indicated in the rating plate are test results obtained at an ambient temperature range of 16\~32°C.
The appliance should be installed in a well ventilated place. The shipment package should be removed.
Caution:
Do not use a sharp or pointed item to defrost.
Important!
It is intended strictly for household use. If using it for industrial or commercial purpose, be sure to observe the relevant norms and regulations.
A leakage test has been conducted in accordance with relevant safety standard.
To avoid the risk of child entrapment, please make sure your old refrigerator is inoperative and safe by removing the latches and bolt locks before disposal.
Caution:
Make sure the refrigeration system is not damaged.
Caution:
Do not use electrical appliances inside the food storage compartments of the appliance, other than model's recommended by the manufacturer.
This User's Manual is applicable to a variety of models and there may be slight changes in certain aspects from model to model.
1. Environmental Protection and Proper Disposal
Package materials
The applianc e is packag ed in a way to prevent damag es during transportation. Recyclable materials are used.
The packing box is made of corrugated board / cardboard (mainly from recycled paper).
· Polystyrene parts (CFC-free foamed polystyrene)
- Linings and polyethylene bags
· Polypropylene straps
All these e va luable materi als ma y be take n to a collecting center and used a gain after ade quate recycling. All waste materials should be disposed properly.
2.Location
Make sure the refrigerator is kept uprig ht during han dling. If an incl ination is r equired, it shou ld not e xceed degrees. Other wise the a ppliance ma y get dama ged resulting n ot onl y i n compromised refrigeration performance.
To avoid product damage or person-al injury, the refrigerator should be un packed by two persons after it is located in a previously selected position.
Before i nstallation, make su re the r refrigerator has no visible exterior damage.
When handling the refrigerator, do not lift it by holding the worktop, to prevent any damage to the refrigerator.
Do not start up a refrigerator that is damaged.
Check the refrigerator carefully for:
- Damaged package due to inappropriate handling during transportation
Damage in the exterior
·Damage in power cord / plug
Any doubt, please contact Customer Service for a thorough checkup of the appliance.
Take necessary me asures to prevent leakage of refrigerant at the start-up of refrigerator that may result in environmental pollution.
3. Installation
a) Remove all package materials.
b) Remove items in the refrigerator.
c) Make sure to remove film and tape on the cabinet and the door.
d) Remov e polystyrene c hips (if a ny) around the refrigerator.
e) Take out accessories and literature in the refrigerator.
f) Clean the inside of the refrigerator with luke warm water and vinegar and then dry it with a soft cloth.
g) Use the spanners supplied to adjust the leveling leg to ensure the refrigerator is stable.
waste
Do not use detergents, sharp or pointed instruments or soda-based cleansers to clean the refrigerator.
- Before installation, make sure the refrigeration system is free of any damage.
- The refrigerator should be used for its intended purpose only.
45: The refrigerator should be positioned on the solid and even floor to ensure refrigerating performance at circulation and refrigerating performance. - If possible, position the refrigerator in a cool and dry well ventilated room.
- Do not expose the refrigerator to direct sunshi ne and make sure the ambient tem perature is not extremely high.
- Keep the refrigerat or from a heat source, such as heating system, oven or cookers. Of herwise the compressor will operate more frequently resulting in extra power consumption.
If the refrigerator will be placed near a heat source, it is recommended to install a thermal barrier between the refrigerator and the heat source (asbestos is prohibited) or maintain adequate space between the refrigerator and
the heat source as follows:
the heat source as follows:
Cooker or electric stove 3 cm
Radiator or oven 30 cm
Another refrigerator 2 cm
Do not place a ny radiating apparatus, such as micro wave oven or roaster, on top of the refrigerator.
Make sure the air vent is not obstructed.
Never unplug the refrigerator by pulling on the power cord. Always grip the plug firmly and pull it straight out from the outlet.
Warning!
After the refrigerator is positioned, allow it to stand still for at least 2 hours before starting it up to ensure stable refrigerant circulation and faultless operation.
Before starting up the refrigerator, make sure the inner compartment is dry (especially corners).
Danger!
Depending on the chemical composition, the refrigerant may be flammable. The leak-proofness of refrigerant circulation system is test proven. Unauthorized intervention of the refrigerant circulation system may cause fire.
Make sure the refrigerant circulation system and the peripheral parts of compressor are not affected.
Any intervention of the refrigerating system should be conducted only by professional personnel.
Warning!
Refrigerant get ting into e yes can caus e seri ous inj ury. In this case, rins e the e yes under running water and c onsult an ophthalmologist without delay.
The refrigerator should be used within an appropriate range of room temperature by its climate type.
The range of room temperature for a specific climate type should be observed. See the rating p late for the climate type of your appliance.
| Climate type | Room temperature |
| SN +10°C~+32°C | |
| N | +16°C~+32°C |
| ST | +18°C~+38°C |
| T | +18°C~+43°C |
4. Rating Plate
A rating p late is found on the side p anel or back panel of the refrigerator, indicating important technical data. Write down these technical data.
Write down these technical data.
Write down the technical data for later reference to avoid the need for moving the refrigerator when such data are needed.
Model / Type
Storage...... Liter
Working voltage..... Volt Max
input power (W) Watt
Current..... Amp
Energy consumption .... kWH/24hr
Freezing capacity ...... kg/24hr
5. Electric Connection
The refrigerator should use a properly grounded outlet which should be checked by a qualified electrician. The refrigerator should always be plugged into its own individual electrical outlet which has a voltage rating and a fuse rating in conformity with the rating plate.
In case of nonconformity, consult the local service center or the dealer immediately.
The refrigerator should not be connected with a converter (such as solar cell)
Do not use an extension cord.
6.Operation instructions

- Buttons
A)Adjust button
B) Power button
- Startup
Press the button A to start the Freezer.
- Setting temperature
Press the button B to select temperature.
The adjustable range was settle in -16,-18,-20,-22,-24 and fast freezing function. Every time you press the adjust button, the indicator light will
start to blink and shift one time, after the blinking, the gear will be settled and the freezer will follow the command to work.
4.Fast freezing function
When you put plentiful food into the freezer, you can use the fast freeze function. The fast freeze function will continue work up to 24 hours.
Then the gear will be automatically reverse back to the last setting.
- Conditions:
- Ambient temperature;
• Quantity of food stored;
- Door openings;
Through observation, you'll soon learn how to select an appropriate temperature setting.
Appropriate temperature setting is very important for food storing. Microbes can get food spoiled very quickly, unless there growth is sprouted
by low temperature environment.
It is recommended to set the temperature to 18irc C or lower which may effectively eliminate food spoiling process by microbes.
6.Turn-off
Press the button B to turn off the freezer. The compressor should stop by then. Lastly, unplug from wall outlet.
2 Normally, when food requires only short period of storage, select a medium setting.
3 Normally, when food requires a long period of storage, select a high setting.
NOTE!
- Never add caned or bottled carbon dioxide drinks to the freezer, as carbon dioxide may expand when under freezing, and lead to explosion hazard.
- Bottled food which needs immediate cooling should be stored in the freezer for no more than one hour before they're taken out, otherwise bottles may burst.
- Ice cream or water ice should be allowed several minutes before using, as lips and tongue may get frostbite (chap may occur in skin). Meanwhile, avoid touching inner walls of freezer with wet hands.
IMPORTANT!
- Food to be added to freezer must be well wrapped.
- Observe expiration date of frozen food.
- Only fresh food in high quality is suitable for freezing storage.
- Food stored in freezer should be properly sized.
- Weight of a single package of frozen food should not exceed 2 kg.
- Please use reusable plastic film, aluminum film for packing food, or put food in containers.
- Food packages should not entrap too much air inside.
- Use bungee, clip, rope or freezing-resistant tape for sealing of food package.
- Film welding device can be used to seal the plastic packages.
- Place the wide side of food package downward to obtain a faster freezing process.
- Wipe the packages dry before adding them to the freezer, as they may stick together when frozen.
- If you need to freeze food which is already partly or totally thawed, please cook it before adding it to the freezer again.
- Don't use food which is already expired, as they may cause poisoning.
7.Freezer compartment
3-star or 4-star freezer are suitable for storing deep frozen food (already frozen before added to the freezer), storing fresh food for a short period (2-3 weeks) by freezing it, or making ice, ice cream and water ice.
Recommended expiration date of food must be observed.
Freezer can be used to produce ice cubes.
- Temperature within the freezer can be adjusted by setting temperature regulator. For fresh food and food which needs to be stored for a long period, -18ircC or below is recommended, as microbes can barely survive under this temperature. Once temperature is higher than -10ircC , microbes will start to cause spoiling of food, and storage period of food will be effectively reduced. If you need to freeze food which is already partly or totally thawed, please cook it before adding it to the freezer again. The high temperature of cooking process can eliminate most microbes.
8. Making ice cubes, ice cream and water ice
Making ice cubes:
- Add water to ice tray to 3/4 of its volume, place it at the bottom area of the freezer. When ice cube s are read y, flush the ice t ray with r unning water, the n, you c a easily take out the ice cubes.
Making ice cream:
- Remove se parators of the ice tray. Please note that creamier your ice cream is, the long er it will take to make it. When ice cream is ready, flush the ice tray with running water, then, you can easily take out the ice cream.
9.Preparing for Vacation
For long vacati on or absenc e, unplug the refrigerator a nd clean the refr igerator as d escribed i n " Cleaning a nd Maintenance". Lea v e the do ors open to pre vent formation of mildew or odor.
10. Cleaning and Maintenance
Unplug or disconnect the appliance before cleaning.
Keep the outsi de clean. Use furn iture polisher or finishing conditioner to clean the outside regularly (do not use these cleaners to cle an the i nside). Wipe the d oor gasket with a cloth lightly dampened with lukewarm water. No detergent is allo wed. N ever use oil or greas e to clean th e do or gasket.
Clean the inside regularly.
- Clean the refrigerator compartment on a monthly basis and c lean the e freezer c ompartment after a d efrost cycle.
Take out foods from refrigerator and freeze r compartments and kept these foods in a cool place. - Remove all detachable parts.
- Interior parts are not suitable to be washed in a dishwasher. W ash them manually using luke warm water and some dish detergent. Do not use concentrated detergent, abrasive agents and chemicals such as acids. Mild dish detergent is recommended.
Steam cleaners are dangerous and strictly prohibited.
Wash the inner compartment with lukewarm clean water and dry with a soft cloth. It is absolutely dry after waiting for 3-4 minutes. Do not destroy or remove the rating plate of the refrigerator. It could be needed for after-sales service or relevant processes. Make sure water doesn't get into electric parts in the refrigerator.
If a heat exchanger, i.e. condenser, is mounted on the back of refrigerator, dust and lint should be removed regularly to enable efficient heat dissipation and avoid excessive power consumption. Use a soft brush or a duster to clean the outside of heat exchanger.
The defrost water drains away through the gutter. The drain hole should be cleaned regularly by use of a swab or similar instrument.
Make sure water doesn't run down the drain hole during cleaning. Otherwise water may spill or splash on the ground due to evaporation.
11. Defrosting
Freezer compartment (if applicable)
The freezer compartment, intended for storage of frozen food, doesn't have automatic defrosting.
The freezer compartment should be defrosted regularly. Defrost the freezer compartment whenever the thickness of ice layer reaches 5cm.
Unplug the refrigerator before defrosting. Take out foods from the freezer compartment and kept these foods in a cool place. Use an ice scraper to remove the ice. To speed up the process, place a bowl of hot water in the freezer compartment. Clean and reload the freezer compartment after defrosting.
POTENTIAL SAFETY HAZARD!
Do not use electrical devices such as hair dryer, electrical fan, steam cleaner, defrost spray or open fire (such as candle) to defrost the freezer compartment. The plastic parts of inner compartment may get melted and any spark or open fire may cause fire in presence of explosive gas. Never use a steam cleaner to defrost the freezer compartment – danger of electric shock!)
Cautions!
Take out the drawer, and wrap up the fro zen foods with newspaper or blanket.
- Keep these foods in a cool place before the defrosting process is finished.
- Keep the door of freezer compartment open.
- Ice and frost form on the surface of evaporator during operation. A thick layer of ice or frost acts as heat insulation and hinders thermal conduction.
- Defrost the freezer compartment in the shortest time possible to avoid thawing of frozen foods.
- Do not remove the ice or frost in the freezer compartment with a sharp or pointed item. Otherwise the evaporator surface may get damaged.
- Wipe off defrost water from time to time with sponge.
- Place a container of hot water (do not use boiling water) near the door of freezer compartment to speed up the defrosting process.
- Dry the freezer compartment and place the frozen food back.
- Reconnect the refrigerator after defrosting.
- Start up the refrigerator by adjusting the temperature control knob.
- Close the door of freezer compartment.
12. Problem Diagnosis
The latest manufacture tec hniques a nd state-of-the-art refrigeration and freezing technology ar e ado pted to ensure safe a nd rel iable o peration of your appl iance. In doubt of fault, make sure to check firsts describe d below before making a service call:
Things to be noted:
The compressor (also known as refrigerating unit) doesn't operate all the time without stop.
The compressor is contr oiled b y th e automatic temperature regulator represented by a temperature dial. When the i interior temper ature e xceeds the preset temperature, the comp erssor starts automaticall y and when the inte rior temperatu re falls belo w the present temperature, the compressor stops automatically.
It's normal that compressor makes noise during operation. The noise comes from the motor. The flow of refrigerant through the refrigerating system may make a gurgling noise. These noises don't mean a fault of the refrigerator.
The exterior surface may be wet when it's cold and the ambient temperature is low. It's normal and the exterior surface will become dry as the ambient temperature rises.
If the reasons of such phenomena can't be identified and solved, please consult the service center.
13. Troubleshooting
a) Problem: Refrigerator does not operate (does not work)
Please check:
- Is the power cord in good condition? Is the refrigerator or properly plugged in the outlet?
-
Is there a po wer interruption? (Use a small ap pliance to check out, e.g. agitator or hair dryer)
-
Is the refrigerator started up?
Is the fuse broken? Or in poor contact?
b) Problem: The inner compartment is not cool enough; the compressor cycles on and off frequently;
Please check:
- The refrigerator/freezer compartment should stand still for at least 2 hours after installation to stabilize the refrigerant circulation system. See "Start-up". If it doesn't work, unplug the refrigerator and tilt the refrigerator to one side for a while or p lace it on an inclined plane and then place it to the original position. Connect the refrigerator after 2 hours. Keep the door(s) closed for 12 hours.
- Is the door properly closed? If so, the door gasket should press on the external cabinet se curely and evenly.
Test: It should be difficult to pull out a piece of paper caught up between the door gasket and the external cabinet. If the paper slips away easily, consult the service center.
- If there is thick ice in the freezer compartment. (See "Cleaning and Maintenance")
- Is the refrigerator exposed to direct sunshine or near a heat source (oven, radiator, etc.)?
What to do: Do not expose the refrigerator to direct sunshine; keep the refrigerator away from any heat source; install a thermal barrier between the refrigerator and the heat source (see "Location").
- Is the inner compartment overloaded?
- Is the room well ventilated? Is the air vent obstructed? Is the heat exchanger (condenser) on the back covered by dust?
c) The temperature of refrigerator compartment is too low
Please check:
- Is the temperature regulator properly set?
- Is the door of freezer compartment properly closed?
- Is there a lot of fresh food (more than 1kg) in the freezer compartment? (If the freezer compartment operates for long periods, the temperature of refrigerator compartment falls accordingly.)
d) The freezer compartment is too warm and frozen foods are thawed
- Is the ambient temperature too low? (If so, the refrigerating unit will malfunction, resulting in higher temperatures in the freezer compartment.)
What to do: Raise the ambient temperature.
e) There is thick ice in the freezer compartment. Please check:
Is the door of freezer compartment properly closed?
- If some food gets frozen to the inner walls, try to remove it with a blunt instrument such as a spoon handle.
- Defrost and clean the freezer compartment (see "Defrosting"). A thick ice layer will impede refrigeration performance and increase power consumption.
f) Unusual noise
Please check:
- Is the refrigerator solidly positioned? Is the refrigerator rubbing against other furniture or items? Is there anything stuck between the back of refrigerator and the wall?
- Move the items in contact with the refrigerator out of way and keep adequate space between the refrigerator and the surroundings.
- Is the movable parts securely retained in place?
- Are bottles or containers in the inner compartment rubbing against each other?
Note!
It's normal that there is noise of refrigerant flowing through the refrigerating system.
It's normal that moisture forms around the door handle in summer. Dry with a soft cloth.
The refrigerator is not user-serviceable and do not attempt to intervene with the normal operation of the appliance.
14. During a Power Interruption
There is no need to take out the frozen foods in the freezer compartment if the power interruption lasts no more than 2 hours. Otherwise, take out the foods after 2 hours.
15. Making A Service Call
Servicing and repair should be conducted by authorized professional personnel. The manufacturer is not responsible for the risk of damages or injuries due to failure to comply with this provision and the warranty will be voided. The warranty and the list of service centers indicate the authorized after-sales service providers for your appliance. Please consult your dealer if the there is no service center in your neighborhood. For faults or problems caused due to improper use or breach of the instructions contained herein, the costs and expenses incurred in servicing and repair should be born by the user and the dealer is not responsible for such costs and expenses. In order to receive prompt assistance, the following information is necessary:
- Type and model of refrigerator (see the rating plate)
- Date of purchase.
· Name and address of the dealer.
- Description of fault / problem.
16. Installation in Kitchen
If you want to place the refrigerator in the kitchen, you should contact with professional installer or local service supplier. Please do not do it yourself.
17. Warranty
The terms and conditions as well as the period of warranty are indicated in the Letter of Warranty enclosed hereto. The dealer will brief you of the same upon purchase.
The manufacturer reserves the right to improve the design, construction and technology from time to time without further notice.
18. Illustration of Parts

natural_image
Line drawing of a refrigerator interior with open door and numbered compartments (no text or symbols)1 Thermostat
2 Drawer

| X(mm) | Y(mm) | Z(mm) | XX(mm) | YY(mm) | ZZ(mm) |
| 540 | 1770 540 | 550-560 | 1778-1785 | 560 |
Installation Guide
This appliance must never be installed close to heat sources, e.g. heating elements or cookers, nor in damp places.
Seek the help of another individual, or two, when installing this appliance. This appliance may have sharp edges. Wear adequate PPE for the task and environment.
To ensure the appliance is level, you should use the height adjustable feet at the front of the appliance.
The cooling system at the rear of the appliance must not touch the rear wall.
The greater the gap, the better.
Before the installation, you should provide the inner dimension of your cabinet to your supplier and see whether your product can be installed into your cabinet or not.
CHANGE THE OPENING DIRECTION OF YOUR PRODUCT 1/2
- Remove the screw caps on the front of the product.

- With the door closed remove the screws from the top and bottom hinges that hold the appliance door to the hinges. Remove the screws from the top hinge first.

natural_image
Two-panel illustration showing a hand holding a small object above a wall, with no visible text or symbols.CHANGE THE OPENING DIRECTION OF YOUR PRODUCT 2/2
- Support the door at the bottom and open the hinges away from the appliance door. Carefully lift the appliance door away, ensuring you don't damage the hinges or the door.

natural_image
Two-panel line drawing showing a person interacting with a wall and a device in a corner (no text or symbols)-
Use the same way to remove the other doors(if applicable)
-
With the top hinge open, remove the screws from the top hinge that fix the hinge to the cabinet of the appliance.

natural_image
Illustration of hands using a tool to draw or install a piece of wood, no text or symbols present- Flip over the top hinge (by 180irc ) and fix it in place on the diagonally opposite corner of the appliance cabinet. Reattach the door by fixing the outside screws of the hinge to the door.

natural_image
Two-panel illustration showing hands using a tool to cut or mark a mechanical component, no text or symbols present.- Install all the door(s) correctly.
VENTILATION 1/2
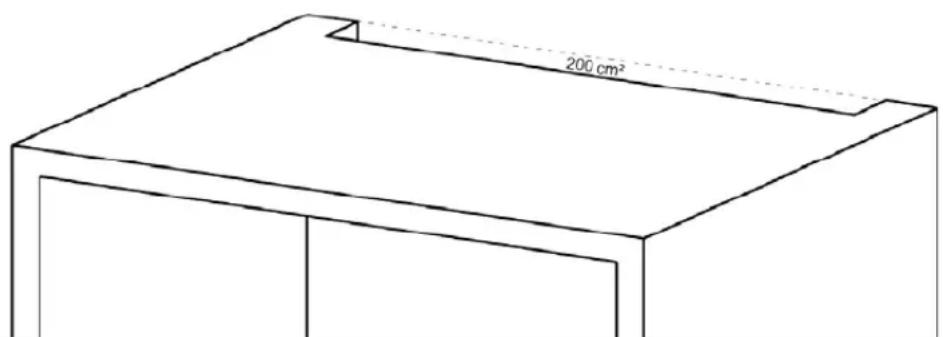
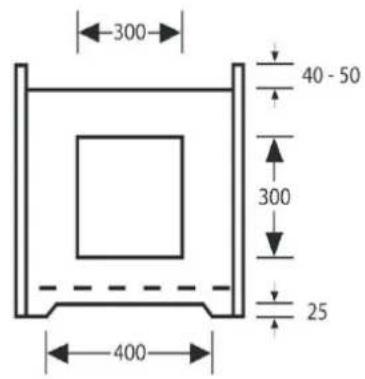
The main consideration when installing any refrigeration unit into a fitted kitchen is ventilation. The heat removed from the Cooling compartment needs to be dissipated into the atmosphere. Incorrect ventilation can lead to premature compressor failure, excessive power consumption, total system failure and may invalidate the warranty provided with the appliance.
For products intended to be installed into a tall housing unit, The following requirements need to be met:
Make a 200 cm 4 opening for the ventilation.
natural_image
Simple line drawing of a rectangular frame with a 200 cm² dimension label (no other text or symbols)VENTILATION 2/2

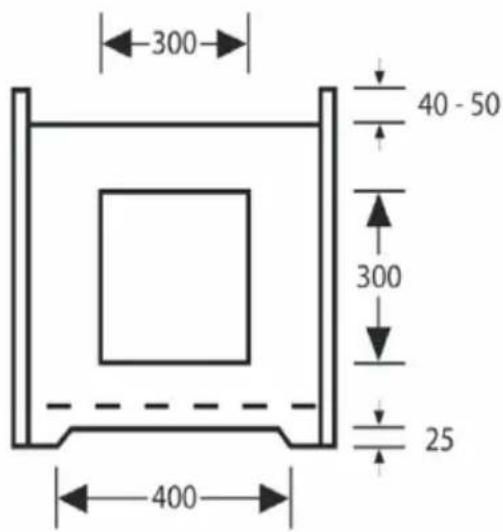
An air passageway should be provided in the top of the cabinet run to allow free air in and out.
There should be space at the rear of the cabinet to allow cool air to be drawn over the condenser. Recommended: 500 x 35mm.
A cutout should be made in the plinth below the fridge/-freezer and this finished neatly using the air vent grille. Alternatively, a thin section of the plinth can be removed to allow air into the unit (recommended 600mm x 10mm)
Mounting the fascia doors
Fig. 2 - Fitting the decor door bracket
Remove the white decorative cover (Fig. 1) by lifting it upwards.
Obtain the below measurements:
Dimension B= Measure from the underside surface of kitchen unit to the bottom of fixing bracket.
Dimension C= Measure from the underside surface of kitchen unit to the top of next unit door.
Unscrew and remove the nuts and washers from the top of the appliance door to remove the bracket.

natural_image
Simple line drawing of a bench with two legs and a curved top, labeled 'Fig 1' (no text or symbols on the diagram itself)
Fig. 3 - Fitting the decor door bracket
Subtract C from B and put the fixing bracket (2) in place using this measurement for vertical position and place to the centre for horizontal position. Secure the fixing bracket (2) using screws(1).

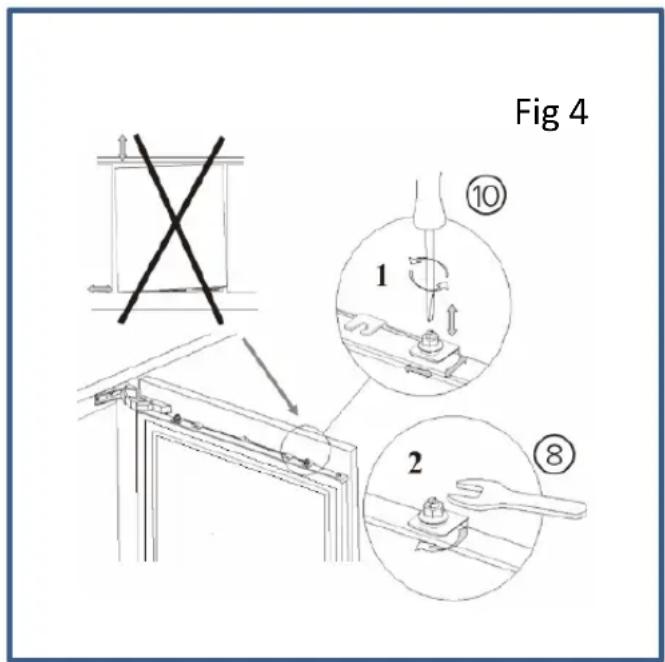
Fig. 4 - Fitting the decor door
Place the decor door onto the appliance door by inserting adjustment bolts into the slots on the fixing bracket. Locate the washers and screw the nuts onto the adjustment bolts.

natural_image
Technical line drawing of a mechanical assembly with mounting brackets and arrows indicating assembly direction (no text or symbols)Mounting the fascia doors
Fig. 4 - Aligning the decor door
Close the door and check the alignment with the other unit doors. Adjust the decor door by screwing or unscrewing the adjustment bolts for vertical adjustment and by the help of the slots on the fixing bracket for other directions. Lock the screws into place as shown in Fig. 4.
Fitting the decor door base fixings
With the appliance door open, locate the metal decor door base fixing brackets and screw the fixings to the decor door. You may need to remove and re-fit these brackets depending upon the decor door used.
Fitting the decorative cover
Re-fit the decorative cover, that you removed in the first step, on to the decor door fixing bracket.
Check that the whole door assembly operates smoothly and that the door seal of the freezer is still creating a seal.
Ensuring the door seals correctly:
It is normal for the seal to be compressed after the door has been reversed.
With the door closed, use a hair dryer to expand the seal and fill the gap between the door and the body of the appliance.
Take care not to use the hair dryer too close to the appliance, which could damage the seal. A distance of approximately 10cm should be adequate.
When completed, allow the seal and door to cool before touching them. Once done, the seal will remain in position.
1 Thermostat
2 Schublade
| X(mm) | Y(mm) | Z(mm) | XX(mm) | YY(mm) | ZZ(mm) | 1 | 1 | 2 |
| 540 | 1770 | 540 | 550-560 | 1778-1785 | 560 | 1 | ||
natural_image
Two-panel illustration showing a hand holding a tool near a wall-mounted device, with no visible text or symbols.natural_image
Two-panel line drawing showing a person's arm holding a wall and a hand using a device to lock or install a door (no text or symbols)natural_image
Illustration of a hand holding a tool over a metal object, no text or symbols presentnatural_image
Two-panel illustration showing hands using a tool to cut a piece of material, no text or symbols presentnatural_image
Simple line drawing of a rectangular object with two vertical supports at the base (no text or symbols)
natural_image
Technical line drawing of a structural frame with mounting holes and support beams (no text or symbols)natural_image
Line drawing of a refrigerator interior with open door and numbered compartments (no text or symbols)1 Termostat
2 läda

| Xmm | Y(mm) | Z(mm) | XX(mm) | YY(mm) | ZZ(mm) | 1 | 12 |
| 540 | 1770 | 540 | 550-560 | 1778-1785 | 560 | 1 | |

Installationsanvisning
natural_image
Two-panel illustration showing a hand using a tool to clean or inspect a small object, no text or symbols present.ÄNDRA DÖRRENS RIKTNING 2/2
natural_image
Two-panel line drawing showing a person's arm holding a wall and a hand using a device to lock or install a device (no text or symbols)natural_image
Illustration of hands using a tool to draw or mark a piece of wood (no text or symbols present)natural_image
Two-panel illustration showing hands using a tool to cut or mark a mechanical component, no text or symbols present.- Installera alla dörrar (er)
VENTILATION 1/2
natural_image
Simple line drawing of a rectangular object with two vertical posts, labeled 'Fig 1' (no other text or symbols)

natural_image
Technical line drawing of a door frame assembly with mounting brackets and arrows indicating assembly direction (no text or symbols)


- Children shall not play with the appliance.
- SKIFT D∅RÅBNINGSRETNINGEN FOR DIT PRODUKT 2/2
- VENTILATION 2/2
- European Safety Certificate Compliance Declaration
- Caution:
- Important!
- Environmental Protection and Proper Disposal
- Package materials
- 2.Location
- Check the refrigerator carefully for:
- Installation
- Do not use detergents, sharp or pointed instruments or soda-based cleansers to clean the refrigerator.
- Warning!
- Danger!
- Rating Plate
- Write down these technical data.
- Electric Connection
- 6.Operation instructions
- NOTE!
- 7.Freezer compartment
- Making ice cubes, ice cream and water ice
- Making ice cubes:
- Making ice cream:
- 9.Preparing for Vacation
- Cleaning and Maintenance
- Steam cleaners are dangerous and strictly prohibited.
- Defrosting
- Freezer compartment (if applicable)
- POTENTIAL SAFETY HAZARD!
- Cautions!
- Problem Diagnosis
- Things to be noted:
- Troubleshooting
- Please check:
- e) There is thick ice in the freezer compartment. Please check:
- f) Unusual noise
- During a Power Interruption
- Making A Service Call
- Installation in Kitchen
- Warranty
- Illustration of Parts
- Installation Guide
- CHANGE THE OPENING DIRECTION OF YOUR PRODUCT 1/2
- CHANGE THE OPENING DIRECTION OF YOUR PRODUCT 2/2
- VENTILATION 1/2
- Mounting the fascia doors
- Fig. 4 - Aligning the decor door
- Fitting the decor door base fixings
- Fitting the decorative cover
- Ensuring the door seals correctly:
- Installationsanvisning
- ÄNDRA DÖRRENS RIKTNING 2/2
Brand : Scandomestic
Model : BIF 293A+
Category : Freezer