
CA-DW539 - CD Player AIWA - Free user manual and instructions
Find the device manual for free CA-DW539 AIWA in PDF.


| Product Type | CD Player |
| Brand | Aiwa |
| Model | CA-DW539 |
| Dimensions (W x H x D) | 430 x 100 x 300 mm |
| Weight | 4.0 kg |
| Power Supply | AC 220-240 V, 50 Hz |
| Power Consumption | 15 W |
| Disc Format | CD, CD-R, CD-RW |
| Playback Modes | Normal, Repeat, Shuffle, Program |
| Outputs | Headphone jack (3.5mm), Line out (RCA) |
| Controls | Play/Pause, Stop, Skip, Search, Open/Close |
| Display | Backlit LCD with track and time |
| Remote Control | Included (IR) |
| Protection | Auto-off after idle, anti-shock buffer |
| Maintenance | Clean lens with cotton swab and isopropyl alcohol; avoid dust and moisture |
| Safety | Do not expose to water or extreme temperatures; unplug during storms |
| Spare Parts | Laser lens (KSS-213), belt for tray, fuse |
| Repairability | Serviceable by authorized technicians; some parts user-replaceable |
| Included Accessories | Remote control, audio cable, power cord, manual |
Frequently Asked Questions - CA-DW539 AIWA
User questions about CA-DW539 AIWA
0 question about this device. Answer the ones you know or ask your own.
Ask a new question about this device
Download the instructions for your CD Player in PDF format for free! Find your manual CA-DW539 - AIWA and take your electronic device back in hand. On this page are published all the documents necessary for the use of your device. CA-DW539 by AIWA.
USER MANUAL CA-DW539 AIWA
TO REDUCE THE RISK OF FIRE OR ELECTRIC SHOCK, DO NOT EXPOSE THIS APPLIANCE TO RAIN OR MOISTURE.
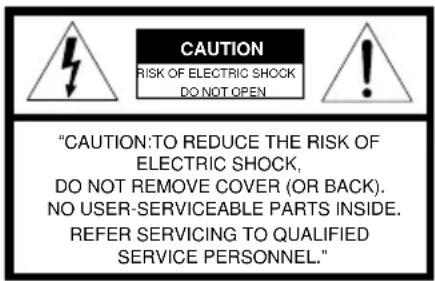
Explanation of Graphical Symbols:

The lightning flash with arrowhead symbol, within an equilateral triangle, is intended to alert the user to the presence of uninsulated “dangerous voltage” within the product’s enclosure that may be of sufficient magnitude to constitute a risk of electric shock to persons.
The exclamation point within an equilateral triangle is intended to alert the user to the presence of important operating and maintenance (servicing) instructions in the literature accompanying the appliance.
OWNER'S RECORD
For your convenience, record the model number (you will find it on the rear of the unit) and serial number (you will find it in the battery compartment) in the space provided below. Please refer to them when you contact your AIWA dealer in case of difficulty.

IMPORTANT SAFETY
Read the Operating Instructions carefully and completely before operating the unit. Be sure to keep the Operating Instructions for future reference. All warnings and cautions in the Operating Instructions and on the unit should be strictly followed, as well as the safety suggestions below.
Warning
To prevent electric shock or injury, these safety instructions should be followed in the installation, use and servicing the unit.
Installation
Attachments – Do not use attachments not recommended by the unit manufacturer as they may result in the risk of fire, electric shock or injury to persons.
Water and Moisture – Do not use this unit near water - for example, near a bathtub, washbowl, kitchen sink, or laundry tub, in a wet basement, or near a swimming pool, and the like.
Heat - Do not use this unit near sources of heat, including heating vents, stoves, or other appliances that generate heat. It also should not be placed in temperatures less than 5^ (41°F) or greater than 35^ (95°F).
Mounting surface - Place the unit on a flat, even surface.
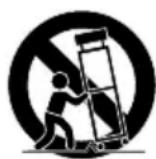
Accessories – Do not place this unit on an unstable cart, stand, tripod, bracket, or table. The unit may fall, causing serious injury to a child or an adult, and serious damage to the appliance. Use only with a cart, stand, tripod, bracket, or table recommended by the manufacturer, or sold with the unit. Any mounting of the appliance should follow the manufacturer's instructions, and should use a mounting accessory recommended by the manufacturer.
Portable cart – An appliance and cart combination should be moved with care. Quick stops, excessive force, and uneven surfaces may cause the appliance and cart combination to overturn.
Ventilation – The unit should be situated with adequate space around it so that proper heat ventilation is assured. Allow 10 cm clearance from the rear and the top of the unit, and 5 cm from the each side. Slots and openings in the cabinet and the back or bottom are provided for ventilation, and to ensure reliable operation of the unit and to protect it from overheating, these openings must not be blocked or covered. The openings should never be blocked by placing the unit on a bed, sofa, rug or other similar surface. This unit should not be placed in a built-in installation such as a bookcase unless proper ventilation is provided.
INSTRUCTIONS
Object and Liquid Entry – Never push objects of any kind into this unit through the cabinet slots as they may touch dangerous voltage points or short-circuit parts that could result in a fire or electric shock. Never spill liquid of any kind on the unit.
Electric Power
Power Sources – This unit should be operated only from the type of power source indicated on the marking label. If you are not sure of the type of power supply to your home, consult your appliance dealer or local power company. To operate unit on battery power, or other sources, refer to the operating instructions.
Grounding or Polarization – This unit is provided with a polarized alternating-current line plug (a plug having one blade wider than the other). This plug will fit into the power outlet only one way. This is a safety feature. If you are unable to insert the plug fully into the outlet, try reversing the plug. If the plug should still fail to fit, contact your electrician to replace your obsolete outlet. Do not defeat the safety purpose of the polarized plug.
Power-Cord Protection – Power-supply cords should be routed so that they are not likely to be walked on or pinched by items placed upon or against them, paying particular attention to cords at plugs, convenience receptacles, and the point where they exit from the product.
Overloading – Do not overload wall outlets, extension cords, integral convenience receptacles as this can result in a risk of fire or electric shock.
Lightning
For added protection for this unit receiver during a lightning storm, or when it is left unattended and unused for long periods of time, unplug it from the wall outlet. This will prevent damage to the unit due to lightning and powerline surges.
Maintenance
Cleaning – Unplug this unit from the wall outlet before cleaning. Do not use liquid cleaners or aerosol cleaners. Use a damp cloth for cleaning.
Damage Requiring Service
Unplug this unit from the wall outlet and refer servicing to qualified service personnel under the following conditions:
1) When the power cord or plug is damaged.
2) If liquid has been spilled, or objects have fallen into the unit.
3) If the unit has been exposed to rain or water.
4) If the unit does not operate normally by following the operating instructions. Adjust only those controls that are covered by the operating instructions as improper adjustment of other controls may result in damage and will often require extensive work by a qualified technician to restore the unit to normal operation.
5) If the unit has been dropped or the cabinet has been damaged.
6) When the unit exhibits a distinct change in performance - this indicates a need for service.
Do not attempt to service this unit yourself as opening or removing covers may expose you to dangerous voltage or other hazards. Refer all servicing to qualified service personnel.
Replacement Parts – When replacement parts are required, be sure the service technician has used replacement parts specified by the manufacturer or having the same characteristics as the original part. Unauthorized substitutions may result in fire, electric shock or other hazards.
Safety Check – Upon the completion of any service or repairs to this unit, ask the service technician to perform safety checks to determine that the unit is in proper operating condition.
Condensation – Moisture may form on the CD pickup lens when:
- The unit is moved from a cold spot to a warm spot
- The heating system has just been turned on
- The unit is used in a very humid room
- The unit is cooled by an air conditioner
When this unit has condensation inside, it may not function normally. Should this occur, leave the unit for a few hours, then try to operate again.
Power supply

The OPE/BATT indicator lights up while the power is on.
Using on AC house current
Connect the AC cord as illustrated below.

CAUTION
Use only the supplied AC cord. Use with other cords may result in the risk of fire.
Using on batteries
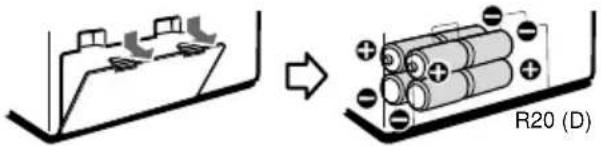
Open the lid of the battery compartment on the rear and insert eight R20 (size D) batteries, not supplied, as illustrated below. Then close the lid.
To switch from AC power supply to battery supply, disconnect the AC cord from the AC inlet.
When the OPE/BATT indicator becomes dim, the tape speed slows down, volume decreases, or sound is distorted during operation, replace the batteries.
Notes on batteries
To avoid damage from leakage or explosion, observe the following:
- Insert the batteries with the 0 and 9 marks correctly aligned.
- Do not mix different types of batteries or old batteries with new ones.
- When the unit is not to be used for a long period, remove the batteries.
- Never recharge the batteries, apply heat to them or take them apart.
- Remove dead batteries.
If liquid leaks from the batteries, wipe thoroughly to remove.
Connections
IMPORTANT
- Make sure that the AC cord is disconnected and batteries are removed before connecting speakers.
- Do not connect other than the supplied speakers.
1 Position the speakers.
To couple with the speakers, slide each speaker down into the guide brackets on the center unit until the height is level with the unit.
To separate the unit from the speakers, slide the speakers up and off, while pressing the speaker release knob.

2 Connect the speakers.
Connect the right speaker cord to the R terminals, and the left speaker to the L terminals. Connect the speaker cord with the white broken line to 0 and the other cord to 9.

Remote control
Insert two R6 (size AA) batteries.

When the reach of the remote control signal is less than 5 meters (16 feet), replace the batteries.
The remote control may not operate correctly when:
- The unit is exposed to intense light, such as direct sunlight
- Objects block the remote control signal to the unit
To use the buttons on the remote control
Buttons on the remote control and the main unit with identical indications have the same functions.
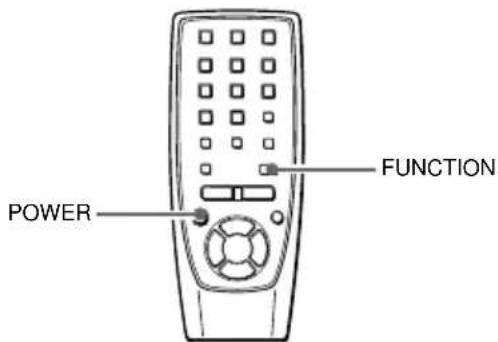
To turn the power on
Press POWER to turn on the display.
When using the unit on the batteries, this button will not turn the power on.
To turn the power off
Press POWER to turn off the display.
When one of the deck operation buttons is pressed, this button will not turn the power off.
To use the FUNCTION button
Each time FUNCTION is pressed while the power is on, the function is selected cyclically.

* applicable when one of the deck operation buttons is pressed
Specifications
Tuner section
Frequency range, antenna — FM: 87.5 - 108.0 MHz Rod antenna, AM: 530/531 - 1,710/1,602 kHz (10/9 kHz step) Ferrite bar antenna
Deck section
Track format — 4 tracks, 2 channels / Frequency range — Normal tape: 50 - 12,000 Hz (EIAJ) / Recording system — AC bias / Erasing system — Magnet erase / Heads — Deck 1: Recording/playback head (1), Erasure head (1); Deck 2: Playback head (1)
CD player section
Disc — Compact disc / Scanning method — Non-contact optical scanner (semiconductor laser) / Rotation speed — Approx. 500 - 200 rpm/CLV / Error correction — Cross interleave, Reed, Solomon code / Number of channels — 2 channels / D/A conversion — 1 bit DAC
General
Power requirements — DC 12 V using eight size D (R20) batteries, AC 120 V, 60 Hz / Dimensions (W · H · D) — 274 · 245 · 211 mm ( 10^7/8 · 9^3/4 · 8^3/8 in.) / Weight — 3.1 kg (6 lbs. 13 oz.) (excluding batteries) / Power output — 5 W + 5 W (EIAJ, 2.7 ohms DC) / Power consumption — 20 W / Accessories — AC cord (1), Remote control (1)
Speaker
Type — 120 mm cone type / Dimensions (W · H · D) — 160 · 236 · 170 mm (6 ^3/8 · 9 ^3/8 · 6 ^3/4 in.) / Weight — Approx. 0.9 kg (2 lbs.) · 2 / Impedance — 2.7 ohms / Allowable max. input — 7 W
Specifications and external appearance are subject to change without notice.
COPYRIGHT
Please check the copyright laws relating to recordings from disc, radio or external tape for the country in which the machine is being used.
If an erroneous display or malfunction occurs
Make sure that none of the deck operation buttons is pressed.
Press s while pressing TAPE/POWER/6 STANDBY. If the unit cannot be reset in the way above, disconnect the AC cord and remove all the batteries to turn off the display.
Leave the unit for a while and turn the power back on.

A TUNER OPERATION
1 Press \*RADIO/BAND repeatedly to select the desired band.

The power is turned on and the previously tuned station is received.
* or BAND on the remote control (applicable when the AC cord is connected)
2 Press r , t (TUNING DOWN, UP) to select a station.
During FM stereo reception, is displayed.
After listening, press TAPE/POWER/6 STANDBY to turn the power off.
For better reception

Extend the rod antenna and orient it for the best reception.

The antenna is inside the unit. Position the unit for the best reception.
For quick tuning (Auto Search)
Keep r , t pressed until the tuner starts searching for a station. When a station is tuned to, the search stops.
If the broadcast signal is weak, it does not stop. To stop the search manually, press r or t .
\*REPEAT/SLEEP/FM MODE/OSC
- If an FM stereo broadcast contains noise, press the button so that modisplayed.
Noise is reduced, although reception is monaural. To restore stereo reception, press the button again.
- If a high-pitched sound is heard during AM recording, press the button repeatedly until the noise is reduced. Its position can be checked by “•” being on or off the display.
* or MODE on the remote control
To change the AM tuning interval
The default setting of the AM tuning interval is 10 kHz/step. If you use the unit in an area where the frequency allocation system is 9 kHz/step, change the interval as follows.
1 Press RADIO/BAND to display FM.
2 Press s while pressing RADIO/BAND to display the AM frequency.
When the AM tuning interval is changed, the preset stations are cleared.
NOTE
If the unit picks up noise from other electrical appliances nearby, like a TV or fluorescent lights, move the unit.

PRESETTING STATIONS
You can preset up to 15 stations in each band.
1 Select a station.
2 Press *s MEMORY once so that "M" is displayed to store the station.
A station is assigned a preset number, beginning from 1 in consecutive order for each band.

* or s STOP on the remote control
3 Repeat steps 1 and 2.
The next station will not be stored if a total of 15 preset stations have already been stored for a band.
To listen to preset stations
Select a band then press e PRESET repeatedly. c PLAY on the remote control is also available.
To select a preset number directly with the remote control
Press the numbered buttons 0-9 and +10.
Example:
To select number 15, press +10 and 5.
To select number 10, press +10 and 0.
To clear a preset station
Select the preset number first. Within 4 seconds, keeps pressed until "M" and the preset number disappear in the display.
The higher numbers in the band are decreased by one.
SOUND ADJUSTMENT
Volume or tone adjustment does not affect recording.
VOLUME (VOL)
Press VOLUME N or M. The volume level is displayed as a number from 0 to MAX (25).
- The volume level is automatically set to 14 if the power is turned off when the volume level is set to 15 or more. (except when turning the power back on within 4 seconds)
- Pressing DISPLAY on the remote control displays the adjusted volume level.
3-mode equalizer
Press one of the 3-mode equalizer buttons (ROCK, POP, JAZZ). The selected mode R (Rock), P (Pop) or J (Jazz) appears in the display.
To cancel, press the selected mode button.
ROCK - Emphasizes the high and low range of music.
POP - Emphasizes voice and midrange of music.
JAZZ - Emphasizes the low range of music.
When using the remote control, press EQ repeatedly until the desired mode is selected.
The equalizer mode changes to ROCK, POP, JAZZ or no equalization, cyclically.
T-BASS system
The T-BASS system enhances the realism of low-frequency sound.
Press T-BASS to turn it on or off.

B CD OPERATION
1 Press CD.
The power is turned on.
2 Press CD OPEN to open the disc compartment. Place a disc with the printed side up and close the disc compartment.
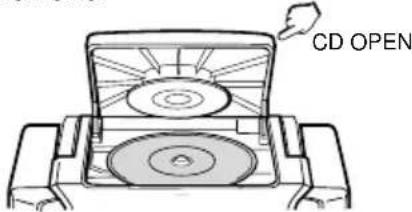
Total number of tracks and total playing time are displayed. It will take about 15 seconds when loading a CD-RW disc.
3 Press \*e PRESET to start play.
The number of the track being played and elapsed playing time are displayed.
* or c PLAY on the remote control
s MEMORY – Stops play.
* e PRESET – Pauses play. To resume play, press again.
* or a PAUSE on the remote control r , t – Searches for a particular point during playback. Keep r or t pressed and then release it.
- Skips to the beginning of a track. Press r or t repeatedly.
* REPEAT/SLEEP/FM MODE/OSC – Repeats a single track or all tracks. Select as follows.
[1: A single track is played repeatedly. Select a track with r or t .
[ : All tracks are played repeatedly.
* or REPEAT on the remote control
To start play when the power is off, press CD. The power is turned on and play of the loaded disc begins (Direct Play Function).
If you load a disc while the CD indicator flashes in step 2, play starts without pressing e .
To select a track directly with the remote control, press the numbered buttons 0-9 and +10. CD play starts from the selected track and continues to the last track.
Example:
To select number 25, press +10, +10 and 5.
To select number 10, press +10 and 0.
After listening, press TAPE/POWER/6 STANDBY to turn the power off.
NOTE
- Do not use irregular shape CDs (example: heart-shaped, octagonal ones). It may result in malfunctions.
- Do not place more than one disc in the disc compartment.
- Do not try to open the disc compartment during play.
- Do not touch the lens. Doing so may cause malfunctions.
- The unit may not play a CD-R/RW disc that is recorded on personal computers or some kinds of CD-R/RW recorders because of differences in recording platforms.
- Do not attach any seal or label to either side (the recordable side or the labeled side) of a CD-R/RW disc. It may cause malfunction.
- Do not load an unrecorded CD-R/RW disc. It will take over 30 seconds to read the disc. The disc may be damaged if you try to open the disc compartment while reading the disc.

PROGRAMMED PLAY
Up to 30 tracks can be programmed from the disc.
1 In stop mode, keep *s MEMORY pressed until "M" flashes in the display.
* or s STOP on the remote control
2 Press r or t to select a track, then press s MEMORY to store it.
Track number

Programmed number
To select a track with the remote control
Press the numbered buttons 0-9 and +10.
3 Repeat step 2 to program other tracks.
4 Keep s MEMORY pressed until "M" stops flashing to finish the program.
"M" remains displayed and indicates the unit stores the programmed tracks.
5 Press e to start play.
To check the program, press r or t in stop mode.
To clear the program, press s once in stop mode so that "M" disappears in the display.
To change the programmed tracks, clear the program and repeat all the steps again.
SETTING THE SLEEP TIMER
The unit can be turned off automatically at a specified time.
1 Keep REPEAT/SLEEP/FM MODE/OSC pressed until "30" flashes in the display.

2 Within 4 seconds, press r or t to specify the time until the power is turned off.
Each time it is pressed, the time changes between 10 and 90 minutes in 10-minute steps.

To check the time remaining until the power is turned off
Repeat step 1 shown above. The remaining time is displayed for 4 seconds.
To cancel the sleep timer
Display the remaining time and press r or t repeatedly until OFF is displayed.
NOTE
If the unit is turned off during tape playback, c on the deck will not be released. Press Z to release c.

C TAPE OPERATION
- Use Type I (normal) tapes only.
- Note that recording is done on only one side of the tape.
INSERTING A TAPE
Press Z to open the cassette holder and insert a tape with the exposed side down and the side to be played facing out.

Push the cassette holder to close.
PLAYING A TAPE
Press c while the power is off.
The power is turned on and play of the inserted tape begins.
The volume level is displayed during tape operation.
Z – Stops play. The power will be automatically turned off.
a – Pauses play. To resume play, press again. f /g – Rewinds/ fast forwards. To stop the winding, press Z.
Continuous play
After play on deck 2 finishes, play on deck 1 will start without interruption.
During play on deck 2, press a then press c on deck 1.
a on deck 1 will be released at the end of play on deck 2.
RECORDING FROM A CD OR THE TUNER
1 Insert a tape to be recorded on into deck 1 with the side to be recorded facing out.

2 Get ready to record from the source.
To record from a CD, press CD and load the disc. To record from a radio broadcast, press RADIO/BAND and tune to a station.
3 Press w on deck 1 to start recording.
c is pressed simultaneously. When the selected function is CD, CD play and recording starts simultaneously.
To record only the selected tracks of a CD
1 Follow steps 1 to 4 of PROGRAMMED PLAY on page 9 to program tracks.
2 Press w.
To stop recording, press Z on deck 1. To stop CD play, press s STOP/MEMORY.
To pause recording, press a . To resume recording, press again.
To erase recording, press w on deck 1 while the power is off.
After recording, press TAPE/POWER/6 STANDBY to turn the power off.
DUBBING A TAPE
1 Press TAPE/POWER/6 STANDBY to turn the power off.
2 Insert a tape to be recorded on into deck 1 with the side to be recorded facing out.
3 Insert a tape to be played into deck 2 with the side to be played facing out.
4 Press a then press w on deck 1 to enter recording pause mode.
The power is turned on.
c is pressed simultaneously.
5 Press DUBB SPEED HIGH/LOW to select a dubbing speed.
The HIGH-SPEED DUBBING indicator lights up: Dubs at high speed.
The HIGH-SPEED DUBBING indicator goes off: Dubs at normal speed.
6 Press c on deck 2.
a on deck 1 is released and recording starts.
To stop recording, press Z on deck 1 and deck 2. The power will be automatically turned off.
NOTE
When recording near a television, noise may be recorded. Move the unit away from the television.
To prevent accidental erasure
Break off the plastic tabs on the cassette tape with a screwdriver or other pointed tool after recording.
To record on the tape again
Cover the tab openings with adhesive tape, etc.
Side A
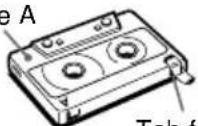
Tab for side A
MICROPHONE MIXING
Connect a microphone with a mini plug to the MIC jack and play a source to be mixed.
To record the microphone mixing sound, insert a tape in deck 1 and press w.
- During dubbing at high speed, the microphone mixing sound is not recorded.
MIC VOL – Adjusts the microphone volume. If a howling sound is produced, turn the volume down.
• To prevent howling, hold the microphone away from the speakers. The use of unidirectional type microphones is also recommended.
Maintenance
To clean the cabinet
Use a soft cloth lightly moistened with mild detergent solution. Do not use strong solvents such as alcohol, benzine or thinner.
To clean the heads
When the tape heads are dirty;
- high frequency sound is not emitted
- the sound is not adequately high
- the sound is off-balance
- the tape cannot be erased
- the tape cannot be recorded on
After every 10 hours of use, clean the tape heads with a head cleaning cassette.
Use separately sold dry-type or wet-type cleaning cassette.
Refer to the instructions of the cleaning cassette for details.
To clean the lens
Use a cotton swab slightly moistened with cleaning fluid. Wipe gently from the center to the edge.

NOTE
This equipment has been tested and found to comply with the limits for a Class B digital device, pursuant to Part 15 of the FCC Rules. These limits are designed to provide reasonable protection against harmful interference in a residential installation.
This equipment generates, uses, and can radiate radio frequency energy and, if not installed and used in accordance with the instructions, may cause harmful interference to radio communications. However, there is no guarantee that interference will not occur in a particular installation. If this equipment does cause harmful interference to radio or television reception, which can be determined by turning the equipment off and on, the user is encouraged to try to correct the interference by one or more of the following measures:
... Reorient or relocate the receiving antenna.
... Increase the separation between the equipment and receiver.
... Connect the equipment into an outlet on a circuit different from that to which the receiver is connected.
... Consult the dealer or an experienced radio/TV technician for help.
CAUTION
Modifications or adjustments to this product, which are not expressly approved by the manufacturer, may void the user's right or authority to operate this product.
- Explanation of Graphical Symbols:
- OWNER'S RECORD
- IMPORTANT SAFETY
- Warning
- Installation
- INSTRUCTIONS
- Electric Power
- Lightning
- Maintenance
- Damage Requiring Service
- Power supply
- Using on AC house current
- CAUTION
- Using on batteries
- Notes on batteries
- Connections
- IMPORTANT
- Position the speakers.
- Connect the speakers.
- Remote control
- The remote control may not operate correctly when:
- To use the buttons on the remote control
- To turn the power on
- To turn the power off
- To use the FUNCTION button
- Specifications
- Tuner section
- Deck section
- CD player section
- General
- Speaker
- COPYRIGHT
- If an erroneous display or malfunction occurs
- A TUNER OPERATION
- Press \*RADIO/BAND repeatedly to select the desired band.
- Press r , t (TUNING DOWN, UP) to select a station.
- For quick tuning (Auto Search)
- \*REPEAT/SLEEP/FM MODE/OSC
- To change the AM tuning interval
- NOTE
- PRESETTING STATIONS
- SOUND ADJUSTMENT
- VOLUME (VOL)
- 3-mode equalizer
- T-BASS system
- B CD OPERATION
- Press CD.
- Press CD OPEN to open the disc compartment. Place a disc with the printed side up and close the disc compartment.
- Press \*e PRESET to start play.
- s MEMORY – Stops play.
- PROGRAMMED PLAY
- SETTING THE SLEEP TIMER
- C TAPE OPERATION
- INSERTING A TAPE
- PLAYING A TAPE
- Press c while the power is off.
- Continuous play
- RECORDING FROM A CD OR THE TUNER
- To record only the selected tracks of a CD
- DUBBING A TAPE
- To prevent accidental erasure
- To record on the tape again
- MICROPHONE MIXING
- Connect a microphone with a mini plug to the MIC jack and play a source to be mixed.
- To clean the cabinet
- To clean the heads
- To clean the lens
Brand : AIWA
Model : CA-DW539
Category : CD Player