
SCP715 - Projector 3M - Free user manual and instructions
Find the device manual for free SCP715 3M in PDF.


| Product Type | Video Projector |
| Brand | 3M |
| Model | SCP715 |
| Display Technology | DLP |
| Resolution | XGA (1024 x 768) |
| Brightness | 2500 ANSI Lumens |
| Contrast Ratio | 2000:1 |
| Light Source | Lamp |
| Lamp Life | Up to 3000 hours (normal mode) |
| Dimensions (W x D x H) | 295 x 210 x 80 mm |
| Weight | 2.5 kg |
| Power Consumption | 230W (max) |
| Inputs | VGA, Composite, S-Video, Audio |
| Outputs | Monitor Out, Audio Out |
| Noise Level | 28 dB (eco mode) |
| Keystone Correction | Vertical +/- 15 degrees |
| Lens | Manual zoom and focus |
| Cleaning | Use soft cloth; clean air filter monthly |
| Safety | Overheat protection, automatic shutdown |
| Spare Parts / Repairability | Replacement lamp available; user-replaceable filter |
Frequently Asked Questions - SCP715 3M
User questions about SCP715 3M
0 question about this device. Answer the ones you know or ask your own.
Ask a new question about this device
Download the instructions for your Projector in PDF format for free! Find your manual SCP715 - 3M and take your electronic device back in hand. On this page are published all the documents necessary for the use of your device. SCP715 by 3M.
USER MANUAL SCP715 3M
Super Close Projection System
SCP715/SCP740/SCP717
Operator's Guide
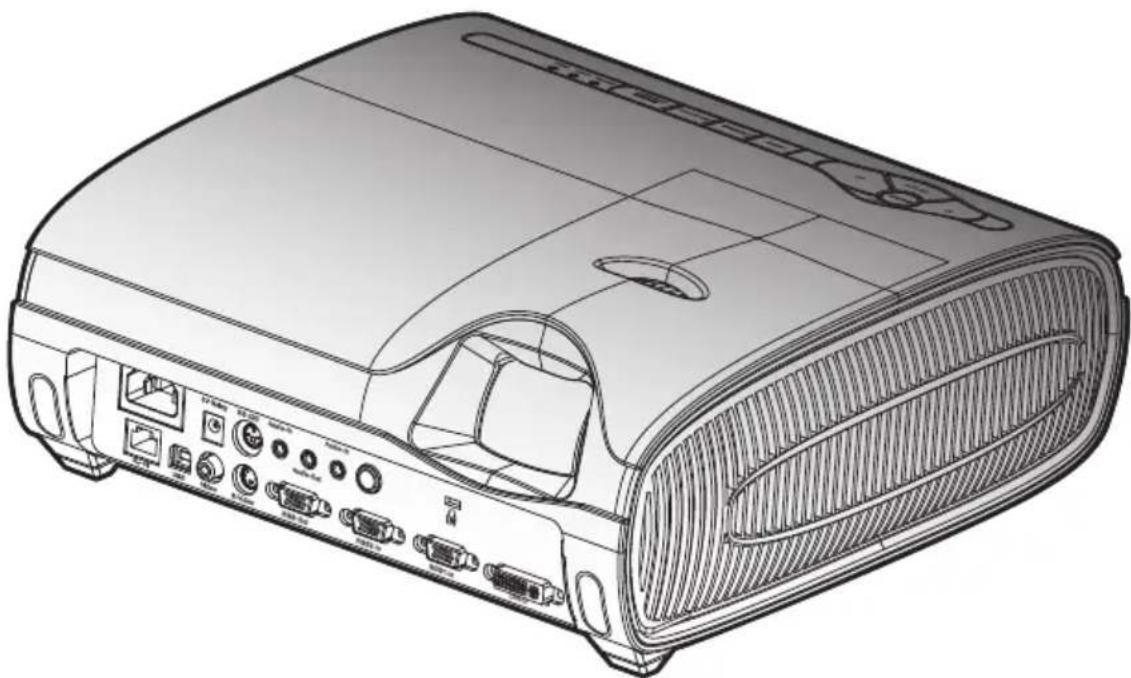
natural_image
Line drawing of a projector module with ports and ventilation slots (no text or symbols)| Important Note |
| Before using this product, please read the “Product Safety Guide” and related manuals to ensure the proper use of this product. After reading them, store them in a safe place for future reference. |
Contact 3M
In the event of missing and/or damaged equipment, or technical questions, the following information can help in the completion of the installation.
Customer Service - 1-800-328-1371 (US)
SCP 700 Series Warranty Statements
Limited Warranty
- The 3M SCP700 Series projector (the "3M Product") is warranted is warranted to be free from defects in material or manufacture for a period of three (3) years from the date of purchase or 4,000 hours of usage, whichever occurs first.
- All other accessories of the 3M Product (those in the applicable modular configurations), excluding the projector lamps, but including the wall mounts, ceiling mounts, digital annotation sensors, and input/output devices are warranted to be free from defects in material or manufacture for a period of one (1) year from the date of purchase.
- The lamp component of the 3M Product is warranted to be free from defects in material and manufacture for a period of for a period of ninety (90) days after the date of purchase of the 3M Product or 180 hours of lamp usage, whichever occurs first. This warranty is for parts only and in the case of an approved warranty claim for a lamp, your exclusive remedy will be for a replacement product shipped to your location.
- Optional product upgrades and/or accessories that are not sold as part of any modular configuration are subject to individual warranties.
THE WARRANTIES STATED ABOVE ARE EXCLUSIVE AND ARE MADE IN PLACE OF ANY AND ALL WARRANTIES, EXPRESS OR IMPLIED WARRANTIES OR CONDITIONS, INCLUDING ANY IMPLIED WARRANTY OF MERCHANTABILITY OR FITNESS FOR A PARTICULAR PURPOSE, OR ANY INDUSTRY PRACTICE OR CUSTOM OR TRADE USAGE.
In the event the 3M Product fails to conform to the above stated warranties within the applicable warranty period, your exclusive remedy shall be, at 3M's option, to replace or repair the 3M Product or to refund the purchase price of the 3M Product. All replaced parts or products become property of 3M. If the product is repaired, 3M will repair the defective part(s) with a new or used part(s). If the 3M Product is replaced, 3M will replace the 3M Product with the same or equivalent model and with a new or refurbished 3M Product. In the case of an approved warranty claim, the replacement 3M Product will carry only the remaining term of the original 3M Product's warranty period as stated above. . For warranty service, you must provide proof of the date of the original purchase else the manufacturing code date will be used to establish the start date of the warranty. The following are exclusions to the above listed warranty:
a. This warranty does not cover 3M Product that is modified or damaged through improper storage, misuse, abuse, accident, vandalism, improper installation, neglect, improper shipping, damage caused by acts of war, disasters such as fire, flood, and lightning, improper electrical current, software problems, interaction with non-3M products, or service other than by an 3M Authorized Service Provider, neglect or mishandling by any person. Normal wear and tear is not covered under warranty.
b. 3M Product is designed to operate in the typical indoor environment. This warranty does not cover 3M Product used outside of the following circumstances:
o 100V-240V AC, 50/60 Hz
o 16° to 29° C (60° to 85° F)
o 10-80% RH (without condensation)
o 0-1828m (0-6000 feet) above sea level
c. The Air Intake and Exhaust Vent must be clear of obstructions, including any potential blockage or obstructions caused from a ceiling or other mount. Inadequate air ventilation will cause the 3M Product to malfunction or will cause damage to the 3M Product which will void the warranty.
d. This warranty does not cover any additional costs including, but not limited to, those associated with removal, cleaning or installation of the 3M Product, adjustments, (mechanical or electronic) made to the 3M Product or replacing customer replaceable parts like lamps and air filters.
e. This warranty covers only normal use of the product. 24-hour-per-day or other excessive continual use causes strain and is not considered normal use.
f. This warranty does not cover consumables (e.g., fuses), other than lamps and only as set forth below.
g. This warranty is not transferable.
h. 3M is not responsible for warranty service should the 3M label or logo or the rating label or serial number be removed unless otherwise stated in writing for the purposed of private labeling for partnership requirements.
i. This warranty does not cover postage, insurance, or shipping costs incurred in presenting your 3M Product for warranty service. Said costs are the customer's responsibility. If a claimed defect cannot be identified or reproduced in service, the customer may be held responsible for cost incurred. Should your warranty upgrade include a "change out" service and the claimed defect cannot be identified or reproduced by the technician, the customer will be responsible for call out costs.
FAILURE TO FOLLOW THE INSTRUCTIONS CONTAINED IN THE APPROPRIATE 3M PRODUCT MANUAL OR TO USE THE 3M PRODUCT IN ACCORDANCE WITH 3M'S INTENDED USE STATEMENT, WILL VOID ALL WARRANTIES AND LIMITED REMEDIES.
EXCEPT AS SPECIFICALLY STATED IN THE APPLICABLE 3M PRODUCT MANUAL, 3M SHALL NOT BE LIABLE FOR ANY INDIRECT, INCIDENTAL, SPECIAL OR CONSEQUENTIAL DAMAGES (INCLUDING, BUT NOT LIMITED TO, LOSS OF PROFITS, REVENUE OR BUSINESS) RESULTING FROM, OR IN ANY WAY RELATED TO PERFORMANCE, USE OR INABILITY TO USE ANY OF THE 3M PRODUCT. This limitation applies regardless of the legal theory upon which damages are sought.
For warranty support, please call or write your local 3M office or a 3M Authorized Service Provider to obtain an RMA # (Return Material Authorization Number) before returning the product. If you are inside the Continental United States of America, please contact 3M Customer Service at 800-328-1371 or email meetings@mmm.com.
What 3M Will Do To Correct Problems:
- If your 3M Product requires service, 3M will ask you to bring or send the 3M Product, securely packaged in its original container or equivalent, along with proof of the date of original purchase, to your 3M Service Dealer or 3M Service Center.
- 3M will, at its option, repair or replace the defective unit without charge for parts or labor. Return of the 3M Product will be at 3M's expense.
- When warranty service involves the exchange of the 3M Product or of a part, the item replaced becomes 3M property.
- The exchanged 3M Product or part may be new or previously refurbished to the 3M standard of quality, and at 3M's option, the replacement may be another model of like kind and quality.
- 3M's liability for replacement of the warranted 3M Product or part will not exceed the original retail selling price of the 3M Product. Exchange or replacement products or parts assume the remaining warranty period of the product covered by this limited warranty. However, each replacement lamp carries the limited 90-day warranty stated above.
The 3M logo, and 3M are trademarks of the 3M Company.
Important Notice
All statements, technical information, and recommendations related to 3M's products are based on information believed to be reliable, but the accuracy or completeness is not guaranteed. Before using this product or implementation, you must evaluate them and determine if they are suitable for your intended application or situation. You assume all risks and liability associated with such use or implementation. Any statements related to the product which are not contained in 3M's current publications, or any contrary statements contained on your purchase order shall have no force or effect unless expressly agreed upon, in writing, by an authorized officer of 3M.
All rights reserved. No part of this book covered by the copyrights hereon may be reproduced or copied in any form or by any means-graphic, electronic, or mechanical, including photocopying, taping or information storage and retrieval systems-without written permission of 3M Projection Systems Department.
Table of Contents 1
Usage Notice 2
Precautions....2
Important Note 6
Introduction....7
Product Features 7
Package Overview....8
Product Overview 9
Main Unit....9
Control Panel 10
Connection Ports 11
Remote Control with Mouse Function 12
Installation 13
Connecting the Projector 13
Connect the Computer/Notebook ....13
Connect the Video 14
Powering On/Off the Projector 15
Powering On the Projector 15
Powering Off the projector 16
LED Indicator 16
Adjusting the Projected Image....17
Adjusting the Projector Image Height 17
Adjusting the Projector Focus 18
3M Super Close Projection System SCP715/SCP717 Adjusting Projected Image
Size 18
3M Super Close Projection System SCP740 Adjusting Projected Image Size .....19
User Controls 20
Control Panel & Remote Control 20
On-Screen Display Menus....23
How to Operate ....23
Menu Tree-1/2....24
Menu Tree-2/2....25
Information....26
Management-1/3....27
Management-2/3....29
Management-3/3....31
Image-1/2 32
Image-2/2 35
LAN 37
Security 41
Appendices....43
Troubleshooting 43
Replacing the Lamp....47
Compatibility Modes 48
RS232 Protocol Function List 49
Regulation & Safety notices 52
Precautions
Follow all warnings, precautions and maintenance as recommended in this user's guide to maximize the life of your unit.

WARNING
- Do not look into the projector's lens when the lamp is on. The bright light may hurt your eyes.
- To reduce the risk of injury to the eyes, do not look directly into the laser light on the remote control and do not point the laser light into anyone eyes. This remote control is equipped with a Class II laser that emits radiation.
- To reduce the risk of fire or electric shock, do not expose this product to rain or moisture.
- Please do not open or disassemble the product as this may cause electric shock.
- When changing the lamp, please allow unit to cool down, and follow all changing instructions.
- Position the power cord and data cable so that they can not be tripped over.
- Do not remove any screws other than those specified in the lamp replacement instructions.
- Disconnect power cord when the projector is not in use, during lamp replacement and while cleaning.
- Switch power "OFF" and disconnect the plug from electrical outlet before replacing the lamp. Grasp plug and pull to disconnect.
- Do not attempt to service the projector; other than the lamp cartridge there are no user serviceable parts inside the projector.

WARNING
- Do not attempt to service the projector other than performing routine lamp replacement. Service should only be performed by a 3M authorized service provider. Aside from the projection lamp assembly, there are no serviceable parts inside the unit.
- Contact a 3M authorized service provider for service.
- Do not modify this projector.
- Do not allow water or other liquids to enter the projector.
- Do not operate this projector in wet environments or outdoors.
- Do not use this projector around unsupervised children.
- Replace power cord if damaged.
- Contact a 3M authorized service provider if the projector becomes damaged.
- Connect this projector into a grounded outlet.
- Use a grounded extension cord with a rating at least equal to that of the projector.
- Use only the 3M brand wall mounting hardware kit if wall mounting is desired.
- Installation of 3M wall kit must only be performed by qualified personnel.
- Adhere strictly to the proper installation procedure as outlined in the installation instructions when installing the 3M wall kit.
- Always operate the unit on a flat, sturdy, and horizontal surface.
- Before operating, please read owner's manual. Do not remove screws except lamp cover screws. Do not block venting openings.
WARNING
- Lamp replacement caution. Before removing the screws, disconnect the power cable. Hot surface inside. Allow 1 hour to cool before replacing the lamp. Handle with care. Risk of explosion. See Owner's Manual.
- Unplug the projector from the electrical outlet and allow the lamp to cool for 60 minutes before replacing the lamp.
- Wait at least 30 minutes for the lamp assembly to cool before replacing.
• Always handle the fragile lamp module with care. - In the event of a lamp rupture, call a 3M authorized service provider for repair. Ruptured lamp is not user serviceable.
- Ventilate the area where the lamp rupture occurred. The lamp operates at high pressure and temperature.
- Replace the lamp module when the lamp replacement message appears.
- Never replace the lamp module with a previously used lamp module.
- Hg: Lamp contains mercury. Don't throw in trash. Dispose according to local, state, or federal laws. See www.lamprecycle.org or call 1-800-328-1371.
- Wash your hands thoroughly if contact with ruptured lamp debris has taken place.
- Ventilate the area where the lamp rupture occurs. The lamp operates at high temperature.

WARNING
- Use only battery type AA.
- Orient the batteries plus (+) and (-) terminals of the batteries according to the markings found on the remote control.
- Do not leave the battery in the remote for an extended period of time.
- Do not heat, disassemble, short, recharge, or expose to fire or high temperature.
- Do not carry batteries loose in your pocket or purse.
- Avoid eye and skin contact in the event that battery would leak.
- Do not mix used and new batteries.
- Dispose of exhausted batteries in accordance with applicable federal, state and local regulations.
- Avoid looking directly into projector lens while the lamp is on.
- Keep the battery and battery cover away from children and pets.
- Changes or modifications not expressly approved by the manufacturer could void the user's authority, which is granted by the Federal Communications Commission to operate this computer.
Do:
- Turn off the product before cleaning.
Use a soft cloth moistened with mild detergent to clean the display housing. - Disconnect the power plug from AC outlet if the product is not being used for a long period of time.
Don't:
Block the slots and openings on the unit provided for ventilation.
Use abrasive cleaners, waxes or solvents to clean the unit.
Use under the following conditions:
- In extremely hot, cold or humid environments.
- In areas susceptible to excessive dust and dirt.
- Near any appliance that generates a strong magnetic field.
- In direct sunlight.
Important Note
- This product will detect the life of the lamp itself. Please be sure to change the lamp when it shows warning messages.
- Reset the "Lamp Counter Reset" function from the On Screen Display "Management" menu after replacing the lamp module (refer to page 28).
- When switching the projector off, please allow the projector to complete its cooling cycle before disconnecting the power.
- Turn on the projector first and then the signal sources.
- When the lamp reaches the end of its life, it will burn out and may make a loud popping sound. If this happens, the projector will not turn back on until the lamp module has been replaced. To replace the lamp, follow the procedures listed under “Replacing the Lamp”. (see page 47)
Product Features
3M Super Close Projection System SCP715/SCP717 are XGA single chip 0.7" DLP® projectors and 3M Super Close Projection System SCP740 is a WXGA single chip 0.65" DLP® projector. Outstanding features include:
- SCP715/SCP717 - True XGA, 1024 x 768 addressable pixels
SCP740 - True WXGA, 1280 x 800 addressable pixels
Texas Instruments Single chip DLP® Technology
NTSC/NTSC4.43/PAL/PAL-M/PAL-N/SECAM and HDTV compatible (480i/p, 576i/p, 720p, 1080i/p) - Multi-Auto functions: Auto detection, Automatic saving of user adjustments
Full function IR remote control with mouse function
User friendly multilingual on screen menu
◆ Advanced digital keystone correction and high quality full screen image re-scaling
User friendly control panel - Two built-in speakers with 2 Watt amplifier
◆ Multiple for Audio inputs
◆ Computer Compatibility: UXGA, SXGA+, SXGA compression and SVGA, VGA re-sizing
Mac compatible
◆ DVI support (HDCP compliant)
◆ Support Network function (LAN/RS232)
Package Overview
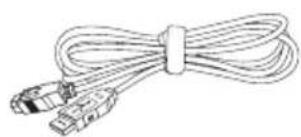
This projector comes with all the items shown below. Check to make sure your unit is complete. Contact your dealer immediately if anything is missing.
natural_image
Illustration of a flatbed electronic device with no visible text or symbolsProjector
natural_image
Coiled cable with two connectors, no text or symbols visibleUS AC Power Cord
UK AC Power Cord
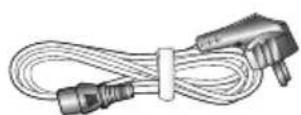
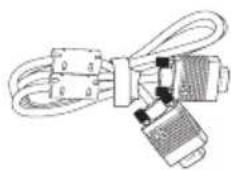
natural_image
Pure electrical circuit lines without any symbols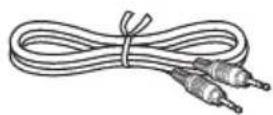
EUR AC Power Cord 3.5mm AudigACable
natural_image
Line drawing of a bundled cable with two USB connectors (no text or symbols)USB Cable
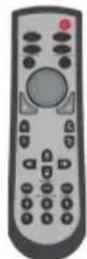
Wireless Remote
Controller
2 x AA Batteries
Documents :
Operator's Guide
Quick Start Card
☑ Product Safety Guide
WEEE Card
Product Overview
Main Unit
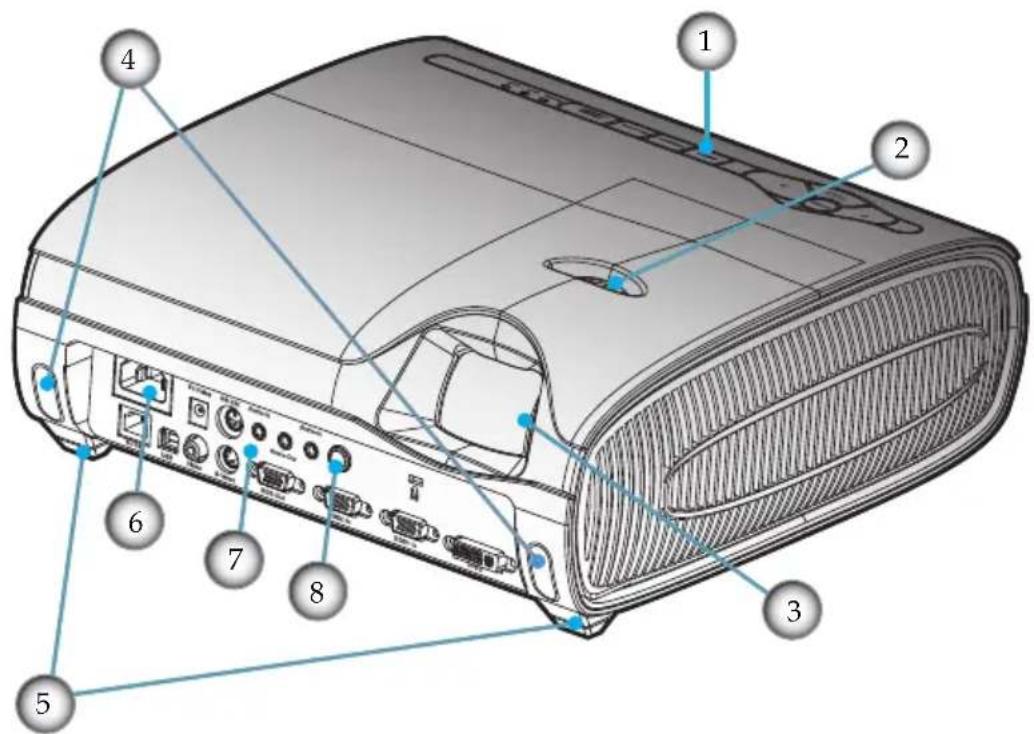
- Control Panel
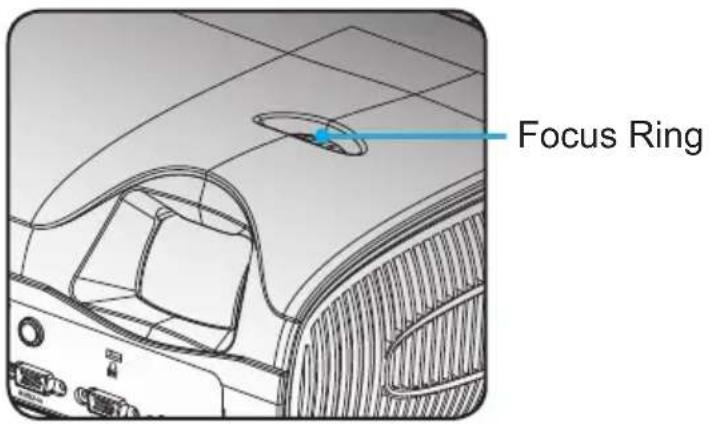
- Focus Ring
- Projection Lens
- Elevator Button
- Elevator Foot
- Power Socket
- Connection Ports
- IR Receivers
Control Panel
flowchart
graph TD
    A["ENTER"] --> B["MENU"]
    A --> C["SOURCE"]
    A --> D["RE-SYNC"]
    A --> E["POWER STANDBY"]
    A --> F["POWER"]
    A --> G["LAMP"]
    A --> H["TEMP"]
    I["1246"] --> A
    J["2"] --> A
    K["3"] --> A
    L["579"] --> A
    M["8"] --> A
    N["10"] --> A
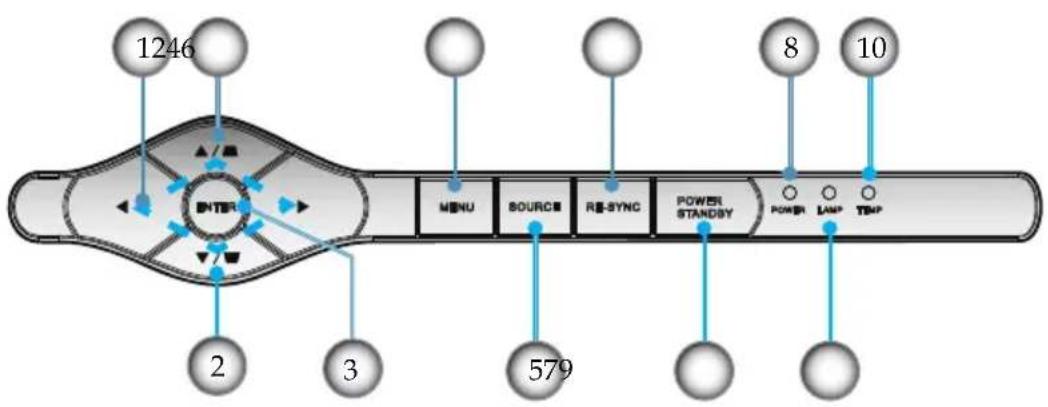
- Four Directional Select Keys
- Keystone +/-
- Enter
- Menu (On/Off)
- Source Select
- Re-Sync
- Power/Standby
- Power/Standby LED
- Lamp Indicator LED
- Temp Indicator LED
Connection Ports
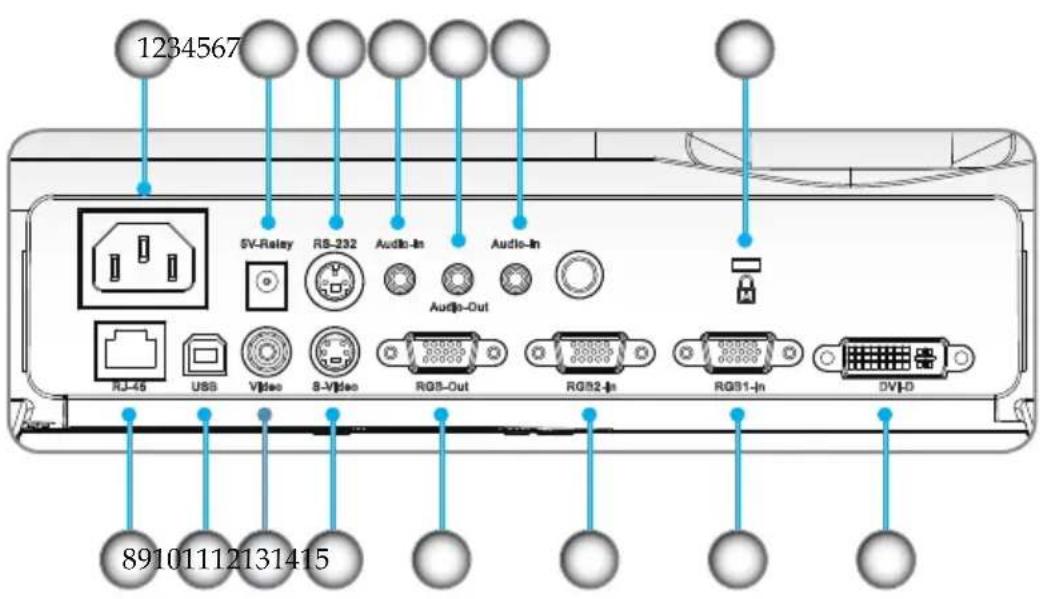
- Power Socket
- 5V-Relay Connector (Output: 5VDC, 2A)
- RS232 Connector
- Audio Input Connector (for S-Video or Composite)
- Audio Output Connector
- Audio Input Connector (for DVI-D or RGB1-In or RGB2-In)
- Kensington ^TM Lock Port
- Networking Connector RJ45
- USB Connector (connect to PC for Remote Mouse function)
- Composite Video Input Connector
- S-Video Input Connector
- Monitor Loop-through Output Connector
- RGB2-In Connector (PC Analog Signal/HD/Component Video Input)
- RGB1-In SCART Connector (PC Analog Signal/SCART RGB/HD/Component Video Input)
- DVI-D Input Connector (PC Digital/HDTV/HDCP Input)
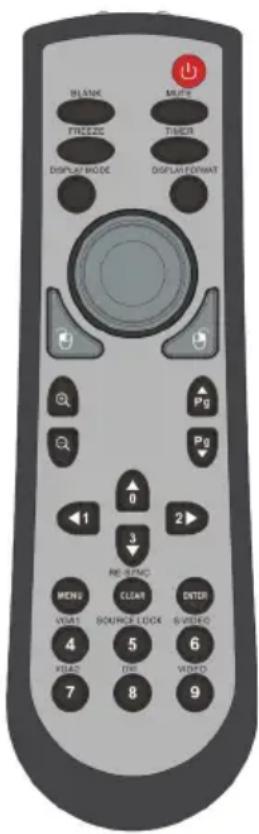
Remote Control with Mouse Function
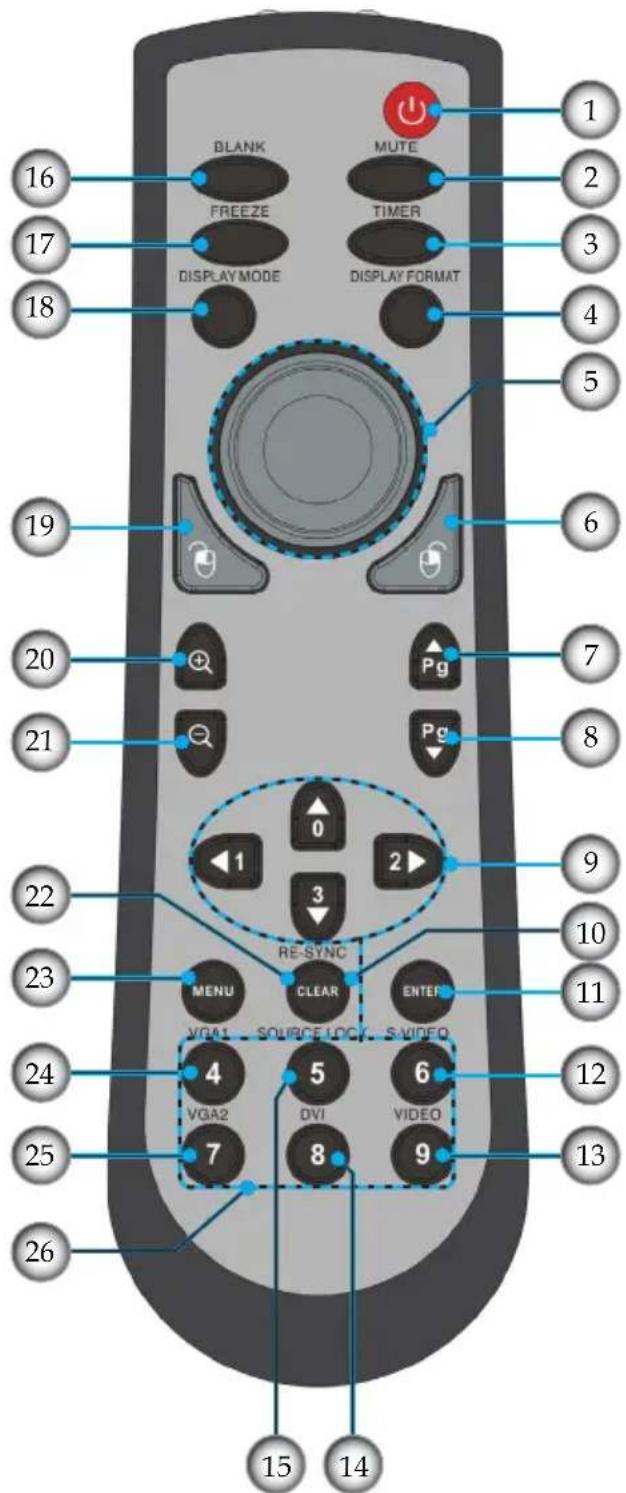
- Power
- Mute
- Timer
- Display Format
- Mouse
- Mouse Right Click
- Page Up
- Page Down
- Four Directional Select Keys
- Re-Sync
- Enter
- S-Video Source
- Composite Video Source
- DVI Source
- Source Lock
- Blank
- Freeze
- Display Mode
- Mouse Left Click
- Zoom In
- Zoom Out
- Clear
- Menu
- VGA1 Source
- VGA2 Source
- Number Buttons
Connecting the Projector
Connect the Computer/Notebook
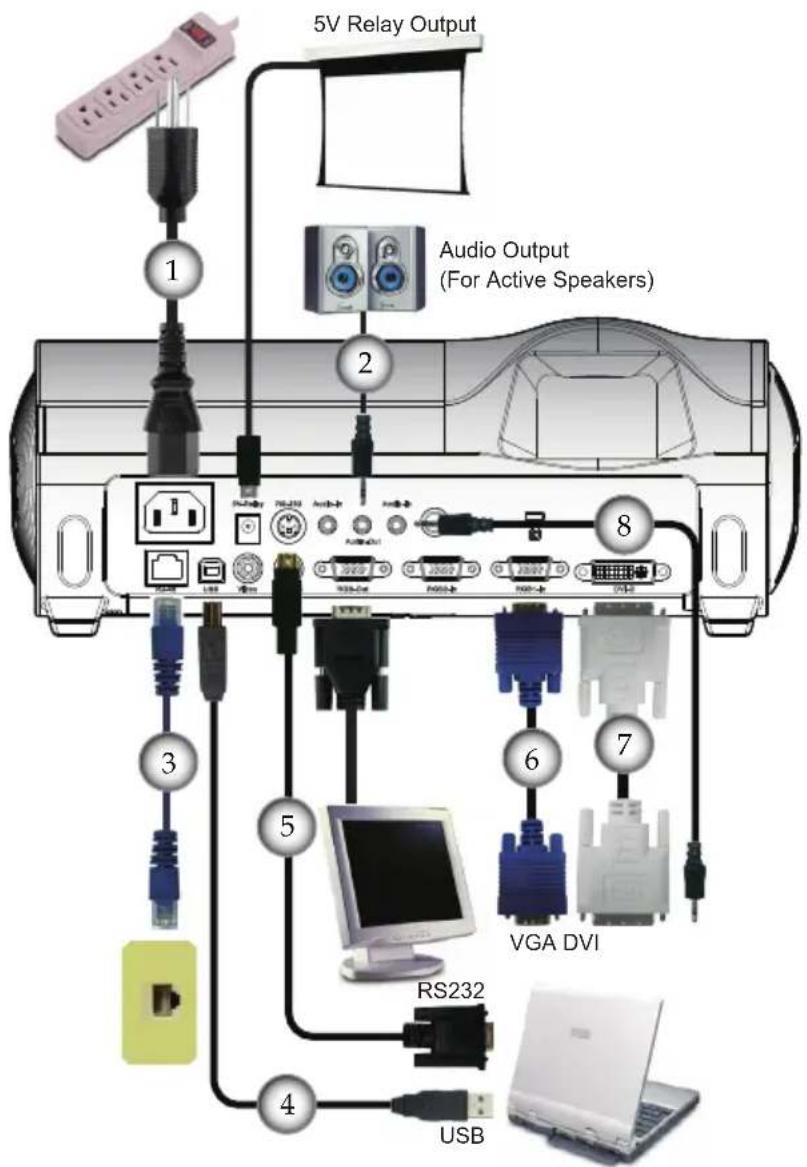
1....Power Cord
2 Audio Output Cable
3....Network Cable (optional accessory)
4....USB Cable
5.... RS232 Cable (optional accessory)
6....VGA Cable
7...... DVI to DVI Cable (optional accessory)
8......Audio Input Cable (optional accessory)
Connect the Video
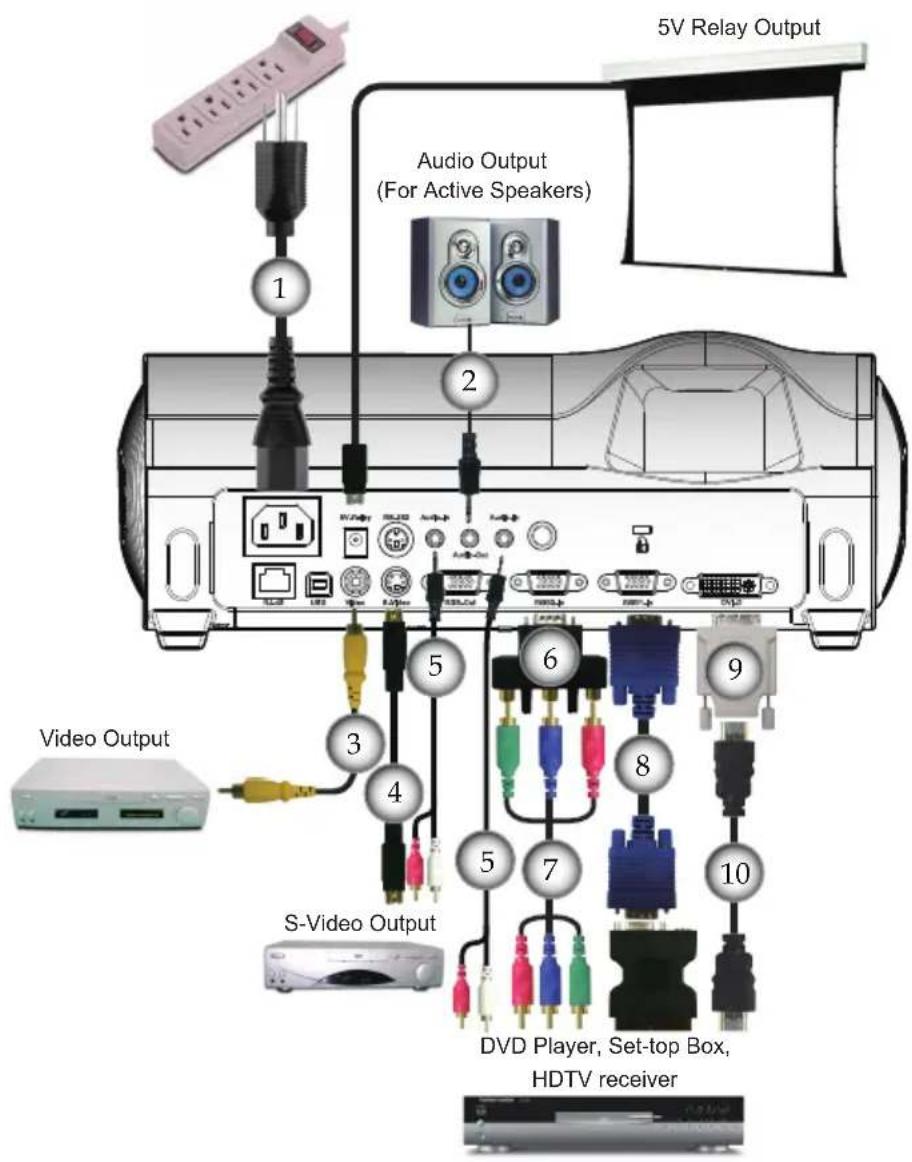
1....Power Cord
2. Audio Output Cable
3. Composite Video Cable (optional accessory)
4. S-Video Cable (optional accessory)
5. Audio Input Cable (optional accessory)
6......VGA to 3 RCA Component/HDTV Adapter (optional accessory)
7....RCA Component Cable for YPbPr (optional accessory)
8....VGA Cable
9......HDMI to DVI Adapter (optional accessory)
10......HDMI Cable (optional accessory)
Powering On/Off the Projector
Powering On the Projector
- Ensure that the power cord and signal cable are securely connected. The Power LED will turn red.
- Turn on the lamp by pressing "Power/Standby" button on the control panel.① And the Power LED will turn blue.
- Turn on your source (computer, notebook, video player, etc.). The projector should automatically detect your source within "Management" menu; check that "Input Source" has been set to "Auto Searching".
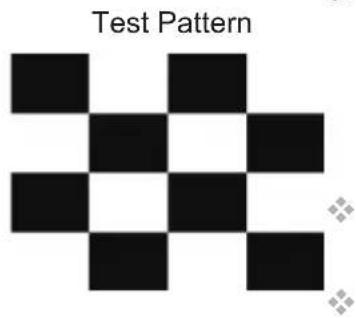
To access the built-in test pattern, please press the "Blank" button, then up arrow.
If you connect multiple sources at the same time, use the "Source" button on the control panel or direct source key on remote control to switch.
NOTE
- Turn on the projector first and then the signal sources.
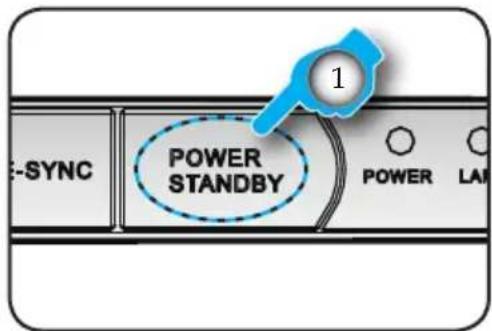
1 Power/Standby
Powering Off the Projector
- Press the "Power/Standby" button to turn off the projector lamp; you will see a message
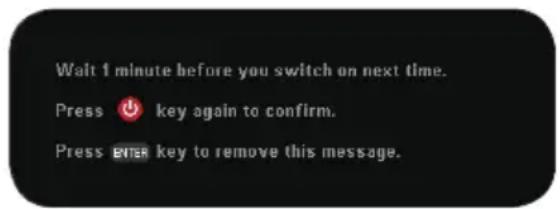
displayed on the projector's screen. Press the "Power/Standby" button again to confirm.
- The cooling fans continue to operate for about 2 minutes for cooling cycle and the Power LED will flash red. When the Power LED stops flashing, the projector has entered standby mode.
Once in standby mode, simply press "Power/Standby" button to restart the projector.
-
Disconnect the power cord from the electrical outlet and the projector.
-
Following a power off procedure, please allow 2 minutes before attempting to restart the projector.
LED Indicator
When the “TEMP” indicator turns red, it indicates the projector has overheated. The projector will automatically shut itself down.
When the “LAMP” indicator turns red, it indicates a problem with the lamp. Turn off the projector and disconnect the power cord from the electrical outlet, then contact your local dealer or our service center.
When the “LAMP” indicator flashes red, it indicates the fan has failed. Stop using the projector and disconnect the power cord from the electrical outlet, then contact your local dealer or our service center.
Adjusting the Projected Image
Adjusting the Projector Image Height
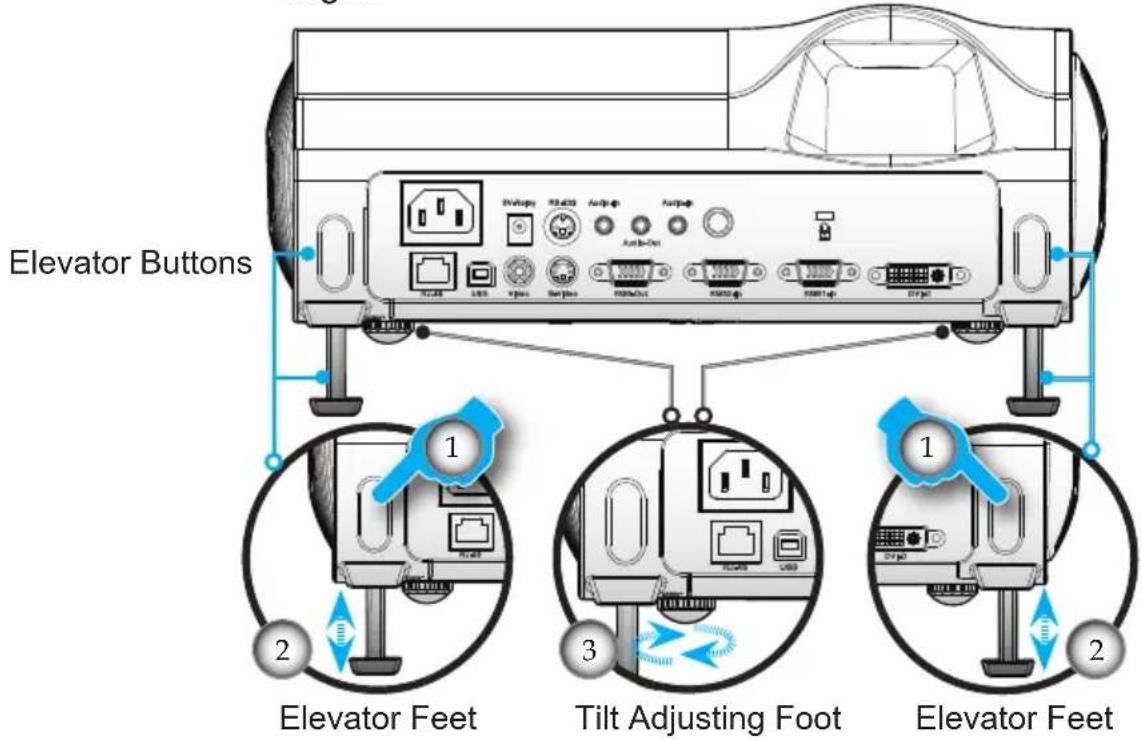
The projector is equipped with elevator feet for adjusting the image height.
To raise the image:
- Press the elevator buttons ①.
- Raise the image to the desired height angle ②, then release the button to lock the elevator feet into position.
- Rotate the tilt adjusting foot ③ to fine-tune the display angle.
To lower the image:
- Press the elevator buttons.
-
Lower the image, then release the button to lock the elevator feet into position.
-
Rotate the tilt adjusting foot ③ to fine-tune the display angle.
Adjusting the Projector Focus
To focus the image, rotate the focus ring until the image is clear.
3M Super Close Projection System SCP715/SCP717 Adjusting Projection Image Size
The projector will focus at distances from 1.64 to 13.60 feet (0.5 to 4.1 meters).
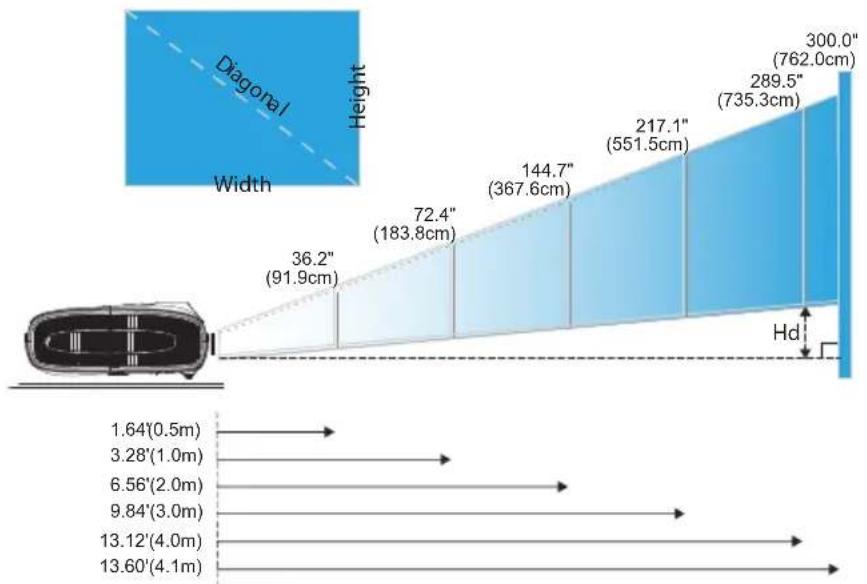
bar
| Vehicle | Width (cm) | Height (cm) | | :--- | :--- | :--- | | 1.64' | 0.5 | | | 3.28' | 1.0 | | | 6.56' | 2.0 | | | 9.84' | 3.0 | | | 13.12' | 4.0 | | | 13.60' | 4.1 | | | 36.2" | 91.9 | | | 72.4" | 183.8 | | | 144.7" | 367.6 | | | 217.1" | 551.5 | | | 289.5" | 735.3 | | | 300.0" | 762.0 | | Diagonal line indicates diagonal width.| Screen (Diagonal) | 36.2"(91.9cm) 72.4"(183.8cm) 144.7"(367.6cm) 217.1"(551.5cm) 289.5"(735.3cm) 300.0"(762.0cm) | ||||
| Screen Size (WxH) | 28.95"x 21.71"73.5 x 55.2cm | 57.90" x 43.42"147.1 x 110.3cm | 115.79" x 86.84"294.1 x 220.6cm | 173.69" x 130.27"441.2 x 330.9cm | 231.59" x 173.69"588.2 x 441.2cm |
| Hd | 2.17" (5.5cm) 4.34" (11.0cm) 8.68" (22.1cm) 13.03" (33.1cm) 17.37" (44.1cm) 18.00" (45.7cm) | ||||
| Distance | 1.64' (0.5m) 3.28' (1.0m) 6.56' (2.0m) 9.84' (3.0m) 13.12' (4.0m) 13.60' (4.1m) | ||||
| This graph is for user's reference only. | |||||
3M Super Close Projection System SCP740 Adjusting Projection Image Size
The projector will focus at distances from 1.64 to 16.40 feet (0.5 to 5.0 meters).
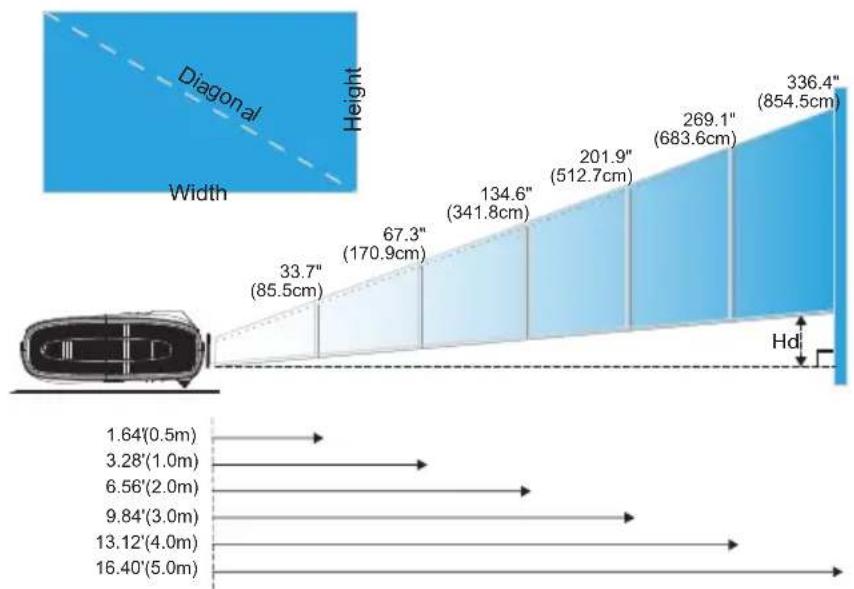
bar
| Segment | Height (cm) | Hd (m) | |---|---|---| | Width | 33.7 | 85.5 | | Height | 67.3 | 170.9 | | Total Height | 134.6 | 341.8 | | Total Height | 201.9 | 512.7 | | Total Height | 269.1 | 683.6 | | Total Height | 336.4 | 854.5 | The chart includes a dimension label 'Diagonal' and 'Width' in the top-left corner, and a horizontal bar chart below showing the corresponding distance measurements in meters from the origin (e.g., 1.64', 3.28').| Screen (Diagonal) | 33.7"(85.5cm) 67.3"(170.9cm) 134.6"(341.8cm) 201.9"(512.7cm) 269.1"(683.6cm) 336.4"(854.5cm) | |||||
| Screen Size (WxH) | 28.54" x 17.84" 72.5 x 45.3cm | 57.05" x 35.65" 144.9 x 90.6cm | 114.10" x 71.31" 289.8 x 181.1cm | 171.15" x 106.97" 434.7 x 271.7cm | 228.20" x 142.62" 579.6 x 362.3cm | 285.25" x 178.28" 724.5 x 452.8cm |
| Hd | 8.21" (20.8cm) 16 | 40" (41.7cm) 32.80" (83.3cm) 49.21" (125.0cm) 65.61" (166.6cm) 82.01" (208.3cm) | ||||
| Distance | 1.64' (0.5m) 3.28' (1.0m) 6.56' (2.0m) 9.84' (3.0m) 13.12' (4.0m) 16.40' (5.0m) | |||||
| This graph is for user's reference only. | ||||||
Control Panel & Remote Control
There are two ways for you to control the functions:
Remote Control and Control Panel.
Using the Control Panel

| Power/Standby | Refer to the “Power On/Off the Projector” section on pages 15-16. |
| Re-Sync | Automatically synchronize the projector to the input source. |
| Source | Press “Source” to select an input signal. |
| Menu | Turn the menu On or Off. |
| Four Directional Select Keys | Use ▲▼to navigate through the menus. |
| Enter | Confirm your item selection. |
| ▽/▽Keystone | Adjust image distortion caused by tilting the projector (±16 degrees). |
| Using the Remote Control | ||
 Power Power | Refer to the “Power On/Off the Projector” section on pages 15-16. | |
| Mute | Momentarily turn off the audio. Press this button again to unlock. | |
| Blank | Momentarily turn off the video. Press this button again to unlock. | |
| Timer | Start the function of “Presentation Timer”. Press this button again to close. (see page 29) | |
| Freeze | Press “Freeze” to pause the screen image. Press this button again to unlock. | |
| Display Format | Display the “Aspect Ratio” section of the on-screen display menu to select the desired aspect ratio. | |
| Display Mode | Select the display mode from PC, Photo, Video, Cinema, sRGB and User. | |
| Mouse Control | Use this button to navigate the mouse on the page. | |
| Mouse Right Click | Mouse right click. | |
| Mouse Left Click | Mouse left click. | |
 Page Up Page Up | Use this button to page up. | |
 Page Down Page Down | Use this button to page down. | |
 Zoom In Zoom In | Zoom in to magnify the image. | |
 Zoom Out Zoom Out | Zoom out to reduce the image. | |
| Four Directional Select Keys | Use ▲ ▼ ▶ ▶ ▶ ▶ ▶ ▶ ▶ ▶ ▶ ▶ ▶ ▶ ▶ ▶ ▶ ▶ ▶ ▶ ▶ ▶ ▶ ▶ ▶ ▶ ▶ ▶ ▶ ▶ ▶ ▶ ▶ ▶ ▶ ▶ ▶ ▶ ▶ ▶ ▶ ▶ ▶ ▶ ▶ ▶ ▶ ▶ ▶ ▶ ▶ ▶ ▸ ▶ ▶ ▶ ▶ ▶ ▶ ▶ ▶ ▶ ▶ ▶ ▶ ▶ ▶ ▶ ▶ ▶ ▶ ▶ ▶ ▶ ▶ ▶ ▶ ▶ ▶ ▶ ▶ ▶ ▶ ▶ ▶ ▶ ▶ ▶ ▶ ▶ ▶ ▶ ▶ ▶ ▶ ▶ ▶ ▶ ▶ ▶ ▶ ▶ △ △ △ △ △ △ △ △ △ △ △ △ △ △ △ △ △ △ △ △ △ △ △ △ △ △ △ △ △ △ △ △ △ △ △ △ △ △ △ △ △ △ △ △ △ △ △ △ △ △ ▽ ▽ ▽ ▽ ▽ ▽ ▽ ▽ ▽ ▽ ▽ ▽ ▽ ▽ ▽ ▽ ▽ ▽ ▽ ▽ ▽ ▽ ▽ ▽ ▽ ▽ ▽ ▽ ▽ ▽ ▽ ▽ ▽ ▽ ▽ ▽ ▽ ▽ ▽ ▽ ▽ ▽ ▽ ▽ ▽ ▽ ▽ ▽ ▽ ▽ ▼ ▼ ▼ ▼ ▼ ▼ ▼ ▼ ▼ ▼ ▼ ▼ ▼ ▼ ▼ ▼ ▼ ▼ ▼ ▼ ▼ ▼ ▼ ▼ ▼ ▼ ▼ ▼ ▼ ▼ ▼ ▼ ▼ ▼ ▼ ▼ ▼ ▼ ▼ ▼ ▼ ▼ ▼ ▼ ▼ ▼ ▼ ▼ ▼ ▼ ▽ ▽ ▽ ▽ ▽ ▽ ▽ ▽ ▽ ▽ ▽ ▽ ▽ ▽ ▽ ▽ ▽ ▽ ▽ ▽ ▽ ▽ ▽ ▽ ▽ ▽ ▽ ▽ ▽ ▽ ▽ ▽ ▽ ▽ ▽ ▽ ▽ ▽ ▽ ▽ ▽ ▽ ▽ ▽ ▽ ▽ ▽ ▽ ▽ ▉ ▽ ▽ ▽ ▽ ▽ ▽ ▽ ▽ ▽ ▽ ▽ ▽ ▽ ▽ ▽ ▽ ▽ ▽ ▽ ▽ ▽ ▽ ▽ ▽ ▽ ▽ ▽ ▽ ▽ ▽ ▽ ▽ ▽ ▽ ▽ ▽ ▽ ▽ ▽ ▽ ▽ ▽ ▽ ▽ ▽ ▽ ▽ ▽ ▽ ▯ ▽ ▽ ▽ ▽ ▽ ▽ ▽ ▽ ▽ ▽ ▽ ▽ ▽ ▽ ▽ ▽ ▽ ▽ ▽ ▽ ▽ ▽ ▽ ▽ ▽ ▽ ▽ ▽ ▽ ▽ ▽ ▽ ▽ ▽ ▽ ▽ ▽ ▽ ▽ ▽ ▽ ▽ ▽ ▽ ▽ ▽ ▽ ▽ ▽ ▎ ▽ ▽ ▽ ▽ ▽ ▽ ▽ ▽ ▽ ▽ ▽ ▽ ▽ ▽ ▽ ▽ ▽ ▽ ▽ ▽ ▽ ▽ ▽ ▽ ▽ ▽ ▽ ▽ ▽ ▽ ▽ ▽ ▽ ▽ ▽ ▽ ▽ ▽ ▽ ▽ ▽ ▽ ▽ ▽ ▽ ▽ ▽ ▽ ▽ ▅ ▽ ▽ ▽ ▽ ▽ ▽ ▽ ▽ ▽ ▽ ▽ ▽ ▽ ▽ ▽ ▽ ▽ ▽ ▽ ▽ ▽ ▽ ▽ ▽ ▽ ▽ ▽ ▽ ▽ ▽ ▽ ▽ ▽ ▽ ▽ ▽ ▽ ▽ ▽ ▽ ▽ ▽ ▽ ▽ ▽ ▽ ▽ ▽ ▽ △ ▽ ▽ ▽ ▽ ▽ ▽ ▽ ▽ ▽ ▽ ▽ ▽ ▽ ▽ ▽ ▽ ▽ ▽ ▽ ▽ ▽ ▽ ▽ ▽ ▽ ▽ ▽ ▽ ▽ ▽ ▽ ▽ ▽ ▽ ▽ ▽ ▽ ▽ ▽ ▽ ▽ ▽ ▽ ▽ ▽ ▽ ▽ ▽ △ △ △ △ △ △ △ △ △ △ △ △ △ △ △ △ △ △ △ △ △ △ △ △ △ △ △ △ △ △ △ △ △ △ △ △ △ △ △ △ △ △ △ △ △ △ △ △ △ ▩ △ △ △ △ △ △ △ △ △ △ △ △ △ △ △ △ △ △ △ △ △ △ △ △ △ △ △ △ △ △ △ △ △ △ △ △ △ △ △ △ △ △ △ △ △ △ △ △ △ ▴ △ △ △ △ △ △ △ △ △ △ △ △ △ △ △ △ △ △ △ △ △ △ △ △ △ △ △ △ △ △ △ △ △ △ △ △ △ △ △ △ △ △ △ △ △ △ △ △ △ ▸ ▸ ▸ ▸ ▸ ▸ ▸ ▸ ▸ ▸ ▸ ▸ ▸ ▸ ▸ ▸ ▸ ▸ ▸ ▸ ▸ ▸ ▸ ▸ ▸ ▸ ▸ ▸ ▸ ▸ ▸ ▸ ▸ ▸ ▸ ▸ ▸ ▸ ▸ ▸ ▸ ▸ ▸ ▸ ▸ ▸ ▸ ▸ ▸ ▸ ▪ ▪ ▪ ▪ ▪ ▪ ▪ ▪ ▪ ▪ ▪ ▪ ▪ ▪ ▪ ▪ ▪ ▪ ▪ ▪ ▪ ▪ ▪ ▪ ▪ ▪ ▪ ▪ ▪ ▪ ▪ ▪ ▪ ▪ ▪ ▪ ▪ ▪ ▪ ▪ ▪ ▪ ▪ ▪ ▪ ▪ ▪ ▪ ▪ ▪ ▫ ▫ ▫ ▫ ▫ ▫ ▫ ▫ ▫ ▫ ▫ ▫ ▫ ▫ ▫ ▫ ▫ ▫ ▫ ▫ ▫ ▫ ▫ ▫ ▫ ▫ ▫ ▫ ▫ ▫ ▫ ▫ ▫ ▫ ▫ ▫ ▫ ▫ ▫ ▫ ▫ ▫ ▫ ▫ ▫ ▫ ▫ ▫ ▫ ▫ ▪ ▪ ▪ ▪ ▪ ▪ ▪ ▪ ▪ ▪ ▪ ▪ ▪ ▪ ▪ ▪ ▪ ▪ ▪ ▪ ▪ ▪ ▪ ▪ ▪ ▪ ▪ ▪ ▪ ▪ ▪ ▪ ▪ ▪ ▪ ▪ ▪ ▪ ▪ ▪ ▪ ▪ ▪ ▪ ▪ ▪ ▪ ▪ ▪ ▩ ▪ ▪ ▪ ▪ ▪ ▪ ▪ ▪ ▪ ▪ ▪ ▪ ▪ ▪ ▪ ▪ ▪ ▪ ▪ ▪ ▪ ▪ ▪ ▪ ▪ ▪ ▪ ▪ ▪ ▪ ▪ ▪ ▪ ▪ ▪ ▪ ▪ ▪ ▪ ▪ ▪ ▪ ▪ ▪ ▪ ▪ ▪ ▪ ▪ ▸ ▪ ▪ ▪ ▪ ▪ ▪ ▪ ▪ ▪ ▪ ▪ ▪ ▪ ▪ ▪ ▪ ▪ ▪ ▪ ▪ ▪ ▪ ▪ ▪ ▪ ▪ ▪ ▪ ▪ ▪ ▪ ▪ ▪ ▪ ▪ ▪ ▪ ▪ ▪ ▪ ▪ ▪ ▪ ▪ ▪ ▪ ▪ ▪ ▸ ▫ ▪ ▪ ▪ ▪ ▪ ▪ ▪ ▪ ▪ ▪ ▪ ▪ ▪ ▪ ▪ ▪ ▪ ▪ ▪ ▪ ▪ ▪ ▪ ▪ ▪ ▪ ▪ ▪ ▪ ▪ ▪ ▪ ▪ ▪ ▪ ▪ ▪ ▪ ▪ ▪ ▪ ▪ ▪ ▪ ▪ ▪ ▪ ▪ ▸ ▬ ▪ ▪ ▪ ▪ ▪ ▪ ▪ ▪ ▪ ▪ ▪ ▪ ▪ ▪ ▪ ▪ ▪ ▪ ▪ ▪ ▪ ▪ ▪ ▪ ▪ ▪ ▪ ▪ ▪ ▪ ▪ ▪ ▪ ▪ ▪ ▪ ▪ ▪ ▪ ▪ ▪ ▪ ▪ ▪ ▪ ▪ ▪ ▪ ▪ ▮ ▪ ▪ ▪ ▪ ▪ ▪ ▪ ▪ ▪ ▪ ▪ ▪ ▪ ▪ ▪ ▪ ▪ ▪ ▪ ▪ ▪ ▪ ▪ ▪ ▪ ▪ ▪ ▪ ▪ ▪ ▪ ▪ ▪ ▪ ▪ ▪ ▪ ▪ ▪ ▪ ▪ ▪ ▪ ▪ ▪ ▪ ▪ ▪ ▪ ▜ ▪ ▪ ▪ ▪ ▪ ▪ ▪ ▪ ▪ ▪ ▪ ▪ ▪ ▪ ▪ ▪ ▪ ▪ ▪ ▪ ▪ ▪ ▪ ▪ ▪ ▪ ▪ ▪ ▪ ▪ ▪ ▪ ▪ ▪ ▪ ▪ ▪ ▪ ▪ ▪ ▪ ▪ ▪ ▪ ▪ ▪ ▪ ▪ ▪ ▢ ▪ ▪ ▪ ▪ ▪ ▪ ▪ ▪ ▪ ▪ ▪ ▪ ▪ ▪ ▪ ▪ ▪ ▪ ▪ ▪ ▪ ▪ ▪ ▪ ▪ ▪ ▪ ▪ ▪ ▪ ▪ ▪ ▪ ▪ ▪ ▪ ▪ ▪ ▪ ▪ ▪ ▪ ▪ ▪ ▪ ▪ ▪ ▪ ▪ ▄ ▪ ▪ ▪ ▪ \textcircled{P} A U T O N O N O N O N O N O N O N O N O N O N O N O N O N O N O N O N O N O N O N O N O N O N O N O N O N O N O N O N O N O N O N O N O N O N O N O N O N O N O N O N O N O N O N O N O N O N O N O N O N O N ON O N O N O N O N O N O N O N O N O N O N O N O N O N O N O N O N O N O N O N O N O N O N O N O N O N O N O N O N O N O N O N O N O N O N O N O N O N O N O N O N O N O N O N O N O N O N O N O N O N O M O N O N O N O N O N O N O N O N O N O N O N O N O N O N O N O N O N O N O N O N O N O N O N O N O N O N O N O N O N O N O N O N O N O N O N O N O N O N O N O N O N O N O N O N O N O N O N O N O N O W N W W W W W W W W W W W W W W W W W W W W W W W W W W W W W W W W W W W W W W W W W W W W W W W W W W W W W W W W W W W W W W W W W W W W W W W W W W W W W W W W W W W W W W W W W W W W W W W W W W W W | |
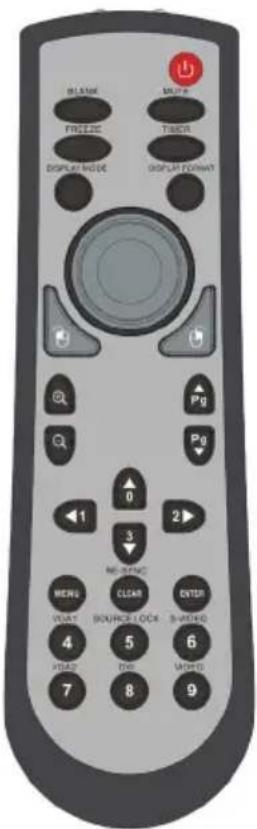
| Menu | Display or exit the on-screen display menus for projector. |
| Clear | Clear your selection. |
| Enter | Confirm your item selection. |
| Source Lock | Select auto detection all connector ports or lock current connector port. |
| Video | Choose composite video source. |
| S-Video | Choose S-Video source. |
| VGA1 | Choose RGB1-In or SCART source. |
| VGA2 | Choose RGB2-In source. |
| DVI | Choose DVI-D source. |
On Screen Display Menus
The Projector has multilingual On Screen Display menus that allow you to make image adjustments and change a variety of settings. The projector will automatically detect the source.
How to Operate
- To open the OSD menu, press "Menu" on the Remote Control or Control Panel.
- When OSD is displayed, use ◀ keys to select any item in the main menu. While making a selection on a particular page, press ▼ key to enter sub menu.
- Use ▲ keys to select the desired item and adjust the settings by ◀ key.
- Select the next item to be adjusted in the sub menu and adjust as described above.
- Press "Menu" to confirm, and the screen will return to the main menu.
- To exit, press "Menu" again. The OSD menu will close and the projector will automatically save the new settings.
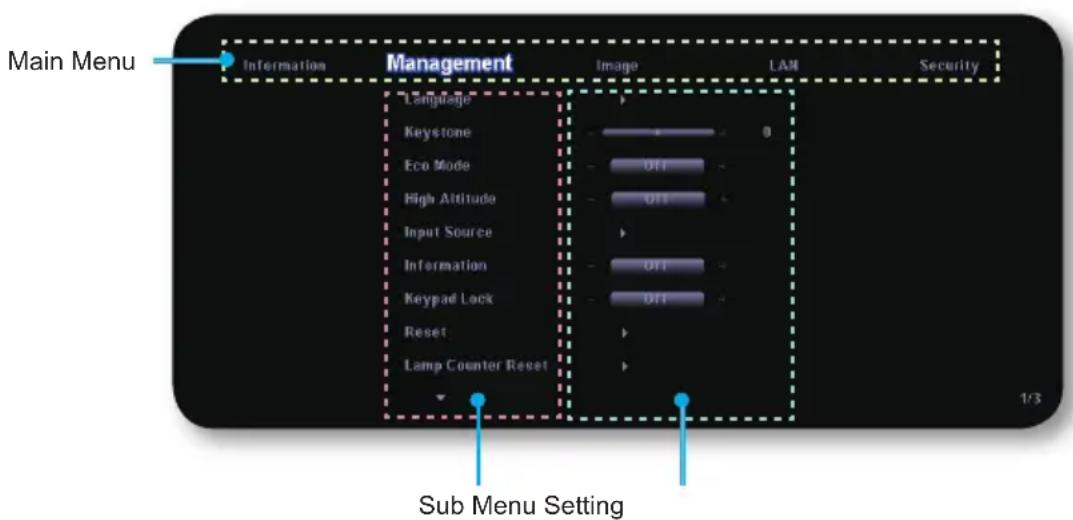
Menu Tree-1/2
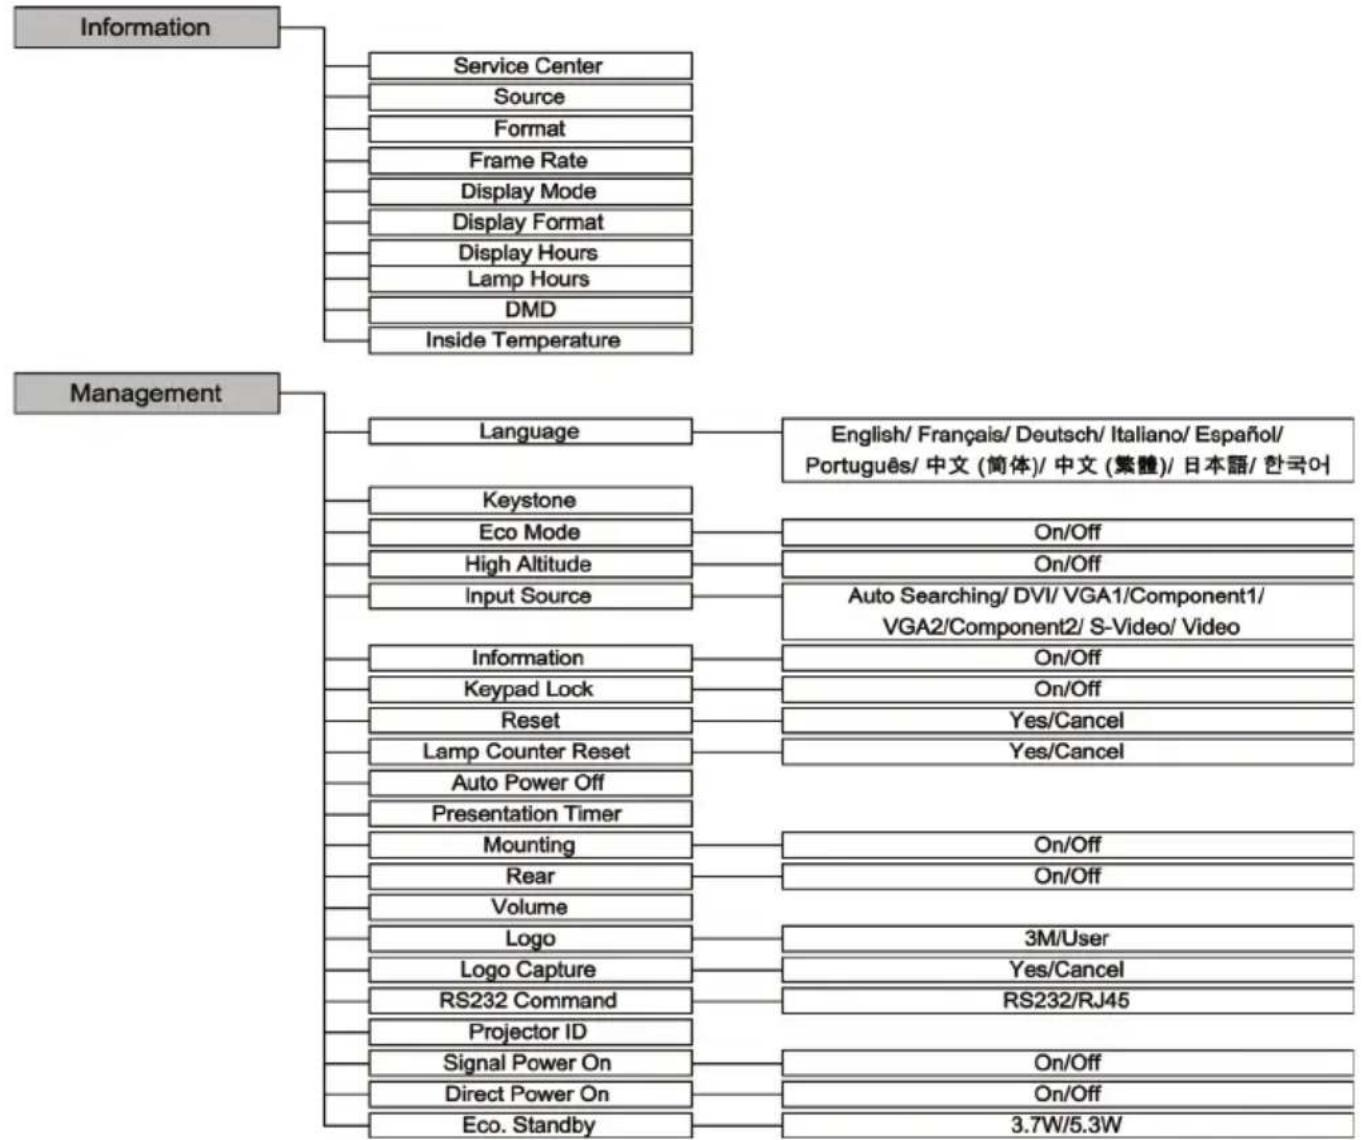
flowchart
graph TD
    A["Information"] --> B["Service Center"]
    A --> C["Source"]
    A --> D["Format"]
    A --> E["Frame Rate"]
    A --> F["Display Mode"]
    A --> G["Display Format"]
    A --> H["Display Hours"]
    A --> I["Lamp Hours"]
    A --> J["DMD"]
    A --> K["Inside Temperature"]

    L["Management"] --> M["Language"]
    M --> N["English/ Français/ Deutsch/ Italiano/ Español/ Português/ 中文 (简体)/ 中文 (繁體)/ 日本語/ 한국어"]
    M --> O["Keystone"]
    O --> P["On/Off"]
    M --> Q["Eco Mode"]
    Q --> R["On/Off"]
    M --> S["High Altitude"]
    S --> T["Input Source"]
    T --> U["Auto Searching/ DVI/ VGA1/Component1/ VGA2/Component2/ S-Video/ Video"]
    M --> V["Information"]
    V --> W["On/Off"]
    M --> X["Keypad Lock"]
    X --> Y["On/Off"]
    M --> Z["Reset"]
    Z --> AA["Yes/Cancel"]
    M --> AB["Lamp Counter Reset"]
    AB --> AC["Yes/Cancel"]
    M --> AD["Auto Power Off"]
    AD --> AE["Presentation Timer"]
    AD --> AF["Mounting"]
    AF --> AG["On/Off"]
    M --> AH["Rear"]
    AH --> AI["On/Off"]
    M --> AJ["Volume"]
    AJ --> AK["3M/User"]
    M --> AL["Logo"]
    AL --> AM["Yes/Cancel"]
    M --> AN["Logo Capture"]
    AN --> AO["RS232 Command"]
    AN --> AP["Projector ID"]
    AP --> AQ["RS232/RJ45"]
    M --> AR["Signal Power On"]
    AR --> AS["On/Off"]
    M --> AT["Direct Power On"]
    AT --> AU["On/Off"]
    M --> AV["Eco. Standby"]
    AV --> AW["3.7W/5.3W"]
Menu Tree-2/2
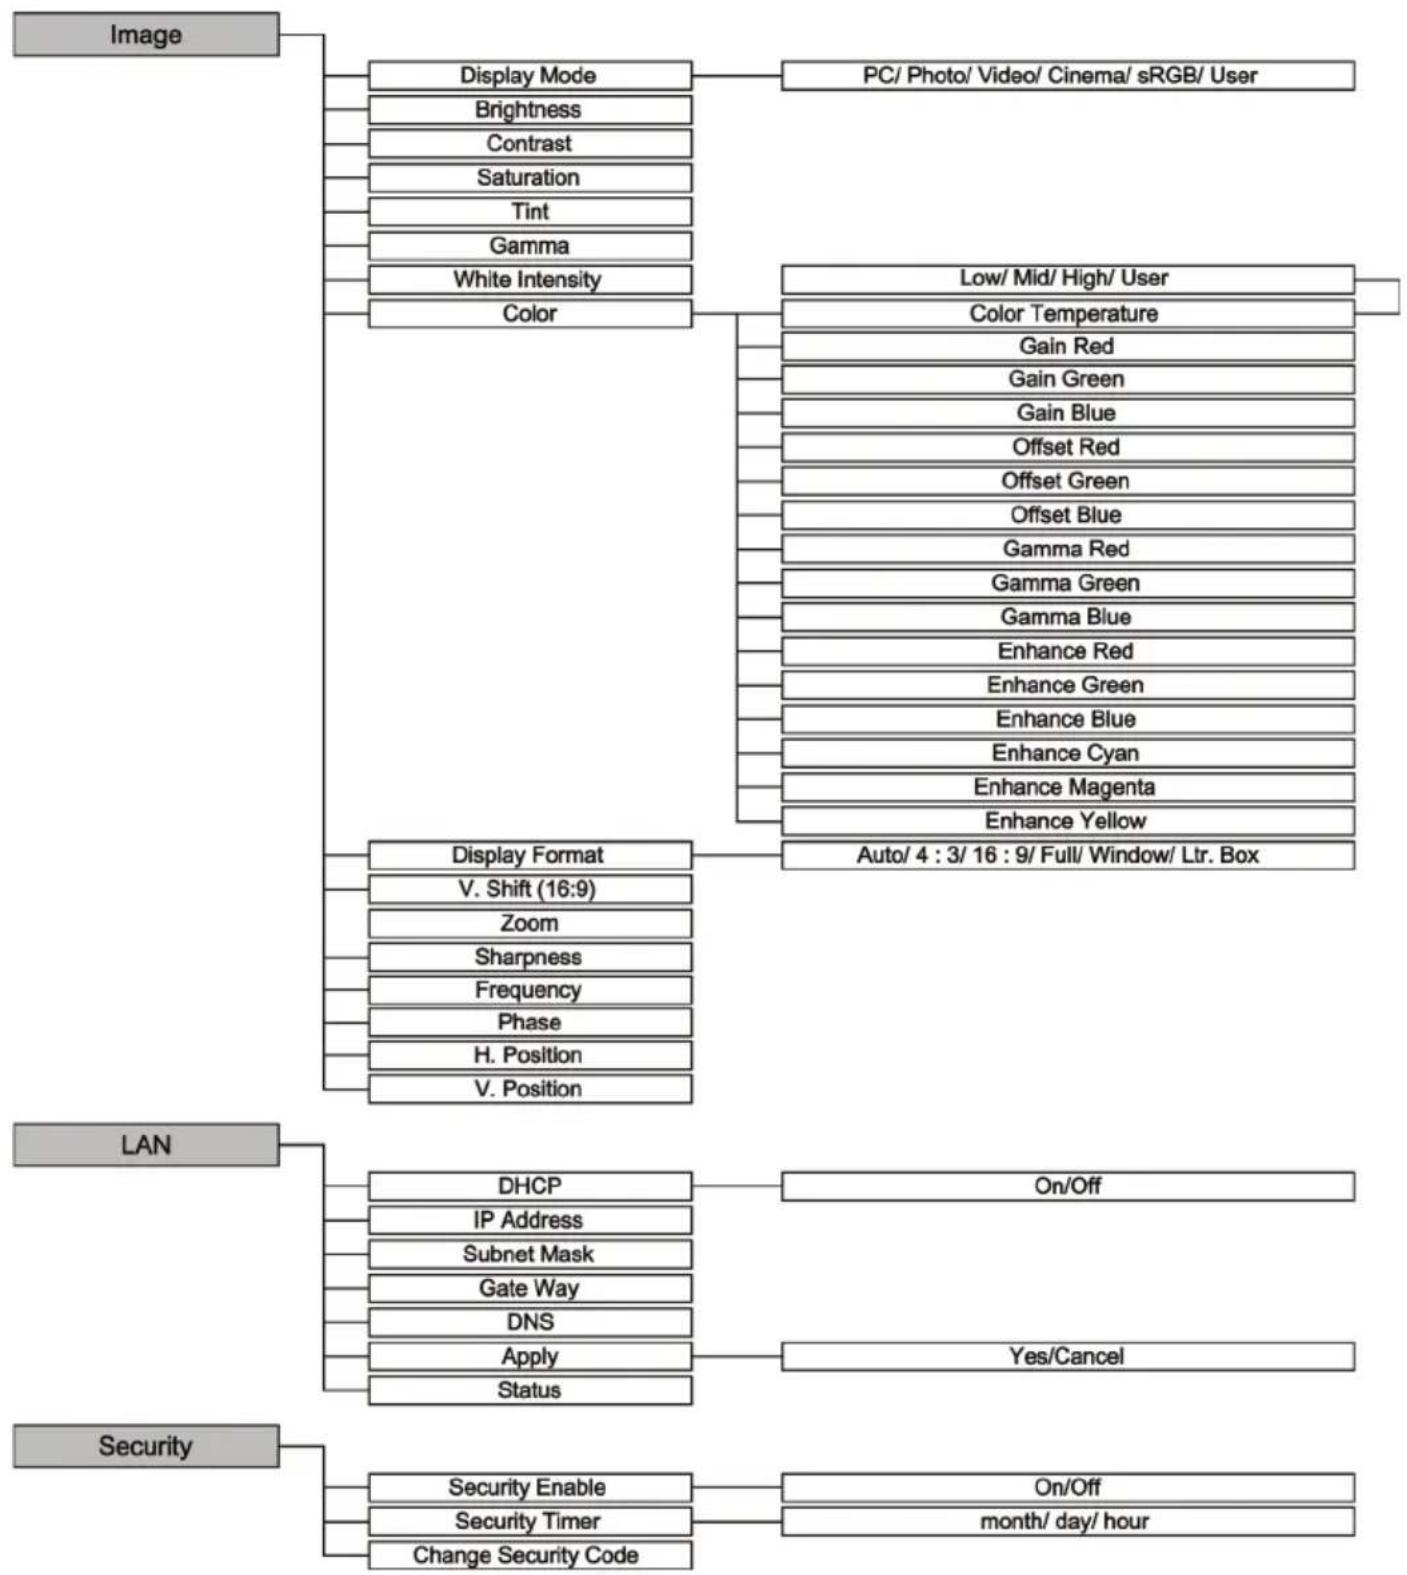
flowchart
graph TD
    A["Image"] --> B["Display Mode"]
    A --> C["Color"]
    A --> D["Display Format"]
    A --> E["LAN"]
    A --> F["Security"]

    B --> G["PC/ Photo/ Video/ Cinema/ sRGB/ User"]
    C --> H["Low/ Mid/ High/ User"]
    C --> I["Color Temperature"]
    C --> J["Gain Red"]
    C --> K["Gain Green"]
    C --> L["Gain Blue"]
    C --> M["Offset Red"]
    C --> N["Offset Green"]
    C --> O["Offset Blue"]
    C --> P["Gamma Red"]
    C --> Q["Gamma Green"]
    C --> R["Gamma Blue"]
    C --> S["Enhance Red"]
    C --> T["Enhance Green"]
    C --> U["Enhance Blue"]
    C --> V["Enhance Cyan"]
    C --> W["Enhance Magenta"]
    C --> X["Enhance Yellow"]
    C --> Y["Auto/ 4 : 3/ 16 : 9/ Full/ Window/ Ltr. Box"]

    D --> Z["V. Shift (16:9)"]
    D --> AA["Zoom"]
    D --> AB["Sharpness"]
    D --> AC["Frequency"]
    D --> AD["Phase"]
    D --> AE["H. Position"]
    D --> AF["V. Position"]

    E --> AG["DHCP"]
    E --> AH["IP Address"]
    E --> AI["Subnet Mask"]
    E --> AJ["Gate Way"]
    E --> AK["DNS"]
    E --> AL["Apply"]
    E --> AM["Status"]

    F --> AN["On/Off"]
    F --> AO["Yes/Cancel"]
    F --> AP["Security Enable"]
    F --> AQ["On/Off"]
    F --> AR["month/ day/ hour"]
    F --> AS["Change Security Code"]
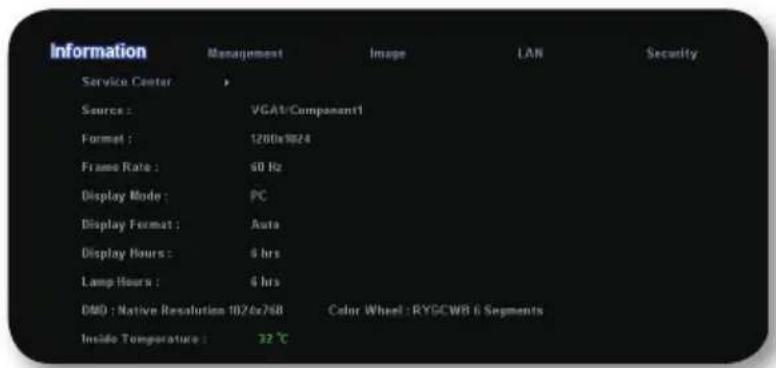
Information
Information
To display the projector information on the screen.
▶ Service Center: To display the location of 3M world wide service centers.
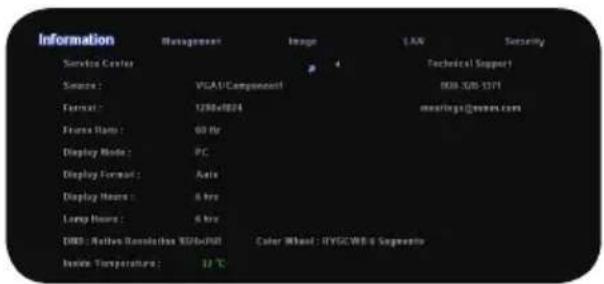
Source: To display the input source information.
Format: To display the resolution of projection image.
Frame Rate: To display the frame rate of projection image.
▶ Display Mode: To display the present of image.
▶ Display Format: To display the aspect ratio of projection image.
▶ Display Hours: To display the projection time.
Lamp Hours: To display the cumulative lamp operating time.
DMD: To display the DMD native resolution.
Color Wheel: To display the color wheel segments.
Inside Temperature: To display the inside temperature of the projector machine.
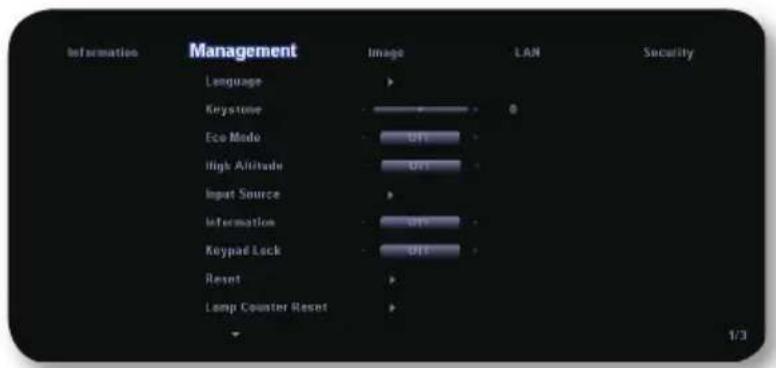
Management-1/3
Language
Choose the multilingual OSD menu. Use the ▲ or ▶ key to select your preferred language.
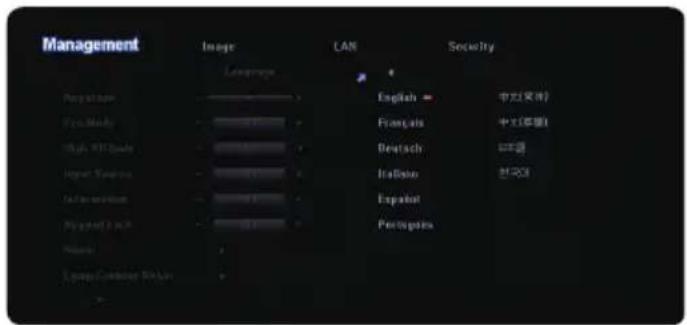
Press "Enter" to finalize the selection.
Keystone
Press the ◀ or ▶ to adjust image distortion vertically and make a squarer image.
Eco Mode
Choose "On" to use less brightness from the projector lamp, yet will make the projector lamp last longer.
High Altitude
Choose "On" to turn on High Altitude mode. Operate the fans at full speed continuously to allow for proper high altitude cooling of the projector.
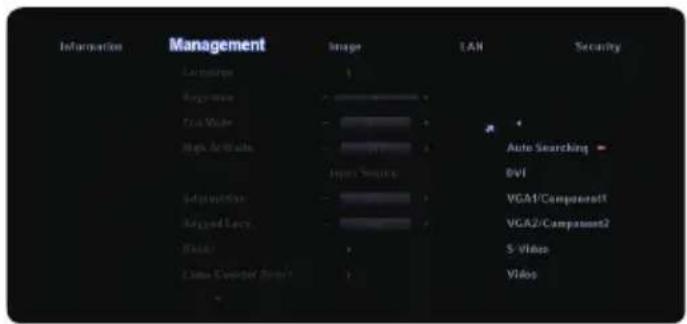
Input Source
Enable input sources. Press ▶ into the sub menu and then use ▲ or ▼ to select. Press "Enter" to finalize the selection. The projector will not search inputs that are de-selected.
Information
On: Choose "On" to display source information on the screen.
▶ Off: Choose "Off" to hide source information on the screen.
Keypad Lock
When the keypad lock function is on, the control panel will be locked, but the projector can still be operated by the remote control. If canceling this function, use the remote control or press the "Enter" key on the control panel for 7 seconds to turn it off.
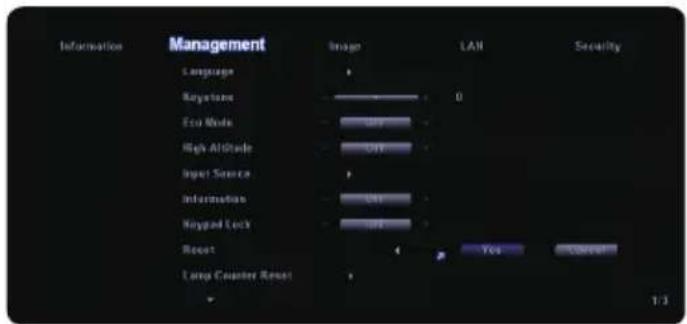
Reset
Choose "Yes" to return the adjustments and settings to the factory default values.
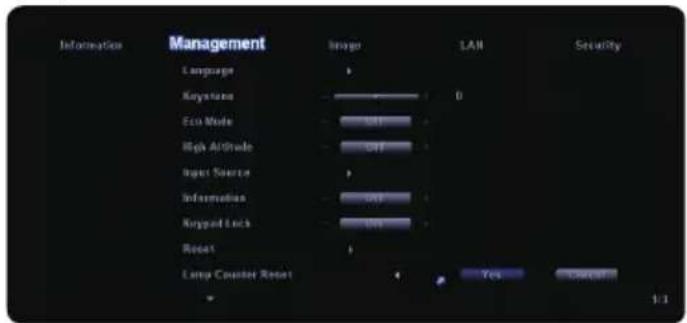
Lamp Counter Reset
Choose "Yes" to reset the lamp life hour counter after replacing the lamp.
Management-2/3
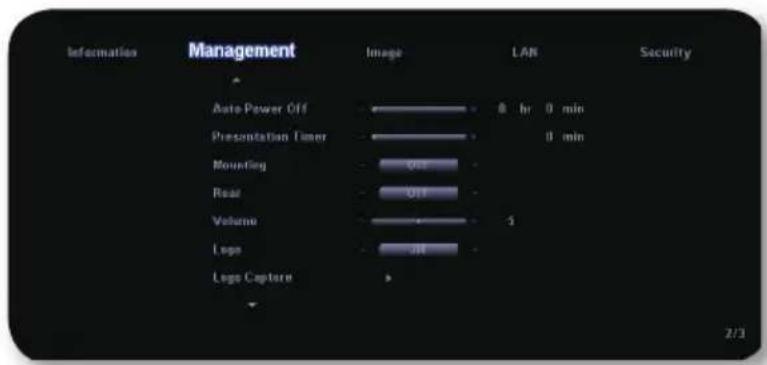
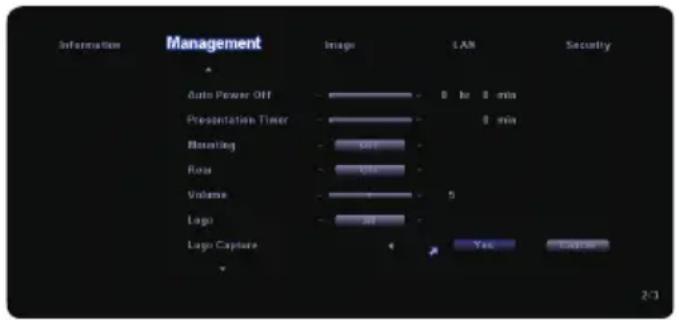
Auto Power Off
Set the countdown timer interval. The countdown timer will start when there is no signal being sent to the projector. Then projector will automatically power off when the countdown has finished. (in minutes)
Presentation Timer
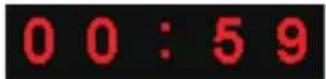
Set the countdown timer for presentation (in minutes). After setting the timer, press "Timer" button on the remote control to start the function.
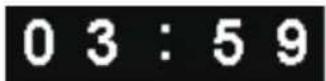
In the last minute, the timer will turn red. After the timer is finished, press "Timer" button on the remote control again to close the image.
Mounting
On: When you choose "On", the projector turns the image upside down for ceiling-mounted projection.
Off: The factory default setting.
Rear
On: When you choose "On", the projector reverses the image so you can project from behind a translucent screen.
Off: The factory default setting.
Volume
Press ◀o decrease the volume.
▶ Press to increase the volume.
Logo
Use this function to select your desired startup screen. If you change the setting from one to another, when you exit the OSD menu, the new setting will take effect on next open.
3M: The default startup screen of 3M projector.
User: Use memorize picture from "Logo Capture" function.
Logo Capture
Press "Yes" to immediately capture a picture what on the display screen.
Management-3/3
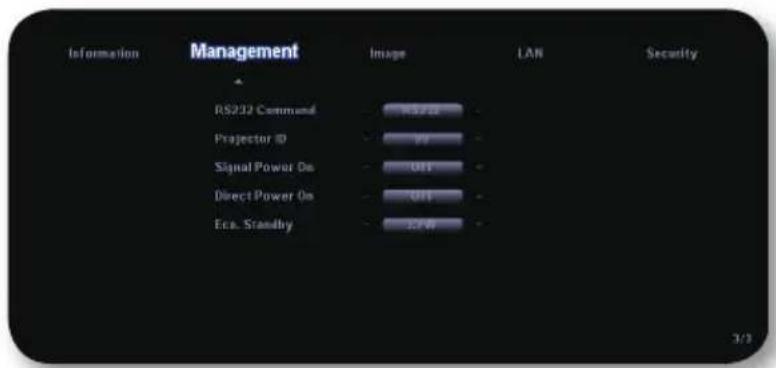
RS232 Command
RS232: Allow RS232 control of an individual projector.
RJ45: Allow network LAN via web browser (Internet Explorer) to control of projector. (Default setting)
Projector ID
ID definition can be set up by menu (range 01\~99), and allow user control an individual projector by RS232. Refer to page 49 for the complete list of RS232 commands.
NOTE
- When "Signal Power On" is enabled, Eco. Standby Mode will be auto set as 5.3W.
Signal Power On
On: The projector will automatically power on when plug in any signal source to the projector at standby mode.
▶ Off: Turn on the projector to normal mode.
Direct Power On
Choose “On” to turn on Direct Power On mode. The projector will automatically power on when AC power is supplied, without pressing the “Power/Standby” key on the projector control panel or “Power” key on the remote control.
NOTE
- When "Eco. Standby" mode is enabled (3.7W), the Signal Power On function is disabled.
Eco. Standby
3.7W: Save power dissipation further.
5.3W: Return to normal standby mode.
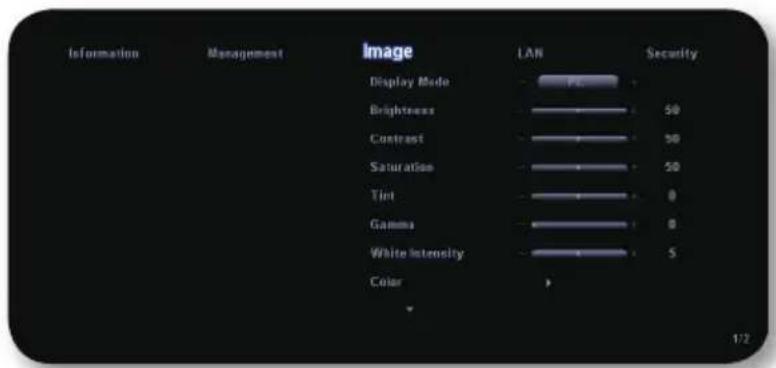
Image-1/2
Display Mode
There are many factory presets optimized for various types of images.
PC: For computer or notebook. (brightest image)
Photo: For optimum color at high brightness.
Video: For playing video in a bright environment.
sRGB: For standard PC color. (best color reproduction)
User: Memorize user's settings.
Brightness
Adjust the brightness of the image.
Press the ◀ to darken image.
Press the ▶ to lighten the image.
Contrast
The contrast controls the degree of difference between the lightest and darkest parts of the picture. Adjusting the contrast changes the amount of black and white in the image.
Press the ◀ to decrease the contrast.
Press the ▶ to increase the contrast.
Saturation
Adjust a video image from black and white to fully saturated color.
Press the ◀ to decrease the amount of saturation in the image.
Press the ▶ to increase the amount of saturation in the image.
NOTE
- "Saturation" functions is only supported under Video mode.
Tint
Adjust the color balance of red and green.
Press the ◀ to increase the amount of green in the image.
Press the ▶ to increase the amount of red in the image.
Gamma
This unit comes with 4 preset gamma curves. After the initial setup and fine tuning is completed, utilize the Gamma Adjustment steps to optimize your image output.
White Intensity
Use the white peaking control to set the white peaking level of DMD chip. 0 stands for minimal peaking, and 10 stands for maximum peaking. If you prefer a brighter image, adjust towards the maximum setting. For a smooth and more natural image, adjust towards the minimum setting.
Color
Color Temperature: Adjust the color temperature. At higher temperature, the screen looks colder; at lower temperature, the screen looks warmer.
When you adjust the color setting item, the color temperature will be set as "User" automatically. And this set "User" is the same for all display mode.
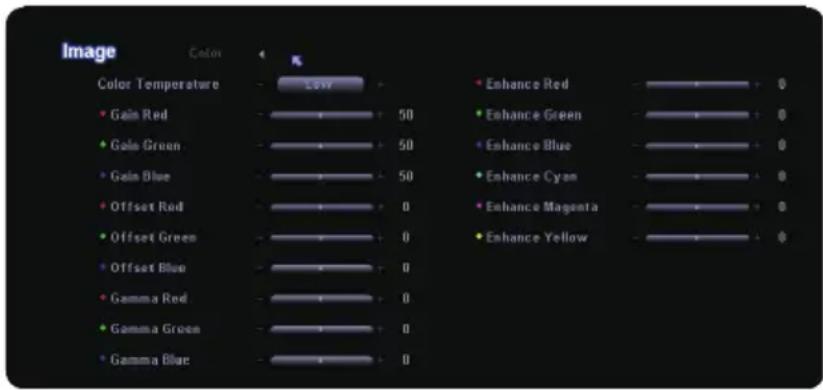
Gain Red/ Gain Green/ Gain Blue: Adjust the contrast of the individual colors.
Offset Red/ Offset Green/ Offset Blue: Adjust the brightness of the individual colors.
▶ Gamma Red/ Gamma Green/ Gamma Blue: Adjust the gamma curves of the individual colors.
Enhance Red/ Enhance Green/ Enhance Blue/ Enhance Cyan/ Enhance Magenta/ Enhance Yellow: Adjust the advanced saturation adjustment of the individual colors.
For example:
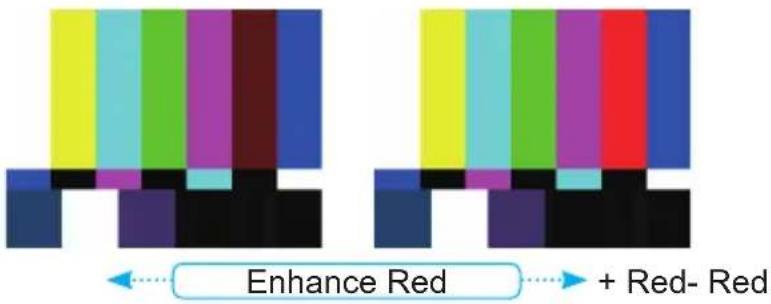
Image-2/2
Display Format
Use this function to choose your desired aspect ratio.
Auto : Keep the image with original width-higth ratio and maximize the image to t native horizontal or vertical pixels.
4:3 : The input source will be scaled to t the projection screen.
16:9 : The input source will be scaled to t the width of the screen.
Full : Resize image to t full screen by width (1280 pixels) and height (800 pixels).
Window: When a 4:3 image is bigger than a 16:9 screen, select the “Window” mode to t the image onto the screen without changing the projection distance.
Ltr. Box (LBX): This format is for non-16x9, letterbox source and for users who use external 16x9 lens to display 2.35:1 aspect ratio using full resolution.
V. Shift (16:9)
Adjust the image position up or down, when you select the aspect ratio of 16:9.
Press the to move the image down.
Press the to move the image up.
Zoom
Press the to reduce the size of an image.
Press the to magnify an image on the projection screen.
Sharpness
Adjust the sharpness of the image.
Press the ◀ to decrease the sharpness.
Press the ▶ to increase the sharpness.
NOTE
- “Frequency”, “Phase”, “H Position” and “V Position” functions are only supported under Computer mode.
Frequency
“Frequency” changes the display data frequency to match the frequency of your computer’s graphic card. If you experience a vertical flickering bar, use this function to make an adjustment.
Phase
Change the display data frequency to match the frequency of your computer's graphic card. When you experience a vertical flickering bar, use this function to make an adjustment.
H Position (Horizontal Position)
Press the ◀ to move the image left.
▶ Press the ▶ to move the image right.
V Position (Vertical Position)
Press the ◀ to move the image down.
▶ Press the ▶ to move the image up.
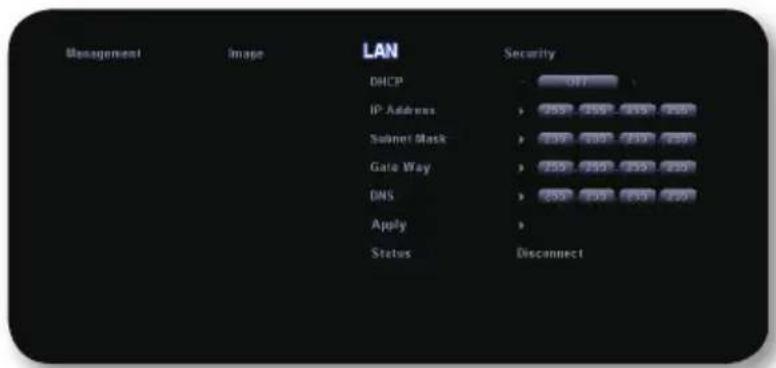
LAN
DHCP
On: Assign an IP address to the projector from the DHCP server automatically.
Off: Assign an IP address manually.
IP Address
Select an IP address.
Subnet Mask
Select subnet mask number.
Gateway
Select the default gateway of the network connected to the projector.
DNS
Select DNS number.
Apply
Press "Yes" to apply the selection.
Status
To display network information.
How to use web browser to control your projector
- Fill in a new IP, a subnet mask, a gateway and a DNS in the dialogue box.
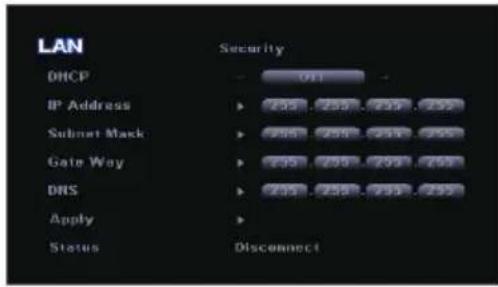
- Then choose apply and press "Enter" button to effectuate the configuration process.
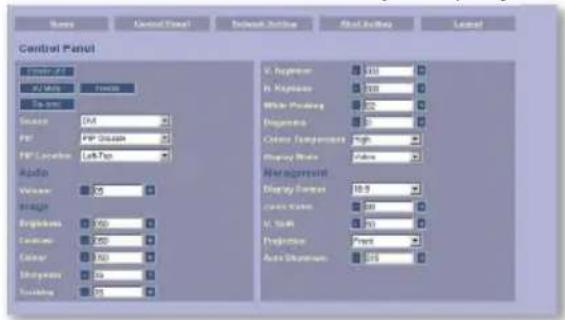
- Open your web browser and type in from the OSD LAN screen then the web page will display as below:
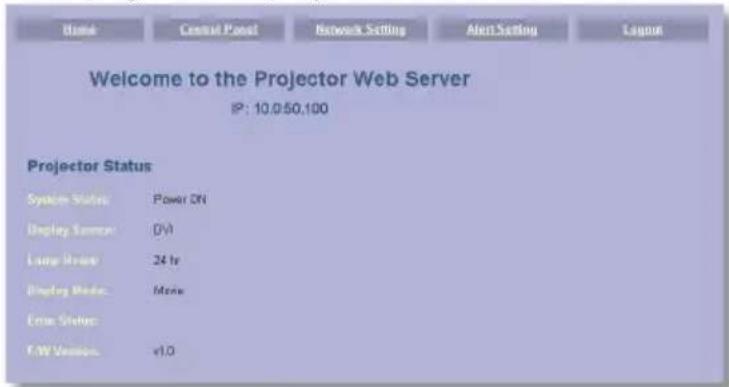
NOTE
- When you used the projector IP address, you will not be able to link to your service server.
- Open "Control Panel" to control your projector.
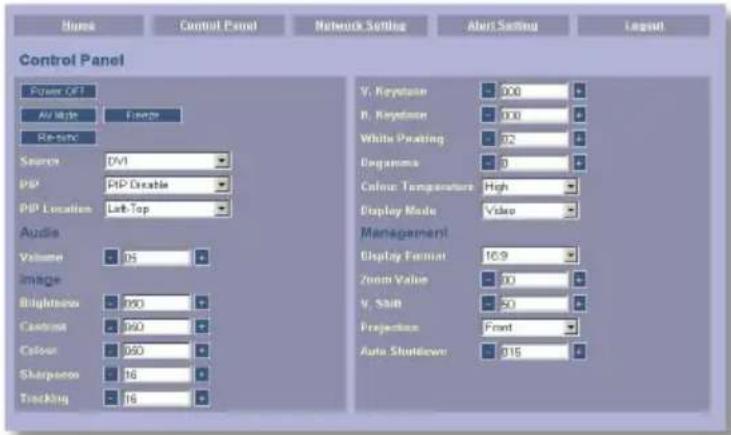
For example:
Use Microsoft Internet Explorer (IE) web browser to control the projector, the IP address is http://10.0.50.100.
Step 1: Find an IP Address (10.0.50.100) from LAN function of projector.
Step 2: Select apply and press "Enter" button to submit function or press "menu" key to exit.
Step 3: To open Network Connections, click Start, click Control Panel, click Network and Internet Connections, and then click Network Connections. Click the connection you want to configure, and then, under Network Tasks ,click
Change settings of this connection.
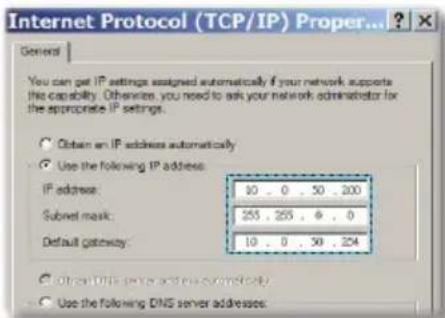
Step 4: On the General tab, under This connection uses the following items, click Internet Protocol (TCP/IP), and then click "Properties."
Step 5: Click Use the following IP address, and type in as below:
1) IP address: 10.0.50.XXX
2) Subnet mask: 255.255.0.0
3) Default gateway: 10.0.50.254
Step 6: To open Internet Options, click IE web browser, click Internet Options, click the Connections tab and click "LAN Settings..."
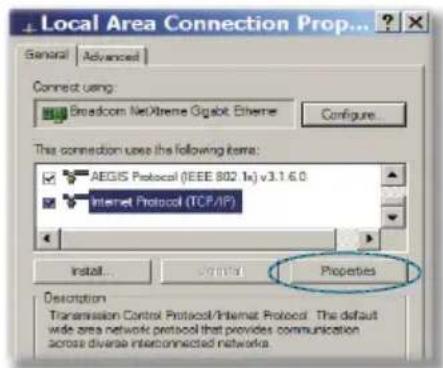
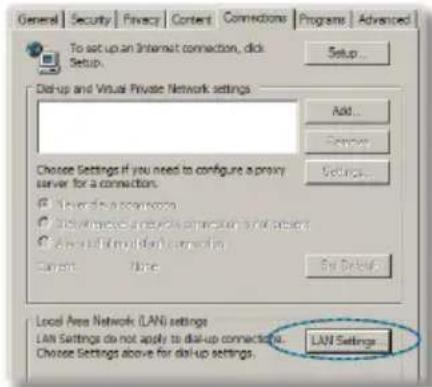
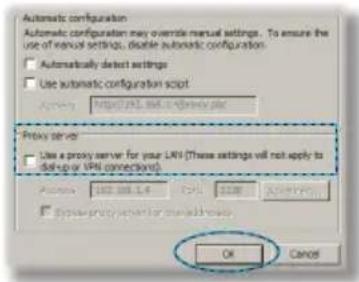
Step 7: The Local Area Network (LAN) Setting dialog box appears, In the Proxy Server area, cancel the Use a proxy server for your LAN check box., then click "OK" button twice.
Step 8: Open your IE and type in the IP address of 10.0.50.100 in the URL then press "Enter" key. The web page will display as below:
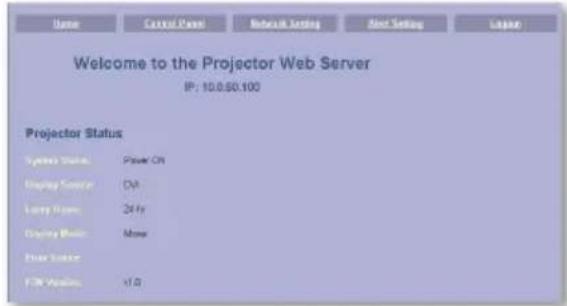
Step 9: Open "Control Panel" to control your projector.
Security
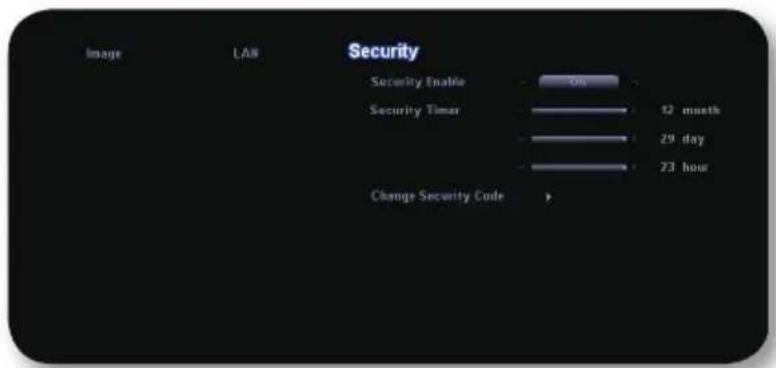
Security Enable
On: Choose "On" to enable security verification when turning on the projector.
Off: Choose "Off" to be able to switch on the projector without password verification.
Security Timer
The function can be selected the time (month/day/hour) to set the number of hours the projector can be used. Once this time has elapsed you will be requested to enter your password again. (Use number buttons on remote. To change password, follow change password security code.)
Change Security Code
First Time:
- Press the to set password.
- The Password is 4 digits, DEFAULT VALUE is "0000". (first time)
- Usenumber buttons on the remote to select your password, and then press "Enter" key to confirm your selection.
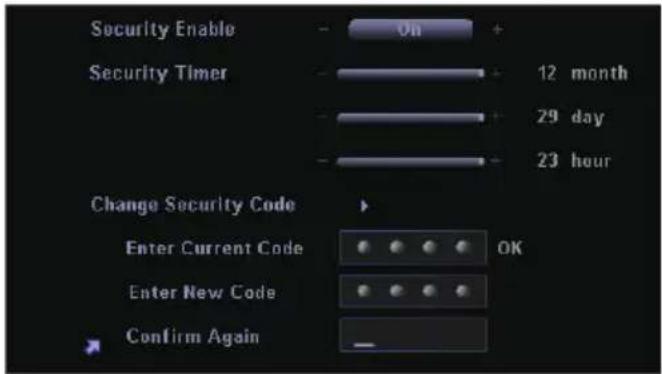
▶ Change Password:
- Press "Enter" to input old password.
- Use number button to enter current password, and then press "Enter" to confirm.
- Enter new password (4 digits in length) using the number buttons on the remote, then press "Enter" to confirm.
- Enter new password again and press "Enter" to confirm.
Troubleshooting
If you experience trouble with the projector, refer to the following information. If the problem persists, please contact your local reseller or service center.
Problem: No image appears on screen
Ensure all the cables and power connections are correctly and securely connected as described in the "Installation" section.
▶ Ensure the pins of connectors are not crooked or broken.
Check if the projection lamp has been securely installed. Please refer to the "Replacing the lamp" section.
Make sure you have removed the lens cap and the projector is switched on.
Ensure that the "Blank" feature is not turned on.
Problem: Left of right edge of the image is missing or the image is unstable or noisy
Press "Re-Sync" on the remote control or on control panel.
If you are using a PC:
For Windows 3.x:
- In the Windows Program Manager, double click the "Windows Setup" icon in the Main group.
- Verify that your display resolution setting is less than or equal to 1600 × 1200 .
For Windows 95, 98, 2000, XP:
- From the "My Computer" icon, open the "Control Panel" folder, and double click the "Display" icon.
- Select the "Settings" tab.
- Click on the "Advanced Properties" button.
If the projector is still not projecting the whole image, you will also need to change the monitor display you are using. Refer to the following steps.
-
Verify the resolution setting is less than or equal to 1600 x 1200 resolution.
-
Select the "Change" button under the "Monitor" tab.
- Click on "Show all devices." Next, select "Standard monitor types" under the SP box; choose the resolution mode you need under the "Models" box.
If you are using a Notebook:
- First, follow the steps above to adjust resolution of the computer.
- Press the toggle output settings. example: [Fn]+[F3]
| HP & Compaq | [Fn]+[F4] | IBM | [Fn]+[F7] |
| Dell | [Fn]+[F8] | NEC | [Fn]+[F3] |
| Gateway | [Fn]+[F4] | Toshiba | [Fn]+[F5] |
Mac Apple:
System Preference⇒Display⇒Arrangement⇒Mirror display
If you experience difficulty changing resolutions or your monitor freezes, restart all equipment including the projector.
Problem: The screen of the Notebook or PowerBook computer is not displaying a presentation
If you are using a Notebook PC:
Some Notebook PCs may deactivate their own screens when a second display device is in use. Each has a different way to be reactivated. Refer to your computer's documentation for detailed information.
Problem: Image is unstable or flickering
▶ Use “Phase” to correct it. (see page 36)
Change the monitor colour setting on your computer.
Problem: Image has vertical flickering bar
Use "Frequency" to make an adjustment. (see page 36)
Check and reconfigure the display mode of your graphic card to make it compatible with the product.
Problem: Image is out of focus
Adjust the Focus Ring on the projector lens.
Make sure the projection screen. (see pages 18-19)
Problem: The image is stretched when displaying 16:9 DVD The projector automatically detects 16:9 DVD and adjusts the aspect ratio by digitizing to full screen with 4:3 default setting.
If the image is still stretched, you will also need to adjust the aspect ratio by referring to the following:
Please select 4:3 aspect ratio type on your DVD player if you are playing a 16:9 DVD.
If you can't select 4:3 aspect ratio type on your DVD player, please select 4:3 aspect ratio in the on screen menu.
Problem: Image is reversed
Select "Management-2/3 Mounting or Rear" from the OSD and adjust the projection direction. (see page 29)
Problem: Lamp burns out or makes a popping sound
When the lamp reaches its end of life, it will burn out and may make a loud popping sound. If this happens, the projector will not turn on until the lamp module has been replaced. To replace the lamp, follow the procedures in the “Replacing the Lamp”. (see page 47)
Problem: LED lighting message
| Message | Power-LED | Temp-LED | Lamp-LED | |
| (Blue) (Red) | ||||
| Standby State(Plug in power cord) | ○ | ○ | ○ | |
| Warming Flashing | ○ | ○ | ○ | |
| Normal Mode | ○ | ○ | ○ | |
| Cooling Flashing | ○ | ○ | ○ | |
| Error (Lamp failed) | ○ | ○ | ○ | |
| Error (Fan failed) Flashing | ○ | ○ | ○ | |
| Error (Over Temp.) | ○ | ○ | ○ | |
NOTE
- Steady light No light

Problem: Message Reminders
Power Off:
Wait 1 minute before you switch on next time.
Press ⏻ key again to confirm.
Press ENTER key to remove this message.
Replace the lamp:
! Lamp life exceeded.
Replacing the Lamp
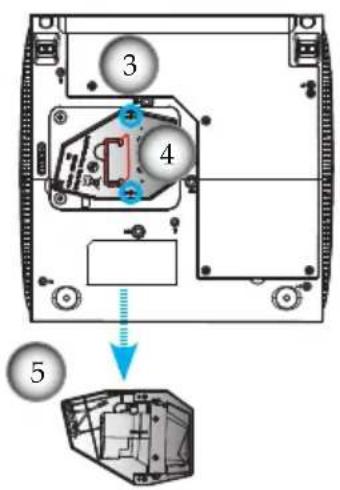
The projector keeps track of the lamp usage. It will show you a warning message:

- Warning: Lamp compartment is hot! Allow 30 minutes to cool down before changing lamp!

Lamp life exceeded.
When you see this message, change the lamp as soon as possible. Make sure the projector has cooled down for at least 30 minutes before changing the lamp.
natural_image
Technical line drawing of a mechanical assembly with gears and housing (no text or symbols)
- Warning: To reduce the risk of personal injury, do not drop the lamp module or touch the lamp bulb. The bulb may shatter and cause injury if it is dropped.
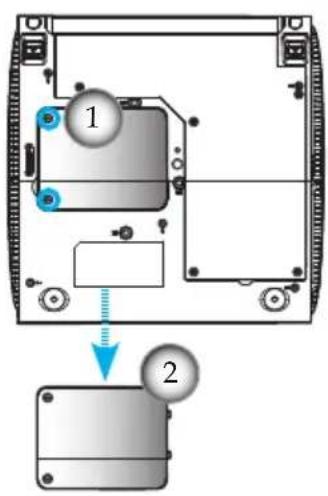
Lamp Replacement Procedure:
- Turn off the power by pressing the Power/Standby button.
- Allow the projector to cool down for at least 30 minutes.
- Disconnect the power cord.
- Use a screwdriver to unscrew the 2 screws from the cover.①
- Push up and remove the cover.②
- Use a screwdriver to unscrew the 2 screws from the lamp module.③
- Pull up the lamp handle carefully. ④
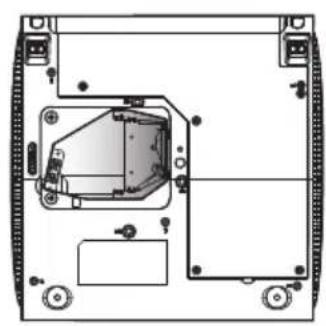
- Remove the lamp module. ⑤
To replace the lamp module, reverse the previous steps.
Compatibility Modes
| Mode Resolution | (ANALOG) (DIGITAL) | |||
| V.Frequency (Hz) | H.Frequency (kHz) | V.Frequency (Hz) | H.Frequency (kHz) | |
| VGA 640 x 3 | 50 70 31.5 70 31.5 | |||
| VGA 640 x 3 | 50 85 37.9 85 37.9 | |||
| VGA 640 x 4 | 00 85 37.9 85 37.9 | |||
| VGA 640 x 4 | 80 60 31.5 60 31.5 | |||
| VGA 640 x 4 | 80 72 37.9 72 37.9 | |||
| VGA 640 x 4 | 80 75 37.5 75 37.5 | |||
| VGA 640 x 4 | 80 85 43.3 85 43.3 | |||
| VGA 720 x 4 | 00 70 31.5 70 31.5 | |||
| VGA 720 x 4 | 00 85 37.9 85 37.9 | |||
| SVGA 800 x | 600 56 35.2 56 35.2 | |||
| SVGA 800 x | 600 60 37.9 60 37.9 | |||
| SVGA 800 x | 600 72 48.1 72 48.1 | |||
| SVGA 800 x | 600 75 46.9 75 46.9 | |||
| SVGA 800 x | 600 85 53.7 85 53.7 | |||
| XGA 1024 x | 768 60 48.4 60 48.4 | |||
| XGA 1024 x | 768 70 56.5 70 56.5 | |||
| XGA 1024 x | 768 75 60.0 75 60.0 | |||
| XGA 1024 x | 768 85 68.7 85 68.7 | |||
| * SXGA 1152 | x 864 70 63.8 70 63.8 | |||
| * SXGA 1152 | x 864 75 67.5 75 67.5 | |||
| * SXGA 1152 | x 864 85 77.1 85 77.1 | |||
| * SXGA 1280 | x 1024 60 63.98 60 | 63.98 | ||
| * SXGA 1280 | x 1024 75 79.98 75 | 79.98 | ||
| * SXGA 1280 | x 1024 85 91.1 85 91.1 | |||
| * SXGA+ 1400 | x 1050 60 63.98 60 | 63.98 | ||
| * UXGA 1600 | x 1200 60 75 60 | 75 | ||
NOTE
- Remark: “*” compressed computer image.
| Mode Resolution | (ANALOG) (DIGITAL) | |||
| V.Frequency (Hz) | H.Frequency (kHz) | V.Frequency (Hz) | H.Frequency (kHz) | |
| MAC LC 13" | 640 x 480 | 66.66 | 34.98 | *** |
| MAC II 13" | 640 x 480 | 66.68 35 *** | *** | |
| MAC 16" 832 x 624 | 74.55 | 49.725 *** *** | ||
| MAC 19" 1024 x 768 75 60.24 *** | *** | |||
| * MAC | 1152 x 870 | 75.06 | 68.68 | *** |
| MAC G4 | 640 x 480 60 31 | 1.35 *** | *** | |
| i MAC DV 1024 x 768 75 60 *** | *** | |||
| * i MAC DV | 1152 x 870 75 | 68.49 *** | *** | |
| * i MAC DV | 1280 x 960 60 | 60 | *** | *** |
RS232 Protocol Function List
| Baud Rate: 9600 Data Bits: 8 |
| Parity: None Stop Bits: 1 |
| Flow Control: None UART16550 FIFO: Disable |
SEND to projector
| 232 Code | Function | Projector Return | Description | |
| IDoolIR101 | Power ON | OK | ||
| IDoolIR100 | Power OFF | OK | is a CarriageReturn code: 0x13 | oo=01-99, projector's ID, oo=00 is for all projectors. |
| IDoolR001 | Eco Modc On | OK | ||
| IDoolR002 | Eco Modc Off | OK | ||
| IDoolR003 | Resync. | OK | ||
| IDoolR004 | Frczcz | OK | ||
| IDoolR005 | Unfrczcz | OK | ||
| IDoolR006 | Source lock on | OK | ||
| IDoolR007 | Source lock off | OK | ||
| IDoolR008 | Mute On | OK | ||
| IDoolR009 | Mute Off | OK | ||
| IDoolR010 | Zoom plus | OK | ||
| IDoolR011 | Zoom minus | OK | ||
| IDoolR012 | up (Pan under zoom) | OK | ||
| IDoolR013 | down (Pan under zoom) | OK | ||
| IDoolR014 | left (Pan under zoom) | OK | ||
| IDoolR015 | right (Pan under zoom) | OK | ||
| IDoolR016 | Reset | OK | ||
| IDoolR017 | Information On | OK | ||
| IDoolR018 | Information Off | OK | ||
| IDoolR020 | Source select | DVI | OK | |
| IDoolR021 | " | VGA1 | OK | |
| IDoolR022 | " | VGA2 | OK | |
| IDoolR023 | " | S-Video | OK | |
| IDoolR024 | " | Video | OK | |
| IDoolR026 | Blank On | OK | ||
| IDoolR027 | Blank Off | OK | ||
| IDoolR030 | Display Format | 4:3 | OK | |
| IDoolR031 | " | 16:9 | OK | |
| IDoolR032 | " | Full | OK | |
| IDoolR033 | " | Window | OK | |
| IDoolR034 | " | Ltr. Box | OK | |
| IDoolR038 | " | Auto | OK | |
| IDoolR035 | Color Temperature | Low | OK | |
| IDoolR036 | " | Medium | OK | |
| IDoolR037 | " | High | OK | |
| IDoolR048 | Logo | 3M | OK | |
| IDoolR049 | " | User | OK | |
| IDoolR050 | Display Mode | PC | OK | |
| IDoolR051 | " | Photo | OK | |
| IDoolR052 | " | Video | OK | |
| IDoolR053 | " | Cinema | OK | |
| IDoolR054 | " | sRGB | OK | |
| IDoolR055 | " | User | OK | |
| IDoolR060 | Mounting | Off | OK | |
| IDoolR061 | " | On | OK | |
| IDoolR062 | Rear | Off | OK | |
| IDoolR063 | " | On | OK | |
| IDoolR069 | Logo Capture | OK | ||
| IDoolR070 | Signal Power On | On | OK | |
| IDoolR071 | Signal Power On | Off | OK | |
| IDoolR072 | High Altitude | On | OK | |
| IDoolR073 | High Altitude | Off | OK | |
| IDoolR074 | Keypad Lock | On | OK | |
| IDoolR075 | Keypad Lock | Off | OK | |
| IDoolR076 | Direct Power On | On | OK | |
| IDoolR077 | Direct Power On | Off | OK | |
| IDoolR078 | Eco.Standby On | OK | ||
| IDoolR079 | Eco.Standby Off | OK | ||
| IDoolR080nnn | Brightness | OK | ||
| IDoolR081nnn | Contrast | OK | nnn=000-100, center is 50 | nnn=000-100, osd show value 0~100. |
| IDoolR082nnn | Volume | OK | ||
| IDoolR083nnn | White Intensity | OK nnn=000-010 | nnn=000-010, center is 5 | |
| IDoolR084nnn | Sharpness | OK | nnn=001-032 | |
| IDoolR085nnn | Phase | OK | nnn=000-063 | |
| IDoolR087nnn | V. Shift | OK nnn=000-100 | ||
| IDoolR088nnn | Projector ID | OK | ||
| IDoolR089nnn | V. Kcystone | OK | ||
| IDoolR090nnn | Auto Shutdown | OK | ||
| IDoolR091nnn | Presentation Timer | OK nnn=000-099 | nnn=000-180, unit is 10 minutes | |
| IDoolR092nnn | Saturation | OK | nnn=000-100 | |
| IDoolR093nnn | Gamma | OK | ||
SEND from projector automatically
when got invalid command NG
when standby/warming/cooling/out of range INFOn
READ from projector
232 Code Function Projector Return Description
IR098 Information OKabbbbcddddef
c : source 0/1/2/3/4/5= none/dvi/vga1/vga2/s-video/video dddd : FW version
e : display mode f : status 0/1/2/3 - standby/warm-up/cooling/out range
IR099 Info. to web only OK[data]
data[0]: Power 1/0-on/off
data|1| : Lamp lit 1/0=ok/failed.
data|2| : Eco Mode 1/0=on/off
data[3]: Freeze 1/0=on/off
data[4]: Source Lock 1/0=on/off
data[5]: Mute 1/0=on/off
data[6]: Information 1/0-on/off
data[7]: Blank 1/0=on/off
data[8]: High Altitude 1/0-on/off
data[9]: Keypad Lock 1/0-on/off
data[10]: -none- 0
data|11| : Signal Power On 1/0=on/off
data|12| : Direct Power On 1/0=on/off
data[13]: Eco Standby 1/0=on/off
data|14| : Source 0/1/2/3/4/5/6= None/DVI/VGA1/VGA2/S-Video/Video
data[15]: Display format 0/1/2/3/4/5=Auto/4:3/16:9/Full/window/LetterBox
data[16]: Display mode 0/1/2/3/4/5=PC/Photo/Video/Cinema/sRGB/User
data[17]: Colour temperature 0/1/2/-low/med/high
data[18]: Gamma 0/1/2/3
data[19]: -none-
data[20]: Logo 0/1=3M/User
data[21]: Mounting 1/0=on/off
data[22]: Rear 1/0=on/off
data|23..24| : Projector ID XX
data|25..26| : Volume XX
data[27..28]: Sharpness XX
data[29..30]: Phase XX
data[31..32]: White Intensity XX
data[33..34]: Zoom XX
data[35..37]: Brightness XXX
data[38..40]: Contrast
data[41..43]: V Image Position XXX
data[44..46]: Ver. keystone XXX
data[47..49]: Auto Power Off XXX
| 232 Code | Function | Lan module Return | Description |
| IR110n | alarm inform | n : 0/1/2/3/4/5: Normal/Thermal Switch Error/Fan Lock/Over Temperature/Lamp Hours Running Out/Lamp Fail | |
| IR04901? | Query lan module | IR25901n | n : n=AAAAAAAAANNNNNNNGGGGGGGDDDDDDDDPC |
| A: IP Address | |||
| N: Subnet Mask | |||
| G: Gateway | |||
| D: DNS | |||
| P: DHCP Mode(0/1: Off/ON) | |||
| IR23904n | Set lan module | IDooIR03904 | C: RJ-45 Connector State(0/1: Disconnect/Connect) |
| n : n=AAAAAAAAANNNNNNNGGGGGGGDDDDDDDD | |||
| A: IP Address | |||
| N: Subnet Mask | |||
| G: Gateway | |||
| D: DNS | |||
| IR04905n | Set lan module | IDooIR03905 | n : 1/0-DHCP on/off |
| IR03903 | Reset lan module |
RS232 Connector
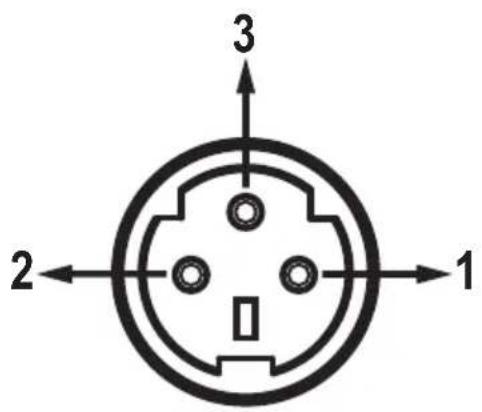
| Pin no. Name | I/O (From Projector Side | |
| 1 | TXD | OUT |
| 2 RXD IN | ||
| 3 GND — | ||
VGA-In Connector
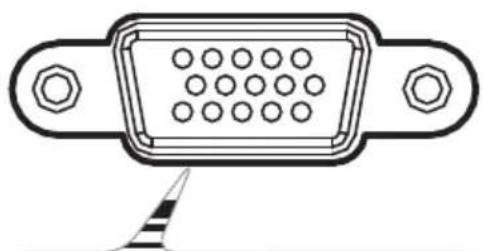
natural_image
Technical line drawing of a V12 connector with pin layout and mounting bracket (no text or symbols)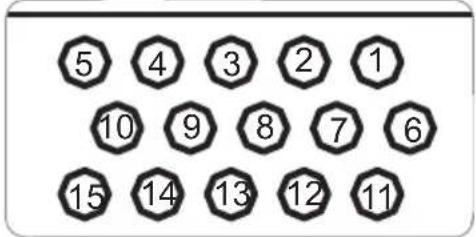
| Pin no. Spec. | |
| 1 | R(RED)/Cr |
| 2 | G(GREEN)/Y |
| 3 B(BLUE)/Cb | |
| 4 | NC |
| 5 GND | |
| 6 GND | |
| 7 GND | |
| 8 GND | |
| 9 DDC 5V | |
| 10 HOT-DET | |
| 11 NC | |
| 12 DDC Data | |
| 13 HS/CS | |
| 14 VS | |
| 15 | DDC Clock |
Regulation & Safety notices
This appendix lists the general notices of your Projector.
FCC notice
This device has been tested and found to comply with the limits for a Class B digital device pursuant to Part 15 of the FCC rules. These limits are designed to provide reasonable protection against harmful interference in a residential installation. This device generates, uses, and can radiate radio frequency energy and, if not installed and used in accordance with the instructions, may cause harmful interference to radio communications.
However, there is no guarantee that interference will not occur in a particular installation. If this device does cause harmful interference to radio or television reception, which can be determined by turning the device off and on, the user is encouraged to try to correct the interference by one or more of the following measures:
- Reorient or relocate the receiving antenna.
- Increase the separation between the device and receiver.
- Connect the device into an outlet on a circuit different from that to which the receiver is connected.
- Consult the dealer or an experienced radio/television technician for help.
Notice: Shielded cables
All connections to other computing devices must be made using shielded cables to maintain compliance with FCC regulations.
Caution
Changes or modifications not expressly approved by the manufacturer could void the user's authority, which is granted by the Federal Communications Commission, to operate this computer.
Operation conditions
This device complies with Part 15 of the FCC Rules. Operation is subject to the following two conditions:
- this device may not cause harmful interference, and
- this device must accept any interference received, including interference that may cause undesired operation.
Notice: Canadian users
This Class B digital apparatus complies with Canadian ICES-003.
Declaration of Conformity for EU countries
• Electromagnetic Compatibility Directive 2004/108/EC
- Low Voltage Directive 2006/95/E
Disposal instructions
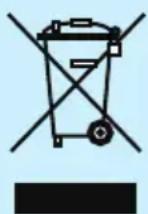
Do not throw this electronic device into the trash when discarding. To minimize pollution and ensure utmost protection of the global environment, please recycle it.
- Super Close Projection System
- SCP715/SCP740/SCP717
- Operator's Guide
- Contact 3M
- SCP 700 Series Warranty Statements
- Limited Warranty
- What 3M Will Do To Correct Problems:
- Important Notice
- Table of Contents 1
- Usage Notice 2
- Introduction....7
- Installation 13
- User Controls 20
- Appendices....43
- Precautions
- WARNING
- Do:
- Don't:
- Important Note
- Product Features
- Package Overview
- Documents :
- Product Overview
- Main Unit
- Remote Control with Mouse Function
- Connecting the Projector
- Connect the Computer/Notebook
- Connect the Video
- Powering On/Off the Projector
- Powering On the Projector
- NOTE
- Powering Off the Projector
- LED Indicator
- Adjusting the Projected Image
- Adjusting the Projector Image Height
- Adjusting the Projector Focus
- 3M Super Close Projection System SCP715/SCP717 Adjusting Projection Image Size
- 3M Super Close Projection System SCP740 Adjusting Projection Image Size
- Control Panel & Remote Control
- Using the Control Panel
- On Screen Display Menus
- How to Operate
- Information
- Management-1/3
- Language
- Keystone
- Eco Mode
- High Altitude
- Input Source
- Keypad Lock
- Reset
- Lamp Counter Reset
- Management-2/3
- Auto Power Off
- Presentation Timer
- Mounting
- Rear
- Volume
- Logo
- Logo Capture
- Management-3/3
- RS232 Command
- Projector ID
- Signal Power On
- Direct Power On
- Eco. Standby
- Display Mode
- Brightness
- Contrast
- Saturation
- Tint
- Gamma
- White Intensity
- Color
- Image-2/2
- Display Format
- Shift (16:9)
- Zoom
- Sharpness
- Frequency
- Phase
- H Position (Horizontal Position)
- V Position (Vertical Position)
- LAN
- DHCP
- IP Address
- Subnet Mask
- Gateway
- DNS
- Apply
- Status
- How to use web browser to control your projector
- Security
- Security Enable
- Security Timer
- Change Security Code
- First Time:
- ▶ Change Password:
- Troubleshooting
- Problem: No image appears on screen
- For Windows 3.x:
- For Windows 95, 98, 2000, XP:
- Problem: Image is out of focus
- Problem: Image is reversed
- Problem: Lamp burns out or makes a popping sound
- Problem: Message Reminders
- Replacing the Lamp
- Lamp Replacement Procedure:
- SEND from projector automatically
- READ from projector
- Regulation & Safety notices
- FCC notice
- Notice: Shielded cables
- Caution
- Operation conditions
- Notice: Canadian users
- Declaration of Conformity for EU countries
- Disposal instructions
Brand : 3M
Model : SCP715
Category : Projector