
SL1M09 - Flashlight STANLEY - Free user manual and instructions
Find the device manual for free SL1M09 STANLEY in PDF.


| Product Type | Rechargeable Spotlight/Flashlight |
| Brand | Stanley |
| Model | SL1M09 |
| Bulb Type | Quartz Halogen, H3 series, 6V, 55W |
| Battery Type | Maintenance-free, sealed lead acid, 6V, 3Ah |
| AC Charger | UL Listed Class 2, 12V DC, 500mA |
| DC Charger (Optional) | 12V DC, with 2A/250V fuse in plug |
| Charge Time | 18-24 hours |
| On/Off Control | Trigger switch with trigger lock bar |
| Charge Status Indicator | LED lights while charging |
| Lens Material | Glass |
| Accessories Included | 120V AC charger; optional: 12V DC charger, carry lanyard |
| Safety Compliance | FCC Part 15 Class B |
| Operating Temperature | Indoor use only; avoid extreme heat |
| Maintenance | Clean outer surfaces with soft cloth moistened with mild soap and water |
| Replaceable Parts | Bulb (6V H3 55W), DC plug fuse (2A/250V); battery not user-replaceable |
| Warranty | One-year limited warranty |
| Battery Disposal | Recycle sealed lead acid battery properly |
Frequently Asked Questions - SL1M09 STANLEY
User questions about SL1M09 STANLEY
0 question about this device. Answer the ones you know or ask your own.
Ask a new question about this device
Download the instructions for your Flashlight in PDF format for free! Find your manual SL1M09 - STANLEY and take your electronic device back in hand. On this page are published all the documents necessary for the use of your device. SL1M09 by STANLEY.
USER MANUAL SL1M09 STANLEY
natural_image
Exterior view of a Stanley electric light bulb (no text or symbols visible on body)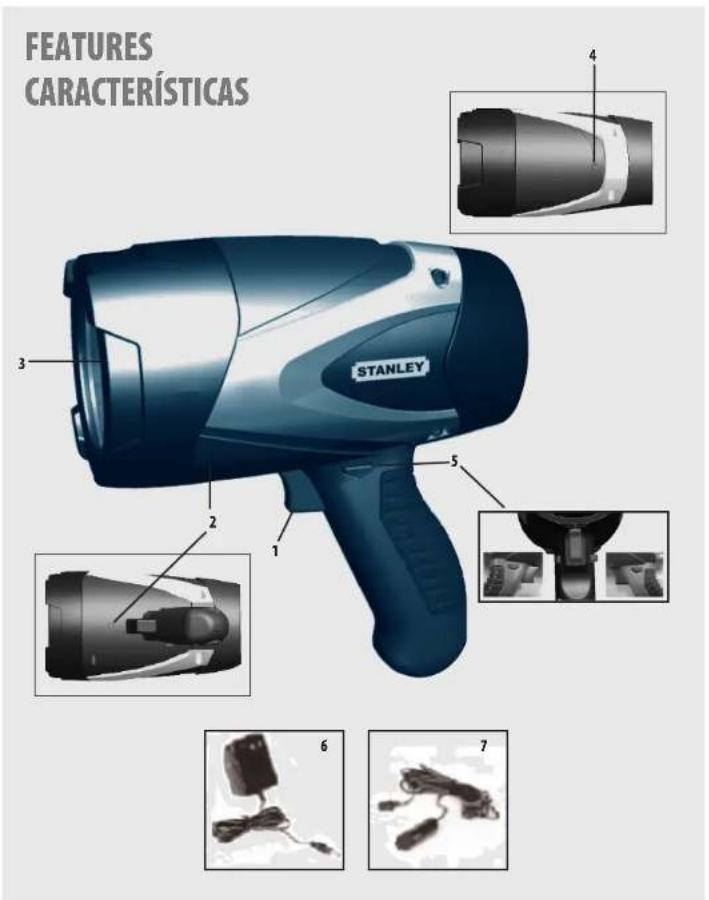
FEATURES
- On/Off trigger
- DC charging port
(for use with 120 volt AC charger or 12 volt DC charger) - Quartz halogen bulb
- Charge status LED indicator
- Trigger lock
6.120 Volt AC charger - 12 volt DC charger (optional accessory)
- Carry lanyard (not shown) (optional accessory)
CARACTERÍSTICAS
This device complies with part 15 of the FCC rules. Operation is subject to the following two conditions: (1) this device may not cause harmful interference, and (2) this device must accept any interference received, including interference that may cause undesired operation.
This equipment has been tested and found to comply with the limits for a Class B digital device, pursuant to part 15 of the FCC Rules. These limits are designed to provide reasonable protection against harmful interference in a residential installation. This equipment generates, uses and can radiate radio frequency energy and, if not installed and used in accordance with the instructions, may cause harmful interference to radio communications. However, there is no guarantee that interference will not occur in a particular installation. If equipment does cause harmful interference to radio or television reception, which can be determined by turning the equipment off and on, the user is encouraged to try to correct the interference by one or more of the following measures:
• Reorient or relocate the receiving antenna.
- Increase the separation between equipment and receiver.
- Connect the equipment into an outlet on a circuit different from that to which the receiver is connected.
- Consult the dealer or an experienced radio/TV technician for help.
Changes or modifications not approved by the party responsible for compliance could void user's authority to operate the equipment.
GENERAL SAFETY WARNINGS AND INSTRUCTIONS
READ ALL INSTRUCTIONS
WARNING: Read all instructions before operating spotlight. Failure to follow all instructions listed below may result in electric shock, fire and/or serious injury.
SAFETY GUIDELINES / DEFINITIONS
■ DANGER: Indicates an imminently hazardous situation which, if not avoided, will result in death or serious injury.
■ WARNING: Indicates a potentially hazardous situation which, if not avoided, could result in death or serious injury.
■ CAUTION: Indicates a potentially hazardous situation which, if not avoided, may result in minor or moderate injury.
CAUTION: Used without the safety alert symbol indicates potentially hazardous situation which, if not avoided, may result in property damage.
RISK OF UNSAFE OPERATION. When using tools or equipment, basic safety precautions should always be followed to reduce the risk of person injury. Improper operation, maintenance or modification of tools or equipment could result in serious injury and property damage. There are certain applications for which tools and equipment are designed. Manufacturer strongly recommends that this product NOT be modified and/or used for any application other than for which it was designed. Read and understand all warnings and operating instructions before using any to or equipment.
IMPORTANT SAFETY INSTRUCTIONS
WARNING: This product or its power cord contains lead, a chemical known to the State of California to cause cancer and birth defect or other reproductive harm. Wash hands after handling.
INSTRUCTIONS PERTAINING TO A RISK OF FIRE, ELECTRIC SHOCK, EXPOSURE TO EXCESSIVE UV RADIATION, OR INJURY TO PERSONS
Lighted lamp is HOT.
WARNING - TO REDUCE THE RISK OF FIRE, ELECTRIC SHOCK, EXPOSURE TO EXCESSIVE UV RADIATION, OR INJURY TO PERSONS:
- Turn off/unplug and allow to cool before replacing the Halogen bulb.
- Halogen bulb gets HOT quickly!
- Do not touch the bulb at any time when operating.
- Only contact switch/plug when turning on.
- Do not touch hot lens or enclosure.
- Do not remain in light if skin feels warm.
- Use only with a 6 volt/55 watt or smaller Halogen bulb.
- When changing bulb, use a soft cloth. Oil from skin may damage bulb.
- Do not operate the spotlight with a missing or damaged lens or enclosure.
■ WARNING – WHEN USING ELECTRICAL APPLIANCES, BASIC PRECAUTIONS SHOULD ALWAYS BE FOLLOWED, INCLUDING THE
FOLLOWING:
• To reduce the risk of injury, close supervision is necessary when the spotlight is used near children.
- Use only attachments recommended or sold by the manufacturer.
WARNING: TO REDUCE THE RISK OF ELECTRIC SHOCK:
- Do not put spotlight in water or other liquid. Do not place or store appliance where it can fall or be pulled into a tub or sink.
- Charge indoors only. Do not expose charger to water or any other liquid.
- Do not clean this appliance with a water spray or the like.
- Use only the chargers supplied by the manufacturer to charge and recharge.
- When an extension cord is used:
- The marked rating of the detachable power supply cord or extension cord should be at least as great as the electrical rating of this appliance.
- The cord should be arranged so that it will not drape over the countertop or tabletop where it can be tripped over, snagged, or pulled on
unintentionally (especially by children).
- The extension cord should be kept dry and off the ground.
■ WARNING: FIRE HAZARD: Never contact combustible material to the lens and never tape or tie the switch in the on position.
■ CAUTION: TO REDUCE THE RISK OF INJURY OR PROPERTY DAMAGE:
- All halogen lights give off heat
- Do not touch lens while operating.
- Keep combustibles away from spotlight lens. Extreme heat can cause fires.
- Never place the light face-down on any surface when lit.
- Never look directly into the light or shine the light into another person's eyes.
- Keep sharp objects away from lens — it is glass and can break.
- Do not immerse spotlight in water.
- Do not expose this unit to extremely high temperatures.
- Do not drop or throw spotlight. It contains glass and a sealed lead acid battery.
- Use only with the charging adapter provided with unit. Plug in the charging adapter at the spotlight first, then plug into the
charging source.
- Do not overcharge: Recharge up to 24 hours maximum.
• After charging/recharging, disconnect charging adapter or extension cord and wait 5 minutes before use.
- Do not crush, cut, pull or expose charging adapter cords to extreme heat.
- Position charging adapter cords so they do not become entangled or become a safety hazard. Keep charging adapter cords away from sharp edges.
- Use in a dry location only.
- Except for the H3, S5 watt bulb, there are no user-serviceable parts inside. Do not attempt to disassemble any other parts of the unit.
• To reduce risk of damage to electric plug and cord, pull by plug rather than cord when disconnecting.
- Do not attempt to charge the unit if the charger is damaged – return the charger to manufacturer for repair or replacement.
SAVE THESE INSTRUCTIONS
INTRODUCTION
Congratulations on purchasing your new spotlight. Read this Instruction Manual and follow the instructions carefully before using your new spotlight.
This unit is shipped in a partially charged state. Charge unit BEFORE first use using the 120 volt AC charger for 24 hours. Recharge after each use. The charge status LED lights while the unit is charging and stays lit while the charger is plugged into the 12 volt DC charging port.
When the spotlight dims, the unit needs recharging.
Charging/recharging using the 120 volt AC charger
- Make sure the spotlight is off (the trigger lock is in the off position and the trigger is not depressed).
- Insert the barrel connector of the AC charger into the 12 volt DC charging port on the back of the unit. Insert the plug end into a (powered)
standard North American 120 volt 60Hz outlet.
- Charge for approximately 18 to 24 hours.
Charging/recharging using the 12 volt DC charger (optional accessory)
- Make sure the spotlight is off (the trigger lock is in the off position and the trigger is not depressed).
- Plug the barrel tip of the supplied 12 volt DC charger into the 12 volt DC charging port.
- Insert the 12 volt DC plug end into the accessory outlet of your vehicle or other 12 volt DC power source.
- Charge for approximately 18 to 24 hours.
Notes: When using a vehicle's 12 volt DC accessory outlet as a charging source, be aware that some vehicles require you to turn on the ignition to power the accessory outlet.
The spotlight may be used with either charger plugged in. However, the charging function with stop until the spotlight On/Off trigger is released and the trigger lock is disengaged.
OPERATING INSTRUCTIONS
Operating the spotlight
-
Disconnect from charger.
-
The On/Off trigger is located in the front of the handle of the spotlight.
-
To turn the spotlight on, squeeze the trigger.
-
To turn off the spotlight, release the trigger.
Note: The On/Off trigger can be locked in the on position using the trigger lock bar on the side of the unit.
Locking the spotlight
To lock the spotlight in the on position, depress the On/Off trigger, then press the trigger lock bar. The spotlight will stay on until the trigger unlock bar is pressed and the on/off trigger is released.
If the On/Off trigger is released when the trigger lock bar is pressed, the spotlight will be locked in the off position. To turn the spotlight on again, press the trigger unlock bar before pressing the On/Off trigger.
Using the carry lanyard (optional accessory)
The carry lanyard may be used to carry the unit or to hang it for storage. Always adjust the slide on the cords to keep the lanyard secure around any supporting object.
■ CAUTION: TO REDUCE THE RISK OF PRODUCT DAMAGE:
- When light is hung by the carry lanyard, do not shake the spotlight or object that it is hanging from. Do not hang the spotlight from any electrical wires or anything that it is not secure.
- Only use the carry lanyard for hanging this spotlight. The carry lanyard is not intended to support additional weight. Do not attach or hang anything additional to the spotlight or risk of breakage may occur.
CARE AND MAINTENANCE
All batteries lose energy from self-discharge over time and more rapidly at higher temperatures. When the unit is not in use, we recommend that the battery is charged at least every 120 days.
Never submerge the unit in water. If the unit gets dirty, gently clean the outer surfaces of the spotlight unit with a soft cloth moistened with a mild solution of water and detergent.
Except for the H3, S5 watt bulb, there are no user-replaceable parts. Periodically inspect the condition of adapters, connectors and wires. Contact manufacturer to replace any components that have become worn or broken.
Battery replacement/disposal
BATTERY REPLACEMENT
The battery should last the service life of the unit. Contact manufacturer for any information you may need.
SAFE BATTERY DISPOSAL
Contains a maintenance-free, sealed, non-spillable, lead acid battery, which must be disposed of properly. Recycling is required, contact your local authority for information. Failure to comply with local, state and federal regulations can result in fines, or imprisonment.

WARNINGS:
- Do not dispose of the battery in fire as this may result in an explosion.
- Before disposing of the battery, protect exposed terminals with heavy-duty electrical tape to prevent shorting (shorting can result in injury or fire).
- Do not expose battery to fire or intense heat as it may explode.
Spotlight Bulb Replacement
To replace the bulb, you will need a small Phillips screwdriver and a 6 volt, H3 55 watt replacement bulb. During installation, avoid touching the glass part of the bulb. Bulb life may be shortened by installing a bulb with dirt or fingerprints on it. The bulb can be wiped clean with a doth moistened with alcohol.

-
Disconnect the unit from any charging adapters.
-
Push the rubber bezel forward toward the front of the spotlight to reveal two small Phillips screws in the retaining ring.
-
Using the screwdriver, remove (counterclockwise) the two screws. Set them aside.
-
Lift off the retaining ring, glass lens and rubber "O" ring and set them aside.
-
Carefully remove the reflector and bulb assembly.
-
Disconnect the bulb wire from the red power wire.
-
Unsnap the hairpin retaining wires from the reflector's flange.
-
Using the screwdriver, loosen the retaining screw to remove the bulb from the reflector (no need to completely remove this screw).
-
Lift out the bulb and detach wire.
-
Insert the replacement bulb into the reflector's flange.
-
Put back and secure the hairpin retaining wires
-
Connect the bulb power wire to the red power wire.
-
Tighten the retaining screw on the flange.
-
Place the reflector in position in the body of the spotlight.
-
Replace the rubber "0" ring in the groove around the perimeter of the reflector.
-
Replace glass and retaining ring so the screw holes are aligned.
-
Secure retaining ring with two screws.
-
Replace rubber bezel.
-
Operate switch to ensure proper operation of spotlight.
WARNING: To reduce the risk of electric shock, replace bulb with 6 volt, H3 55 watt only.
12 volt DC charger plug fuse replacement
The fuse in the plug end of the 12 volt DC charger protects the adapter's charging circuit. If the 120 volt I_C charger operates, but the DC charging adapter does not, then this fuse may be opened (blown).
To replace the fuse:
-
Unscrew the end cap of the DC plug (counterclockwise).
-
Remove spring center contact and fuse.
-
Check fuse with a continuity checker.
-
If blown, locate a replacement 2 amp/250 volt fuse.
-
Replace the fuse, spring, contact and end cap.
-
Screw end cap clockwise until it is finger tight - DO NOT OVER-TIGHTEN.
-
Test for proper operation of the 12 volt DC charging adapter.
TROUBLESHOOTING
The charge status indicator LED does not light when charging
-
Check connection to the 12 volt DC charging port.
-
Check connection to AC or DC power source.
-
Confirm there is a functioning AC or DC current.
Unit will not operate
-
The battery may be completely discharged. Charge the unit following the directions.
-
The halogen bulb may have blown. Check bulb filament. If the filament is coiled and unbroken, the bulb is not blown. Otherwise, replace the bulb following the instructions in the manual.
ONE-YEAR LIMITED WARRANTY
Manufacturer warrants this product for one year against any defects in material or workmanship. The defective product will be replaced or repaired at no charge in either of two ways.
The first, which will result in exchanges only, is to return the product to the retailer from whom it was purchased (provided that the store is a participating retailer). Returns should be made within the time period of the retailer's policy for exchanges (usually 30 to 90 days after the sale). Proof of purchase may be required. Please check with the retailer for their specific return policy regarding returns that are beyond the time set for exchanges. The second option is to return the product (prepaid) to the manufacturer for repair or replacement at our option. Proof of purchase may be required.
This warranty does not apply to accessories. This warranty gives you specific legal rights and you may have other rights which vary from state to state or province to province. This product is not intended for commercial use.
SPECIFICATIONS
Spotlight
Bulb: 6 volt, H3 series, 55 watt
Battery: Maintenance-free, sealed lead acid, 6 volt, 3 amp hour
120 volt AC charger
Charger: UL Listed Class 2, 12 volts DC (500mA)
12 volt DC charger (optional accessory)
Voltage: 12 volts DC
DC Plug Fuse: 2A/250V
- FEATURES
- CARACTERÍSTICAS
- GENERAL SAFETY WARNINGS AND INSTRUCTIONS
- READ ALL INSTRUCTIONS
- SAFETY GUIDELINES / DEFINITIONS
- IMPORTANT SAFETY INSTRUCTIONS
- INSTRUCTIONS PERTAINING TO A RISK OF FIRE, ELECTRIC SHOCK, EXPOSURE TO EXCESSIVE UV RADIATION, OR INJURY TO PERSONS
- Lighted lamp is HOT.
- FOLLOWING:
- ■ CAUTION: TO REDUCE THE RISK OF INJURY OR PROPERTY DAMAGE:
- SAVE THESE INSTRUCTIONS
- INTRODUCTION
- OPERATING INSTRUCTIONS
- Operating the spotlight
- ■ CAUTION: TO REDUCE THE RISK OF PRODUCT DAMAGE:
- CARE AND MAINTENANCE
- WARNINGS:
- TROUBLESHOOTING
- ONE-YEAR LIMITED WARRANTY
- SPECIFICATIONS
Brand : STANLEY
Model : SL1M09
Category : Flashlight