
ST1500 - Snow blower Texas - Free user manual and instructions
Find the device manual for free ST1500 Texas in PDF.


| Product Type | Snow Blower |
| Brand | Texas |
| Model | ST1500 |
| Clearing Width | 24 inches (61 cm) |
| Intake Height | 20 inches (51 cm) |
| Engine Displacement | 208 cc |
| Fuel Type | Gasoline (unleaded) |
| Start Type | Electric and recoil start |
| Drive System | Self-propelled, 6 forward speeds, 2 reverse |
| Stage Type | Two-stage |
| Throw Distance | Up to 40 feet (12 m) |
| Wheel Size | 13 x 4 inches |
| Headlight | Yes, LED |
| Weight | 120 lbs (54 kg) |
| Dimensions (L x W x H) | 56 x 25 x 48 inches (142 x 63 x 122 cm) |
| Chute Rotation | 180 degrees, remote controlled |
| Electric Start | Requires 120V AC outlet |
| Oil Capacity | 0.63 US quarts (0.6 L) |
| Fuel Tank Capacity | 1.5 US gallons (5.7 L) |
| Noise Level | Less than 100 dB(A) |
| Warranty | 2 years limited |
Frequently Asked Questions - ST1500 Texas
User questions about ST1500 Texas
0 question about this device. Answer the ones you know or ask your own.
Ask a new question about this device
Download the instructions for your Snow blower in PDF format for free! Find your manual ST1500 - Texas and take your electronic device back in hand. On this page are published all the documents necessary for the use of your device. ST1500 by Texas.
USER MANUAL ST1500 Texas
DK "Original brugsanvisning"
GB "Original instructions"
Safety instructions....11
Assembling....12
Starting....13
Maintenance and Storage 14
Troubleshooting 14
The Environment, Recycling and Disposal....15
Technical Data 15


Lille drivrem (34 fig 8)
- Caution! Read the instruction manual and follow the warning and safety instructions!
- Always switch off the appliance, disconnect the power and wait till the machine comes to a standstill prior to maintenance, cleaning or repair work!
- Caution! Blades do not stop immediately after switching off.
- Danger! Objects may be thrown out at high speed when motor is running. Keep people, pets and domestic animals out of the danger area.
- Keep the mains cable free from the tines or blades. Tines or blades may damage the cables and cause contact with live parts.
- Caution! Unplug immediately if the power cord or plug becomes damaged!
- Danger! Keep hands and feet away from the cutting equipment!
- Caution! Always wear eye and ear protection.
- Do not use the machine in wet weather conditions!
- Wear safe, sturdy, nonskid footwear!

Safety instructions
Read the operating instructions and act accordingly. Keep it for general use.
Comply with the safety information and the warning on the appliance.
● The appliance must be assembled correctly before use.
- Before inserting the plug in the mains socket, make sure that the socket ratings are correct and correspond to those indicated on the rating label on the appliance.
● Never move the appliance by pulling at the cables.
● Always disconnect the appliance from the mains supply before transporting it to other places.
● Always switch off the appliance before disconnecting any plug and socket connector or extension cables.
- Keep children and pets away. All onlookers should be kept a safe distance away from the appliance when it is in use.
● The user is responsible for third parties while working with the appliance.
● Be careful never to throw snow towards people or cars, and never allow anyone in front of your snow thrower.
- People not acquainted with the operating instructions, children, juveniles who have not yet reached the minimum age for using this appliance, and people under the influence of alcohol, drugs or medication are not allowed to use the appliance.
- Only use the appliance for its designed purposes.
● Always use the appliance with the discharge chute attached.
- Keep hands and feet away from all rotating and moving parts.
- Never put your hand in the discharge chute or near the auger to remove snow, sticks or other debris. Blocked auger can "spring back" when cleared and may cause personal injury, even with the appliance stopped. Always use an object such as a long stick or shovel handle to clear blockages.
● Wear safe, sturdy, nonskid footwear. Ensure that you have a good a stand, especially on slopes.
- Wear safety glasses and avoid any loose-fitting clothing that could get caught in moving parts. Be careful of long hair.
● Only work in daylight or sufficiently good artificial light.
- In order to start the appliance, the auger must be completely free to move.
● The use of the appliance is only permitted if the safety distance provided by the guide bar is complied with.
● Always hold the handlebar firmly and walk, never run.
- Do not overload the appliance by attempting to clear snow at too fast a rate.
- Slow down and turn corners slowly.
- Caution! Auger does not stop immediately after switching off.
● Always switch off the appliance, disconnect the plug and wait until the auger stops before carrying out maintenance or cleaning work.
- Use caution when cleaning or performing maintenance on the appliance. DANGER! Watch your fingers! Wear gloves!
● It is forbidden to move or modify any of the electrical and mechanical safety devices.
- The snow can sometimes hide objects that might clog the chute, or otherwise cause damage. Clear the area of doormats, sleds, boards, wires and other debris.
- If the appliance strikes a foreign body, examine the appliance for signs of damage and carry out any necessary repairs before restarting and continuing to work.
- If the appliance should start to vibrate abnormally, switch off the motor and check for the cause immediately. Vibration is generally a warning of trouble.
- The appliance should be checked carefully before use. You should only work with an appliance that is in good condition. If you notice any defect on the machine that may cause danger to the operator, do not operate the appliance until defects are rectified.
- Replace worn or damaged parts for safety. Use only original spare parts. Parts not produced by manufacturer may cause poor fit and possible injury.
Electrical safety
● Design of the connection cable according to IEC 60245 (H 07RN-F) with a core cross-profile section of at least
- 1.5 m 2 for cable lengths up to 25 m
2.5 m for cable lengths over 25 m
- Long and thin connection lines result in a potential drop. The motor does not reach any longer its maximal power; the function of the device is reduced.
- Plugs and coupler outlets on connection cables must be made of rubber, non-rigid PVC or other thermoplastic material of same mechanical stability or be covered with this material.
● The connector of the connection cable must be splash-proof. - When running the connection line observe that it does not interfere, is not squeezed, bended and the plug connection does not get wet.
● Wind off completely the cable when using a cable drum. - Do not drive the device across the extension cable. Make sure that it is behind you in a secure position. Place the cable on a path or area that has already been thatched.
- Do not use the cable for purposes for which it is not meant. Protect the cable against heat, oil and sharp edges. Do not use the cable to pull the plug from the socket.
- Protect yourself against electric shocks. Avoid touching earthed parts with your body (e.g. pipes, heating apparatus, cookers, fridges etc.).
● Regularly check the extension cables and replace them if they are damaged. - Do never connect a damaged cable to the mains. Do not touch a damaged cable before it is disconnected from the mains. A damaged cable may cause contact with live parts.
- Do not use any defective connection cables.
- When working outdoors, only use extension cables especially approved and appropriately labeled for outdoor use.
- Do not set up any provisional electrical connections.
● Never bypass protective devices or deactivate them.
● Only hook up the machine by means of a fault-current circuit breaker (30 mA).
The electrical connection or repairs to electrical parts of the machine must be carried out by a certified electrician or one of our customer service points. Local regulations - especially regarding protective measures - must be observed.
Damaged mains leads must be replaced by the manufacturer or one of their service workshops or a similar qualified person to prevent dangers. Repairs to other parts of the machine must be carried out by the manufacturer or one of his customer service points. Use only original spare parts, accessories and special accessory parts. Accidents can arise for the user through the use of other spare parts. The manufacturer is not liable for any damage or injury resulting from such action.
Description (Fig. 1)
- Main plug
- Lock off button
- Switch trigger
- Handle
- Front handle
- Guide bar lower section
- Discharge chute
- Auger
- Motor housing
- Discharger adjustment knob
- Wheel
Assembling
Guide bar (Fig. 1 A)
Slide the lower section (6) into the up tube (4).
Line up holes on each tube, and make sure that the internal cable (A) does not pass the mounting holes.
Fix two sections firmly with the supplied screw and swing nut.
Discharge adjustment knob (Fig. 1B)
Attach the knob (10) to the rocker arm (51) and fasten with supplied screw.
Motor housing (Fig. 1C)
- Connect socket (B) to the plug on the motor housing.
- Fasten the housing by supplied 4 screws.
Front handle
Loosen the knob and lift up the handlebar to the operation position. (Fig. 2)
Adjust the height of the handle to a safe and comfortable position and fix it by the knob.
Connection the mains (Fig. 3)
Loop the extension cord and feed it through the rear handle. Rest the cord around the cord hook. This will help prevent you from disconnecting the extension cord from the product during operation.
Warning! Do not handle the plug or the appliance with wet hands or while standing in water.
DANGER! Electric shock causes series injury and death!
Starting
Intend use
This appliance is only intended for sweeping of snow on steps, patios and decks in private domestic and hobby gardens. It is not designed for use in public areas, parks, sports areas, and in agriculture and forestry.
Using the application only on hard, flat surfaces free of sad, stone and debris, wires and any other objects.
For any other purpose is considered incorrect and unapproved. The manufacturer is not liable for any damage or injury resulting from such use. The user is entirely responsible for any associated risks.
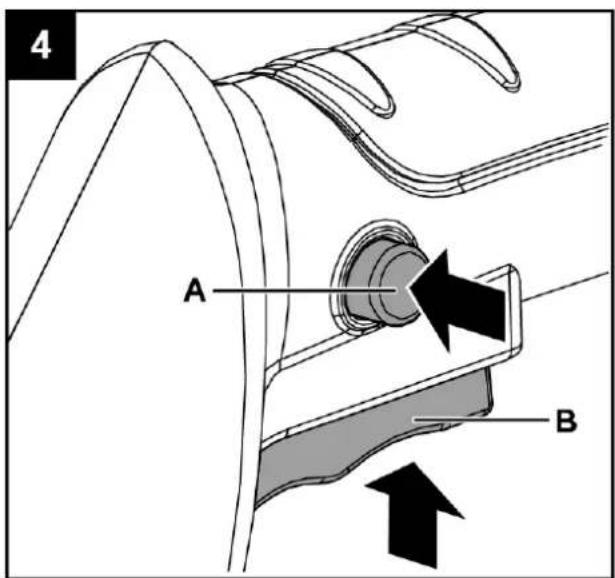
On/Off switch (Fig. 4)
Warning! The auger starts rotation immediately after switch on! Keep hands and feet away from auger.
To switch ON, hold the appliance firmly with two hands and press the Safety lock off button (2) while press the On/Off switch trigger (3).
Keep the switch trigger hold while release the button.
To stop the appliance, release the switch trigger and it automatically returns to its start position.
Removing snow
● Before starting work, make sure that the area to be clear is free of stones, debris, wires and any other objects.
● Make sure all fasteners (screws, nuts, etc.) are always fully tightened so that you can work safely with the appliance.
- Check the auger for wear and tear at regular intervals.
- Position discharge chute in safe direction and angle, away from operator and bystanders.
● Clearing snowfall often, before it gets too deep. Snow is best removed as soon as possible after snow falls.
- Lift the auger off surface slightly before switch on.
- Switch on and tilt the appliance forward until the scraper blade contacts the ground. Push the appliance forward at a comfortable rate of speed, yet slow enough to clear the path completely. The width and depth of the snow determines your forward speed.
- Direct the snow to the right or to the left by holding the appliance at a slight angle. For the most efficient snow removal, throw the snow downwind, and slightly overlap each swath.
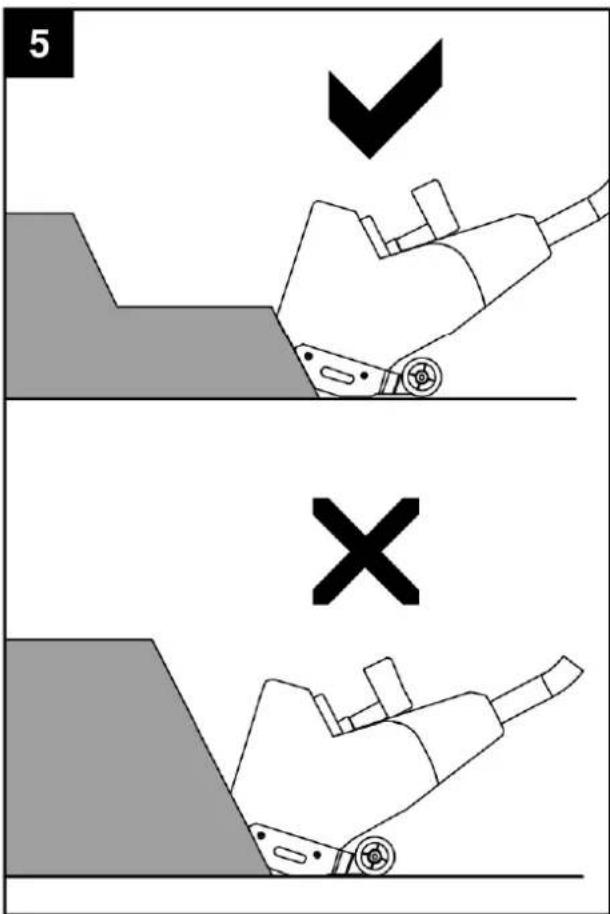
- The appliance can remove snow up to 12 cm deep in one pass. When clearing deeper drifts, hold the appliance by the upper and lower handles and use a swinging or sweeping motion. Shaving off the top layer and making multiple passes (Fig. 5).
Adjustment of the discharge direction (Fig. 6)
Snow may be discharged to the left, straight forward, or to the right of the operator.
To change the directions do as follow: 1- stop the machine and wait until the auger has come to a complete stop. 2-
Grasp the discharge knob and pull it up.3- Turn the discharge direction knob to the left, mid or the right position, depending on which direction you want to throw the snow. 4- Release the knob and restart the appliance.
For large areas, a definite pattern of operation is required to thoroughly clean an area of snow. These patterns will avoid throwing snow in unwanted places as well as eliminating a second removal of snow.
Pattern A: Throw the snow to the right or left side where it is possible, as on a long driveway it is advantage to start in the middle. Plow from one end to the other, throwing snow to both sides. Pattern B: If the snow can only be thrown to one side of the driveway or sidewalk (above), start on the opposite side.
- Scraping the snow all the way down to the pavement will wear out the scraper and auger. To spare the machinery, one or two inches of snow can be left behind, to be handled with de-icing salt or a shovel.
- After clearing the snow, let the motor run for a few minutes so that the ice doesn't freeze any moving parts. Then switch off the motor, wait for all moving parts to stop, and wipe the ice and snow off the appliance.
Warning! To avoid serious personal injury, do not use hands or feet to unclog chute.
![graph TD subgraph A A1["Component A"] --> A2["Component B"] A2 --> A3["Component C"] A3 --> A4["Component D"] A4 --> A5["Component E"] A5 --> A6["Component F"] A6 --> A7["Component G"] A7 --> A8["Component H"] A8 --> A9["Component I"] A9 --> A10["Component J"] A10 --> A11["Component K"] A11 --> A12[…](/content/2026/05/1004014/images/209d8b894cd20147827ec3807eb4f3b0b044e76eb2ad22706012644211bf8638.jpg)
Before carrying out any maintenance operations, cut off the electric power supply by disconnecting the plug from the extension cable.
● Regular cleaning and maintenance of your appliance will ensure efficiency and prolong the life of your appliance.
- After each operation, take apart and clean out the ice and debris from the ventilator and its slot, auger and housings.
- Only use a cloth soaked with hot water and a soft brush to clean the application. Never wet or spray water on the machine!
- Do not use detergents or solvents as these could cause irreparable damage to your appliance. Chemicals can destroy the plastic parts.
- To protect the application from corrosion when storing for a longer period, treat the metal parts with harmless oil to the environment.
● Store the appliance in a dry room out of reach of kids.
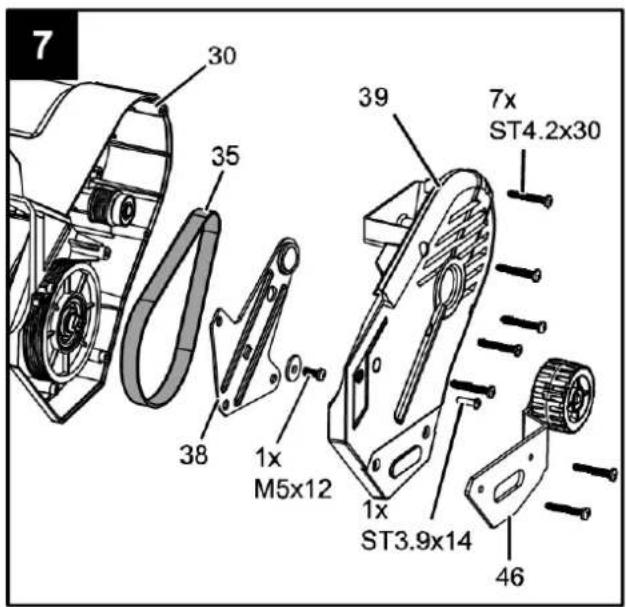
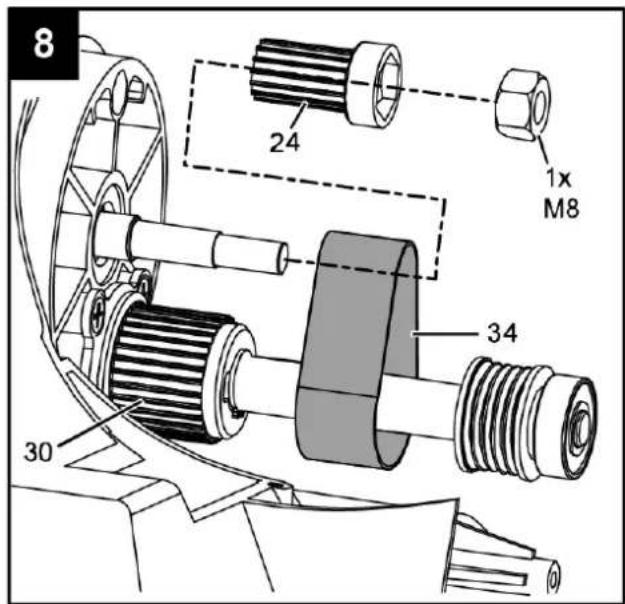
Change of belt (Fig. 7, 8)
The drive belts (34) and (35) need to be replaced depends on wear and tear.
Drive belt (35 fig 7)
- Undo screws and take off the cover (39).
- Remove screw, washer and pulley frame (38), and the belt (35) from the pulleys.
● Install the new belt in the same pathway as the old one.
Drive belt (34), small
- Loosen the nut and take the pulley (24) off with the belt (34) off the shaft.
- Remove the retaining ring (21), washer and pulley (33) if necessary.
● Reinstall belt (35), pulley frame (38) and the cover.
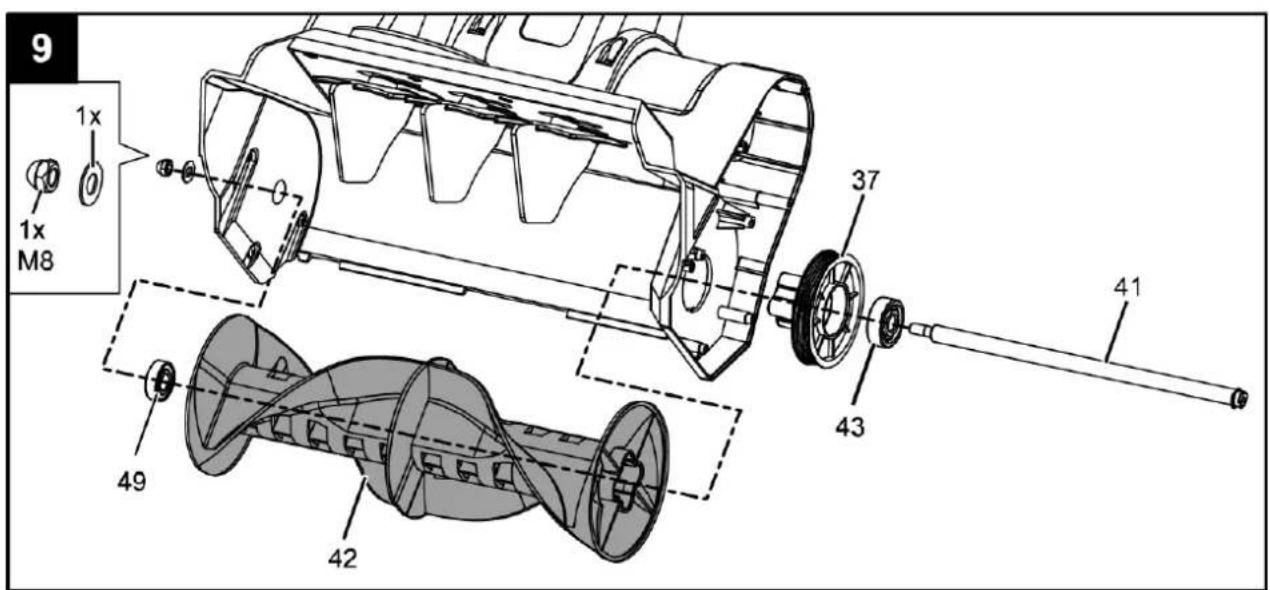
Auger (Fig. 9)
Caution! Check fasteners before each operation. Loosen auger result extra vibration and damage to the appliance.
To change the auger:
● (Fig 7) Remove cover (39), pulley frame (38) and belt (35).
- (fig 9) Loosen the nut from other side of auger (42) and dismount the pulley (37) and auger axle (41).
- Replace the auger with a new one.
Scraper blade (Fig. 10)
Scraper blade is a wear item and should be replaced when necessary. Wear scraper blade invite extremely vibration and damage of auger.
- Undo 3 screws.
- Replace with a new one.
Troubleshooting
Warning! Before any maintenance work, first switch off the appliance and unplug from the mains.
- Motor does not start
Mains failure. Check the mains if the same as described in the technical data. Connections problem. Check electrical connection and make sure the operation of the switch is turned on correctly.
● Poor snow throws
Drive belt worn or damaged. Replace the drive belt. Auger worn or damaged. Replace the auger, check the tighten of screws and nuts. Blocked discharge. Switch off the appliance and clean the discharge.
● Abnormal vibrations
Drive belt worn or damaged. Replace the drive belt. Auger worn or damaged. Replace the auger, check the tighten of screws and nuts. Scarper blade worn or damaged. Replace the scarper blade, check the tighten of screws.
The Environment, Recycling and Disposal
Electrical devices do not go into the domestic rubbish. Give devices, accessories and packaging to an ecofriendly recycling.
According to the European Directive 2002/96/EC on electrical and electronic scrap, electrical devices that are no longer serviceable must be separately collected and brought to a facility for an environmentally compatible recycling.
Technical Data
Power supply voltage 230V\~50Hz
Power consumption 1500 W
Idle Speed 4500 min
Sweep width 340 mm
Maximum clearing depth 120 mm
Maximum throwing distance 9 m
Isolation class II
Weight: 6,6
Noise power level LWA 103
Noise pressure level LPA 86 dB(A)
Acceleration handle under load 5 m/s 2
kg
Spare parts
Spare part drawings for the specific product can be found
on our website www.texas.dk
If you find the part numbers yourself, this will facilitate more rapid service.
For purchase of spare parts, please contact your dealer.
You will find a list of dealers on the Texas website.
Výstraha!
2000/14/EC amended by 2005/88/EC
Materiellet er udført i overensstemmelse med følgende standarder • Conforms with the following standards • In Übereinstimmung mit den folgende Standards • Conformément aux normes suivantes • Jest zgodna z następującymi normami •
EN 62233:2008, ISO/DIS 8437:2008, EN ISO 12100:2010, EN 60335-1:2012+A11:14, AfPS GS 2014:01 PAK, EN 55014-1:2006/+A1:2009/+A2:2011, EN 55014-2:2015, EN 61000-3-2:2014, EN61000-3-11:2000
Guaranteed LWA : 99 dB(A) Measured LpA : 86 dB(A) Vibration ah=5\ m/s2
Serial numbers 1909621001 - 2112629999
Texas Andreas Petersen A/S Knullen 22 • DK-5260 Odense S
Johnny Lolk
Responsible for documentation
24.06.2019
Johnny Lolk Managing Director
TEXAS


- DK "ORIGINAL BRUGSANVISNING
- GB "ORIGINAL INSTRUCTIONS
- SAFETY INSTRUCTIONS
- READ THE OPERATING INSTRUCTIONS AND ACT ACCORDINGLY. KEEP IT FOR GENERAL USE
- COMPLY WITH THE SAFETY INFORMATION AND THE WARNING ON THE APPLIANCE
- ELECTRICAL SAFETY
- DESCRIPTION (FIG. 1)
- ASSEMBLING
- GUIDE BAR (FIG. 1 A)
- DISCHARGE ADJUSTMENT KNOB (FIG. 1B)
- MOTOR HOUSING (FIG. 1C)
- FRONT HANDLE
- CONNECTION THE MAINS (FIG. 3)
- STARTING
- INTEND USE
- ON/OFF SWITCH (FIG. 4)
- REMOVING SNOW
- ADJUSTMENT OF THE DISCHARGE DIRECTION (FIG. 6)
- BEFORE CARRYING OUT ANY MAINTENANCE OPERATIONS, CUT OFF THE ELECTRIC POWER SUPPLY BY DISCONNECTING THE PLUG FROM THE EXTENSION CABLE
- CHANGE OF BELT (FIG. 7, 8)
- AUGER (FIG. 9)
- SCRAPER BLADE (FIG. 10)
- TROUBLESHOOTING
- THE ENVIRONMENT, RECYCLING AND DISPOSAL
- TECHNICAL DATA
- SPARE PARTS
- VÝSTRAHA
- 2000/14/EC AMENDED BY 2005/88/EC
- TEXAS
Brand : Texas
Model : ST1500
Category : Snow blower