
PHD 4313 S - Cooker Philco - Free user manual and instructions
Find the device manual for free PHD 4313 S Philco in PDF.


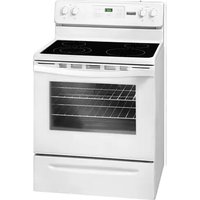
| Product Type | Free-standing Electric Cooker |
| Brand | Philco |
| Model | PHD 4313 S |
| Height | 85-90 cm |
| Width | 60 cm |
| Depth | 60 cm |
| Weight | Approximately 55 kg |
| Power Supply | 220-240 V, 50/60 Hz |
| Power Consumption | Maximum 10 kW (typical) |
| Oven Type | Multifunction electric oven with grill |
| Hob Type | 4-zone ceramic hob (or solid plates, assumed ceramic) |
| Oven Functions | Convection, bottom heat, top heat, grill, defrost, pizza mode |
| Cleaning | Standard enamel interior; easy-clean surface |
| Safety Features | Child lock, automatic shut-off, residual heat indicator |
| Spare Parts | Available through authorized service centers; includes heating elements, knobs, glass door |
| Reparability | Repairable with common tools; service manual available |
| Warranty | Standard 1-2 years (check local policy) |
| Energy Efficiency Class | A (typical for electric cookers) |
Frequently Asked Questions - PHD 4313 S Philco
User questions about PHD 4313 S Philco
0 question about this device. Answer the ones you know or ask your own.
Ask a new question about this device
Download the instructions for your Cooker in PDF format for free! Find your manual PHD 4313 S - Philco and take your electronic device back in hand. On this page are published all the documents necessary for the use of your device. PHD 4313 S by Philco.
USER MANUAL PHD 4313 S Philco
Famous for Quality the World Over
Dear customer,
Thank you for buying a PHILCO brand product. So that your appliance serves you well, please read all the instructions in this user's manual.
CONTENTS
PART 1: IMPORTANT SAFETY INSTRUCTIONS....2
PART 2: DESCRIPTION OF THE CONTROL PANEL .... 5
PART 3: OPERATING THE APPLIANCE....6
- Before first use ....6
- Touch controls ....6
• Turning the appliance on and off....6 - Turning the hotplates on and off....6
• Detection of cookware ....7
• Residual heat indicator....7 - Booster function....7
- Timer function ....7
• Automatic cooking....8 - Pause function ....8
- Memory 9
- Keep warm function....9
• Control panel lock 9
• Principle of induction....9 - Suitable cookware....10
• Saving energy 11
PART 4: CLEANING AND MAINTENANCE....12
PART 5: INSTALLING THE APPLIANCE....13
• Safety precautions....13
- Selecting the installation location....13
- Positioning the cooktop on the workbench 14
Electrical connection....15
PART 6: TROUBLESHOOTING .... 16
PART 7: TECHNICAL SPECIFICATIONS....19
EN - 1
PART 1: IMPORTANT SAFETY INSTRUCTIONS
Recommendation:
Carefully read these instructions before installing and operating this appliance. Write down the serial number found on the rating label of the oven in the space below. It is essential that you store this user's manual in a safe place so that you can use it in the future. If you intend to sell the appliance, give it to another owner, or if you move, always make sure that the user's manual is attached to the appliance, so that the new owner can learn about the operation of the appliance and the relevant warnings.
SERIAL NUMBER:
Basic safety instructions
• Take the appliance out of the packaging. Check that you have removed all advertising and promotional labels before first use.
• After unpacking, check the appliance for damage, also check the power cord for damage, if appropriate. Do not install a damaged appliance or an appliance with a damaged power cord. Contact an authorised service centre.
• We recommend that you keep the packaging materials at least for the warranty period.
• This appliance is designed for household use in the home.
- Only use the appliance for the purpose of heating or cooking food; do not use for other purposes than for which it is designed (e.g. heating a room).
- The Manufacturer, importer take no responsibility for damages caused by inappropriate, incorrect or negligent use.
- Do not use the appliance for cutting or chopping food (e.g. bread). The glass surface of the appliance must not be used as a work surface.
- Do not use cookware that could scratch or damage the surface of the appliance.
- Only connect the appliance to a properly grounded circuit that conforms to valid electrical safety codes. If you are not sure whether the used electrical circuit is properly grounded, please contact a qualified electrician.
- Do not subject the power cord to excessive pressure during the installation and placement of the device, or to extreme temperatures.
• Under no circumstances should you replace the power cord yourself. All maintenance must be performed by a qualified electrician with the power cord disconnected.
- Do not use adapters, multi-socket adapters or extension cords.
• Built-in appliances may only be used when installed into a suitable unit that conforms to relevant standards.
- If you hear a cracking sound coming from the appliance, turn it off and disconnect it from the power socket to prevent potential injury by electrical shock.
• We recommend that you install a smoke detector and that you locate fire blankets or fire extinguishers near the appliance.
• The appliance may heat up during operation, prevent small children from coming close to the appliance.
- This appliance must not be used by any persons (including children) with mental disabilities, weak strength or by inexperienced persons, unless they have been properly trained or schooled in the safe use of the product, or unless they are properly supervised by a qualified person who is responsible for their safety.
• Children should always be supervised so as not to play with the appliance.
EN - 2
Safety instructions for use
- Do not place any metal items or flammable materials such as knives, forks, spoons, wiping cloths or pot lids, etc. near the cooking surfaces as they may heat up or catch on fi re.
- Do not place empty cookware on cooking surfaces when they are turned on, or use the surfaces without cookware.
- Only use cookware designed for this type of appliance.
- Do not leave the appliance turned on without supervision, especially when cooking with fat or oil. In the event of burns, a sudden ignition could occur.
- Pay increased attention when another turned on appliance (e.g. an iron) is used near the turned on appliance and check that the power cord is not touching or near the cooking surfaces.
- Do not place cookware with a wet base on to the hot hotplates. There is a danger of damaging the cookware and the surface treatment of the cooktop.
- If liquid is spilled from the cookware and comes into contact with a hot hotplate, pressurised steam may be created. Risk of skin burns or damage to the cooktop. Carefully wipe the liquid off the cooktop using a dry wiping cloth.
- Check that the appliance is properly turned off if you will not be using it.
- Only use cookware that is suitable and designed for this type of appliance. Such cookware for induction appliances should be clearly marked by the manufacturer.
• Do not use flammable substances (alcohol, petrol) near the appliance when using it. - You may hear a quiet sound when the appliance is turned on. This is normal.
• If the appliance is not used according to the here provided instructions, there is a risk of skin burns.
IMPORTANT
Leave a ventilation opening of at least 5 mm between the workbench and the front part of the component located underneath it.
Cleaning and repairs
• Ensure that the appliance is turned off and that it has cooled down completely before cleaning it.
- Do not use steam cleaners for cleaning.
• Do not use coarse or aggressive cleaning agents as they could damage the surface of the appliance.
- For cleaning, use only special agents designed for glass ceramic cooktops.
- Keep the appliance clean to extend its lifetime.
- If the appliance needs servicing or repairs that requires the removal of the cover, please contact an authorised service centre or another qualified person.
- Under no circumstances should you attempt to repair the appliance yourself.
- Neither the manufacturer, importer nor the distributor take any responsibility for damage resulting from incorrect installation or connection.
Avoid the following
The base of the used cookware
A course base can scratch the cooktop. Do not turn on the cooktop with empty cookware. This could cause damage.
Hot cookware
Never move hot pots or pans on to the control panel or the frame of the cooktop.
Salt, sugar and sand
Salt, sugar and sand can scratch the cooktop. Do not use the cooktop as a workbench or as storage space.
Hard and pointed items
Hard or pointed items can damage the cooktop.
Boiled over food
Sugar and similar foods may damage the cooktop.
Plastic and foils
Aluminium foils and plastic containers will melt on hot hotplates.
Cleaning agents
Cleaning agents that are not designed for glass ceramic cooktops may leave irremovable stains on the surface of the cooktop
PART 2: DESCRIPTION OF THE CONTROL PANEL
Description of the control panel

flowchart
graph TD
    A["Timer display"] --> B["Hotplate button"]
    B --> C["Power on display"]
    C --> D["Keep warm button"]
    C --> E["On / Off indicator light"]
    D --> F["0/I"]
    E --> F
    F --> G["On / Off button"]
    H["Timer indicator light"] --> I["8."]
    I --> J["8."]
    J --> K["Pause/resume indicator light"]
    K --> L["P II"]
    L --> M["Booster button"]
    L --> N["Pause/resume button"]
    O["Power selection and timer setting zone"] --> P["u"]
    P --> Q["0/I"]
    Q --> R["On / Off button"]
    S["Timer indicator light"] --> T["8."]
    T --> U["8."]
    U --> V["Pause/resume indicator light"]
    V --> W["P II"]
NOTE: Due to continuous development, the presented picture may differ from the actual model.
Shown on the display
| Display Meaning Function | ||
| 0 Zero Hotplate is activated. | ||
| 1...9 Power level Selecting a power level | ||
| U_Pan detection No pan or inadequate pan. | ||
| A Thermal accelerator Automatic cooking | ||
| E Error message Electronic error | ||
| H | Residual heat | The hotplate is still hot even after it is turned off. |
| P Booster function The Booster function is activated. | ||
| L | Lock Control panel lock | |
| U Keep warm function Automatically maintains temperature at 42 °C | ||
| II | Stop & Go function | The operation of the cooktop is paused. |
PART 3: OPERATING THE APPLIANCE
Before fi rst use
Before first use, wipe the cooktop with a clean wiping cloth and wipe dry using a dry wiping cloth. Do not use any cleaning agents, there is a risk of a fine blueish coat forming on the cooktop, which is very difficult to remove.
Touch controls
The hotplate is equipped with electronic controls with touch buttons. The respective function is activated when a button is touched. This is accompanied by an indicator light, a letter or number on the display and a sound is made.
Turning the appliance on and off
To turn on the appliance, press the button 0/1 once. "0" will appear on the display.
To turn off the appliance, press the button 0/I once. The display will turn off and "H" will appear.
Turning a hotplate on and off
To set the power level using your fingers, slide across the power selection zone to the right to increase power or to the left to decrease power.
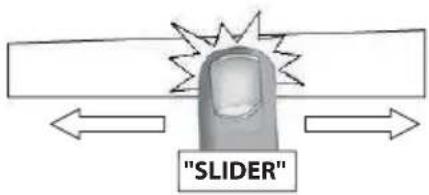
To turn off the hotplate, slide your finger along the power selection zone until 0 or H appears on the display.
Likewise, you can set the power level of the hotplate by directly marking the location on the power selection zone.

NOTE:
You can set the timers in the same way as the hotplate power level settings.
If you do not press any button for 20 seconds, the hotplates will return to the stand-by mode.
EN-6
Detection of cookware
The detection of cookware function ensures the safe operation of the cooktop. The induction cooktop will not function if:
- there is no cookware on the hotplate or if the cookware is not suitable for use on an induction cooktop. In such a case, it will not be possible to set a power level and the display will show "U". The symbol will disappear when you place the correct type of cookware on the hotplate.
- remove the cookware from the hotplate, operation will be ended. The display will show "U". This symbol will disappear when you place the cookware back on to the hotplate. The cooking process will continue at the set power level.
After finishing cooking, turn off the hotplate. Do not allow the detection of cookware function to be activated unnecessarily.
Residual heat indicator
The appliance is equipped with a residual heat function. If the temperature of the hotplate is higher than 50 °C after it is turned off, the letter "H" will appear on the display, indicating the danger of a hot hotplate. Wait until the indicator (letter H) turns off. Otherwise there exists a risk of burns or a fire.
Booster function
The appliance is equipped with a Booster function [P].
This function shortens the cooking time by setting the maximum power level for 10 minutes. This function is suitable for speeding up the heating of large amounts of liquids or sauces.
To set the Booster function, press the Booster button, the display will show the P symbol.
To turn off the Booster function, slide your finger along the power selection zone until 0 appears on the display or press the "P" symbol.
NOTE:
The cooktop is equipped with the maximum power output. If the booster function is activated, in order for the maximum power level not to be exceeded, the electronic system will automatically set the power of another hotplate to a lower level. "9" will start flashing on the display within a few seconds and then the maximum permitted power level from "6" to "8" will appear.
Timer functions
The timer makes it possible to set the time after which the hotplate will automatically turn off in the range from 1 to 99 minutes.
Setting and adjusting the cooking time
Example: You wish to set 16 minutes at a power level of 7.
Select the respective hotplate, the display will show "00" and an indicator light of the selected hotplate will turn on. Set the power level of the hotplate to 7. To select the timer, press CL on the display and the display will show "00". To set the single digits, slide your finger along the power selection zone until 6 appears on the display. "0" will remain still and "6" will flash. To confirm the single digits, press "06" on the display.
To set the tens, slide your finger along the power selection zone until "1" appears on the display. "1" will flash and "6" will remain still. To confirm the tens, press "16" on the display.
The time is confirmed and the countdown will be started.
Stopping the cooking time
Example: 13 minutes were set to a power level of 7.
To turn off off the power, press the selected hotplate and set the power level from 7 to 0.
To select the timer, press "13" on the display. "13" will appear on the display. To deactivate the single digits, slide your finger along the power selection zone. On the display, "1" will remain still and "0" will flash. To confirm, press "10" on the display.
To deactivate the tens, slide your finger along the power selection zone. On the display, "0" will flash and "0" will remain still. To confirm, press "00" on the display.
Automatic shut off after the cooking time has elapsed
"00" will start flashing on the display and a sound will be made as soon as the timer duration is complete. To cancel the sound signal, press the "00" on the display.
Minute timer
Example: You wish to set 29 minutes.
Turn on the cooktop using button 0/I. The indicator lights will turn on. To select the timer, press "CL" on the display. "00" will appear on the display.
To set the single digits, slide your finger along the power selection zone until 9 appears on the display. "0" will remain still and "9" will flash. To confirm the single digits, press "09" on the display.
To set the tens, slide your finger along the power selection zone until "2" appears on the display. "2" will flash and "9" will remain still. To confirm the tens, press "26" on the display.
After several seconds the indicator light will stop flashing. "00" will start flashing on the display and a sound will be made as soon as the timer duration is complete. To cancel the sound signal, press the "00" on the display.
Automatic cooking
All hotplates are equipped with the automatic cooking function. The selected hotplate will start cooking at full power for a certain time and then automatically reduce the power to a preset power level.
Select the hotplate by pressing the respective button. "0" will appear on the selected hotplate and an indicator light will turn on.
To set the full power level, slide your finger along the power selection zone until "9" appears on the display.
To activate the automatic cooking function, press the power selection zone again in the location of the "9" and the symbols "9" and "A" will start flashing on the display.
To set the power level, slide your finger along the power selection zone until "7" appears on the display. Then "7" and "A" will flash.
To turn off the function, select the hotplate and press "7". Then move your finger along the power selection zone from 1 to 9.
Pause function
This function makes it possible to temporarily turn off a hotplate and to turn it on again to the initial setting.
To turn on the function, press the II button for approximately 2 seconds. The display will show II. To turn off the function, press the II button for approximately 2 seconds and use the power selection zone. The previous setting will appear.
Memory
After turning off the cooktop using the 0/1 button, it is possible to renew the last setting, i.e.:
- settings of all hotplates;
- minutes and seconds of timers on selected hotplates;
- keep warm function.
To renew the last settings, turn on the cooktop using the 0/1 button and then press the ll button before the indicator light stops fl ashing. The last settings will be renewed.
Keep warm function
This function enables the cooktop to reach and automatically maintain a temperature of approximately 70^ . In this way it prevents pots from boiling over as well as the burning of food.
Select a hotplate and "0" to "9" or "H" will appear on the display.
To activate the keep warm function, press the U button on the power selection zone, the display will show "U". To deactivate the function, press the "U" button on the selected display. Then set the power level to "0" to "9" or "H".
This function can be activated independently for each hotplate.
The function will remain activated for approximately another 10 minutes after cookware is taken off the hotplate.
The maximum time that can be set for the keep warm function is 2 hours.
Control panel lock
The appliance is equipped with a control panel lock function, which prevents accidental or undesirable changes from being made on the hotplate control panel or the timer.
To activate the lock, turn on the appliance using the 0/I button. Simultaneously press the "P" and "O" buttons on the right hotplate display, then press the display of the right hotplate again. "L" will appear on the display.
To deactivate the lock, simultaneously press the "P" and "L" button on the right hotplate display. Then press "P".
Principle of induction
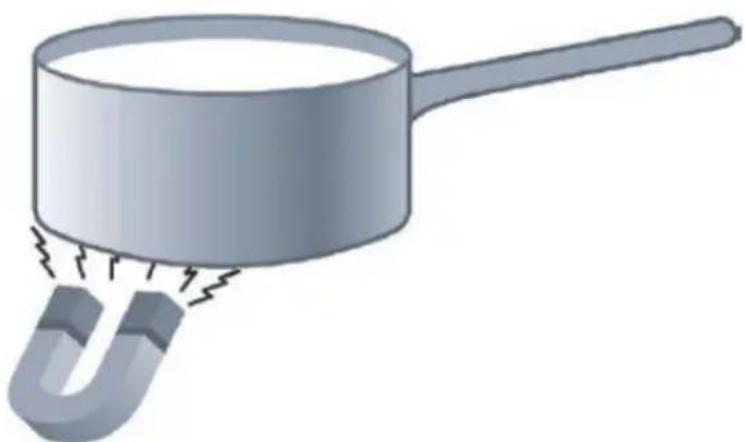
An induction coil is located under each hotplate. When it is turned on, it creates a variable electromagnetic field, which produces induction current in the ferromagnetic bottom part of the pot. The result is that the bottom of the pot located on the hotplate is heated. For proper operation, it is necessary that the cookware is ferromagnetic (you can verify this using a small magnet), ideally cast iron, steel, enamelled, stainless steel with a ferromagnetic base.
Conversely, unsuitable cookware materials are copper, pure stainless steel, aluminium, glass, wood, ceramics, stone, etc.
The hotplate on the induction cooktop automatically adjusts to the size of the cookware. However, this will not work for cookware with a diameter that is too small. The diameter of the cookware depends on the diameter of the hotplate. If the cookware is not detected by the hotplate, U will appear on the display.
Suitable cookware
Do not use cookware that has a coarse base because this base could scratch the glass ceramic surface. Suitable cookware should have a thick flat base. Before using and placing the cookware on the cooktop, check that the base is clean and dry.
Place the cookware on the hotplate before turning it on.
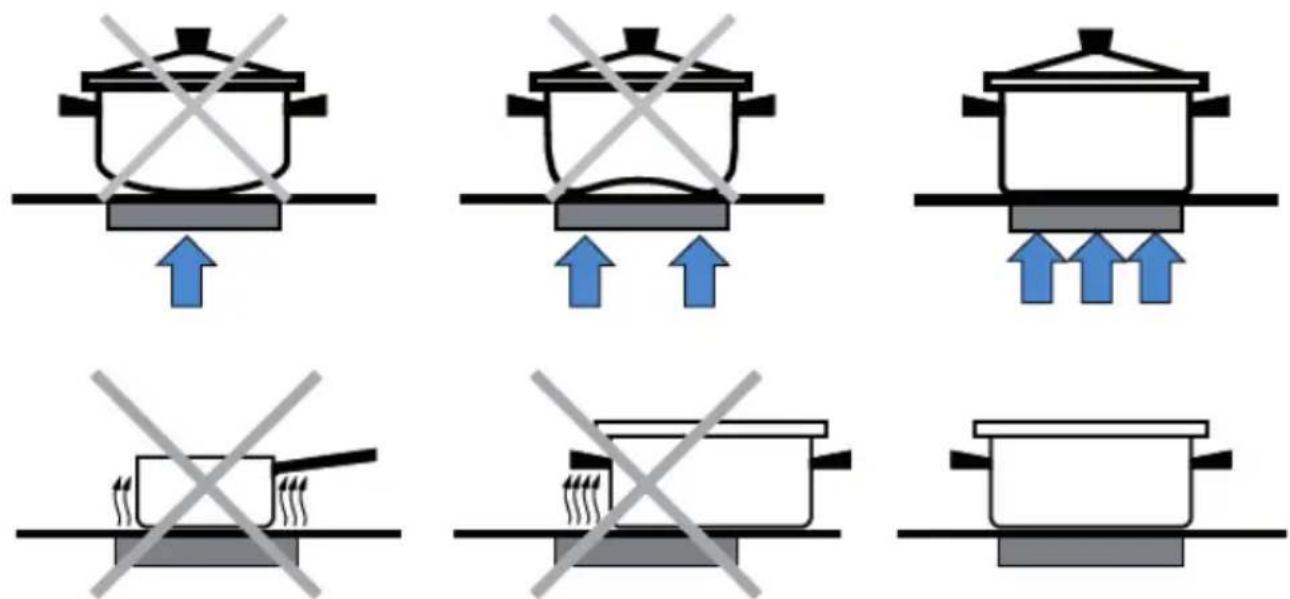
Always use a lid on the cookware. The cookware base should not be smaller or larger than the diameter of the hotplate. To prevent wasting energy, the cookware should be at least as large as the hotplate - see picture below.
natural_image
Illustration of a magnifying glass pouring liquid into a U-shaped magnet with magnetic field lines (no text or symbols)Energy savings
- Place the cookware on the hotplate before turning it on. If you turn on the hotplate before placing the cookware on it, the hotplate will not turn on and the display will show.
• To reduce the cooking time, use a lid. - As soon as the liquid starts to boil, lower the temperature.
- To shorten the cooking time, reduce the amount of water and fat to a minimum.
- Select the respective temperature for the given type of food.
NOTE:
Quality metal cookware is suitable for induction cooktops. Use a magnet to check whether the cookware is suitable for induction cooking. If the magnet is attracted, the cookware is suitable for induction cooking. If the magnet is repulsed then do not use such cookware.
Examples of power settings
(only a recommendation)
| 1 - 2 | Melting Heating | Sauces, butter, chocolate, gelatine |
| 2 - 3 | Mild heating Defrosting | Rice, pudding, sugar syrup, dried vegetables, fi sh, frozen products |
| 3 - 4 Steam cooking Vegetables, fi sh, meat | ||
| 4 - 5 Water For potatoes, soups, pasta, fresh vegetables | ||
| 6 - 7 Medium heat Meat, eggs, smoked goods, goulash, roulades, off al | ||
| 7 - 8 Cooking Potatoes, frying | ||
| 9 Frying, grilling, boiling water Steaks, omelettes, fried meals, water | ||
| Booster Frying, grilling, boiling water Steaks, omelettes, fried meals, water | ||
PART 4: CLEANING AND MAINTENANCE
Before cleaning, check that the appliance is turned off, the power cord is disconnected from the power socket, or if appropriate the circuit breaker to which the appliance is connected is disengaged.
Clean the cooktop before every use. This will prevent food remains from baking on.
For cleaning use special cleaning agents for glass ceramic cooktops, which can be used even if the cooktop is still warm. Rinse and wipe dry using a clean wiping cloth or paper towel.
You can use a special scraper for the removal of baked on food. Sticky food (e.g. sugar) must be removed immediately after being spilled, before the surface cools down.
The scraper is equipped with a razor blade that is very sharp. Be careful when using the scraper. Keep out of the reach of children.
To remove baked on food, moisten a soft sponge and remove the baked on food using the moistened soft sponge.
Do not use abrasive sponges, steel wool, caustic cleaning agents, cleaning agents in sprays or any sharp items to clean the surface of the cooktop.
Do not use a steam cleaner to clean away food.
Regular maintenance will extend the lifetime of your cooktop.
PART 5: INSTALLING THE APPLIANCE
Safety precautions
- The appliance MUST be installed in the correct manner from the technical point of view and in accordance with this installation manual and according to valid local legal codes. The person performing the installation is responsible for any damages caused by an inadequate installation.
- The appliance must only be connected by an authorised technician, who must follow the provisions of the power company in the installation location.
- With respect to protection, the appliance is a type I and may only be put into operation if the connection is properly grounded.
- Serious injuries may result if this appliance is not correctly connected to a grounding clamp or is put into operation without professional installation. The manufacturer is not responsible for incorrect use and possible damages caused by an incorrect electrical installation.
- With respect to electrical protection, it is necessary to install type B or C fuses.
- If the appliance is not equipped with a plug, then it is necessary to install suitable means for disconnecting it from the electricity grid in accordance with valid local installation codes.
- The power cord must be guided in such a way that it does not touch the hot parts of the cooktop or a stove.
- Induction cooktops can only be installed above ovens with ventilation from the same manufacturer.
- A refrigerator, dishwasher, stove without ventilation or washing machine may not be installed under the cooktop.
- If the cooktop is installed above a drawer, metal items located inside the drawer space could become heated to a high temperature by the air circulation coming from the cooktop ventilation, so for this reason we recommend the use of a partition panel.
- For a suitable partition panel you can use a wooden board or purchase adequate accessories.
- Any tampering with the appliance, including the replacement of the power cord may only be performed by an authorised service centre.
ATTENTION:
Neither the manufacturer, importer nor the distributor take any responsibility for damage resulting from incorrect installation or connection.
Selecting the installation location
- Do not place any other appliance in the area up to 65~cm above the appliance.
- A range hood must be installed according to the range hood manufacturer's instructions.
• The wall in the rear part of the installed cooktop must be made from an inflammable material. - The length of the power cord must not exceed 2 metres.
Requirements for the workbench
- The workbench must be straight and located horizontally. Perform the cut-outs into the built-in furniture prior to installing the appliance. Remove all splinters and wood shavings otherwise a malfunction of the electrical components could occur. At the same time ensure that after performing the cut-out works, the stability of the furniture is not compromised.
- The surfaces of the cuts need to be treated so that they are resistant against temperature and moisture (they could start swelling).
• Furniture intended for built-in appliances must be resistant to temperatures of up to 100°C.
- The minimum distance from the cut-out to the side wall must be: 40 mm. Do not locate the cooktop between two side walls. If it is located in such a way, it is necessary to maintain a minimum distance of 200 mm from one of the side walls.
• The minimum thickness of the workbench into which the installation is made is:
- 30 mm if the installation is above an oven:
- 20 mm if the installation is without an oven or above a drawer.
- For the ventilation of the cooktop, provide an opening in the top part of the rear wall of the furniture with a width of 45 mm and a 20 mm gap between the rear wall of the furniture and the kitchen wall. If you will be installing the cooktop above a drawer, it is necessary to maintain a minimum distance of 65 mm between the drawer and the top part of the workbench.
Positioning the cooktop in the workbench
Take the appliance out of the packaging and remove all advertising and promotional materials to check that the appliance is not damaged. If the appliance is damaged or the power cord is damaged, do not use the appliance and contact an authorised service centre.
Cut-out dimensions: 420 x 490 mm. Cut out an opening with the corresponding dimensions.
Apply single sided tape around the bottom edge of the cooktop - see picture below. Do not stretch too much.

Insert the cooktop into the cut-out hole in the workbench.
To ensure cooling, before inserting the oven, it is necessary to remove the rear kitchen panel in the location where the oven is opened. The front part of the kitchen part must have a hole no smaller than 5mm .
ATTENTION:
Under no condition should you glue this glass ceramic cooktop!
EN - 14
Electrical connection
Before connecting the electrical wiring check that:
- The voltage indicated on the rating label of the appliance (in the rear part) is the same as the voltage in your power socket.
- The circuit into which the appliance will be connected must cover the load of the given appliance (see rating label).
• The power supply must be grounded in accordance with stipulated valid codes and must be in good condition.
• The circuit breaker to which the appliance is connected must remain easily accessible. - If neither the respective electrical circuit or circuit breaker are available, it is necessary to have one installed by a qualified electrician before installing and connecting the appliance.
The electrical wiring connection may only be performed by an authorised service centre or by an electrical technician registered for this purpose!
An incorrect connection will lead to irreparable damage of the device, which may subsequently not be acknowledged in a warranty claim.
Before connecting, have the voltage in your grid checked to ensure that it conforms to the voltage on the rating label.
The consumer's connecting voltage (230 V against N) must be verified by a technician using a measuring device. The length of the power cord must be 1.5 m so that you can connect the device prior to moving it towards the wall. Protective electrical lines must be performed according valid codes and norms.
The appliance may only be connected to a 230 V \~ 50/60 Hz power grid.
Only connect the appliance to a grounded power socket. Follow the electrical wiring instructions. The terminal box is located under the rear part of the appliance. Use a screwdriver to open it up.
| Power socket Connections | Power cord diameter | Power cord Protection fuse | |
| 230 V ~ 50/60 Hz 1 phase | + N 3x 2.5 mm ^2 | H05 VV-FH05 RR-F25 A* | |
| 400 V ~ 50/60 Hz 2 phases | + N 4x 1.5 mm ^2 | H05 VV-FH05 RR-F16 A* |
* calculated concurrently with the factor according to the norm EN 60 335-2-6/1990
Connecting the cooktop
Setting the configuration:
For various types of connections, use brass jumpers located in the cabinet next to the terminals.
Monophase 230V\~1P+N
Put a bridge between terminal 1 and 2 and between terminal 3 and 4. Attach the earth to the terminate "earth", the neutral N to one of the terminals 3 or 4 and the Phase L to one of the terminals 1 or 2.
Biphase 400V\~2P+N
Attach the earth to the terminate "earth", the neutral N to one of the terminals 3 or 4, the Phase L1 to the terminals 1 and the Phase L2 to the terminal 2.
Warning:
Frequent tightening and releasing of screws may damage the effectiveness of the tightening of once tightened screws. We recommend that you handle the screws as little as possible to prevent damaging their threads.
Check that the screws are correctly inserted and tightened.
PART 6: TROUBLESHOOTING
Error message E4
Before performing the steps described below, ensure that:
- there is no cookware located on the hotplate;
- take a pot with a ferromagnetic base with a diameter of at least 16 cm;
- disconnect the appliance from the power grid by removing the fuse or disengaging the circuit breaker;
- after 2 minutes, reconnect to the grid and start the corrective process;
- do not use the 0/1 button.
Step 1
- Press and hold the number 2 on the picture shown below. "-" will appear on all LCD displays.
- At the same time, use your other hand to gradually briefly and quickly press every button of every hotplate in the sequence shown in the illustration below from a to d.
A double beep indicates that an error has been identified. If this occurs, start again from point 1.

flowchart
graph TD
    A["①"] --> B["SLIDER"]
    B --> C["②"]
    C --> D["③"]
    D --> E["③"]
    E --> F["②"]
    F --> G["③"]
    G --> H["②"]
    H --> I["③"]
    I --> J["③"]
    J --> K["②"]
    K --> L["③"]
    L --> M["③"]
    M --> N["②"]
    N --> O["③"]
    O --> P["③"]
    P --> Q["②"]
    Q --> R["③"]
    R --> S["③"]
    S --> T["②"]
    T --> U["③"]
    U --> V["③"]
    V --> W["②"]
    W --> X["③"]
    X --> Y["③"]
    Y --> Z["②"]
    Z --> AA["③"]
    AA --> AB["③"]
    AB --> AC["②"]
    AC --> AD["③"]
    AD --> AE["③"]
    AE --> AF["②"]
    AF --> AG["③"]
    AG --> AH["③"]
- Remove your fingers from the control buttons and press the button under number 1 on the picture for several seconds until the symbol E starts flashing.
- Wait until the symbol E stops flashing.
- Wait several more seconds, symbol E will automatically change to C. The existing setting has been cancelled.
NOTE:
On induction cooktops with 3 cooking zones there is no rear right hotplate (b) present, therefore it is necessary to press the front right hotplate (a) twice, i.e. a - a - c - d.
Step 2
New settings.
- Take a pot with a ferromagnetic base with a diameter of at least 16 cm;
- Select a hotplate by pressing the button for its selection.
- Place the pot on the selected hotplate.
- Wait until the symbol C changes to "-"The selected hotplate will be configured.
- Proceed in the same manner with all the hotplates with the symbol C.
- The hotplates will be configured as soon as the displays turn off.
EN - 16
NOTE:
Use the same pot for all the hotplates.
Never place multiple pots on to the hotplates at the same time during the configuration.
If the problem persists, please contact an authorised service centre.
The cooktop or a hotplate did not turn on.
- The cooktop is incorrectly connected to the power grid.
- The protective fuse is disengaged.
- The lock function is activated.
- The touch buttons are coated with a layer of grease or water.
- There is a foreign object on the buttons.
The symbol U is shown on the control panel display.
- There is no cookware located on the hotplate.
- The cookware on the hotplate is not suitable for induction cooktops.
- The size of the base is too small.
The symbol C or E is shown on the control panel display.
- Disconnect and reconnect the appliance.
- Contact an after-sales service centre.
One or all the hotplates are not working.
- The safety system was activated.
- You forgot to turn off the hotplates for a long time.
- One or more touch buttons are covered.
- The cookware is empty and its base is overheated.
- The cooktop is also equipped with an automatic power level reduction function and an overheating protection fuse.
Continuous ventilation after the cooktop is turned off.
- This is not a fault, the fan protects the electrical components from overheating.
- The fan will stop automatically.
Automatic cooking did not start.
- The hotplate is too hot (H symbol).
- It is set to the highest cooking temperature (9).
The symbol L is shown on the display.
- See subchapter Lock.
The symbol U is shown on the display.
- See subchapter Keep warm.
The symbol / or Er03 is shown on the control panel display.
- An item or liquid is covering the control buttons. The symbol will disappear as soon as the buttons are cleared or cleaned.
The symbol E2 is shown on the control panel display.
- The cooktop is overheated, allow it to cool down and then turn it on again.
The symbol E3 or E7 is shown on the control panel display.
- The used cookware is not suitable. Use different cookware.
If any of the symbols persist, please contact an authorised service centre.
PART 7: TECHNICAL SPECIFICATIONS
| MODEL PHD 4313S | |
| Front left hotplate | Diameter: 200 mmNominal power output 2,300 WBooster 3,000 W |
| Back left hotplateRight hotplate | Diameter: 180 mmNominal power output 1,100 WBooster 1,400 W |
| Timer Yes | |
| Pot detection Yes | |
| Booster Yes | |
| Total power input 5,800 W | |
| Residual heat indicator Yes | |
| Child safety lock Yes | |
| Automatic shut off | Yes |
| Shut off after overflow Yes | |
| Stop & Go function | Yes |
| Voltage | 220/240 V ~ 50/60 Hz |
NOTE: All the here provided data is subject to change.
INSTRUCTIONS AND INFORMATION REGARDING THE DISPOSAL OF USED PACKAGING MATERIALS
Dispose of packaging material at a public waste disposal site.
DISPOSAL OF USED ELECTRICAL AND ELECTRONIC APPLIANCES
The meaning of the symbol on the product, its accessory or packaging indicates that this product shall not be treated as household waste. Please, dispose of this product at your applicable collection point for the recycling of electrical & electronic equipment waste. Alternatively in some states of the European Union or other European states you may return your products to your local retailer when buying an equivalent new product. The correct disposal of this product will help save valuable natural resources and help in preventing the potential negative impact on the environment and human health, which could be caused as a result of improper liquidation of waste. Please ask your local authorities or the nearest waste collection centre for further details. The improper disposal of this type of waste may fall subject to national regulations for fi nes.
For business entities in the European Union
If you wish to dispose of an electrical or electronic device, request the necessary information from your seller or supplier.
Disposal in other countries outside the European Union
If you wish to dispose of this product, request the necessary information about the correct disposal method from local government departments or from your seller.

This product meets all the basic EU regulation requirements that relate to it.
Changes to the text, design and technical specifications may occur without prior notice and we reserve the right to make these changes.
INDUKČNÍ SKLOKERAMICKÁ VARNÁ DESKA
NÁVOD K OBSLUZE
PHILCO

Famous for Quality the World Over
Vážený zákazníku
natural_image
Illustration of a magnifying glass pouring liquid into a U-shaped magnet with magnetic field lines (no text or symbols)Úspora energie
Famous for Quality the World Over
Vážený zákazník
natural_image
Illustration of a magnifying glass pouring liquid into a U-shaped magnet with magnetic field lines (no text or symbols)Úspora energie

- CONTENTS
- PART 1: IMPORTANT SAFETY INSTRUCTIONS
- Recommendation:
- SERIAL NUMBER:
- Basic safety instructions
- EN - 2
- Safety instructions for use
- IMPORTANT
- Cleaning and repairs
- Avoid the following
- The base of the used cookware
- Hot cookware
- Salt, sugar and sand
- Hard and pointed items
- Boiled over food
- Plastic and foils
- Cleaning agents
- PART 2: DESCRIPTION OF THE CONTROL PANEL
- PART 3: OPERATING THE APPLIANCE
- Before fi rst use
- Touch controls
- Turning the appliance on and off
- Turning a hotplate on and off
- Detection of cookware
- Residual heat indicator
- Booster function
- NOTE:
- Timer functions
- Setting and adjusting the cooking time
- Stopping the cooking time
- Automatic shut off after the cooking time has elapsed
- Minute timer
- Automatic cooking
- Pause function
- Memory
- Keep warm function
- Control panel lock
- Principle of induction
- Suitable cookware
- Energy savings
- Examples of power settings
- PART 4: CLEANING AND MAINTENANCE
- PART 5: INSTALLING THE APPLIANCE
- Safety precautions
- ATTENTION:
- Selecting the installation location
- Requirements for the workbench
- Positioning the cooktop in the workbench
- Electrical connection
- The electrical wiring connection may only be performed by an authorised service centre or by an electrical technician registered for this purpose!
- Connecting the cooktop
- PART 6: TROUBLESHOOTING
- Error message E4
- Step 1
- Step 2
- EN - 16
- The cooktop or a hotplate did not turn on.
- The symbol U is shown on the control panel display.
- The symbol C or E is shown on the control panel display.
- One or all the hotplates are not working.
- Continuous ventilation after the cooktop is turned off.
- Automatic cooking did not start.
- The symbol L is shown on the display.
- The symbol U is shown on the display.
- The symbol / or Er03 is shown on the control panel display.
- The symbol E2 is shown on the control panel display.
- The symbol E3 or E7 is shown on the control panel display.
- PART 7: TECHNICAL SPECIFICATIONS
- INSTRUCTIONS AND INFORMATION REGARDING THE DISPOSAL OF USED PACKAGING MATERIALS
- DISPOSAL OF USED ELECTRICAL AND ELECTRONIC APPLIANCES
- For business entities in the European Union
- Disposal in other countries outside the European Union
- INDUKČNÍ SKLOKERAMICKÁ VARNÁ DESKA
- PHILCO
- Úspora energie
Brand : Philco
Model : PHD 4313 S
Category : Cooker