
CRM 2122 - Car radio HYUNDAI - Free user manual and instructions
Find the device manual for free CRM 2122 HYUNDAI in PDF.


| Product Type | Car Stereo with CD/MP3 Player |
| Brand | Hyundai |
| Model | CRM 2122 |
| Dimensions (W x H x D) | 178 x 50 x 155 mm |
| Weight (Netto) | 1.74 kg |
| Power Supply | 12V DC (11–16 V), negative ground |
| Maximum Power Output | 45 W x 4 channels |
| Continuous Power Output | 22 W x 4 channels (4 Ω, 10% THD) |
| Suitable Speaker Impedance | 4–8 ohm |
| Pre-Amp Output Voltage | 2.0 V (CD play mode: 1 kHz, 0 dB, 10 kΩ load) |
| Fuse | 15A |
| FM Frequency Range | 87.5–108.0 MHz (Europe) / 87.5–107.9 MHz (America) |
| AM Frequency Range | 522–1620 kHz (Europe) / 530–1710 kHz (America) |
| Disc Playback | CD, CD-R, CD-RW, MP3 (ISO 9660 compatible) |
| RDS Functions | AF, PS, TA, PTY, EON, CT |
| Anti-Theft System | Detachable faceplate |
| Audio Controls | Volume, Bass, Treble, Balance, Fader; 5-band DSP (Pop, Rock, Classic, Flat, Off) |
| CD Player Signal-to-Noise Ratio | >80 dB |
| CD Player Frequency Response | 20 Hz – 20 kHz |
| FM Stereo Separation | 30 dB (1 kHz) |
| FM Signal-to-Noise Ratio | 55 dB |
| Wiring Connector | ISO connector (supplied); modified wiring for VW/Audi/Opel |
| Reset Button | Yes (erases clock and presets) |
Frequently Asked Questions - CRM 2122 HYUNDAI
User questions about CRM 2122 HYUNDAI
0 question about this device. Answer the ones you know or ask your own.
Ask a new question about this device
Download the instructions for your Car radio in PDF format for free! Find your manual CRM 2122 - HYUNDAI and take your electronic device back in hand. On this page are published all the documents necessary for the use of your device. CRM 2122 by HYUNDAI.
USER MANUAL CRM 2122 HYUNDAI
PŘED UVEDENÍM DO PROVOZU
FM1 -> FM2 -> FM3 -> AM1 -> AM2
Přehrávání disku:

Důležité:
ŘEŠENÍ PROBLÉMŮ
PRED UVEDENÍM DO PREVÁDZKY
FM1 -> FM2 -> FM3 -> AM1 -> AM2
Prehrávanie disku:
AMS: Auto Memory Store (Automatické ukladanie do pamäti)
RDS (RADIO DATA SYSTEM)
POP -> ROCK -> KLASICKÁ HUDBA -> NEUTRÁLNY -> DSP VYPNUTÉ
Režim EPS

Dôležité:
Odtwarzanie płyty:

Ważne:


ROZWIAZYWANIE PROBLEMÓW
- Use only in a 12-volt DC negative-ground electrical system.
Disconnect the vehicle's negative battery terminal while mounting and connecting the unit. - When replacing the fuse, be sure to use one with an identical amperage rating. Using a fuse with a higher amperage rating may cause serious damage to the unit.
- DO NOT attempt to disassemble the unit. Laser beams from the optical pickup are dangerous to the eyes.
- Make sure that pins or other foreign objects do not get inside the unit. They may cause malfunctions, or create safety hazards such as electrical shock or laser beam exposure.
- If you have parked the car for a long time in hot or cold weather, wait until the temperature in the car becomes normal before operating the unit.
- Keep the volume at a level at which you can hear outside warning sounds (horns sirens, etc.).
CD NOTES
- Playing a defective or dusty CD can cause dropouts in sound.
- Hold CDs as illustrated.
- Do not touch the unlabeled side.
- Do not attach any seal, label or data protection sheet to either side of a disc.
- Do not expose a CD to direct sunlight or excessive heat.
- Wipe a dirty CD from the center outward with a cleaning cloth.
- Never use solvents such as benzine or alcohol.
- This unit cannot play 3-inch (8cm) CDs. Never insert a 3-inch CD contained in the
adapter or an irregularly shaped CD. The unit may not be able to eject it, resulting in a malfunction.

Before Operation
- Do not raise the volume level too much, as this will block outside sounds, making driving dangerous.
- Stop the car before performing any complicated operation.
CAUTION
- DO NOT open covers and do not repair yourself. Consult the dealer or an experienced technician for help.
Contents
Safety information 56
Panel Controls 57
Button Tips 58
MP3 Overview 59
MP3 Playback 60.-61
RDS 61.-63
Menu function 64.-65
Electrical Connections 66.-67
Innsation Guide 68
Anti- Theft System 69
Troubleshooting 70.-71
Specifications 71.-72
* In addition to ordinary CDs, this unit can play a CD-R, CD-RW a MP3.
PANEL CONTROLS

Disc playback / 1 - 6 Radio preset
- -Power on -Mute-power off (press more than 2 sec.)
- -Rotate the knob to adjust volume level. -Push to select VOL/BAS/TRE/BAL/FAD, rotate the knob to adjust level. -Push more than 2 seconds to menu mode
- -Panel release
-
-Radio -Disc play (when disc inserted)
-
-AMS: Radio auto preset Radio preset scan -Search:
MP3 track/file/character search 6 -11.-Disc playback - -Play/pause Top play (press more than 2 sec.)
- -Intro play
- -Track repeat play
- -Track random play
- -MP3 track -10 down
- -MP3 track+10 up -Radio preset Press to tune in a preset station. Hold for more than 2 seconds to store station.
-
-Display switch
-
-Band switch: FM1 -> FM2 -> FM3 -> AM1 -> AM2
- -Traffic announcement
- -Program type
- -Alternative frequency
- -Eject
- -Radio tune -Track skip/seek
BUTTON TIPS
Radio:
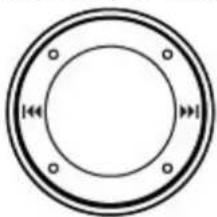
Press ◀ or ▶ briefly to tune in the station that you have known its frequency. Hold more than 2 seconds, tuning will automatically activate and stop when signals of the next station are received.

Disc Playback
Press ◀ or ▶briefly either side of the button to go to the next or previous track. Hold more than 2 seconds to fast forward or reverse back the track.
AMS: Auto Memory Store
Press AMS briefly to scan the preset station 1
-6 for 5 seconds each. Hold more than 2 seconds, the 6 strongest available stations will be automatically saved in memory of preset button 1 - 6.


Display and Set the Clock
- Press DISP button, time displays.
- Press again more than 2 seconds, time blinks, rotate the knob clockwise to set hour, rotate the knob anticlockwise to set minute.
- Press DISP again to confirm.


MP3 OVERVIEW
Note on MP3
- MP3 is short for MPEG Audio Layer 3 and refers to an audio compression technology standard.
- This product allows playback of MP3 files on CD-ROM, CD-R or CD-RW discs.
- The unit can read MP3 files written in the format compliant with ISO 9660. However it does not support the MP3 data written by the method of packet write.
- The unit can not read an MP3 file that has a file extension other than „.mp3“.
- If you play a non-MP3 file that has the „.mp3 „ extension, you may hear some noise.
- In this manual, we refer to what are called „MP3 file“ and „folder“ in PC terminology as „track“ and „album“, respectively.
• Maximum number of directory level is 8, including the root directory.
• Maximum number of files and folders per disc is 1000. - The unit may not play tracks in the order of Track numbers.
- The unit plays only the audio tracks if a disc contains both audio tracks and MP3 files.
- When playing a disc of 8kbps or VBR*, the elapsed playing time in the display window will not be correct and also the intro play may not function properly.
*VBR: Variable Bit Rate.
Note on creating your own CD-Rs or CD-RWs containing MP3 files
- To enjoy high quality sound, we recommend converting to MP3 files with a sampling frequency of 44.1 kHz and a fixed bit rate of 128 kbps.
- Do not store more than 1000 M P3 files per disc.
- For ISO 9660 - compliant format, the maximum allowable depth of nested folders is 8, including the root directory (folder).
- When CD-R disc is used, playback is possible only for discs which have been finalized.
- Make sure that when MP3 CD-R or CD-RW is burned that it is formatted as a data disc and NOT as an audio disc.
- You should not write non-MP3 files or unneeded folders along with MP3 files on the disc otherwise it takes a long time until the unit starts to play MP3 files.
- With some CD-R or CD-RW media, data may not be properly written depending on their manufacturing quality. In this case, data may not be reproduced correctly. High quality CD-R or CD-RW disc is recommended.
- Up to 16 characters are displayed for the name of an album or a track. ID3 TAG version 1.x is required.
- Note that the unit may not play tracks in the order that you wrote them to the disc.
MP3 PLAYBACK
When playing MP3 disc, the folder/file name and ID3 TAG (Song Title, Album and Artist) can scroll entirely across the LCD.
Elapsed playing time & Track number → Folder name & number → File name & number → Song title → Album title → Artist name
MP3 Track Search
Press AMS button twice to select „FILE SCH“ mode.
Press SEL button and LCD display will show „001“.
If your desired track number is less than 100,
rotate the knob to select the first digit and press SEL button once again and rotate the knob to set the tens digit of the track number.
Press SEL button again more than 2 seconds to play the track.
If your desired track number is more than 100,
rotate the knob to select the first digit and press SEL button to confirm, rotate the knob to select the tens digit and press SEL button to confirm rotate the knob to select the hundreds digit and press SEL button to confirm, press SEL button again to
play the track.

* If the track number you enter is
TRK SCH
beyond the maximum file number, the last song will played.
001
MP3 File Search
Press AMS button twice to select „FILE SCH“ mode. Press SEL button to enter. Rotate the knob to select folder. If you just want to play songs of this folder, press SEL button more than 2 seconds to play the first track of the folder. If you want to play desired track of the folder, press SEL button and rotate the knob to select the track you want. Press SEL button again to play the track.
FILE SCH
MP3 PLAYBACK
MP3 Character playback

Press AMS button three times to select "CHAR SCH" mode. Press SEL button and "A" displayed..
If you press SEL button more than 2 seconds, the track which name has "A" will be displayed. Rotate the knob to select the 1st character of the desired track name and press SEL button to confirm. Then "A" flashes at the next place, select 2nd and other character of the desired track name as steps above.
Press SEL more than 2 seconds to play the track of the select name.
For example: To search character „ECHO“.
![graph TD A["CHAR SCH"] --> B["R"] B --> C["EA"] D["ECHO"] --> E["ECHA"] E --> F["ECA"]](/content/2026/05/1003631/images/4d0121fcfb8011cc68294484bfa61fc75546f93a466d2241b3f9bf563b9148d3.jpg)
RDS (RADIO DATA SYSTEM)
RDS Service availability varies with areas. Please understand if RDS service is not available in you area, the following service is not available, either. The following functions are available when receiving RDS stations.
RDS Basics
AF (Alternative Frequency List) When reception is poor, an RDS station broadcasting the same program is tuned in automatically.
PS Display (Program Service name) The name of station is displayed instead of frequency.
AF Mode : Press AF button less than 1 second to switch AF mode on and off.
AF indication on LCD will flash until RDS information is received.
REG Mode : Press AF button more than 1 second to switch REG mode on and off.
The frequency is changed only for programs within the region.
The frequency is changed also for programs outside the region.
During FM mode when AF is on, radio seek, scan and AMS functions can only receive and save RDS program.
BBC P4
REG ON
REG OFF
CT Service (Clock Time)
When receiving.and RDS station, the CT (Clock Time) service automatically adjusts the time. NO CT is displayed in areas where CT service is not available.
NO CT
RDS (CONTINUED)
Traffic Announcements
Some RDS FM stations periodically provide traffic information.
TP ( Traffic Program Identification ) Broadcasting of traffic information
TA ( Traffic Announcements Identification ) Radio announcements on traffic conditions.
TRAF INF
TA Mode: Press TA button to turn on / off TA.
When TA mode is on and TA indicator on LCD is displayed.
When traffic announcement is transmitted, regardless of the mode, reception will begin at volume level 20 if volume level is below 20.
After the traffic announcement is over, it will return to previous mode and volume level.
When TA is turned on, SEEK, SCAN, AMS function can be received or saved when traffic program identification (TP) code is received.
EON (Enhanced Other Networks)
When EON data is received, the EON indicator lights and the TA and AF functions are expanded as follows.
TA: Traffic information from the current and other network stations can be received.
AF: The frequency list of preset RDS stations is updated by EON data. EON enables the radio to make fuller use of RDS information.
It constantly updates the AF list of preset stations, including that currently tuned in to. If you preset a station for from home, you will later be able to receive the same station at an alternative frequency, or any other station serving the same program, EON also keeps track of locally available TP stations for quick receptions.
RDS (CONTINUED)
PTY Reception (Program Type)
RDS FM stations provide a program type identification signal. Example: news, rock, info, sport, etc.
NEWS
PTY Mode: press PTY button to turn PTY on, previous PTY type is displayed and searched if no button is pressed for 2 seconds. If there is no correspond program type, NO PTY is displayed.
PTY Type Preset
Press PTY once to enter MUSIC type or press PTY twice to enter SPEECH type. Then use buttons 1-6 to select the desired program type.
| PRESET NO. MUSIC TYPE SPEECH TYPE | ||
| 1 | POP M | NEWS |
| AFFAIRS | ||
| ROCK M INFO | ||
| 2 | M.O.R. M | SPORT |
| EDUCATE | ||
| LIGHT M DRAMA | ||
| 3 | CLASSICS M | CULTURE |
| SCIENCE | ||
| OTHER M VARIED | ||
| 4 | JAZZ M | WEATHER |
| FINANCE | ||
| COUNTRY M CHILDREN | ||
| 5 | NATIONAL M | SOCIAL |
| RELIGION | ||
| OLDIES M PHONE IN | ||
| 6 | FOLK M TRAVEL | |
| FOLK HOBBIES | ||
| DOCUMENT | ||
MENU FUNCTION
Press the knob more than 2 seconds to enter menu mode, then each press changes the mode as follows:
TA mode -> MASK mode -> TA VOL -> RETUNE mode -> DSP mode -> ESP mode -> MULT ON/OFF -> LOUD ON/OF -> BEEP ON/OF -> SEEK 1/2 mode (only in tuner mode) -> STE-REO/MONO mode -> LOCAL/DX mode -> VOL mode -> A-VOL

TA mode
Rotate the knob to choose TA ALARM or TA SEEK mode, When TAis turned on and no traffic program identification codehas been received during the specified time, no TA/TP is displayed and according to the MENU SELECT, alarm is set off, or TA SEEK is activated. TA ALARM mode : NO TA/TP is displayed and alarm is set off.TA SEEK mode: TA SEEK is activated.
MASK Mode
Rotate the knob to choose MASK DPI or MASK ALL mode.
MASK DPI mode : Only the AF which has different program identification is masked.
MASK ALL mode : The AF which has different program identification and NO RDS signal with high field strength is masked.
TA VOL
Rotate the knob to choose TA volume.
RETUNE mode
Rotate the knob to choose RETUNE-S or RETUNE-L.RETUNE-S or RETUNE-L is time length selection of TA SEEK retune interval.
RETUNE-S: Short, TA SEEK retune interval is 45 seconds.
RETUNE-L: Long, TA SEEK retune interval is 180 seconds. Remark: RETUNE mode functions for TA during TA SEEK mode only.
DSP mode
Rotate the knob to choose DSP sound effect:
POP -> ROCK -> CLASSIC -> FLAT -> DSP OFF
EPS mode
EPS 12 s: Selected as CD-ESP time 12 seconds, MP3-ESP time > 100 seconds.
EPS 45 s: Selected as CD-ESP time 45 seconds, MP3-ESP time > 100 seconds.
MENU FUNCTION
MULT ON/OFF mode
MULT OFF: Mixed CD, one session CD.
MULT ON: Mixed, extra, multi session CD.
LOUD ON/OFF
Rotate the knob to choose loudness on or off.
BEEP ON/OFF
Rotate the knob to choose button beep sound on or off.
SEEK 1 / 2 mode
Rotate the knob to choose radio seek mode 1 or 2.
SEEK 1: Searching station will stop when the next station is received.
SEEK 2: Searching station will stop when ▶ or ◀ button is released and next station is received.
STEREO/MONO mode
Rotate the knob to choose FM stereo or mono.
LOCAL/DX
Rotate the knob to choose tuner sensitivity local or distant.
VOL LAST/ADJUST mode
Press knob to choose V-LAST, the turn-on volume level is the volume level of latest power off. Rotate knob to choose V-ADJ, the turn-on volume level is the setting volume.
A-VOL
Rotate the knob to set the turn-on volume level at V-ADJ mode.
ELECTRICAL CONNECTIONS
Wiring Diagram
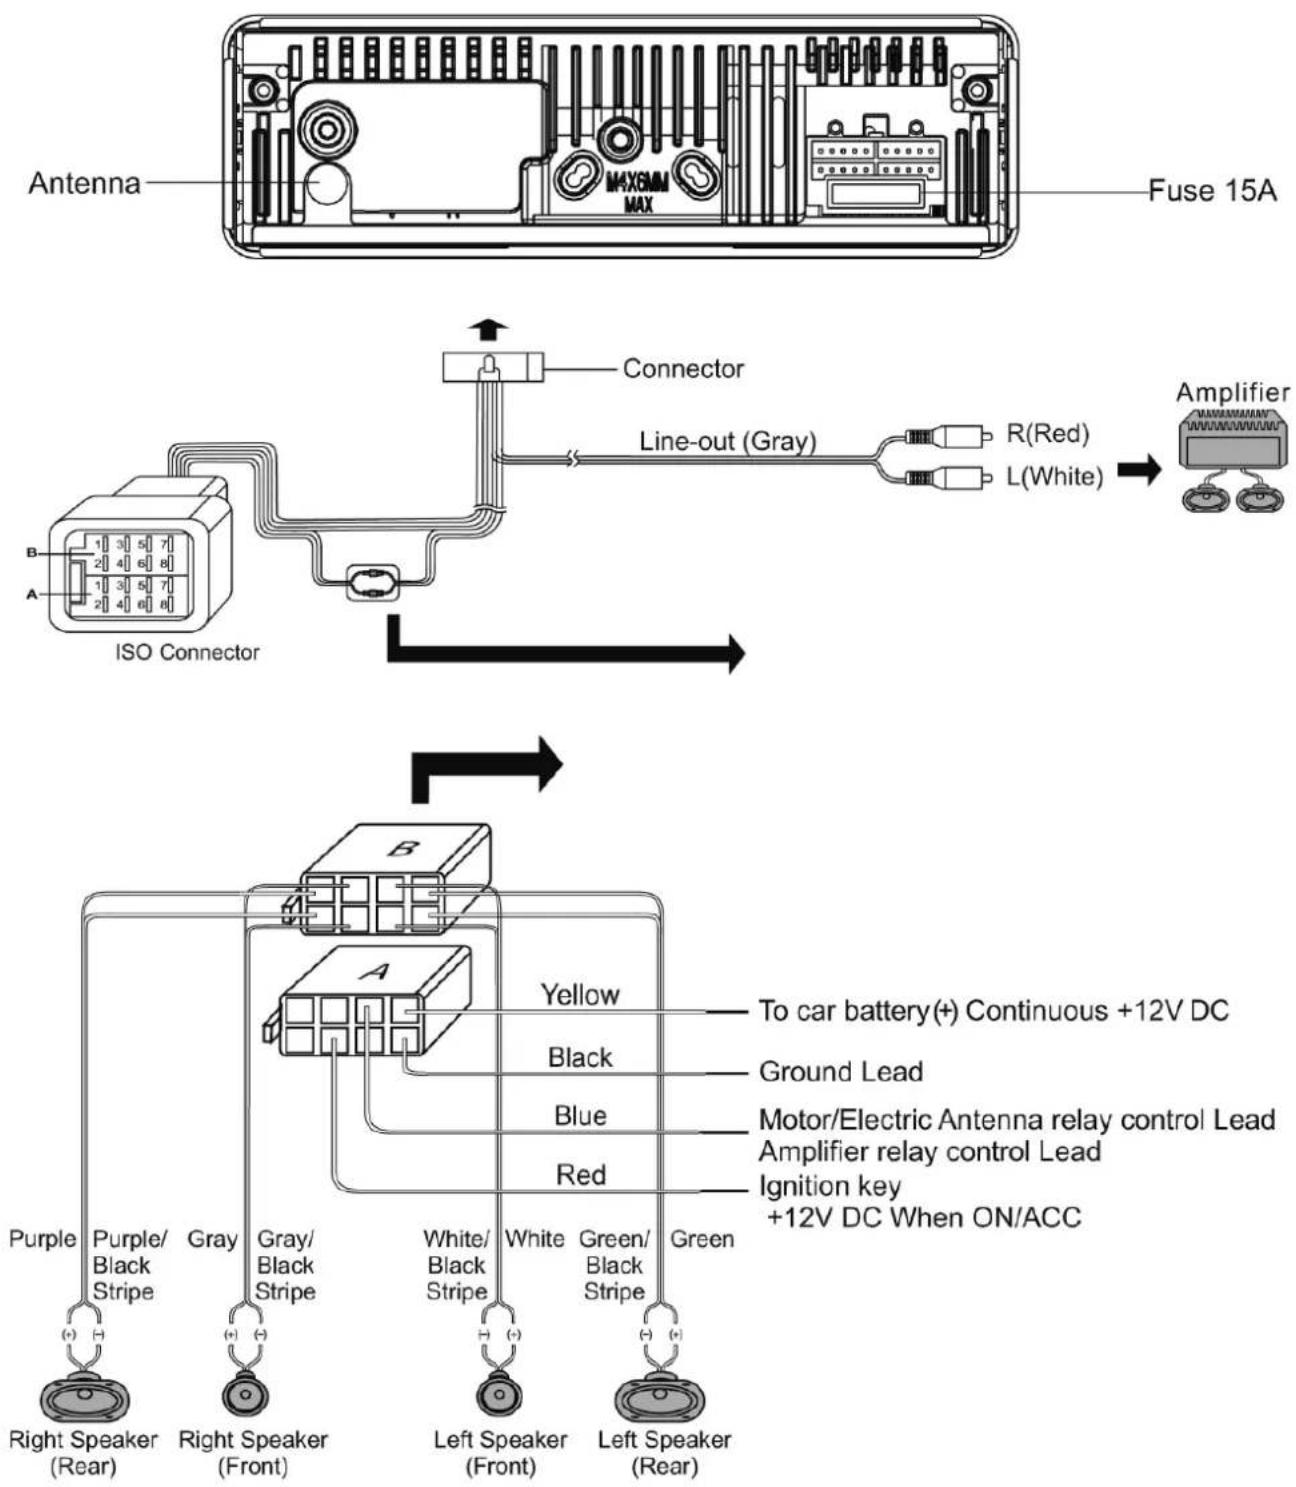
For same VW/Audi or Opel (Vauxhall)
car models, you may need to modify wiring of the supplied power cord as illustrated, or else the memory of the unit may be lost after you power off. Contact your authorized dealer before installing this unit.
Original wiring
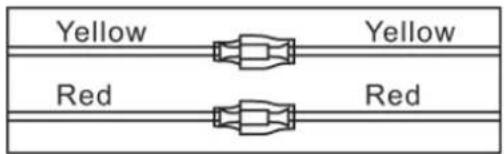
Modified wiring

ELECTRICAL CONNECTIONS
Using the ISO Connector
- If your car is equipped with the ISO connector, then connect the ISO connectors as illustrated.
- For connections without the ISO connectors, check the wiring in the vehicle carefully before connecting, incorrect connection may cause serious damage to this unit. Cut the connector, connect the colored leads of the power cord to the car battery, as shown in the colour code table below for speaker and power cable connections.
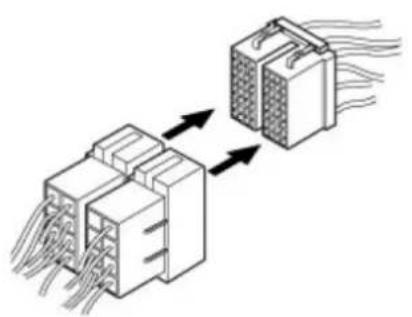

| LOCATION | FUNCTION | |
| Connector A Connector B | ||
| 1 Rear | Right (+) - Purple | |
| 2 Rear | Right (-) - Purple / Black Stripe | |
| 3 Front | Right (+) - Gray | |
| 4 ACC+ | / red Front Right (-) - Gray | / Black Stripe |
| 5 Auto | Antenna / blue Front Left(+) | - White |
| 6 Front | Left(-) - White / Black Stripe | |
| 7 Battery | 12V(+) / yellow Rear Left | (+) - Green |
| 8 Ground | / black Rear Left (-) - Green | / Black Stripe |
INSTALLATION GUIDE
Installation Procedures
First complete the electrical connections, and then check for correctness.
Reset
When the installation and connections are completed, be sure to press the RESET with a ball-point pen, etc. Note: Press the RESET button will erase the clock and stored stations.

Installation opening
This unit can be installed in any dashboard having an opening as shown below. The dashboard should be 4.75mm - 5.56mm thick in order to be able to support the unit.

Important:
Remove these two screws before installation. Otherwise, the until will not work.
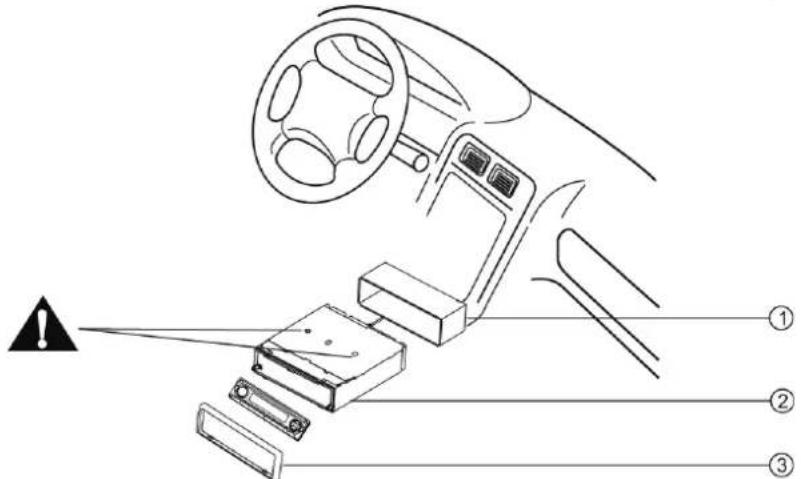
- Inset mounting collar into the dashboard, and bend the mounting tabs out with a screwdriver.
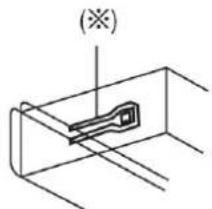
Make sure that lock lover ✗ is flush with the mounting collar (not projecting outward).
- Secure the rear of the unit.
After fixing mounting bolt and power connector, fix the rear of the unit to the car body by rubber cushion.
- Insert trim plate.
ANTI- THEFT SYSTEM
This unit is equipped with a detachable panel Removing this panel makes the radio totally inoperable.
Place the Detachable Panel into Case
- Switch off the power of the unit.
- Remove the detachable panel.
- Gently press the button of the case and open the cover. Place the panel into the case and take it with you when you leave the car.

Instal Detachable panel
- Fix right side of face plate in the right part of panel slot of the unit.
- Press down the left side of the face plate until if clicks into the panel slot of the unit.

Remove the unit
-
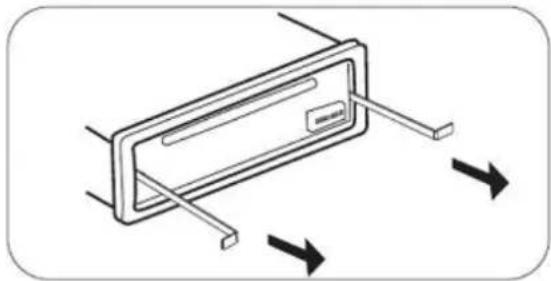
Remove the panel and the trim plate. Insert booth L-keys into hole on the front of the set until they lock.
-
Pull out the unit.

TROUBLESHOOTING
If you suspect something wrong, immediately switch power off. Do not use the unit in abnormal condition, for example without sound, or with smoke or foul smell, can cause fire or electric shock. Immediately stop using it and call the store where you purchased Never try to repair the unit yourself because it is dangerous to do so.
General
No power or no sound.
Car's engine switch is not on. Turn your car's key to ACC or ON.
Cable is not correctly connected. Check connection.Fuse is burnt. Replace fuse.
Check volume or mute on/off. If the above solutions cannot help. Press the RESET button.
Disc
Disc is inside but no sound.
Disc is upside down.
Place disc in the correct direction, and the label side up.
Disc is dirty or damaged. Clean disc or change another disc.
Disc sound skips, tone quality is low.
Disc is dirty or damaged. Clean CD or change another CD.
Sound skips due to vibration.
Mounting angle is over 30° .
Adjust mounting angle to less than 30° .
Unstable mounting.
Mount the unit securely with the mounting parts.
Radio
Much noise in broadcast.
Station is too far, or signals are too weak.
Select other stations of higher signal level.
Preset station lost.
Battery cable is not correctly connected.
Connect the battery cable to the terminal that is always live.
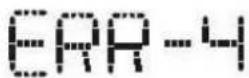
Error Display Messages
Disc is not CD or contains no MP3 files.
NO FILE
Disc upside down.
ERR-01
Recovery error, check the disk.

MP3 error, check the disk.

Disc mechanism error:
Press ▲button to eject disc
In case that the disc cannot be ejected by pressing ▲button, press the RESET switch and press the ▲. button again. If still not ejecting, consult your dealer.

SPECIFICATIONS
General
| Power supply | 12V DC (11 – 16 V) |
| Test voltage 14,4V, negative ground | |
| Maximum power output | 45 W x 4 channels |
| Continuous power output | 22 W x 4 channels (4 Ω 10% T. H. D.) |
| Suitable speaker impedance | 4 –8 ohm |
| Pre-Amp output voltage | 2,0 V (CD play mode: 1 kHz, 0 dB, 10 kΩ load) |
| Output impedance (video) | 75 ohm |
| Fuse | 15A |
| Dimensions (W x H x D): | 178 x 50 x 155 mm |
| Weigh (NETTO) t | 1,74 Kg |
FM Stereo Ratio
| Frequency range | 87,5 –108,0 MHz (Europe) |
| 87,5 –107,9 MHz (America) | |
| Usable sensitivity | 8 dBμ |
| Quieting sensitivity (S/N=50dB) | 12 dBμ |
| Frequency response | 30 Hz – 15 kHz |
| Stereo separation | 30 dB (1 kHz) |
| Image response ratio | 50 dB |
| IF response ratio: | 70 dB |
| Signal/noise ratio: | 55 dB |
Note: Specifications and the design are subject to change without notice due to improvements in technology.
AM Radio
| Frequency range:Usable sensitivity (S/N=20dB): | 522 – 1620 kHz (Europe)530 – 1710 kHz (America) 30 dBμ |
Disc player
| System:Frequency response:Signal/noise ratio:Total harmonic distortion:Wow and flutter:Chanel separation: | Disc digital audio system20 Hz – 20 kHz>80 dBLess than 0,20% (1 kHz)Below measurable limits>60 dB |
Components
| Mounting collar | 1 |
| Machine screws M5x6 mm | 4 |
| Mounting bolt (50 mm) | 1 |
| Wire connector | 1 |
| Removable face plate case | 1 |
| Trim plate | 1 |
| L-key | 2 |
| Operating Instructions | 1 |
| Rubber cushion | 1 |
WARNING:
Do not use this product near water, in wet areas to avoid fire or injury of electric current. Always turn off the product when you don't use it or before a revision. There aren't any parts in this appliance which are reparable by consumer. Always appeal to a qualified authorized service. The product is under a dangerous tention.
Disposal of used electrical & electronic equipment
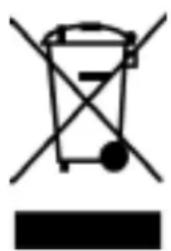
The meaning of the symbol on the product, its accesory or packaging indicates that this product shall not be treated as household waste. Please, dispose of this equipment at your applicable collection point for the recycling of electrical & electronic equipments waste. In the European Union and Other European countries which there are separate collection systems for used electrical and electronic product. By ensuring the correct disposal of this product, you will help prevent potentially hazardous to the environment and to human health, which could otherwise be caused by unsuitable waste handling
of this product. The recycling of materials will help conserve natural resources. Please do not therefore dispose of your old electrical and electronic equipment with your household waste. For more detailed information about recycling of this product, please contact your local city office, your household waste disposal service or the shop where you purchased the product.
- PŘED UVEDENÍM DO PROVOZU
- PŘEHRÁVÁNÍ DISKU
- DŮLEŽITÉ
- ŘEŠENÍ PROBLÉMŮ
- PRED UVEDENÍM DO PREVÁDZKY
- PREHRÁVANIE DISKU
- AMS: AUTO MEMORY STORE (AUTOMATICKÉ UKLADANIE DO PAMÄTI)
- RDS (RADIO DATA SYSTEM)
- REŽIM EPS
- DÔLEŽITÉ
- ODTWARZANIE PŁYTY
- WAŻNE
- ROZWIAZYWANIE PROBLEMÓW
- CD NOTES
- BEFORE OPERATION
- CAUTION
- CONTENTS
- PANEL CONTROLS
- BUTTON TIPS
- RADIO
- DISC PLAYBACK
- AMS: AUTO MEMORY STORE
- DISPLAY AND SET THE CLOCK
- MP3 OVERVIEW
- NOTE ON MP3
- NOTE ON CREATING YOUR OWN CD-RS OR CD-RWS CONTAINING MP3 FILES
- MP3 PLAYBACK
- MP3 TRACK SEARCH
- MP3 FILE SEARCH
- MP3 CHARACTER PLAYBACK
- RDS BASICS
- CT SERVICE (CLOCK TIME)
- RDS (CONTINUED)
- TRAFFIC ANNOUNCEMENTS
- EON (ENHANCED OTHER NETWORKS)
- PTY RECEPTION (PROGRAM TYPE)
- NEWS
- PTY TYPE PRESET
- MENU FUNCTION
- TA MODE
- MASK MODE
- TA VOL
- RETUNE MODE
- DSP MODE
- EPS MODE
- MULT ON/OFF MODE
- LOUD ON/OFF
- BEEP ON/OFF
- SEEK 1 / 2 MODE
- STEREO/MONO MODE
- LOCAL/DX
- VOL LAST/ADJUST MODE
- A-VOL
- ELECTRICAL CONNECTIONS
- USING THE ISO CONNECTOR
- INSTALLATION GUIDE
- INSTALLATION PROCEDURES
- RESET
- INSTALLATION OPENING
- IMPORTANT
- ANTI- THEFT SYSTEM
- PLACE THE DETACHABLE PANEL INTO CASE
- INSTAL DETACHABLE PANEL
- REMOVE THE UNIT
- TROUBLESHOOTING
- GENERAL
- DISC
- ERROR DISPLAY MESSAGES
- PRESS ▲BUTTON TO EJECT DISC
- SPECIFICATIONS
- AM RADIO
- WARNING
- DISPOSAL OF USED ELECTRICAL & ELECTRONIC EQUIPMENT
Brand : HYUNDAI
Model : CRM 2122
Category : Car radio