
PLA 1483 W - Washing machine Philco - Free user manual and instructions
Find the device manual for free PLA 1483 W Philco in PDF.


| Product Type | Washing Machine |
| Brand | Philco |
| Model | PLA 1483 W |
| Capacity | 8 kg |
| Maximum Spin Speed | 1400 rpm |
| Energy Class | A+++ |
| Dimensions (H x W x D) | 85 cm x 60 cm x 55 cm |
| Weight | 65 kg |
| Power Supply | 220-240 V, 50 Hz |
| Noise Level (Wash / Spin) | 56 dB / 75 dB |
| Number of Programs | 15 |
| Key Programs | Cotton, Synthetics, Delicates, Quick 15', Wool, Bed & Bath |
| Additional Features | Child Lock, Delay Start, LED Display, Overflow Protection |
| Maintenance | Clean filter and detergent drawer regularly; check drain hose |
| Safety | Anti-flood system, child lock, thermal protection |
| Spare Parts Availability | Door seal, pump filter, belt, heating element, control board |
| Repairability Index (France) | 8.5/10 |
Frequently Asked Questions - PLA 1483 W Philco
User questions about PLA 1483 W Philco
0 question about this device. Answer the ones you know or ask your own.
Ask a new question about this device
Download the instructions for your Washing machine in PDF format for free! Find your manual PLA 1483 W - Philco and take your electronic device back in hand. On this page are published all the documents necessary for the use of your device. PLA 1483 W by Philco.
USER MANUAL PLA 1483 W Philco
Automatic Washing Machine
USER'S MANUAL
PHILCO

Famous for Quality the World Over
Dear customer,
Thank you for buying a PHILCO brand product. So that your appliance serves you well, please read all the instructions in this user's manual.
CONTENTS
PART 1: BEFORE PUTTING INTO OPERATION....2
- Important safety instructions....2
- General safety instructions....2
- Recommendation....3
PART 2: INSTALLATION....4
• Removal of the transportation screws....4
• Levelling the washing machine....5
• Electrical connection....5
• Water supply connection .... 5
• Water drain connection....6
PART 3: CONTROL PANEL ....7
• Description of the washing machine ....7
- Drawer for washing detergents....8
- Program selector....8
• Electronic display....9
PART 4: WASHING LAUNDRY....10
- First wash cycle....10
• Before actually washing....10
• Operating the washing machine 12
• Additional functions....12 - Starting a program....17
- Adding/removing laundry during the wash....18
• Child safety lock 19 - Cancelling a program....19
• Ending a program....20
PART 5: MAINTENANCE AND CLEANING....21
• Electronic display/warning symbols....21
• The water inlet filters....22
• The pump filter 22
- Drawer for washing detergents....23
• Siphon plug 24
• The washing machine cabinet....24
• The Drum....24
- Removal of scale deposits from the washing machine....24
PART 6: PRACTICAL INFORMATION ...... 25
PART 7: PREVENTION OF MINOR MALFUNCTIONS ...... 26
PART 8: AUTOMATIC MALFUNCTION DETECTION SYSTEM ...... 29
PART 9: INTERNATIONAL WASHING SYMBOLS....30
PART 10: TECHNICAL SPECIFICATIONS ...... 31
PART 11: ENERGY SAVING TIPS....31
EN - 1
PART 1: BEFORE PUTTING INTO OPERATION
Important safety instructions:
- Read carefully and store for future use.
- The safety of this appliance complies with industry norms and meets legal appliance safety requirements. However, as manufacturers, we consider it our duty to provide you with the following safety instructions.
- It is essential that you store this user's manual in a safe place so that you can use it in the future. If you intend to sell the appliance, give it to another owner, or if you move, always make sure that the user's manual is attached to the appliance, so that the new owner can find out about the operation of the appliance and the relevant warnings.
- Before installation or operation of the appliance you MUST carefully read all the safety instructions and the user's manual.
- Before putting the appliance into operation for the first time, check that it has not been damaged during transport.
- Never connect a damaged appliance. If some parts are damaged, contact the supplier.
- If the washing machine is supplied in the winter months, when the temperature falls under 0^ , store the appliance at room temperature for 24 hours before first use.
General safety instructions
- Changing the technical parameters, or any making other modifications to the appliance is dangerous.
- During the course of the high temperature program the door heats up to a high temperature. Do not touch the door!
- Ensure that small household pets cannot get into the drum. It is therefore better to always check the inside of the drum before use.
- Items such as coins, safety pins, nails, bolts, stones and other heavy or sharp items can cause considerable damage and do not belong in the appliance.
- Use only the recommended amount of fabric softener and washing detergents. If you use a higher amount than is recommended, the fabric could be damaged.
• Always use the amount of detergent recommended by the manufacturer. - Small pieces of laundry such as socks, shoelaces, washing bands, etc. should be washed in a special purpose washing bag or in a pillow case, because the individual items could become jammed between the tube and the rotating drum.
- Do not use the washing machine to wash products from metal skeletons, fabrics which are not hemmed or that snag.
- After use, before cleaning or maintenance always disconnect the washing machine from the power supply and turn off the water inlet.
- Never attempt to repair the appliance yourself. Repairs carried out by inexperienced persons may lead to injuries or serious damage to the appliance. Contact your local service centre for repairs. Always request original spare parts.
- Do not use multi-sockets or extension cords.
- Do not plug in the appliance with a defective power cord.
- If the power cord is damaged, have it replaced by the manufacturer or an authorised service technician to prevent hazardous situations.
- Do not pull the power plug out of the power socket by pulling on the cord. Hold the power cord by holding the power plug directly.
- Do not connect the power plug if you have wet hands.
EN - 2
- Never touch the appliance if you have wet hands or feet.
- Never open the detergent drawer while washing.
- Never attempt to open the washing machine door while washing.
- Because the washing machine can become very hot during operation, do not touch the hose during the draining or filling process.
• In the case of any defect, first turn off the appliance, disconnect it from the power supply and shut off the water inlet. Do not attempt to repair the device yourself. Contact the nearest authorised service. - Do not forget that the packaging material from the washing machine may present a danger to children.
- Do not allow children to play with the washing machine.
- Keep household pets at a safe distance from the washing machine.
- The washing machine should only be used by persons fully instructed about the instructions, provisions and controls described in this user's manual.
- This washing machine is designed for domestic use only. The use of the washing machine for commercial purposes voids the warranty.
- Do not install the appliance on a carpet or another similar surface, which could block the ventilation openings on the underside.
- Do not place the drain hose into a container, bucket or sink.
Recommendation
- Long term contact of washing detergents and fabric softeners with air will cause them to dry out and stick to the walls of the drawer. To prevent this from happening, fill the drawer with washing detergent and fabric softener immediately before washing.
- We recommend the use of the prewash only for heavily soiled laundry.
- Do not exceed the maximum loading capacity of the drum.
- This appliance must not be used by persons (including children) with physical, sensory or psychological impairments or by inexperienced persons, unless properly trained or schooled in the safe use of the appliance, or unless they have been properly supervised by a person who will be responsible for their safety. Children should be supervised so as not to play with the appliance.
- If you will not be using the washing machine for an extended period of time, pull it out of the power socket, shut off the water inlet and leave the door open so that the inside of the washing machine can dry out and so unpleasant odours are not created.
- As a result of quality control procedures some water may remain in the washing machine. This will not damage the washing machine in any way.
• We recommend that the first wash is performed using the White 90 - 95° program (depending on the model) without any laundry, put 1/2 a measuring cup of detergent into the second detergent compartment.
PART 2: INSTALLATION
Carefully read the entire user's manual before putting your washing machine into operation and store it in a safe place for future reference.
Removal of the transportation screws
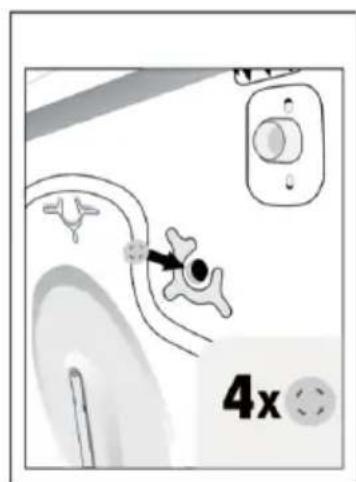
- You must remove the transportation screws located in the back part of the washing machine before putting it into operation.
- Loosen the bolts using a correctly sized spanner, turning it anticlockwise. (PIC. 1)
- Remove the bolts by pulling them out. (PIC. 2)
- Insert plastic plugs found in the accessories pouch, into the transportation screw openings. (PIC. 3)
- Carefully store the transportation screws removed from the washing machine for future transport purposes.
NOTE:
Defects caused by starting the washing machine with the transportation screws installed are not covered by the warranty.

natural_image
Top-down schematic of a medical device with internal components and control buttons (no text or labels)
natural_image
Pure mechanical diagram showing a circular component with directional arrows and mounting points, no text or symbols present.PIC. 1

natural_image
Illustration of a medical device with a 4x multiplier label (no text or symbols on the diagram itself)PIC, 2 PIC, 3
EN - 4
Levelling the washing machine
- Do not place the washing machine on carpets or similar surfaces.
• To ensure quite and vibration free operation of your washing machine, you should place it on an even non-slip and fi rm surface.
You can level the washing machine by adjusting the adjustable feet:
- First loosen the plastic nut.
- Adjust by screwing out the feet upwards or downwards.
• After levelling the washing machine, re-tighten the plastic nut by screwing it upwards. - Never level the washing machine on an uneven surface by placing cardboard, wooden blocks, etc. under the feet.

natural_image
Pure mechanical component diagram without any text, numbers, or symbols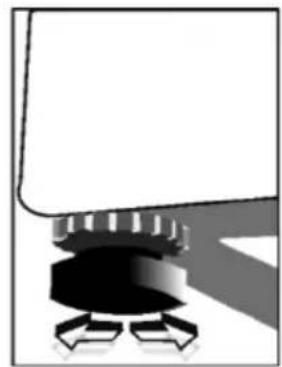
natural_image
Pure mechanical component diagram without any text, numbers, or symbolsElectrical connection
• Technical specifications of your washing machine: 220-240 V \~ 50 Hz.
- A special grounding plug is attached to the power cord of your washing machine. This plug must be fully inserted into a grounded power socket (with 10 A). The electrical fuse or circuit breaker to which the washing machine is connected should be rated at 10A. If you do not have such sockets and fuses in your home, have them installed by a qualified electrician.
- Our company takes no responsibility for whatever damages caused by using the washing machine without grounding.
Water supply connection
- Depending on the functions of your washing machine the washing machine is equipped with either a single water inlet (cold) or a double water inlet (cold/hot). The hose with the white end is intended for the cold water inlet and the hose with the red end is intended for the hot water inlet (on washing machines with a hot and cold water inlet).
- So that water does not leak from the connection points, the hose kit also includes 1 seal (for washing machines with a cold water inlet) or 2 seals (for washing machines with hot and cold water inlets). Install these seals on the end of the water inlet hose connected to the tap.
- Connect the hose with the white end to the water inlet valve with the white filter and the hose with the red end to the water inlet valve with the red filter (the second mentioned option applies to washing machines with a hot and cold water connection). Tighten the plastic connecting parts using your hand. A qualified plumber will provide a safer connection.
- The water pressure of 0.1 - 1 MPa in your water tap will ensure a more efficient operation of your washing machine (the pressure of 0.1 MPa equates to a flow rate of more than 8 litres of water per minute from a fully open tap).
• After the connections are complete, check that the connections do leak, by fully opening the tap. -
Check that the supply hoses are not bent, broken or cracked.
-
Connect the supply hose to a 3/4" threaded water tap.
- If the washing machine has a dual water inlet (for hot and cold water), the temperature of the hot water should not exceed 70 °C.

Water drain connection
- Check that the supply hoses are not bent, twisted, cracked or excessively stretched.
- The drain hose should be installed at a height of min. 60 cm and max. 100 cm above the ground.
- The end of the drain hose may be inserted directly into the drain opening or to a special end fitting attached to the drain of the wash basin.
- Never attempt to extend the length of the drain hose by adding extra parts.

NOTE:
Do not place the drain hose into a container, bucket or sink.
PART 3: CONTROL PANEL
Control panel
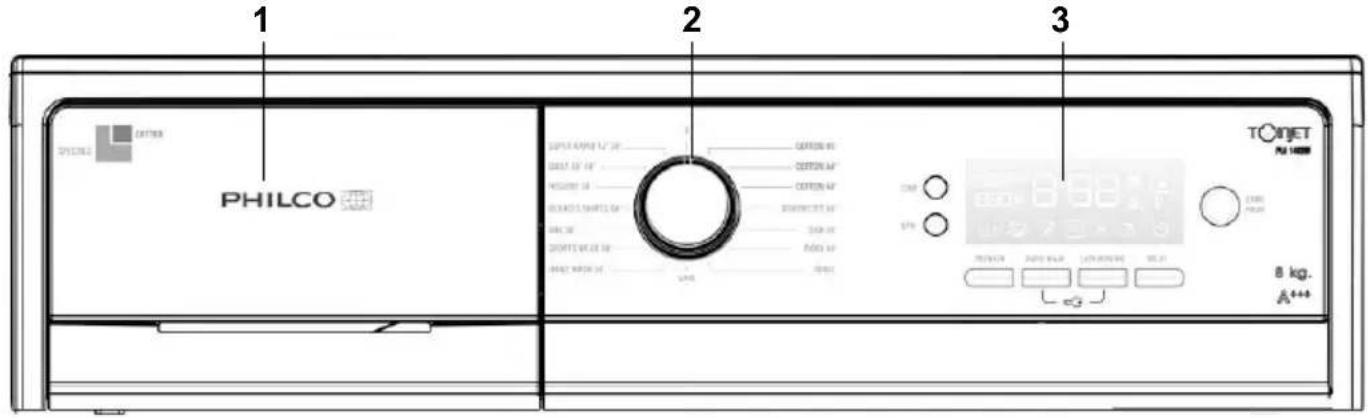
- The drawer for washing detergents
- Program selector
- Electronic display and additional functions
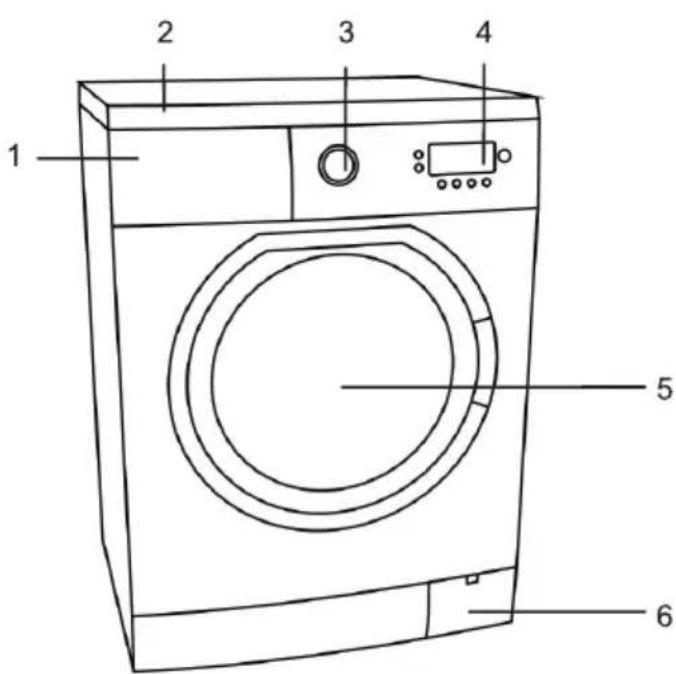
Description of the washing machine
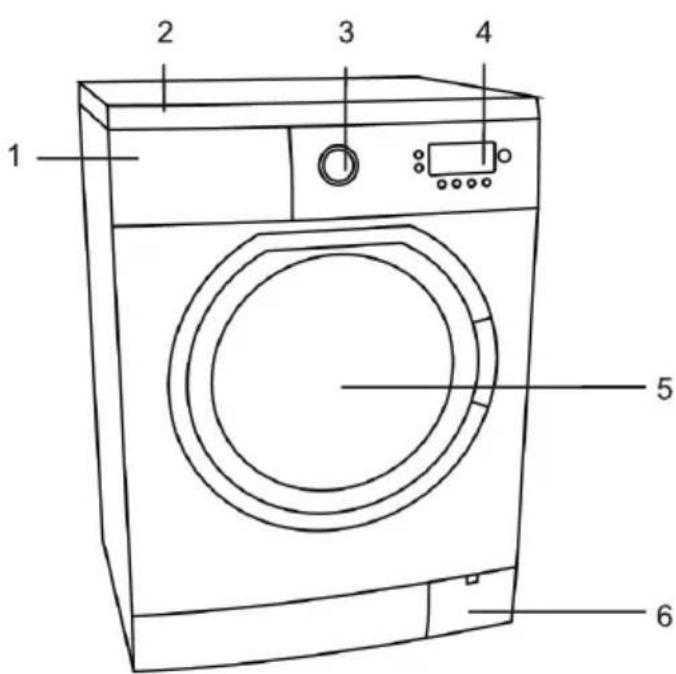

3
- Drawer for washing detergents 6. Pump fi iter cover
- Top plate 7. Safety transportation screws
- Program selector 8. Power cord
- Electronic display 9. Drain hose
- Door 10. Inlet valve
Drawer for washing detergents

A. Prewash compartment D. Siphon plug
B Main wash compartment E. Measuring cup for liquid washing detergents
C. Softener compartment
Program selector
Using the program selector, select a program, in which you wish to wash your laundry. The program selection may be done by turning the program selector knob in both directions. Check, whether the program selector is exactly on the program, which you wish to use.
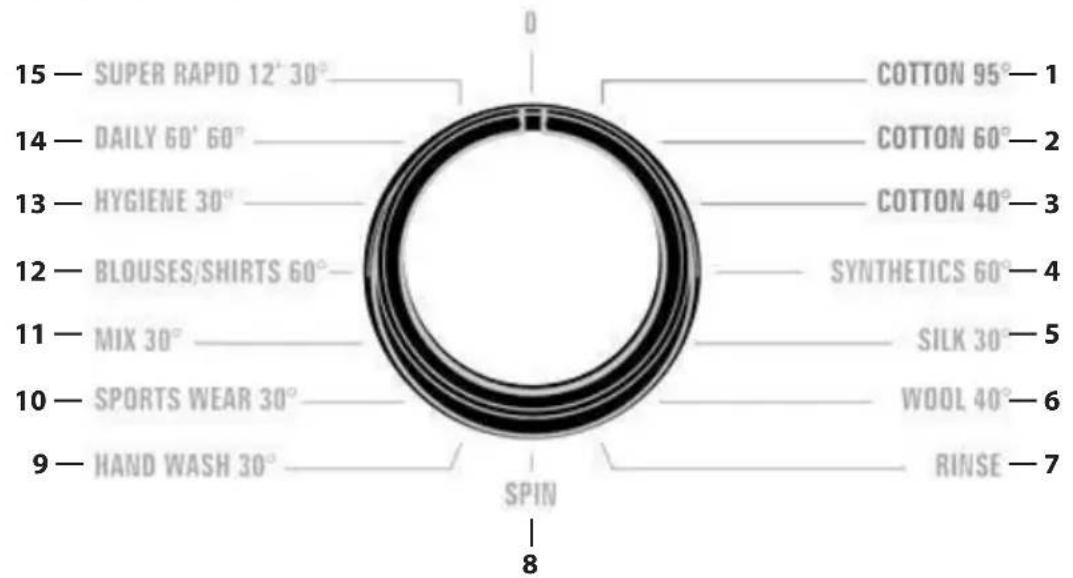
- Cotton 95^
- Cotton 60^
- Cotton 40° 11. Mixed wash 30°
- Synthetics 60° 12. Shirts, blouses 60°
- Silk 13. Hygienic wash 30^
- Wool 40° 14. Daily 60°
- Rinsing 15. Super rapid wash 12min.30°
-
Spinning
-
Hand wash 30°
- Sports garments 30°
EN - 8
Electronic display
flowchart
graph TD
    A["1"] --> B["SPIN"]
    B --> C["TEMP."]
    D["2"] --> E["8"]
    F["3"] --> G["RAPID WASH"]
    H["4"] --> I["EASY IRONING"]
    J["5"] --> K["DELAY"]
    L["6"] --> M["START PAUSE"]
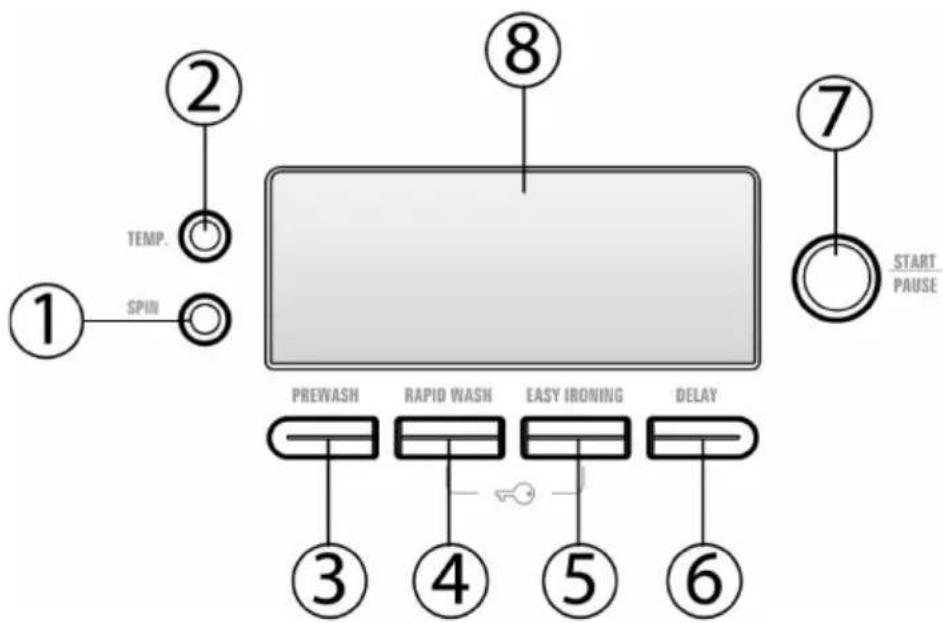
- SPIN (button for setting the spinning speed)
- TEMP (button for setting the washing temperature)
- PREWASH (button for the additional function - prewash)
- RAPID WASH (button for the additional function - rapid wash)
- EASY IRONING (button for the additional function - easy ironing)
- DELAY (button for the additional function - delayed wash)
- Start/Pause button
- Electronic display
The display shows the temperature, spinning speed, remaining time until the end of your selected additional function cycle, and also whether the door is locked or not. The electronic display will also inform you about any malfunctions, which occurred during the wash by displaying a malfunction code and it will also inform you about the completion of a selected washing program by showing "END".
PART 4: WASHING LAUNDRY
- Connect the washing machine to a power socket.
- Open the water tap.
First wash cycle
There may be some water left over inside the washing machine from the factory tests. We therefore recommend to perform the first wash without laundry so as to drain this water; put half a measure of standard detergent into compartment 2, which is used for washing detergents and select the program for cotton at 90^ .
Before actually washing
Sorting laundry
- Sort the laundry according to its type (cotton, synthetics, delicates, wool, etc.), washing temperature and the level of dirtiness.
- Never wash whites together with coloured laundry.
- Because your new coloured laundry may release some of its colour, wash it separately.
- Before placing the laundry into the washing machine check pockets for any forgotten items. In this way you will prevent damaging your clothes and the washing machine.
- Do up zips and buttons on the laundry.
- From curtains and drapes remove the plastic or metal hooks or insert the into a wash bag and tie it up.
- Turn clothing such as pants, knitted fabrics, T-shirts and singlets inside out.
- Wash small items such as socks and handkerchiefs in a wash bag.


Standard washing Max. wa
hing temperature 90°C Max. washing
temperature 60°
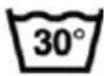


Max. washing temperature 30° Hand wash Do not wash
The mark shown under the symbol means that a product (laundry) marked in this way must not be exposed to excessive mechanical stress and also the effective duration of temperature, humidity, auxiliary agents (softeners) must be as short as possible.
Placing clothing inside the washing machine
- Open the door of the washing machine.
- Spread the laundry evenly inside the washing machine.
- Insert one item at a time.
- When closing the door, make sure that no laundry has been caught in the door.
- Firmly close the washing machine door, otherwise the washing machine will not start.
Detergent dosage
The amount of detergent you use in the washing machine depends on the following criteria:
- The consumption of detergent changes with the degree of dirtiness of the laundry. Do not use a prewash for lightly soiled laundry and use a small amount of detergent in the 2 compartment for washing detergents.
- For excessively soiled laundry select a program with a prewash, put 14 of a detergent measuring cup into compartment 1 for washing detergents and put the remainder of the measuring cup into compartment 2.
- Use washing detergents specially made for automatic washing machines. The dosage of the detergent is shown on the packaging.
- Increased water hardness necessitates the use of an increased amount of detergent in the wash.
- Increases laundry amounts also necessitate the use of an increased amount of detergent in the wash.
- Pour fabric softeners (conditioners) into the fabric softener compartment in the detergent drawer. Do not go over the MAX mark. Otherwise the fabric softener will flow out the siphon into the water used for washing.
- If the fabric softener is very thick then dilute it with water before placing it in the compartment. The thick fabric softener could clog up your siphon and so prevent the fabric softener from entering the washing machine.
- You can use liquid detergents for all washing programs without a prewash. For this purpose install into the second detergent compartment in the drawer a measuring cup and pour in the detergent according to the mark shown on the measuring cup.
Operating the washing machine
Program selection
Select the appropriate program for your laundry according to the program table
Additional functions
Before starting the program you can also select an additional function.
- Press the button of the additional function that you wish to select.
- If the symbol of the additional function lights up on the display, the selected additional function has been activated
- If the symbol of the additional function fl ashes on the display, the selected additional function has not been activated.
Reason for the additional function not being activated:
• The additional function, which you wanted to use is not compatible with the program you have selected.
- The washing machine has already gone past the stage during which it was possible to use the additional function.
• It is not compatible with the additional function, which you selected before it.
Half load detection system
Your washing machine is equipped with a half load detection system. If you put approximately half (and less) the maximum load capacity of laundry into the washing machine, the washing machine will start so that in certain programs (White 95°, Colorfast 60°, Non colorfast 40°) it saves time, water consumption and electricity. If the half load detection is activated, the washing machine can complete your selected program in a shorter time.
Twinjet system - Dual channel system
The water with the washing detergent will be circulated in the washing machine by 2 spraying mechanisms and a mixing system by means of a dual channel system. The circulated detergent water solution will be sprayed on the laundry enabling better washing efficiency.
The dual channel system helps to wash a larger amount of laundry in a shorter time with better results, guaranteed lower electricity and water consumption.

natural_image
Close-up of a washing machine wheel with mesh grille and central hub (no visible text or symbols)Table 1
| PROGRAM TABLE | |||||
| PROGRAM | TEMPERA-TURE (°C) | PROGRAM DURATION (MIN.) | DRAWER COMPART-MENT | MAX. DRY LAUNDRY CAPACITY (kg) | TYPE OF LAUNDRY |
| 1- COTTON | 95 | 190 | 2 | 8 | Heavily soiled cotton and linen laundry. (Underwear, bed linen, table cloths, towels (max. 3,5 kg), bedspreads, etc.) |
| 2- COTTON 60 180 2 8 | Dirty cotton and linen laundry (Underwear, bed linen, table cloths, towels (max. 3,5 kg), bedspreads, etc.) | ||||
| 3- COTTON 40 166 2 8 Dirty coloured cotton and linen laundry | |||||
| 4-SYNTHETICS 60 101 2 3,5 | Heavily soiled synthetic or synthetic blend laundry (Nylon socks, shirts, blouses, pants containing nylon, etc.) | ||||
| 5-SILK 30 91 2 2,5 | Less soiled laundry containing machine-washable silk. | ||||
| 6-WOOL | 40 78 2 2,5 Machine-washable woollen laundry | ||||
| 7-RINSE | - | 36 | - | 8 | If you wish to rinse laundry that has already been washed once more, you can use this program for any type of laundry. |
| 8-SPIN | - | 15 | - | 8 | If you wish to spin laundry that has already been washed once more, you can use this program for any type of laundry. |
| 9-HAND WASH | 30 60 2 2,5 | Delicate and woollen laundry for hand washing | |||
| 10-SPORTS WEAR | 30 74 2 3,5 Sports wear. | ||||
| 11-MIX WASH | 30 103 2 3,5 | Dirty cotton, synthetic, coloured and linen laundry all together. | |||
| 12-SHIRTS/BLOUSES | 60 119 2 4 | Dirty shirts and blouses from cotton, synthetics and blends all together. | |||
| 13-HYGIENE | 30 182 2 5 | This program eliminates bacteria in the laundry at low temperatures of 30 °C you can use for less soiled coloured, linen laundry and for children's clothing. | |||
| 14-DAILY 60 min. | 60 60 2 4 | You can wash your dirty cotton, coloured and linen laundry for 60 min. at 60 °C | |||
| 15-SUPER RAPID 12 min. | 30 12 2 2 | You can wash your dirty cotton, coloured and linen laundry in 12 minutes. Note: Because this is a short cycle, use less washing detergent than is used for the other programs. The duration of the program will be extended if the washing machine detects an unstable load. You can open the door 2 minutes after the completion of the wash. (The 2 minute period necessary for the unblocking of the washing machine door is not included in the total washing time.) | |||
Program duration, energy consumption and water consumption values may vary according to towash load weight and type, selected extra functions, tap
□ water and ambient temperature.
1 - Setting the spinning speed and the additional function of delayed soaking
You can set the spinning speed for your laundry using the spinning speed button.

flowchart
graph LR
    A["1"] --> B["SPIN"]
    B --> C["1000°"]
    C --> D["PHENASH RAPID WASH EAST INRORING DELAY"]
    D --> E["SPIN"]
    E --> F["SPIN"]
    F --> G["---°"]
    G --> H["PREWASH RAPID WASH EAST INRORING DELAY"]
    H --> I["START PASE"]
    J["TUMP"] --> K["SPIN"]
    L["Start PASE"] --> M["SPIN"]
When you select a new program, the maximum spinning speed will appear on the display.
You can gradually reduce the spinning speed within the range from the maximum spinning speed of the program to cancelling spinning completely (--), using the spinning speed button.
If you missed the desired speed, repeatedly press the spinning speed button until the desired value appears.
If you cannot take the laundry out of the washing machine immediately after the wash and you don't want your laundry to be crinkled, you can use the additional delayed soaking function.
In programs with which the additional function of delayed soaking can be used, activate it by pressing the spinning speed button until you completely cancel spinning (--). The function will be active, if the symbol

lights up on the electronic display.
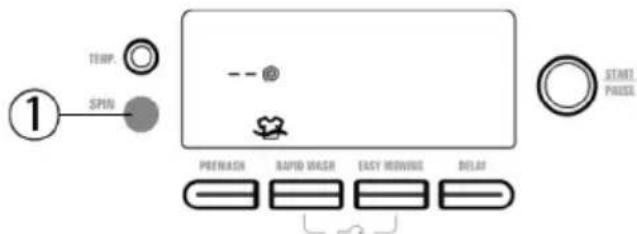
If you select this function, the laundry will remain soaked after the last rinse. As soon as the laundry is left to soak after the last rinse the symbol will light up on the electronic display.
If you wish to take the laundry out of the washing machine, press the Start/Pause button. The washing machine will drain the water and the program will finish without spinning.
If you want to spin the laundry:
a) You can select spinning using the spinning speed button while the laundry is soaking after the end of the last rinse. If you wish to take the laundry out of the washing machine, press the Start/Pause button. The washing machine will drain the water and end the program after spinning your laundry at the speed selected by you.
b) Switch the program selector to 0. Set spinning on the program selector. If necessary you can lower the spinning speed. Start the washing machine by pressing the Start/Pause button. The washing machine will end the program after spinning your laundry at the speed selected by you.
EN - 14
2 - Setting the washing temperature
You can select the washing temperature using the washing temperature button.


After setting a new program the maximum temperature for the given program will always appear on the display.
You can gradually lower the temperature in the range from the maximum temperature down to cold water (--) by pressing the water temperature button.
If you missed the desired temperature, repeatedly press the water temperature button until the desired temperature appears.
3 - PREWASH - Additional function
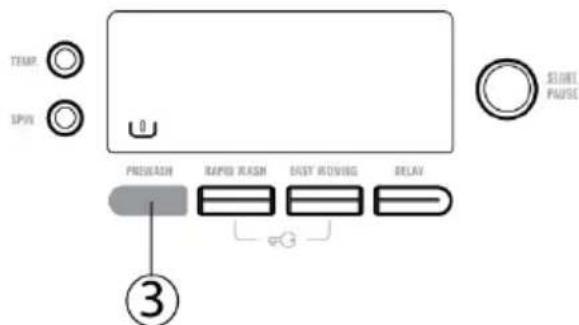
Using this additional function you can prewash your heavily soiled laundry before the main wash. When using this function you should put washing detergent into the prewash compartment in the drawer.
4 - RAPID WASH - Additional function

This additional function makes it possible to shorten the washing time of lightly soiled laundry. If you put half the load (or less) of laundry into the washing machine, the washing machine automatically detects this.
The half load detection system together with the program selected by you, will wash your laundry in a shorter time and will use less water and electricity. If the washing machine detects a half load, the symbol will automatically light up on the display. If you want to cancel this option, all you need to do is to press the rapid wash additional function button. It is not possible to select the rapid wash additional function for the same washing program.
5 - EASY IRONING (additional function)
By activating this additional function you can ensure that the laundry is not as crinkled after the wash.

6 - DELAY - (additional function - delayed start)
Using this additional function you can delay the start of the wash in the range from half an hour to 24 hours.
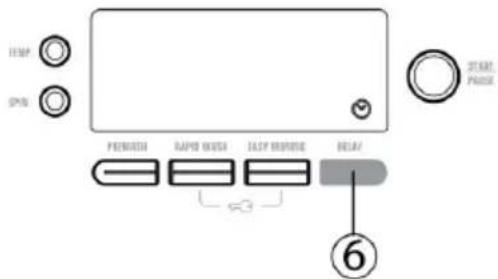
Using the delayed start additional function:
- Press the delayed start button once.
• "0.5h" will appear on the display.
• Repeatedly press the button until a time appears at which you want to start the wash. - If you wish to activate the delayed start that you selected in the program, press any of the additional function buttons except for the Start/Pause button.
The timer interval for the delayed start is in half hour increments for the first two hours, from the 3rd to the 23rd hour the increments are in hours.
If you missed the desired time, repeatedly press the delayed start button until the desired value appears again.
If you wish to cancel the delayed start, just press the delayed start button once.
Start the delayed start function by starting the washing machine using the Start/Pause button. As soon as you turn on the washing machine, a countdown is activated on the display based on the interval you set.
7 - Additional function - antiallergic wash

For programs where this additional function is active, there is an additional rinse before the final rinse of the laundry.
NOTE: The antiallergic wash additional function is automatically selected only in the Hygiene wash program.
Starting a program
Start/Pause button

Press the Start/Pause button to start your selected program or to stop a program that is running. If you switch the washing machine to the pause mode, the electronic display will flash.
After turning on the washing machine, the following symbols will appear on the electronic display for your selected programs.
- Washing temperature.
- Spinning speed.
- The additional function symbols if you have selected any.
- Time at which the program will end or a countdown for a delayed start, depends on your selection.
- Open or locked door symbol.
NOTE:
The open door symbol will go off and then the locked door symbol will go on for about 1 minute after the washing machine has been started using the Start/Pause button.

natural_image
Simple line drawing of a speech bubble with a bracket and eraser, no text or symbols presentnatural_image
Blank white rectangular area with a small icon in the top-right corner (no text or symbols)Adding/removing laundry during the wash
Adding/removing laundry during the wash
If you want to add or remove laundry during the course of a wash:
- Switch the washing machine to the pause mode by pressing the Start/Pause button.
- After a while, once the symbol 📋 appears on the electronic display, you can open the washing machine door. When the symbol 📋 appears on the electronic display, you can, after opening the door, add or remove some laundry.

natural_image
Two blank rectangular panels with simple line drawings of a basketball and a soccer ball, no text or symbols present.NOTE:
If the symbol 🔒 is fl ashing on the electronic display, it means that the washing machine will not allow laundry to be added or removed during the wash, because it has passed the stage, where it was possible.
• After finishing adding or removing laundry, close the door of the washing machine and press the Start/Pause button.
- Once the door is locked the washing machine will resume washing.
• The symbol will light up on the electronic display.

natural_image
Blank white rectangular area with a small icon in the top-right corner (no text or symbols)Child safety lock
To prevent accidentally changing a program when a button is pressed or the selector is turned during the wash, there is a child lock. Activate the child lock by pressing and holding down the additional function buttons rapid wash and easy ironing for at least 3 seconds.
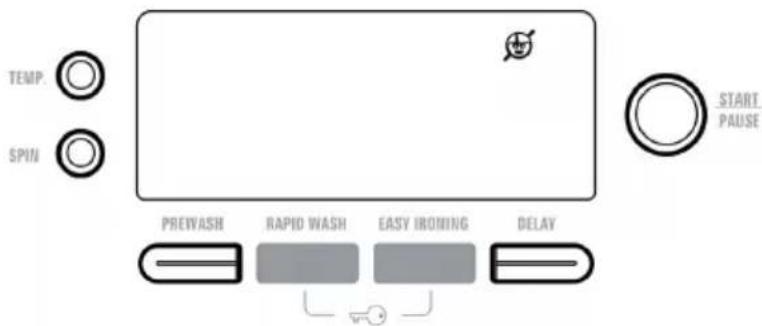
After it is activated the symbol lights up on the electronic display.
If you press any button while the child lock is activated, the symbol will light up on the electronic display.
If during the course of any program and while the child lock is activated you select another program, after turning the program selector to position 0, the currently running program will be renewed.
Deactivate the child lock by pressing the same buttons and holding them down for at least 3 seconds. As soon as the child lock is deactivated the symbol 🤔 on the electronic display will turn off.
Cancelling a program
If you want to cancel a program that is running:
- Switch the program selector to 0.
• The washing machine will stop the program and cancel it. - You can get rid of the water in the washing machine by switching the program selector to any program.
• The washing machine will carry out the necessary draining of water and cancel the program. - You can start the washing machine by selecting a new program.
Ending a program
After the completion of a selected program the washing machine will automatically stop.
"END" will be shown on the electronic display.
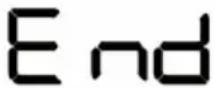
NOTE:
After completing a program the washing machine will turn off the electronic display after 2 minutes so as to save electricity. If any additional function button is pressed it will turn itself on again.
- If you see that the symbol indicating that the door can be opened is on, you can open the door of the washing machine and take laundry out.

natural_image
Simple line drawing of a hand holding a small object, no text or symbols present- After taking the laundry out of the washing machine, leave the door open so that the washing machine can dry out.
- Switch the program selector to 0.
- Disconnect the washing machine from the power socket.
- Shut off the water inlet.
PART 5: MAINTENANCE AND CLEANING

- Disconnect the washing machine from the power socket.
- Shut off the water inlet.
Electronic display/warning symbols
Notifi cation of an outage / low water pressure
If the symbol 📋 lights up on the electronic display:
- The water supply may be clogged. Check it.
- There may be a water outage. Check it. If it is so, switch the program selector to position 0. You can select a program and start the washing machine once water supply is renewed.
• The water pressure may be low. Check it.
• The supply hose may be bent. Check it. - The supply hose may be clogged. Clean the supply hose fi Iters. (*)
• The inlet valve filter may be clogged. Clean the inlet valve filters. (*)

natural_image
Blank white rectangle with a small icon in the top-left corner (no text or symbols)(*) See chapter referring to cleaning and maintenance
Notification of clogged pump fi Iter
If the symbol Ⓗ lights up on the electronic display:
- The pump fi Iter may be clogged. Clean out the pump fi Iter. (*)
- The drain hose may be clogged or bent. Check the drain hose.
natural_image
Simple geometric diagram with a triangle and a small symbol inside, no text or labels present.(*) See chapter referring to cleaning and maintenance.
The water inlet fi Iters
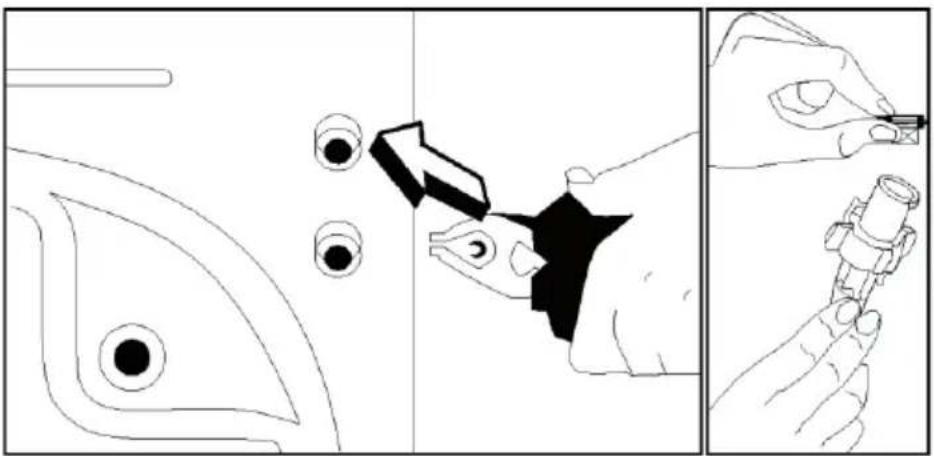
There are filters connected to the hose ends at the tap end and at the end of the inlet valves, which prevent dirt and foreign materials contained in water entering the washing machine. If the washing machine is not filling up with a sufficient amount of water despite the water inlet being open, clean these filters.
- Disconnect the supply hose.
• Using tweezers take the filters out of the inlet valves and wash them with a brush.
• Using your hand take out the filters on the supply hoses at the end connected to the tap together with the seals and clean them.
• After cleaning the filters put them back in the same way.
natural_image
Illustration showing a hand holding a pen and a small object, with no visible text or symbols
Attention:
The water inlet valves may be blocked by a contaminated water supply or because of inadequate necessary maintenance, or the valves may be damaged, which may cause a water to constantly flow through. For these reasons such types of malfunctions are not covered by the warranty.
The pump fi Iter
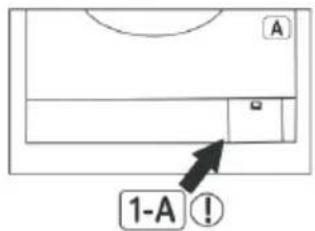
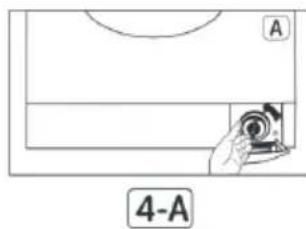
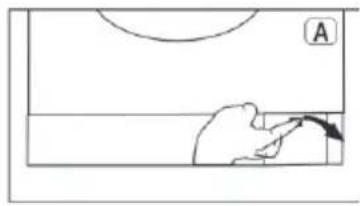
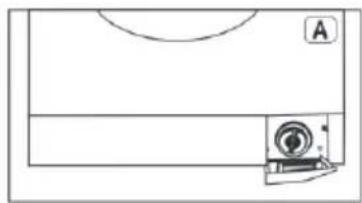
The pump filtration system extends the life of the pump, which is used for draining dirty water. It ensures that lint from the laundry does not enter the pump. We recommend you clean the pump filter every 2-3 months. Clean the pump filter as follows:
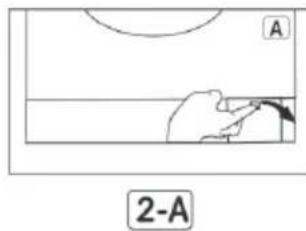
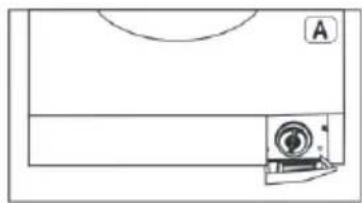
- Open the cover on the kickplate.
- Before opening the filter cover, place a container in front of it, into which the water remaining in the washing machine will flow.
- Loosen the filter cover by turning it anticlockwise and drain the water.
- Remove all foreign material from the fi Iter.
- Check by hand that the pump rotates.
• After cleaning the pump, return the filter by turning it clockwise.
• Reattach the kickplate cover.
- Don't forget that if you do not attach it correctly, water will leak from your washing machine.
natural_image
Simple line drawing of a hand holding a tool near a horizontal bar, labeled '2-A' below (no text or symbols on the diagram itself)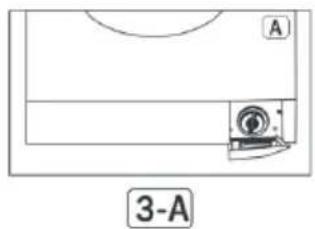

WARNING!
Danger of scalding!
Because the water in the pump may be very hot, wait until it has cooled down.
The drawer for washing detergents
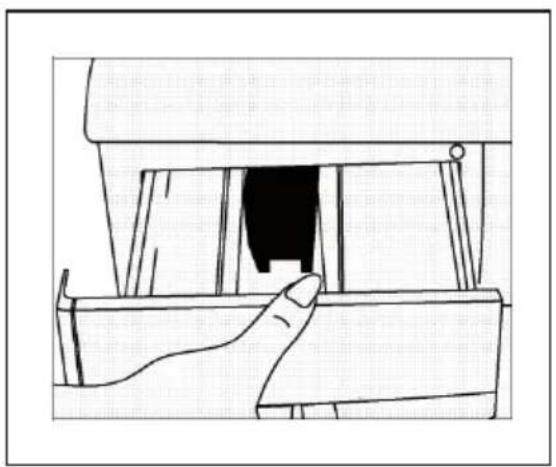
Over time washing detergent deposits may accumulate in the drawer and in the washing machine opening. Therefore, the washing detergent drawer needs to be regularly cleaned from accumulated deposits. Take the drawer out as follows:
• Pull the drawer out completely (PIC. 1).
- Fully press down the lid of the siphon inside the drawer and pull the drawer until you pull it out (PIC. 2).
- Wash with water and an old toothbrush.
- Remove the deposits accumulated inside the drawer opening without them being allowed to enter the washing machine.
- Once the drawer is dry, insert it back into the washing machine in the reverse sequence here described.
natural_image
Line drawing of a hand inserting a component into a device (no text or symbols)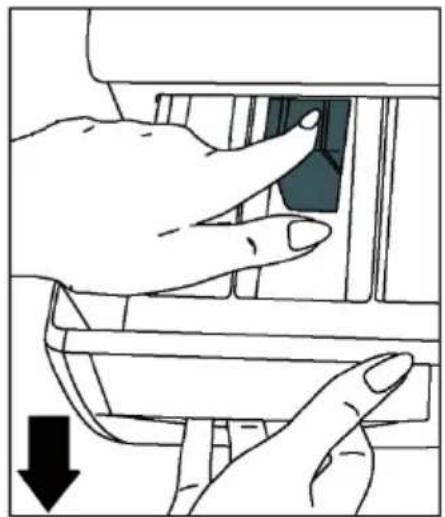
natural_image
Illustration of a hand pressing down on a device component with a downward arrow indicating action (no text or symbols present)PIC. 1 PIC. 2
The siphon plug
Take out the washing detergent drawer. Pull out the siphon plug and thoroughly clean off fabric softener residue. Reinsert the cleaned siphon plug in its place. Check that it is properly inserted.

The washing machine cabinet
Clean the washing machine from the outside using lukewarm water and a gentle cleaning agent, which will not damage the surface coat of the washing machine cabinet. After rinsing with clean water, wipe the washing machine with a soft and dry wiping cloth.

WARNING!
If you have installed the washing machine in a place where the ambient temperature falls below 0^ C and you will not be using it, do the following:
- Connect the washing machine to a power socket.
- Close the water tap and disconnect the supply hose or hoses.
- Insert the end of the drain hose and supply hose into a container on the ground.
- Set to program selector to the drain program.
• The program indicator light will turn on. - Start the program by pressing the Start/pause button.
• After the program has finished (the end indicator light will turn on) disconnect the washing machine from the power socket.
After completing these steps the remaining water in the washing machine will be drained, which will avoid the danger of it freezing inside the washing machine. If you wish to use the washing machine again, ensure that the ambient temperature is above 0^ C.
The Drum
Do not leave any metal items inside the washing machine, such as needles, clips or coins, etc. These items can cause rusty stains to appear on the drum. If you wish to remove these stains, use a cleaning agent not containing chloride and follow the instruct of the cleaning agent's manufacturer. Never use steel wool used for dishes, or any other similar abrasive items to clean the rusty stains.
Removal of scale deposits from the washing machine
We recommend the use of a commonly available scale remover and to follow the instructions printed on the packaging.

WARNING!
Scale removal mixes contain acids and may cause discolouration of your laundry and may have a negative effect on your washing machine.
PART6: PRACTICAL INFORMATION

Alcoholic beverages: First prewash the stain in cold water, then apply glycerine and water and rinse in a solution of water and vinegar.
Shoe polish: First lightly scrub the stain without damaging the fabric using washing detergent and rinse. If the stain does not go away, apply a solution of one part pure alcohol (96 percent) and two parts water and subsequently wash in lukewarm water water.
Tea and coffee: Strech the part of the laundry with the stain over the top of a pot and rinse with water that is as hot as the fabric will handle. If it is appropriate for your laundry, wash the stain in bleaching lye.
Chocolate and cocoa: Leave your laundry in cold water and scrub with soap or washing detergent, then wash in water that is as hot as the fabric will handle. If an oily stain remains on your laundry, wash in hydrogen peroxide (concentration 3%).
Ketchup: After scratching away dried residues without damaging the laundry, leave to soak for about 30 minutes in cold water and wash with a washing detergent.
Bouillon, eggs: Remove dried residues and wipe with a sponge or a soft wiping cloth dipped in cold water. Apply washing detergent and wash in diluted lye.
Greasy and oily stains: First wipe away residues. Apply washing powder to the stain and then wash in lukewarm water soapy water.
Mustard: First apply glycerine to the stain. Apply washing powder and then wash. If the stain does not disappear, apply alcohol to the stain (for synthetics and coloured laundry use a solution of 1 part alcohol and 2 parts water)
Blood: Leave your laundry to soak in cold water for 30 minutes. If the stain does not disappear, dip into a solution of water and ammonia (3 spoons of ammonia per 4 litres of water) for about 30 minutes.
Cream, ice cream and milk: Leave your laundry in cold water and apply washing detergent to the stain. If the stain does not disappear, apply lye to it in the correct concentration for the given type of fabric (do not use lye on coloured laundry).
Soil: Remove soil stains as soon as possible. Wash in washing detergent and if it does not disappear, apply oxygenated water (concentration 3%).
Ink: Dip the stain in cold water and wait until the ink dissolves in the water. Then apply water with lemon juice a washing detergent to the stain, wait about 5 minutes and then wash.
Fruit: Stretch the part of the laundry with the stain over the top of a pot and pour cold water on it. Pour hot water on to the stain. Apply cold water and glycerine. Wait 1-2 hours and sprinkle with white vinegar, then rinse.
Grass stains: Apply washing detergent to the stain. If it is appropriate for this type laundry, wash the stain in lye. To woollen clothing apply alcohol. (For coloured clothing us a solution of 1 part pure alcohol and 2 parts water).
Oil paints: You should remove the stains before they dry using a solvent. Then apply a washing detergent and wash.
Scorch stains: If your laundry will allow it, you can put lye into the washing water. For woollen laundry you should cover the stain with a wiping cloth dipped in oxygenated water, place a dry wiping cloth over this and iron over the stain. After rinsing you should thoroughly was the laundry.
PART 7: PREVENTION OF MINOR MALFUNCTIONS
All necessary repairs of the washing machine should be performed by an authorised service centre. If it is necessary to repair your washing machine or you are unable to remedy the malfunction using the information below:
- Disconnect the washing machine from the power socket.
- Shut off the water inlet.
- Contact the nearest authorised service.
| MALFUNCTION POSSIBLE CAUSE REMEDY | ||
| You washing machine is not working. | It is not connected to a power socket. | Connect the power plug to the power socket. |
| The fuse has burnt out. Replace the fuse. | ||
| A power outage occurred. | Check whether the electricity is working. | |
| You didn't press the Start/pause button. | Press the Start/pause button. | |
| The program selector is in the position O (off). | Turn the program selector to the desired position. | |
| The washing machine door is not properly shut. | Close the door properly. You should hear it click in. | |
| Your washing machine is not filling up with water. | The water inlet is shut off . Open the water inlet. | |
| The supply hose may be bent. Check the supply hose. | ||
| The supply hose is clogged. Clean the supply hose fl Iters. (*) | ||
| The inlet valve filter is clogged. | Clean the inlet valve filters. (*) | |
| The washing machine door is not properly shut. | Close the door properly. You should hear it click in. | |
| Your washing machine is not draining water. | The drain hose is clogged or bent. Check the drain hose. | |
| The pump fi Iter is clogged. | Clean out the pump fi Iter. (*) | |
| You didn't place the laundry evenly into the washing machine. | Arrange the laundry inside the washing machine so that it is evenly arranged in the drum. | |
| The washing machine is vibrating. | A foot of the washing machine hasn't been adjusted. | Adjust the foot. (**) |
| You didn't remove the transporting screws. | Remove the transporting screws. (**) | |
(*) See chapter referring to cleaning and maintenance.
(**) See chapter referring to the installation of your washing machine.
| MALFUNCTION POSSIBLE CAUSE REMEDY | ||
| The washing machine is vibrating. | There is not very much laundry in the washing machine. | This doesn't prevent the operation of the washing machine. |
| There is an excessive amount of laundry in the washing machine or the laundry is not arranged evenly. | Do not exceed the recommended amount of laundry and arrange it evenly inside the drum. | |
| The washing machine is touching a rigid object. | Ensure that the washing machine is not touching any rigid objects. | |
| There is an excessive amount of foam in the drawer for washing detergent. | You have used too much washing detergent. | Press the Start/pause button. To prevent the formation of foam, pour one spoon of softener into half a litre of water and pour this solution into the drawer for the washing detergent. After 5 - 10 minutes press the Start/pause button. Next time you wash select the correct washing detergent dosage. |
| You have used an inappropriate washing detergent. | Use only washing detergent intended for automatic washing machines. | |
| The results of the wash are not satisfactory. | Your laundry is too soiled for the selected program. | Select a more appropriate program. (see Table 1) |
| You have not used a sufficient amount of washing detergent. | Use more washing detergent, depending on its properties. | |
| The results of the wash are not satisfactory. | You have placed too much laundry in the washing machine. | Only place as much laundry into the washing machine as not to exceed the maximum capacity of the washing machine. |
| Maybe you have hard water. | Use as much washing detergent so as to meet the instructions of the washing detergent's manufacturer. | |
| The laundry is not evenly arranged inside the washing machine. | Arrange the laundry inside the washing machine so that it is evenly arranged in the drum. | |
| The water is drained out of the washing machine immediately after it has been filled. | The end of the drain hose is too low relative to the washing machine. | Locate the drain hose at an appropriate height. (**) |
| No water can be seen in the drum during the wash. | This is not a malfunction. The water is in the lower part of the drum. | - |
| There are washing detergent residues on the laundry. | Insoluble residues of the washing detergent in the form of white stains may appear on the laundry. | Set the calibration of your rinsing program on your washing machine to an additional rinse or after the laundry has dried remove the stains using a brush. |
| There are grey stains on the laundry. | These stains may be caused by oil, a cream or a lotion. | During the next wash use the maximum amount of washing detergent set by its manufacturer. |
| Spinning does not take place or it is very late. | This is not a malfunction. In this way the test of the unbalanced load may working. | The uneven contents testing system may be trying to use a homogeneous method to evenly arrange the laundry in the drum. After it has been arranged the washing machine will go to the spinning process. For the next wash, place the laundry arranged evenly into the drum. |
(**) See chapter referring to the installation of your washing machine.
PART 8: AUTOMATIC MALFUNCTION DETECTION SYSTEM
Your washing machine is equipped with a system, which during the washing process continually monitors the correct progress and in the case of any malfunction takes the necessary remedy measures and will at the same time inform you about the malfunction.
| MALFUNCTION CODE | POSSIBLE CAUSE REMEDY | |
| E01 | Open washing machine door. | Close the washing machine door. If the problem continues, turn off the washing machinedisconnect it from the power socket and immediately contact the nearest authorised service centre. |
| E03 | The pump is broken or the pump fi lter is clogged or there is a fault in the electrical connection of the pump. | Clean out the pump fi lter.If the problem persists, contact your nearest authorised service centre. (*) |
| E04 | There is an excessive amount of water in the washing machine. | The washing machine will automatically drain this water. After draining the water turn off the washing machine and disconnect it from the power socket. Shut off the water inlet and contact your nearest authorised service centre. |
(*) See chapter referring to cleaning and maintenance.
| MALFUNCTION CODE | POSSIBLE CAUSE REMEDY | |
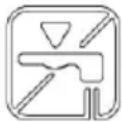 | Water outage or low water pressure | - The water supply may be clogged. Check it.- There may be a water outage.Check it. If it is so, switch the program selector to position 0. You can select a program and start the washing machine once water supply is renewed.- The water pressure may be low. Check it.- The supply hose may be bent. Check it.- The supply hose may be clogged.- Clean the supply hose fi Iters. (*)- The inlet valve fi Iter may be clogged.- Clean the inlet valve fi Iters. (*)If the problem persists, disconnect the washing machine from the power socket, shut off the water inlet and contact your nearest authorised service centre. |
 | The pump is broken or the pump fi Iter is clogged or there is a fault in the electrical connection of the pump. | - The pump fi Iter may be clogged. Clean out the pump fi Iter. (*)- The drain hose may be clogged or bent. Check the drain hose.If the problem persists, contact your nearest authorised service centre. (*) |
PART 9: INTERNATIONAL WASHING SYMBOLS
 | 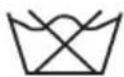 | 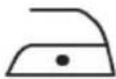 |  |
| Washing temperature | Do not wash (hand wash) | Lukewarm iron Medium hot iron | |
 |  |  |  |
| Hot iron Do not iron Do not tumble dry Hang to dry | |||
 |  |  |  |
| Drip dry. Dry fl at | Do not bleach May be bleached. | ||
 |  |  |
| These are symbols for dry cleaning. The letters instruct the cleaner on the type of agent to use. Garments bearing these symbols should not be washed in a washing machine, unless the label says otherwise. | ||
PART 10: TECHNICAL SPECIFICATIONS
| Operating voltage / frequency (V/Hz) 220 - 240 V ~ 50 Hz | |
| Total current (A) 10 | |
| Water pressure (MPa) | Max.: 1 MPaMin.: 0.1 MPa |
| Total power input (W) 2200 | |
| Max. dry laundry capacity (kg) 8 | |
| Spinning (rpm) Max.: 1400 | |
| Number of programs 15 | |
| Dimensions (height x width x depth) (cm) | 85 x 60 x 57 |
| Noise level during washing / spinning (dB) 58/78dB | |
Note: All the here mentioned data is subject to change.
PART 11: ENERGY SAVING TIPS
Energy and water consumption may vary depending on the water pressure, water hardness, water temperature, ambient temperature, amount of laundry, selection of additional functions, voltage fluctuations.
You will limit energy and water consumption if during the use of your washing machine you adhere to the capacity stated for a given program, you wash laundry that is less soiled or daily using shorter programs, if you regularly clean it and carry out maintenance on it, if you use it during the night time off-peak currents set by your electricity supplier.
INSTRUCTIONS AND INFORMATION REGARDING THE DISPOSAL OF USED PACKAGING MATERIALS
Dispose of packaging material at a public waste disposal site.
DISPOSAL OF USED ELECTRICAL AND ELECTRONIC APPLIANCES

The meaning of the symbol on the product, its accessory or packaging indicates that this product shall not be treated as household waste. Please, dispose of this product at your applicable collection point for the recycling of electrical & electronic equipment waste. Alternatively in some states of the European Union or other European states you may return your products to your local retailer when buying an equivalent new product. The correct disposal of this product will help save valuable natural resources and help in preventing the potential negative impact on the environment and human health, which could be caused as a result of improper liquidation of waste. Please ask your local authorities or the nearest waste collection centre for further details. The improper disposal of this type of waste may fall subject to national regulations for fi nes.
For business entities in the European Union
If you wish to dispose of an electrical or electronic device, request the necessary information from your seller or supplier.
Disposal in other countries outside the European Union
If you wish to dispose of this product, request the necessary information about the correct disposal method from local government departments or from your seller.

This product meets all the basic EU regulation requirements that relate to it.
Changes to the text, design and technical specifications may occur without prior notice and we reserve the right to make these changes.
NOTES
Automatická pračka
NÁVOD K POUŽITÍ
PHILCO

Famous for Quality the World Over
Vážený zákazníku,
natural_image
Top-down schematic of a medical device with directional arrows indicating movement or force (no text or labels)
natural_image
Diagram of a mechanical or electrical component with rotational arrows and control buttons (no text or symbols)OBR. 1

OBR. 2 OBR. 3

natural_image
Diagram showing a device with a mouse, plug, and screen (no readable text or symbols)Vyrovnání pračky
natural_image
Pure mechanical component diagram without any text, numbers, or symbols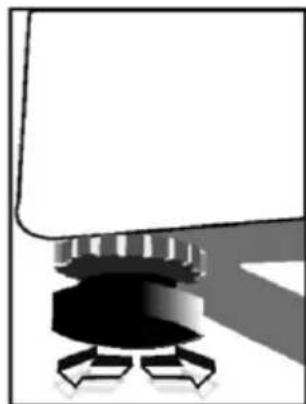
natural_image
Pure mechanical component diagram without any text, numbers, or symbolsnatural_image
Close-up of a washing machine wheel rim and vent, showing internal mechanical components (no text or symbols visible)Tabulka 1
natural_image
Simple line drawing of a hand holding a small object, no text or symbols presentnatural_image
Blank white rectangle with a small icon in the top-right corner (no text or symbols)natural_image
Simple line drawing of a basketball hoop with a dashed arrow indicating the ball trajectory (no text or symbols)
natural_image
Simple line drawing of a speech bubble with a bracket and eraser, no text or symbols presentPOZNÁMKA:
natural_image
Blank white rectangular area with a small icon in the top-right corner (no text or symbols)Dětský zámek
natural_image
Blank white image with a small icon in the top-left corner (no text or symbols)natural_image
Simple geometric diagram showing a triangle with a small symbol inside, no text or labels present.
Upozornění:
natural_image
Simple line drawing of a basketball court with an arrow pointing to the center (no text or symbols)1-A!
natural_image
Simple line drawing of a hand holding a pen, pointing at a rectangular object with a curved top (no text or symbols)2-A
natural_image
Simple line drawing of a basketball court with a magnified inset showing the front view (no text or symbols)3-A

natural_image
Simple line drawing of a hand holding a camera lens, no text or symbols present4-A

VAROVÁNÍ!
Nebezpečí opaření!
natural_image
Line drawing of a hand pressing down a small object into a window (no text or symbols)
natural_image
Illustration of a hand pressing down on a mechanical component with a downward arrow indicating motion (no text or symbols)OBR. 1 OBR. 2
Famous for Quality the World Over
Vážený zákazník,
natural_image
Technical diagram of a mechanical component with arrows indicating directional components (no text or labels)
natural_image
Diagram of a mechanical or electrical component with directional arrows indicating motion, no text or symbols present.OBR. 1

OBR. 2 OBR. 3

Vyrovnanie práčky
natural_image
Pure mechanical component diagram without any text, numbers, or symbols
natural_image
Pure mechanical component diagram without any text, numbers, or symbols- Zásuvka na pracie prostriedky
- Volič programov
- Elektronický displej a doplnkové funkcie
Popis práčky

3
natural_image
Close-up of a car wheel rim with perforated metal surfaces and central hub (no text or symbols visible)TABULKA 1
natural_image
Simple line drawing of a speech bubble with a bracket and a small object, no text or symbols presentOtvorené dvierka

natural_image
Blank white rectangular area with a small icon in the top-right corner (no text or symbols)Zamknuté dvierka
natural_image
Simple line drawing of a basketball hoop and shuttlecock (no text or symbols)
natural_image
Simple line drawing of a speech bubble with a bracket and speech bubble (no text or symbols)POZNÁMKA:
natural_image
Blank white rectangular area with a small icon in the top-right corner (no text or symbols)Detská zámka
natural_image
Blank white rectangle with a small icon in the top-left corner (no text or symbols)natural_image
Simple geometric diagram showing a triangle with a small symbol inside, no text or labels present.
Upozornenie:
natural_image
Simple line drawing of a basketball court with an arrow pointing to the center (no text or symbols)1-A!

natural_image
Simple line drawing of a hand holding a pen, pointing at a rectangular object with a curved top (no text or symbols)2-A
natural_image
Simple line drawing of a basketball court with a magnified inset showing the front view (no text or symbols)3-A

natural_image
Simple line drawing of a hand holding a camera lens, no text or symbols present4-A

VAROVANIE!
Nebezpečenstvo obarenia!
natural_image
Line drawing of a hand pressing down a small object into a window (no text or symbols)
natural_image
Illustration of a hand pressing down on a mechanical component with a downward arrow indicating motion (no text or symbols)OBR. 1 OBR. 2
is a registered trademark used under license from Electrolux International Company, U.S.A.
- Automatic Washing Machine
- USER'S MANUAL
- PHILCO
- CONTENTS
- PART 1: BEFORE PUTTING INTO OPERATION....2
- PART 2: INSTALLATION....4
- PART 3: CONTROL PANEL ....7
- PART 4: WASHING LAUNDRY....10
- PART 5: MAINTENANCE AND CLEANING....21
- PART 6: PRACTICAL INFORMATION ...... 25
- PART 7: PREVENTION OF MINOR MALFUNCTIONS ...... 26
- PART 8: AUTOMATIC MALFUNCTION DETECTION SYSTEM ...... 29
- PART 9: INTERNATIONAL WASHING SYMBOLS....30
- PART 10: TECHNICAL SPECIFICATIONS ...... 31
- PART 11: ENERGY SAVING TIPS....31
- PART 1: BEFORE PUTTING INTO OPERATION
- Important safety instructions:
- General safety instructions
- EN - 2
- Recommendation
- PART 2: INSTALLATION
- Removal of the transportation screws
- NOTE:
- EN - 4
- Levelling the washing machine
- Electrical connection
- Water supply connection
- Water drain connection
- PART 3: CONTROL PANEL
- Drawer for washing detergents
- Program selector
- EN - 8
- Electronic display
- PART 4: WASHING LAUNDRY
- First wash cycle
- Before actually washing
- Sorting laundry
- Detergent dosage
- Operating the washing machine
- Program selection
- Additional functions
- Reason for the additional function not being activated:
- Half load detection system
- Twinjet system - Dual channel system
- - Setting the spinning speed and the additional function of delayed soaking
- EN - 14
- - Setting the washing temperature
- - PREWASH - Additional function
- - RAPID WASH - Additional function
- - EASY IRONING (additional function)
- - DELAY - (additional function - delayed start)
- - Additional function - antiallergic wash
- Starting a program
- Adding/removing laundry during the wash
- Child safety lock
- Cancelling a program
- Ending a program
- PART 5: MAINTENANCE AND CLEANING
- Electronic display/warning symbols
- Notifi cation of an outage / low water pressure
- Notification of clogged pump fi Iter
- The water inlet fi Iters
- Attention:
- The pump fi Iter
- The drawer for washing detergents
- The siphon plug
- The washing machine cabinet
- WARNING!
- The Drum
- Removal of scale deposits from the washing machine
- PART6: PRACTICAL INFORMATION
- PART 7: PREVENTION OF MINOR MALFUNCTIONS
- PART 8: AUTOMATIC MALFUNCTION DETECTION SYSTEM
- PART 9: INTERNATIONAL WASHING SYMBOLS
- PART 10: TECHNICAL SPECIFICATIONS
- PART 11: ENERGY SAVING TIPS
- INSTRUCTIONS AND INFORMATION REGARDING THE DISPOSAL OF USED PACKAGING MATERIALS
- DISPOSAL OF USED ELECTRICAL AND ELECTRONIC APPLIANCES
- For business entities in the European Union
- Disposal in other countries outside the European Union
- NOTES
- Automatická pračka
- NÁVOD K POUŽITÍ
- Vyrovnání pračky
- POZNÁMKA:
- Dětský zámek
- Vyrovnanie práčky
- Detská zámka
Brand : Philco
Model : PLA 1483 W
Category : Washing machine