
PLD 1271 - Washing machine Philco - Free user manual and instructions
Find the device manual for free PLD 1271 Philco in PDF.


| Product Type | Automatic Washing Machine |
| Brand | Philco |
| Model | PLD 1271 |
| Dimensions (H x W x D) | 85 x 59.6 x 54 cm |
| Power Supply | 220-240 V ~ 50 Hz |
| Total Current | 10 A |
| Total Power Input | 2200 W |
| Water Pressure | 0.1 - 1 MPa |
| Max Dry Laundry Capacity | 7 kg |
| Maximum Spin Speed | 1200 rpm |
| Number of Programs | 15 |
| Noise Level (Wash/Spin) | 58 dB / 78 dB |
| Wash Programs | White/Cotton, Cotton 60°, Cotton 40°, Synthetics, Delicate Synthetics, Mix Wash, Wool, Hand Wash, Silk, Quick Wash, Rinse, Spin, Drain |
| Additional Functions | Prewash, Extra Rinse, Easy Ironing, Soak, Rinse Hold, Child Lock, Delayed Start, Temperature Adjustment |
| Water Supply | Single (cold) or dual (hot/cold) inlet |
| Drain Hose Height | 60 - 100 cm from ground |
| Safety Features | Child lock, door lock, overheating protection |
| Maintenance | Clean pump filter every 2-3 months, clean detergent drawer, clean water inlet filters |
| Accessories Included | Water inlet hose(s), drain hose, transportation screw plugs, user manual |
| Installation | Remove transportation screws, adjust feet, connect water and drain hoses, plug into grounded outlet |
Frequently Asked Questions - PLD 1271 Philco
User questions about PLD 1271 Philco
0 question about this device. Answer the ones you know or ask your own.
Ask a new question about this device
Download the instructions for your Washing machine in PDF format for free! Find your manual PLD 1271 - Philco and take your electronic device back in hand. On this page are published all the documents necessary for the use of your device. PLD 1271 by Philco.
USER MANUAL PLD 1271 Philco
Automatic Washing Machine
USER MANUAL
PHILCO

Famous for Quality the World Over
Dear customer,
Thank you for buying a PHILCO brand product. So that your appliance serves you well, please read all the instructions in this user's manual.
THE CONTENTS
SECTION 1: BEFORE USING ....2
• Important Safety Precautions ....2
- General Safety Precautions....2
- Recommendations....3
SECTION 2: INSTALLATION ....4
- Removal of transportation screws....4
- Adjustment of feet ....5
• Electrical connection....5
• Water supply connection....5
• Water drain connection....6
SECTION 3: CONTROL PANEL ...... 7
- Start/Pause button....7
• Function indicator lights....8
• Function buttons....9 - Spin speed selector....10
• Program knob 10
SECTION 4: WASHING YOUR LAUNDRY....11
- First wash cycle....11
• Before washing 11 - Running the machine....12
- Adjusting the wash water temperature....14
- Setting the programme startup time....14
• Child lock....15
SECTION 5: MAINTENANCE AND CLEANING....17
• Water inlet filters....17
- Pump filter....17
• Detergent drawer 18
- Siphon plug 19
• The cabinet .... 19
• The drum....19
- Remove of your machine from lime 19
SECTION 6: PRACTICAL INFORMATION....20
SECTION 7: AVOIDING MINOR FAULTS ...... 21
SECTION 8: AUTOMATIC FAILURE DETECTION SYSTEM....24
SECTION 9: INTERNATIONAL WASHING SIGNS 26
SECTION 10: TECHNICAL SPECIFICATIONS ...... 27
SECTION 11: ENERGY SAVING TIPS....27
EN - 1
SECTION 1: BEFORE USING
Important Safety Precautions
- Read carefully and safe for future reference.
- Safety of this appliance complies with the industrial standards and meets the legal requirements for safety appliances. However, we, as a manufacturer, think it is our duty to provide you the following safety precautions.
- Please keep the manual in a safe place in order to use it in future. Should the appliance be sold or transferred to another owner, or if you move, always make sure the appliance is accompanied by the instruction manual so that the new owner could get acquainted with the use of the appliance and the relevant warnings.
- Before any installation or use, you SHOULD READ carefully all the safety precautions and manual.
- Before the first use make sure the appliance has not been damaged when transported.
- Do not plug in a defective appliance. If any part of the appliance is damaged, contact your dealer or retailer.
- If the washing machine has been delivered in winter months when the temperature might drop below 0°C, store the appliance in a room temperature for 24 hours before the first use.
General Safety Precautions
• Any change in technical specifications or any other adjustment on the appliance is dangerous.
- The washing machine door heats to high temperature during washing programmes with high temperature. Do not touch the door!
- Ensure small pets cannot enter the drum. Before turning on, always check the drum is empty.
- Items such as coins, safety-pin, nails, screws, stones or any other heavy or sharp objects can cause a significant damage on the appliance and such objects should not be placed in the appliance.
- Use only the recommended quantity of softener and washing powder. In case you use higher quantity than recommended, you can damage the clothes.
• Always use the quantity of washing powder recommended by a manufacturer.
- Small pieces of clothes such as socks, shoe-laces, ribbons etc., wash in a special designed washing bag or in a pillow case because such small pieces could get stuck between the tube and the inner drum.
- Do not use the washing machine to wash any clothes with metal skeleton, or fabrics that are not edged or they get ticked off.
• After use, before cleaning or maintenance, always unplug the washing machine from the power outlet and close the water inlet.
- Never attempt to repair the appliance yourself. Repairs carried by unqualified personnel should cause an injury or serious damage on the appliance. For any repair, contact the authorised service centre. Always ask for the original spare parts.
- Do not use multi-plugs or extension cords.
- Do not plug in the appliance with a defect power cord.
- When the power cord is damaged, it should be replaced only by a manufacturer or its authorised service centre to avoid any dangerous situation.
- Do not unplug the socket plug by pulling the power cord. Disconnect the power cord by holding the socket plug.
- Do not plug the appliance with wet hands.
- Never touch the appliance with wet hands or feet.
- Do not open the detergent drawer during the washing process.
EN - 2
- Never attempt to open the door during the washing process.
- As the washing machine can reach high temperatures during the washing process, do not touch the draining hose or the water coming out of the hose.
- In case of any defect, at first turn off the appliance, unplug from the power outlet and close the water inlet. Do not attempt to repair the appliance yourself. Contact the local authorised service centre.
- Do not forget the packaging material could be dangerous for your children.
- Do not leave children to play with the appliance.
- Keep pets at safe distance from the washing machine.
- The washing machine should be operated only by persons who are fully familiar with the regulations, precautions and operation described in this instruction manual.
- Your washing machine is only for household use. In case of its use for commercial purposes you can lose the warranty.
- Do no install the appliance on the carpets or other similar surfaces because it should block the ventilation slots at the bottom side.
- Do not place the outlet hose into a container, bucket or sink.
RECOMMENDATIONS
- The detergent or softener in contact with air for a long time will dry and stick to your detergent drawer. To avoid this put your detergent and softener into the detergent drawer just before washing.
- It is recommended that you use pre-washing program for only very dirty clothes.
- Please do not exceed the maximum loading capacity.
- The appliance is not intended for use by people (including children) with reduced physical, sensor or mental capabilities, or lack of experience and knowledge, unless they have been given supervision or instruction concerning use of the appliance by a preson responsible for their safety. Children should be supervised to ensure that they don't play with the appliance.
- If you will not use your machine for a long time, unplug your machine, close the water supply and leave the door open in order to keep the inside of the machine dry and for prevention from unpleasant odour.
- As a result of the quality control procedures, a certain amount of water may remain in your machine. This is not harmful for your machine.
- We recommend that the first wash is performed with the White 90 - 95° program (depending on the model) without any laundry, put 1/2 a measuring cup of washing agent into the second compartment for the washing agent.
SECTION 2: INSTALLATION
You must pay attention to the following issues before using your washing machine.
REMOVAL OF TRANSPORTATION SCREWS
- Transportation screws, which are located at the back side of the machine, must be removed before running the machine.
- Loosen the screws by rotating counterclockwise by a suitable wrench. (DIAGRAM-1)
- Remove the screws by pulling them. (DIAGRAM-2)
- To the holes where the transport screws have been removed, insert the plastic transport screw taps found in the accessories bag. (DIAGRAM-3)
- The transportation screws, that have been removed from the machine should be kept in hand for any other transportation necessities.
NOTE:
Defects caused by running the washing machine with installed transportation screws, are not subject to warranty.
DIAGRAM - 1 DIAGRAM - 2 DIAGRAM - 3

natural_image
Abstract graphic with curved arrow and circular emblem (no text or symbols)
natural_image
Close-up of a black mechanical component with a circular opening and a downward arrow (no text or symbols visible)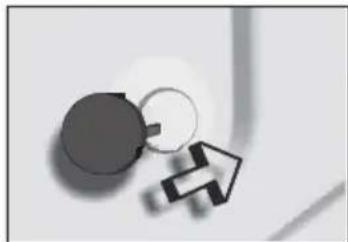
natural_image
Abstract graphic with a gray circle and arrow, no text or symbols present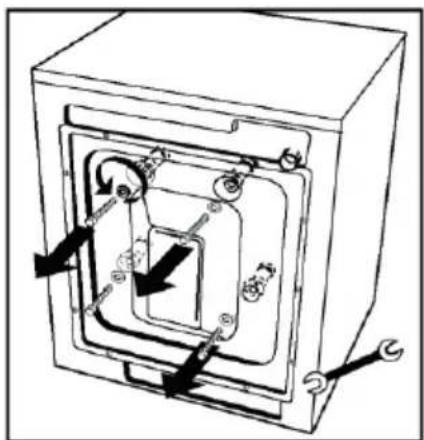
natural_image
Technical diagram of a mechanical device with internal components and directional arrows indicating motion (no text or symbols)ADJUSTMENT OF FEET
- Do not install your machine on rugs or similar surfaces.
- For your machine to work silently and without any vibration, it should be settled on a flat, non-slippery and tough ground.
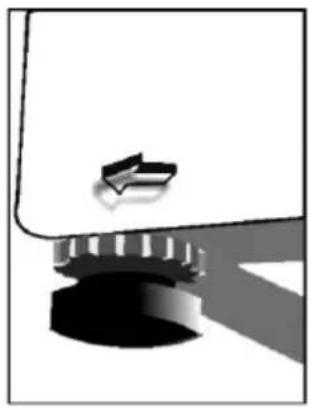
You can adjust the balance of your machine from its feet:
- First, loosen the plastic adjustment nut.
- Adjust by rotating the feet upwards or downwards.
• After the balance has been reached, tighten the plastic adjustment nut again by rotating it upwards. - Never put cartons, wooden blocks or similar materials under the machine to balance the irregularities on the level of the ground.
natural_image
Pure mechanical component diagram without any text, numbers, or symbols
natural_image
Pure mechanical component diagram without any text, numbers, or symbolsELECTRICAL CONNECTION
- Your washing machine works with 220-240V and 50Hz.
- A special grounded plug has been attached to the network cable of your washing machine. This plug must definitely be inserted to a grounded socket with 10 ampere. The fuse flow value of the electricity line attached to this should also be 10 ampere. If you have no such sockets and fuses in your house, let it be made by a qualified electrician.
- Our company will not be responsible for any damages that may occur as a result of usage without grounding.
WATER SUPPLY CONNECTION
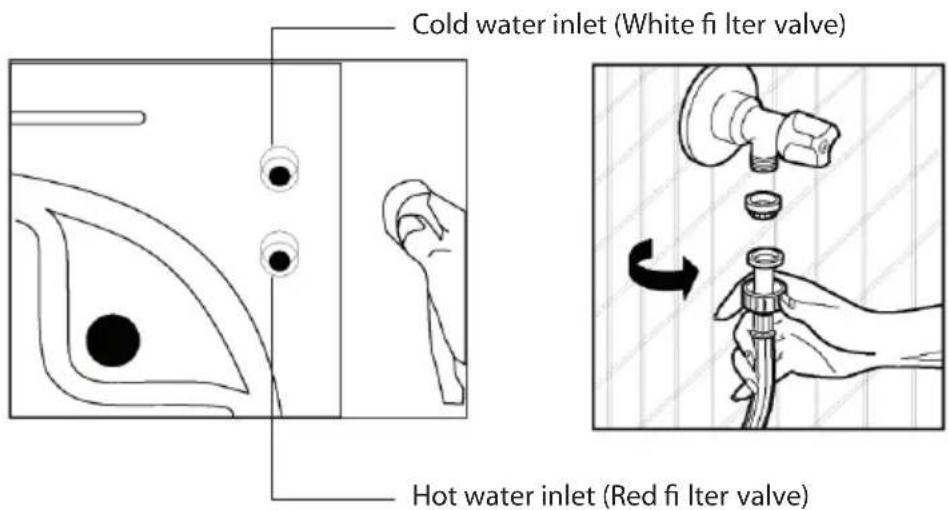
- Depending on the features your machine, may be with single water inlet (cold) or double water inlet (cold/hot). The white headed hose is for cold water inlet and red headed hose is for hot water inlet (valid for machines with hot&cold water inlet).
- To prevent leakage from the connection joints, 1 (valid for cold water inlet) or 2 (valid for machines with hot&cold water inlet) seals are included in the hose packing. Fit these seals at the end of water inlet hoses on the tap side.
- Connect the white headed hose to the water inlet valve with white filter and connect the red headed hose to the water inlet valve with red filter (latter is valid in machines with hot&cold water inlet). Tighten the plastic parts of the connections with your hand. Please call a qualified plumber for safer connections.
• Water pressure of 0,1-1 MPa from your tap will enable your machine to work more efficiently. (0,1 MPa pressure means water flow of more than 8 liters in 1 minute from a fully opened tap.)
• After connections are completed, check for the non-leakage of the connection joints by turning on your tap completely.
- Be sure that water inlet hoses are not folded, broken or crushed.
- Mount the water inlet hoses to a 3"/4, geared water tap.
- If the washing machine has a dual water supply (for hot and cold water), the temperature of the hot water should not exceed 70 °C.
WATER DRAIN CONNECTION
- Be sure that water inlet hoses are not folded, twisted, crushed or elongated by stretching.
• Water drain hose should be mounted at a height of minimum 60 cm, maximum 100 cm from the ground. - The end of the water drain hose may directly be fitted to the dirty water outlet hole or a special apparatus mounted on the outlet bracket of the wash-stand.
- Never attempt to extend the water drain hose by adding extra parts.

NOTE:
Do not place the drain hose into a container, bucket or sink.
SECTION 3: CONTROL PANEL

- Detergent drawer 6. Start/pause and cancel button
- Program knob 7. Function buttons
- Electronic indicator
-
Spin speed selector
-
Washing operation light

START/PAUSE BUTTON
This button is used for starting a selected programme or putting a programme in progress on pause.


FUNCTION INDICATOR LAMPS
Pressing the start/hold button or any other function button switches on the lamps found above the buttons and the control panel, which indicate the wash stages of programmes. When any one of these lamps is on it means that certain programme is in use. The lamp is off when any function button or the start/hold button is pressed, or the selected function has finished its operation.

mode
MENU BUTTON
Using the menu button you can access the functions for setting the temperature and the programme startup time of your machine.
select
SELECT BUTTON
With the select button you can change the functions for setting the temperature and the programme startup time of your machine any way you wish.
ELECTRONIC INDICATOR
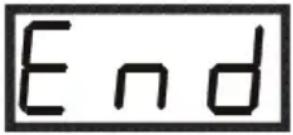
With the help of the electronic indicator you can adjust the temperature and the programme startup time, and also see the time the machine will complete the wash. The electronic indicator will warn you by showing an error icon on its indicator in case there should be any errors during the operation of your machine, and at the same time inform you of the completion of the selected wash programme by reading "END" on its indicator.

FUNCTION BUTTONS

Rinse hold
This function is recommended to be used when the clothes cannot be taken immediately after the end of the program. This will prevent occurrence of wrinkles. When this button is pressed, the last rinsing water is not drained. For the program to continue from the start pause, repress the start pause.
If you do not want your sensitive clothes to be spinned or you want them to be spinned sensitively, turn the program knob to P (off) position. Bring the program knob on one of the draining or spinning programs you desire and press the start/pause button. If the program you have selected is a drain program, your machine will draining the water inside. If you have selected a spinning program, your machine will perform a spinning operation and then end the program.

Extra rinse
You can have one more rinsing done in addition to the rinses which your machine has made in all washing programs by using this function.

Easy ironing
By using this function, you can ensure your clothes to come out less wrinkled after the washing.

Soak
Using this function will ensure better cleaning by leaving your clothes in water with detergent for a certain period of time before your machine takes in the initial water and starts washing. This function is recommended to be used for very dirty clothes.

WARNING!
If you have forgotten to use an additional function and the machine has started the wash operation press the button of the additional function you wish to select; if the indicator lamp above it keeps lighting the additional function you selected will become active. If the lamp stays lit for a certain while and then goes out the additional function you selected will not become active.
NOTE:
Our products contain electronic cards and touchscreen buttons. Lightly pressing on the buttons will suffice to activate the functions.
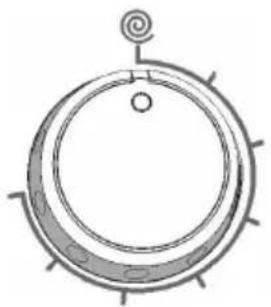
SPIN SPEED SELECTOR
By the spin speed selector knob, you can make the adjustment of speed for the process of spinning your clothes. The speed adjustment interval is between O (No spin) and the maximum spinning speed of your machine.
natural_image
Simple line drawing of a circular mechanical component with no text or symbolsNOTE: Do the spinning process of your sensitive and delicate clothes in the most appropriate mode.
PROGRAM KNOB
With the program knob, you can select the program with which you desire to wash your clothes. You can adjust the program selection process by turning the program knob in both directions. You must be careful that the adjustment sign of the program knob is exactly on the program you want to select. When you bring the programme knob to P (off) position, your machine will carry out the drain operation in order to finish (cancel) programme cycle. After drain is finished, machine will go into Standby Mode. You can now select another programme you wish to start.

A. WHITE/COTTON
I. WOOL
B. WHITE/COTTON/PREWASH
C. COTTON 60°
D. COTTON 40°
E. SYNTHETICS
F. SYNTHETICS/PREWASH
G. DELICATE SYNTHETICS
H. MIX WASH

J. HAND WA
SECTION 4: WASHING YOUR LAUNDRY
- Plug the machine.
- Open the tap water.
First wash cycle
There may be water left inside your machine after factory tests and trials. It is recommended that the first wash cycle should be made without any laundry so that carry out this water; pour half a measuring cup of normal all-purpose detergent into compartment 2 and select cotton program at 90°C.
BEFORE WASHING
Discrimination of your laundry
- Discriminate your clothes according to their types (cotton, synthetic, sensitive, woolen, etc.), washing temperatures and level of dirtiness.
- Never wash your white and coloured clothes together.
- Since your new coloured clothes may shed dye on the first wash, wash them separately.
- Be careful that no metal pieces are found on or in the pockets of your clothes, remove if there is any.
- Zip and button your clothes.
- Remove the plastic or metal hooks of the curtains and laces or place them inside a washing bag and tie.
- Pull the textiles like trousers, knitted fabric, t-shirt and sweat shirt inside out.
- Wash your small clothes like socks and handkerchiefs in a washing bag.


Wash up tol 90 °C Wash up tol 60 °C Wash up tol 30 °C Not washable in
washing n
Placement of the clothes into the machine
- Open the door of your machine.
- Fill your clothes in your machine in a well-spread manner.
- Place each cloth separately.
- When you shut the door of your machine, be careful that no cloth is jammed between the cover and the gasket.
- Shut the door of your machine tightly otherwise your machine will not start the washing process.
Filling detergent in the machine
The quantity of the detergent that you will fill in your machine depends on the following criteria:
- Your detergent consumption will change according to the dirtiness level of your clothes. For your slightly dirty clothes, do not pre-wash and put a small amount of detergent in the compartment no.2 of the detergent drawer.
- For your excessively dirty clothes, select a program with pre-washing, fill 14 portion of the detergent you will put in compartment 1 in the detergent drawer and the remaining portion in compartment 2.
- In your machine, use the detergents developed especially for automatic washing machines. The quantities that will be used for your clothes are written on the packing of the detergents.
- As the hardness of your water increases, the amount of the detergent to be consumed will also increase.
• As the amount of your clothes increases, the amount of the detergent to be consumed will also increase.
- Fill your softener in the softener compartment in your detergent drawer. Do not exceed the MAX level. Otherwise, the softener will diffuse in the washing water via the siphon.
- The softeners with high density should be diluted with some water before filling in the drawer. That is because the softener with high density obstructs the siphon and prevents the flow of the softener.
- You can use fluid detergents in all programs without pre-washing. For this, mount the fluid detergent level plate in the second compartment of the detergent drawer and arrange the amount of fluid detergent according to the levels on this plate.
RUNNING THE MACHINE
Program selection and features
Select programmes and additional functions appropriate for your laundry with the help of the tables shown on pages 16.
Start/Pause button
Pressing this button you can start the programme you selected or put the programme in progress on pause. When the programme you selected starts its operation the lamp above the start/pause button will start lighting. When you wish to put the selected programme on pause press the start/pause button once. The lamp above it will start to flash. In order to restart the programme from the point it was put on pause at you will have to press the start/pause button once again.
Starting the program
- Adjust the programme button to a programme you wish to select.
- If the programme you selected is a wash programme the wash operation lamp will flash.
- If the programme you selected is a rinse/spin or drain programme the lamps indicating the related selection will flash.
- Start the selected programme by pressing the start/pause button.
- When you start the programme by pressing the start/pause button the lamps will light up indicating that the start/pause button is active and the wash operation is in progress.


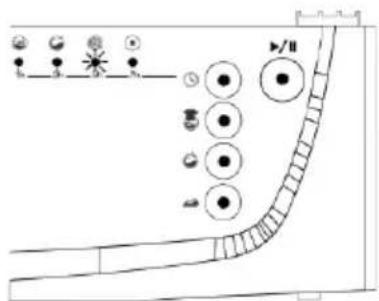
Selecting an additional function button
- Adjust the programme button to a programme you wish to select.
- If the programme you selected is a wash programme the wash operation lamp will light up.
- If the programme you selected is a rinse/spin or drain programme the lamps indicating the related selection will light up.


In order to select an additional function:
- Press once the additional function button you wish to select.
- If the lamp above the function button keeps lighting it means you have selected the function you wished to select.
- If the lamp above the function button is flashing it means you cannot use that additional function for the wash programme you selected.
- Start the selected programme by pressing the start/pause button.
- When you start the programme by pressing the start/pause button the lamps will light up indicating that the start/pause button is active and the wash operation is in progress.

Cancelling a programme
If you wish a certain programme in progress to finish early:
- Press the start/hold button for 4 seconds.
- Your machine will carry out the discharge operation necessary for the programme to finish, and then end the programme.
- The electronic indicator will keep flashing "END".

Programme end
- Your machine will stop automatically when the programme you selected has finished.
- The electronic indicator will read "END".

- Bring the programme button to the P (off) position.
- The door lock of your machine will automatically release about two minutes after the programme has finished. You can open the door and take out the laundry by pulling the door handle towards yourself.
• After you have taken out the laundry leave the door open so that the machine interior can dry. - Unplug the machine.
- Turn off the water tap.
ADJUSTING THE WASH WATER TEMPERATURE
In order to adjust the temperature:
- Press the MODE button once after selecting the programme and the (additional) function(s) you will use.
- The electronic indicator will show the wash temperature for the programme you selected.
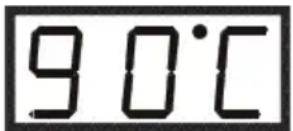
• You can reduce this temperature value down to the wash temperature value you prefer by using the select button.
- If you wish to wash your laundry in cold water press the select button until the electronic indicator will read "CLD".

- If you have skipped the temperature level you prefer you can readjust it by continuously pressing the select button.
If you wait for longer than five seconds without pressing any button on this menu the electronic indicator will return to the start.
If no temperature adjustment is made the wash operation will be performed at maximum temperature depending on the features of the programme.
SETTING THE PROGRAMME STARTUP TIME
In order to set the programme startup time of your machine:
- Press the MODE button twice after selecting the programme and the (additional) function(s) you will use.
- The electronic indicator will read "0 h".

EN - 14
- Specify after how many hours you wish the programme you selected to start and adjust this delay time by using the select button.
• The delay time can be set at a value between 1-23 hours.
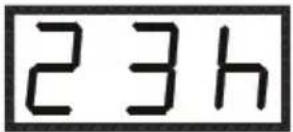
- Set the delayed start as follows:
- Set the delay time you prefer by using the select button.
- The electronic indicator will flash the "h" next to the delay time.
- You can activate the delayed start by pressing the Start/Pause button.
If you have skipped the delay time you prefer you can readjust it by pressing the select button.
If you wait for longer than five seconds without pressing any button on this menu the electronic indicator will return to the start.
Child lock
Your machine is equipped with a child lock in order to prevent a programme's operation from being affected by a push on a button during a wash operation. The child lock will become active after the first and second function buttons on the control panel are pressed at the same time and for longer than three seconds. When it becomes active the electronic indicator will flash "0:-n" and the indicator will return to its previous position. In case any button is pressed the electronic indicator will warn you by flashing "0:-n". In order to deactivate it you will have to press the same buttons for longer than three seconds. When the lock is no longer active the electronic indicator will read "0:-n" for a short while. When the programme has finished, child lock will automatically be deactivated.

Table 1
| PROGRAM | Detergent Compart. | Max. Dry Load Capacity (kg) | Type of Laundry Explanations | |
| A-WHITE COTTON | 2 7 Dirty, boil, cotton and linen textile | Underwears, sheet, table cloth, t-shirt, shirt, towel(max.3,5 kg) | ||
| B-WHITE COTTON (PREWASH) | 1+2 7 | Very dirty, cotton, coloured and linen textile | ||
| C-COTTON 60° | 2 7 Dirty, cotton, coloured and linen textile | |||
| D-COTTON 40° | 2 | 7 | Dirty, cotton, coloured and linen textile | |
| E- RESISTANT SYNTHETICS | 2 3,5 | Dirty, synthetic or synthetic mixture textile | Nylon socks, blouse | |
| F- SYNTHETICS (PREWASH) | 1+2 3,5 | Very dirty, synthetic or synthetic mixture textile | ||
| G- DELICATE SYNTHETICS | 2 3,5 | Dirty, synthetic or synthetic mixture textile | ||
| H-MIX WASH 2 3,5 | Slightly dirty, cotton, coloured and linen textile | T-shirt, nylon socks, shirt, | ||
| I-WOOL 2 2 | Dirty, hand and machine to wash wool laundry | All wool laundry | ||
| J-HAND WASH 2 2 | Very slightly dirty, cold water, hand and machine to wash wool laundry | |||
| K-SILK 2 2 | Very slightly dirty, cold water, hand and machine to wash wool laundry | Silk mixture laundry | ||
| L-QUICK WASH 2 3 5 | Slightly dirty, cotton, coloured and linen textile | Underwears, sheet, table cloth, t-shirt, shirt, towel | ||
| RINSE | When you need an additional rinsing to be done to your clothes after the washing process, you can use this program for all kinds of clothes. | |||
| SPIN | You can use this program, when you need an additional spinning to be done to your clothes after the washing process. Please do not use this program for your delicate or woolen laundry. | |||
| DRAIN | This program is used to drain the dirty water inside after the washing process of your machine. If you want the water inside your machine to be drained before the program ends, you can use this program. | |||
Program duration, energy consumption and water consumption values may vary according to wash load weight and type, selected extra functions, tap water and ambient temperature.
SECTION 5: MAINTENANCE AND CLEANING

- Unplug your machine.
- Close the water tap.
WATER INLET FILTERS
On the tap part of your machine's water inlet hose and at the ends of water inlet valves, there are filters to prevent entrance of the dirt and foreign materials in the water to the machine. If the machine is unable to receive sufficient water although your water tap is opened, these filters should be cleaned.
- Remove the water inlet hose.
- Remove the filters found on the water inlet valves by using a pincer and wash thoroughly with a brush.
- Clean the filters of the water inlet hoses located on the tap side by removing manually together with the seal.
• After you clean the filters, you can fit them the same way as you have removed.


Attention:
The water inlet valves may be blocked by a contaminated water supply or because of inadequate necessary maintenance, or the valves may be damaged, which may cause a water to constantly flow through. For these reasons such types of malfunctions are not covered by the warranty.
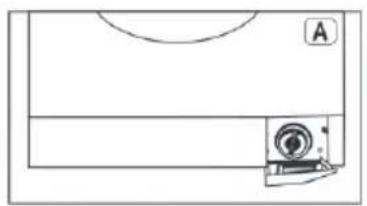
PUMP FILTER
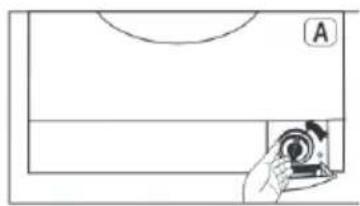
The pump filter system elongates the life of your pump, which is used to drain the dirty water. It prevents lint to enter the pump. Cleaning of your pump filter in every 2-3 months is recommended. To clean your pump filter:
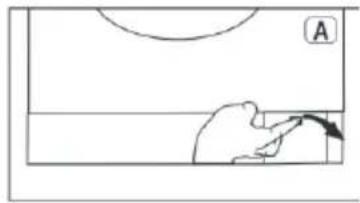
- Open the cover on the bottom moulding.
- Before opening the filter cover, place a cup in front of the filter cover to prevent flow of the remaining water in the machine.
- Loosen the filter cover by rotating it counter clockwise and drain the water.
- Remove the foreign materials from the filter.
-
Check for the rotation of the pump manually.
• After you have cleaned the pump, fit the filter cover by rotating clockwise. -
Put the kickplate cover into the place.
- Do not forget that if you do not fit in the filter cover properly, it will leak water.

natural_image
Simple line drawing of a basketball court with an arrow pointing to the center area (no text or symbols)1-A!

natural_image
Simple line drawing of a hand holding a pen, pointing at a horizontal bar (no text or symbols)2-A

natural_image
Simple line drawing of a basketball court with a circular target and a corner aperture (no text or symbols)3-A
natural_image
Simple line drawing of a hand holding a camera lens, no text or symbols present4-A

WARNING!
Danger of being scalded!
Since the water inside the pump maybe hot, wait for it to cool.
DETERGENT DRAWER
Detergents may cause residue buildup in the detergent drawer and in its slot over time. Take out the detergent drawer periodically to clean up the accumulated residue. In order to take out the drawer:
• Pull the drawer to its end (DIAGRAM-1).
- Keep pulling by pressing on the siphon lid inside the drawer pulled to its end, and remove the drawer from its place (DIAGRAM-2).
- Wash it up with water with the help of an old toothbrush.
- Collect the residues inside the drawer slot without letting them drop into the machine.
• After thoroughly drying the drawer put it back in its place reversing the removal procedure.

natural_image
Line drawing of a hand inserting a black object into a device (no text or symbols)
natural_image
Illustration of a hand pressing down on a mechanical component with a downward arrow indicating motion (no text or symbols)DIAGRAM - 1 DIAGRAM - 2
EN - 18
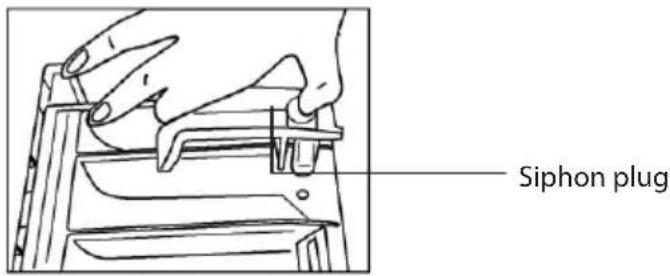
SIPHON PLUG
Pull out the detergent drawer. Remove the siphon plug and clean the residues of the softener thoroughly. Fit the cleaned siphon plug in its location. Check if it placed properly.
THE CABINET
Clean the exterior surface of the cabinet of your machine with lukewarm water and a cleaning substance that will not irritate the cabinet. After rinsing with clean water, wipe it with a soft and dry cloth.

WARNING!
If the machine is installed in a location where the ambient temperature can fall below 0\ ircC , do the following when it will not be in use:
- Plug in the machine.
- Close the water tap and pull out the water inlet hose or hoses from the tap.
- Place the ends of the water drain and water inlet hoses in a cup on the ground.
- Adjust the program knob to "Draining" program.
• The program ready light will be on. - Run the program by pressing the start/pause button.
- Unplug your machine when the program is over (program end light is on).
When you complete these proces, the remaining water inside the machine will be drained and thus formation of ice in the machine will be prevented. When you operate your machine again, be sure that the ambient temperature is above 0 °C.
THE DRUM
Do not leave metal parts like needles, staples or coins, etc., inside your machine. These pieces cause formation of rust stains in the drum. To eliminate these stains of rust, use a cleaning substance without chlorium and follow the warnings of the cleaning substance producer. For cleaning of the rust stains, never use dish-washing wires or similar rough objects.
REMOVE OF LIME FROM YOUR MACHINE
If you arrange the amount of the detergent you use in your machine properly, there will be no need for lime removal. However, if you desire to apply the removal procedure, use the lime protectors in the market and pay attention to their warnings.

WARNING!
The lime eliminating substances contain acids and this may cause colour modifications in your clothes along with an adverse effect on your machine.
SECTION 6: PRACTICAL INFORMATION

Alcoholic beverages: The stain point, should first be washed with cold water, than should be wiped with glycerine and water and be rinsed with water mixed with vinegar.
Shoe Polish: The stain should be slightly scratched without ruining the cloth, rubbed with detergent and rinsed. In case it is not eliminated, it should be rubbed with 1 unit of pure alcohol (96 degrees) mixed in 2 units of water and then washed with lukewarm water.
Tea and coffee: Stretch the stained area of your cloth on the top of a container and pour water as hot as the type of your cloth can endure on it. If the type of your cloth is suitable, wash it with lye.
Chocolate and cocoa: By leaving your clothes in cold water and rubbing with soap or detergent, wash it in the highest temperature that the type of your cloth can endure. If there is still a stain of oil left, wipe with oxygenated water (in proportion of 3%).
Tomato paste: After scraping the dried pieces without ruining the cloth, leave in cold water for about 30 minutes and wash by rubbing with detergent.
Meat broth-egg: Eliminate the dried stain residues and wipe with a sponge or soft cloth wetted in cold water. Rub with detergent and wash with diluted lye.
Grease and oil stains: First wipe the residues. Rub the stain with detergent and then wash with lukewarm soapy water.
Mustard: First apply glycerine to the stained area. Rub with detergent and then wash. If the stain still does not disappear, wipe with alcohol (On synthetic and coloured cloth, a mixture of 1 unit alcohol, 2 units water should be used)
Blood stain: Lay your clothes in cold water for 30 minutes. If the stain still does not disappear, lay in mixture of water and ammonia (3 table-spoons of ammonia in 4 liters of water) for 30 minutes.
Cream, ice-cream and milk: Lay your clothes in cold water and rub the stained area with detergent. If the stain has still not disappeared, apply lye on the fabric of your clothes in proper proportion.(Do not use lye on coloured clothes.)
Mould: Mould stains should be cleaned as soon as possible. The stain should be washed with detergent, and if it does not disappear, it should be wiped with oxygenated water (in proportion of 3%).
Ink: Hold the stained area under cold water and wait until the inky water completely runs off. Then rub with water diluted with lemon juice and detergent, wash after waiting for 5 minutes.
Fruit: Stretch the stained area of your clothes on the top of a container and pour cold water on it. Do not pour hot water on the stain. Wipe with cold water and apply glycerine. Wait for 1-2 hours and rinse after wiping with a few drops of white vinegar.
Grass stain: Rub the stained part with detergent. If the type of fabric is suitable for use of lye, wash it with lye. Rub your woolen clothes with alcohol. (For coloured ones, a mixture of 1 unit pure alcohol and 2 units of water).
Oil Paint: The stain should be eliminated before it dries by applying thinner on it. Then it should be rubbed with detergent and washed.
Burnt stain: If your cloth is suitable for use of lye, you can add lye into your washing water. For woolen fabric, a cloth damped in oxygenated water should be covered on the stain and it should be ironed with a dry cloth on it. It should be washed after rinsing well.
SECTION 7: AVOIDING MINOR FAULTS
All repairing which must be done on the machine should be done by authorized service. When a repairing is required for your machine or you are unable to eliminate the failure with the help of the information given below:
- Unplug the machine.
- Close the water tap.
- Apply to the nearest authorized service station.
| FAILURE PROBABLE | CAUSE METHODS OF ELIMINATION | |
| Your machine does not operate. | It is unplugged. Insert the plug into the socket. | |
| The fuse has burnt out. Change your fuse. | ||
| The electric power is off. Check the electric power. | ||
| Start/pause button has not been pressed. | Press the start/pause button. | |
| The program knob is in P (off) status. | Bring the program knob on the desired status. | |
| The door is not shut properly. | Shut the door properly. You should hear the click. | |
| Your machine does not receive water. | Water tap is closed. | Open water tap. |
| The water inlet hose may be bent. | Check the water inlet hose. | |
| The water inlet hose is obstructed. | Clean the filters of water inlet hose. (*) | |
| The valve inlet filter is obstructed. | Clean the valve inlet filters. (*) | |
| The door is not shut properly. | Shut the door properly. You should hear the click. | |
| Your machine is not draining water. | The drain hose is obstructed or bent. | Check the drain hose. |
| The pump filter is obstructed. | Clean the pump filter. (*) | |
| The clothes are not placed inside the machine in a well-balanced manner. | Spread the clothes inside the machine in an orderly and well-balanced manner. | |
| Your machine is vibrating. | The feet of your machine are not adjusted. | Adjust the feet. (**) |
| Transportation screws are not removed. | Remove transportation screws. (**) | |
(*)See the section concerning the maintenance and cleaning of your machine.
(**)See the section concerning installations your machine.
| FAILURE PROBABLE | CAUSE METHODS OF ELIMINATION | |
| Your machine is vibrating. | There is a small amount of clothes in the device. | It does not prevent operation of the machine. |
| Excessive amount of clothes are filled in the machine or the clothes are not placed in a well-balanced manner. | Do not exceed the recommended quantity of clothes and spread your clothes in the machine in a well-balanced manner. | |
| Your machine touches a ripid object. | Prevent your machine's leaning on a tough place . | |
| Excessive foam in the detergent drawer. | Too much detergent has been used. | Press the start/pause button.In order to stop the foam,dilute one table-spoon of softener in half liter of water and pour it in the detergent drawer.Press the start/pause button after 5-10 minutes.Arrange the amount of the detergent properly in the next washing process. |
| Wrong detergent has been used. | Use only the detergents produced for full automatic machines. | |
| The washing result is bad. | Your laundry too dirty for the program you have selected. | Select a suitable program.(see Table-1) |
| The amount of detergent used is not sufficient. | Use more detergent according to the detergent. | |
| The washing result is not good. | Clothes exceeding the maximum capacity has been filled in your machine. | Put the clothes in your machine in a manner not to exceed its maximum capacity. |
| Your water may be hard. | Use the amount of detergent according to the declaration of the detergent producer. | |
| Distribution of the clothes in your machine is not well-balanced. | Spread the clothes inside the machine in an orderly and well-balanced manner . | |
| The water is drained from the machine as soon as it is filled. | The end of the water drain hose is in a position too low according to the machine. | Place the water drain hose in an appropriate height.(**) |
| No water is seen in the drum during washing. | No failure. The water is at the lower part of the drum. | - |
| There are residues of detergent on the clothes. | The pieces of some detergents which do not dissolve in water may stick to your clothes as white stains. | By calibrating your machine for "Rinsing" program,make an additional rinsing or eliminate the stains After drying with the help of a brush. |
| There are gray stains on the clothes. | These stains may be caused by oil,cream or ointment . | In the next washing operation, use the maximum detergent amount declared by the detergent producer. |
| The spinning process is not done or starts with delay . | No failure. The unbalanced load control may works in that way. | The unbalanced load control system will try to distribute your clothes in a homogenous manner. After your clothes are distributed, passage to spinning process will be realized.In the next washing process,place your clothes into the machine in a well-balanced manner. |
(**) See the section concerning installations your machine.
SECTION 8: AUTOMATIC FAILURE DETECTION SYSTEM
Your machine is equipped with systems which will both take the necessary precautions and warn you in case of any failure by controlling it self constantly during the washing processes.
| FAILURE CODE PROBABLE FAILURE THE PROCESS TO BE DONE | ||
 | The door is not shut properly. | Shut the door properly so that you hear the click. If the problem persists, turn off the machine unplug and apply to the nearest authorized service immediately. |
 | The water level in your machine is below heater. The pressure of your water supply may be low or locking. | Turn on the tap to the end. Water may be cut, check it. If the problem is still continuing, your machine will automatically stop after a while. Unplug your machine, turn off the tap and apply to the nearest authorized service. |
 | The pump has failed or the pump fi Iter is obstructed. | Clean the pump fi Iter. If the problem persists, apply to the nearest authorized service.(*) |
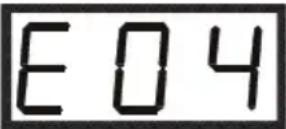 | There is an excessive amount of water in your machine. | Your machine will automatically drain the water. After your machine has completed the draining process, shut down your machine and unplug. Close the tap and apply to the nearest authorized service. |
(*) See the section regarding the maintenance and cleaning of your machine.
| FAILURE CODE PROBABLE FAILURE THE PROCESS TO BE DONE | ||
 | The heater of your machine or the heat sensor has failed. | Shut down your machine and unplug. Turn off your tap and apply to the nearest authorized service. |
 | The motor has failed. | Shut down your machine and unplug. Turn off the tap and apply to the nearest authorized service. |
 | Electronic card has failed. | Shut down your machine and unplug. Turn off the tap and apply to the nearest authorized service. |
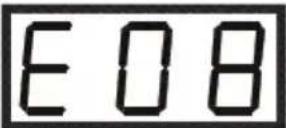 | The motor has failed. | Shut down your machine and unplug. Turn off the tap and apply to the nearest authorized service. |
| FAILURE CODE PROBABLE FAILURE THE PROCESS TO BE DONE | ||
 | The network voltage is too high or too low. | If the network voltage is lower than 150V or higher than 260V, your machine will automatically stop. When the network voltage is recovered, your machine will continue its operation. |
 | Communication error. | Shut down your machine and unplug. Turn off the tap and apply to the nearest authorized service. |
SECTION 9: INTERNATIONAL WASHING SIGNS
 |  |  |  |
| Washing temperature | Do not wash (hand wash) | Lukewarm iron | Medium hot iron |
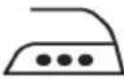 |  |  |  |
| Hot iron Do not iron Do not tumble dry Hang to dry | |||
 |  |  | 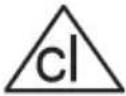 |
| Drip dry Dry fl at Do not bleach Handy to bleach | |||
 |  |  |
| All of these are dry cleaning symbols. The letters are to instruct the cleaner what type of solvent to be used.Garments bearing these symbols should not be washed in your machine unless the label says otherwise. | ||
SECTION 10: TECHNICAL SPECIFICATIONS
| Model PLD 1271 | |
| Operating voltage / frequency (V/Hz) 220 - 240 V ~ 50 Hz | |
| Total current (A) 10 | |
| Water pressure (MPa) | Max.: 1 MpaMin.: 0,1 Mpa |
| Total power input (W) 2200 | |
| Max. dry laundry capacity (kg) 7 | |
| Spinning (rpm) Max. 1200 | |
| Number of programs 15 | |
| Dimensions (height x width x depth) (cm) | 85 x 59,6 x 54 |
| Noise level during washing / spinning (dB) 58/78 | |
Note: All the here presented data is subject to change.
SECTION 11: ENERGY SAVING TIPS
Energy and water consumption may vary depending on the water pressure, water hardness, water temperature, ambient temperature, amount of laundry, selection of auxiliary functions, voltage fluctuations.
You will limit energy and water consumption if during the use of your washing machine you adhere to the capacity stated for a given program, you wash clothes that are less soiled or daily using shorter programs, if you regularly clean it and carry out maintenance on it, if you use it during the night time off-peak currents set by your electricity supplier.
INSTRUCTIONS AND INFORMATION REGARDING THE DISPOSAL OF USED PACKAGING MATERIALS
Dispose of packaging material at a public waste disposal site.
DISPOSAL OF USED ELECTRICAL AND ELECTRONIC APPLIANCES

The meaning of the symbol on the product, its accessory or packaging indicates that this product shall not be treated as household waste. Please, dispose of this product at your applicable collection point for the recycling of electrical & electronic equipment waste. Alternatively in some states of the European Union or other European states you may return your products to your local retailer when buying an equivalent new product. The correct disposal of this product will help save valuable natural resources and help in preventing the potential negative impact on the environment and human health, which could be caused as a result of improper liquidation of waste. Please ask your local authorities or the nearest waste collection centre for further details. The improper disposal of this type of waste may fall subject to national regulations for fi nes.
For business entities in the European Union
If you wish to dispose of an electrical or electronic device, request the necessary information from your seller or supplier.
Disposal in other countries outside the European Union
If you wish to dispose of this product, request the necessary information about the correct disposal method from local government departments or from your seller.

This product meets all the basic EU regulation requirements that relate to it.
Changes to the text, design and technical specifications may occur without prior notice and we reserve the right to make these changes.
NOTES
EN - 29
Automatická pračka
NÁVOD K OBSLUZE
PHILCO

Famous for Quality the World Over
Vážený zákazníku,
natural_image
Abstract graphic with curved arrow and circular symbol (no text or symbols)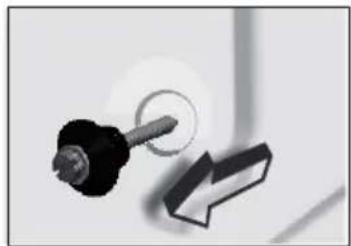
natural_image
Close-up of a black and white mechanical component with a circular opening, next to a directional arrow (no text or symbols visible)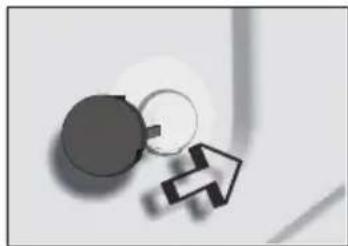
natural_image
Abstract graphic with a gray circle and white arrow pointing diagonally (no text or symbols)
natural_image
Technical diagram of a mechanical device with internal components and directional arrows (no text or labels)Vyrovnání pračky
natural_image
Pure mechanical component diagram without any text, numbers, or symbols
natural_image
Pure mechanical component diagram without any text, numbers, or symbolsmode
natural_image
Simple line drawing of a circular mechanical component with no text or symbolsA. BÍLÉ/BAVLNĚNÉ
I. VLNA
B. BÍLÉ/BAVLNĚNÉ/PŘEDPÍRKA J. RUČNÍ PRANÍ
C. BAVLNĚNÉ 60°
K. HEDVÁBÍ
D. BAVLNĚNÉ 40°
L. RYCHLÉ PRANÍ
E. SYNTETIKA

F. SYNTETIKA/PŘEDPÍRKA

G. JEMNÉ PRÁDLO

H. SMĚS
CZ-10
ČÁST 4: PRANÍ PRÁDLA

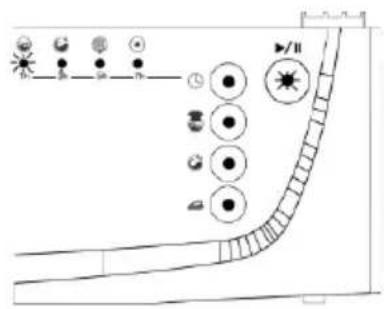

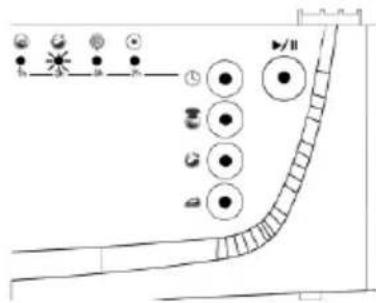
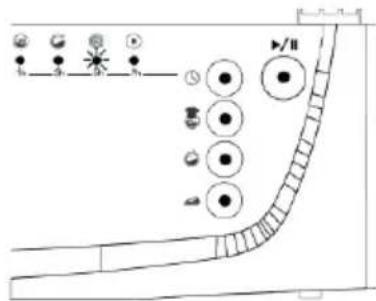

Zrušení programu
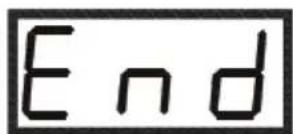
Ukončení programu

Upozornění:
natural_image
Simple line drawing of a basketball court with an arrow pointing to the center (no text or symbols)1-A!

natural_image
Simple line drawing of a hand holding a pen, poised to write on paper (no text or symbols)2-A

natural_image
Simple line drawing of a basketball court with a magnifying glass on the side (no text or symbols)3-A

natural_image
Simple line drawing of a hand holding a camera lens, no text or symbols present4-A

VAROVÁNÍ!
Nebezpečí opaření!
natural_image
Line drawing of a hand pressing down a small object into a container (no text or symbols)
natural_image
Illustration of a hand pressing down on a mechanical component with a downward arrow indicating action (no text or symbols present)OBR. 1 OBR. 2
CZ - 18
Famous for Quality the World Over
Vážený zákazník,
natural_image
Abstract graphic with curved arrow and circular symbol (no text or symbols)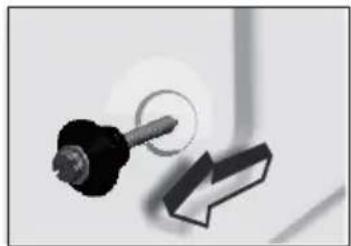
natural_image
Close-up of a black mechanical component with a circular opening and an arrow pointing downward (no text or symbols visible)
natural_image
Abstract graphic with a gray circle and white arrow pointing diagonally (no text or symbols)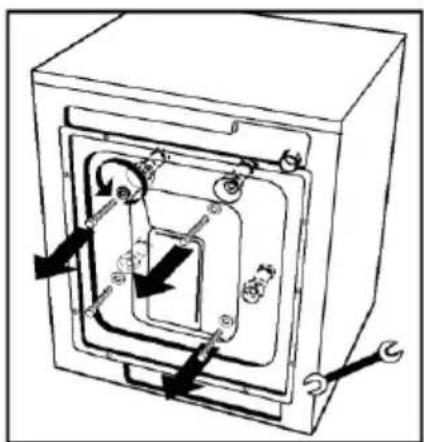
natural_image
Technical diagram of a mechanical assembly with arrows indicating motion or force directions (no text or labels)VYROVNANIE PRÁČKY
- Práčku nestavajte na koberce ani podobné povrchy.
- Aby vaša práčka fungovala potichu a bez vibrácií, mali by ste ju umiestnit na rovný, nešmyklavý a pevný povrch.
natural_image
Pure mechanical component diagram without any text, numbers, or symbols
natural_image
Pure mechanical component diagram without any text, numbers, or symbolsELEKTRICKÉ PRIPOJENIE

KONTROLKY JEDNOTLIVÝCH FUNKCIÍ
mode
TLAČIDLO REŽIMU (MODE)
natural_image
Simple line drawing of a circular mechanical component with no text or symbolsA. BIELA/BAVLNENÁ
I. VLNA
B. BIELA/BAVLNENÁ/PREDPRANIE J. RUČNÉ PRANIE
C. BAVLNENÁ 60°
K. HODVÁB
D. BAVLNENÁ 40°
L. RÝCHLE PRANIE
E. SYNTETIKA

F. SYNTETIKA/PREDPRANIE

G. JEMNÁ BIELIZEŇ VYPÚŠŤANIE

H. ZMES
SK - 10
ČASŤ 4: PRANIE BIELIZNE


Zrušenie programu

Ukončenie programu
- Po dokončení vybraného programu sa práčka automaticky zastaví.
- Na elektronickom displeji sa rozsvieti „END“ (Koniec).
• Gombík programov prepnite do polohy P (vypnuté).
- Po dokončení programu sa poistka dvierok práčky automaticky uvolní asi po 2 minútach. Dvierka môžete otvorit potiahnutím za rukovat' dvierok smerom k vám a vybrať bielizeň z práčky.
- Po vybratí bielizne z práčky nechajte dvierka otvorené, aby práčka mohla vyschat.
- Práčku odpojte zo zásuvky.
- Uzatvorte prívod vody.
NASTAVENIE TEPLOTY VODY
natural_image
Diagram showing a hand holding a pen and a tool interacting with a device, alongside a close-up of the device's tip (no text or symbols present)
Upozornenie:
natural_image
Simple line drawing of a basketball court with an arrow pointing to the center area (no text or symbols)1-A!
natural_image
Simple line drawing of a hand holding a pen, pointing at a horizontal bar (no text or symbols)2-A
natural_image
Simple line drawing of a basketball court with a circular target and a corner aperture (no text or symbols)3-A

natural_image
Simple line drawing of a hand holding a camera lens, no text or symbols present4-A

VAROVANIE!
Nebezpečenstvo obarenia!
natural_image
Line drawing of a hand pressing down a mechanical component into a housing (no text or symbols)
natural_image
Illustration of a hand pressing a button on a device component, with a downward arrow indicating action (no text or symbols present)OBR. 1 OBR. 2
ZÁTKA SIFÓNU
- Automatic Washing Machine
- USER MANUAL
- PHILCO
- THE CONTENTS
- SECTION 1: BEFORE USING ....2
- SECTION 2: INSTALLATION ....4
- SECTION 3: CONTROL PANEL ...... 7
- SECTION 4: WASHING YOUR LAUNDRY....11
- SECTION 5: MAINTENANCE AND CLEANING....17
- SECTION 6: PRACTICAL INFORMATION....20
- SECTION 7: AVOIDING MINOR FAULTS ...... 21
- SECTION 8: AUTOMATIC FAILURE DETECTION SYSTEM....24
- SECTION 9: INTERNATIONAL WASHING SIGNS 26
- SECTION 10: TECHNICAL SPECIFICATIONS ...... 27
- SECTION 11: ENERGY SAVING TIPS....27
- SECTION 1: BEFORE USING
- Important Safety Precautions
- General Safety Precautions
- EN - 2
- RECOMMENDATIONS
- SECTION 2: INSTALLATION
- REMOVAL OF TRANSPORTATION SCREWS
- NOTE:
- ADJUSTMENT OF FEET
- ELECTRICAL CONNECTION
- WATER SUPPLY CONNECTION
- WATER DRAIN CONNECTION
- SECTION 3: CONTROL PANEL
- START/PAUSE BUTTON
- FUNCTION INDICATOR LAMPS
- mode
- MENU BUTTON
- select
- SELECT BUTTON
- ELECTRONIC INDICATOR
- FUNCTION BUTTONS
- Rinse hold
- Extra rinse
- Easy ironing
- Soak
- WARNING!
- SPIN SPEED SELECTOR
- PROGRAM KNOB
- SECTION 4: WASHING YOUR LAUNDRY
- First wash cycle
- BEFORE WASHING
- Discrimination of your laundry
- Filling detergent in the machine
- RUNNING THE MACHINE
- Program selection and features
- Starting the program
- Selecting an additional function button
- In order to select an additional function:
- Cancelling a programme
- Programme end
- ADJUSTING THE WASH WATER TEMPERATURE
- SETTING THE PROGRAMME STARTUP TIME
- Child lock
- SECTION 5: MAINTENANCE AND CLEANING
- WATER INLET FILTERS
- Attention:
- PUMP FILTER
- DETERGENT DRAWER
- EN - 18
- SIPHON PLUG
- THE CABINET
- THE DRUM
- REMOVE OF LIME FROM YOUR MACHINE
- SECTION 6: PRACTICAL INFORMATION
- SECTION 7: AVOIDING MINOR FAULTS
- SECTION 8: AUTOMATIC FAILURE DETECTION SYSTEM
- SECTION 9: INTERNATIONAL WASHING SIGNS
- SECTION 10: TECHNICAL SPECIFICATIONS
- SECTION 11: ENERGY SAVING TIPS
- INSTRUCTIONS AND INFORMATION REGARDING THE DISPOSAL OF USED PACKAGING MATERIALS
- DISPOSAL OF USED ELECTRICAL AND ELECTRONIC APPLIANCES
- For business entities in the European Union
- Disposal in other countries outside the European Union
- NOTES
- Automatická pračka
- NÁVOD K OBSLUZE
- Vyrovnání pračky
- ČÁST 4: PRANÍ PRÁDLA
- Zrušení programu
- Ukončení programu
- Upozornění:
- CZ - 18
- VYROVNANIE PRÁČKY
- ELEKTRICKÉ PRIPOJENIE
- KONTROLKY JEDNOTLIVÝCH FUNKCIÍ
- TLAČIDLO REŽIMU (MODE)
- ČASŤ 4: PRANIE BIELIZNE
- Zrušenie programu
- Ukončenie programu
- NASTAVENIE TEPLOTY VODY
- Upozornenie:
- ZÁTKA SIFÓNU
Brand : Philco
Model : PLD 1271
Category : Washing machine