
ETV 3160bcs - Oven Concept - Free user manual and instructions
Find the device manual for free ETV 3160bcs Concept in PDF.


| Product Type | Built-in Electric Oven |
| Brand | Concept |
| Model | ETV 3160bcs |
| Dimensions (W x H x D) | 595 x 595 x 575 mm |
| Net Weight | 35 kg |
| Power Supply | 230 V, 50/60 Hz, 2450 W |
| Energy Class | A |
| Oven Capacity | 65 Litres |
| Number of Functions | 8 Cooking Modes |
| Main Functions | Convection, Grill, Bake, Defrost, Rotisserie, Pizza, Fan Assisted, Light |
| Control Type | Touch & Rotary Knobs |
| Display | Digital LED with Timer |
| Interior Material | Enamel Easy Clean |
| Cleaning Type | Manual Clean with Enamel Coating |
| Safety Features | Child Lock, Automatic Shut-off, Residual Heat Indicator |
| Spare Parts Availability | Available via Concept Service Centers |
| Repairability | Repairable with Original Components |
| Installation | Built-in, Requires Ventilation Cut-out |
| Accessories Included | Baking Tray, Wire Shelf, Rotisserie Spit |
| Warranty | 2 Years |
Frequently Asked Questions - ETV 3160bcs Concept
User questions about ETV 3160bcs Concept
0 question about this device. Answer the ones you know or ask your own.
Ask a new question about this device
Download the instructions for your Oven in PDF format for free! Find your manual ETV 3160bcs - Concept and take your electronic device back in hand. On this page are published all the documents necessary for the use of your device. ETV 3160bcs by Concept.
USER MANUAL ETV 3160bcs Concept
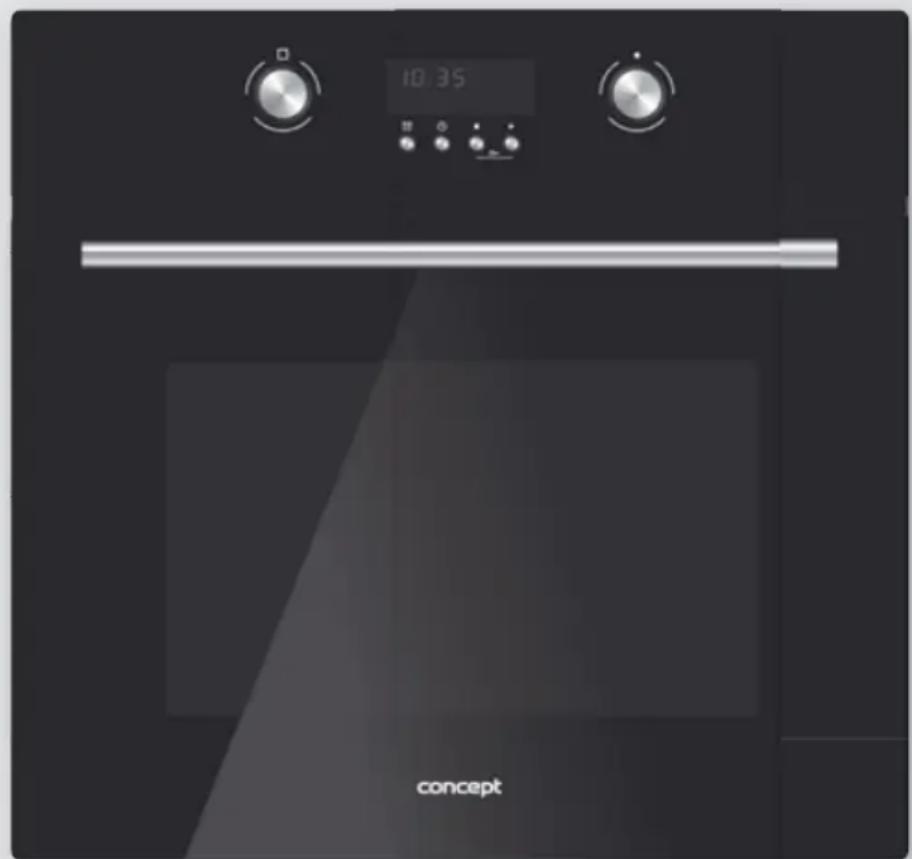
Built-in Multifunctional Electric Oven
natural_image
Modern kitchen appliance with digital display and control knobs, no visible text or symbols on main bodyETV3160
SK PL ENCZ
PODĚKOVÁNÍ
POPIS OVLÁDACÍHO PANELU
natural_image
Row of eight grayscale icons representing basic objects or symbols (no text or labels)Obr. 2
natural_image
Diagram of a hand pulling a metal rod into a rack frame (no text or symbols)Obr. 3
natural_image
Illustration of a hand placing a tray with arrows indicating motion (no text or symbols)Obr. 4
POZOR!
natural_image
Close-up of a glossy black metal bracket with a small bolted detail (no text or symbols visible)Obr. 5
Obr. 8a
Obr. 8b
A 600 mm
B 565 mm
C 560 mm
D 90 mm
E 24 mm
F 5 mm
G 118 mm
H 113 mm
J 80 mm
K 70 mm
L 25 mm
natural_image
Diagram showing a funnel with internal structure and a circular arrow indicating rotation (no text or symbols)Obr. 9
OCHRANA ŽIVOTNÍHO PROSTŘEDÍ
POPIS OVLÁDACIEHO PANELA
- Volič funkcií
- Tlačidlo na nastavenie doby odpočítavania (minútka)
- Tlačidlo na nastavenie denného času
- Tlačidlo STOP
- Tlačidlo ŠTART
- Volič -/+
NÁVOD NA OBSLUHU
Pred prvým použitím
natural_image
Row of eight grayscale icons on black background, no text or symbols presentObr. 2
natural_image
Diagram of a hand pulling a metal rod into a rack frame (no text or symbols)Obr. 3
natural_image
Illustration of a hand placing a tray with arrows indicating rotation or movement (no text or symbols)Obr. 4
POZOR!
natural_image
Close-up of a glossy black metal bracket with a small circular bolt on the side (no text or symbols visible)Obr. 5
Obr. 8a
Obr. 8b
A 600 mm
B 565 mm
C 560 mm
D 90 mm
E 24 mm
F 5 mm
G 118 mm
H 113 mm
J 80 mm
K 70 mm
L 25 mm
OPIS PANELU STEROWANIA
natural_image
Row of eight grayscale icons on black background, no text or symbols presentRyc. 2
natural_image
Diagram of a hand pulling a metal rod into a rack frame (no text or symbols)Ryc. 3
natural_image
Illustration of a hand placing a tray with arrows indicating motion (no text or symbols)Ryc. 4
UWAGA!
natural_image
Close-up of a metallic bracket with a small bolt and corner detail (no text or symbols visible)Ryc. 5
f) Wentylator
Ryc. 8a
Ryc. 8b
A 600 ~mm
B 565 mm
C 560 mm
D 90 mm
E 24 mm
F 5 mm
G 118 mm
H 113 mm
J 80 mm
K 70 mm
L 25 mm
Thank you for purchasing a Concept product. We hope you will be satisfied with our product throughout its service life.
Please study the entire Operating Manual carefully before you start using the product. Keep the manual in a safe place for future reference. Make sure other people using the product are familiar with these instructions.
TABLE OF CONTENTS
Technical Parameters 34
Importance notices 35
Product Description 36
Description of the Control Panel....37
Operating Instructions 37
Basic Functions of the Unit 37
Individual Functions of Baking 38
Informative Values of Temperature, Position Heights and Times of Baking.....39
Baking Tips 39
Advanced Functions of Baking 40
Cleaning and Maintenance 42
Unit installation 42
Service 44
Environmental protection 44
| Technical parameters | |
| Voltage 220-240 V ~ 50/60 Hz | |
| Power input 3100 W | |
| Input of the upper heater 950 W | |
| Input of the lower heater 1100 W | |
| Input of the rear circular heater 2200 W | |
| Input of the grill heater 2100 W | |
| Temperature setting range 50 – 250 °C | |
| Installation dimensions (w x h x d) 565 × 595 × 560 mm | |
| External dimensions (w x h x d) | 595 × 595 × 620 mm |
| Internal dimensions (w x h x d): | 428 × 418 × 313 mm |
| Internal volume | 56 l |
| Weight | 38 kg |
| Noise level | < 63 dB(A) |
IMPORTANT NOTICES:
Delivery
- Check the package and unit immediately after delivery for any damage that may have o shipping.
• If the unit is damaged, do not operate it. Contact the supplier as soon as possible. - Remove all the covering and marketing materials from the unit before the first use.
- Dispose of the packaging material properly.
Installation
• Follow the instructions for the appliance connection and installation.
• Do not lift the unit holding it by the handle of the door.
• The unit has to be disconnected from the power socket during installation.
- Make sure the mains voltage and current protection correspond to the values on the rating plate. Use grounded wall outlets only.
• After installation of the unit its plug should be freely accessible.
Normal operation
• Use the unit only as described in this operating manual.
• Use the unit in the household and for baking food only.
• Do not use the unit if you are barefoot.
• Do not put oversized food or metal objects inside the oven. These could cause a fire.
- Do not sit or stand on the open door of the unit.
- WARNING! A large volume of steam may be released or grease may splash out when you open the door. Be careful. There is a risk of scalding!
- Do not touch hot surfaces or heaters during use or shortly after use of the unit.
• Do not store anything inside the unit.
• Never operate the appliance with wet hands.
- Turn off the unit and disconnect the plug from the mains outlet in case of any failure.
• Never pull the cord to disconnect the plug from the wall outlet; hold the plug instead.
- Check the appliance and power cord for damage regularly. Never switch on a damaged appliance.
- Do not use the unit if the door or packing is damaged. Have the unit repaired in an authorised service centre.
- Do not immerse the power cord, plug, or appliance in water or any other liquid.
• Make sure that all controls are in the OFF position when the appliance is not in use.
- When the unit is in operation, do not leave the doors of the cupboards above it open, otherwise these could be damaged by the released steam and heat e.g. in case of opening the oven door.
- Do not use accessories which have surface treatment damaged, are worn or have other defects.
Children in the household
• The appliance is not intended for and should not be accessible to children or people with reduced capabilities.
- The appliance is not intended for use by people with reduced physical, sensory or mental capabilities or lack of knowledge, unless under the supervision of an acquainted person responsible for their safety.
• Take extra care when using the unit near children.
• Do not use the appliance as a toy.
• Use manufacturer-recommended accessories only.
WARNING!
Open the unit only for a short time to put in or take out food, so as to prevent injury caused e.g. by tripping. Children could lock themselves in the unit (risk of suffocation), or be exposed to other dangers.
Possible defects
• Only qualified personnel may repair and intervene in the unit.
- The unit should be disconnected from the electric network during repairs and interventions. Switch off circuit breaker, or disconnect the plug of the supply cable.
• Never pull the cord to disconnect the plug from the wall outlet; hold the plug instead.
Failure to follow the manufacturer's instructions may invalidate the warranty.
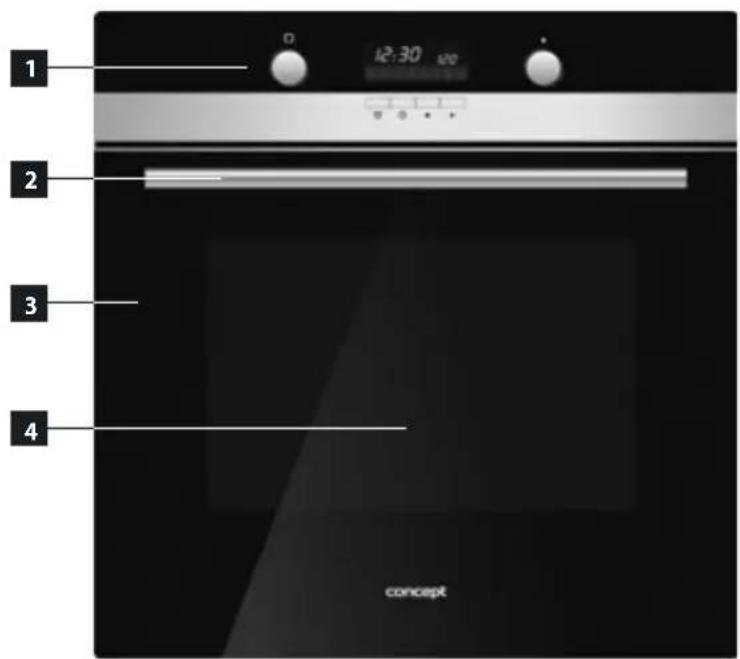
PRODUCT DESCRIPTION
- Control panel
- Door handle
- Door
- Triple-glass window of the door
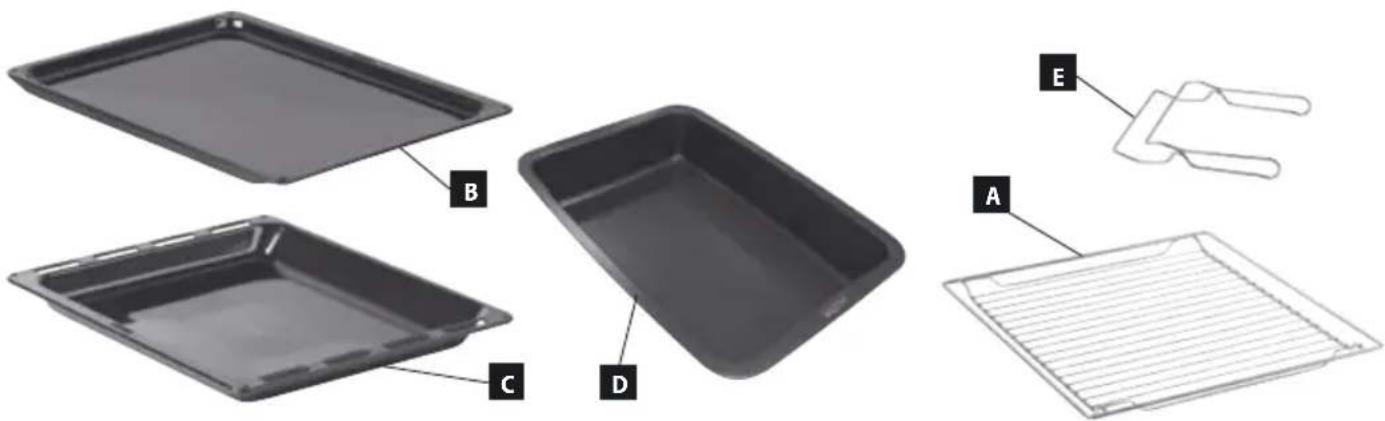
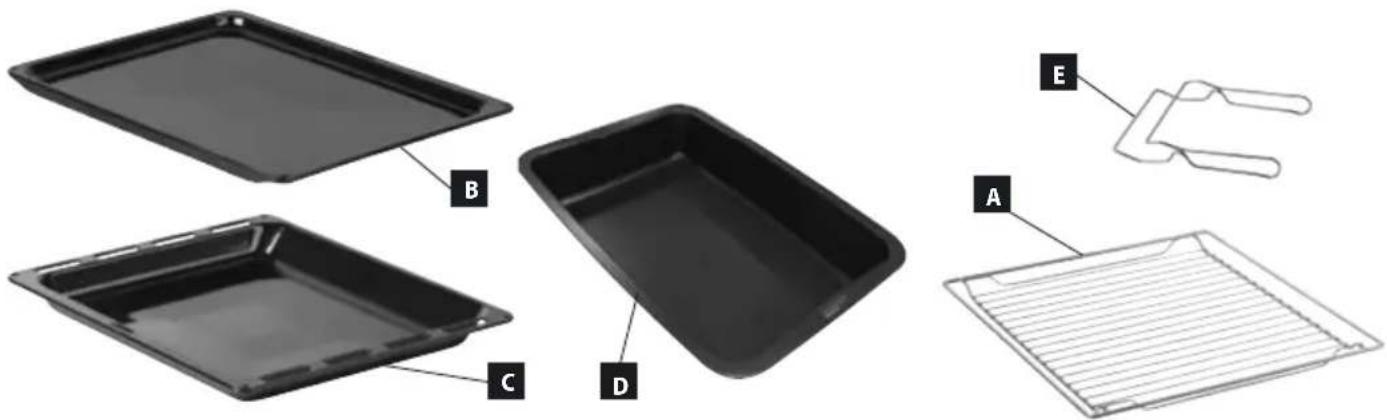
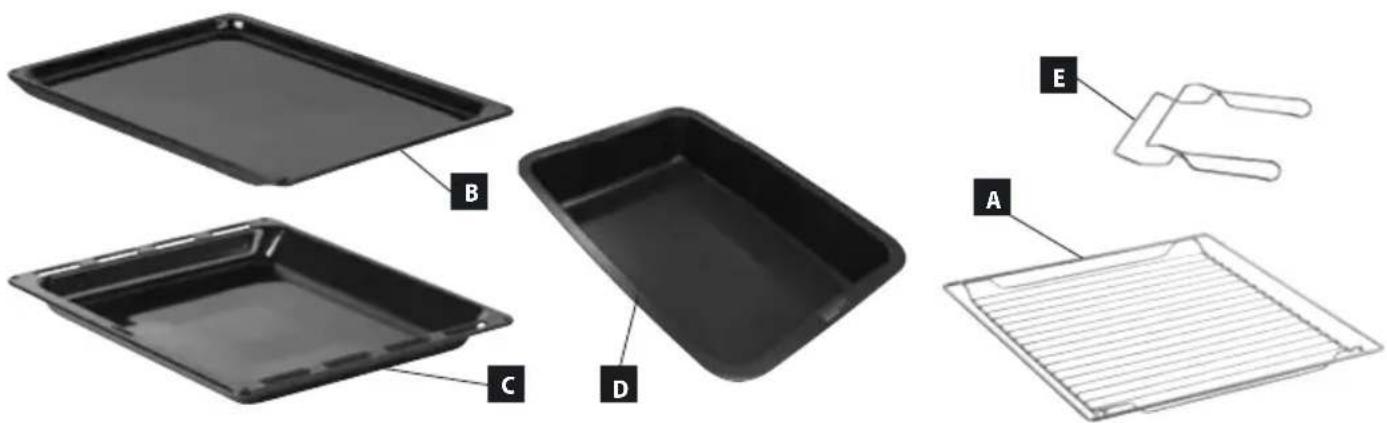
Accessories
A Grill 2 pieces
B Shallow baking pan (depth 19 mm) 1 piece
C Deep baking pan (depth 39 mm) 2 pieces
D Extra deep tray (depth 75 mm) 1 piece
E Grill holder
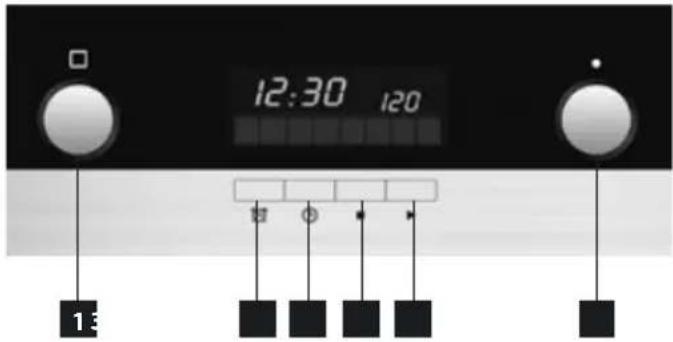
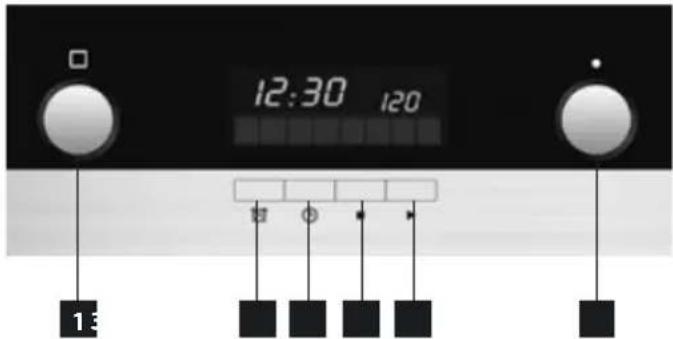
DESCRIPTION OF THE CONTROL PANEL
- Mode selector
- Button for setting the countdown time (minute clock)
- Button for setting the time of day
- STOP button
- START button
- -/+ selector
OPERATING INSTRUCTIONS
Before first use
Prior to using a new unit, wipe the surface and the inside with a wet cloth for hygienic reasons. Wash the accessories in warm water with a detergent, or in a dishwasher.
Then, heat the unit without food at maximum temperature for 20 minutes (see the Operating Instructions below). The unit may emit a slight smell and smoke, which should disappear after a while. Air the room well during this process.
Note: Function selector (1) and -/+ selector (6) will pop up after pushing to allow controlling the unit. If you want to prevent accidental change of settings during baking or after the baking is finished, fix them in the inserted position by pushing down to stop.
After connecting to a power source
- After connecting the unit to the mains, the symbols 00:00 shine on the display.
- Press the time of day button (3) to activate the mode of setting the time of day. The hour position blinks. Turn the -/+ selector to set the current hour on the display.
- To set the current minutes, press the time of day button (3) again and turn the -/+ selector.
- To confirm the setting, press the time of day button (3). The symbol ":" starts blinking (see Fig. 1).
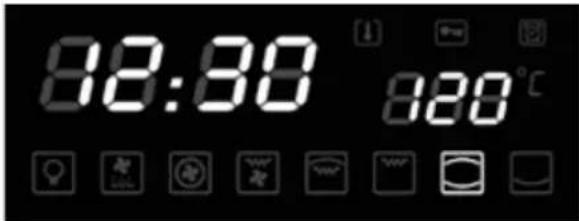
Fig. 1
Basic Functions of the Unit
- Put the pan with food in the selected position height (numbered from below).
- Turn the function selector (1) to select the required baking function (see Fig. 2).

natural_image
Row of eight white square icons on black background, no text or symbols presentFig. 2
- Turn the -/+ selector (6) to set the temperature to the required value.
- Press the START button (5); heating will start in several seconds. The temperature set on the display blinks. When the unit reaches the set temperature, the displayed value will shine without blinking.
- Turn the function selector (1) to set the required time of baking on the display. Press START (5) to confirm the selection.
Note: To pause the baking time, press the STOP button (4) once; to resume it, press the START button (5). To cancel the current program, press the STOP button (4) twice.
- After the end of baking, the unit switches off and a short sound signal is heard. The display will show the current time of day.
Individual Functions of Baking
| Symbol Function description | |
 | Lighting of the internal space of the oven. |
 | This mode of oven function setting serves for particularly careful defrosting of food. Air at room temperature is forced into the internal space of the oven.Note: This function is suitable for defrosting food or raw products before final preparation. |
 | Heating of the oven by the circular heater and the fan function. The air circulation makes an even temperature in the entire space of the oven.The temperature can be set within the range of 50 – 240 °C.Note: This function is also suitable for baking food on two pans simultaneously (suitable for baking higher and thicker baked goods, such as cakes, or larger amounts of food). Pre-heating the oven is not necessary. |
 | Grilling together with the fan function. Because of the air circulation, the temperature in the oven is higher in its upper part (above the grill or pan).The temperature can be set within the range of 50 – 200 °C.Note: This function is suitable for grilling or roasting big pieces of meat at a higher temperature. Leave the oven door closed. Pre-heating the oven is not necessary. |
 | Big grill – large area of the grill while utilizing infrared irradiation.The temperature can be set within the range of 180 – 240 °C.Note: For bigger pieces of meat. During baking open the door as rarely as possible. During grilling put the food in the highest possible position. |
 | Infrared grill.The temperature can be set within the range of 180 – 240 °C.Note: For smaller or thin pieces of meat. During baking open the door as rarely as possible. During grilling put the food in the highest possible position. |
 | Heating of the oven by the upper and lower heater.The temperature can be set within the range of 50 – 250 °C.Put in the food only after pre-heating the oven to the set temperature. During baking open the door as rarely as possible. |
 | Heating of the oven by the lower heater only. Preset temperature 60°C.Note: Thus function is suitable for the completion of baking foods which require a higher temperature from below (pizza). |
Informative Values of Temperature, Position Heights and Times of Baking
| Food Weight (g) | Position height | Baking function | Recommended temperature (°C) | Baking time (min.) | Dishes used | |||
| 1st side 2nd side | ||||||||
| Cakes | -3 160 | 20-30 - Pan |  | |||||
| -3 160 | 20-30 - Pan |  | ||||||
| - | 1+3 |  | 160 20-30 - Pans | |||||
| Apple pie | -2 190 | 50-70 - Pan |  | |||||
| - | 1+3 |  | 190 50-70 - Pans | |||||
| Swiss roll | -3 200 | 10-18 - Pan |  | |||||
| Sausages | 400 g | 4 |  | 240 | 5-10 | 3-6 | Grill | |
| Beef | 1000 g | 2 |  | 210 | 10-20 | 5-15 | Grill* | |
| Pork | 1000 g | 2 |  | 190 | 19-30 | 11-21 | Grill* | |
| Chicken | 1300 g | 2 |  | 180 | 35-45 | 15-25 | Grill | |
| Hamburgers | 1000 g | 4 |  | 240 | 10-20 | 5-10 | Grill* | |
| Pork slices | 1000 g | 4 |  | 240 | 15-25 | 10-20 | Grill* | |
| Beef slices | 1000 g | 4 |  | 240 | 10-20 | 5-15 | Grill* | |
* put a pan with a little water in position height 1 under the grill to collect the drippings.
Baking Tips
• The exact values of temperature for each kind of food and each way of baking have to be tried out.
- During baking open the oven door as rarely as possible. Otherwise the temperature mode of baking would be disturbed, the time of baking would extend and the food could be burnt.
- Marinated meat and meat without bones roast faster than unprepared meat. To check thorough roasting of meat, press it e.g. with a fork. If it does not release juice, it is well done.
- Meat which is larded or covered with bacon must not be roasted at too high a temperature, so that the grease does not sputter.
- When roasting big pieces of meat fluids evaporate, which then condense on the oven door. This is natural and it does not imply any danger to the use of the unit. After the end of baking, wipe the oven door and the neighbouring space in the oven dry.
- The pastry will swell only after 2/3 of the stated baking time. The time of baking depends on the type of filling (fruits, marmalade).
• Whipped dough should not contain too much water, which extends the time of baking.
- Do not put utensils directly on the bottom of the oven, otherwise they would prevent the spreading of heat and thus could cause damage to the enamel because of overheating.
- When baking in more pans, the simultaneously inserted foods do not have to be ready at the same time.
- Baking pans are not designed for long-term storage of food (more than 48 hours). For longer storage move the food to a suitable utensil.
- When baking without the fan we recommend pre-heating the oven for approximately 10 – 15 minutes. Do not open the oven door unnecessarily during baking.
- Before grilling pre-heat the grill for approx. 5 minutes (until the grill heater is red). The grill with food should be placed as close as possible to the heater. To collect the drippings, put a pan with a little water under the grill. Grilling will enable browning and a crispy surface on the roasted meat.
WARNING!
When using the grill, the accessible parts of the oven may become too hot. Prevent children from accessing the hot parts of the oven.
- When baking with the fan it is not necessary to pre-heat the oven, except for baking foods with very short baking times, or in the case of baking foods with a high content of water (e.g. fruit cakes) to prevent condensation of water vapour. Various food with similar times of baking can be prepared in two pans simultaneously, even if the time of baking differs. The scent and taste of the foods do not influence each other. Putting in and taking out of the food does not involve great heat losses. The temperature is quickly compensated by the fan. The baking temperatures are lower than those used in the standard baking mode (by 20 – 30°C for pastry and by 30 – 40°C for meat); the time of baking is longer (by approx. 5 – 10 minutes). When baking small pastries in two pans, we recommend swapping the height of both pans after 2/3 of the baking time or taking the pan that is ready sooner out earlier.
- When defrosting, lay the frozen food in the packing on a dish, put it on the grill in the centre of the oven and switch on the oven in the mode at a temperature of °C. The oven door must be closed.
- When grilling with the fan it is not necessary to pre-heat the oven. Grill with the oven door closed. When grilling this way set the thermostat as needed within the range from 50 to 200°C. The distance between the food and the grill heater must correspond to the required results:
- smaller distance for a brown surface and underdone inside,
- bigger distance for thorough roasting of the food.
To collect the drippings, put a pan with a little water under the food.
Advanced Functions of Baking
a) Function of displaying the time of day during baking
During baking, press the button for setting the time of day (3). The time of day appears on the display for several seconds.
b) Child lock function
To activate/deactivate the child lock, press the STOP (4) and START (5) buttons simultaneously in the OFF status for 5 seconds. Now control using the buttons is blocked.
c) Countdown function
In the OFF status you can use the unit as a kitchen minute clock for counting down the set time.
- To activate the countdown mode, press the countdown time setting button (2). The hour position blinks. Turn
the -/+ selector (6) to set the required hours on the display.
-
To set the required minutes, press the countdown time setting button (2) again and turn the -/+ selector (6).
-
Press START (5) to confirm the setting. The symbol ":" will blink.
-
After the set time elapses, a short sound signal is heard.
Note: For this function, the time of day must be set on the unit.
d) Automatic switch-off function
If you select a baking function, but you do not press the START button (5) within 5 minutes, the unit will switch off automatically.
Note: Manual or automatic switch-off of the unit results in the clearing of all set functions and values.
e) Telescopic rails
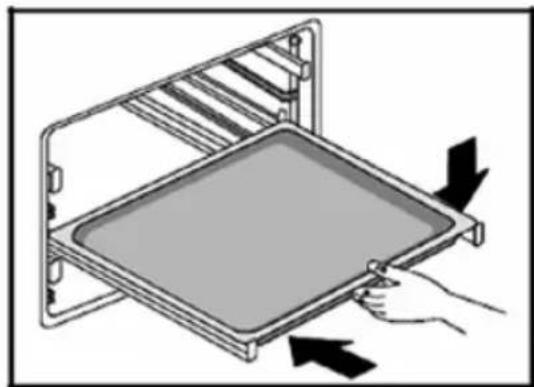
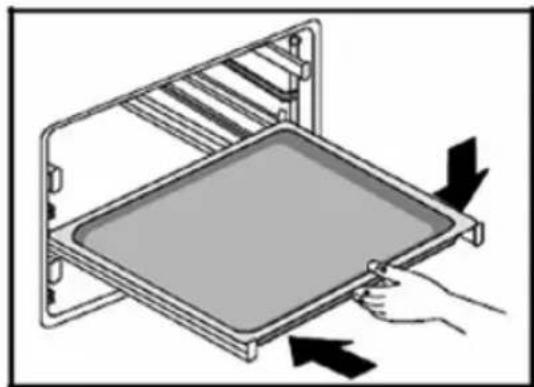
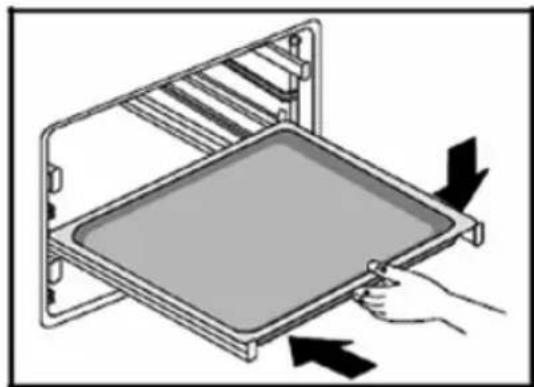
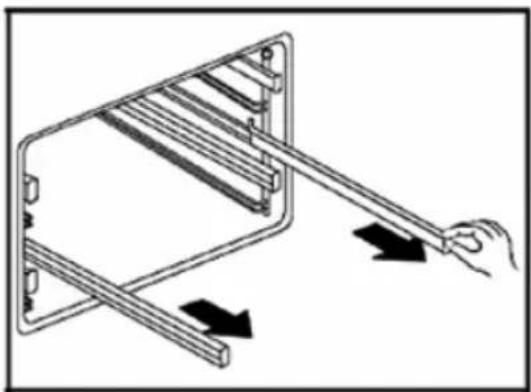
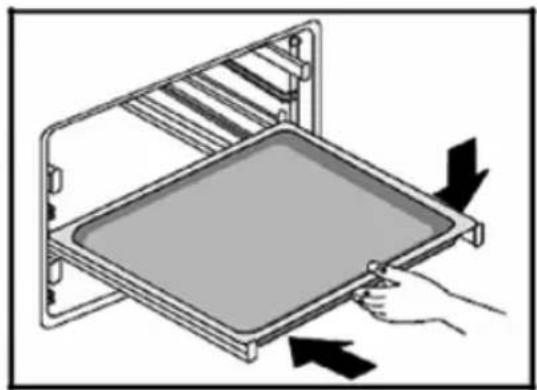
The unit is equipped with 2 pairs of telescopic rails that allow withdrawing the baking pans, thus making access easier when putting in and taking out the baking pans, or when checking the baked food. (Fig. 3, 4).
natural_image
Diagram of a hand pulling a horizontal rod into a rack frame with directional arrows (no text or symbols)Fig. 3
natural_image
Illustration of a hand placing a tray with arrows indicating motion (no text or symbols)Fig. 4
WARNING!
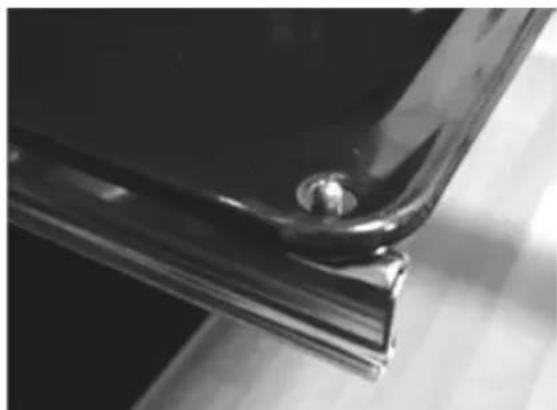
The telescopic rails get very hot during the operation. There is a risk of burning yourself! When putting the baking pans in, place them on the protrusions at the ends of the rails (Fig. 5).
natural_image
Close-up of a metallic bracket with a small screw and mounting hole (no text or symbols visible)Fig. 5
f) Cooling fan
The fan is located on the upper side of the oven and provides the circulation of cool air in the furniture. The fan switches on automatically when the oven is switched on. When the oven is switched off, the cooling fan is deactivated after about 15 minutes.
CLEANING AND MAINTENANCE
For the sake of good appearance and reliability, keep the unit clean.
The modern design of the unit facilitates the maintenance to the minimum.
The parts of the unit which come into contact with food have to be cleaned regularly.
- Before any maintenance and cleaning, disconnect the power cord from the mains or switch off the circuit breaker of the mains outlet of the unit.
• Set all controls in the OFF position. - Wait until the inside of the unit is not hot anymore but remains lukewarm – cleaning is easier than when it is cold.
• Clean the outer surface of the unit with a damp cloth, soft brush or fine sponge and then wipe it dry. - The inside of the oven can be wiped with a damp cloth, soft brush or sponge. In the case of heavy dirt, use hot water with a non-aggressive detergent.
- To clean the glass of the oven door do not use coarse abrasive cleaners or sharp metal scrapers, since they can scratch the surface or the glass can be broken.
- Never leave aggressive or acidic substances (lemon juice, vinegar) on the enamelled, varnished or stainless parts.
• Do not use an autoclave to clean the unit!
• The baking pans may be washed in a dishwasher.
UNIT INSTALLATION
- Only the customer is responsible for installation in situ. Defects caused by incorrect installation are not covered by the warranty.
- The manufacturer bears no responsibility for damage caused to people, animals or objects as a result of incorrect installation.
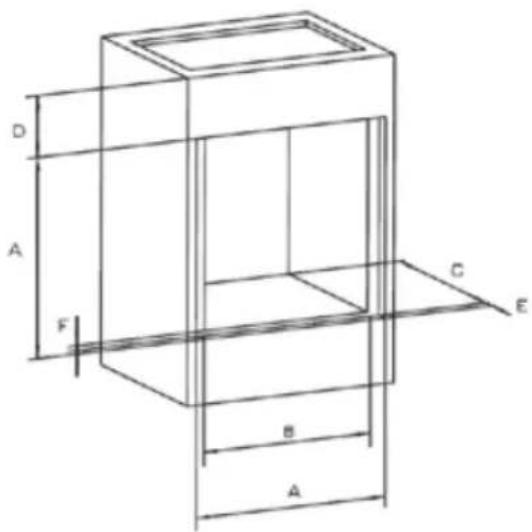
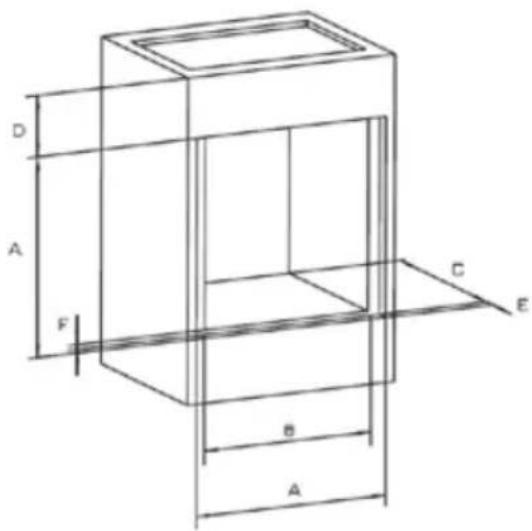
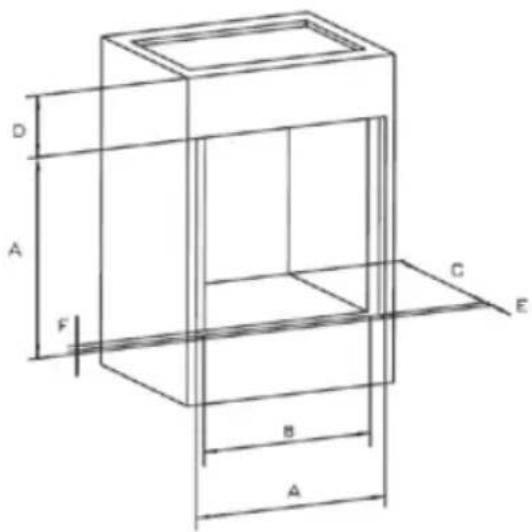
• To ensure the correct function of the unit, place it in suitable furniture. - The unit should be installed in standardised kitchen furniture designed for built-in appliances or in properly adapted furniture of dimensions according to Fig. 8a, 8b.
- The kitchen furniture must be made of sufficiently heat-resistant material. The materials and adhesives used must be resistant to heating of the unit according to standard ČSN EN 60335-2-6. Materials and adhesives that do not meet the stated standard may deform or loosen.
Connecting to the mains
- Make sure the mains voltage and current protection correspond to the values on the rating plate. We recommend using a separate outlet circuit with a 16A circuit breaker.
• Use grounded wall outlets only. -
Do not use adapter plugs, connectors or extension cables. They could create a risk of fire due to overheating.
• The supply cable plug has to be freely accessible even after the installation of the unit.
• Only a qualified expert can perform connection changes. -
The electrical safety of the unit can only be guaranteed if the protective terminal of the unit is connected to the protective conductor of the mains.
- The manufacturer bears no responsibility for damage caused to people or objects as a result of a missing or bad protective connection.
- The power cord must be located so that it does not come into contact with hot parts of the unit and so that it is not deformed or excessively bent.
Follow the installation instructions:
- Remove all the covering and marketing materials from the unit before the first use.
- For the required built-in box dimensions see Fig. 8a, 8b. For the sake of efficient air circulation the unit has to be located according to the dimensions on the pictures and the design of the cabinet must enable air flow into its bottom part.
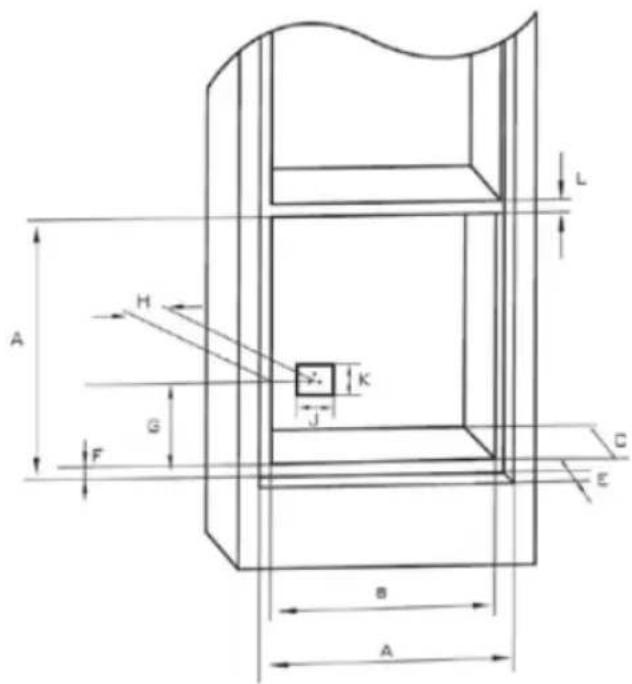
Fig. 8a
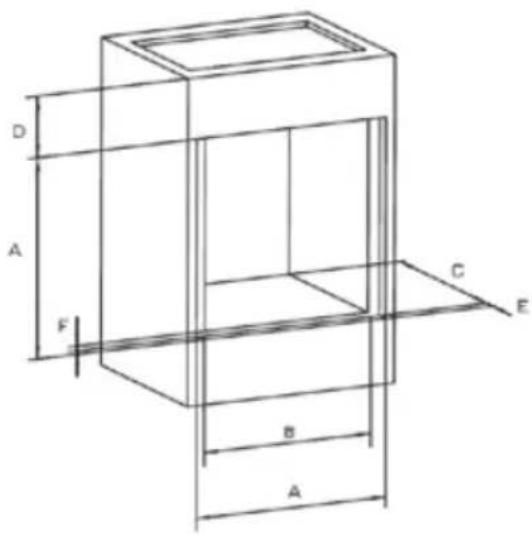
Fig. 8b
A 600 mm
B 565 mm
C 560 mm
D 90 mm
E 24 mm
F 5 mm
G 118 mm
H 113 mm
J 80 mm
K 70 mm
L 25 mm
- Put the unit on the edge of the cabinet and run the power cord through the rear wall of the cabinet so that its plug is accessible after installation.
- Push the unit carefully to the selected place in the cabinet. Be careful not to squeeze the power cord.
- Attach the unit to the cabinet by screwing 4 screws in the holes in the side walls of the unit. The holes can be seen after opening the door.
- Plug the supply cable in the wall outlet.
Removal
To uninstall the unit, it is important to proceed correctly:
- First, unplug the power cord from the mains (pull out the plug or switch off the circuit breaker).
- Remove the attachment screws.
- Slide out the unit and at the same time pull out the power cord carefully.
SERVICING
Lighting bulb of the internal space of the oven
The bulb of the internal space lighting is special, with high thermal resistance (25 W, 300°C). To replace it, proceed as follows (Fig. 9):
- Pull the power cord out of the mains outlet or switch breaker of the unit's mains outlet.
- Unscrew the covering glass and replace the bulb with a new one of the same type!
- Screw the covering glass back in place.
WARNING!
The customer may only perform the bulb replacement. Any extensive maintenance or repair requiring access to the inner parts of the product must be performed by an expert service centre.
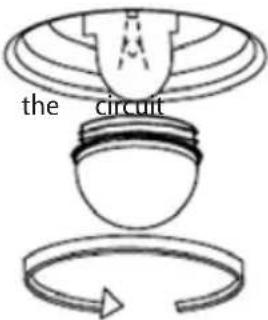
Fig. 9
ENVIRONMENTAL PROTECTION
• Packaging materials and obsolete appliances should be recycled.
• The transport box may be disposed of as sorted waste.
• Polyethylene bags shall be handed over for recycling.
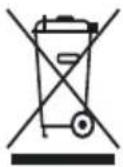
Appliance recycling at the end of its service life:
A symbol on the product or its packaging indicates that this product should not go into household waste. It must be taken to the collection point of an electric and electronic equipment recycling facility. By making sure this product is disposed of properly, you will help prevent the negative effects on the environment and human health that would otherwise result from inappropriate disposal of this product. You can learn more about recycling this product from your local authorities, a household waste disposal service or in the shop where you bought this product.
Jindřich Valenta - ELKO Valenta Czech Republic, Vysokomýtská 1800, 565 01 Choceň, Tel. +420 465 322 895, Fax: +420 465 473 304, www.my-concept.cz
ELKO Valenta – Slovakia, s.r.o., Hurbanova 1563/23, 911 01 Trenčín
Tel.: +421 326 583 465, Fax: +421 326 583 466, www.my-concept.sk
Elko Valenta Polska Sp. Z. o. o., Ostrowskiego 30, 53-238 Wrocław
Tel.: +48 71 339 04 44, Fax: 71 339 04 14, www.my-concept.pl

- PODĚKOVÁNÍ
- POPIS OVLÁDACÍHO PANELU
- POZOR!
- OCHRANA ŽIVOTNÍHO PROSTŘEDÍ
- POPIS OVLÁDACIEHO PANELA
- NÁVOD NA OBSLUHU
- Pred prvým použitím
- OPIS PANELU STEROWANIA
- UWAGA!
- f) Wentylator
- TABLE OF CONTENTS
- IMPORTANT NOTICES:
- Delivery
- Installation
- Normal operation
- Children in the household
- WARNING!
- Possible defects
- PRODUCT DESCRIPTION
- Accessories
- DESCRIPTION OF THE CONTROL PANEL
- OPERATING INSTRUCTIONS
- Before first use
- After connecting to a power source
- Basic Functions of the Unit
- Baking Tips
- Advanced Functions of Baking
- a) Function of displaying the time of day during baking
- b) Child lock function
- c) Countdown function
- d) Automatic switch-off function
- e) Telescopic rails
- f) Cooling fan
- CLEANING AND MAINTENANCE
- UNIT INSTALLATION
- Connecting to the mains
- Follow the installation instructions:
- Removal
- SERVICING
- Lighting bulb of the internal space of the oven
- ENVIRONMENTAL PROTECTION
- Appliance recycling at the end of its service life:
Brand : Concept
Model : ETV 3160bcs
Category : Oven