
Bioceramic CKSTPA4881013 - Hob OSTER - Free user manual and instructions
Find the device manual for free Bioceramic CKSTPA4881013 OSTER in PDF.


| Product Type | Ceramic Hob |
| Brand | Oster |
| Model | Bioceramic CKSTPA4881013 |
| Dimensions (W x D x H) | Approx. 59 x 52 x 6 cm |
| Weight | Approx. 11.5 kg |
| Power Supply | 220-240 V ~ 50/60 Hz |
| Total Power Output | Approx. 7000 W |
| Number of Cooking Zones | 4 |
| Burner/Cooking Zone Types | Ceramic glass radiant zones |
| Control Type | Touch controls |
| Main Functions | Booster function, timer, child lock, residual heat indicator |
| Cleaning and Maintenance | Wipe with a damp cloth after cooling; use ceramic hob cleaner for stubborn stains |
| Safety Features | Automatic shut-off, overheating protection, pan detection |
| Spare Parts Availability | Contact Oster customer service or authorized distributors for replacement parts |
| Repairability Index | High (replaceable glass top and control board) |
| Energy Efficiency Class | Class A (estimated) |
| Installation Type | Built-in |
| Certifications | CE, RoHS |
| What is in the Box | Hob, power cable, installation bracket, user manual |
Frequently Asked Questions - Bioceramic CKSTPA4881013 OSTER
User questions about Bioceramic CKSTPA4881013 OSTER
0 question about this device. Answer the ones you know or ask your own.
Ask a new question about this device
Download the instructions for your Hob in PDF format for free! Find your manual Bioceramic CKSTPA4881013 - OSTER and take your electronic device back in hand. On this page are published all the documents necessary for the use of your device. Bioceramic CKSTPA4881013 by OSTER.
USER MANUAL Bioceramic CKSTPA4881013 OSTER
natural_image
Illustration of a Oster bioceramic grater with control panel and temperature scale (no text or symbols on the device itself)MODELO/MODEL
CKSTPA4881
READ ALL INSTRUCTIONS BEFORE USING THIS APPLIANCE
MANUAL DE INSTRUÇÕES
GRILL ELÉTRICO MULTIUSO
LEIA TODAS AS INSTRUÇÕES ANTES DE USAR ESTE APARELHO
PRECAUCIONES IMPORTANTES
natural_image
Line drawing of a grater with heat exchanger and side panel, showing cooling mechanism (no text or symbols)Figura 1
natural_image
Line drawing of a mechanical presser or scraper with a handle and internal components (no text or symbols)Figura 2
natural_image
Line drawing of a grater with control knob and base mount (no text or symbols)Figura 3
When using electrical appliances, basic safety precautions should always be observed including the following:
-
READ AND SAVE ALL INSTRUCTIONS.
-
Make sure the voltage in your outlet is the same as the voltage indicated on the appliance's rating label.
-
To protect against the risk of electric shock, DO NOT immerse the cord, plug or unit in water or any other liquid.
-
DO NOT touch hot surfaces. Use handles.
-
Children should not use this appliance.
-
Unplug from outlet when not in use and before cleaning. Allow unit to cool before cleaning or storing it.
-
NEVER yank the cord to disconnect the unit from the electrical outlet. Instead, grasp the plug and pull it to disconnect.
-
DO NOT operate any appliance if the cord is damaged. DO NOT use the appliance if it malfunctions or has been damaged in any manner. In order to avoid the risk of an electric shock, NEVER try to repair it yourself. Take it to the nearest Authorized Oste® Service Center for examination and repair. An incorrect re-assembly could present a risk of electric shock when the unit is in use.
-
The use of replacement parts or accessories not recommended by the manufacturer may cause fire, electrical shock or injuries.
-
DO NOT use outdoors or for commercial purposes.
-
DO NOT use this appliance for purposes other than the one for which it was designed.
-
DO NOT let the electrical cord hang over the edge of the table or countertop, or touch hot surfaces.
-
DO NOT place on or near a hot gas or electric burner, heated oven or microwave oven.
-
Use it on a heat-resistant, flat level surface only.
-
Extreme caution must be used when moving any appliance containing hot foods or oils.
-
When using this appliance, provide adequate air space above and on all sides for air circulation.
-
DO NOT leave unit unattended during use.
-
Use it with a wall receptacle only.
-
When using this appliance, make sure there are no flammable materials close to it, such as curtains, paper, plastic, etc.
-
This appliance is not intended for use by persons (including children) with reduced physical, sensory or mental capabilities, or lack of experience and knowledge, unless they have been given supervision or instruction concerning use of the appliance by a person responsible for their safety. Children should be supervised to ensure that they DO NOT play with the appliance.
- Close supervision is necessary when any appliance is used near children, or incapacitated individuals.
- This appliance is not intended to be operated by means of an external timer or separate remote-control system.
- This appliance is intended to be used in household and similar applications such as: staff kitchen areas in shops, offices and other working environments farm houses by clients in hotels, motels and other residential type environments bed and breakfast type environments.
THIS UNIT IS FOR HOUSEHOLD USE ONLY.
SAVE THESE INSTRUCTIONS
DESCRIPTION OF THE APPLIANCE
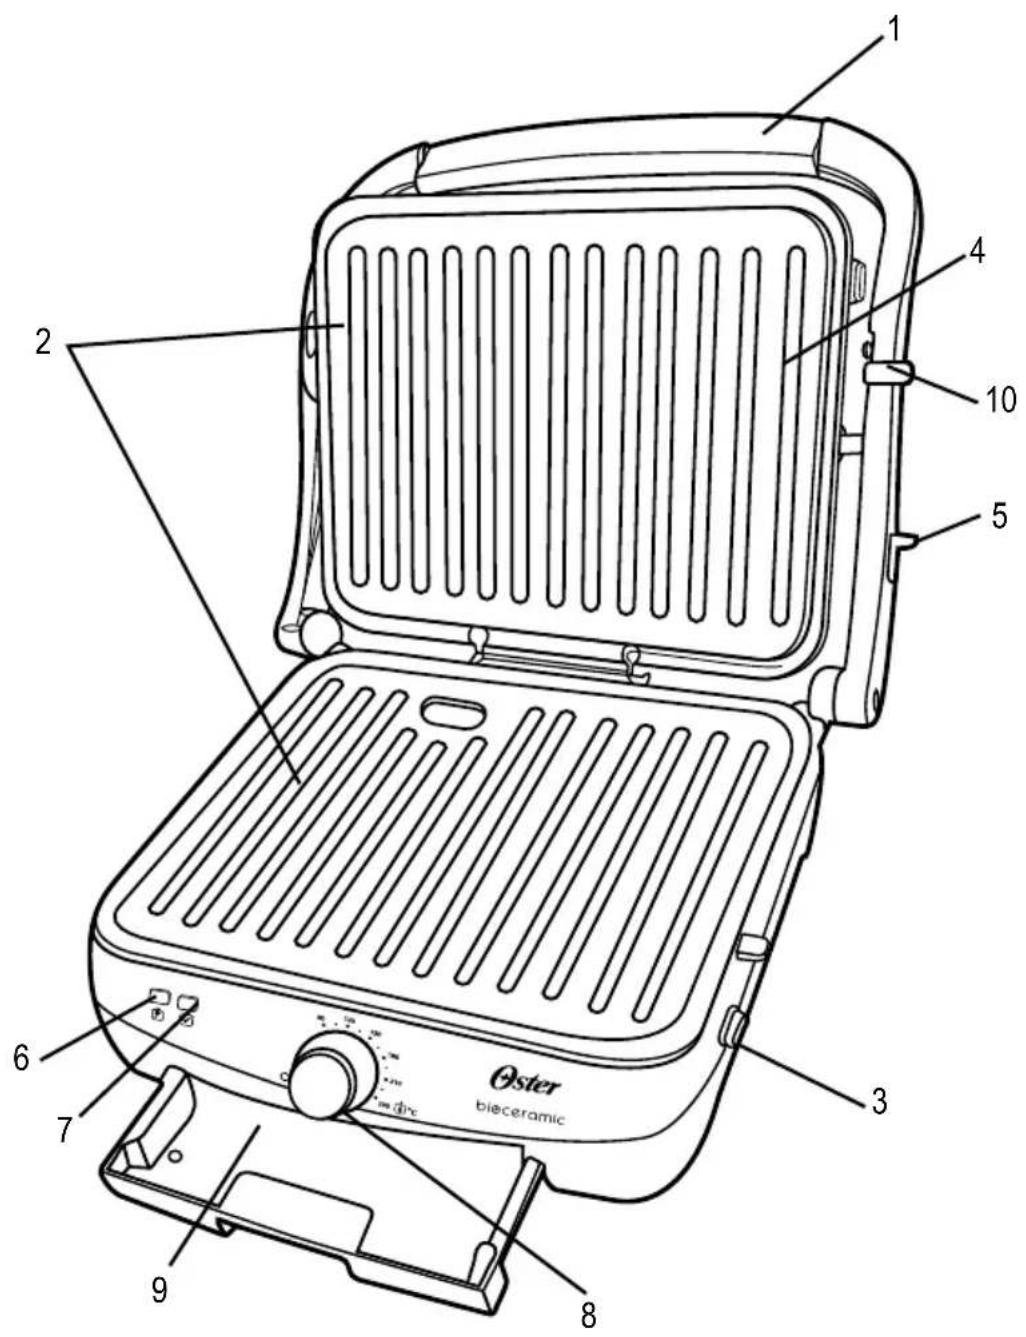
- Cool Touch Handle
- Buttons to release Grill Cooking Plates
- Hinged pivoted top cover
- Button to open grill at 180°angle
- Power On Indicator Light (Red)
- Ready to Cook Indicator Light (Green)
- Temperature Control Knob
- Slide-in Removable Drip Tray
-
Lock for Top Cover for Vertical Storage
-
Ceramic Non-Stick/Removable Grill Cooking Surfaces
BEFORE USING YOUR OSTER® MULTI-USE ELECTRIC GRILL
Before using your Oster® Multi-Use Electric Grill for the first time, please follow the instructions below:
- Remove any stickers from the product.
-
Clean and condition the non-stick surfaces:
-
Remove the two cooking plates by pushing the respective release buttons and wash them thoroughly with hot, soapy water. Rinse and dry them well and then place them back on the unit ensuring they lock into place.
• DO NOT IMMERSE UNIT IN WATER. - To condition the cooking surfaces, plug the appliance into the appropriate electrical outlet. The red power on indicator light will illuminate. Allow the unit to pre-heat until the green ready to cook indicator light is lit up.
- Wipe a small amount of butter or margarine onto the cooking surfaces, spread slightly and wipe away any excess.
NOTE: When using the unit for the first time, you may notice a fine smoke haze coming out from the unit. This is normal. It is due to the initial heating of internal components.
Your Oster® Multi-Use Electric Grill With Removable Plates is now ready to use and it will not be necessary to condition it again.
USING YOUR OSTER® MULTI-USE ELECTRIC GRILL
- Plug the power cord into the appropriate electrical outlet. The power on indicator light will illuminate and remain lit for as long the appliance is plugged in.
- Pre-heat the unit until the green ready to cook indicator light is lit.
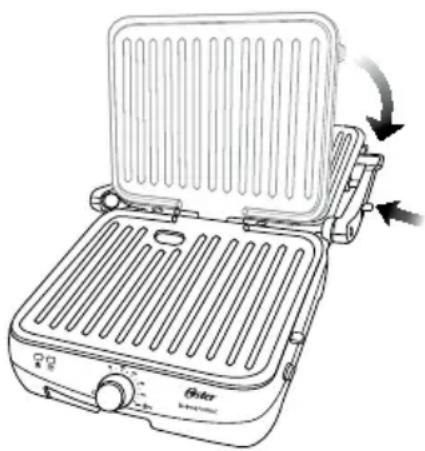
- Place the foods to be prepared on your grill on top of the non-stick cooking surface(s). Use it closed if you would like to press the foods to be grilled or open it at 180^ angle if you would like to cook on both cooking surfaces and without pressing. To open the grill to a 180^ angle, simply press and hold down the button and pull back the handle and top grill to a completely open position (see figure 1).
natural_image
Line drawing of a grater with cooling fins and heat exchanger, showing no text or symbolsFigure 1
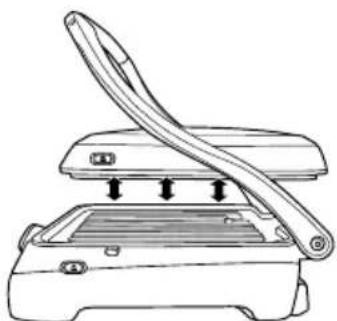
- If you would like to use only one cooking plate and press the foods with the top grill, gently lower the top-cooking surface by pulling down the cool touch handle. The hinged pivoted top plate will adjust automatically according to the thickness of the food, ensuring that the top cooking surface lies evenly on your food for perfect grilling every time (see figure 2).
Note: Ensure that the cord is kept well away from the cooking surfaces at all time while in use or when the unit is hot.
natural_image
Line drawing of a mechanical press or press device with a curved handle and three arrows indicating force or movement (no text or symbols present)Figure 2
-
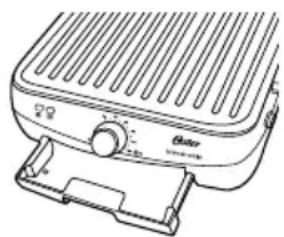
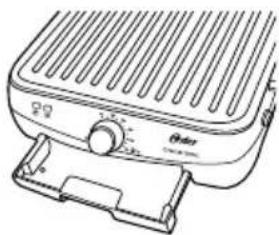
Slide-in the drip tray, ensuring it is properly positioned under the drainage outlets of the cooking surfaces in order to collect any oils, juices or liquids that might drip during the grilling process (see figure 3).
-
Adjust the temperature knob to the desired position for greater cooking control and versatility.
natural_image
Line drawing of a portable electric heater with control panel and base mount (no text or symbols)Figure 3
- Allow your foods to grill until done.
NOTE: The green ready indicator light may turn on and off during cooking. This indicates that the thermostat is maintaining the proper cooking temperature to grill to perfection.
-
The cooking surfaces have a durable non-stick coating. Some foods such as melted cheese might cause the foods to slightly stick to the surfaces. Use heat resistant plastic or wood spatula to remove the food. Never use a sharp or metal object since that might damage the non-stick surface.
-
After you have finished using your Oster® Multi-Use Electric Grill, unplug it from the electric outlet.
WARNING: THE METAL TOP COVER GETS VERY HOT. KEEP HANDS AND OTHER OBJECTS AWAY FROM IT.
TIPS AND SUGGESTIONS
• Always pre-heat the unit before using it.
- Be careful when biting into foods containing fillings such as cheese, tomato or jam, as they retain heat and can burn if eaten too quickly after grilling.
- It is not necessary to butter the outside of breads since the unit has ceramic non-stick surfaces. However, if you would like to brown the bread, it is recommended spreading a small amount of butter or margarine.
CLEANING AND MAINTENANCE
- Unplug and allow unit to cool completely before cleaning.
• DO NOT IMMERSE THE UNIT IN WATER OR ANY OTHER LIQUID. - Remove the two cooking plates by pushing the respective release buttons and wash them thoroughly with hot, soapy water. To remove cooked-on food, use a nylon scrubby or non-abrasive cleanser. DO NOT use a steel wool pad or other abrasive cleansers, which may damage the non-stick surfaces. Rinse and dry them well and then place them back on the unit ensuring they lock into place.
- The drip tray can be removed from the unit to dispose any collected oils, juices and liquids and can be washed with warm and soapy water.
- To clean the exterior, simply wipe with a dampened cloth and polish dry with a soft cloth.
- DO NOT use metal utensils or sharp metal objects such as a knife, as this will damage the ceramic non-stick cooking surfaces.
- DO NOT cut food on top of the cooking surfaces to avoid damaging the ceramic non-stick coating.
STORAGE
- Clean unit well before storing.
- Lock the top cover for convenient space-saving vertical storage.
PRECAUÇÕES IMPORTANTES
natural_image
Line drawing of a grater with heat exchanger and side panel, showing cooling mechanism (no text or symbols)Figura 1
natural_image
Line drawing of a mechanical press or scraper device with a handle and internal components (no text or symbols)Figura 2
natural_image
Line drawing of a portable electric heater with a control panel and base (no text or symbols)Figura 3
XXX where X is any number between 0 and 9 or any letter between A and Z.
The following information is intended for Mexico only.
MODELOS: CKSTPA4881, CKSTPA4881-013
© 2013 Sunbeam Products, Inc. All rights reserved. Distributed by Sunbeam Latin America, LLC,
5200 Blue Lagoon Drive, Suite 860, Miami, FL 33126.
One year limited warranty – please see insert for details.
Brand : OSTER
Model : Bioceramic CKSTPA4881013
Category : Hob