
BF-MM - Uncategorized STIHL - Free user manual and instructions
Find the device manual for free BF-MM STIHL in PDF.


| Product Type | Gasoline-Powered Handheld Blower |
| Model | BF-MM |
| Brand | STIHL |
| Engine Displacement | 27.2 cm³ |
| Power Output | 0.8 kW |
| Air Volume | 800 m³/h |
| Air Speed | 80 m/s |
| Fuel Type | Gasoline-oil mixture (50:1) |
| Fuel Tank Capacity | 0.5 L |
| Weight (without fuel) | 4.5 kg |
| Dimensions (L x W x H) | 400 x 300 x 350 mm |
| Sound Pressure Level | 94 dB(A) |
| Vibration Level | 4.0 m/s² |
| Main Functions | Blowing leaves and debris, clearing driveways and lawns |
| Maintenance | Clean air filter, replace spark plug, check fuel lines |
| Safety Features | Throttle trigger lock, anti-vibration system, spark arrester |
| Spare Parts | Air filter, spark plug, fuel filter, ignition coil |
| Repairability | Modular design with accessible components; serviceable by authorized dealers |
Frequently Asked Questions - BF-MM STIHL
User questions about BF-MM STIHL
0 question about this device. Answer the ones you know or ask your own.
Ask a new question about this device
Download the instructions for your Uncategorized in PDF format for free! Find your manual BF-MM - STIHL and take your electronic device back in hand. On this page are published all the documents necessary for the use of your device. BF-MM by STIHL.
USER MANUAL BF-MM STIHL
natural_image
Close-up of a black and silver manual tiller with spoked blades, no text or symbols visible
WARNING
Read Instruction Manual thoroughly before use and follow all safety precautions – improper use can cause serious or fatal injury.

ADVERTENCIA
Guide to Using this Manual 2
Safety Precautions and Working
Techniques 3
Using the Unit 8
Approved KombiEngines 10
Assembling the Unit 10
Mounting the KombiTool 11
Fitting the Harness 12
Starting / Stopping the Engine 13
Storing the Machine 13
Maintenance and Care 14
Main Parts 15
Specifications 16
Maintenance and Repairs 16
Disposal 17
Trademarks 17
STIHL®
BF-KM
Allow only persons who fully understand the manuals of the KombiEngine and soil cultivator KombiTool to operate this power tool combination.
To receive maximum performance and satisfaction from your STIHL KombiTool, it is important that you read, understand and follow the safety precautions and the operating and maintenance instructions in chapter "Safety Precautions and Working Techniques" before using your KombiTool. For further information you can go to www.stihlusa.com.
Contact your STIHL dealer or the STIHL distributor for your area if you do not understand any of the instructions in the two manuals.

WARNING
Because a KombiEngine equipped with a soil cultivator KombiTool is a power tool with relatively fast turning attachment, some special safety precautions must be observed to reduce the risk of personal injury. Careless or improper use may cause serious or even fatal injury.
This instruction manual is protected by copyright. All rights reserved, especially the rights to reproduce, translate and process with electronic systems.
KombiSystem
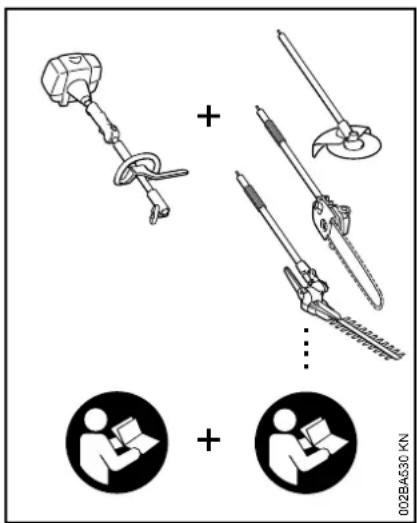
In the STIHL KombiSystem a number of different KombiEngines and KombiTools can be combined to produce a power tool. In this instruction manual the functional unit formed by the KombiEngine and KombiTool is referred to as the power tool.
Therefore, the separate instruction manuals for the KombiEngine and KombiTool should be used together for the power tool.
Always read and and make sure you understand both instruction manuals before using your power tool for the first time and keep them in a safe place for future reference.
Guide to Using this Manual
Pictograms
All the pictograms attached to or embossed on the machine are shown and explained in this manual.
Symbols in Text
Many operating and safety instructions are supported by illustrations.
The individual steps or procedures described in the manual may be marked in different ways:
●A bullet marks a step or procedure.
A description of a step or procedure that refers directly to an illustration may contain item numbers that appear in the illustration. Example:
●Loosen the screw (1).
●Lever (2) ...
In addition to the operating instructions, this manual may contain paragraphs that require your special attention. Such paragraphs are marked with the following symbols and signal words:

DANGER
Indicates an imminent risk of severe or fatal injury.

WARNING
Indicates a hazardous situation which, if not avoided, could result in severe or fatal injury.
NOTICE
Indicates a risk of property damage, including damage to the machine or its individual components.
Engineering Improvements
STIHL's philosophy is to continually improve all of its products. As a result, engineering changes and improvements are made from time to time. Therefore, some changes, modifications and improvements may not be covered in this manual. If the operating characteristics or the appearance of your machine differs from those described in this manual, please contact your STIHL dealer or the STIHL distributor for your area for assistance.
Safety Precautions and Working Techniques

Because a KombiEngine equipped with a soil cultivator KombiTool is a high-speed power tool, special safety precautions must be observed to reduce the risk of personal injury.

It is important that you read, fully understand and observe the following safety precautions and warnings. Read the instruction manuals and the safety precautions of your KombiEngine and KombiTool periodically. Careless or improper use may cause serious or fatal injury.
Have your STIHL dealer show you how to operate your power tool. Observe all applicable local safety regulations, standards and ordinances.

WARNING
As more fully explained later in these Safety Precautions, to reduce the risk of personal injury, make sure your unit is equipped with the proper handle and harness for the type of working tool you are using. Use only working tools that are specifically authorized by STIHL for use on your KombiEngine model.

WARNING
Do not lend or rent your power tool without the instruction manuals of your KombiEngine and KombiTool. Be sure that anyone using it understands the information contained in these manuals.

WARNING
The use of this machine may be hazardous. If the rotating blade comes in contact with your body, it will injure you. When it comes in contact with solid foreign objects such as rocks or bits of metal, it may fling them directly or by ricochet in the direction of bystanders or the operator. Striking such objects could damage the soil cultivating attachment and may cause blades to crack, chip or break. Thrown objects, including broken blades, may result in serious or fatal injury to the operator or bystanders.
STIHL does not recommend the use of non-elastic blades when working in stony areas.
Use your KombiEngine equipped with the soil cultivator KombiTool only for rejuvenation of flower beds and plantings, and for mixing soil-improving additives into the soil.

WARNING
Do not use it for other purposes, since misuse may result in personal injury or property damage, including damage to the machine.

WARNING
Minors should never be allowed to use this power tool. Bystanders, especially children, and animals should not be allowed in the area where it is in use.

WARNING
To reduce the risk of injury to bystanders and damage to property, never let your power tool run unattended. When it is not in use (e.g. during a work break), shut it off and make sure that unauthorized persons do not use it.
Most of these safety precautions and warnings apply to the use of all STIHL soil cultivators. Different models may have different parts and controls. See the appropriate section of your KombiEngine and KombiTool instruction manuals for a description of the controls and the function of the parts of your model.
Safe use of a power tool involves
-
the operator
-
the power tool
-
the use of the power tool.
THE OPERATOR
Physical Condition
You must be in good physical condition and mental health and not under the influence of any substance (drugs, alcohol, etc.) which might impair vision, dexterity or judgment. Do not operate this machine when you are fatigued.
English

WARNING
Be alert – if you get tired, take a break. Tiredness may result in loss of control. Working with any power tool can be strenuous. If you have any condition that might be aggravated by strenuous work, check with your doctor before operating this machine.
Proper Clothing

WARNING
To reduce the risk of injury, the operator should wear proper protective apparel.
The deflector provided with your power tool will not protect the operator from all foreign objects (stones, glass, wire, etc.) thrown back by the rotating working tool. Thrown objects may also ricochet and strike the operator.

WARNING

To reduce the risk of injury to your eyes never operate your power tool unless wearing goggles or properly fitted protective glasses with adequate top and side protection complying with ANSI Z87 "+" (or your applicable national standard). To reduce the risk of injury to your face STIHL recommends that you also wear a face shield or face screen over your goggles or protective glasses.
Power tool noise may damage your hearing. Wear sound barriers (ear plugs or ear mufflers) to protect your hearing. Continual and regular users should have their hearing checked regularly.
Be particularly alert and cautious when wearing hearing protection because your ability to hear warnings (shouts, alarms, etc.) is restricted.

Always wear heavy duty work gloves (e.g. made of leather or other wear resistant material) when handling the soil cultivating attachment. Heavy-duty, nonslip gloves improve your grip and help to protect your hands.

Clothing must be sturdy and snug-fitting, but allow complete freedom of movement. Wear long pants made of heavy material to help protect your legs. Do not wear shorts, sandals or go barefoot.
Avoid loose-fitting jackets, scarfs, neckties, jewelry, flared or cuffed pants, unconfined long hair or anything that could become caught on branches, brush or the moving parts of the unit. Secure hair so it is above shoulder level.

Good footing is very important. Wear sturdy boots with nonslip soles. Steel-toed safety boots are recommended.
For further instructions on proper clothing see the safety precautions in the instruction manual of the KombiEngine you are using.
THE POWER TOOL (KOMBIENGINE EQUIPPED WITH SOIL CULTIVATOR KOMBITOOL)
For illustrations and definitions of the power tool parts see the chapter on "Main Parts."

WARNING
Never modify this power tool in any way. Only attachments supplied by STIHL and expressly approved by STIHL for use with the specific STIHL model are authorized. Although certain
unauthorized attachments are useable with STIHL power tools, their use may, in fact, be extremely dangerous.
If this tool is subjected to unusually high loads for which it was not designed (e.g. heavy impact or a fall), always check that it is in good condition before continuing work. Check in particular that the fuel system is tight and that the (no leaks) and that the controls and safety devices are working properly. Do not continue operating this machine if it is damaged. In case of doubt, have it checked by your STIHL servicing dealer.
THE USE OF THE POWER TOOL (KOMBIENGINE EQUIPPED WITH SOIL CULTIVATOR KOMBITOOL)
Transporting the Power Tool

WARNING
To reduce the risk of injury from loss of control and blade contact, never carry or transport your power tool with the working tool moving.

WARNING
Always switch off the engine and make sure the working tool has stopped before putting a power tool down.
natural_image
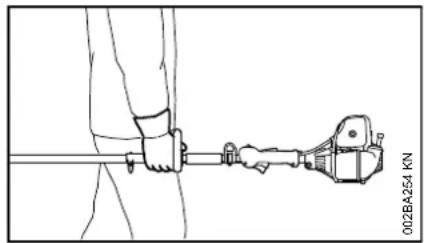
Line drawing of a person holding a tool with a device attached (no text or symbols)It may be carried only in a horizontal position. Grip the shaft in a manner that the machine is balanced horizontally. Keep the hot muffler away from your body and the soil cultivating attachment behind you.

WARNING
When transporting it in a vehicle, properly secure it to prevent turnover, fuel spillage and damage to the unit.
Before Starting

WARNING
Always check your power tool for proper condition and operation before starting. Never attempt to modify the controls or safety devices.

WARNING
Never operate your power tool if it is damaged, improperly adjusted or maintained, or not completely or securely assembled.

WARNING
Do not attach any soil cultivating attachment to a unit without proper installation of all required parts. Failure
to use the proper parts may cause the blades to fly off and seriously injure the operator or bystanders.

WARNING
The soil cultivating attachment must be properly tightened and in safe operating condition. Inspect for loose parts (nuts, screws, etc.) and for cracked, bent, warped or damaged blades. Replace damaged blades before using the power tool.
Keep the handles clean and dry at all times; it is particularly important to keep them free of moisture, pitch, oil, fuel mix, grease or resin in order for you to maintain a firm grip and properly control your power tool.
Keep the deflector adjusted properly at all times (see chapter "Assembling the Unit" of your instruction manual).
Adjust harness and hand grip to suit your size before starting work. To be better prepared in case of an emergency, practice releasing the unit from the harness as quickly as possible.
Starting

WARNING
Start the engine at least 10 feet (3 m) from the fueling spot, outdoors only.
For specific starting instructions, see the appropriate section of your KombiEngine and KombiTool manuals.
Place the power tool on firm ground or other solid surface in an open area. Maintain good balance and secure footing.
English

WARNING
To reduce the risk of injury from loss of control, do not attempt to "drop start" your power tool.

WARNING
To reduce the risk of injury from loss of control, be absolutely sure that the working tool is clear of you and all other obstructions and objects, including the ground, because when the engine starts at starting-throttle, engine speed will be fast enough for the clutch to engage and move the working tool.
Once the engine has started, immediately blip the throttle trigger, which should release the starting throttle and allow the engine to slow down to idle.
With the engine running only at idle, attach the power tool to the spring hook of your harness (see appropriate chapter of this manual).

WARNING
Your power tool is a one-person machine. Do not allow other persons in the general work area, even when starting.
See also the safety precautions on Starting in the instruction manual of the KombiEngine.
During Operation
Holding and Controlling the Power Tool
natural_image
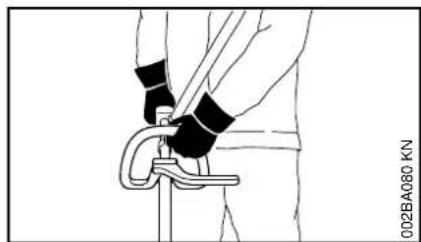
Line drawing of a person using a tool to grip a curved object, no text or symbols presentAlways hold the unit firmly with both hands on the handles while you are working. Wrap your fingers and thumbs around the handles.
Your right hand should grip the control handle at the rear, and your left hand should grip the loop handle. This also applies to left-handers.

WARNING
To reduce the risk of injury from loss of control, never work on a ladder or on any other insecure support. Never hold the soil cultivating attachment above waist height.

WARNING

Never attempt to operate your power tool with one hand. Loss of control of the power tool resulting in serious or fatal injury may result. To reduce the risk of cut injuries, keep hands and feet away from the soil cultivating attachment. Never touch a moving working tool with your hand or any other part of your body.

WARNING
Do not overreach. Keep proper footing and balance at all times. Special care must be taken in slippery conditions (wet ground, snow) and in difficult, overgrown terrain. Watch for hidden obstacles such as tree stumps, roots and ditches to avoid stumbling. For better footing, clear away scrub and cuttings. Be extremely cautious when working on slopes or uneven ground.
Working Conditions
Operate and start your power tool only outdoors in a well-ventilated area. Operate it under good visibility and daylight conditions only. Work carefully.

WARNING
If the soil being worked on or the surrounding ground is coated with a chemical substance (such as an active pesticide or herbicide), read and follow the instructions and warnings that accompany the substance at issue.

WARNING

Inhalation of certain dusts, especially organic dusts such as mold or pollen, can cause susceptible persons to have an allergic or asthmatic reaction.
Substantial or repeated inhalation of dust and other airborne contaminants, in particular those with a smaller particle size, may cause respiratory or other illnesses. Control dust at the source where possible. Use good work practices, such as operating the unit so that the wind or operating process directs any dust raised by the power tool away from the operator. Follow the recommendations of EPA / OSHA / NIOSH and occupational and trade associations with respect to dust ("particulate matter"). When the inhalation of dust cannot be substantially controlled, i.e., kept at or near the ambient (background) level, the operator and any bystanders should wear a respirator approved by NIOSH / MSHA for the type of dust encountered.

DANGER

Your power tool is not insulated against electric shock. To reduce the risk of electrocution, ensure that there are no buried power cables that may be carrying electric current that could come into contact with the working tool. Damaging such cables with the tool can cause electric shocks with serious or fatal consequences.
Information on the routing of cables can be obtained from public utilities and such service providers as "Miss Utility" or "One Call."
Operating Instructions

WARNING
Do not operate your power tool using the starting throttle lock, as you do not have control of the engine speed.
In the event of an emergency, switch off the engine immediately – move the slide control / stop switch / momentary stop switch to 0 or STOP.

WARNING
The soil cultivating attachment continues to rotate for a short period after the throttle trigger is released (flywheel effect).
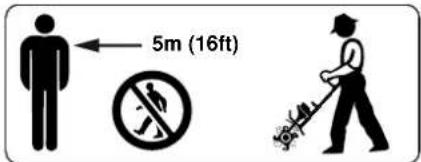
To reduce the risk of eye and other injury always wear proper eye protection (see section on "Proper Clothing") and ensure that bystanders are at least 16 feet (5 m) away. To reduce the risk of damage to property, also maintain this distance from such objects as vehicles or windows. Any coworkers who must be in the restricted area should also wear goggles or protective glasses.
Stop the engine immediately if you are approached.

WARNING
Before you start work, examine the area for stones, glass, fence wire, metal, trash or other solid objects. The soil cultivating attachment could throw objects of this kind.

WARNING
Replace a cracked, bent, warped or damaged blade immediately, even if damage is limited to superficial cracks. Such attachments may shatter at high speed and cause serious or fatal injury.

WARNING
Avoid cutting close to fences, sides of buildings, tree trunks, stones or similar obstacles which could damage the blade or lead to loss of control of the unit. Be aware of a higher risk of ricochets in such conditions. Flying objects or
English
damaged blades may cause serious or fatal injuries to the operator and bystanders. Avoid the roots of trees! Large roots may jam the blades and damage the machine. The tree may also be damaged if its roots are severed.

WARNING
If the working tool or deflector is blocked or covered, always switch off the engine and ensure that the tool has come to a standstill before starting to clean it. Grass, weeds, etc. should be cleaned off the tool at regular intervals.

WARNING
To reduce the risk of unintentional rotation of the working tool and injury, always shut off the engine and remove the spark plug boot before replacing the soil cultivating attachment.

WARNING
The gearbox becomes hot during operation. To reduce the risk of burn injury, do not touch the gear housing when it is hot.
MAINTENANCE, REPAIR AND STORING

WARNING
Always stop the engine and make sure that the attachment is stopped before doing any maintenance or repair work or cleaning the power tool. Do not attempt any maintenance or repair work not described in your KombiEngine and
KombiTool instruction manuals. Have such work performed at your STIHL servicing dealer only.

WARNING
Use only identical STIHL replacement parts for maintenance and repair. Use of non-STIHL parts may cause serious or fatal injury.
Wear gloves when handling or performing maintenance on blades.

WARNING
Never repair damaged attachments by welding, straightening or modifying the shape. This may cause parts of the attachment to come off and result in serious or fatal injuries.
Tighten all nuts, bolts and screws, except the carburetor adjustment screws, after each use.
Do not clean your machine with a pressure washer. The solid jet of water may damage parts of the machine.
Store the power tool in a dry and high or locked location out of reach of children.
Using the Unit
General
natural_image
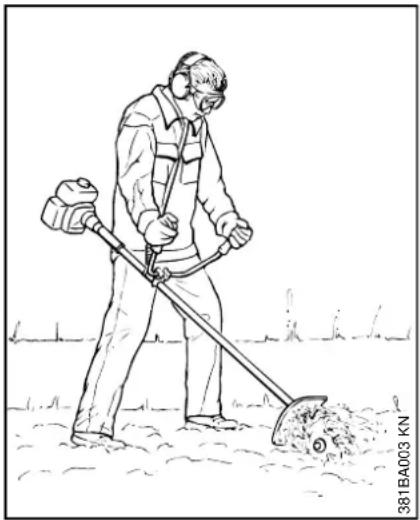
Line drawing of a person using a shoveling machine in a field (no text or symbols)The KombiTool is also available in a version with pick tines (BF-KM).
natural_image
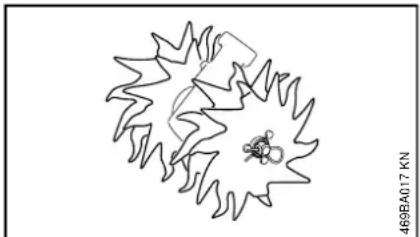
Abstract line drawing of a circular pattern with a small insect-like shape inside (no text or symbols)Pick tines are particularly suitable for tilling and loosening hard or packed soil.
Preparations
- Start the engine.
●Put on the shoulder strap.
Working Technique
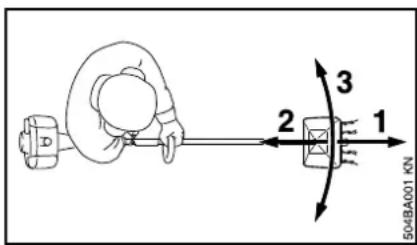
You can work with your cultivator in the forward (1) and backward (2) directions, from left to right or vice versa (3) or in a circular motion.
Choose the best method to suit your purpose, i.e. this depends on the shape and size of the area and soil conditions.
Working in an alternating backwards and forwards motion is particularly suitable for loosening packed soil.
The rotor blades may only be mounted and operated in one position. Arrows on the blades show the required direction of rotation.
Typical Applications
natural_image
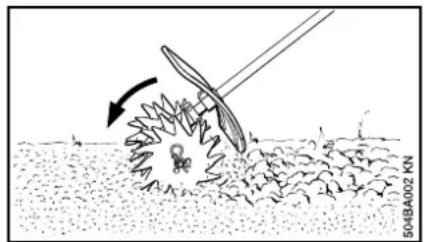
Diagram showing a mechanical device interacting with a gear-like structure in a field (no text or symbols)●Breaking up soil
A few preparations are necessary before you begin to break up soil which has been previously tilled (e.g. last year's vegetable or flower garden). First clear away surface weeds and remains of other plants as well as hard objects like rocks, stones, bottles, pieces of wood etc.
Hold the cultivator firmly with both hands and till only a small area at a time to the required depth.
Finish tilling the area by guiding the cultivator in such a way that you leave no footprints. Use a rake to level off the entire area.
natural_image
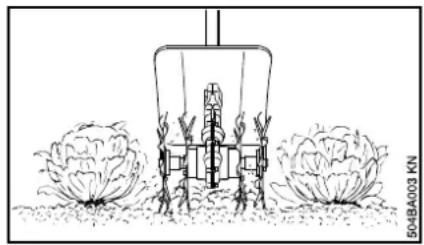
Diagram of a mechanical device with three leaf-like structures in the foreground (no text or symbols)●Loosening soil around plants
Only loosen the surface soil around plants. Avoid going too deep as this could damage the shallow roots of some plants.
To avoid any damage to the cultivator or trees, be wary not to catch the blades on the large roots of trees.
●Working in soil improvers
The cultivator can be used for mulching with loam, compost, leaves, other organic material or fertilizers.
Prepare the area by removing all old roots, the remains of large plants and hard objects (stones etc.). Spread the mulch evenly on the ground.
Work in the mulch with a circular or back and forth motion.
Finish off by leveling the area with a rake.
●Trenching or furrowing
Walk slowly backward and pull the cultivator to create the furrow required. Repeat as necessary to obtain deeper furrows.
Cleaning the rotor blades
Parts of plants, e.g. roots, can become tightly wrapped around or between the rotor blades during operation. To clean the rotor blades:
- Wear work gloves.
– Pull the hitch pins out of the axle.
– Pull the rotor blades off the shaft. - Remove pieces of roots, plants and soil.
Approved KombiEngines Assembling the Unit
KombiEngines
Only KombiEngines supplied by STIHL or expressly approved by STIHL for use with the specific model are authorized.
Only use this KombiTool with the following KombiEngines:
For machines with a loop handle, the clip (barrier bar) must be installed.
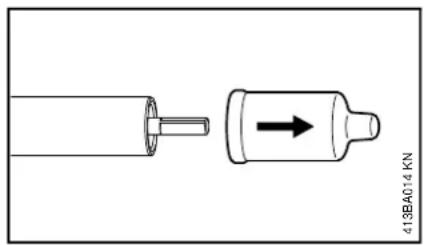
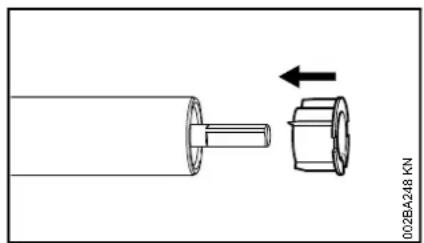
- Pull the protective caps off the ends of the drive tube and keep them in a safe place for later use – see "Storing the Machine".
natural_image
Technical diagram showing a mechanical assembly with a shaft and housing, no text or symbols presentNOTICE
The plug may come out of the drive tube when you pull off the cap. Push it back into the drive tube as far as stop.
Mounting the deflector
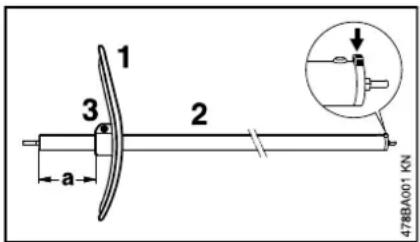
- Slide the deflector (1) onto the drive tube (2) until distance "a" is 4 in (100 mm).
●Line up the deflector (1) so that it is vertical and the fixing lug (arrow) on the drive tube points up.
●Tighten the clamp screw (3) moderately.
NOTICE
Check that the deflector is secure – it must not be possible to rotate it on the drive tube.
Mounting the Gearbox
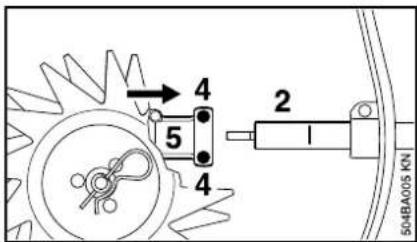
●Loosen the clamp screws (4).
- Push the gearbox (5) onto the drive tube (2) – turn the gearbox back and forth as necessary until the housing is approximately in line with the mark.
Aligning the Drive Tube
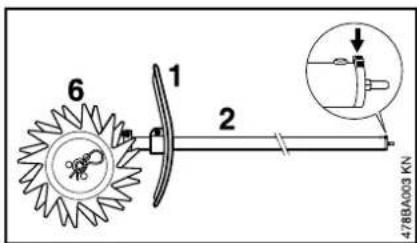
●Line up the gearbox on the drive tube so that the deflector (1) and the rotor blades (6) are vertical and the fixing lug (arrow) on the drive tube (2) points up.
●Tighten down the clamp screws firmly.
NOTICE
It must not be possible to rotate the gearbox on the drive tube.
Mounting the Rotor Blades
Take care not to lose the two washers on the gearbox output shaft.
- Arrange the blades in the order they will be fitted on the shaft, noting the following points:
Left-hand and right-hand blades are different. The direction of rotation is marked with arrows on the gearbox and blades.
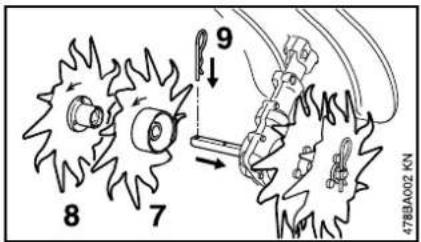
- Rotate the inner right-hand blade (7) on the shaft until it can be pushed into position – check the direction of rotation again (arrows).
The hub of the inner blade is larger than that of the outer blade.
- Rotate the outer right-hand blade (8) on the shaft until it can be pushed into position – check the direction of rotation again (arrows).
- Insert and engage the hitch pin (9) in the hole in the shaft – fold the hitch pin flat against the blade.
●Use the same procedure to mount the rotor blades on the left-hand side.
Mounting the KombiTool
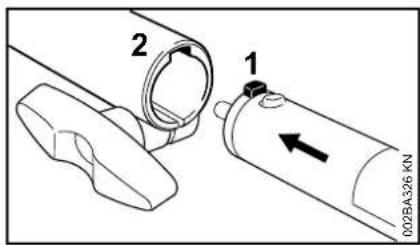
●Push the lug (1) on the drive tube into the slot (2) in the coupling sleeve as far as stop.
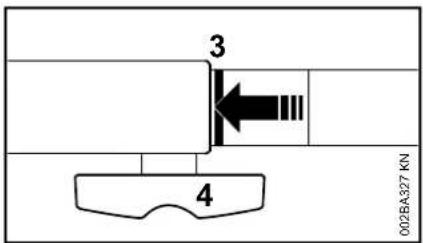
When correctly installed, the red line (3) (arrow point) must be flush with the end of the coupling sleeve.
●Tighten down the star knob (4) firmly.
Removing the KombiTool
●Reverse the above sequence to remove the drive tube.
English
Fitting the Harness
The type and style of the harness, carrying ring and carabiner (spring hook) depend on the market.
Shoulder Strap
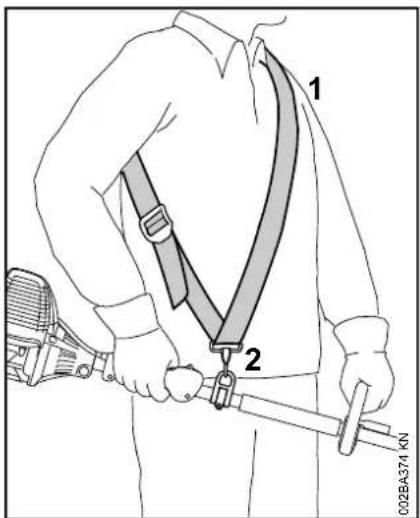
●Put on the shoulder strap (1).
- Adjust the length of the strap so that the carabiner (2) is about a hand's width below your right hip.
Full harness
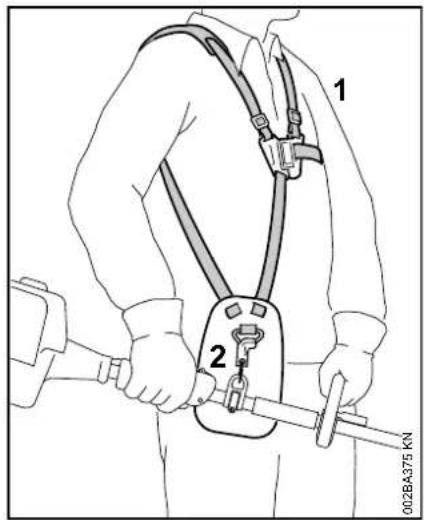
●Put on the full harness (1).
- Adjust the length of the strap so that the carabiner (2) is about a hand's width below your right hip.
Attaching Machine to Harness
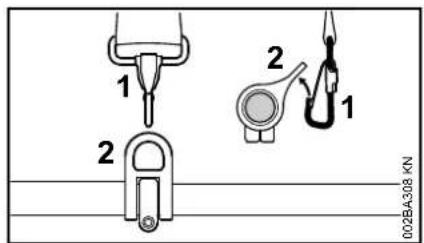
- Attach the carabiner (1) to the carrying ring (2) on the drive tube – hold the carrying ring steady.
Disconnecting Machine from Harness
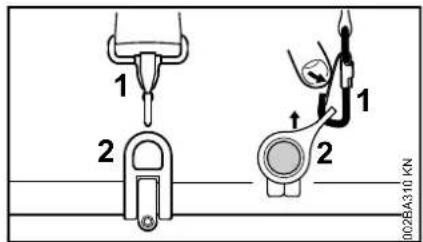
- Press down the bar on the carabiner (1) and pull the carrying ring (2) out of the carabiner.
Throwing Off the Machine
WARNING
The machine must be quickly thrown off in the event of imminent danger. Practice removing and putting down the machine as you would in an emergency. To avoid damage, do not throw the machine to the ground when practicing.
Practice quickly detaching the power tool from the carabiner as described under "Disconnecting Machine from Harness".
If you are using a shoulder strap: Practice slipping the strap off your shoulder.
If you are using a full harness: Practice quickly opening the locking plate and slipping the harness straps off your shoulders.
Starting / Stopping the Engine
Starting the Engine
Always follow the operating instructions for the KombiEngine and basic power tool.
natural_image
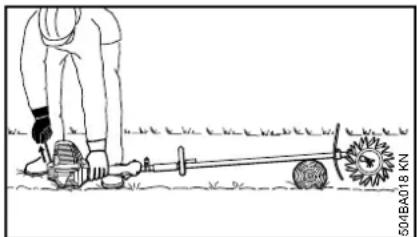
Line drawing of a person using a power tool in a field, with a wheel nearby (no text or symbols)●Place the machine on the ground: It must rest securely on the machine support. Rest the deflector end of the drive tube on a raised support (e.g. mound, log, brick).
To reduce the risk of accidents, check that the rotor blades are not touching the ground of any other obstacles.
●Make sure you have a firm footing, either standing, stooping or kneeling.
- Hold the machine with you left hand and press it down firmly – do not touch the controls on the control handle – see KombiEngine or basic power tool instruction manual.
NOTICE
Do not stand or kneel on the drive tube.
WARNING
The blades may begin to rotate as soon as the engine starts. For this reason, blip the throttle after starting – the engine returns to idling speed.
The starting procedure is now as described in the instruction manual of the KombiEngine or basic power tool you are using.
Stopping the Engine
- See KombiEngine or basic power tool instruction manual.
Storing the Machine
For periods of 3 months or longer
- Remove, clean and inspect the rotor blades.
- If the KombiTool is removed from the KombiEngine and stored separately: Fit the protective cap on the drive tube to avoid dirt getting into the coupling.
- Store the machine in a dry, high or locked location – out of the reach of children and other unauthorized persons.
English
Maintenance and Care
The following intervals apply to normal operating conditions only. If your daily working time is longer or operating conditions are difficult (very dusty work area, etc.), shorten the specified intervals accordingly.
All accessible screws and nuts
●Retighten if necessary
Sweeping attachments and deflectors
●Visual inspection, check tightness before starting work and after every refueling stop
●Replace if damaged
Safety labels
●Replace illegible safety labels
Main Parts
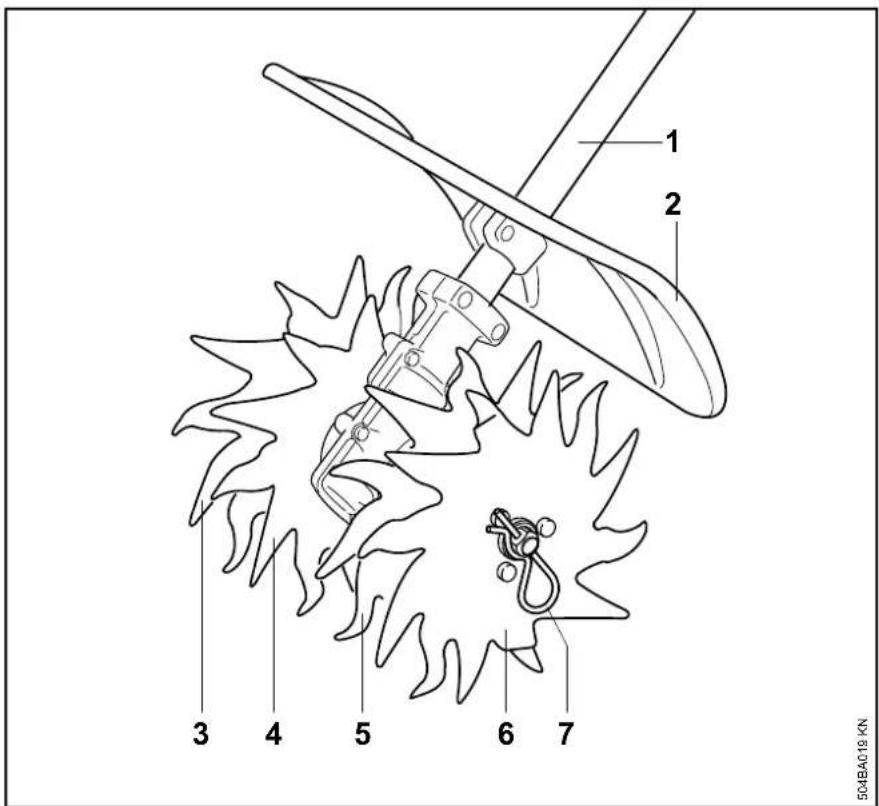
1 Drive Tube
2 Deflector
3 Outer Right-Hand Cultivator Blade
4 Inner Right-Hand Cultivator Blade
5 Inner Left-Hand Cultivator Blade
6 Outer Left-Hand Cultivator Blade
7 Hitch Pin
English
Definitions
1 Drive Tube
Encloses and protects the drive shaft between the coupling sleeve and gearbox.
2 Deflector
Designed to reduce the risk of injury from foreign objects flung backwards toward the operator by the attachments and from contact with the attachments.
3 Outer Right-Hand Cultivator Blade
Metal blade, star-shaped with pointed or curved tines. Mounts to the outer right-hand side.
4 Inner Right-Hand Cultivator Blade
Metal blade, star-shaped with pointed or curved tines. Mounts to the inner right-hand side.
5 Inner Left-Hand Cultivator Blade
Metal blade, star-shaped with pointed or curved tines. Mounts to the inner left-hand side.
6 Outer Left-Hand Cultivator Blade
Metal blade, star-shaped with pointed or curved tines. Mounts to the outer left-hand side.
7 H i t c h P i n
Secures the attachments and simplifies removal and installation of the attachments.
Specifications
Gearbox
Single-stage worm gear
Gear ratio: 44:1
Attachment
Four rotor blades, double-edged, rotate in same direction
Diameter: 230 mm (9 in)
Working width: 220 mm (8.7 in)
Weight
Complete with deflector and drive tube:
4.1 kg (9.0 lbs)
Maintenance and Repairs
Users of this unit should carry out only the maintenance operations described in this manual. STIHL recommends that other repair work be performed only by authorized STIHL servicing dealers using genuine STIHL replacement parts.
Genuine STIHL parts can be identified by the STIHL part number, the
STIHL ^ logo and, in some cases, by the STIHL parts symbol G_ . The symbol may appear alone on small parts.
For repairs of any component of this unit's air emissions control system, please refer to the air emissions systems warranty in this manual.
Disposal
Observe all country-specific waste disposal rules and regulations.

STIHL products must not be thrown in the garbage can. Take the product, accessories and packaging to an approved disposal site for environment-friendly recycling.
Contact your STIHL servicing dealer for the latest information on waste disposal.
Trademarks
STIHL Registered Trademarks
STIHL®
STIHL®
G
The color combination orange-grey (U.S. Registrations #2,821,860; #3,010,057, #3,010,058, #3,400,477; and #3,400,476)




MASTERWRENCH STIHL
SERVICE
AutoCut®
FARM BOSS®
iCademy®
MAGNUM®
MasterWrench Service®
MotoMix®
OILOMATIC®
ROCK BOSS®
STIHL Cutquik®
STIHL DUROMATIC®
STIHL Quickstop®
STIHL ROLLOMATIC®
STIHL WOOD BOSS®
TIMBERSPORTS®
WOOD BOSS®
YARD BOSS®
Some of STIHL's Common Law Trademarks


4-MIX ^TM
BioPlus ™
Easy2Start ™
EasySpool ^TM
ElastoStart ™
Ematic ^TM
FixCut ^TM
IntelliCarb ™
Master Control Lever ^TM
Micro TM
Pro Mark ^TM
Quiet Line ^TM
STIHL M-Tronic ^TM
English
STIHL OUTFITTERS ^TM
STIHL PICCO ^TM
STIHL PolyCut ^TM
STIHL PowerSweep ™
STIHL Precision Series ^TM
STIHL RAPID ^TM
STIHL SuperCut ^TM
TapAction ^TM
TrimCut ^TM
This listing of trademarks is subject to change.
Any unauthorized use of these
trademarks without the express written consent of
Waiblingen is strictly prohibited.
Contenido
Sistema KombiSystem 20
natural_image
Line drawing of a person holding a long rod connected to a mechanical device (no text or symbols)natural_image
Line drawing of a person holding a sword with bandages, no text or symbols presentnatural_image
Line drawing of a person using a shovel in a field, no text or symbols presentnatural_image
Abstract line drawing of a stylized flower or snowflake with a small flower inside, no text or symbols present.natural_image
Diagram showing a tool interacting with a pile of debris, no text or symbols present●Rotura del suelo
natural_image
Diagram of a mechanical device with two plants and a base, no text or symbols presentnatural_image
Technical diagram showing a shaft and gear assembly with an arrow indicating motion (no text or symbols)INDICACIÓN
natural_image
Line drawing of a person using a power tool on a field, with a wheel and ball nearby (no text or symbols)MasterWrench Service®
MotoMix®
OIOMATIC®
ROCK BOSS®
STIHL Cutquik®
STIHL DUROMATIC®
STIHL Quickstop®
STIHL ROLLOMATIC®
STIHL WOOD BOSS®
TIMBERSPORTS®
WOOD BOSS®
YARD BOSS®
This product contains chemicals known to the State of California to cause cancer, birth defects or other reproductive harm.
0458-478-8621-A
0458-478-8621-A
- WARNING
- ADVERTENCIA
- KombiSystem
- Guide to Using this Manual
- Pictograms
- Symbols in Text
- DANGER
- NOTICE
- Engineering Improvements
- Safety Precautions and Working Techniques
- THE OPERATOR
- Physical Condition
- English
- Proper Clothing
- THE POWER TOOL (KOMBIENGINE EQUIPPED WITH SOIL CULTIVATOR KOMBITOOL)
- Working Conditions
- MAINTENANCE, REPAIR AND STORING
- Using the Unit
- General
- Preparations
- Working Technique
- Typical Applications
- ●Breaking up soil
- ●Working in soil improvers
- ●Trenching or furrowing
- Cleaning the rotor blades
- Approved KombiEngines Assembling the Unit
- KombiEngines
- Mounting the Gearbox
- Aligning the Drive Tube
- Mounting the Rotor Blades
- Removing the KombiTool
- Fitting the Harness
- Throwing Off the Machine
- Starting / Stopping the Engine
- Starting the Engine
- Stopping the Engine
- Storing the Machine
- Maintenance and Care
- Main Parts
- Definitions
- Drive Tube
- Deflector
- Outer Right-Hand Cultivator Blade
- Inner Right-Hand Cultivator Blade
- Inner Left-Hand Cultivator Blade
- Outer Left-Hand Cultivator Blade
- H i t c h P i n
- Specifications
- Gearbox
- Attachment
- Weight
- Maintenance and Repairs
- Disposal
- Trademarks
- STIHL Registered Trademarks
- STIHL®
- Contenido
- ●Rotura del suelo
- INDICACIÓN
Brand : STIHL
Model : BF-MM
Category : Uncategorized