
XHP1550WL - Washing machine/dryer accessory WHIRLPOOL - Free user manual and instructions
Find the device manual for free XHP1550WL WHIRLPOOL in PDF.

| Product Type | Pedestal for front-loading washer or dryer |
| Brand | Whirlpool |
| Model | XHP1550WL |
| Height | 39.4 cm (15.5 inches) |
| Approximate weight | 15 kg |
| Material | Painted steel |
| Color | White |
| Load capacity | Up to 150 kg (depending on supported appliance) |
| Main functions | Elevates the machine for easy access, built-in storage drawer |
| Included accessories | 4 sheet metal screws #12 × 5/8 in, drawer divider, drawer shelf |
| Tools required for installation | 14 mm hex head ratchet, 9/16 in open-end wrench, 1/4 in nut driver, level |
| Compatibility | Compatible Whirlpool and Maytag front-loading washers and dryers |
| Leveling feet | 4 adjustable feet with lock nuts |
| Maintenance | Clean with a damp cloth and mild detergent |
| Safety | Use two or more people for installation; follow excessive weight warnings |
| Warranty | 1 year parts and labor |
Frequently Asked Questions - XHP1550WL WHIRLPOOL
User questions about XHP1550WL WHIRLPOOL
0 question about this device. Answer the ones you know or ask your own.
Ask a new question about this device
Download the instructions for your Washing machine/dryer accessory in PDF format for free! Find your manual XHP1550WL - WHIRLPOOL and take your electronic device back in hand. On this page are published all the documents necessary for the use of your device. XHP1550WL by WHIRLPOOL.
USER MANUAL XHP1550WL WHIRLPOOL
15.5" (39.4 cm) Washer/Dryer Pedestal
Installation Instructions
Location Requirements 2
Before Installing Your Pedestal 3
INSTALLATION INSTRUCTIONS 4
Installing the Pedestal 4
WARRANTY 6
PEDESTAL SAFETY
Your safety and the safety of others are very important.
We have provided many important safety messages in this manual and on your appliance. Always read and obey all safety messages.

This is the safety alert symbol.
This symbol alerts you to potential hazards that can kill or hurt you and others.
All safety messages will follow the safety alert symbol and either the word "DANGER" or "WARNING."
These words mean:
DANGER
WARNING
You can be killed or seriously injured if you don't immediately follow instructions.
You can be killed or seriously injured if you don't follow instructions.
All safety messages will tell you what the potential hazard is, tell you how to reduce the chance of injury, and tell you what can happen if the instructions are not followed.
INSTALLATION REQUIREMENTS
Tools and Parts
Gather the required tools and parts before starting installation.
Read and follow the instructions provided with any tools listed here.
Tools needed
Utility knife
14" hex-head ratchet or open-end wrench (leveling legs)
5 / 16 " hex-head ratchet or nut driver (for sheet metal screws)
1/4" nutdriver
916'' open-end wrench (for leveling leg locknuts)
Pliers or slip-joint pliers (for drain and inlet hoses)
Level
Bucket
Parts supplied
Remove the parts package from the pedestal drawer. This package contains 4, #12 x 5 / 8" hex head sheet metal screws and drawer divider.
Location Requirements
WARNING

Explosion Hazard
Keep flammable materials and vapors, such as gasoline, away from dryer.
Place dryer at least 18 inches (46 cm) above the floor for a garage installation.
Failure do to so can result in death, explosion, or fire.
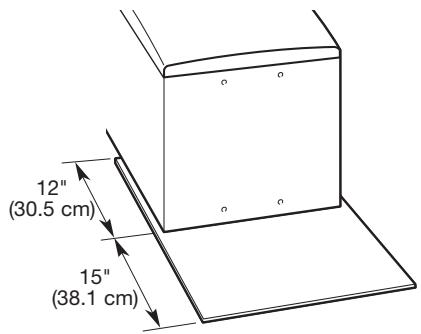
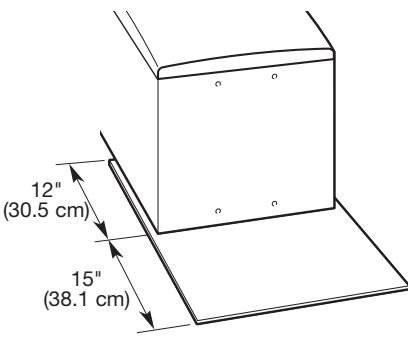
NOTE: If dryer and pedestal assembly is located in a garage, 3'' (7.6 cm) must be added under pedestal so that dryer is 18'' (46 cm) above garage floor.
Before Installing Your Pedestal
IMPORTANT: If your washer and dryer are already installed, they must be uninstalled.
If you need to uninstall your washer or dryer, see your Installation Instructions that came with your model for tools required.
Uninstalling Your Washer
WARNING
Excessive Weight Hazard
Use two or more people to move and uninstall washer.
Failure to do so can result in back or other injury.
- Turn off the hot and cold water faucets.
- Unplug the power supply cord or disconnect power.
- Slowly loosen the fill hoses at the faucets to relieve the water pressure. Use a sponge or towel to absorb the released water.
- Remove the hot and cold fill hoses from the back of the washer. Drain the water from the hoses into a bucket.
- Squeeze the ears of the drain hose clamp with pliers to open and slide the clamp down the hose. Disconnect the drain hose from the washer and drain any water in the hose into a bucket.
- Pull the washer away from wall so it can be tipped on its back.
- Protect the floor with a large piece of cardboard cut from the pedestal carton. Lay the washer on its back (make sure that the power supply cord is not under the washer) so that the cardboard is under the entire lower back edge of the washer. An
additional small amount of water will drain out of the washer when it is tipped back.
- Go to "Installing the Pedestal" section.
Uninstalling Your Electric Dryer
WARNING

Electrical Shock Hazard
Disconnect power before servicing.
Replace all panels before operating.
Failure to do so can result in death or electrical shock.
- Unplug the power supply cord.
- Disconnect wiring if dryer is direct wired.
WARNING
Excessive Weight Hazard
Use two or more people to move and uninstall dryer.
Failure to do so can result in back or other injury.
- Pull the dryer away from the wall enough to loosen the vent clamp. Loosen the clamp and gently remove the exhaust vent from the dryer exhaust outlet.
- Pull the dryer away from wall so that it can be tipped onto its back.
- Protect the floor with a large piece of cardboard cut from the pedestal carton. Lay the dryer on its back (make sure that the power supply cord is not under the dryer) so that the cardboard is under the entire lower back edge of the dryer.
- Go to "Installing the Pedestal" section.

Uninstalling Your Gas Dryer
- Unplug the power supply cord or disconnect power.
- Turn off the gas supply.
WARNING
Excessive Weight Hazard
Use two or more people to move and uninstall dryer.
Failure to do so can result in back or other injury.
- Pull the dryer away from the wall enough to loosen the vent clamp. Loosen the clamp and gently remove the exhaust vent from the dryer exhaust outlet.
- Disconnect the flexible gas supply line from the dryer. Put a piece of tape over the open ends of the gas line connection fittings.
-
Pull the dryer away from wall so that it can be tipped onto its back.
-
Protect the floor with a large piece of cardboard cut from the pedestal carton. Lay the dryer on its back (make sure that the power supply cord is not under the dryer) so that the cardboard is under the entire lower back edge of the dryer.
- Go to "Installing the Pedestal" section.
WARNING
Excessive Weight Hazard
Use two or more people to move washer or dryer.
Failure to do so can result in back or other injury.
- Position the packaged washer or dryer close to its final position. Cut the packaging as follows:
Washer: Cut plastic film along dotted cut line around the base. Do not remove the packaging.
Dryer: Cut carton around top and down corners along dotted cut lines. Lay all four carton sides on

A. Carton sides
floor. Discard carton top and corner posts.
IMPORTANT: Leave carton bottom underneath dryer.
- Lay washer or dryer on its back.
NOTE: When laying the washer on its back, hold the bottom cap down on the floor. Do not remove the plastic film, corner posts or top cap. These protect the floor and washer back. When laying the dryer on its back, the floor and dryer back are protected by pieces of the carton.
INSTALLATION INSTRUCTIONS
Installing the Pedestal
Follow these instructions to install the pedestal on a washer or dryer.
WARNING
Excessive Weight Hazard
Use two or more people to move and install pedestal.
Failure to do so can result in back or other injury.
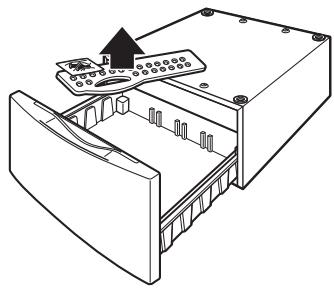
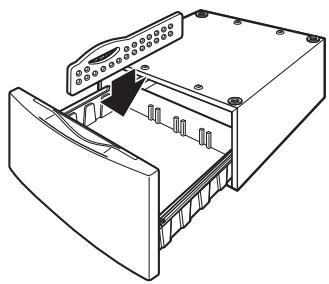
- Open the pedestal drawer as far as possible and remove the contents. This package contains 4, #12 x 5 / 8 hex head sheet metal screws used in step 5 and divider pack.
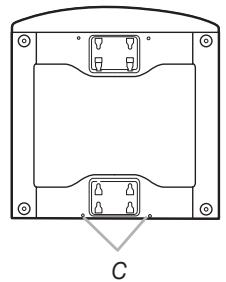
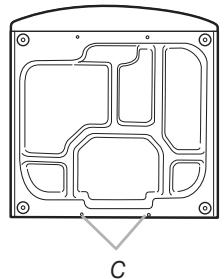
- Verify the 4 spacer pads are installed on the top of the pedestal.
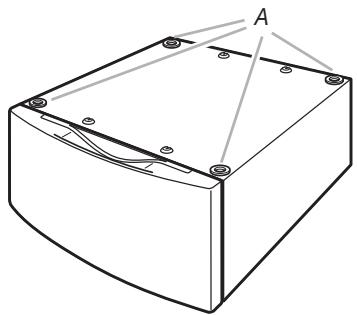
A. Spacer pads
- Using 1/4" nut driver, remove the hex-head screws from both
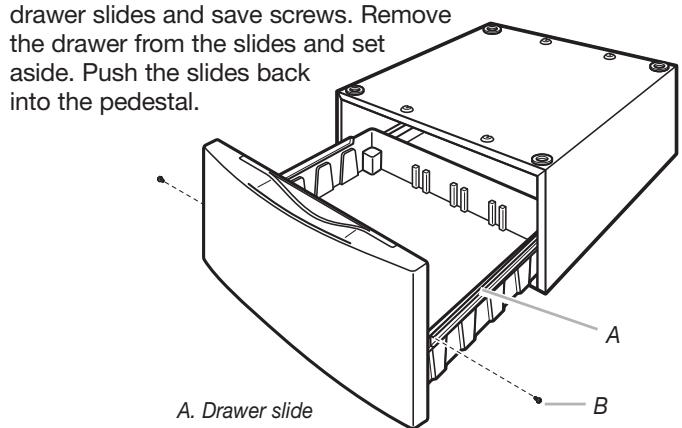
A. Drawer slide
B. Hex-head screw
- If your washer or dryer has feet installed, remove them. Do not install the feet that came with a new washer or dryer.
- Partially install 2 of the # 12 × 5% hex head sheet metal screws in the lower holes. Leave a space of about 3% (1 cm) between the screw head and the bottom of the washer or dryer.
A
B
A. Washer bottom
B. Dryer bottom
C. Install screws
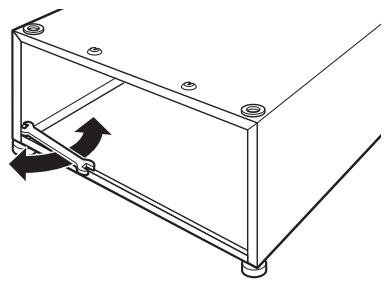
- Tip the pedestal on its back and move it against the washer or dryer bottom. Slide the pedestal's keyhole slots over the lower 2 partially installed screws.
- Position the pedestal toward the front of the washer or dryer and install the 2 remaining hex-head sheet metal screws. Do not tighten completely.
- Align the sides of the pedestal so that they are even with the sides of the washer or dryer. Reach inside the pedestal drawer opening and securely tighten all 4 pedestal screws.
- Tip the washer or dryer back to its upright position. Remove and discard packaging including washer's plastic film, corner posts and top cap.
- Slide the washer or dryer close to its final location.
- Follow the Installation Instructions that came with your model to finish installing or reinstalling your washer or dryer (hoses, vents, etc.).
- Level the washer or dryer from side to side and front to back. NOTE: Make sure all 4 pedestal feet are in solid contact with the floor.
Place a level on the top. Locate the 14 thex-head screws on the top of each pedestal foot. Reach inside the pedestal and
use a 1/4 " hex-head ratchet or open-end wrench to adjust the feet up or down as needed to level the washer or dryer. The washer or dryer should not move front to back, side to side, or diagonally when pushed on its top edges.
- When the washer or dryer is level, use a 9 / 6" open-end wrench to securely tighten all 4 locknuts against the pedestal. The locknuts must be tightened to prevent vibration. Recheck that the washer or dryer is level. The washer or dryer should not move front to bac diagonally when pushed on its top
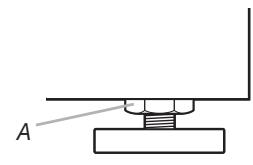
A. Locknut
- Pull both drawer slides out and reassemble the drawer to the drawer slides with the 2 hex-head screws.
NOTE: Use of the divider is optional.
- Remove the divider from the bag.
- Place the divider in the drawer at the desired location.
- Close the drawer.
Before you call for Service
This pedestal must be installed only with the appropriate Whirlpool® or Maytag® front-load washer or dryer. This pedestal must be operated according to the instructions provided with your Whirlpool or Maytag front-load washer or dryer's Owner's manual or Use and Care Guide. Before you call for service, please locate your model and serial number for both the pedestal and the corresponding Whirlpool or Maytag front-load washer or dryer.
For any pedestal purchased for use with a Whirlpool or Maytag front-load washer or dryer, the Whirlpool Corporation Pedestal Warranty applies.
WHIRLPOOL CORPORATION PEDESTAL WARRANTY
ONE-YEAR LIMITED WARRANTY
For one year from the date of purchase, when this appliance is operated and maintained according to instructions attached to or furnished with the product and is used with the appropriate Whirlpool Corporation front-load washer or dryer, Whirlpool or Whirlpool Canada (hereafter "Whirlpool") will pay for factory specified replacement parts and repair labor to correct defects in materials or workmanship. Service must be provided by a Whirlpool designated service company.
ITEMS WHIRLPOOL WILL NOT PAY FOR
- Service calls to correct the installation of your appliance, to instruct you how to use your appliance, to replace or repair house fuses or to correct house wiring or plumbing.
- Repairs when your appliance is used for other than normal, single-family household use.
- Damage resulting from accident, alteration, misuse, abuse, fire, flood, acts of God, improper installation, installation not in accordance with electrical or plumbing codes, or use of products not approved by Whirlpool.
- Replacement parts or repair labor costs for units operated outside the United States or Canada.
- Pickup and delivery. This appliance is designed to be repaired in the home.
- Repairs to parts or systems resulting from unauthorized modifications made to the appliance.
- Expenses for travel and transportation for product service in remote locations.
- The removal and reinstallation of your appliance if it is installed in an inaccessible location or is not installed in accordance with published installation instructions.
DISCLAIMER OF IMPLIED WARRANTY; LIMITATION OF REMEDIES
DISCLAIMER OF IMPLIED WARRANTY; LIMITATION OF REMEDIES CUSTOMER'S SOLE AND EXCLUSIVE REMEDY UNDER THIS LIMITED WARRANTY SHALL BE PRODUCT REPAIR AS PROVIDED HEREIN. IMPLIED WARRANTY, INCLUDING WARRANTY OF MERCHANTABILITY OR FITNESS FOR A PARTICULAR PURPOSE, ARE LIMITED TO ONE YEAR OR THE SHORTEST PERIOD ALLOWED BY LAW. WHIRLPOOL SHALL NOT BE LIABLE FOR INCIDENTAL OR CONSEQUENTIAL DAMAGES. SOME STATES AND PROVINCES DO NOT ALLOW THE EXCLUSION OR LIMITATION OF INCIDENTAL OR CONSEQUENTIAL DAMAGES, OR LIMITATIONS ON THE DURATION OF IMPLIED WARRANTY OF MERCHANTABILITY OR FITNESS, SO THESE EXCLUSIONS OR LIMITATIONS MAY NOT APPLY TO YOU. THIS WARRANTY GIVES YOU SPECIFIC LEGAL RIGHTS AND YOU MAY ALSO HAVE OTHER RIGHTS, WHICH VARY FROM STATE TO STATE OR PROVINCE TO PROVINCE.
Outside the 50 United States and Canada, this warranty does not apply. Contact your authorized Whirlpool dealer to determine if another warranty applies. If you need service, in the U.S.A., call 1-800-422-1230. In Canada, call 1-800-807-6777. 4/06
Keep this book and your sales slip together for future reference. You must provide proof of purchase or installation
date for in-warranty service.
Write down the following information about your major appliance to better help you obtain assistance or service if you ever need it. You will need to know your complete model number and serial number. You can find this information on the model and serial number label located on the product.
Dealer name
Address
Phone number
Model number
Serial number
Purchase date
TABLE DES MATIÈRES
SECURITE DU PIEDESTAL 7
EXIGENCES D'INSTALLATION 7