
IAHRF79B - Headphones iLive - Free user manual and instructions
Find the device manual for free IAHRF79B iLive in PDF.


| Product Type | Wired Headphones |
| Brand | iLive |
| Model | IAHRF79B |
| Driver Diameter | 40 mm |
| Frequency Response | 20 Hz - 20 kHz |
| Impedance | 32 ohms |
| Connector Type | 3.5 mm audio jack |
| Cable Length | 1.2 m (approx.) |
| Dimensions (LxWxH) | 7.5 x 6.0 x 3.0 inches |
| Weight | 0.5 lbs |
| Power Source | Passive (no battery required) |
| Noise Isolation | Passive (over-ear design) |
| Microphone | Built-in inline microphone |
| Controls | Volume and playback controls on cable |
| Compatibility | Smartphones, tablets, PCs, MP3 players |
| Care Instructions | Wipe with a soft, dry cloth; avoid moisture |
| Safety Warnings | Do not use at high volumes for extended periods; keep away from children |
| Spare Parts Availability | Not available; contact iLive support |
| General Information | Designed for personal audio enjoyment; foldable for portability |
Frequently Asked Questions - IAHRF79B iLive
User questions about IAHRF79B iLive
0 question about this device. Answer the ones you know or ask your own.
Ask a new question about this device
Download the instructions for your Headphones in PDF format for free! Find your manual IAHRF79B - iLive and take your electronic device back in hand. On this page are published all the documents necessary for the use of your device. IAHRF79B by iLive.
USER MANUAL IAHRF79B iLive
User's Guide for Model IAHRF79 v2258-01

natural_image
Black outdoor headphones with a charging case (no visible text or symbols)SAFETY WARNINGS
- WARNING: Where the mains plug or appliance coupler is used as the disconnect device, such disconnect device shall remain readily operable.
- Risk of electric shock. Grounding continuity must be maintained.
- Lithium batteries, like all rechargeable batteries, are recyclable and should be recycled or disposed of according to state and local guidelines. They should never be disposed of in normal household waste, and they should never be incinerated, as they might explode. Contact your local government for disposal or recycling practices in your area.
- Only use the included power supply or a UL/ETL certified power supply of the same power output specifications.
- To avoid hearing damage, make sure that the volume on your music player is turned down before connecting your headphones. After placing headphones in/on your ears, gradually turn up the volume until you reach a comfortable listening level.

WARNING: This product can expose you to chemicals including lead, which is known to the State of California to cause cancer and birth defects or other reproductive harm. For more information go to: www.P65Warnings.ca.gov This product meets and complies with all Federal regulations.
FCC WARNINGS
WARNING: To assure continued operation, follow the attached installation instructions and use only shield cables when connecting to other devices. Changes or modifications not expressly approved by the party responsible for compliance could void the user's authority to operate the equipment.
NOTE: This equipment has been tested and found to comply with the limits for a Class B digital device, pursuant to Part 15 of the FCC Rules. These limits are designed to provide reasonable protection against harmful interference in a residential installation.
This equipment generates, uses, and can radiate radio frequency energy and, if not installed and used in accordance with the instructions, may cause harmful interference to radio communications. However, there is no guarantee that interference will not occur in a particular installation. If this equipment does cause harmful interference to radio or television reception, which can be determined by turning the equipment off and on, the user is encouraged to try to correct the interference by one or more of the following measures:
- Reorient or relocate the receiving antenna.
- Increase the separation between the equipment and receiver.
- Connect the equipment into an outlet on a circuit different from that to which the receiver is connected.
- Consult the dealer or an experienced radio/TV technician for help.
TABLE OF CONTENTS
Introduction - 4
Features
Includes
Overview
Headphones - 5
Base - 6
Control Functions - 7
LED Indicator Lights - 7
Setup
Base Power - 8
Headphone Charging - 9
Digital Optical Audio - 10
RCA Stereo Audio - 11
Coaxial Audio - 12
Line In - 13
Listening
Pairing the Headphones to the Base - 14
Troubleshooting - 15
Customer Support - 16
Contact Information
International Support
Warranty Information
INTRODUCTION
Trying to do some around-the-house chores and still want to listen to the TV or your favorite music? These wireless headphones allow freedom of movement while maintaining excellent reception.
Features
» Digital 2.4GHz wireless connection
» Up to 100ft transmission distance without line of sight limitations
» Compatible with any media device with a 3.5mm audio output, digital optical audio output, or coaxial output
» No voice or picture latency
» Comfortable, noise isolating earcups
» Rich sound and deep bass
» Fold-flat design for convenience on-the-go
» Transmitter base also serves as a charging dock for the headphones
» Built-in rechargeable battery: approx. 7 hour battery life
Includes
» Optical audio cable
» 3.5mm stereo audio cable
» RCA to 3.5mm stereo audio adapter cable
» Micro-USB charging cable
» AC/DC power adapter
» User's Guide
» Warranty
OVERVIEW
Headphones
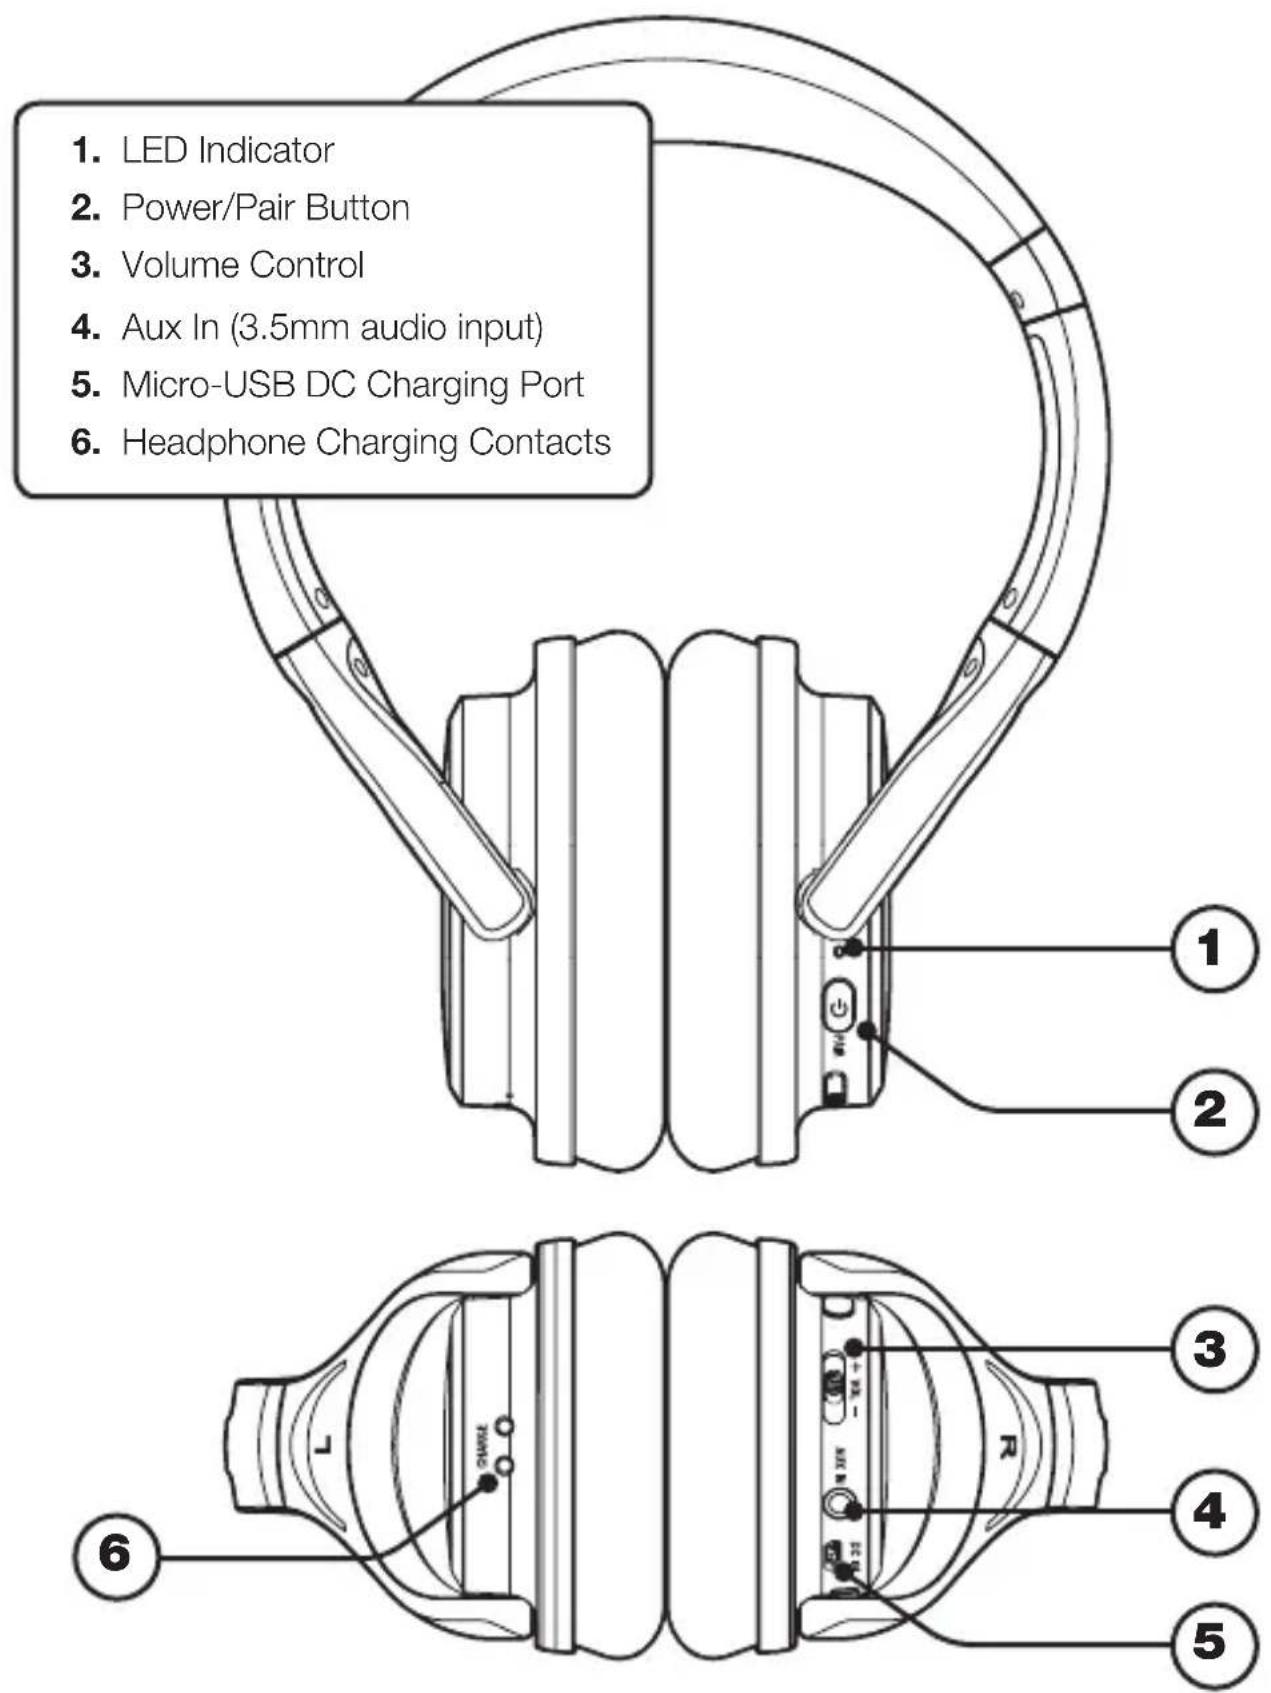
OVERVIEW
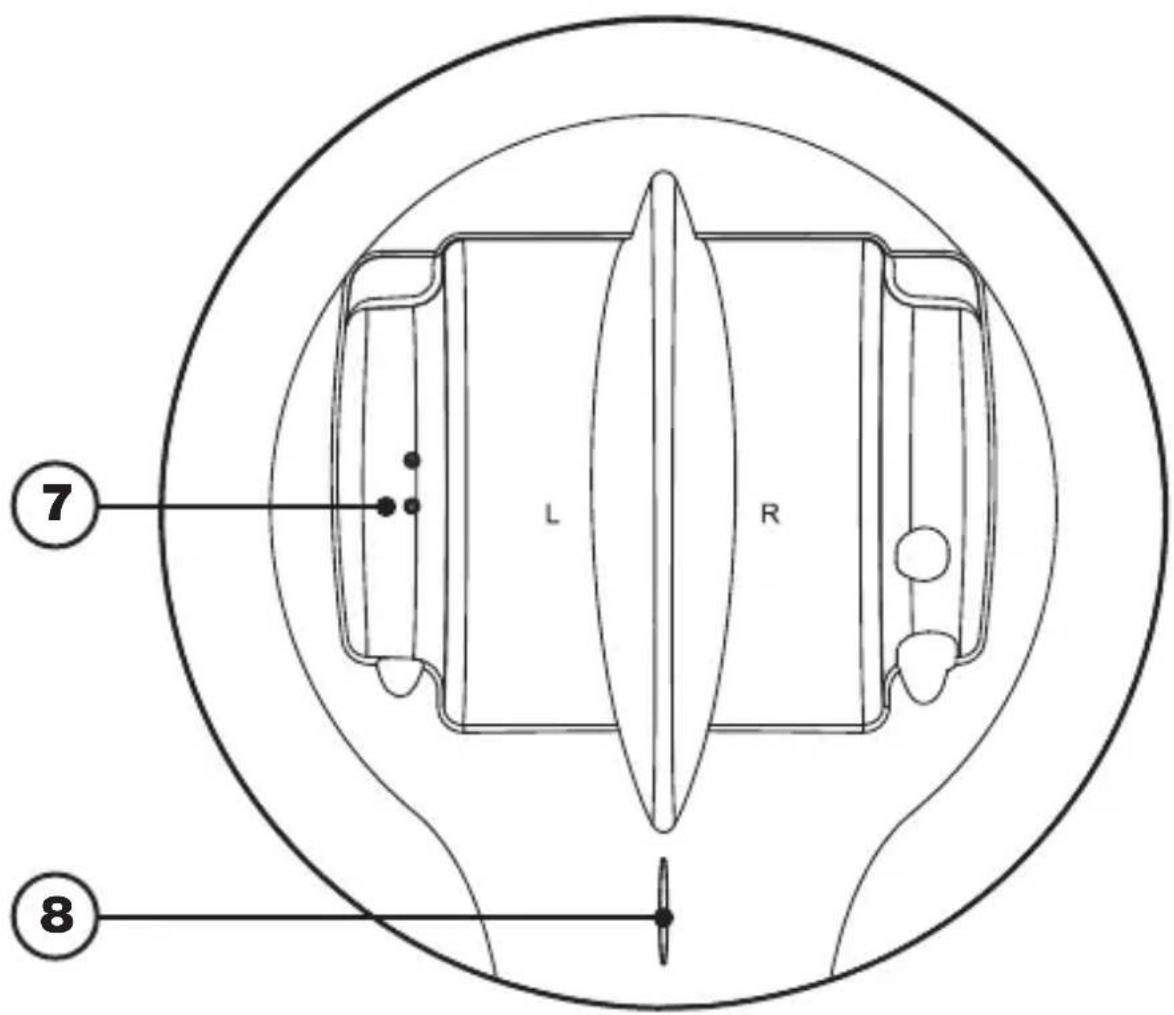
Base
- Charging Contacts
- LED Indicator
Control Functions

» Power
Press and hold to power ON and OFF.
» Pair
Press to pair to the headset base (see pg. 14 for pairing procedure).
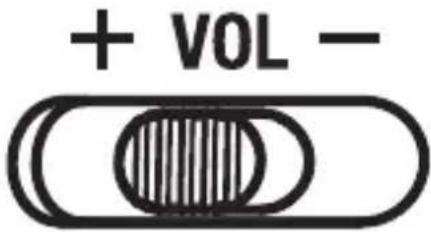
» Volume
Press up or down to adjust volume level.
LED Indicator Lights
» Headphone Functions
Flashing Blue - Wi-Fi connecting Solid Red - Battery charging
» Base Functions
Solid Red - Charging headphones Solid Blue - Media source connected Flashing Blue - Media source not connected
SETUP
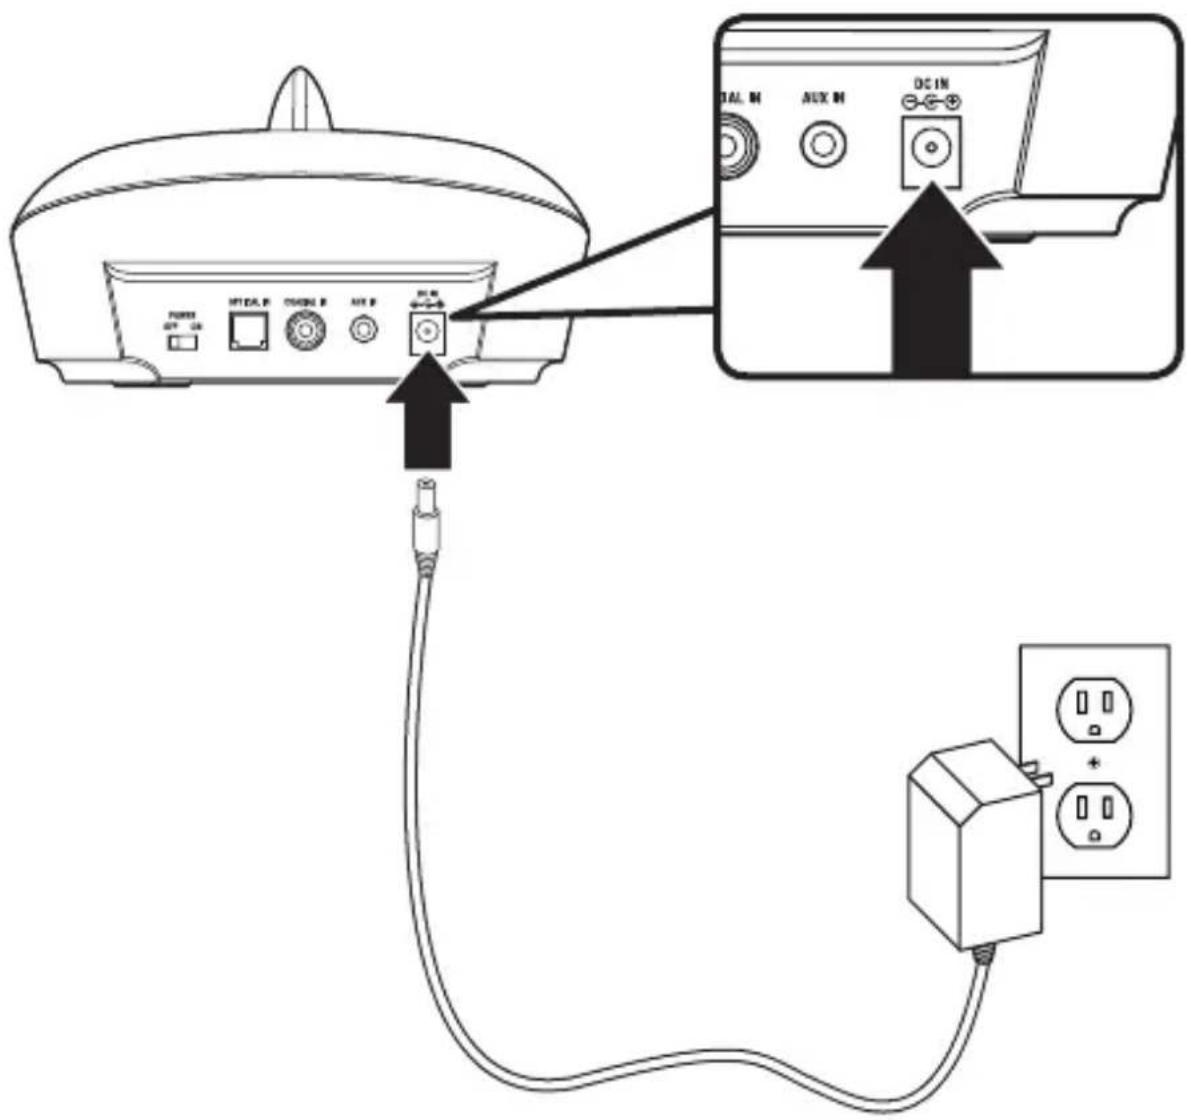
Base Power
Connect the DC Power Input on the base to a standard power outlet using a DC Power Adapter (included).
The base must be connected to a power source and powered ON to transmit audio to the headphones.
Headphone Charging
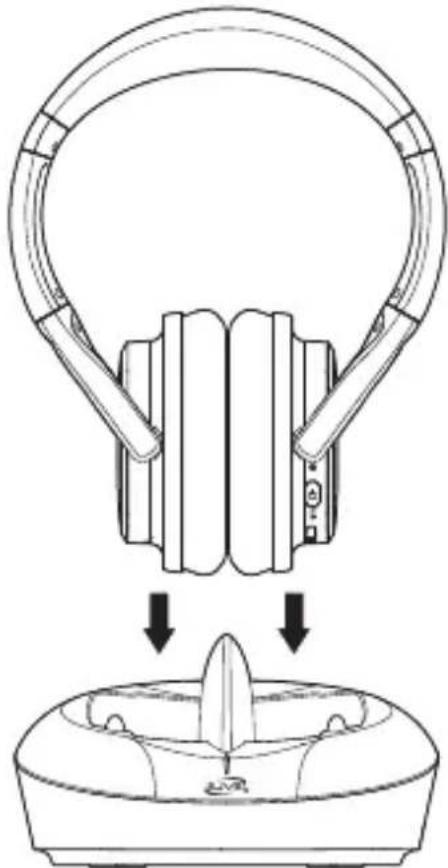
There are two ways to charge the headphones.
» Place the headphone on the base so that the charging contacts are aligned.
» Use a Micro-USB to USB cable (included) to connect the DC Input (Micro-USB) on the headphones to the USB port on a powered on computer or USB power adapter (not included).
A fully charged battery will provide up to 7 hours of playtime. Battery life will improve at lower volume levels and decrease at higher volume levels.
| Headphone & Base Indicator Light | Battery Status |
| Red light ON Charging battery | |
| Light OFF Charging | complete |

natural_image
Diagram of a hand holding a circular device with internal components, showing fluid flow and mechanical assembly (no text or symbols)Transmitter Base

USB Power Adapter (not included) or powered ON computer (not included).
CONNECTING AUDIO
Digital Optical Audio
Requires a media source with an Optical Audio Output and a Digital Optical Audio Cable (included).
-
Using a Digital Optical Audio Cable, connect the Optical Output on your media source (TV, amplifier, etc.) to the Optical Input on the base.
-
On the connected media source (TV, amplifier, etc.), make sure the audio settings are set to PCM or Optical Audio.
-
Audio played through the connected media source (TV, amplifier, etc.) will now be sent through the base.
Important tips for optical audio:
» Use the correct Optical cable and make sure that it is firmly seated in the Optical Input/Output sockets on the base and the media source.
» Optical audio output is activated from the media source (a red light should be visible from the Optical socket). It may be labeled SPDIF in the setting menu of the source.
» The optical output source should be set to output PCM and not Dolby Digital.

RCA Stereo Audio
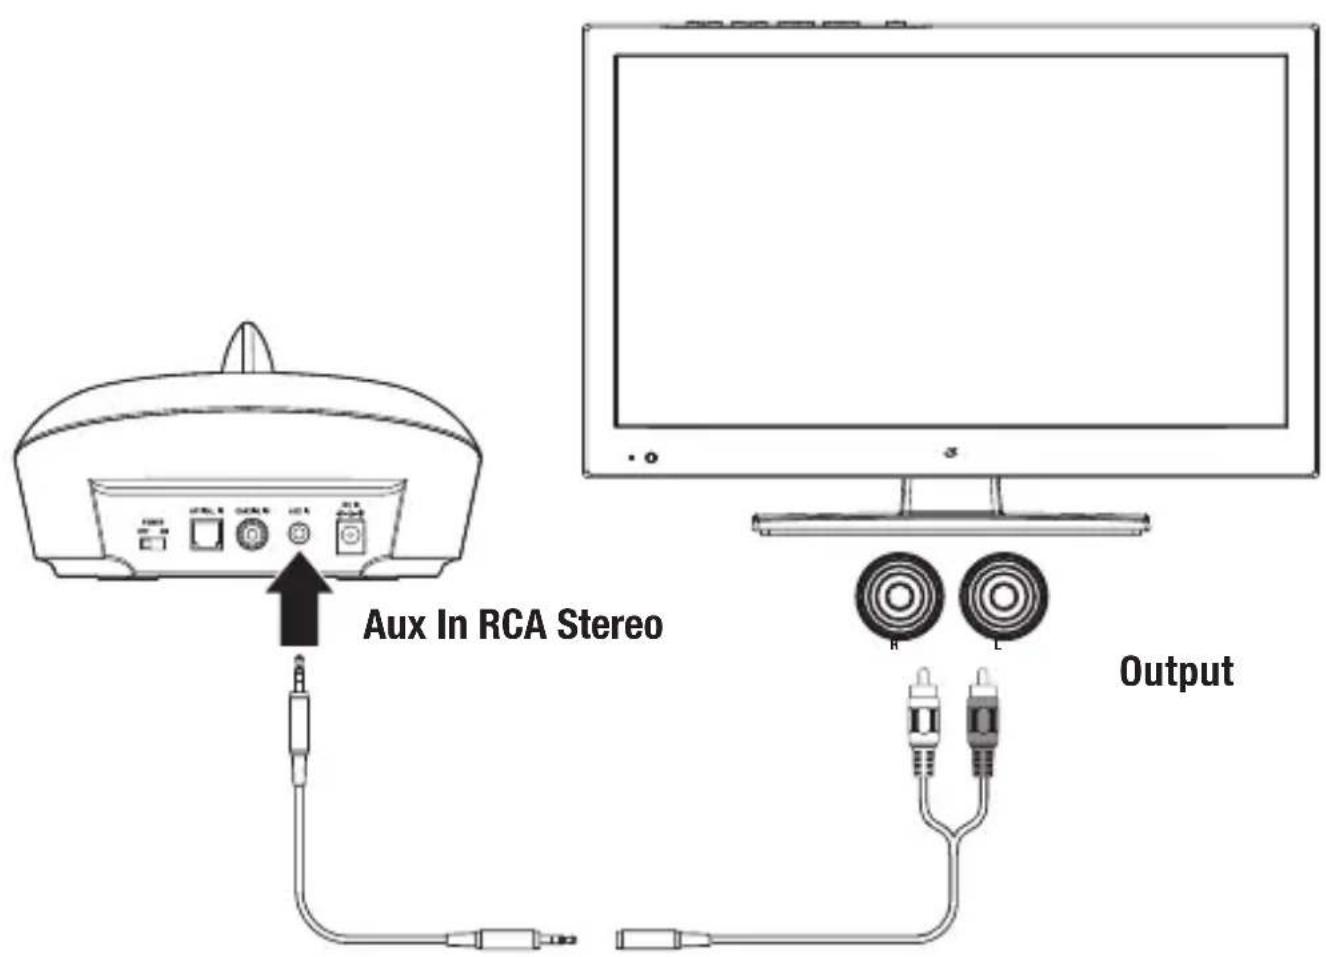
Requires a 3.5mm to RCA stereo audio cable adapter and a 3.5mm audio cable (included). When connecting an RCA stereo audio cable (Red/White), match the colored plugs to their corresponding ports.
-
Using a 3.5mm to RCA Stereo Audio Cable (included), connect the RCA Stereo Output on your media source (TV, amplifier, etc.) to the Aux In (3.5mm audio input) on the base.
-
Audio played through the connected media source (TV, amplifier, etc.) will now be sent through the base.
RCA to 3.5mm cable3.5mm audio cable
CONNECTING AUDIO
Coaxial Audio
Requires a media source with a Coaxial Audio Output and a Coaxial Audio Cable (not included).
-
Using a Coaxial Audio Cable, connect the Coaxial Output on your media source (TV, amplifier, etc.) to the Coaxial Input on the base.
-
On the connected media source (TV, amplifier, etc.), make sure the audio settings are set to Coaxial Output.
-
Audio played through the connected media source (TV, amplifier, etc.) will now be sent through the base.

Line In
Requires a 3.5mm audio cable (included).
- Connect a 3.5mm audio cable to the Line In on the base or the headphones and the audio output/headphone jack on an audio device.

LISTENING
Pairing the Headphones to the Base
Note: After the initial pairing, the headphones will stay paired to the transmitter base. It will not be necessary to reconnect each time you use the headphones.
- Press and hold the Power/Pair button to power on the headphones.
- Press the Power/Pair button again to begin pairing. The headphones will automatically detect the base and connect to it.
- After a successful connection, the LED on the headphones will slowly blink blue. The LED on the base will turn solid blue.
- When you are finished using the headphones, press and hold the Power/Pair button to power them off, then place them on the base to charge the batteries while not in use.
TROUBLESHOOTING
| PROBLEM POSSIBLE SOLUTION | |
| Unit will not power on | » Make sure the headphones' battery is charged. Recharge if needed. |
| Audio distortion | » Volume on the headphones or the connected device may be too high. Reduce the volume of one or both of the devices. |
| Headphones won't play or fails to connect | » Make sure the volume on the headphones is turned up to an audible level.» Make sure the headphones' battery is charged and they are powered on.» Stay within 3 ft. of the headphones when pairing to the transmitter base.» Stay within 50 ft. of the transmitter base. |
| White noise/Headphones will not function properly | » Power the headphones OFF, then ON again. |
CUSTOMER SUPPORT
Contact Information
Website: www.iLiveElectronics.com Email Support: prodinfo@dpiinc.com Email Parts: partsinfo@dpiinc.com Phone Support: 1-888-999-4215
Warranty Information
For Warranty Information and the most up-to-date version of this User's Guide, go to www.iLiveElectronics.com.
International Support
To download this User's Guide in English, Spanish, or French, or to get answers to frequently asked questions, visit the support section at: www.iLiveElectronics.com
Protect for Today Sustain for Tomorrow
Copyright © 2019 Digital Products International (DPI, Inc.) All other trademarks appearing herein are the property of their respective owners.
- SAFETY WARNINGS
- FCC WARNINGS
- TABLE OF CONTENTS
- Introduction - 4
- Overview
- Setup
- Listening
- Troubleshooting - 15
- Customer Support - 16
- INTRODUCTION
- Features
- Includes
- Headphones
- Base
- Control Functions
- » Power
- » Pair
- » Volume
- LED Indicator Lights
- » Headphone Functions
- » Base Functions
- Base Power
- Headphone Charging
- CONNECTING AUDIO
- Digital Optical Audio
- Important tips for optical audio:
- RCA Stereo Audio
- Coaxial Audio
- Line In
- Pairing the Headphones to the Base
- TROUBLESHOOTING
- CUSTOMER SUPPORT
- Contact Information
- Warranty Information
- International Support
Brand : iLive
Model : IAHRF79B
Category : Headphones